Solution of the Week: Financial Reports with Impactful Visuals
Finance reporting is a critical part of understanding an organization’s financial health. With Zoho Analytics, you can easily create dynamic reports such as Balance Sheets, Budget Statements, and Profit and Loss Statements.
Now, with the release of Zoho Analytics 6.0, the platform offers even more advanced tools to optimize the financial report view. While Zoho Analytics has always enabled comprehensive financial reporting (through its integration connectors for Zoho Books, QuickBooks, Xero), the latest version enhances this with powerful visual features like Data Bars, which provide clearer insights into performance trends.
This document outlines how these reports can be generated using simple drag-and-drop functionality and customizable features in Zoho Analytics.
Creating a Balance Sheet Using Finance Data
Generating a Balance Sheet in pivot using Zoho Analytics allows you to visualize your organization’s financial position in a comprehensive and structured way.
- Drag and Drop the Data: Start by selecting the Balance sheet base type, Account group, Balance Sheet Account Type, and Balance Sheet Account Name from the Accounts table and drop them into the Rows shelf. Drag and drop the Credit Amount, Debit Amount, and Balance Sheet Total from the Accrual Transactions table into the Data shelf.
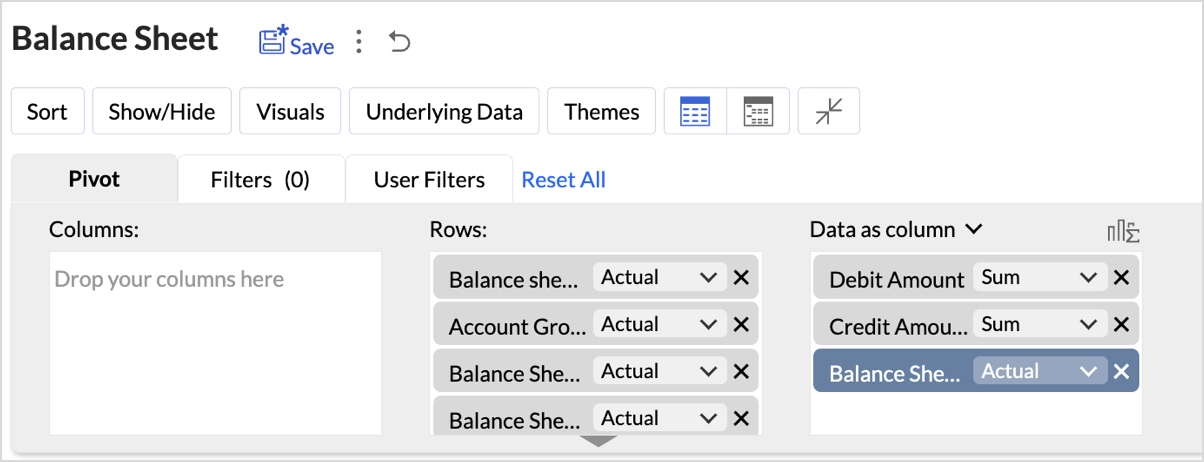
- Layout Adjustments:
- Navigate to Settings > Layout.

- Change the Layout to Compact.
- Check Increase Font Size for each higher group in Rows.
- Uncheck Show row numbers.
- Uncheck Show vertical lines between them.
- Set Column Width to Fit to Screen.
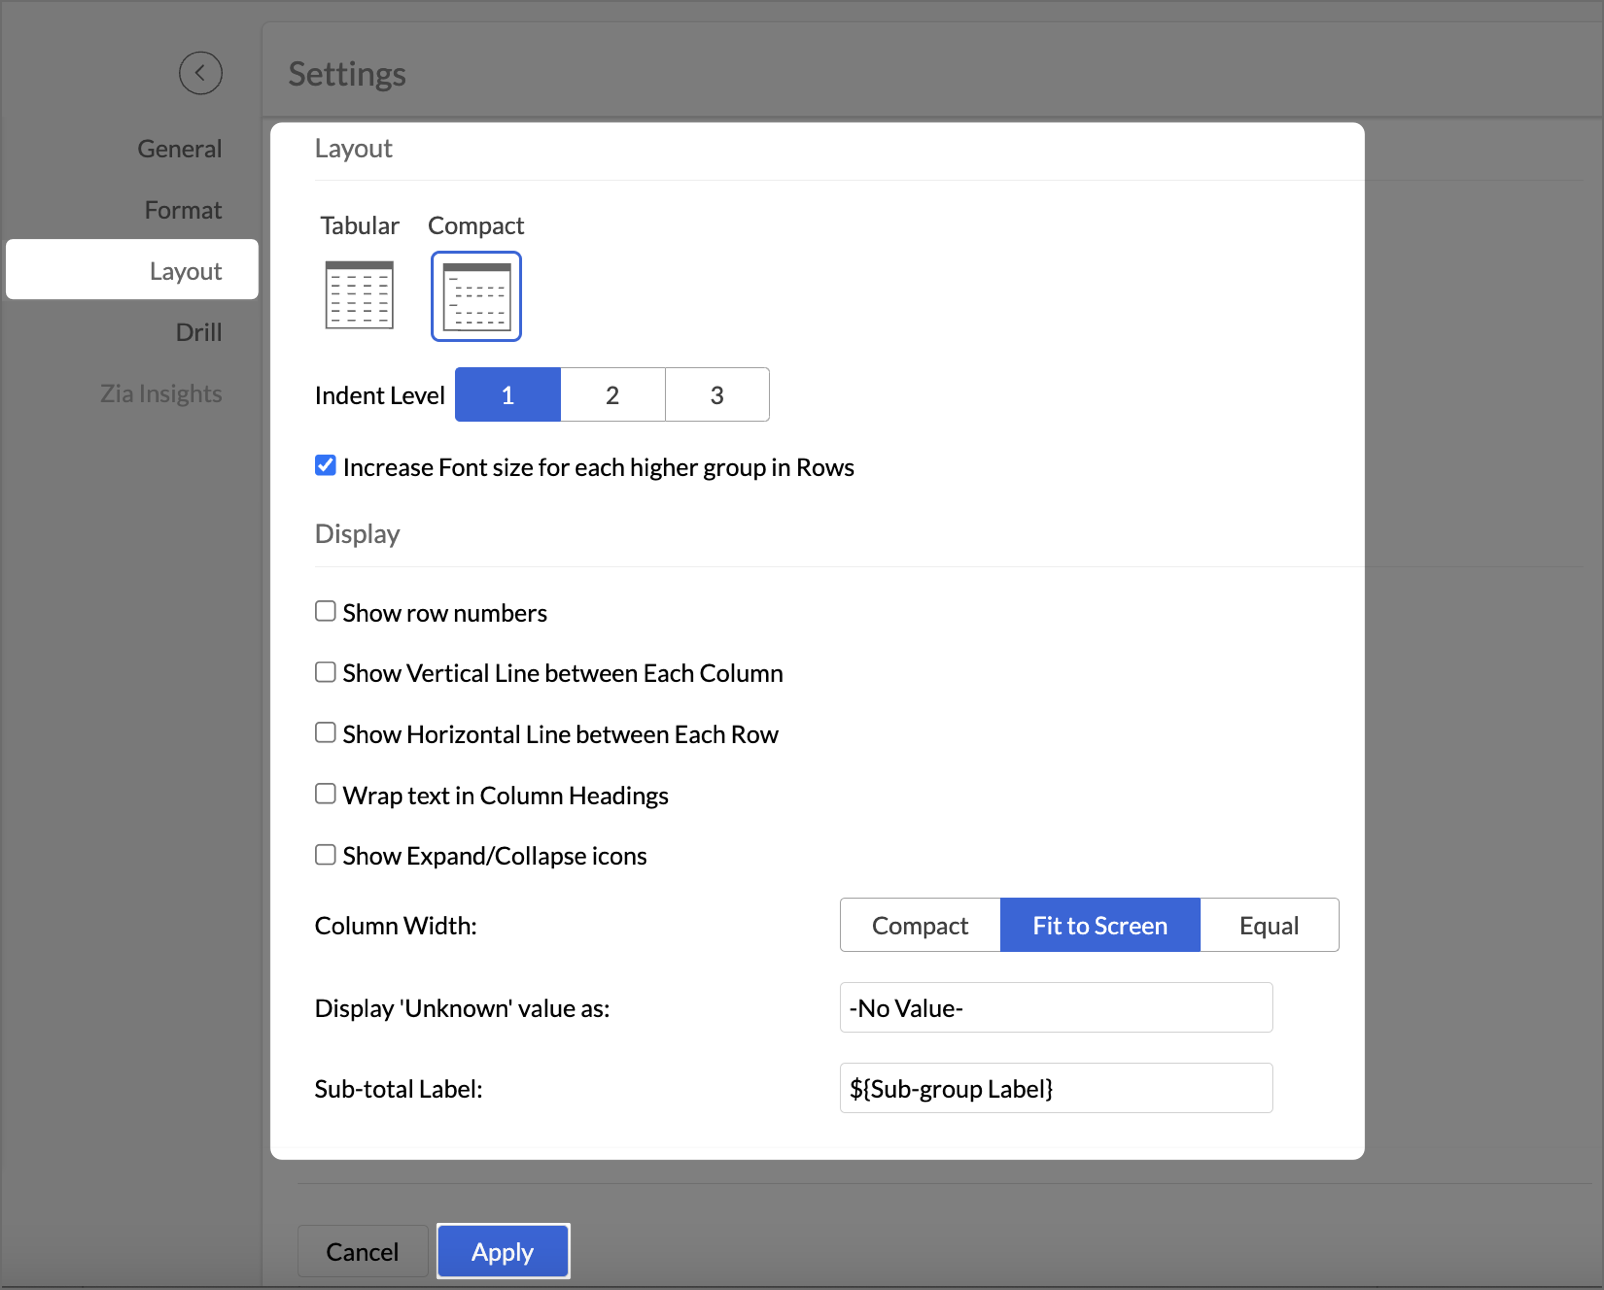
- After making layout adjustments, click Apply to finalize the formatting.
- Go to Visuals and select Data Bars With Data to improve the presentation of financial data, making it easier to interpret key insights visually.

By following these steps, you will generate a clear and structured Balance Sheet that highlights your organization's assets, liabilities, and equity.
Key Features of the Balance Sheet Report
- Increased Font Size for Key Categories
Emphasizes important financial categories like Assets, Equity, and Liabilities, improving readability and focus. - Compact Layout
Ensures a clear, organized display of financial data, enabling efficient consumption of the report. - Line Removal for Clean Aesthetics
Removal of vertical and horizontal lines results in a cleaner visual presentation, improving the user experience. - Data Bars for Quick Insights
Visual data bars provide a quick snapshot of financial status, allowing users to identify key trends at a glance. - Timeline Filter for Flexibility
Filters allow users to view financial data across different periods, making it easier to analyze financial trends over time.
In Zoho Analytics, utilizing the Timeline Filter allows users to transform static financial data into a time-based, dynamic report. The formulas used in creating this filter enable detailed insights into financial performance over a selected period. Below, we explain the key aggregate formulas and how they enable users to achieve greater flexibility and customization, going beyond the typical app potential.
- Opening Balance Formulasum_if("Accrual Transactions"."Transaction Date" < ${system.timeline.date.from},if("Accounts"."Account Base Type" in ('Asset') OR ("Accounts"."Account Base Type" in ('Equity') and "Accounts"."Account Name" in ('Drawings')),"Accrual Transactions"."Debit - Credit","Accrual Transactions"."Credit - Debit"),0)
This formula calculates the Opening Balance for a selected period by summing transactions that occurred before the specified date (timeline.date.from).
This approach allows users to view the Opening Balance as of a given date, making it highly flexible for periods that differ across user's datasets.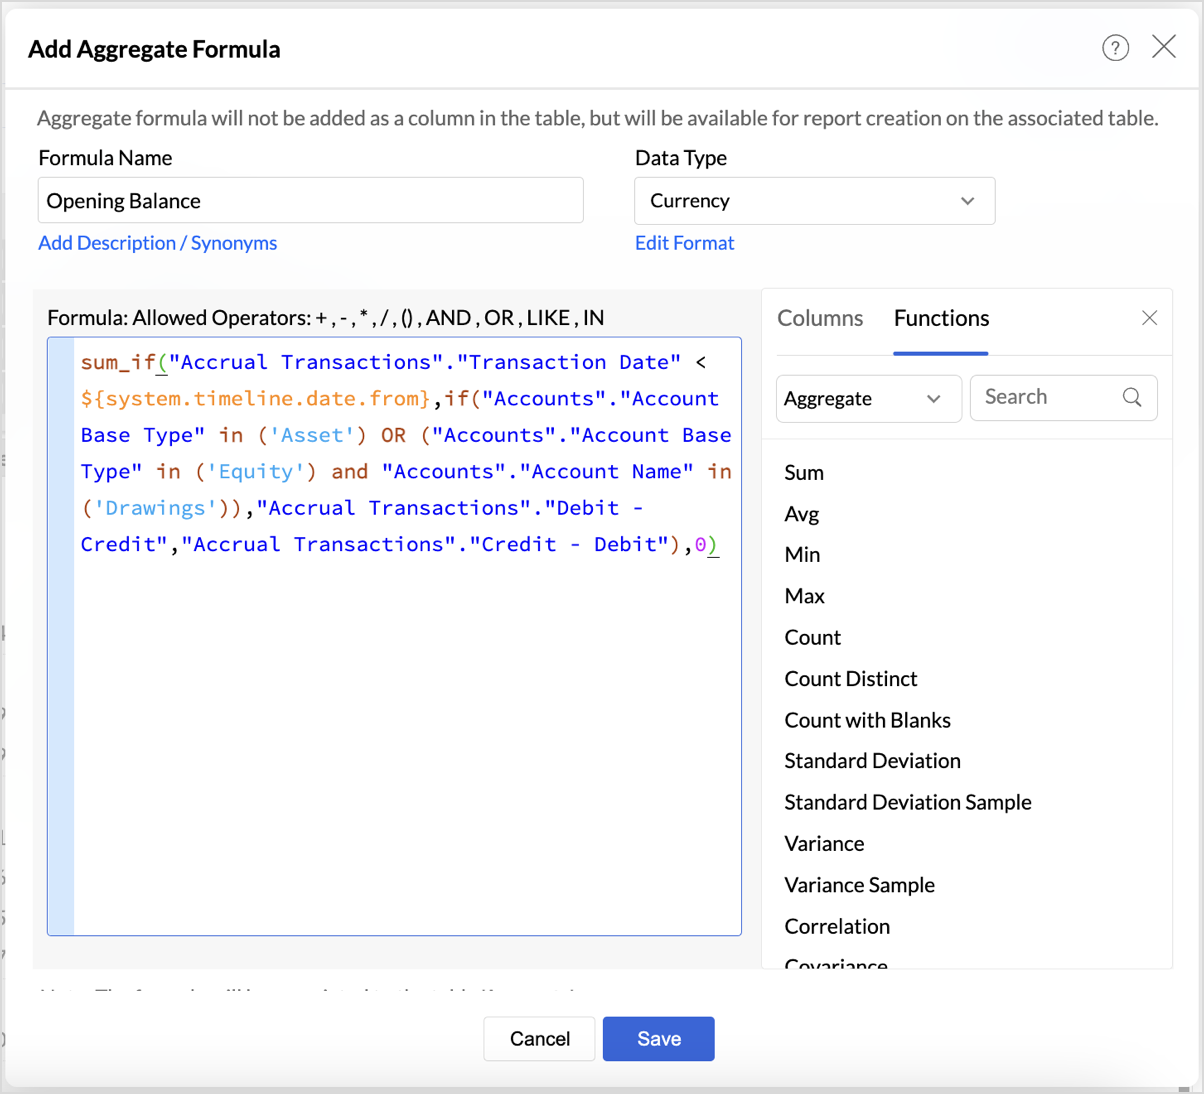
|
if("Accounts"."Account Base Type" in ('Asset') OR ("Accounts"."Account Base Type" in ('Equity') and "Accounts"."Account Name" in ('Drawings')),"Accrual Transactions"."Debit - Credit","Accrual Transactions"."Credit - Debit")
|
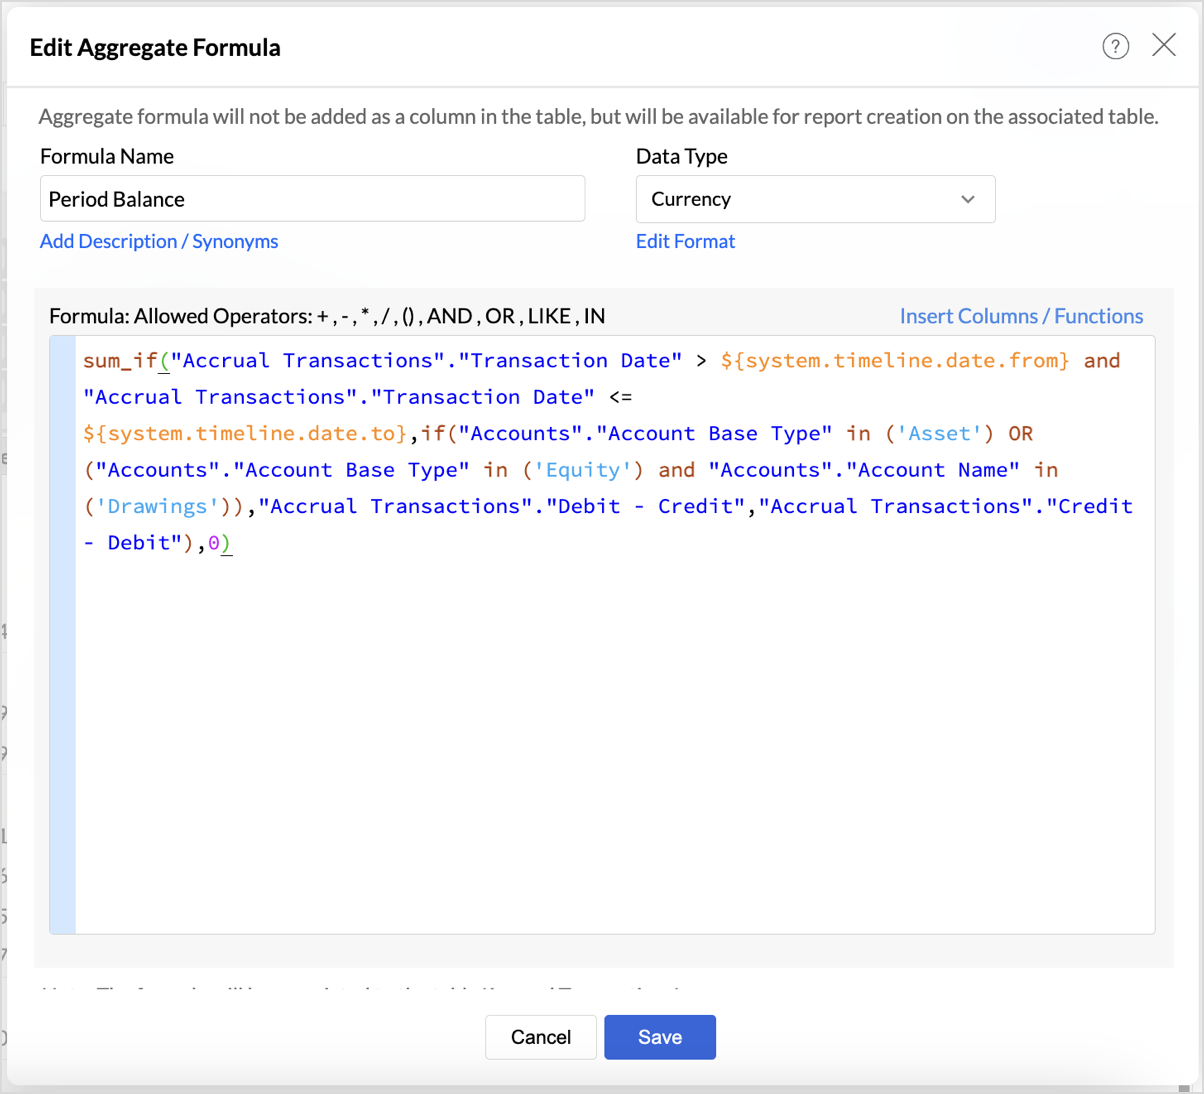
- Period Balance Formulasum_if("Accrual Transactions"."Transaction Date" > ${system.timeline.date.from} and "Accrual Transactions"."Transaction Date" <= ${system.timeline.date.to},if("Accounts"."Account Base Type" in ('Asset') OR ("Accounts"."Account Base Type" in ('Equity') and "Accounts"."Account Name" in ('Drawings')),"Accrual Transactions"."Debit - Credit","Accrual Transactions"."Credit - Debit"),0)
- Closing Balancesum_if("Accrual Transactions"."Transaction Date" <= ${system.timeline.date.to},if("Accounts"."Account Base Type" in ('Asset') OR ("Accounts"."Account Base Type" in ('Equity') and "Accounts"."Account Name" in ('Drawings')),"Accrual Transactions"."Debit - Credit","Accrual Transactions"."Credit - Debit"),0)
The Closing Balance formula calculates the final balance as of a selected date (timeline.date.to). It works by summing all transactions up until the specified date, following the same account type distinctions used in the previous formulas.
This formula is essential for determining the financial standing of an organization at the end of a reporting period, such as the end of a quarter or year.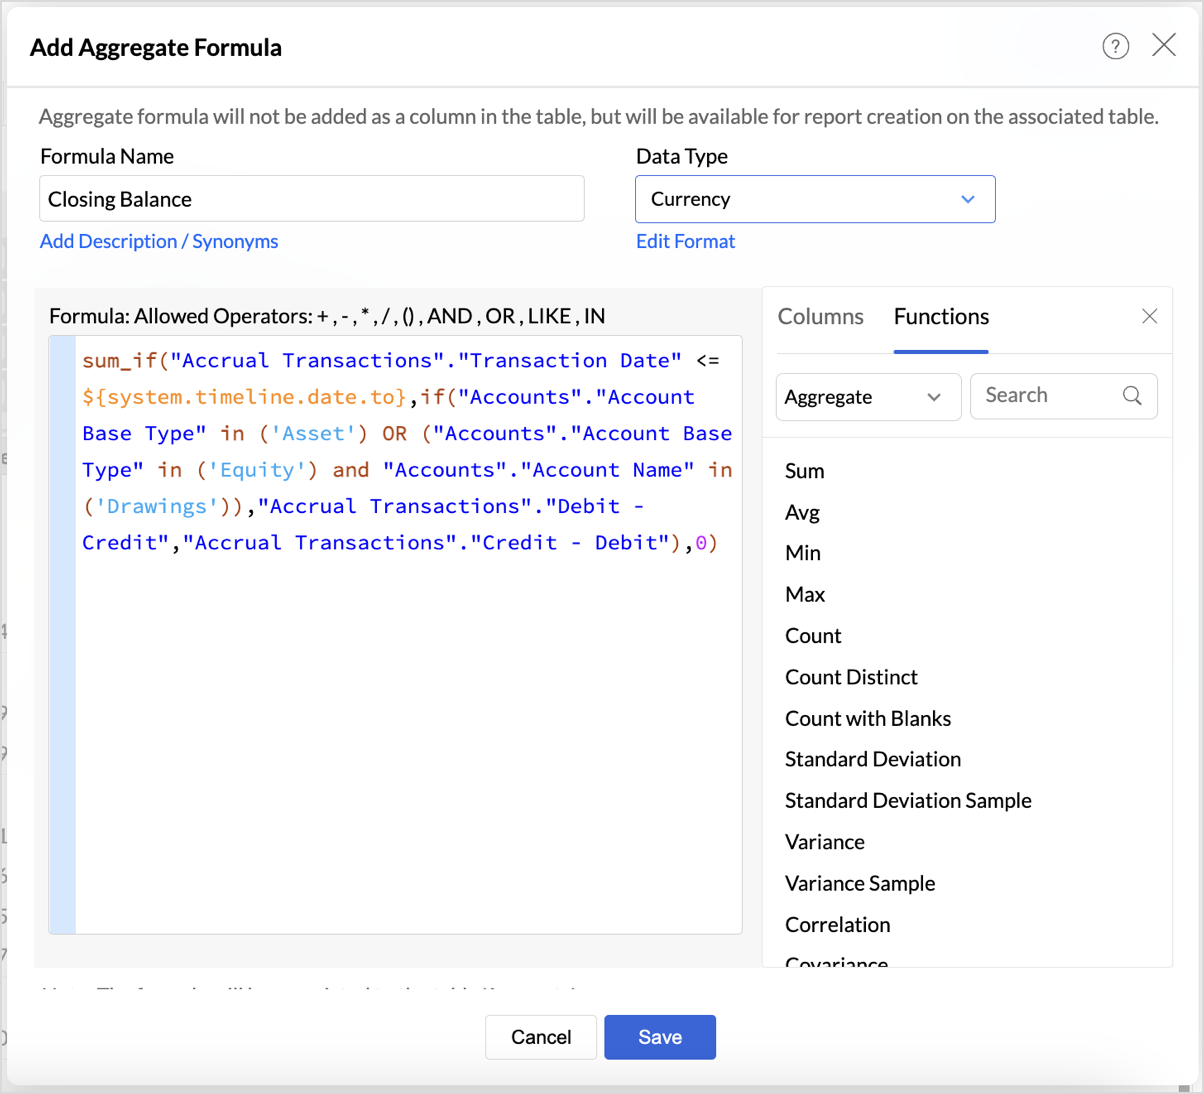
Follow the below steps to create opening and closing balances with timeline filters:
- Drag and drop the created aggregate formulas into the data shelf.
- Select Data as row from the drop-down.
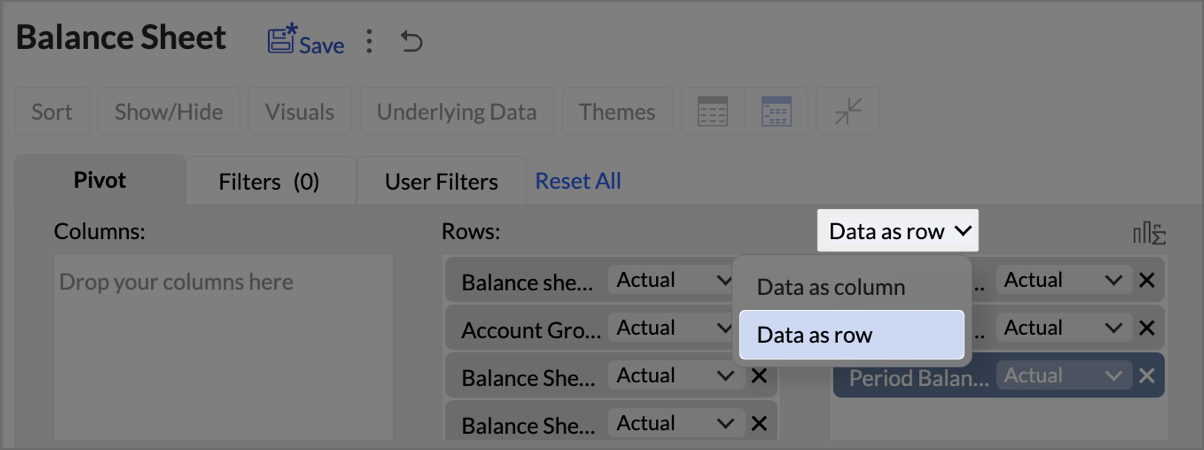
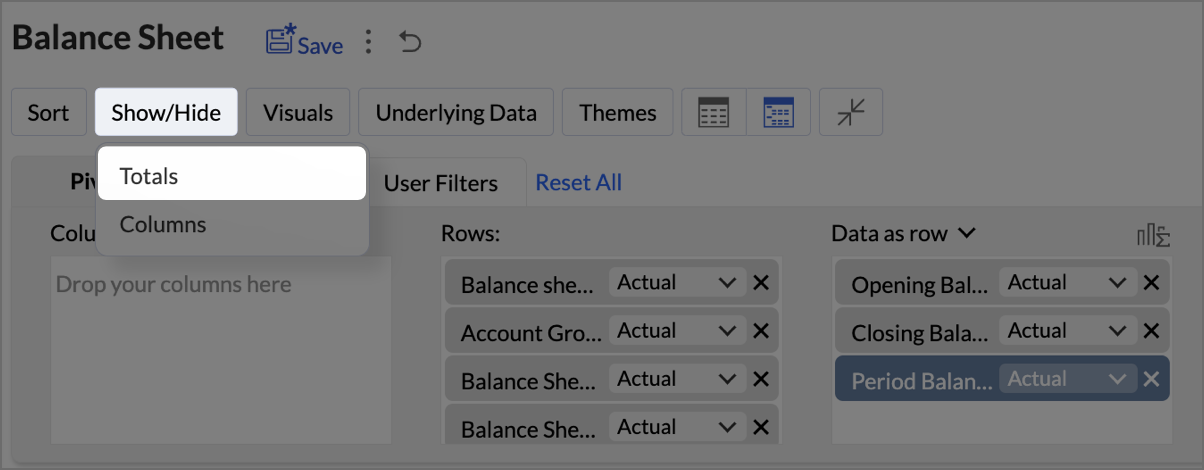
- Click on Show/Hide, then select Totals.
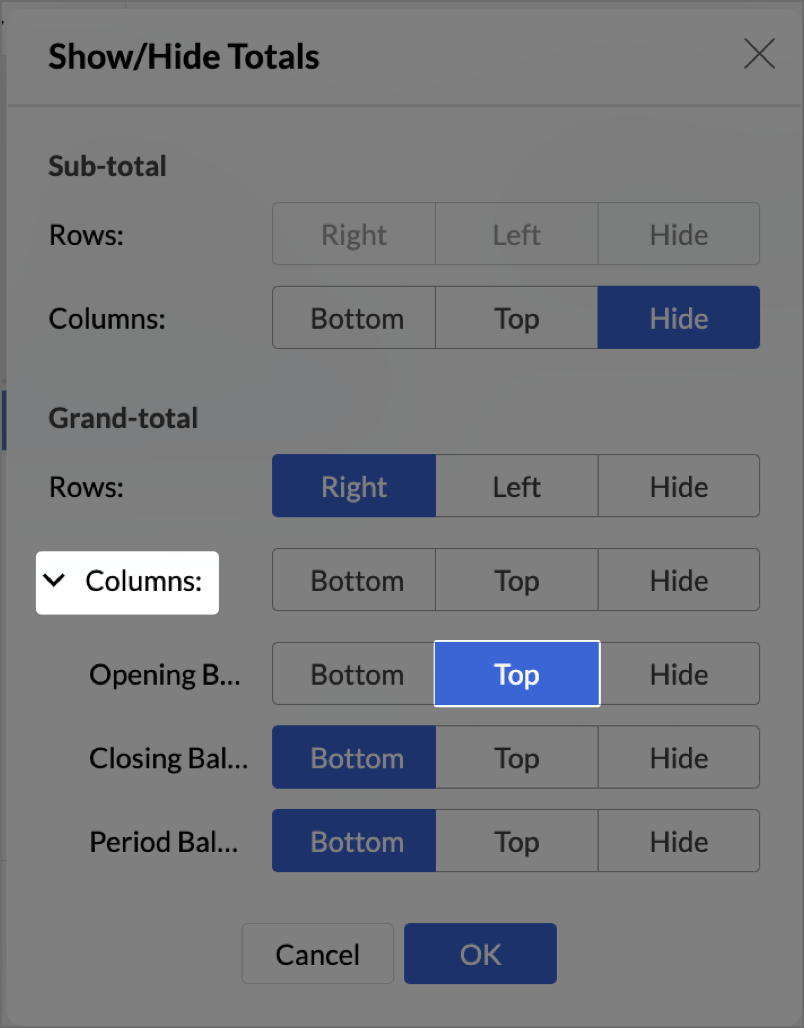
- Click on Columns drop-down, then set the Opening Balance as Top.
- Navigate to Settings > Layout and set Column Width as Equal. Provide Width value as required in px.
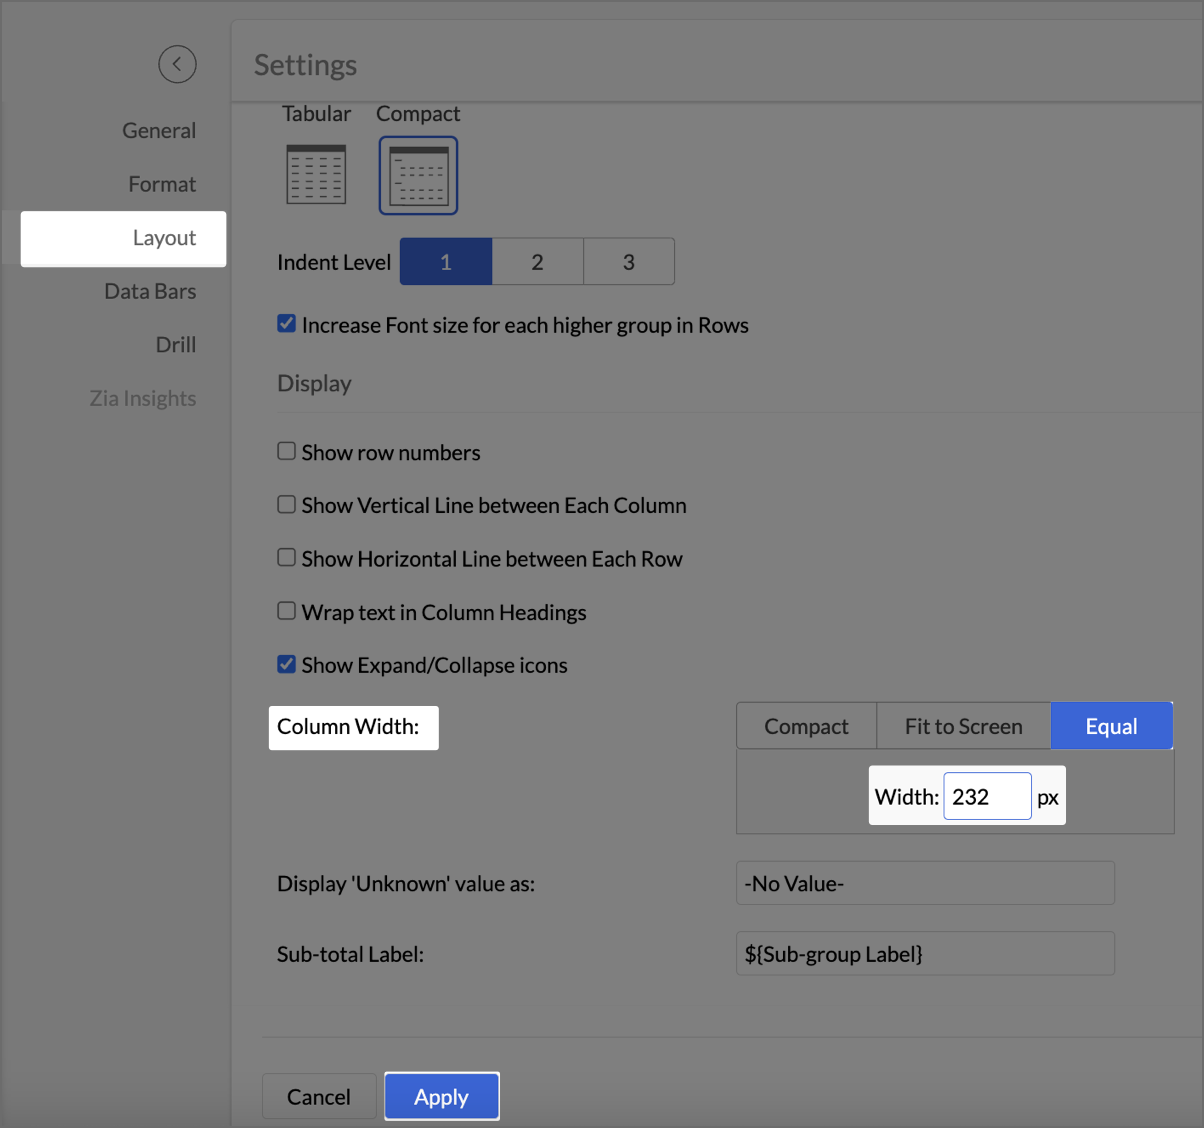
- Click Apply.
- Check Include Timeline Filter.
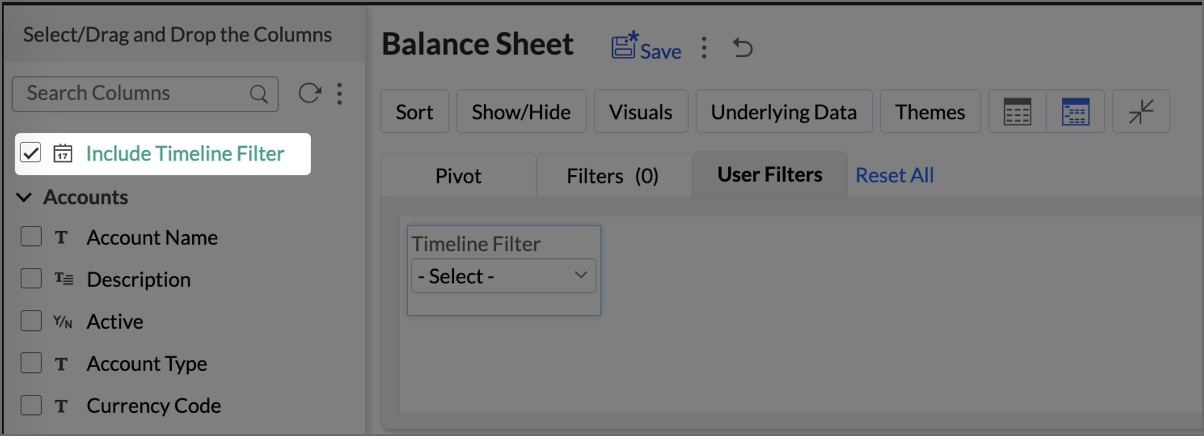
The Timeline Filter is now enabled, and users can apply time-based filters to their data.
Creating a Budget Statement
A Budget Statement helps compare actual financial performance against projected budgets, identifying variances and areas of concern. This visually enhanced report is designed to help businesses quickly assess deviations between expected and real expenditures, allowing for better budget management and financial decision-making.
- Drag and drop Account into the Row shelf, and Actuals and Budget into the Data shelf from the Budget vs Actual table.

- Add Report Formula:
- Click Add Report Formula to create custom calculations.
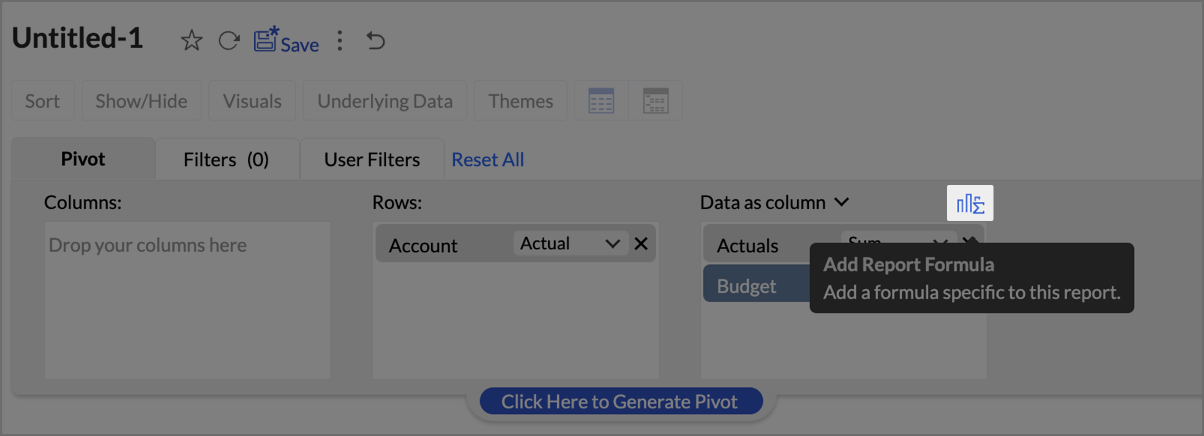
- Name the formula column appropriately (e.g., “Deviation”).
- Set Data Type as Decimal Number
- Create a formula to calculate the difference between actuals and budget as shown in the image.
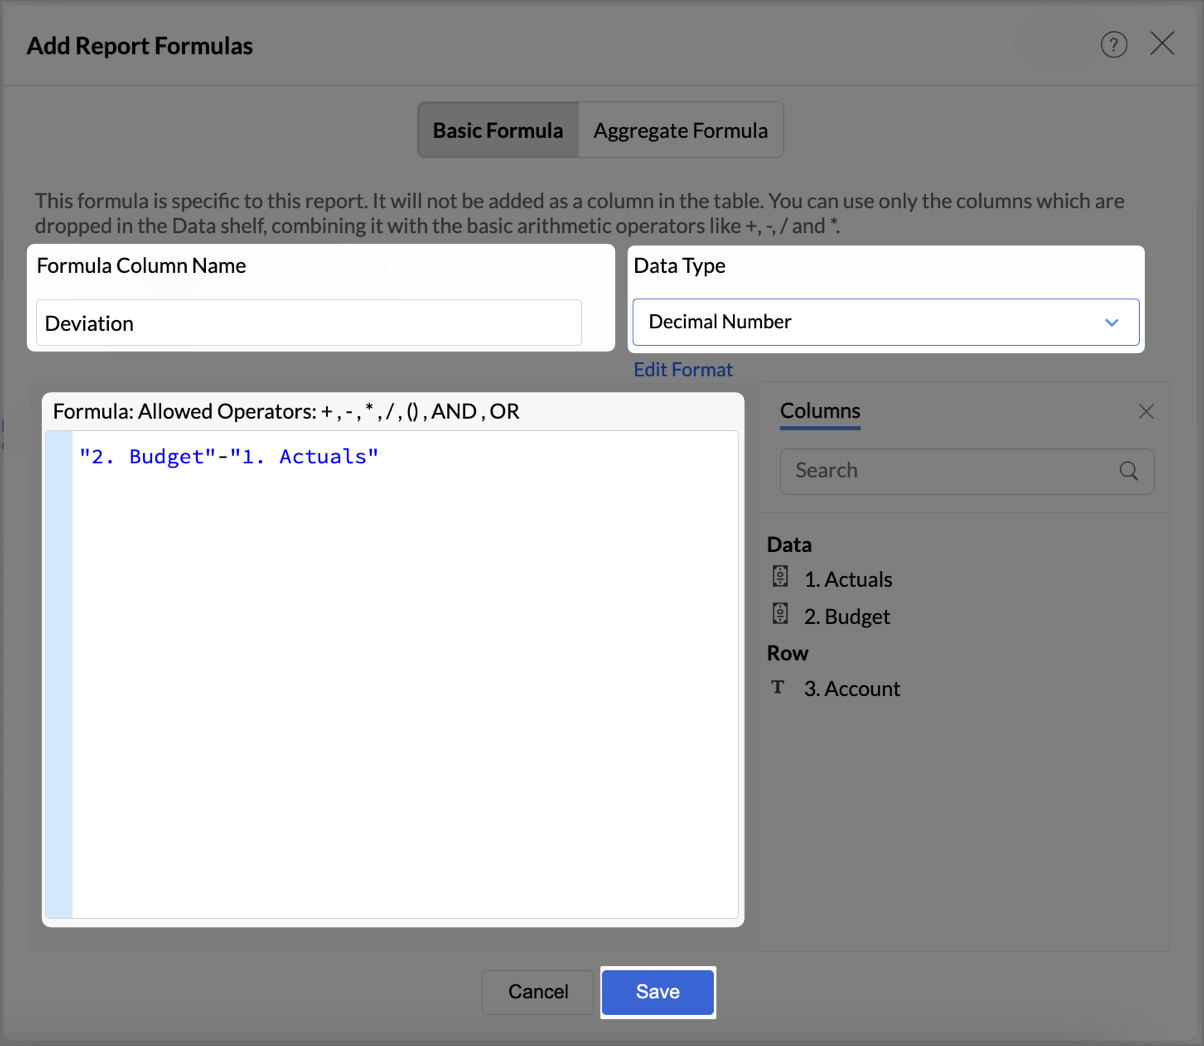
- Click Save.
- By following the same steps mentioned above, create one more formula to calculate the percentage difference between actuals and budget as shown in the image.
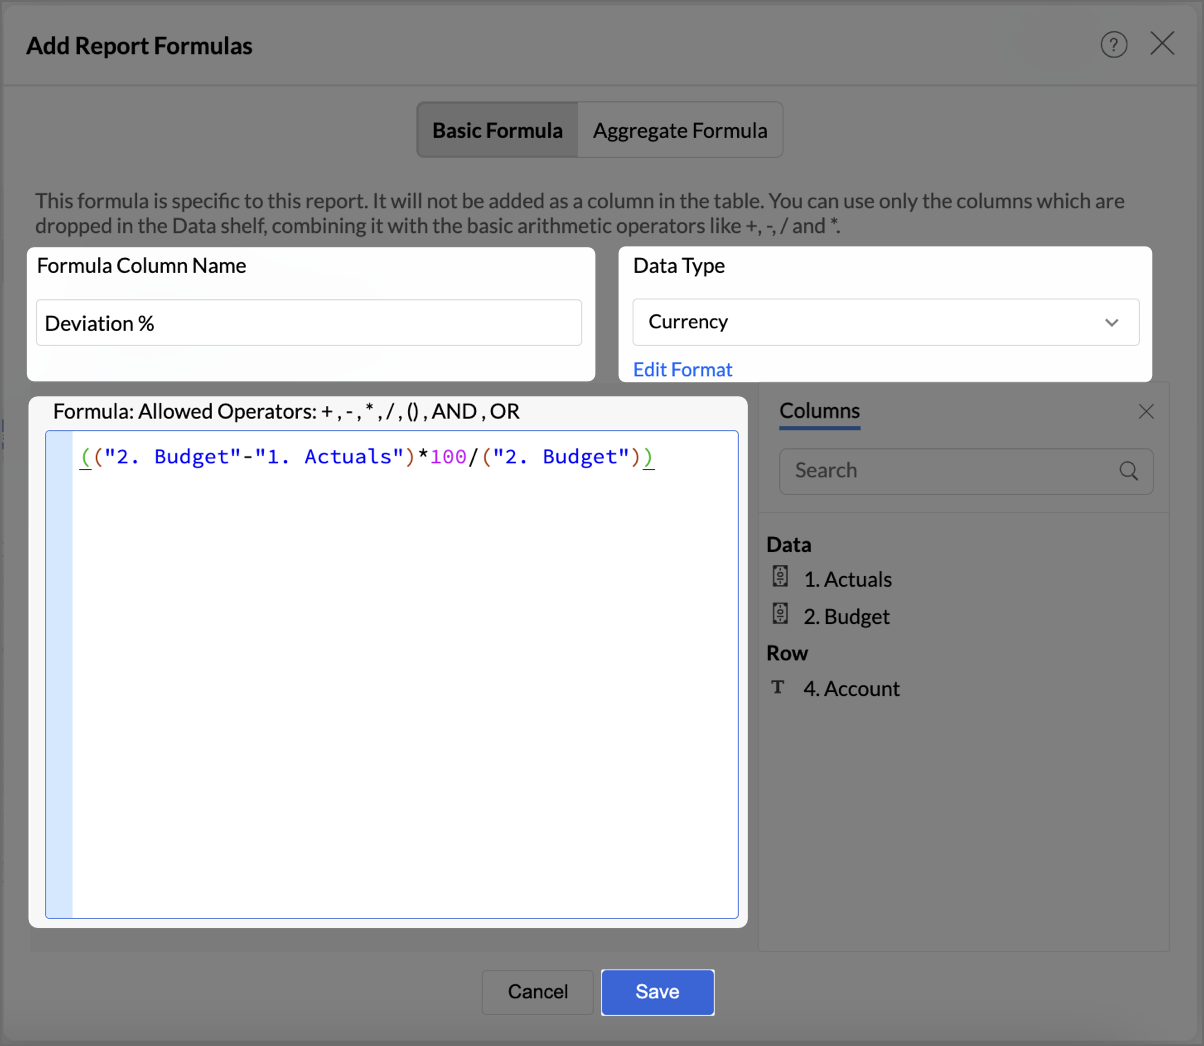
- Click Save.
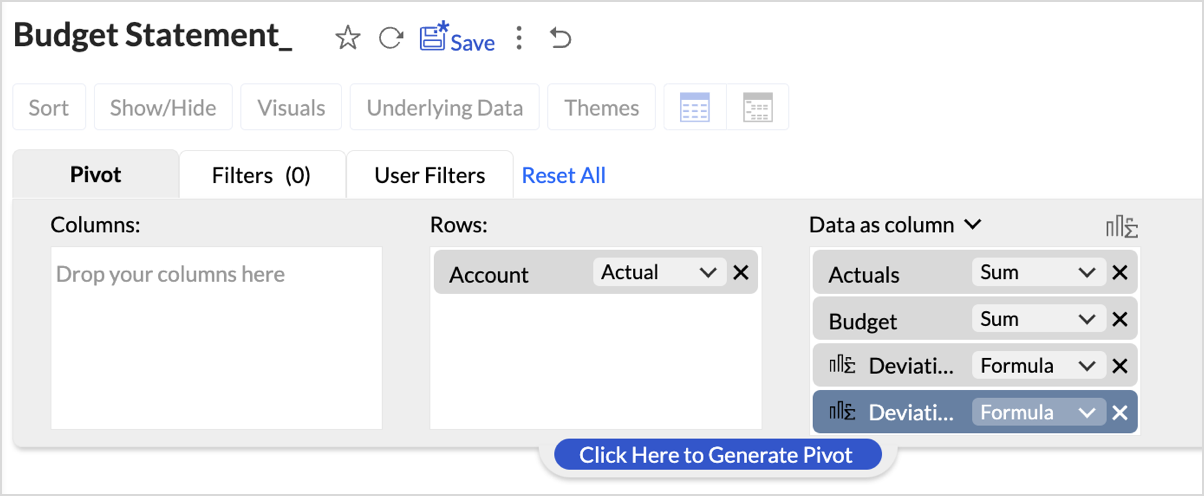
The created formulas will appear in your data shelf and columns, reflecting in the report. - Go to Visuals and choose Data Bars With Data for a more intuitive understanding of budget performance.
By following these steps, you will have a detailed Budget Statement that compares actual spending to the budget, highlighting deviations.
Report Structure and Visuals
- Account Breakdown
The report is organized by account categories, such as Bank Fees, Cost of Goods Sold, and more, showing both Budgeted and Actual amounts for each category. - Key Columns
The report includes the following key columns: - Total Budget - Displays the budget allocated for each account.
- Total Actuals - Shows the actual amount spent or earned for each account.
- Variance (Deviation) - Represents the difference between the budgeted amount and the actuals.
- Variance Percentage (Deviation %) - This column shows the percentage difference between the budgeted and actual amounts, highlighting under- or over-expenditure.
- Data Bars for Clarity
- Green Bars indicate favorable performance (within or under budget).
- Red Bars highlight overspending or budget deviations (e.g., Office Expenses or Rent).
Key Features of the Budget Statement Report
- Visual Representation of Deviations
Data bars visually indicate how spending aligns or deviates from the budget, enabling quick identification of problem areas. - Concise Overview of Financial Performance
The report provides a clear overview of actual versus budgeted performance, allowing decision-makers to assess financial health efficiently. - Enhanced Usability with Percent Deviations
Percentage-based deviation columns allow users to understand the scale of over- or under-performance relative to the budget, making it easy to identify areas that are significantly off track.
Creating Profit and Loss report
A Profit and Loss (P&L) report in Zoho Analytics helps businesses assess their revenue, expenses, and profitability over a specific period. By following these steps, you can create a detailed and visually engaging P&L report.
- Drag and drop Account base type, P&L Operating Profit Type, P&L Gross Type, Base type P&L, and Account Name into the Columns shelf from the Accounts table and Profit and Loss Balance into the Rows from Data shelf from the Accrual Transactions table.

- Layout Adjustments:
- Navigate to Settings > Layout.

- Change the layout to Compact.
- Set Indent Level to 3.
- Check Increase Font Size for each higher group in Rows to make key categories more visible.
- Uncheck Show row numbers for a cleaner report.
- Uncheck Show Vertical Line between Each Column to streamline the visual presentation.
- Set Column Width to Equal and specify the width as required in px.
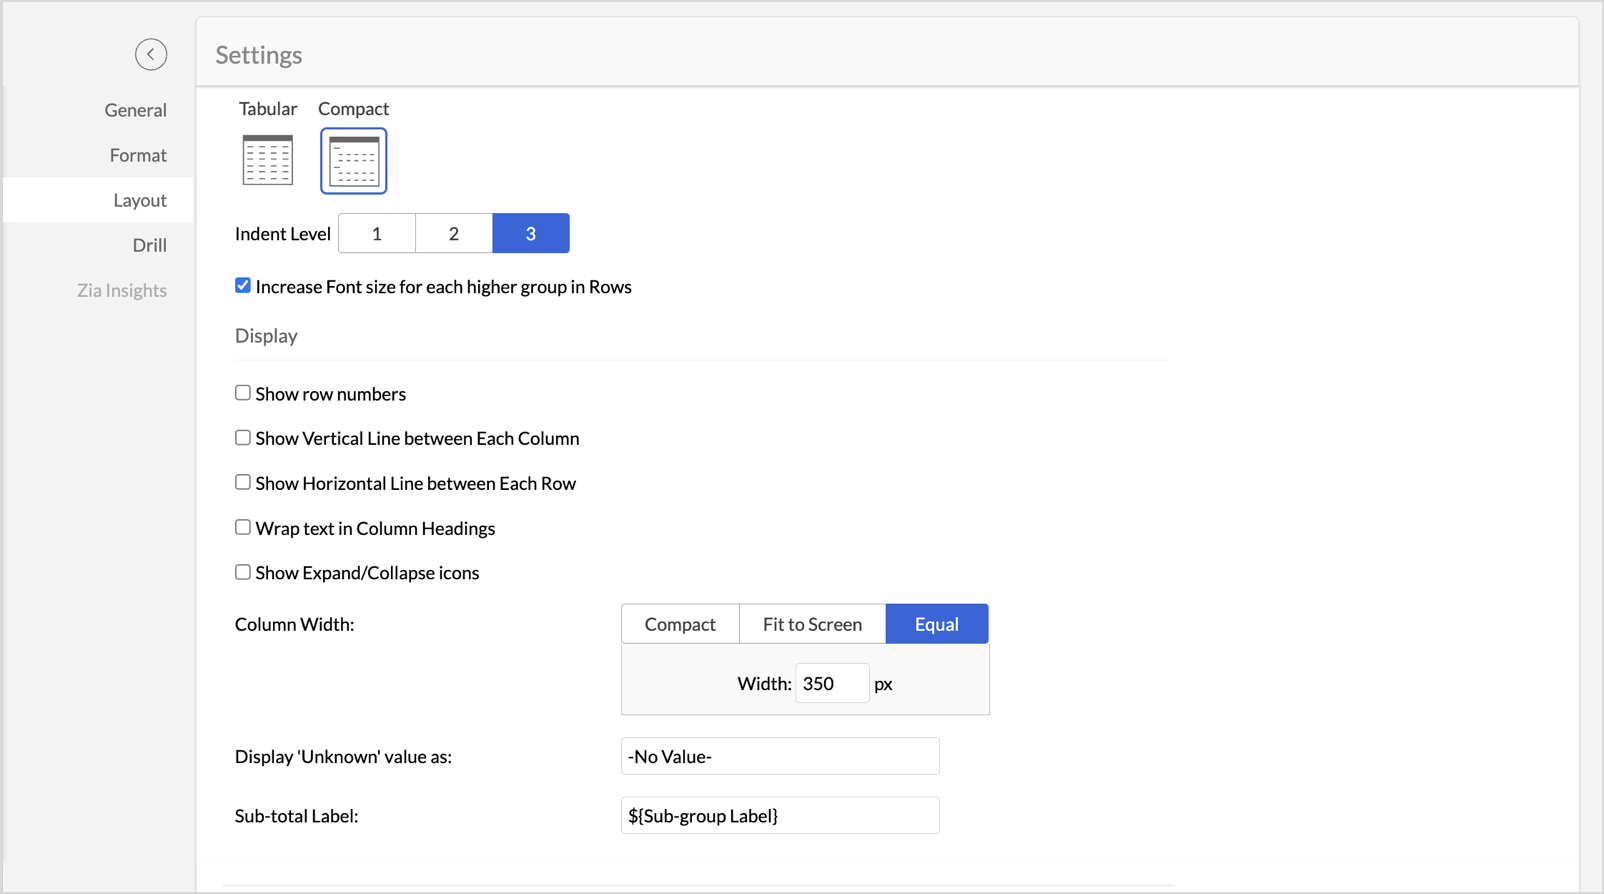
- Navigate to Settings > Layout.
- Once the layout adjustments are made, click Apply to lock in the formatting.
- Click Themes, and select the second theme. Set Row Spacing as 2.
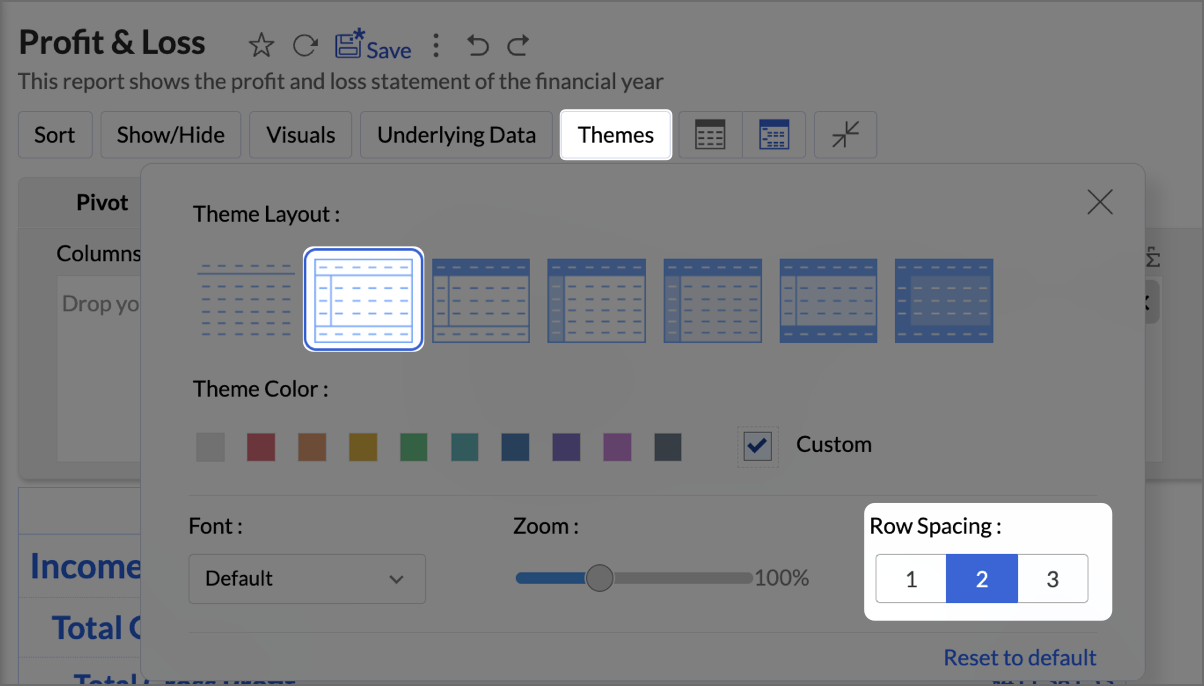
- Navigate to Visuals and select Data Bars With Data to provide a quick and clear visual representation.

By following the above steps, you will create aProfit and Loss report which provides a concise and structured view of your business’s financial performance, making it easy to track profitability over time and identify key financial trends.
Zoho Analytics provides an intuitive and customizable platform for generating comprehensive Balance Sheets, Budget Statements, and Profit & Loss reports. With its drag-and-drop functionality and powerful visual tools, Zoho Analytics transforms finance reporting into a data-driven process that improves decision-making, forecasting, and resource management.
Start leveraging Zoho Analytics today to create reports that provide actionable insights, helping your organization thrive financially!
Topic Participants
Pradeepkumar R
Storytelling BeanCounter - www.storytellingbeancounter.com
Inform
Pradeepkumar R
Sticky Posts
Tip of the Week - Spot Risky Sales with Conditional Formatting
In Zoho Analytics, small tweaks can lead to big insights. One such feature is Conditional formatting based on other columns, your key to instantly spotting where sales success is overshadowed by product returns. Our tip this week shows you how to apply
Recent Topics
Composite Product (kit) - Dynamic Pricing
I am setting up Composite Products for item kits that I sell. I also sell the items from the kit individually. Problem is when pricing changes on an individual part, the Composite Product price does not change meaning when the cost of item # 2 in theView Answer Bot conversations?
We are trialing Zia and are experimenting with Answer Bot on our knowledge base. So far so good! Management asks me if it is possible to view Answer Bot conversations, the purpose being to look over its shoulder and confirm that it is working as desTrain Zia answer bot on only part of Knowledge Base?
We are trialing Zia answer bot and hope to use it on the knowledge base to help our users find the information they are looking for. I have found how to train Zia on the entirety of our knowledge base. But is there a way to train it on only certain categoriesSmarter holiday planning with yearly-specific Holiday Lists
Hello everyone! Managing holidays and business hours is now easier and more efficient. Holiday Lists now support holidays that fall on different dates every year, while business hours now supports more than one holiday list. This helps businesses manageTemporary Outage in Zoho Cliq Affecting US Users – July 23, 2025
We experienced a service disruption in Zoho Cliq that impacted core functionality for users in the US region. The issue occurred between Jul 23, 2025, 06:54:00 PM IST and 07:13:13 PM IST, lasting approximately 19 minutes. To restore service stability,Zoho Writer for Proposals
Hi, one of the things we've struggled with since moving to Zoho ecosystem is our proposal software Qwilr does not integrate well. It surprises me Zoho doesn't have proposal software but given all the capabilities of Zoho Writer, I'm wonder if anyone isCRM HAS BEEN SOOO SLOW For Days 05/15/25
I have fantastic Wifi speed and have zero issues with other websites, apps, or programs. It takes an excruciatingly amount of time to simply load a record, open an email, compose an email, draft a new template, etc. Am I in a subset/region of subscribersApprovals in Zoho Creator
Hi, This is Surya, in one of my creator application I have a form called job posting, and I created an approval process for that form. When a user submits that form the record directly adding to that form's report, even it is in the review for approval.How to Create a Fixed Sliding Time Window (D-45 to D-15) in Zoho Analytics ?
Hello, I would like to create a report in Zoho Analytics based on a sliding time window between D-45 and D-15, with a fixed snapshot of that specific period. The data displayed should strictly reflect activity recorded between D-45 and D-15 only, withoutHow exactly does "Reply assistance" work in Zoho Desk? What context is sent to the LLM?
Hi, Im trying to better understand the technical behavior of the feature "Reply assistance" in Zoho Desk, and I couldn’t find detailed information in the current documentation. Specifically, I have questions about what data is actually being sent to theHow Does Knowledge Base Search and Article Recommendation Work?
Hello, I would like to understand how the Knowledge Base search engine works. Specifically, does it search based on: The article title only? The full article content? Both, the article and the content? Keywords? Tags? Also, how does the system determine🚀 WorkDrive 6.0 (Phase 1): Empowering Teams with Content Intelligence, Automation, Accessibility, and Control
Hello, everyone! WorkDrive continues to evolve from a robust file management solution into an intelligent, secure, and connected content collaboration platform for modern businesses. Our goal remains unchanged: to simplify teamwork, strengthen data security,Zoho Campaigns: An Outstanding Email Marketing Tool
Introducing Zoho Campaigns! A product designed by Zoho, the Zoho Campaigns is made to create, deliver, and manage integrated email campaigns that can help in boosting the sales of a company and its customer base. Zoho Campaigns is actually an email marketingZoho Creator Developer Console | Improved Distribution and Lifecycle Management for apps
Hello everyone, We're excited to introduce new enhancements now in the Zoho Creator Developer Console. These updates strengthen private app distribution through licensing controls and extend environment support across all installed apps, helping teamsAnchor Links in Dashboards
Hello, Our dashboards frequently have multiple sections that would be more easily skipped between using anchor links. Please consider adding an anchor link feature to the text widget? This could be done by adding an anchor link option to the text widget next to the "remove" option (see screenshot). The option would assign an ID to the <div> containing the text widget in the live dashboard. Then, the chosen ID could be linked using a traditional <a href="#link_id"> in the html section of the textZoho CRM for Everyone's NextGen UI Gets an Upgrade
Hello Everyone We've made improvements to Zoho CRM for Everyone's Nextgen UI. These changes are the result of valuable feedback from you where we’ve focused on improving usability, providing wider screen space, and making navigation smoother so everythingSync images with Shopify/Cart
Hello, sync images with shopify or other cart, it cuts out the double work of having to upload to shopify/cart and zoho. ThanksAllow selection of select inactive users in User data fields
Hello, We sometimes need to select a previous employee that has an inactive account in the User data field. For example, when doing database cleanup and indicating actions are done by a certain employee that weren't filled out when they were part of theIs it Possible to Modify Standard Report Urls
Is there a way to permanently modify standard report Urls? Use case: Suppose I have a Products report. Showing list as timeline, calendar, or kanban doesn't make sense. Want to hide that from users by adding #Report:Products?zc_ShowAs=false&zc_Print=falseAssessment Answered - Automation (Related List)
Hello everyone, We have linked a candidate assessment to our job posting. When someone applies, they are required to answer all the assessment questions. However, some candidates submit their applications without completing the questions. In such cases,External User onboarding for zoho connect is not really intuitive.
So the external user is sent an invite, which has a button that directs them to login to zoho to view the invite, but if they don't have a zoho account, they cannot access that invite, which seems kinda silly, as there is not real way on for them to createHaving trouble fetching contents of Zoho Connect Feeds using the API, requesting alternative API documentation.
I'm trying to retrieve feed/post data from Zoho Connect using the API but facing challenges with the current documentation. What I've tried: OAuth authentication is working correctly (getting 200 OK responses) Tested multiple endpoints: /pulse/nativeapi/v2/feeds,How to upload file to Connect using API?
Hi there. I looked at the API documentation and nowhere did it mention how to use the API method to upload a file even though it is mentioned that it is possible to be done so. Please help.Select the task view on the board in the Zoho Connect iPhone app
Hello. How do I select the task view on the board in the Zoho Connect iPhone app? The Android app has this functionality.The power of workflows in Zoho Marketing Automation - Video Webinar
In this Zoho Marketing Automation video webinar, our experts walk you through: Why you may want to create marketing workflows How to create marketing workflows Use Zoho CRM data and apply workflows to automate your marketing strategy How workflows canAuto tagging
Some of the articles I enter into Notebook get there when I enter them in Raindrop.io and IFTTT copies the articles in Notebook. When this happens the notes are tagged but instead of useful one word tags with topic the tag pertains to the specific articleConstant refresh required in lots of Zoho tabs
"Hey Zoho, if you can sync my notification bell across 15 tabs using a BroadcastChannel, why can't you send a 'Data Refresh' signal the same way? We don't need a browser reload—we just need the data to sync without us clicking F5 like it's 1999." "PS:What's New in Zoho Billing | January 2026
Excited about the latest enhancements in Zoho Billing? Our January updates bring an intelligent AI assistant, smarter subscription management, and improved tax compliance, saving you time and reducing manual work. Dive into the details below to see howCliq iOS can't see shared screen
Hello, I had this morning a video call with a colleague. She is using Cliq Desktop MacOS and wanted to share her screen with me. I'm on iPad. I noticed, while she shared her screen, I could only see her video, but not the shared screen... Does Cliq iOS is able to display shared screen, or is it somewhere else to be found ? RegardsInserting images into Articles or Knowledgebase
Hi, Are there any plans in improving the Knowledgebase text editor so it would allow inserting images through Windows clipboard via copy-paste? Say for example I took a screenshot using the snipping tool in Windows and I'd like to insert that image toLinks not functioning in Zoho mail
Links that are included in emails I receive are not activating. Nothing at all happens when I click on them. I have researched FAQs and this forum to no avail. Any suggestions?Zoho Mail iOS app update: Manage folders and tags
Hello everyone! In the most recent version of the Zoho Mail iOS app, we have brought in support to manage(create, edit and delete) the folders and tags. Create folders Create Tags Edit/ Delete folder In addition to this, we have also brought in supportZoho Social API for generating draft posts from a third-party app ?
Hello everyone, I hope you are all well. I have a question regarding Zoho Social. I am developing an application that generates social media posts, and I would like to be able to incorporate a feature that allows saving these posts as drafts in Zoho Social.[Important announcement] Zoho Writer will mandate DKIM configuration for automation users
Hi all, Effective Dec. 31, 2024, configuring DKIM for From addresses will be mandatory to send emails via Zoho Writer. DKIM configuration allows recipient email servers to identify your emails as valid and not spam. Emails sent from domains without DKIMCreate an Eye-Catching Announcement Widget for Your Help Center
Hello Everyone! In this week’s edition, let’s explore how to keep your customers updated with exciting news in the Help Center. See how ZylkerMobile wowed their customers by bringing updates right to their portal. ZylkerMobile, the renowned brand forUI issue with Organize Tabs
When looking at the organize Tabs window (bellow) you can see that some tabs are grayed out. there is also a "Add Module/Web Tab" button. When looking at this screen it's clear that the grayed out tabs can not be removed from the portal user's screenSuper Admin Logging in as another User
How can a Super Admin login as another user. For example, I have a sales rep that is having issues with their Accounts and I want to view their Zoho Account with out having to do a GTM and sharing screens. Moderation Update (8th Aug 2025): We are workingTask list flag Internal/External for all phases
Phases are commonly used in projects to note milestones in the progression of a project, while task lists can be used to group different types of tasks together. It makes sense to be able to define a task list as either internal or external however theZoho CRM Feature Requests - SMS and Emails to Custom Modules & Time Zone Form Field
TLDR: Add Date/Time/Timezone form field, and be able to turn off auto timezone feature. Allow for Zoho Voices CRM SMS Extension to be able to be added to custom modules, and cases. Create a feature that tracks emails by tracking the email chain, ratherOur Review Of Zoho CRM after 60 Days
The purpose of this is to just share with Zoho why I love their product, but ultimately why I could not choose Zoho CRM for our next CRM. About two months ago we begun a CRM exploration process for our financial planning firm, based in Texas. We alreadyNext Page