Zoho Expense: Product Updates November - December 2022
Hello customers,
As we're nearing the end of 2022, we want to take this opportunity to thank you for your support and love for Zoho Expense. We promise to put together new features time and again to help you have a smooth expense reporting experience. Now, let's go through the enhancements made to Zoho Expense.
Bulk Archive Trips
If your trip is cancelled, closed, or if you've received reimbursements for the trip's expense reports, you can archive it and view it under the Archived filter. With this update, you can now archive and unarchive multiple trips in one go.
To bulk archive trips: Go to Trips on the left sidebar. Select the trips that you want to archive and click Archive.

To bulk unarchive trips: Go to Trips on the left sidebar. Click the All Trips filter and select Archived. Select the trips that you want to unarchive and click Unarchive.
Split Expenses Within Reports
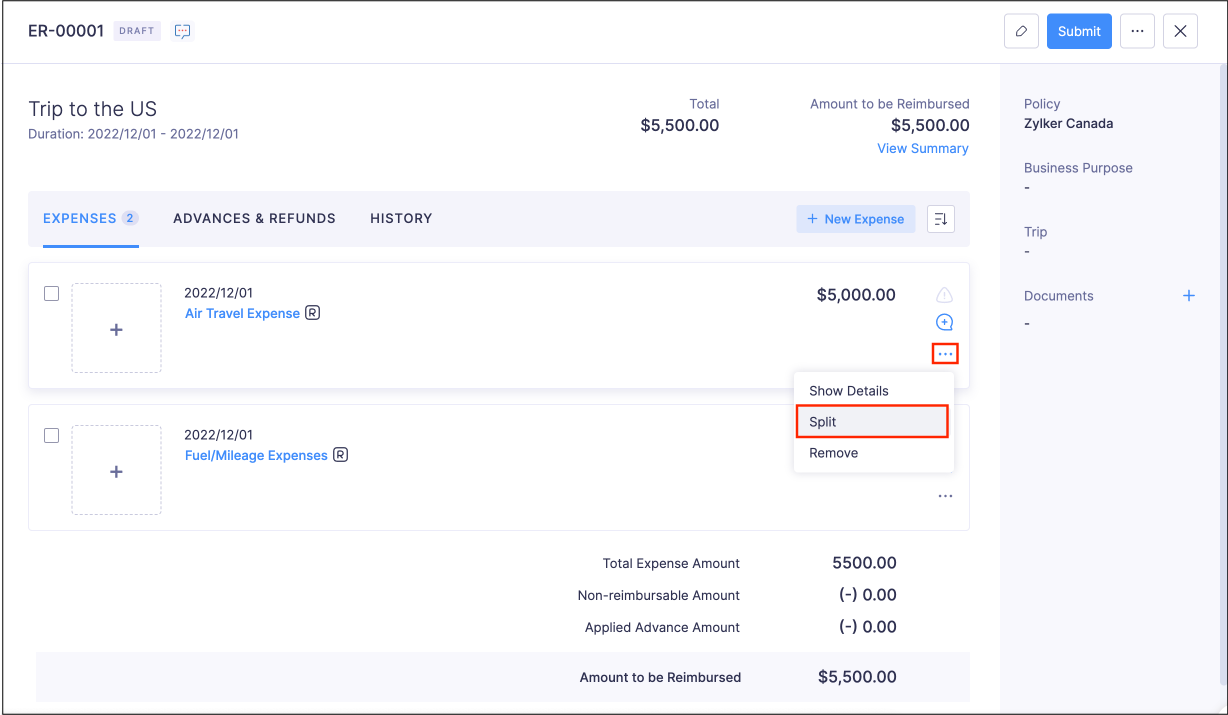
We've now added the option to split an expense from within a report. You can split an expense into multiple expenses based on its category, amount, or a custom field. When you split an expense from inside a report, the split expenses will be automatically associated with that report.
To split an expense from within a report: Go to Reports on the left sidebar. Click the report that has the expense you want to split. Click the More (...) icon at the bottom right corner of the expense. Click Split. Enter the details and click Save.

Allow Other Travellers of a Trip To Associate Reports
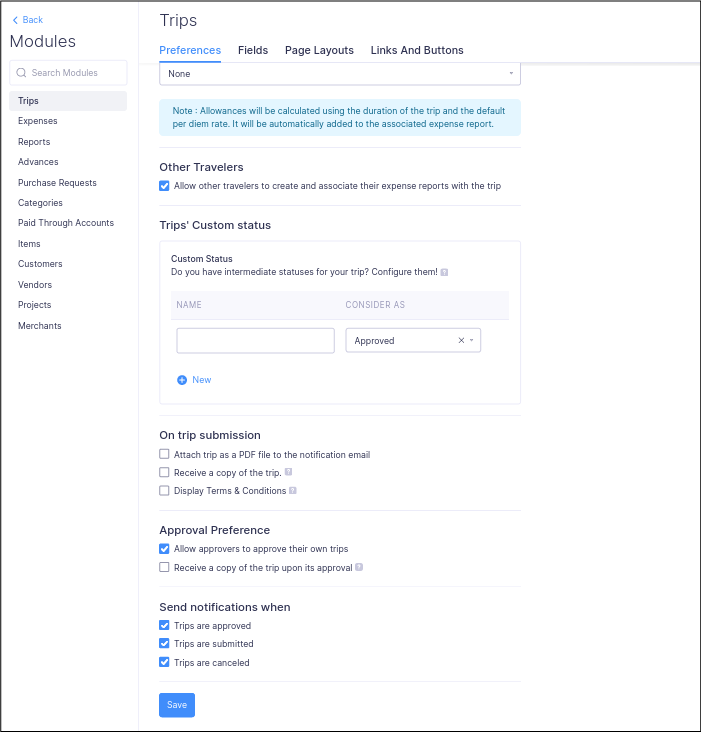
Introducing a new preference for the Trips module. If there are other travellers on a trip, they can now associate their reports with that trip without having to create a separate trip to submit their expense reports. The other travellers can also create a new report under the Reports module and associate it with that trip. Admins can enable this preference under Settings. This feature is available in early access. To enable it for your organisation, you can send an email to support@zohoexpense.com.
To enable this preference: Go to Admin View > Settings > Modules > Trips. Enable Allow other travellers to create and associate their expense reports with the trip and click Save.

Mandate Travel Profile
To help the travel desk manage employees' booking process efficiently, we've now introduced a configuration in Trips Preferences to mandate the creation of a Travel Profile to create trips. Every employee should provide details such as their Name and DOB as it appears on their passport so that it'll be easy for the travel desk to make bookings.
To create a Travel Profile: Go to My Settings on the left sidebar. Click + Add Travel Profile. Enter the necessary details and click Save.
Custom Status Filter for Expense Reports Details Analytic Report
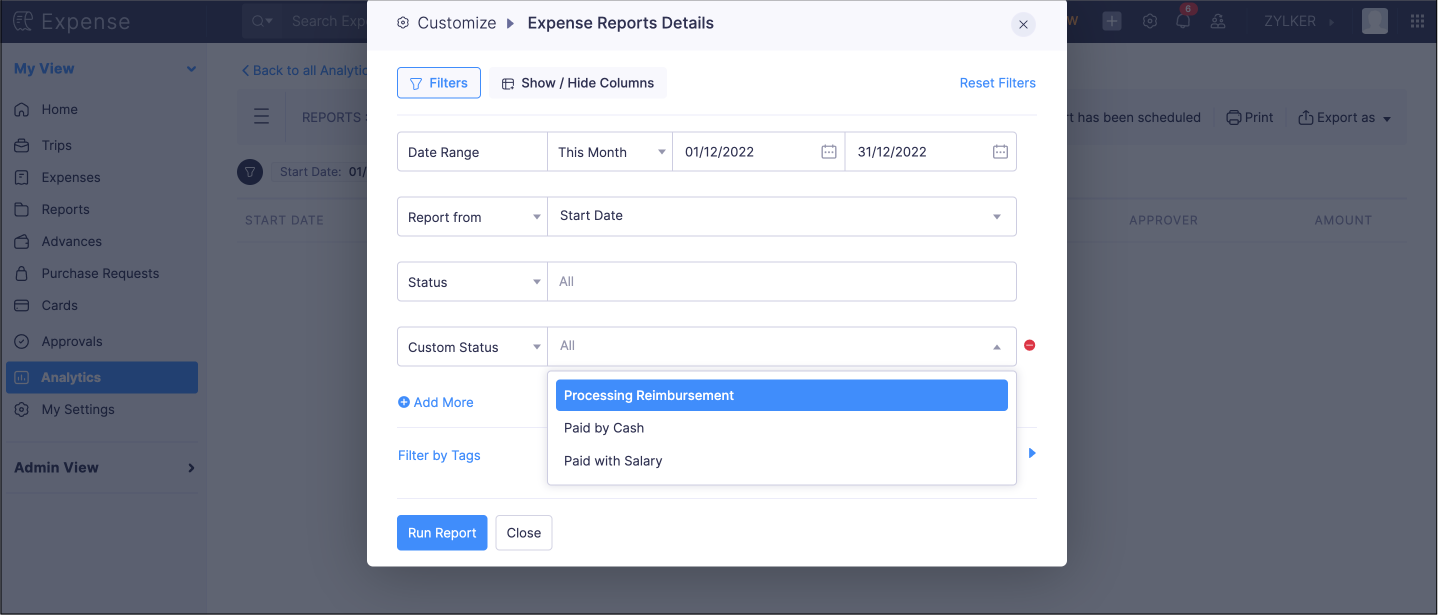
In addition to filtering reports based on the default statuses available in Zoho Expense, we've now added the option to view reports based on the custom statuses that you've created. While customizing the Expense Reports Details analytic report, select the preferred custom status and view the details of the reports for which the custom status has been applied.
To filter report details based on a custom status: Go to Analytics on the left sidebar. Click Expense Reports Details. Click Customize. Select a custom status. Click Run Report.

Support for Electronically Protected Health Information (ePHI)
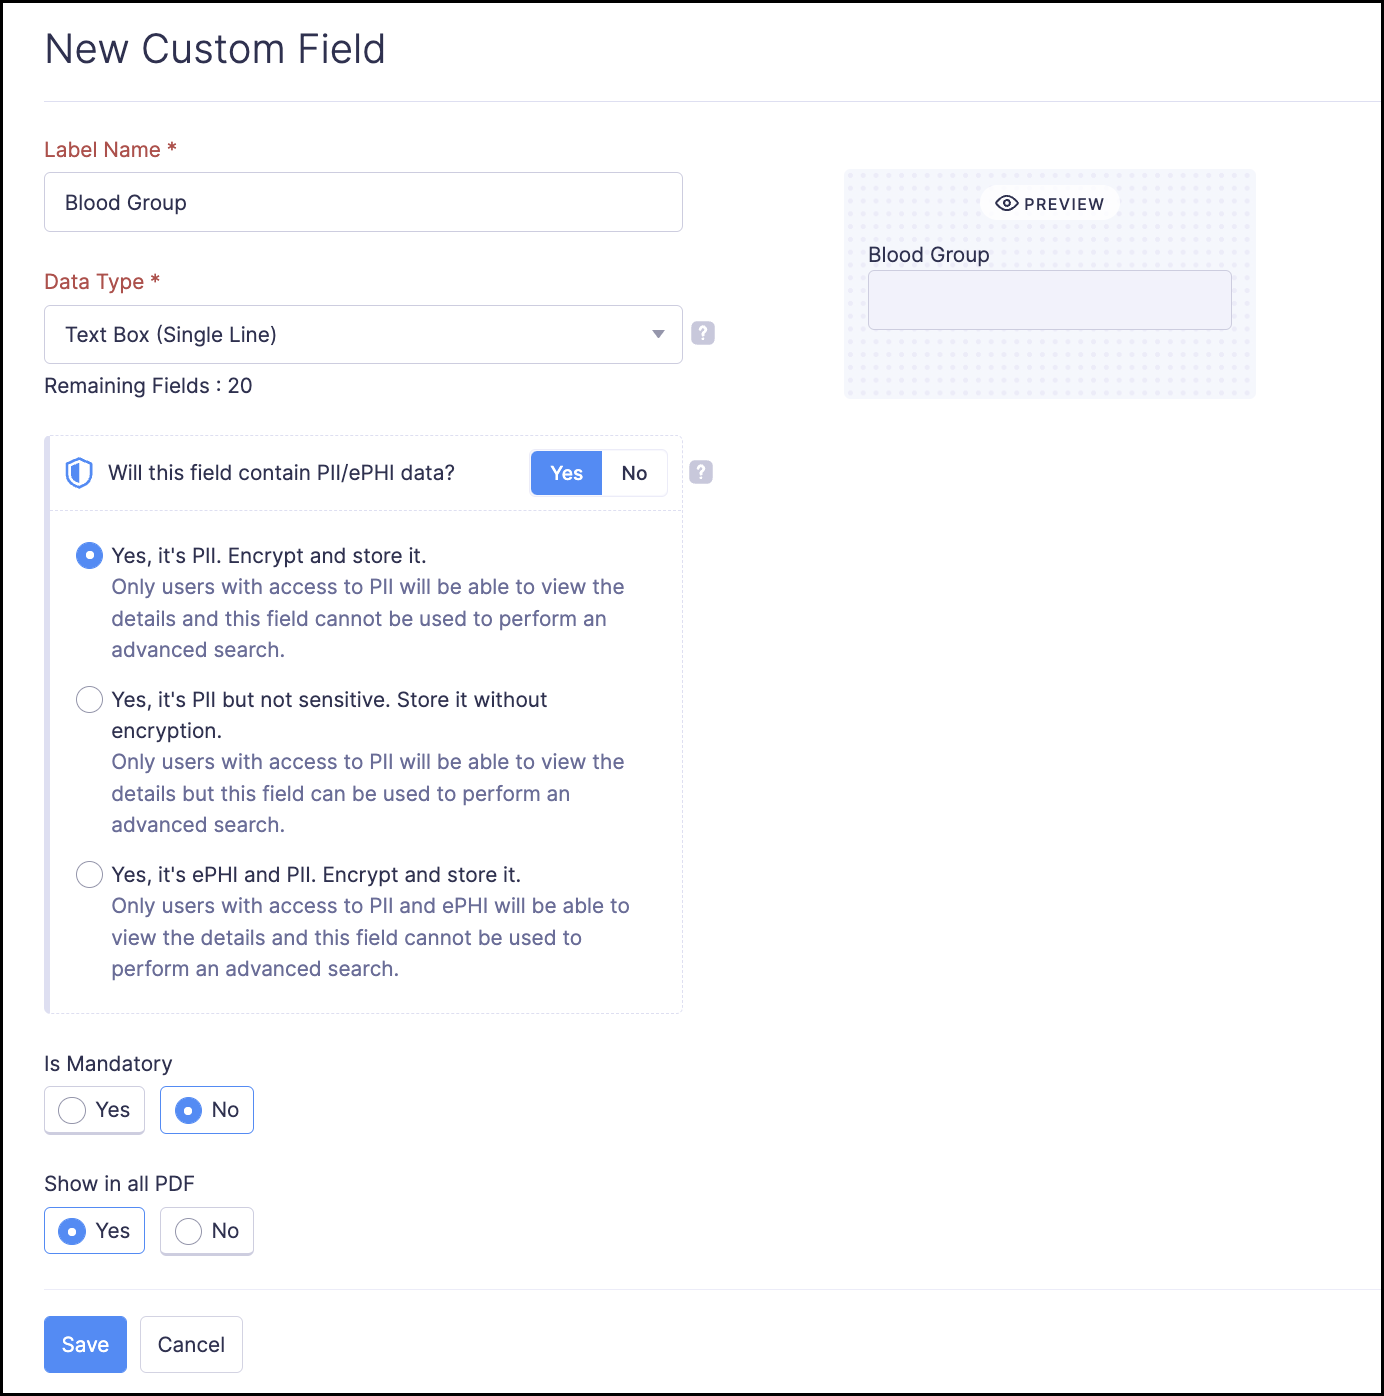
To help you comply with the HIPAA regulations, we've introduced Electronic Protected Health Information (ePHI) as a data privacy option in the custom fields. You can use ePHI custom fields to store any health information that can be used to identify an individual. The values stored in these fields will be encrypted and will not appear in searches.
To mark a custom field as ePHI: Go to Admin View > Settings > Modules > Trips, Expenses, Reports, Advances > Fields > + New Field. Enter the necessary details. Click Yes next to Will this field contain PII/ePHI data? and select the option that fits. Click Save.

Bulk Per Diem for iOS App
Using the iOS app, you can now record per diem expenses in bulk. Simply enter your travel location along with the duration and Zoho Expense will automatically calculate the per diem for you. You can also record per diem for daily trips to the same location.
Give all these features a try and let us know how they benefit your business in the comments below. For any questions, write to us at support@zohoexpense.com.
Regards,
The Zoho Expense Team
Topic Participants
Vidhya G S
Recent Topics
Create New Tasks Layout in CRM
I am able to do this in Leads, Contacts, Meetings, Calls - every other module, but cannot create a new layout in tasks. I have the appropriate access but it's simply not appearing as an option. Only "Standard" option shows. Please help!Whatsapp Connection Status still "Pending" after migration
Hello, I migrated my WhatsApp API to Zoho from another provider a day ago. So far the connection status is still “Pending”. There is a problem? How long does it usually take?Exciting Updates to the Kiosk Studio Feature in Zoho CRM!
Hello Everyone, We are here again with a series of new enhancements to Kiosk Studio, designed to elevate your experience and bring even greater efficiency to your business processes. These updates build upon our ongoing commitment to making Kiosk a powerfulMeet Canvas' Grid component: Your easiest way to build responsive record templates
Visual design can be exciting—until you're knee-deep in the details. Whether it's aligning text boxes to prevent overlaps, fixing negative space, or simply making sure the right data stands out, just ironing out inconsistencies takes a lot of moving parts.Record history and ticket interaction tab in contacts and accounts
Hello everyone! We have improved the History tab to help users trace updates in the interaction activity logs of the Contacts and Accounts detail pages in the Customer Module. This enhancement make it easier to get clear details about who made each update,Using IMAP configuration for shared email inboxes
Our customer service team utilizes shared email boxes to allow multiple people to view and handle incoming customer requests. For example, the customer sends an email to info@xxxx.com and multiple people can view it and handle the request. How can I configureAuto-Invite Users to Portals in Zoho CRM based on Conditions
Hello Everyone, You can now automate portal invitations in Zoho CRM with the new Auto-Invite users feature in Portal management. No more manually enabling portal access one by one. With this enhancement, you can automatically send invites for users toZoho CRM for Everyone's NextGen UI Gets an Upgrade
Hello Everyone We've made improvements to Zoho CRM for Everyone's Nextgen UI. These changes are the result of valuable feedback from you where we’ve focused on improving usability, providing wider screen space, and making navigation smoother so everythingAuto-sync field of lookup value
This feature has been requested many times in the discussion Field of Lookup Announcement and this post aims to track it separately. At the moment the value of a 'field of lookup' is a snapshot but once the parent lookup field is updated the values diverge.Zoho Recruit Subscription
Hello Zoho Recruit Team, Good day! I would like to inquire about your recruitment subscription plans and would also like to verify the current subscription our company is enrolled in under Zoho Recruit. Thank you, and I look forward to your response.Keyboard shortcut M key
I'm trying to customize my keyboard shortcuts and assign the "m" key. But it says the key is already assigned. I've looked through all my shortcuts and can't see any assigned "m". When I select an email and press the M key, nothing happens. What is theIs it possible to create a meeting in Zoho Crm which automatically creates a Google Meet link?
We are using Google's own "Zoho CRM for Google" integration and also Zoho's "Google Apps Sync" tools, but none of them provide us with the ability to create a meeting in Zoho CRM that then adds a Google Meet link into the meeting. Is this something thatEnsure Consistent Service Delivery with Comprehensive Job Sheets
We are elated to announce that one of the most requested features is now live: Job Sheets. They are customizable, reusable forms that serve as a checklist for the services that technicians need to carry out and as a tool for data collection. While onAutomatic Portal invite
We have numerous customers we move through a blueprint in deals, when they get to a certain point we need to give them portal access, how can this be done through deluge or a workflow? Latest Update (December 2025): The option to automate portal invitationsMarketer's Space: Why mobile optimization deserves a place in your email strategy
Hello Marketers, Welcome back to Marketer's Space! Today, we'll talk about the importance of creating mobile-friendly email designs. While mobile phones were once used only to make phone calls, today they're used for almost everything, including texting,Enhancements in Canvas
Dear All, Greetings! Canvas lets you design the record details page to suit your brand or business preferences. We are glad to introduce the following enhancements to uplift your design experience. Reusable Components Style Presets Let's go! ReusableIntroducing Dark Mode / Light Mode : A New Look For Your CRM
Hello Users, We are excited to announce a highly anticipated feature - the launch of Day, Night and Auto Mode implementation in Zoho CRM's NextGen user interface! This feature is designed to provide a visually appealing and comfortable experience forABN with Legal Entity Name
Hi, How can I execute this? The ABN number is entered in Accounts Module and ideally, it should display or suggest the correct Legal Entity Name based on the ABN lookup. ex. Account Name: JPG Resources ABN Number: 65 067 761 871 Legal Entity Name: (autoPresenting ABM for Zoho CRM: Expand and retain your customers with precision
Picture this scenario: You're a growing SaaS company ready to launch a powerful business suite, and are looking to gain traction and momentum. But as a business with a tight budget, you know acquiring new customers is slow, expensive, and often deliversHas CSS Changed for Common Elements?
I noticed today that the standard title headings on my Forms and Reports display smaller in size than before. Google Dev Tools (attached), seems to confirm my suspicion. Something appears to be overriding the 1.375rem to 1.125rem. The font size on theText snippet
There is a nice feature in Zoho Desk called Text Snippet. It allows you to insert a bit of text anywhere in a reply that you are typing. That would be nice to have that option in Zoho CRM as well when we compose an email. Moderation Update: We agree thatZoho Cliq not working on airplanes
Hi, My team and I have been having this constant issue of cliq not working when connected to an airplane's wifi. Is there a reason for this? We have tried on different Airlines and it doesn't work on any of them. We need assistance here since we are constantlyPrepopulating Fields
Hello, I have a form (Assets) with 2 lookup fields: Client (from Clients) Site (from Client Sites) I modified the code (highlighted in red below), so the Site dropdown shows the list of sites related to the Client. must have Client_Site ( type = picklistTimeline Tracking Support for records updates via module import and bulk write api
Note: This update is currently available in Early Access and will soon be rolled out across all data centers (DCs) and for all editions of Zoho CRM. The update will be available to all users within your organization, regardless of their profiles or roles.What is the difference between Zoho Campaigns and marketing hub?
Zoho Campaigns is a permission-based email marketing tool for sending marketing emails and mass emails. Marketing Automation is a multichannel marketing automation tool that caters to organizations looking for tools to engage their users across multipleUnify Overlapping Functionalities Across Zoho Products
Hi Zoho One Team, We would like to raise a concern about the current overlap of core functionalities across various Zoho applications. While Zoho offers a rich suite of tools, many applications include similar or identical features—such as shift management,Detailed Account Reports - Add Running Balance
When one clicks into an account from a report (say P/L or Balance Sheet), the default reports have the Debit, Credit, and then the Amount. The Amount column (last one) is duplicate information. It would be far better and fit more peoples' use cases ifCan we add custom fields to portal community profiles?
How do we add custom fields to our profile pages in our portal community? If we have the ability to add custom fields, will we be able to access those fields via API? We want to use our Desk community in our help portal as our primary community and wouldFuture Orders - Due Date
Hi In my role, I can receive tickets where the work required is requested months in advance. Using a Future Orders option, which I believe was setup under the On Hold status type, hides the Due Date, in all views/ticket etc. Whilst I understand the reasoningStart Workflow from Deluge Script
I have developed a customized process from our CRM that leverages a deluge script to create a statement of work document. Once the document has been created via the merge and store function, I would like the ability to start a workdrive review & approveIssue: Ticket Export Does Not Include Ticket Threads
Dear Zoho Desk Support Team, I hope you’re doing well. I wanted to bring to your attention that the current ticket export feature in Zoho Desk does not seem to include the ticket threads or conversation history. When exporting tickets, only the summaryPushover Notification Module
Hello, it would be good if there would be a "Pushover" (https://pushover.net/) module besides the standard SMS module. Pushover is now very well known, especially in IT, and is becoming more and more popular. The biggest advantage are the customizableForward - no Ticket Number
Hello, when I send an email to Zoho Desk via Reply or Reply All, the ticket number is in the subject line. But if I use forward then not. Is there an option to change this? We often forward e-mails and a reply to this will of course create a new ticketCheckout: Adding Images
Hello everyone, I’m trying to add a small GoGreen logo in the shipping section of the checkout to promote our sustainable shipping. While I can insert text without any issues, it seems that adding images is not supported in this area. Is there currentlySortie de Zoho TABLE ??
Bonjour, Depuis bientôt 2 ans l'application zoho table est sortie en dehors de l'UE ? Depuis un an elle est annoncée en Europe Mais en vrai, c'est pour quand exactement ??[solved] #original_sender trick not working for us
Hello community ! We really like DESK.. it's working like a charm for us but I have a request. Some users are sending emails personnaly to me (instead of using the support adress).. and I saw there was a possibilty to use : #original_sender {mail@mail.com}SalesIQ Chat Notifications
I am the admin of our salesIQ implementation. About two weeks ago, I started hearing/seeing notification for ALL chats messages from monitored agents/chat participants. I don't need to see these, we have a manager who deals with this. I can't stop theCorrelated subqueries not supported in Zoho Analytics. This creates huge limitations
Running into a major limitation in Zoho Analytics: correlated subqueries simply don’t work, even in completely standard SQL patterns inside a JOIN. Example: LEFT JOIN "Bills" b ON d."Id" = b."Deal ID" AND EXISTS ( SELECT 1 FROM "BillUnknown table or alias 'A1'
I would like to create a subquery but i am getting the following error: Unknown table or alias 'A1' used in select query. This is the sql statement: SELECT A1.active_paying_customers, A1.active_trial_customers, A1.new_paying_signup, date(A1.date_active_customers),HubSpot CRM to Zoho Creator Integration
I'm trying to create an integration between HubSpot CRM and Zoho Creator with HubSpot being the push source (if a contact is created or updated in HubSpot, it pushes the information to Zoho Creator). I have two questions: 1- Is it best to use Zoho FlowNext Page