Automating appointment status and customer feedback collection
Hello community members,
In the spirit of elevating your scheduling game for 2024, we're bringing you a couple of useful workarounds that can enhance your overall Bookings experience.
We have divided the community post into two halves. In the first half, we will show how to automate the appointment status to Completed. This action ensures that emails are automatically triggered after the appointment is completed. In the second half, we will explore how to add and prefill the feedback form in your customer emails. This will allow you to efficiently gather feedback from customers.
In an effort to streamline the entire process, we're merging both topics into a single post. This aims to automate updating the appointment status to completed, triggering the completion email to customers, and seamlessly integrating our Zoho Survey form for actively collecting valuable feedback.
In an effort to streamline the entire process, we're merging both topics into a single post. This aims to automate updating the appointment status to completed, triggering the completion email to customers, and seamlessly integrating our Zoho Survey form for actively collecting valuable feedback.
Automating the appointment status
Currently, updating an appointment's status to Completed is a manual process in Zoho Bookings. However, with our new workaround, you can now streamline this task through automation. We've included steps below that will make it so that once an appointment has ended, its status will automatically switch to Completed.
Note that if you mark an appointment as No show, your selection will not be overwritten by this new workaround.
If you're still concerned about this, consider editing the content of the appointment completion trigger email, providing generic content suitable for both attendees and non-attendees. This guarantees that even if all appointments are marked as completed, a generic email with relevant information will be sent to all customers.
Prerequisites for automating the appointment status
1. Zoho Bookings basic or premium subscription.
2. Zoho Flow paid subscription
How to automate
A. First, we'll create a new flow in Zoho Flow:
1. Sign in to Zoho Flow.
2. Select the Create flow option.
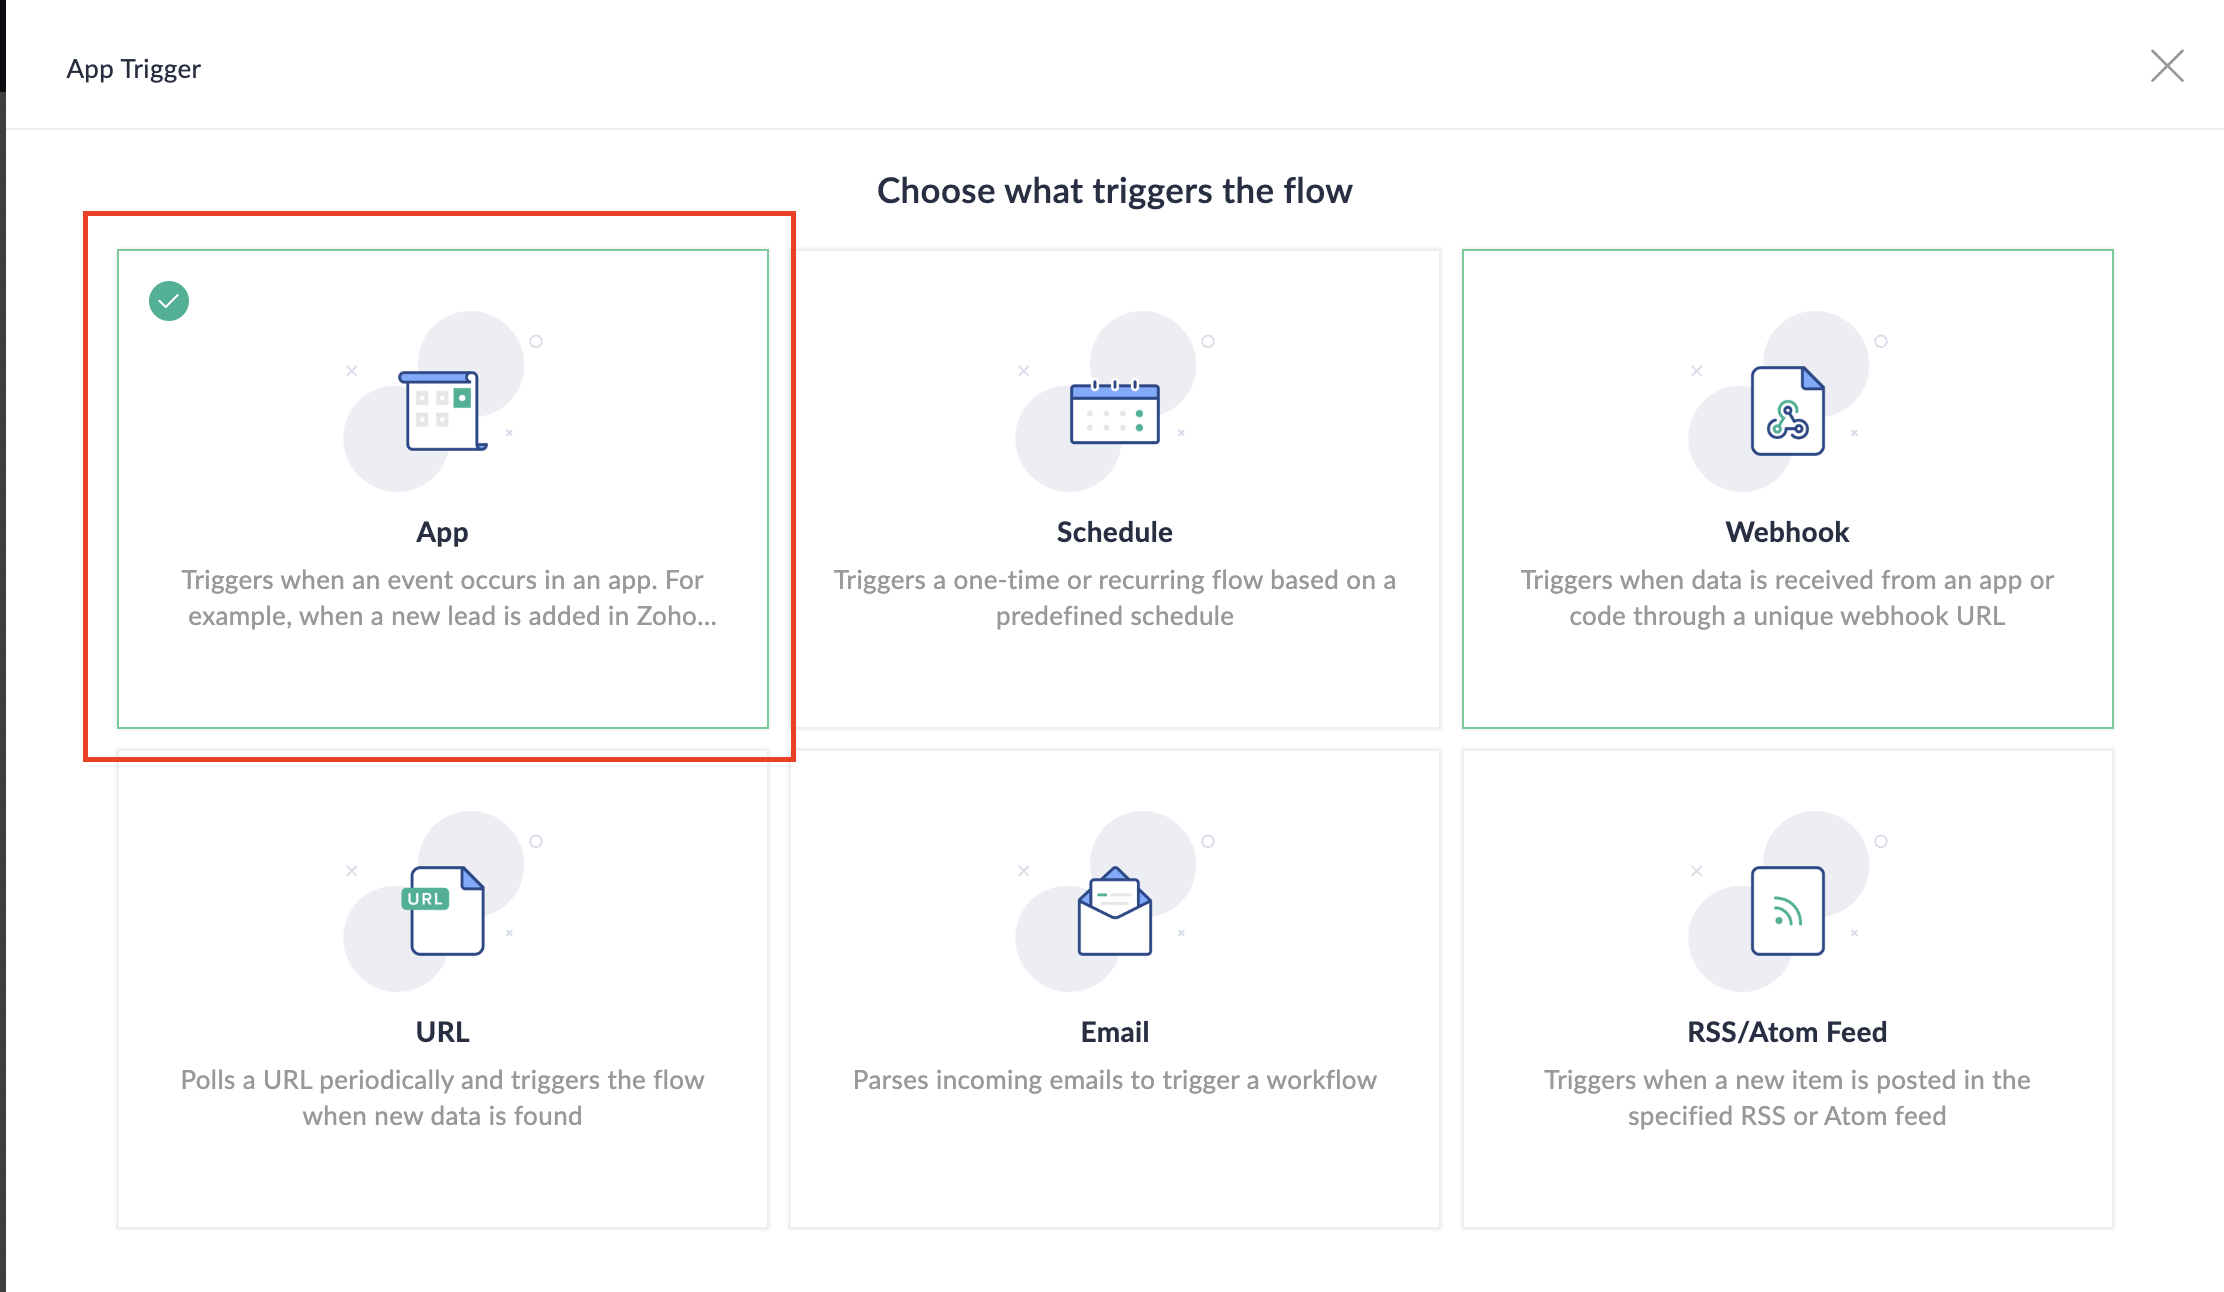
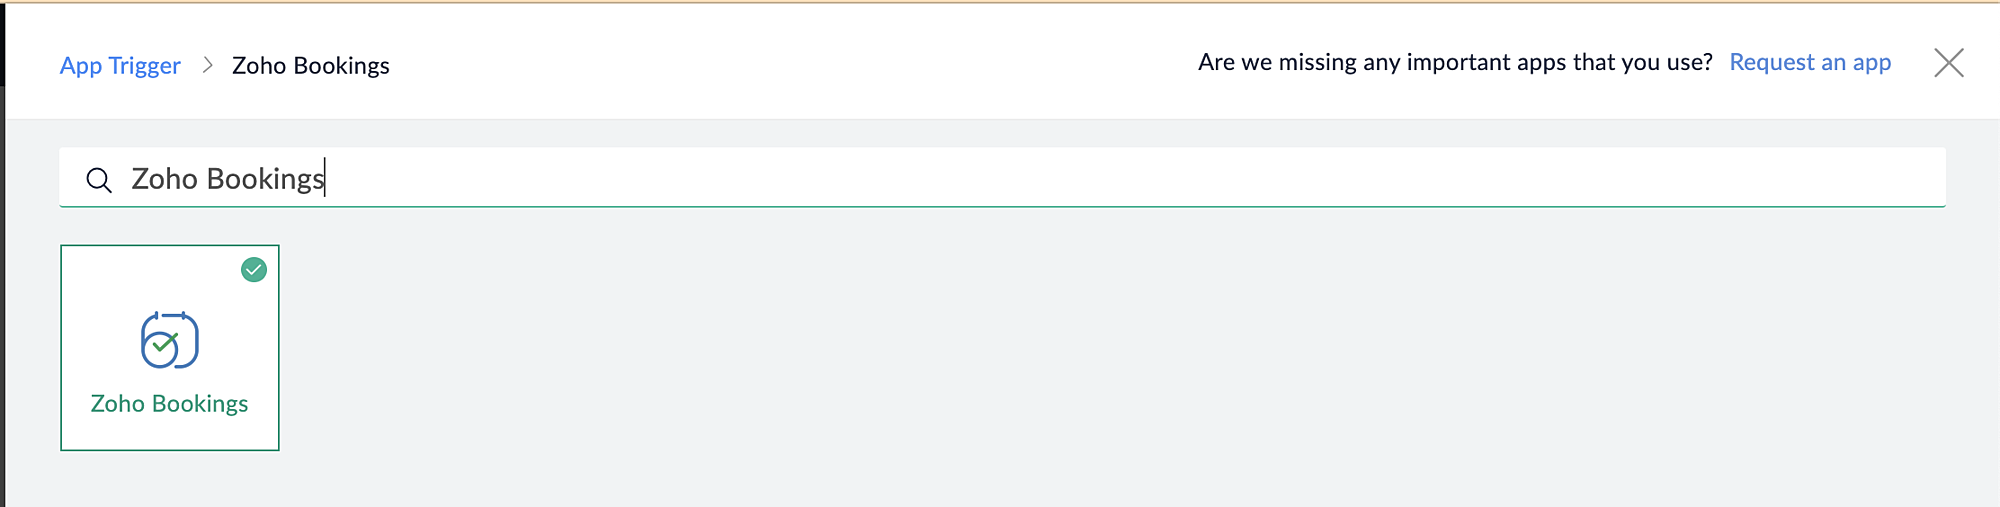
3. Select App and search for Zoho Bookings in the search bar.
4. Select the Appointment booked trigger.
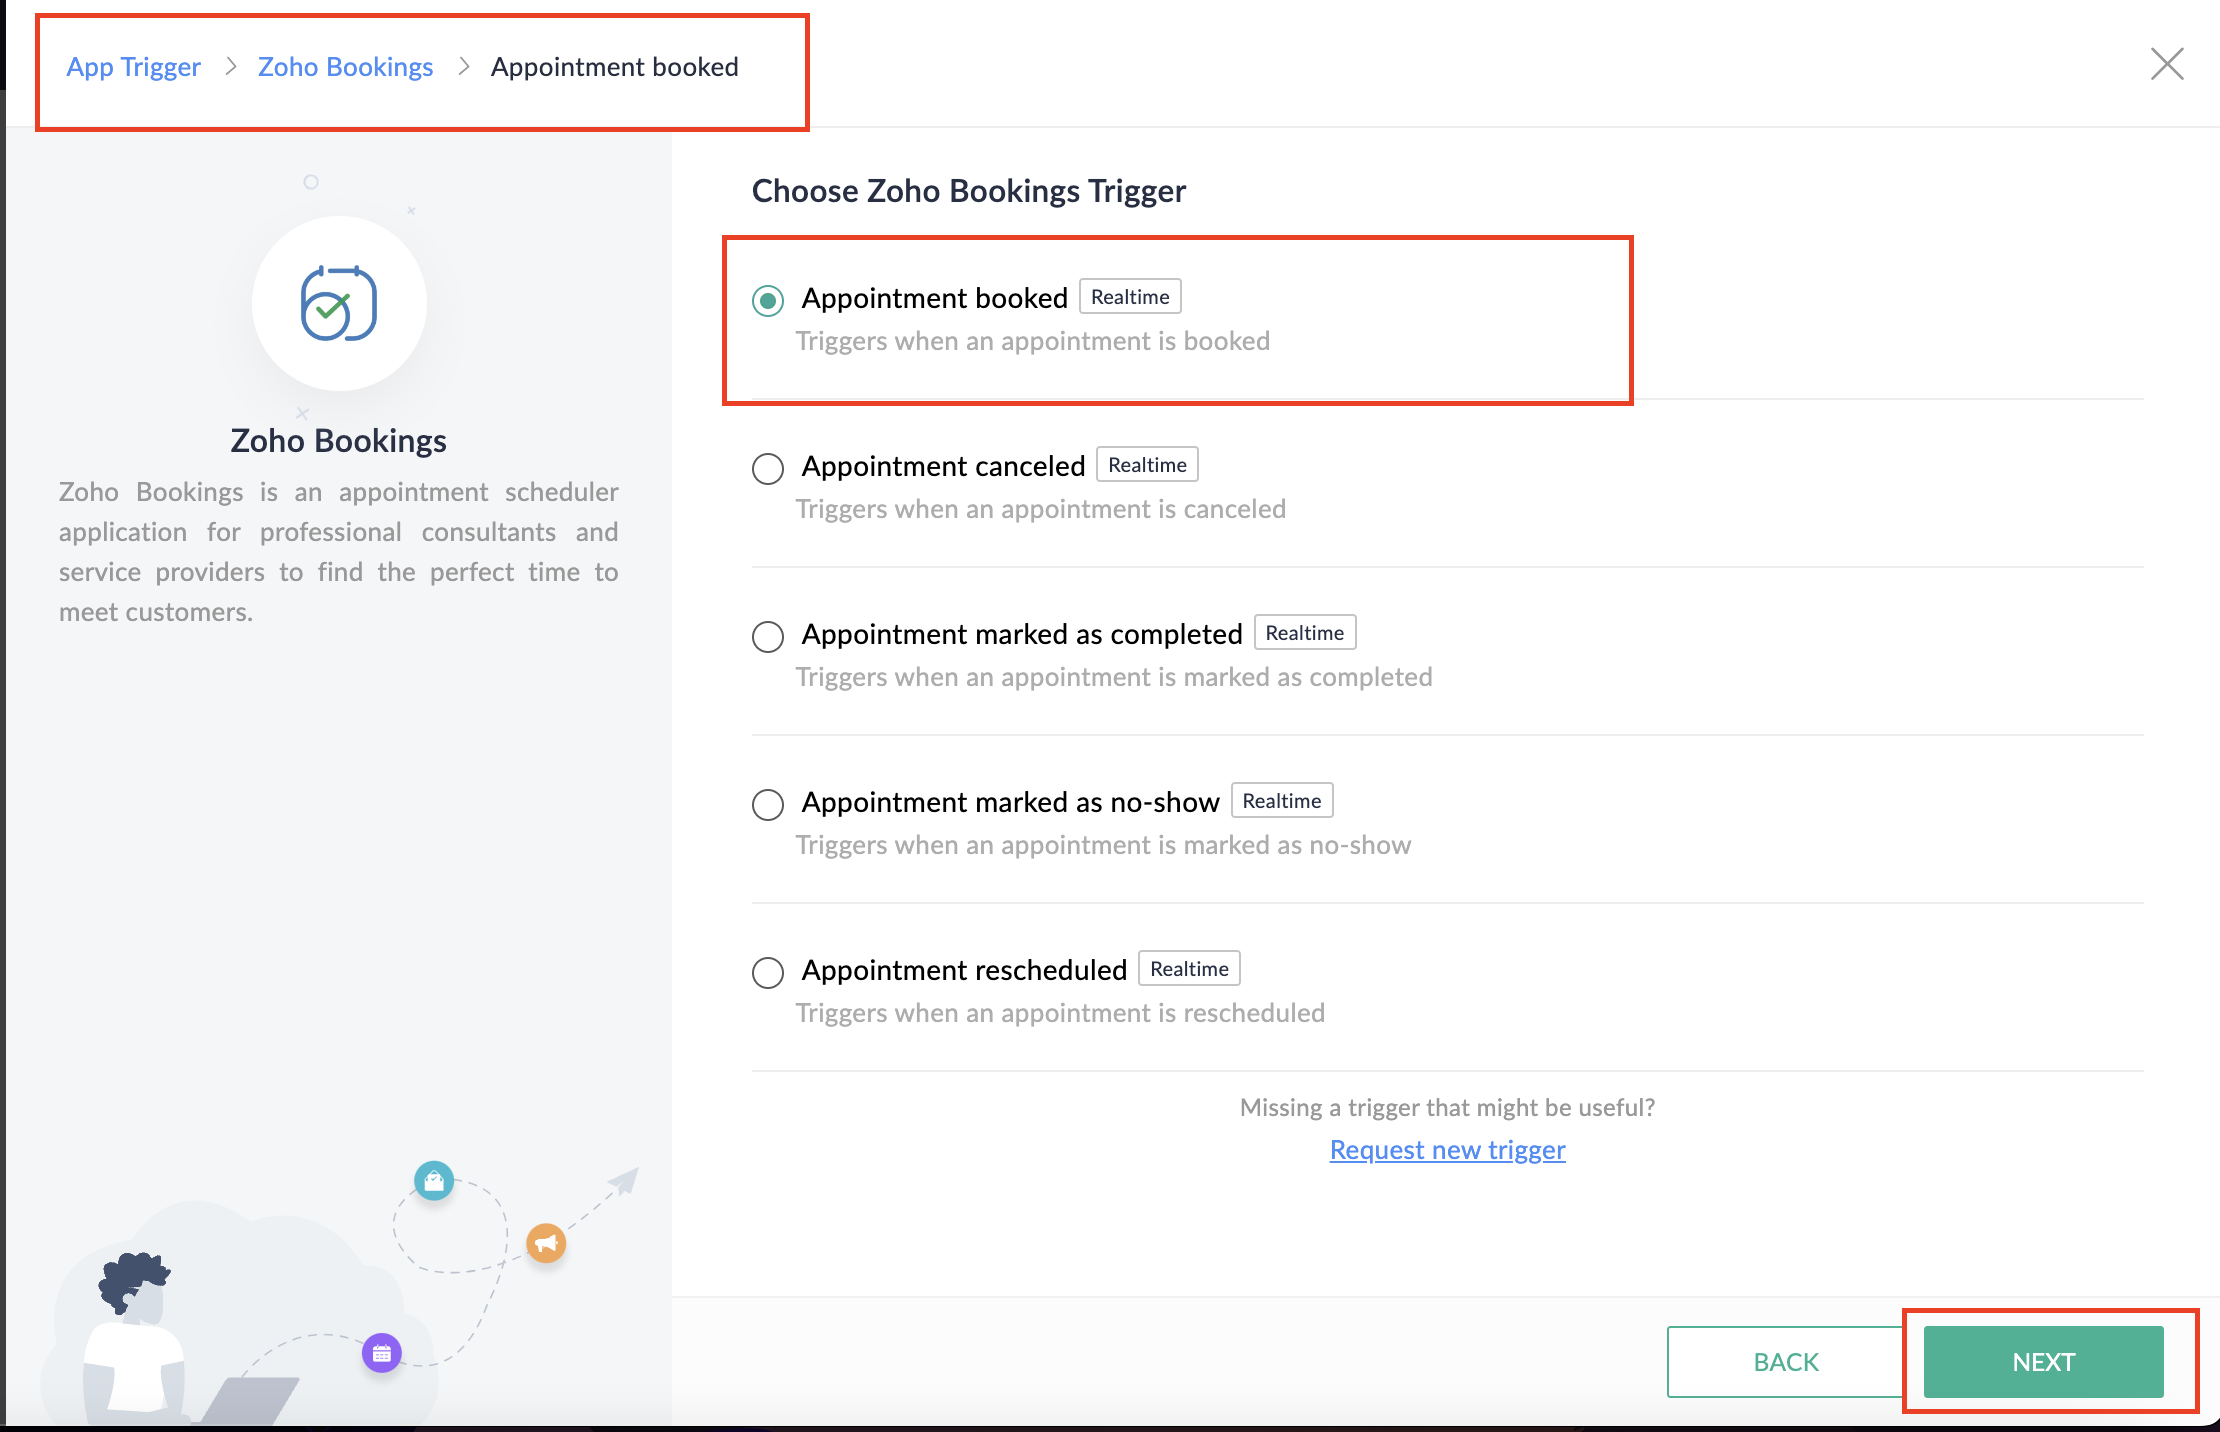
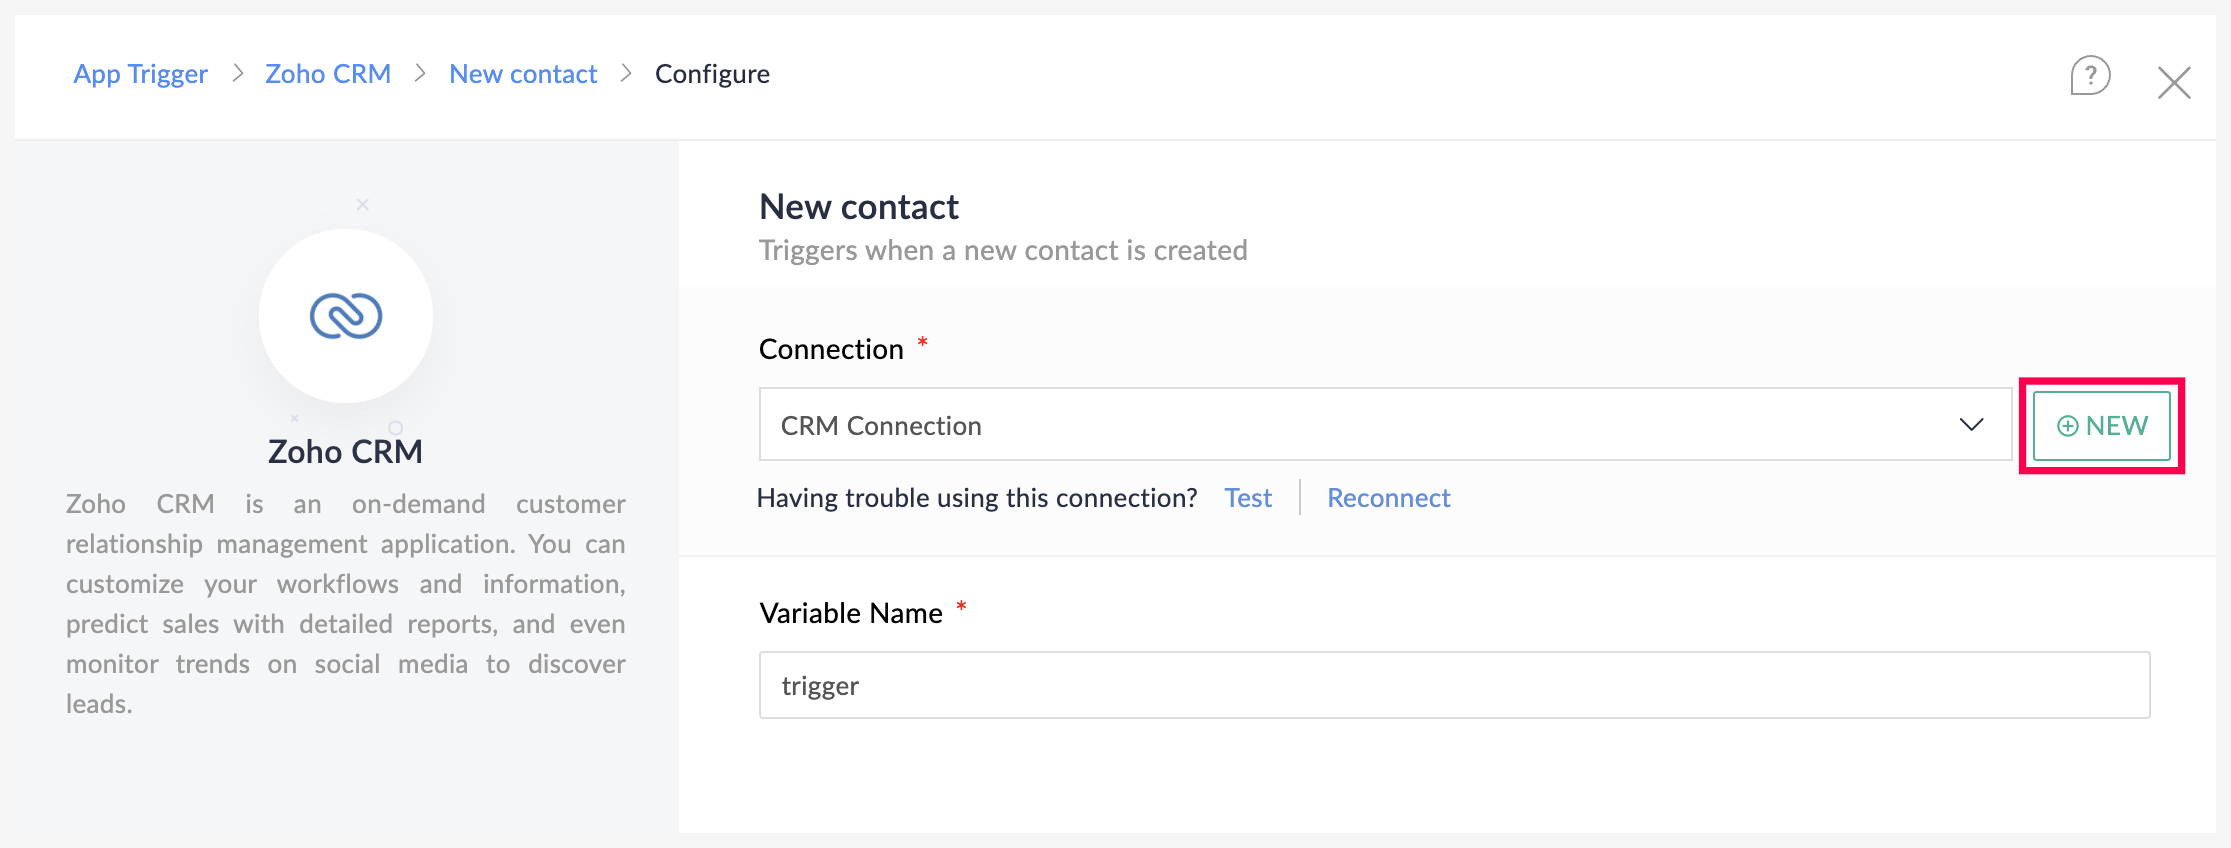
5. Select the Connection and Variable Name.
6. Click Done.
You have now created a new flow for Zoho Bookings.
Other helpful links for this process:
- How to create a flow in Zoho Flow: Create a flow from scratch
- How to create connection in Zoho Flow: Create a Connection
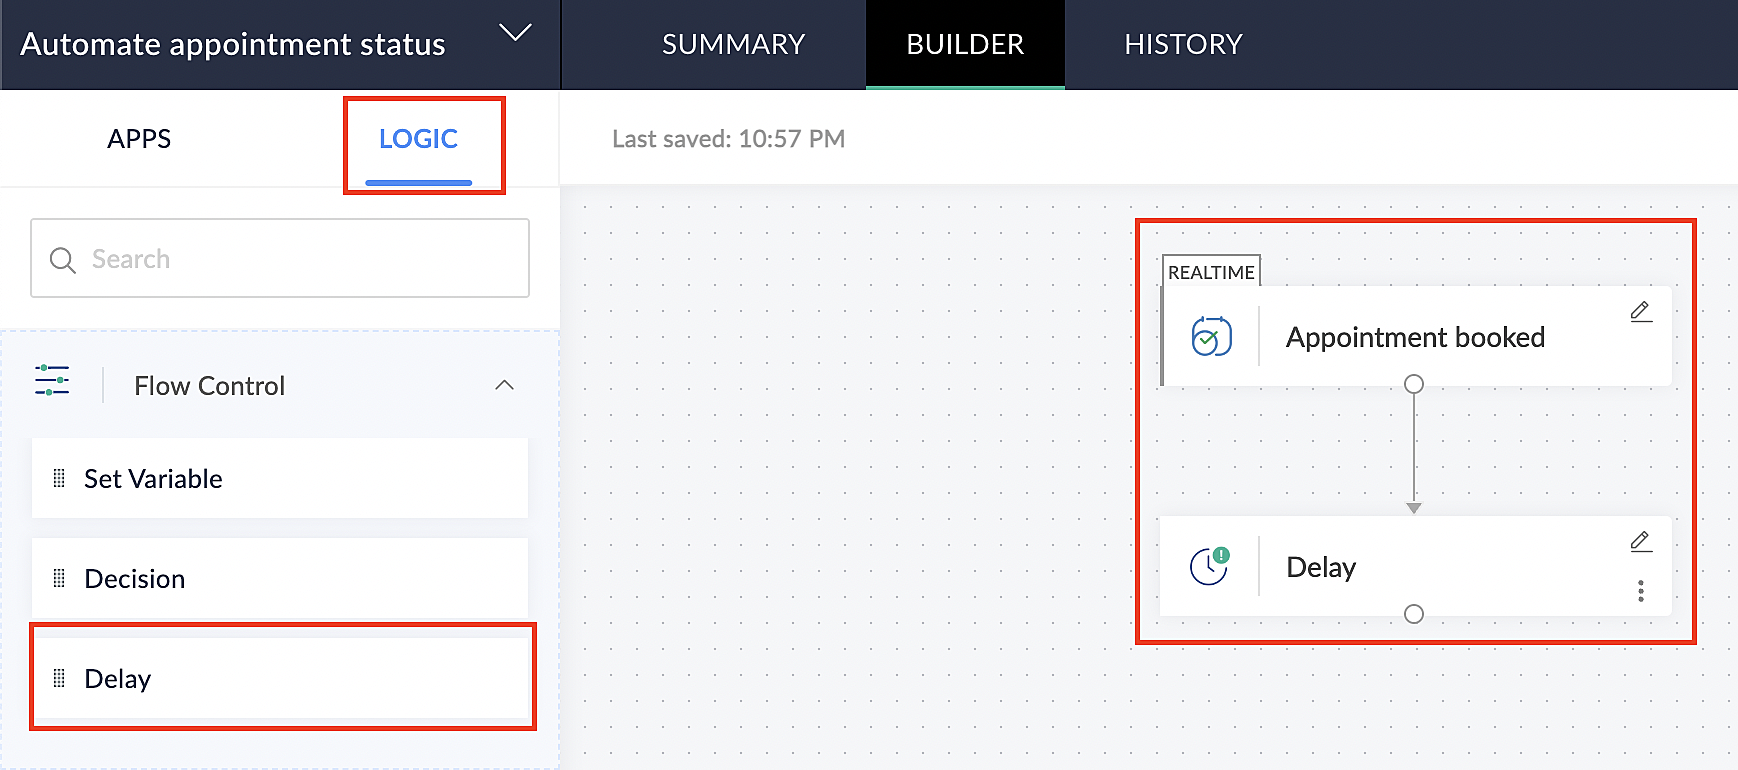
B. Next, let's configure the logic:
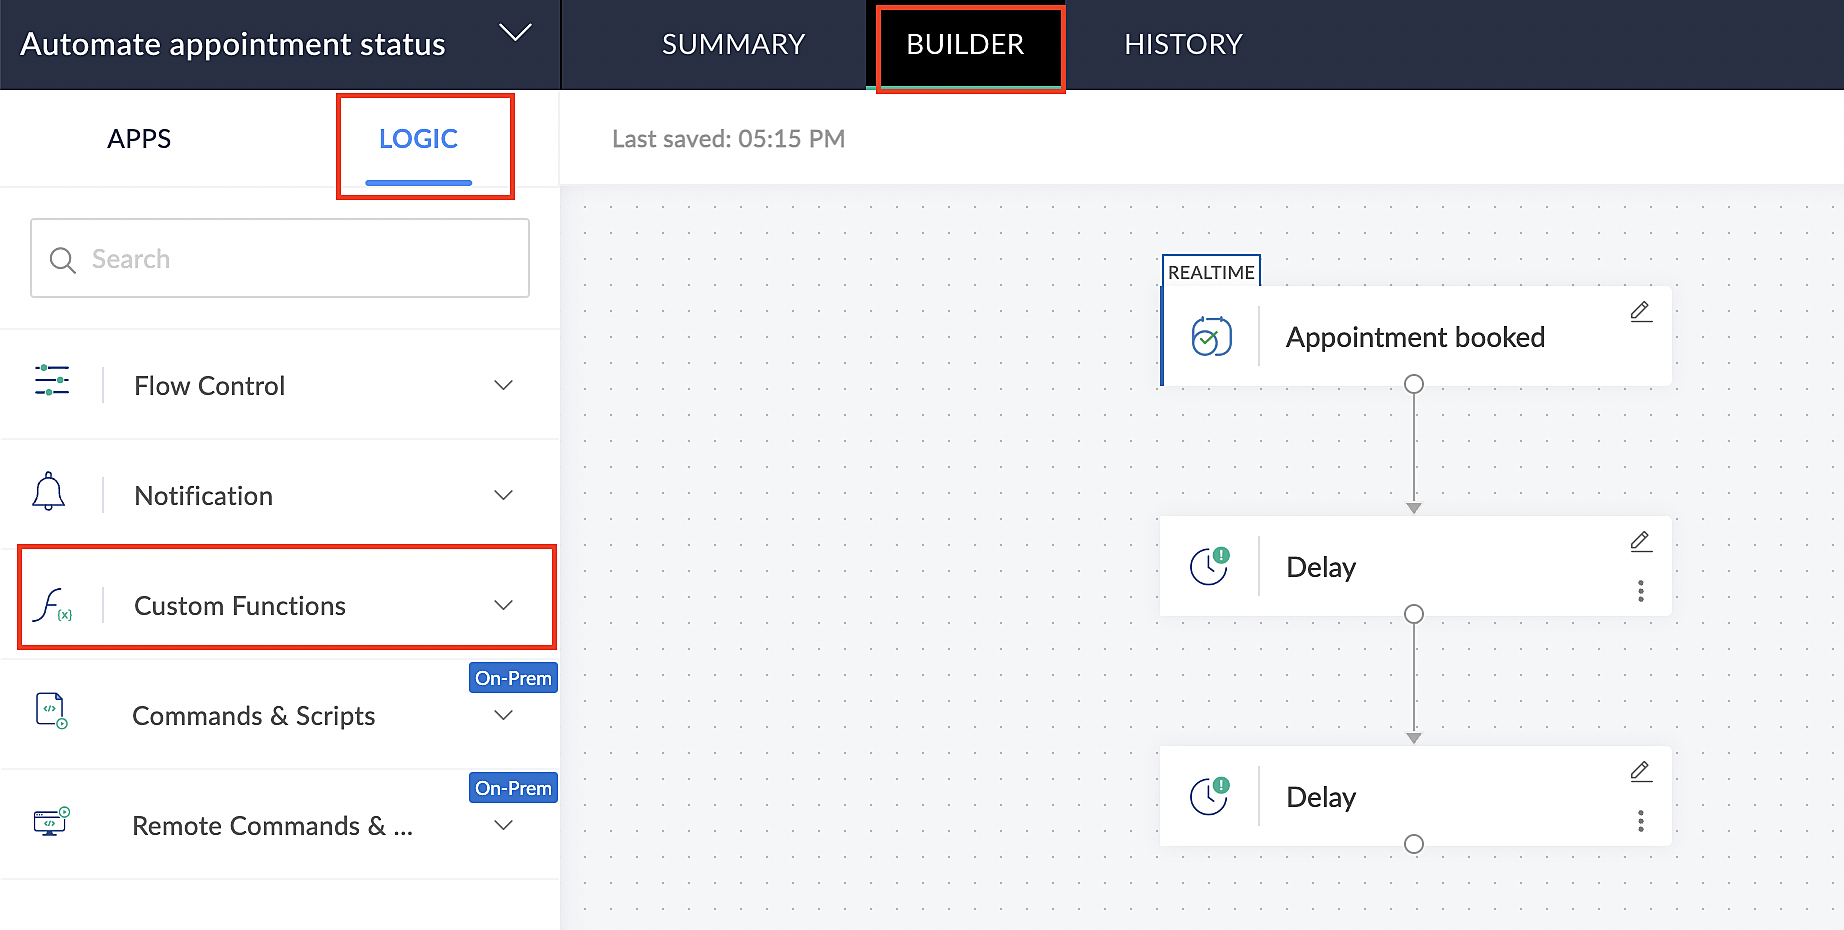
1. Navigate to the Logic tab in Zoho Flow.
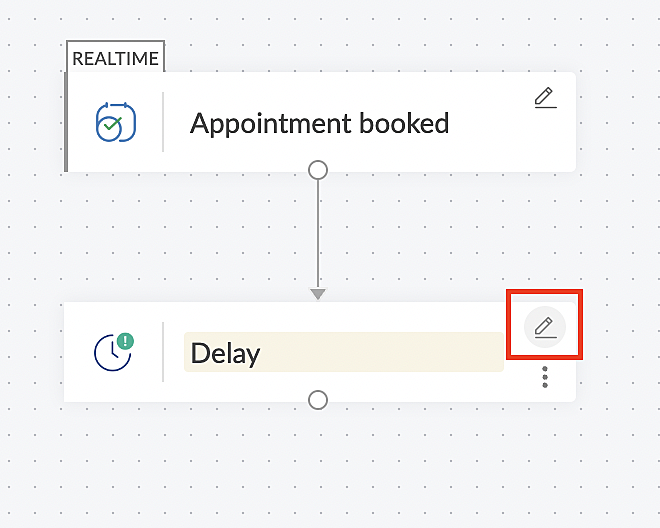
2. Click the Flow Control dropdown and select Delay.
3. Drag and drop the Delay function to the bottom of the Appointment booked trigger.

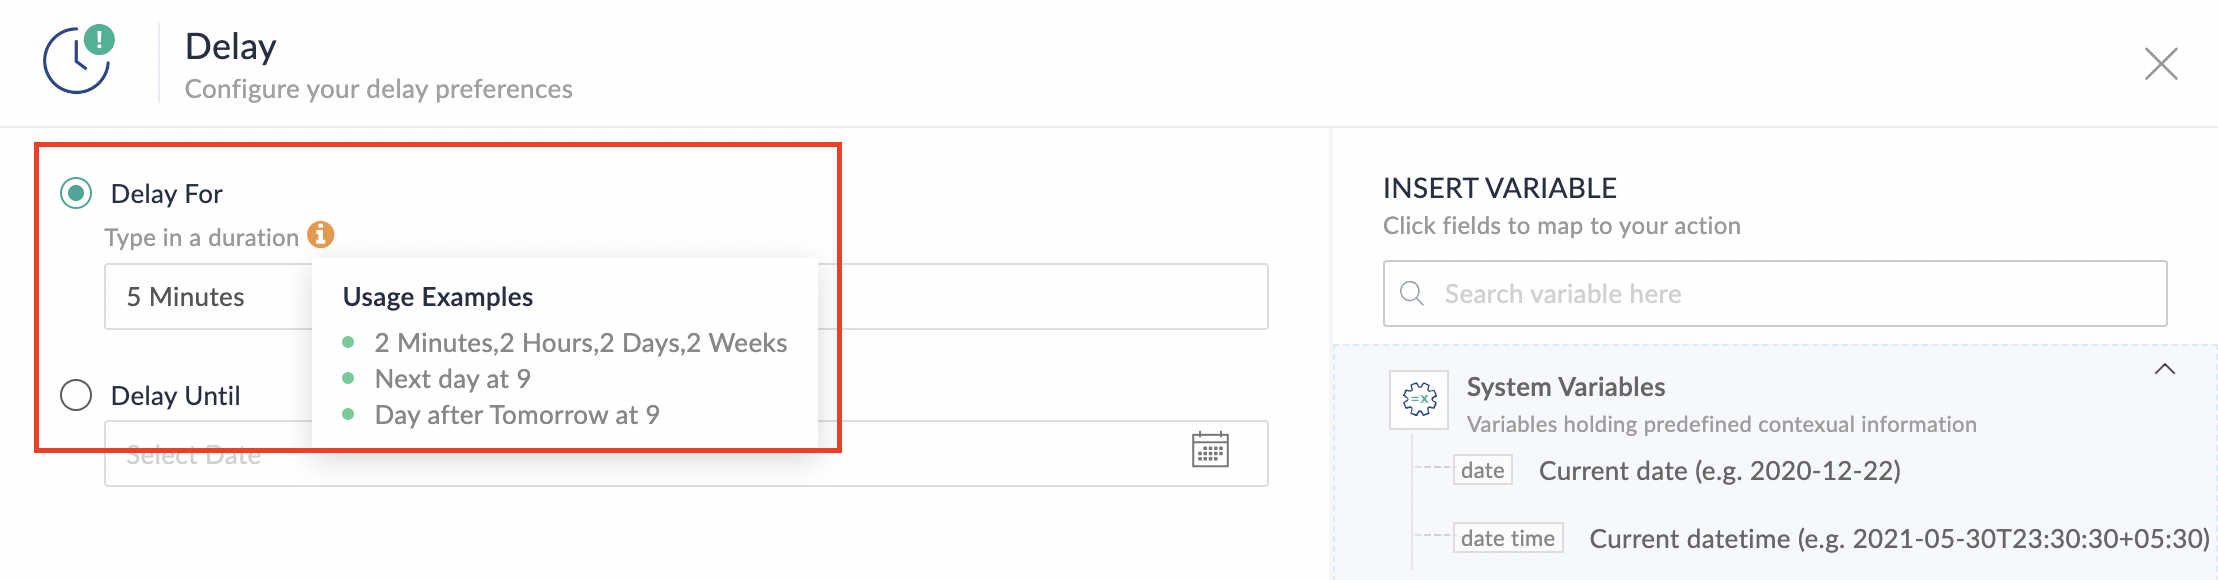
4. Click on the edit icon next to the Delay function.
5. In the Delay For the column, select the appointment end time variable from the available Zoho Bookings variables.
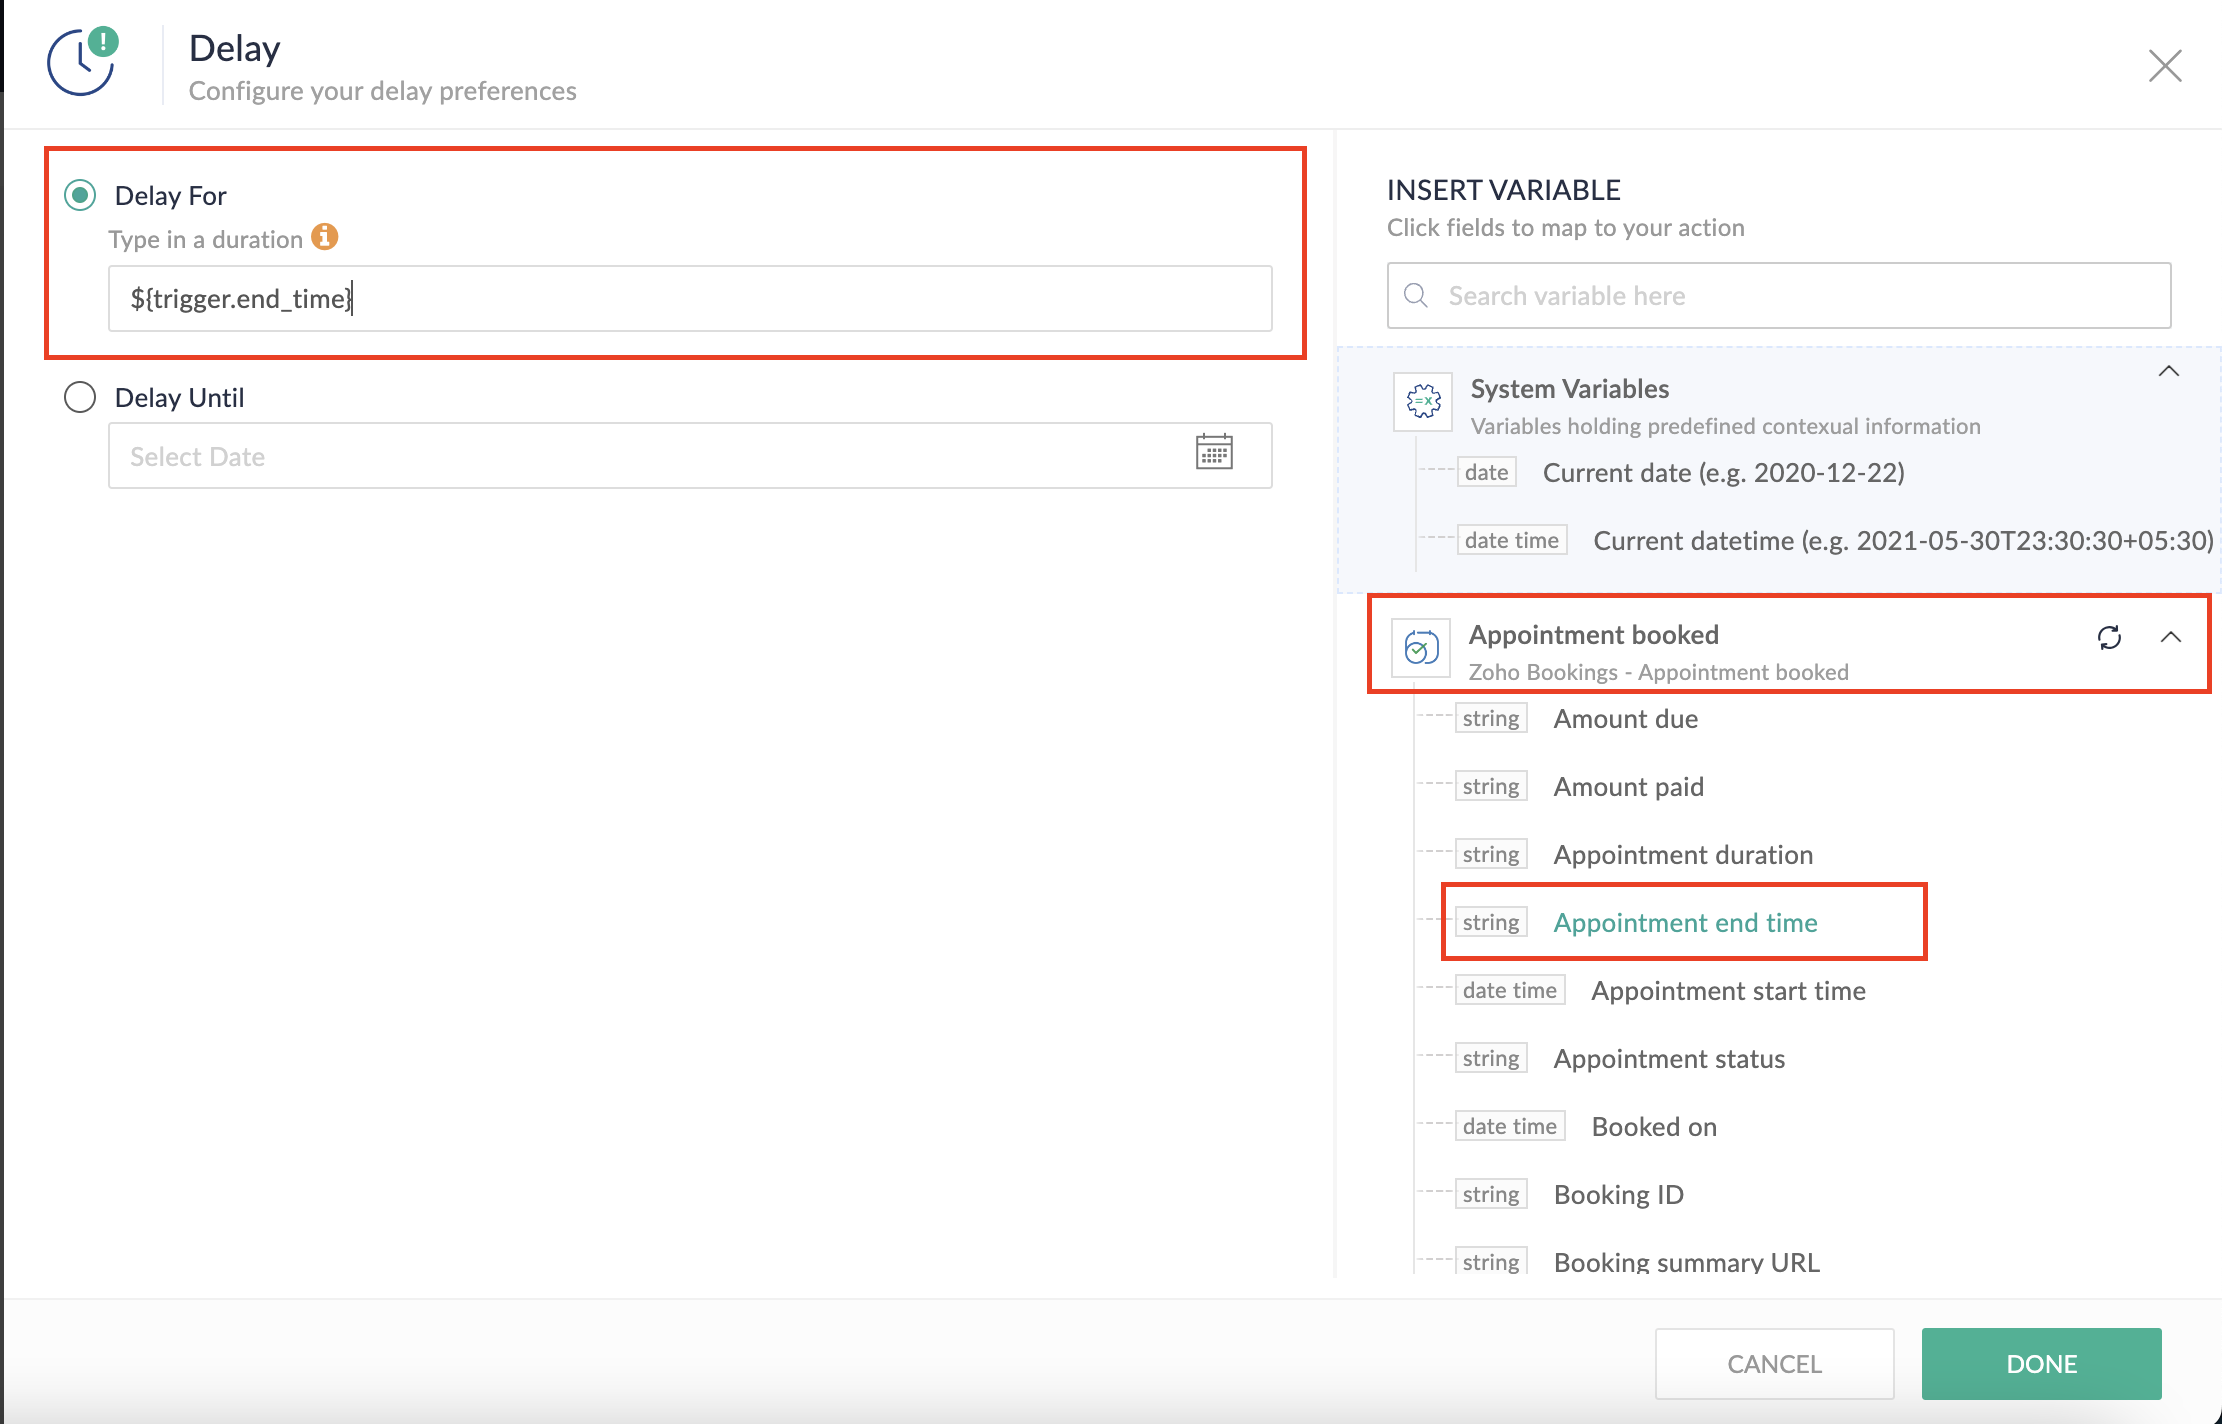
Completing this steps helps us ensure that this workflow executes exclusively at the end of each appointment.
C. We can now allocate additional time for any necessary actions:
For example, let's consider extending the remaining actions by an extra 5 minutes. This extension grants you additional time to update the appointment status.
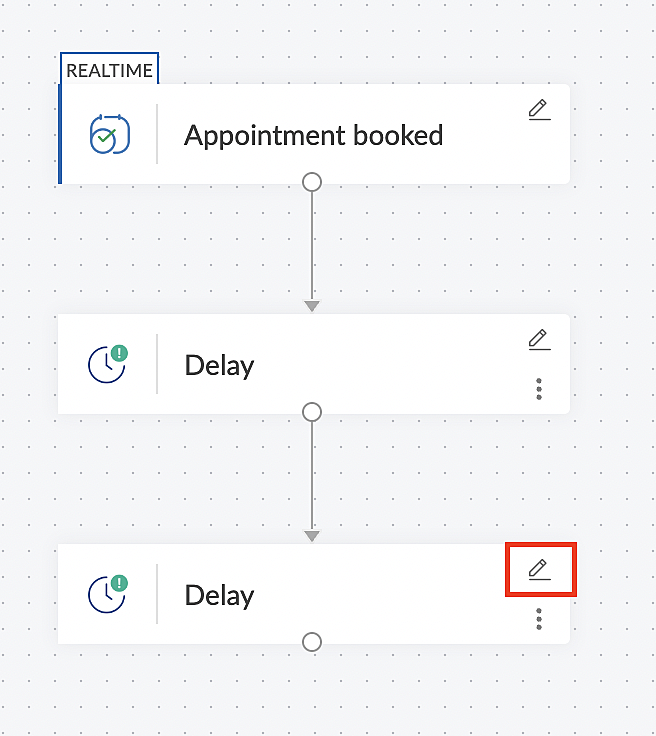
1. From the Logic tab, drag and drop another Delay action to the bottom of the first Delay action.
2. Click on the edit icon next to the Delay function.
3. In the Delay For column, set the desired extra time based on your preference. If going by our proposed example, we'd configure an additional 5 minutes.
For more details: Delay
Note: If you decide not to include extra time and prefer to execute the flow precisely at the end of the appointment duration, you do not need to complete this section of steps.
D. Finally, let's configure a custom function
Through this step, we'll ensure our ended appointment's status updates to Completed (as long as no other status has been selected).
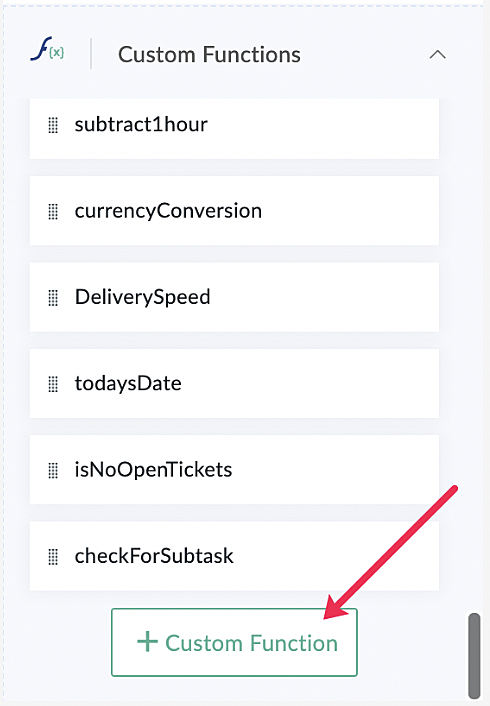
1. From the Logic tab, click the Custom Functions dropdown.
For more details: Custom Functions
2. Click +Custom Function.
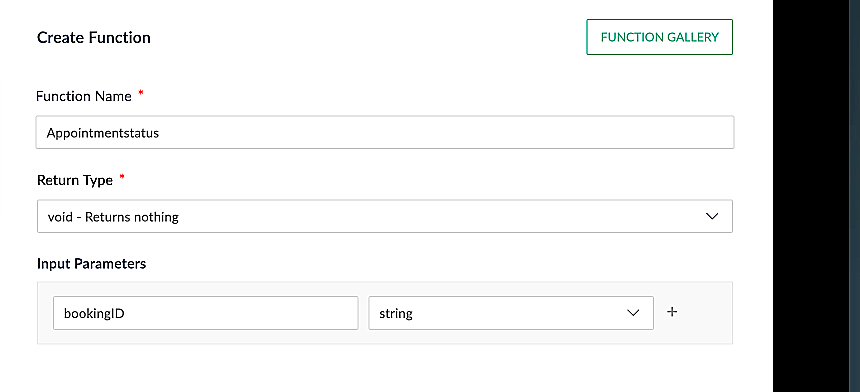
3. Add a relevant name for the function under Function Name, and set the Return Type as void - Returns nothing from the dropdown.
4. Under Input parameters, type bookingID and select string from the dropdown as shown in the screenshot below.
5. Click Create to open the Deluge script page, where we will enter our code for execution.
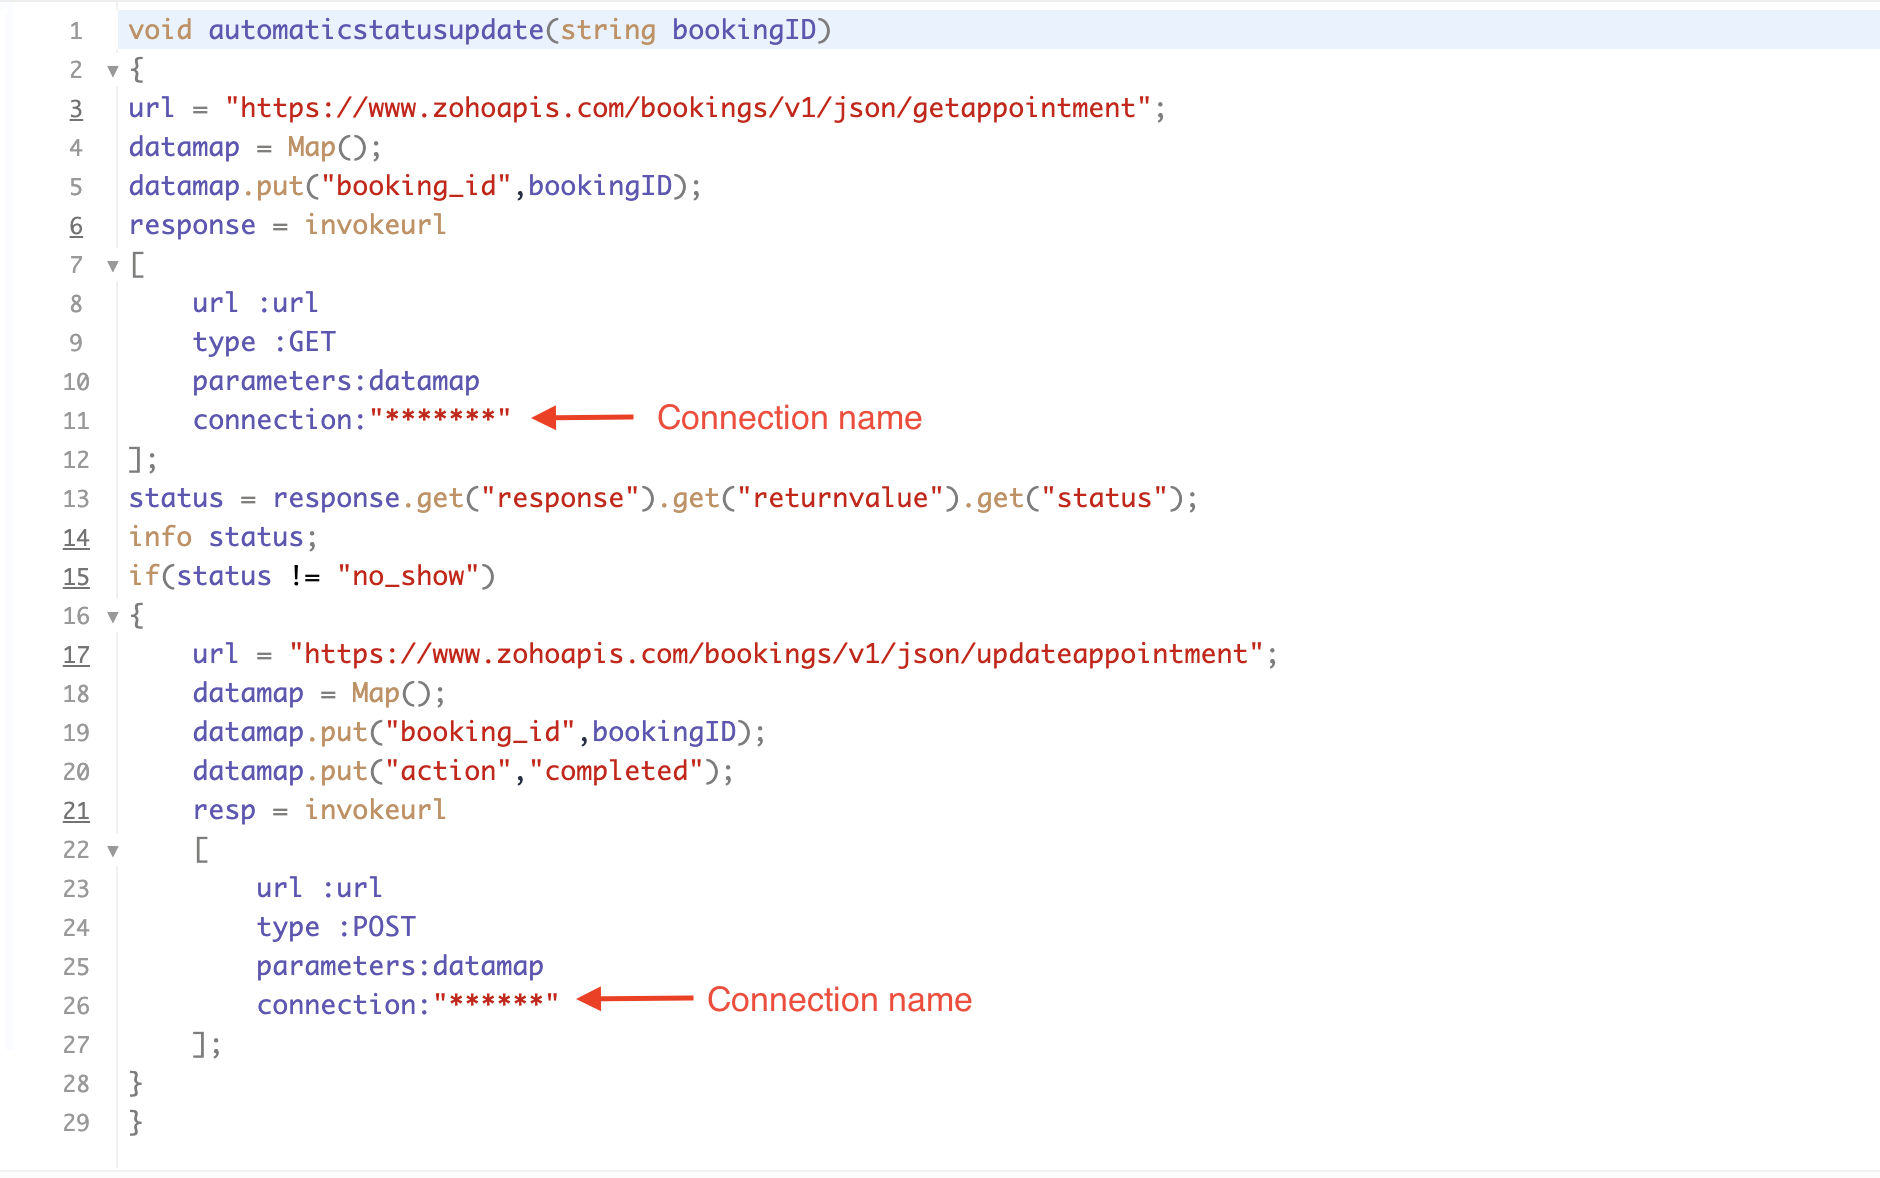
If you're interested, here is a brief explanation of the code:
Line 1: To pass the input data below to the code.
- Booking ID: Identifies the specific booking for fetching details and checking the status.
Line 3: Set up the API endpoint URL based on the Zoho Bookings account's data center.
- More details: Domain-specific API URLs
Line 3–12: We utilize the Get Appointment API' to retrieve the appointment details. For more details: Get Appointment API
Line 13: Here, we're fetching the status of the respective appointment from the response of the Get Appointment API.
Line 15: Implement an 'if' condition to execute the code only if the appointment status is not No show.
Line 16–27: In this step, we utilize the 'Update Appointment API to mark the appointment status as Completed' when the condition specified in line 15 of the code is met.
This is how the final flow will look:
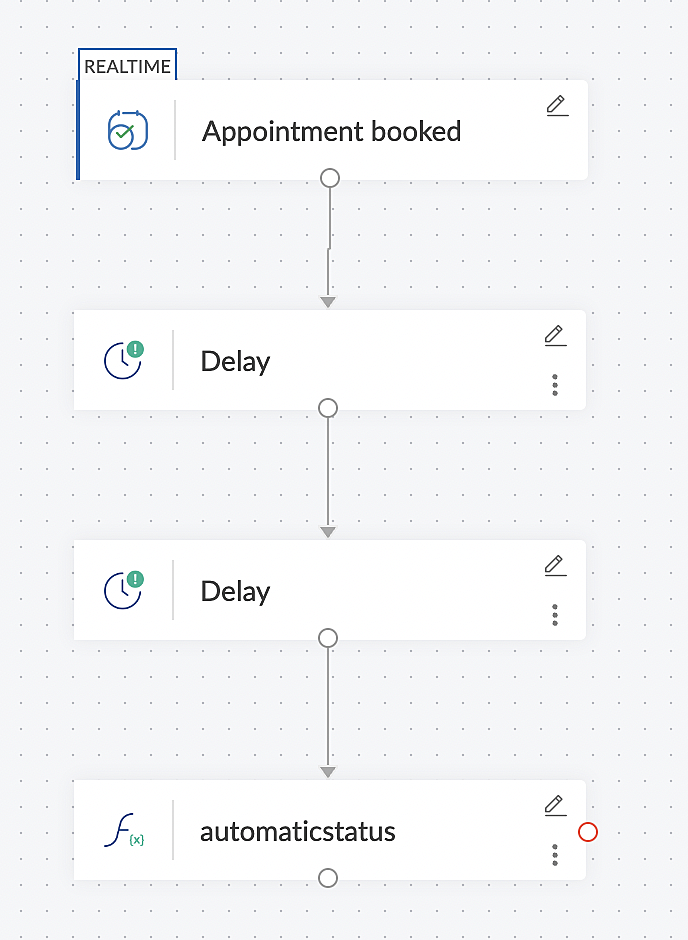
This is how the final flow will look:
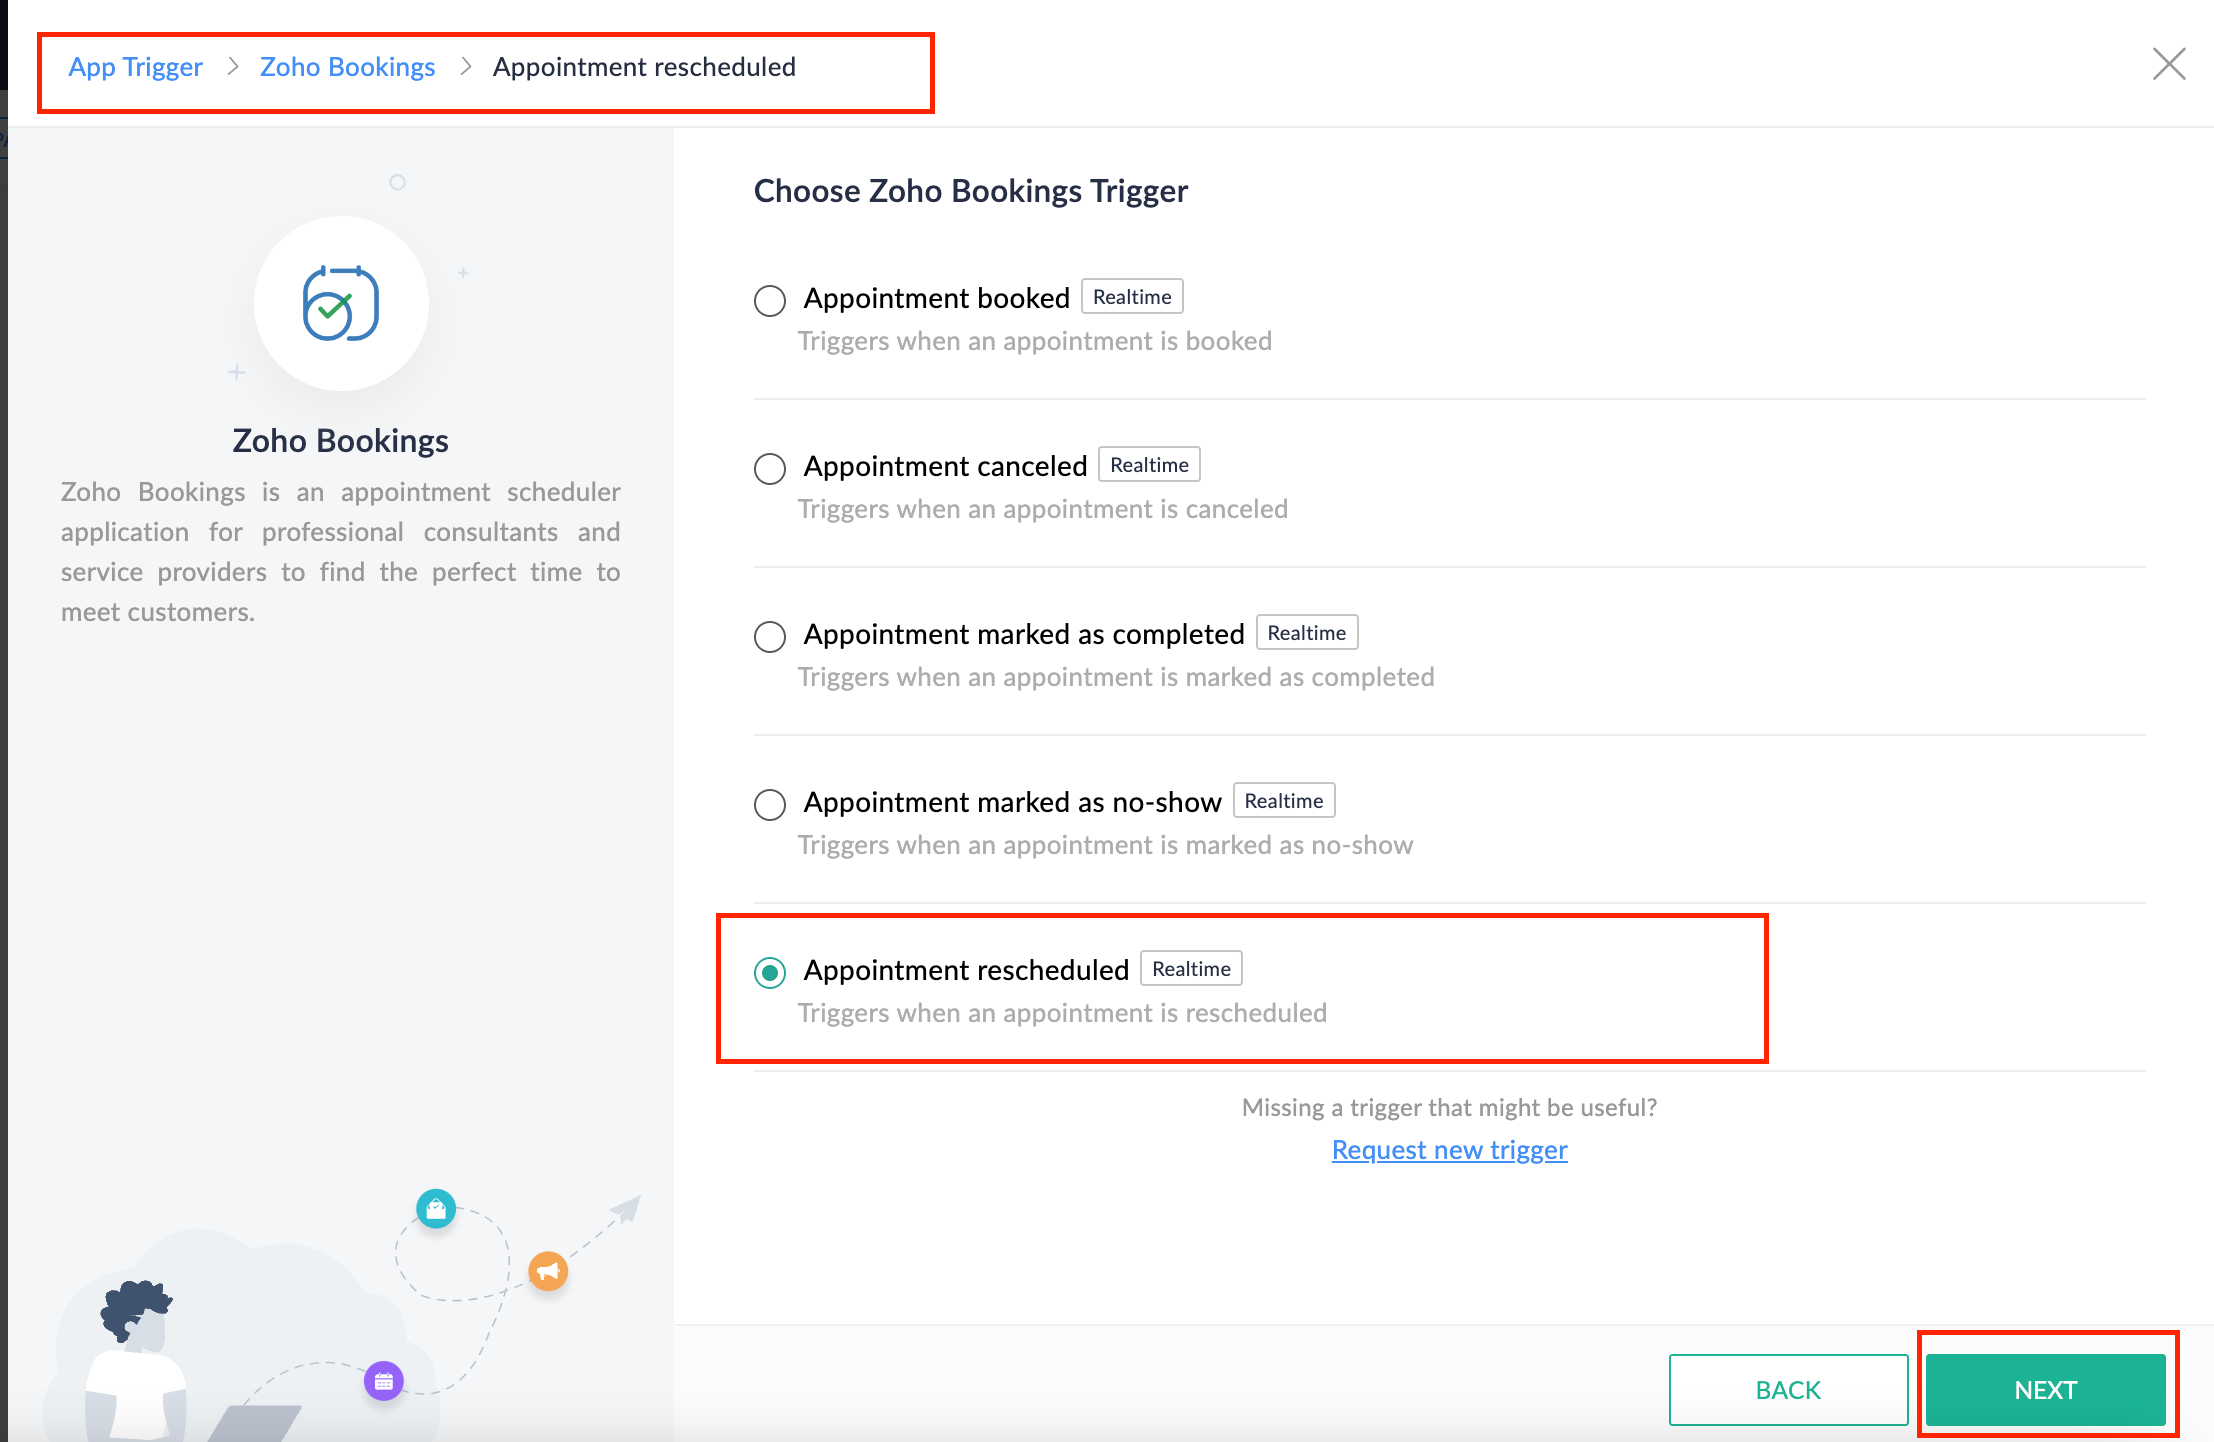
Note: The described flow is tailored for newly scheduled appointments. For cases where appointments are initially scheduled and later rescheduled, a separate flow must be created. The flow for rescheduled appointments follows the same steps outlined above, with the only modification being the initial trigger. Instead of the 'Appointment booked' trigger, please substitute it with the 'Appointment rescheduled' trigger in step A (steps B, C, and D remain the same).
Collecting feedback with surveys
Ensuring a seamless and positive customer experience is a top priority for every appointment. An integral part of this process involves gathering feedback from customers after the appointment's completion. This valuable feedback not only helps understand their sentiments but also provides insights for continuous improvement.
Let's explore how to leverage Zoho Survey to collect valuable feedback from customers. Additionally, we'll delve into the process of pre populating survey fields with the customer's name extracted from the appointment.
How to create a survey in Zoho survey:
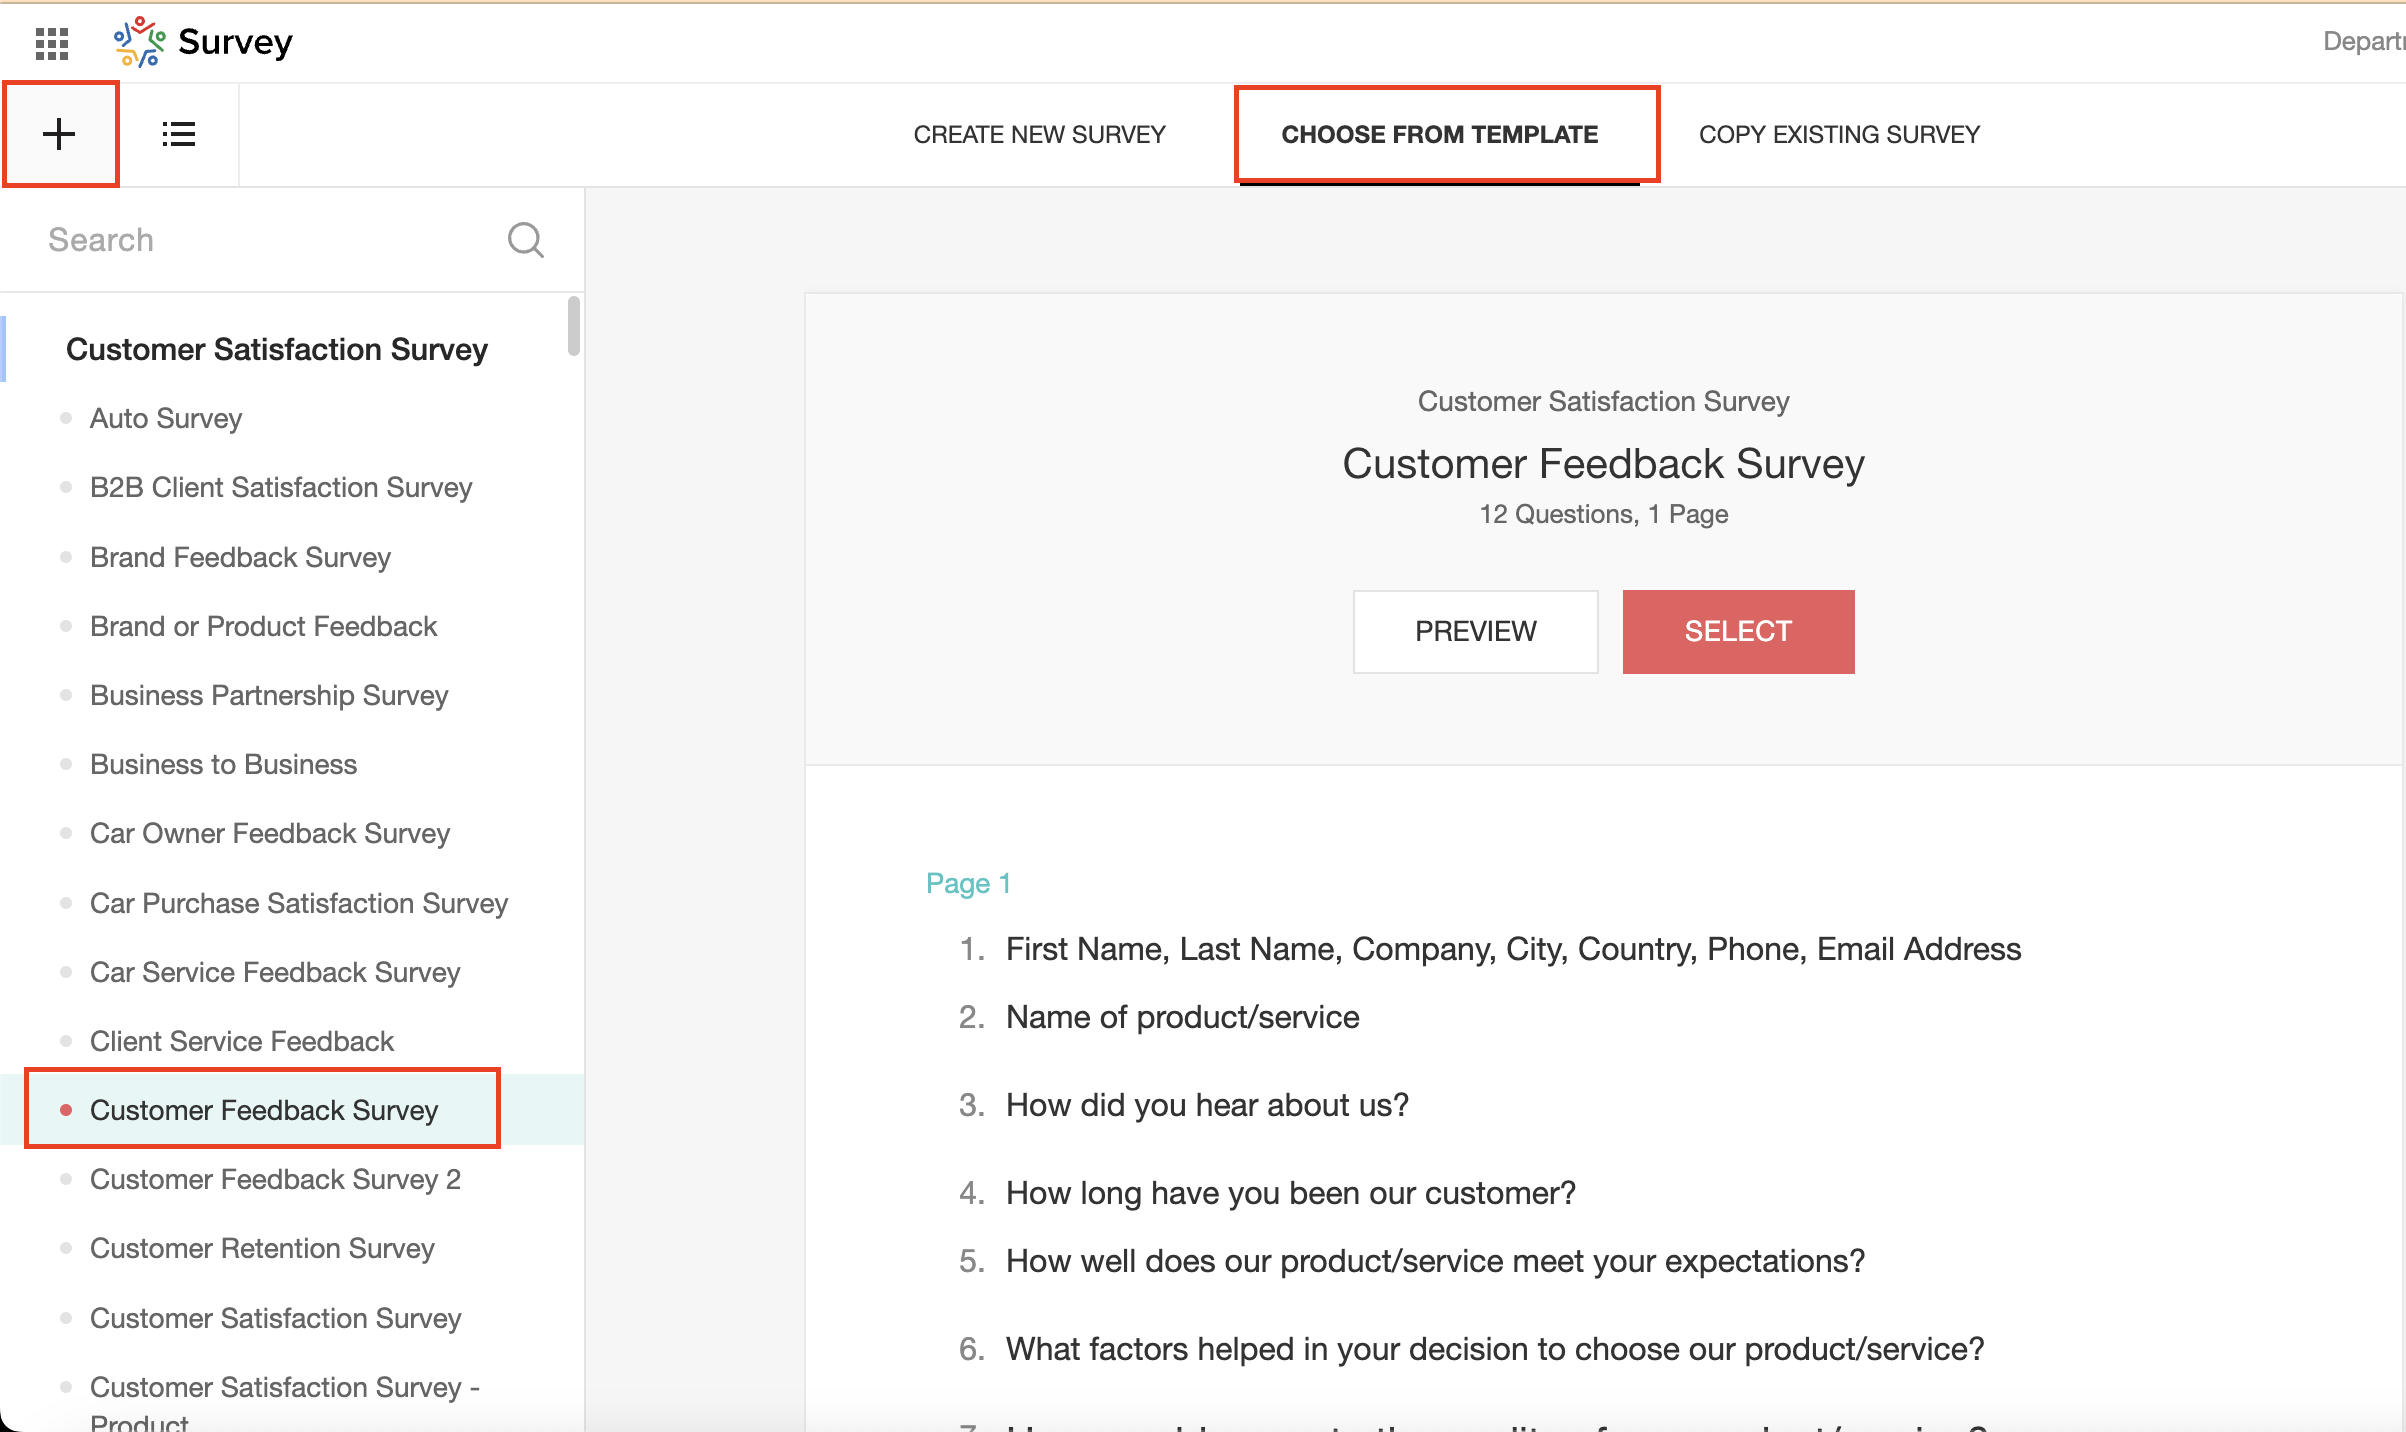
You have the option to create a new survey from scratch or choose from templates or existing surveys.
For more details, refer to: Create a Survey.
As an example, let's use the Customer Feedback Survey from the templates.
To enhance your survey experience, you have the flexibility to edit the survey form and select specific fields for inclusion.
Now, let's take a closer look at streamlining the customer experience by auto-populating the field inputs in Zoho survey with customer details. This additional step eliminates the need for customers to add their information manually, contributing to an enhanced overall experience.
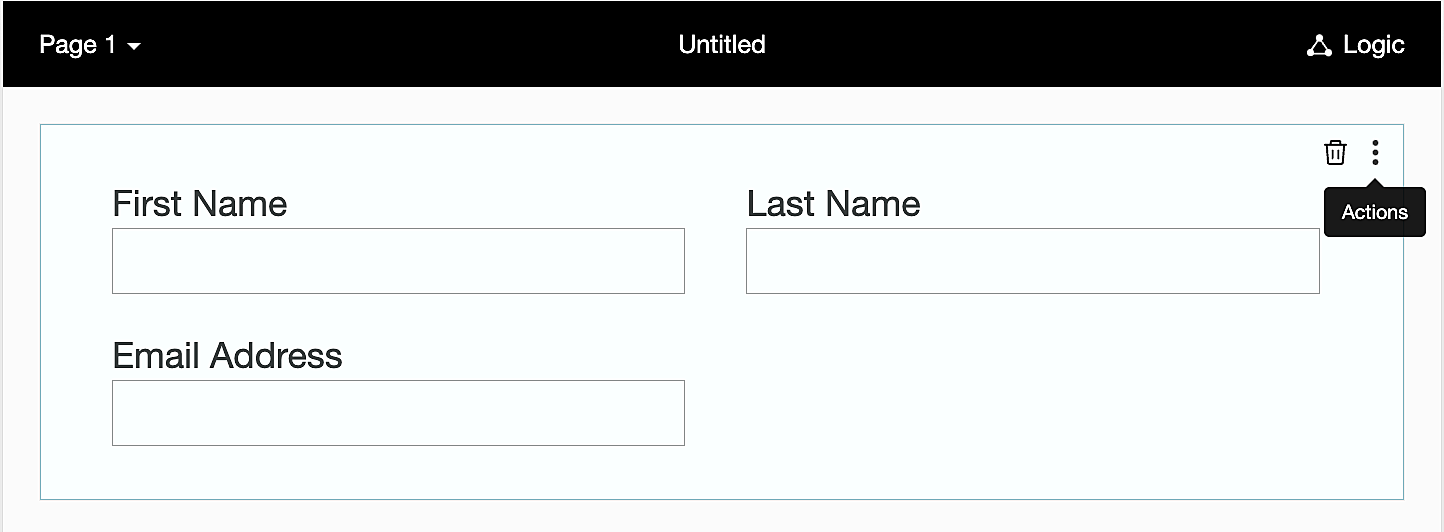
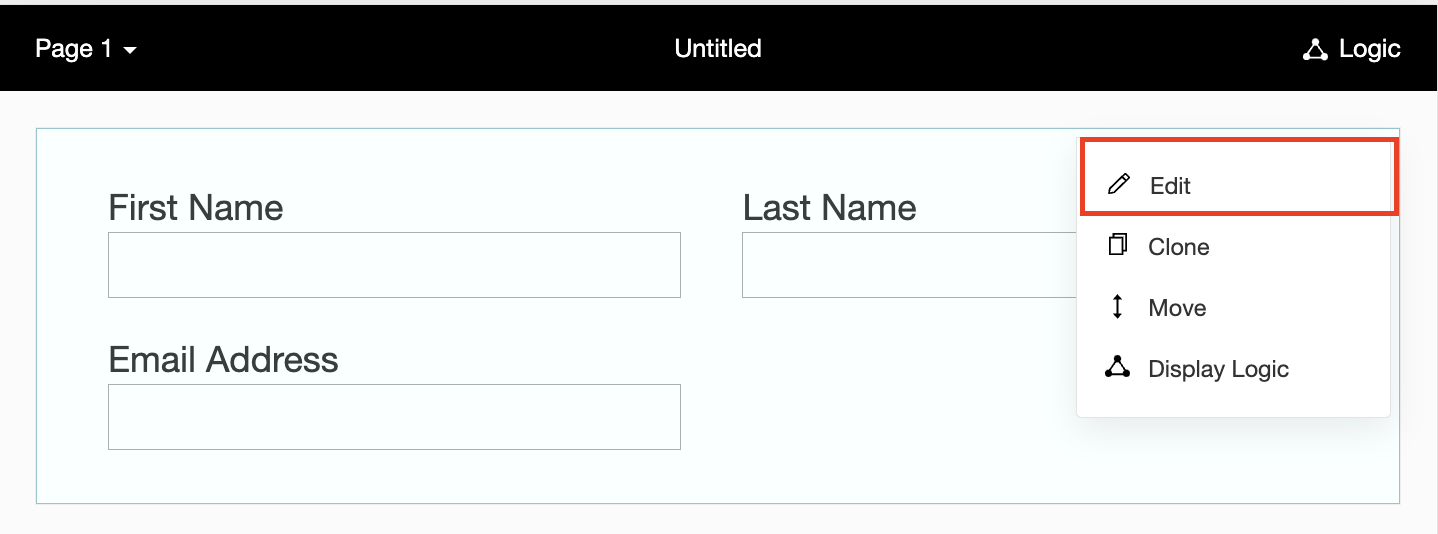
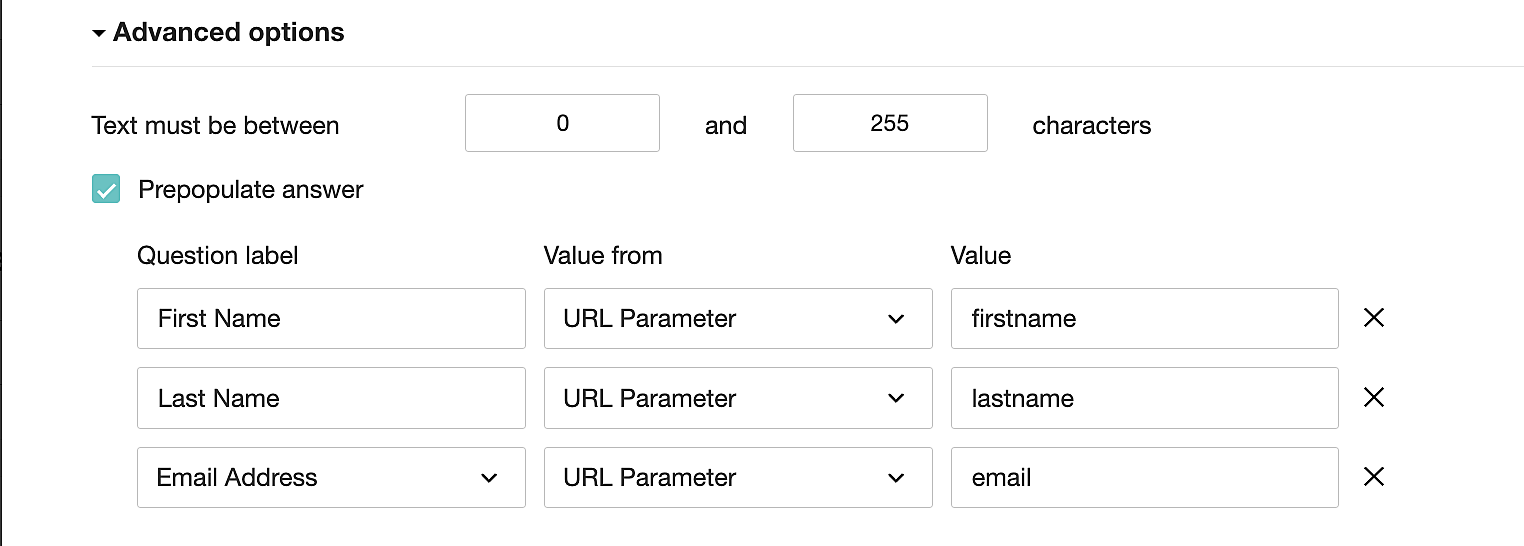
1. Click on the Actions button (three dots) next to the Last Name field, and choose Edit.
2. Click on Advanced options and check the box next to Prepopulate answer.
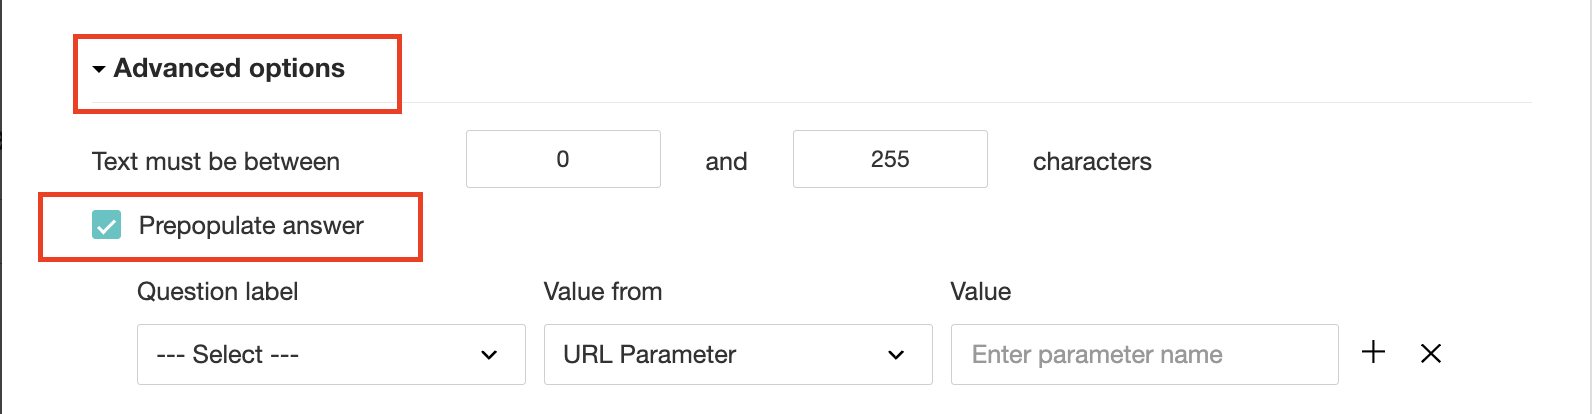
3. Select First Name, Last Name, and Email Address under Question label and URL parameter in each corresponding Value from field.
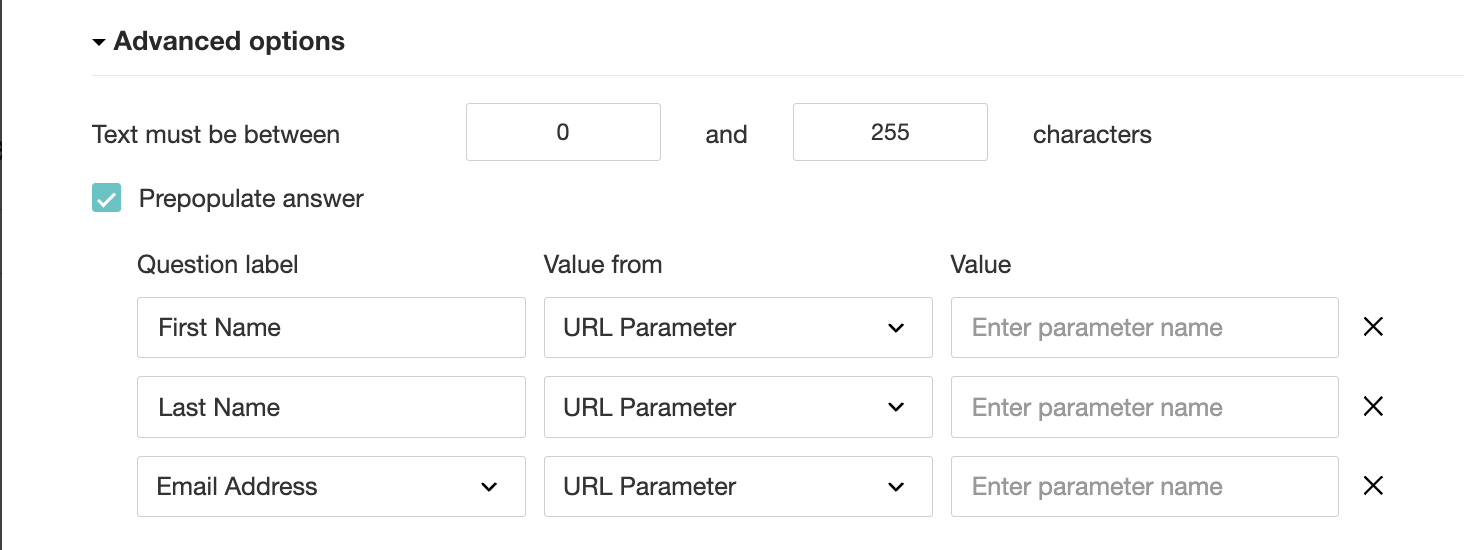
4. In the Value field, configure the parameter name (e.g., firstname, lastname, email). Once configured, this parameter name will be used in the survey link to prefill the fields in the survey form. Customize it as per your requirements, ensuring consistency with the term used in the survey URL.
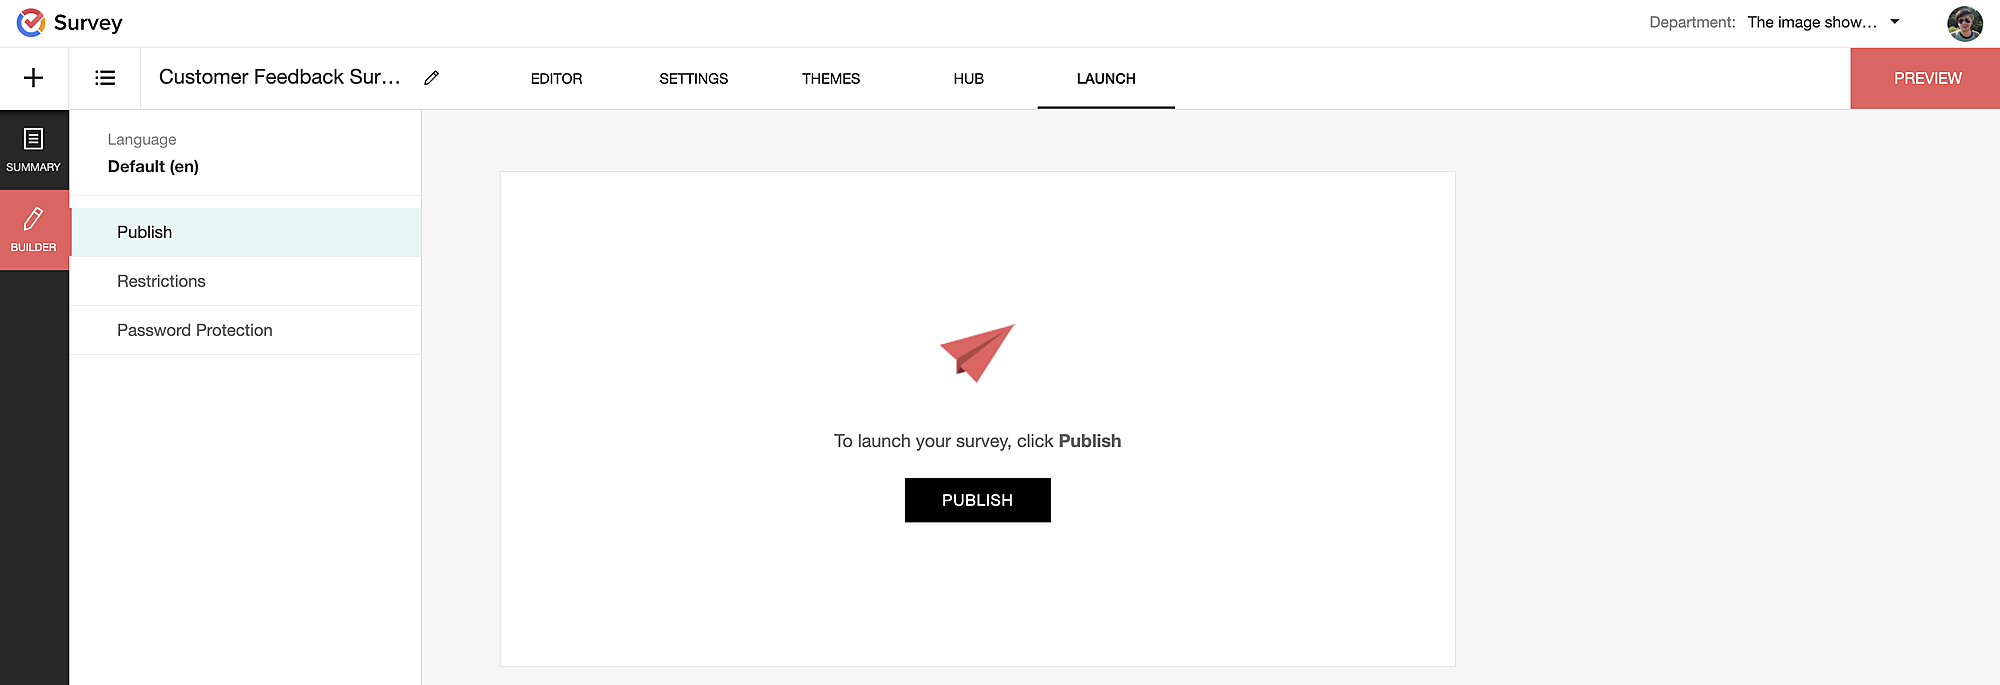
To publish the survey, go to the Launch tab and click on the Publish button to obtain the Zoho Survey URL.
Pre-populating fields in the Zoho Survey form
Once we have the Zoho Survey URL, we'll need to match the configured parameter name and variables from the Zoho Bookings email notifications. These variables play a crucial role in dynamically fetching customer information and populating it in the Zoho Survey form.
For details about variables in Zoho Bookings email notifications, refer to this link: Pre-defined variables
We'll now edit the survey URL to align the variables with the configured Value, or parameter name, from our prepopulated answer settings.
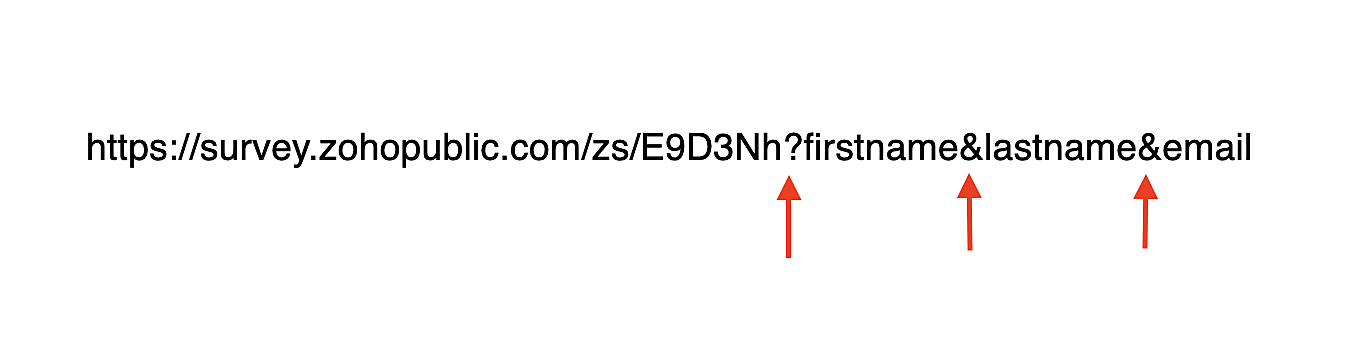
Let's say this is our survey URL:
https://survey.zohopublic.com/zs/E****h
We'll want to use a question mark ("?") at the end of the survey URL and an ampersand ("&") to separate different parameter names.
Here's what that would look like using our example Value names from earlier:
Now, let's map the parameter names to the Zoho Bookings variables.
It would look like this:

For more details: Autofill
Where to use the Zoho Survey URL
To enable the automatic sending of the Zoho Survey URL to customers upon updating the appointment status to Completed, follow these steps in the Zoho Bookings application:
For one-on-one services:
1. Click on Service in the top left corner.
2. Select the desired one-on-one service.
3. Choose Service Notifications.
4. Navigate to the For Customers tab.
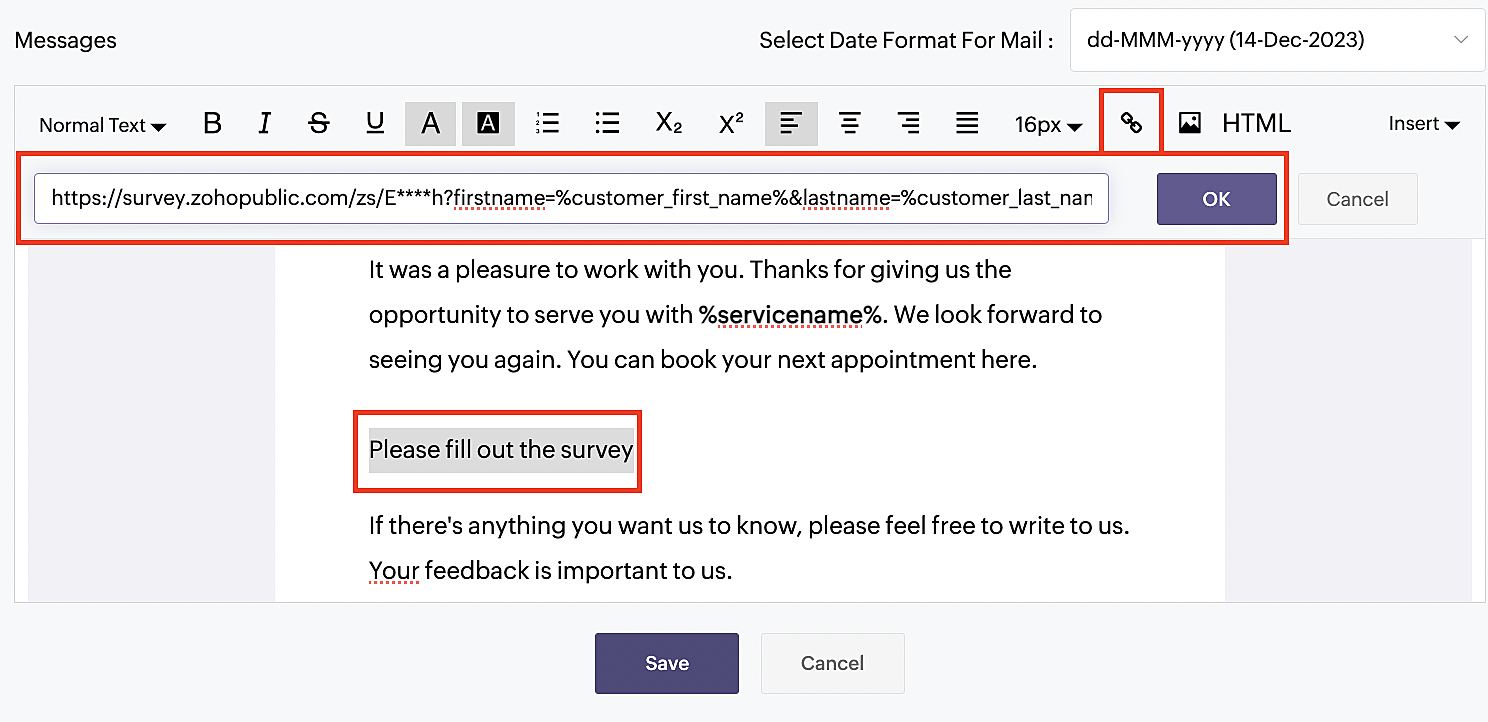
5. Click Customize next to the Mark As Completed' trigger to access the email content.

6. Enter your desired name for the button. For example, you might use something like 'Please fill out the survey'.
7. Select the entered text and click on the Add Link icon. Paste the configured Zoho Survey URL in the URL box. This will convert your text into a hyperlink that leads to the survey.
For group and resource booking services, please follow the same steps under Workspaces > Notifications.
For more details: Workspace Notifications
With the completion of this step, we have incorporated the Zoho Survey URL with dynamic variables, facilitating the dynamic autofill of customer data.
To wrap it up
With the successful implementation of the configuration described above, the entire process of automating status updates and collecting feedback is now seamlessly integrated, promising an elevated and enhanced product experience for all users.
If you have any questions or need assistance with your configuration, please email us at hello@zohobookings.com or support@zohobookings.com.