Business Benefits
- Operational Efficiency: This custom solution eliminates the need for manual dashboard monitoring. Booking updates are automatically communicated to Cliq as they occur.
- Enhanced Customer Experience: Faster internal awareness leads to expedited confirmations, better-prepared staff, and a more seamless appointment experience.
- Centralized Communication: All booking activities are consolidated in the same Cliq channel your team uses daily, minimizing context switching and preventing information silos.
- Enterprise-Ready, No Additional Cost: Built entirely on the Zoho Cliq Developer platform, this custom solution requires no third-party middleware. It operates within your existing Zoho subscription framework.
Step 1: Create a bot
- Go to the top-right corner of your profile and click on it.
- Select "Bots and Tools" from the dropdown menu.
- To create a new bot, click on "Create Bot" under the "Bots" section.
- Enter a name and description for your bot and ensure that channel configuration settings are enabled during setup.
- Finally, save the bot.

Step 2: Retrieve the bot webhook URL
- Webhook tokens are listed in the Bots & Tools section along with other internal tools.
- When you access the webhook tokens module, you'll need to authenticate using two-factor authentication (2FA), verify your identity, and then click "Continue."
- After authenticating, you can create, edit, and manage your webhook tokens as needed.
- Generate a webhook token and retrieve the bot's webhook URL as instructed.

Step 3: Generate Cliq bot incoming url
- Navigate to the newly created bot and click on it. A pane will appear showing the bot's URL details.
- Copy your bot's incoming endpoint from this window and append your token to it:
- https://cliq.zoho.com/api/v2/bots/<yourbotname>/incoming?zapikey=<webhooktoken>
Step 4 : Creating a workflow in Zoho Bookings
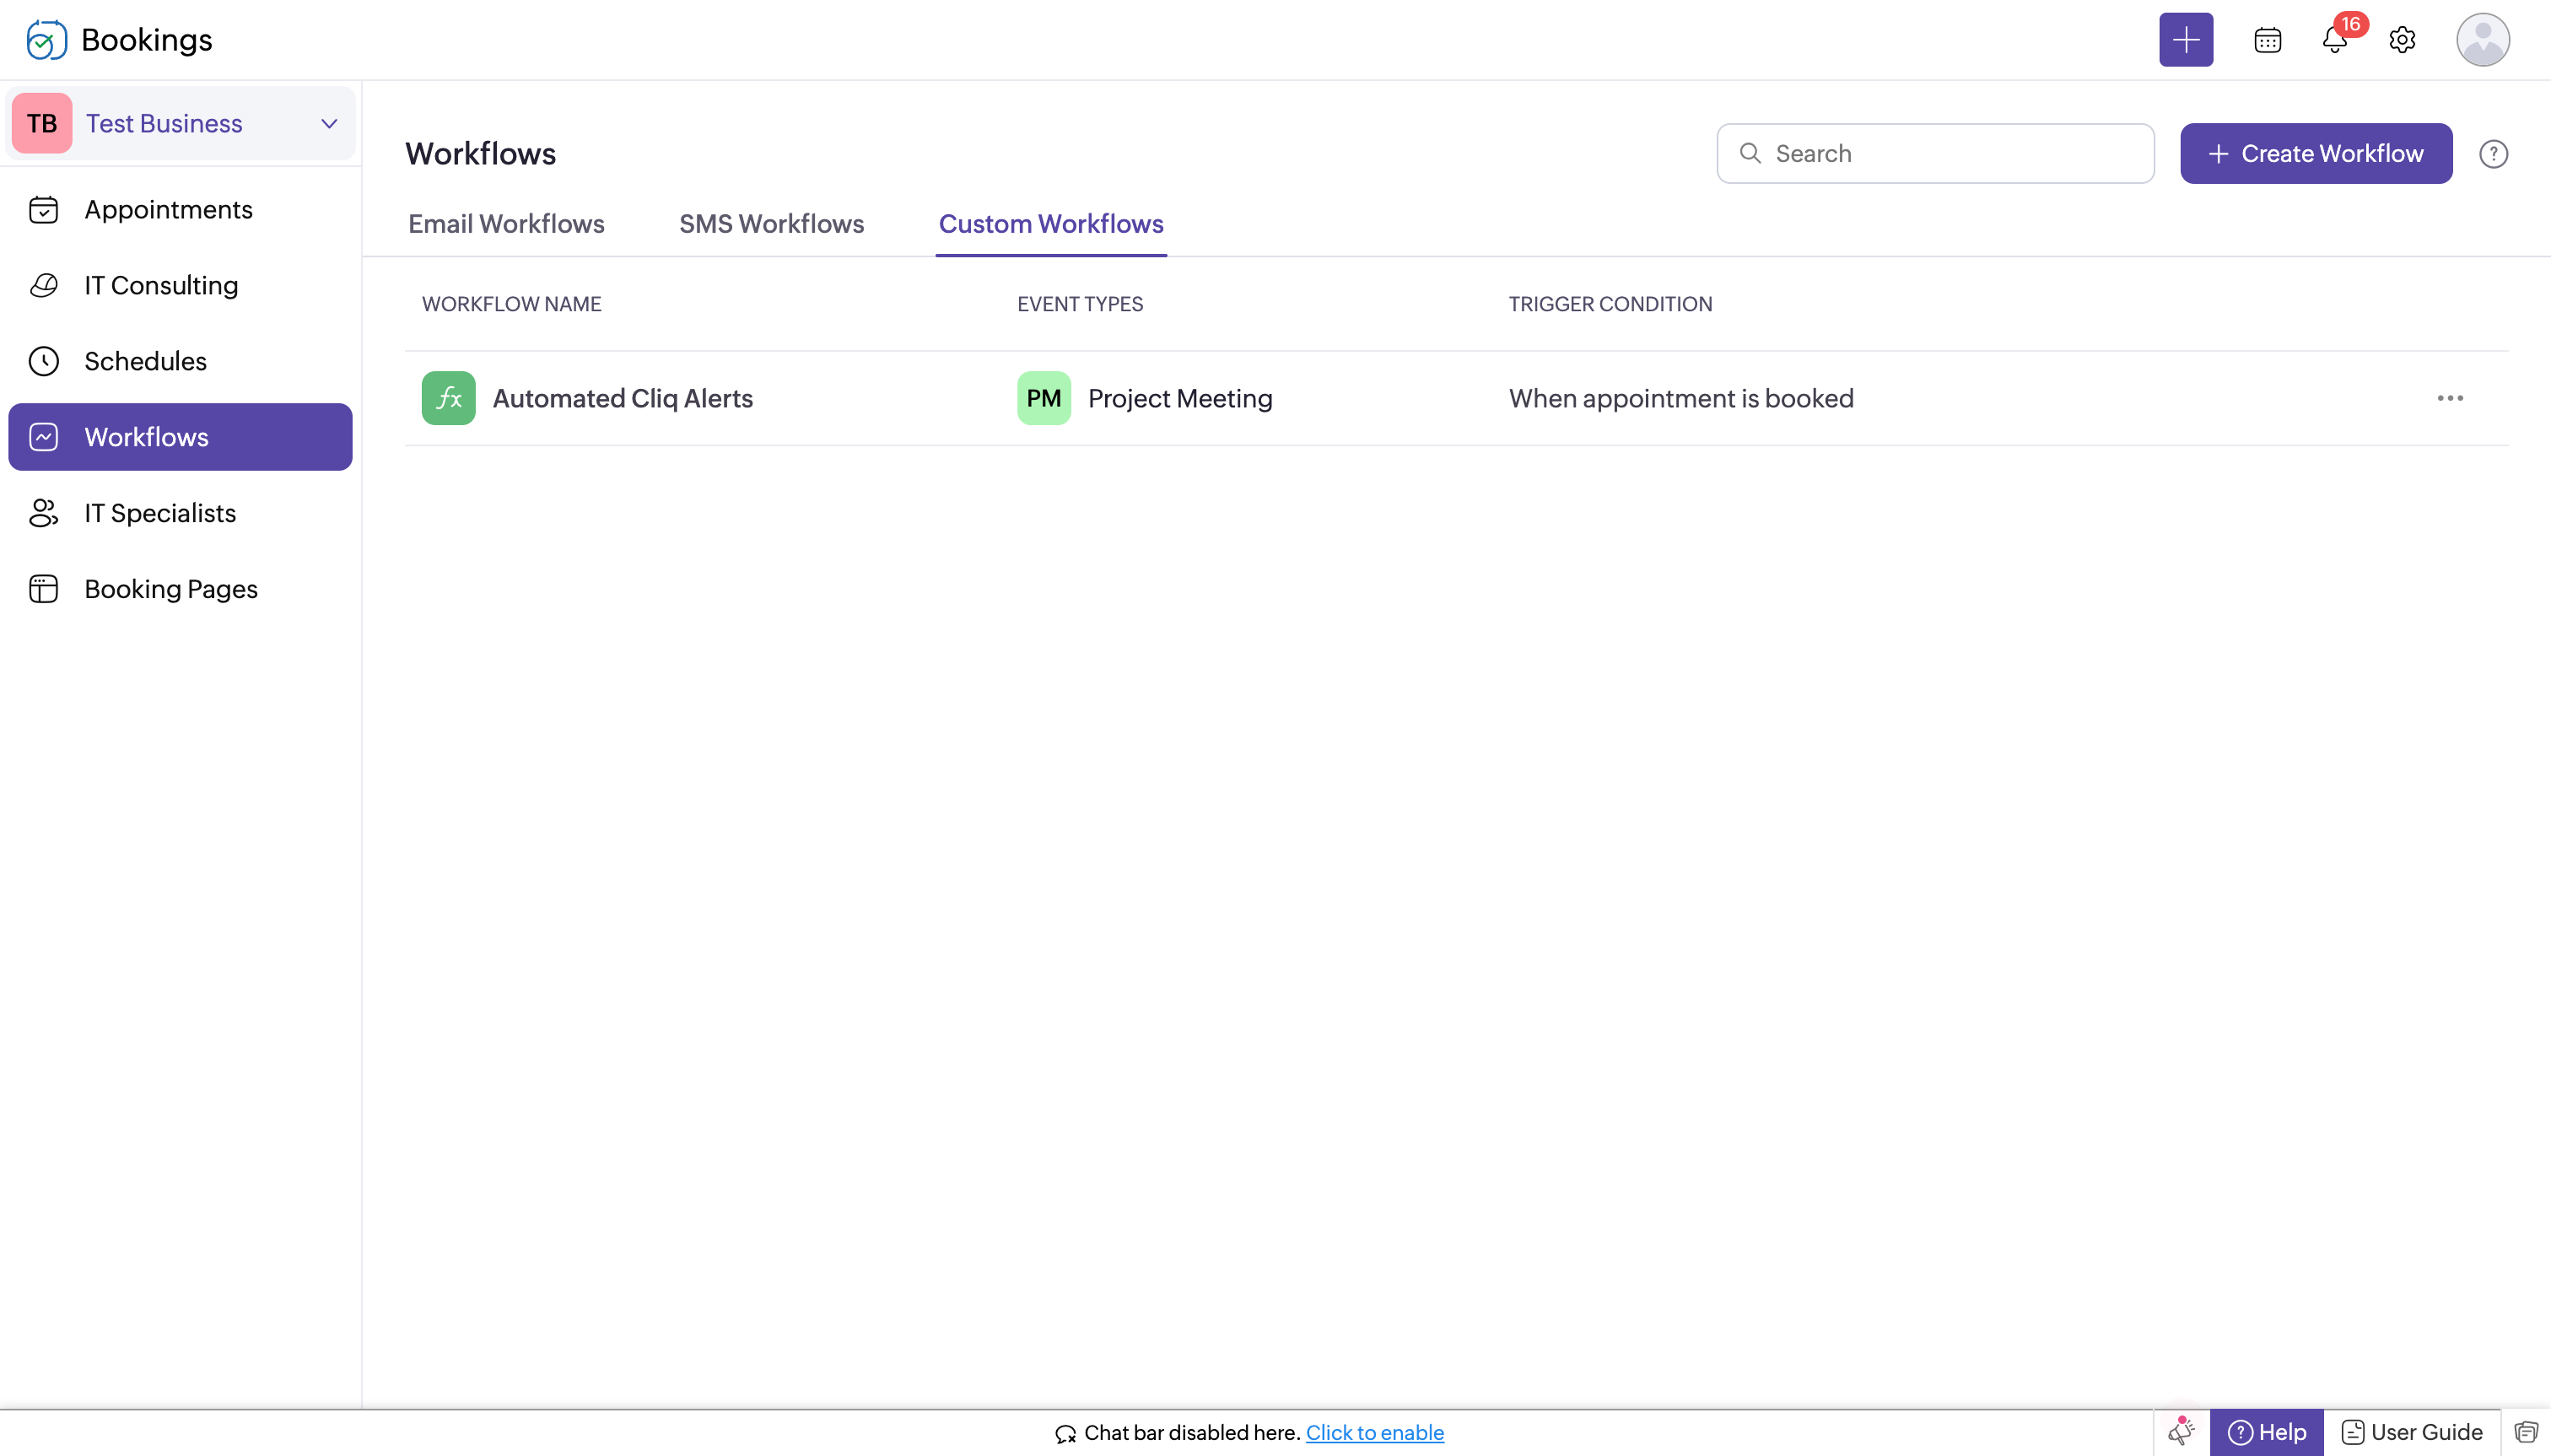
- Log in to Zoho Bookings.
- In the left panel, navigate to one of the following options:
- Workflows → Custom Workflows → Create New Workflow
- or Workflows → Create Workflow → Create New Workflow.
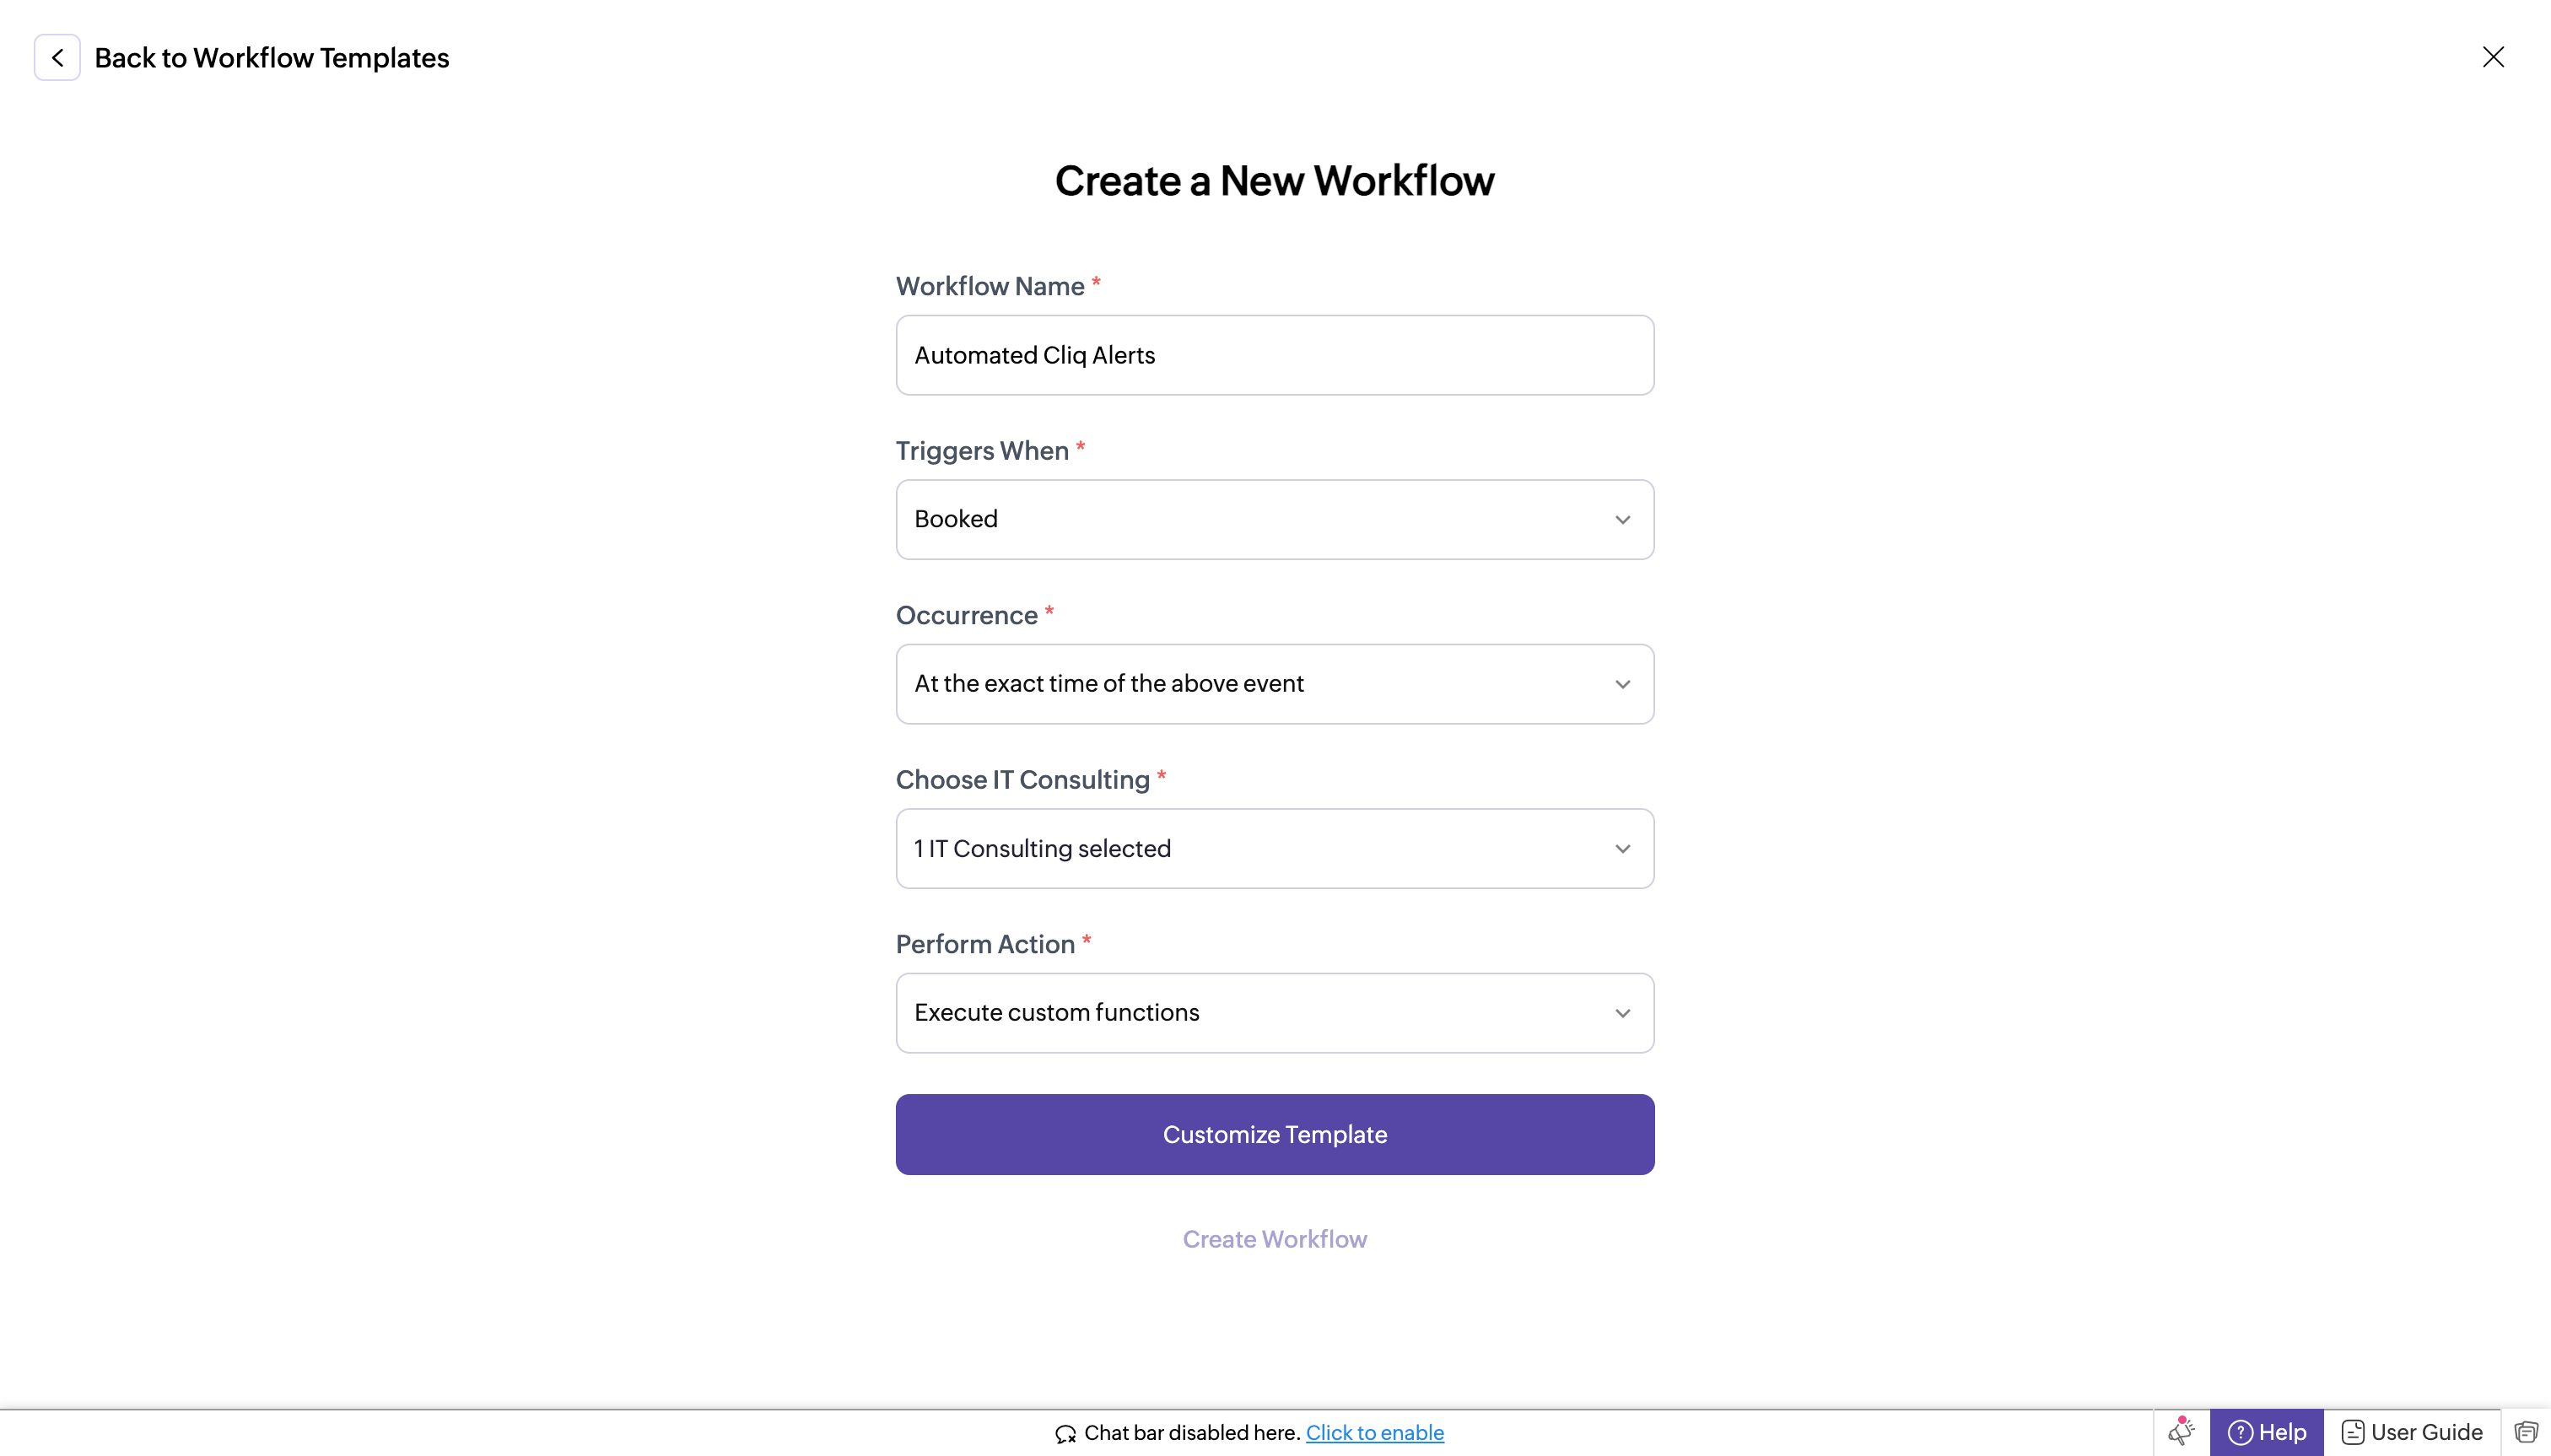
- If you chose Workflows → Custom Workflows → Create New Workflow, complete the following fields:
- Workflow Name: Enter a name for your workflow.
- Trigger When: Select "Booked."
- Occurrence: Choose "Immediately."
- Choose Service (e.g., IT Consulting): Select your Service.
- Perform Action: Select "Execute Custom Functions."
- Customize Template: Paste the following code.
- In the template editor, paste the code, replacing "<bot incoming url>" with the full URL you created in the previous step.
- bookingInfoMap = Map();
- bookingInfoMap.put("BookingInfo",bookingInfo);
- cliqWebhookTrigger = invokeurl
- [
- url : "<bot incoming url>"
- type :POST
- parameters:{"Book Details":bookingInfo} + ""
- headers:{"content-type":"application/json"}
- ];
- info cliqWebhookTrigger;
- Click Create Workflow. With this setup, whenever a new appointment is booked, it will trigger a notification to your Cliq bot's incoming handler.
Step 6 : Setting up bot incoming webhook handler
- Head back to Cliq, locate the bot you created under the "Bots and Tools" section, and access its incoming webhook handler.
- The incoming webhook handler is designed to allow third-party services, such as Zoho Bookings, to post messages directly to your bot.
- Copy and paste the below code, then click "Save".
- Create a Zoho Cliq Default Connection:
Before you begin scripting the code below, you need to create a connection in Zoho Cliq. Once the connection is established, you can use it in Deluge integration tasks and invoke URL scripts to access data from the required service.
Use a unique name for the connection with the scope set to
ZohoCliq.Reminders.All.Note: Refer to the document on Connections in Cliq for more information.
- Post Alerts to a Channel:
To post an alert to a channel, you'll need the unique names of both the channel and the bot. This is necessary as we will use the
zoho.cliq.postToChannelAsBotDeluge task in the code below. Follow these steps to retrieve these names:How to Obtain the Channel Unique Name in Cliq?:
- Navigate to the top right corner of your preferred channel and click on the three dots.
- In the menu that appears, select "Channel info." A pop-up will display detailed information about the channel.
- Hover over the "Connectors" section and click on it.
- Under "API Parameters," you will find the channel unique name.
How to Obtain the Bot Unique Name in Cliq?
- Go to "Bots & Tools," and under the bots section, select your preferred bot.
- Copy the API endpoint URL. The bot's unique name is located between "bots/" and the next slash ("/").
Example:
In this example, the bot's unique name is
crmupdatesincliq. - Retrieve the Bot Chat ID:
- Open Zoho Cliq and navigate to your bot in the chat window.
- Click on the bot to open the conversation.
- Check the URL in your browser; the bot chat ID is the alphanumeric string that appears after "chats/".
Example:
In this example, the bot chat ID is
CT_9874563201845670134_10005673821-B7.
After creating the connection, retrieving the channel unique name, bot unique name, and bot chat ID, keep this information handy for use in the code below.
- response = Map();
- info params;
- info headers;
- info body;
- bookingDetails = body.get("Book Details");
- info bookingDetails;
- bookingID = bookingDetails.get("booking_id");
- workspaceName = bookingDetails.get("workspace_name");
- customerEmail = bookingDetails.get("customer_email");
- startTime = bookingDetails.get("start_time");
- endTime = bookingDetails.get("end_time");
- timeZone = bookingDetails.get("time_zone");
- summaryUrl = bookingDetails.get("summary_url");
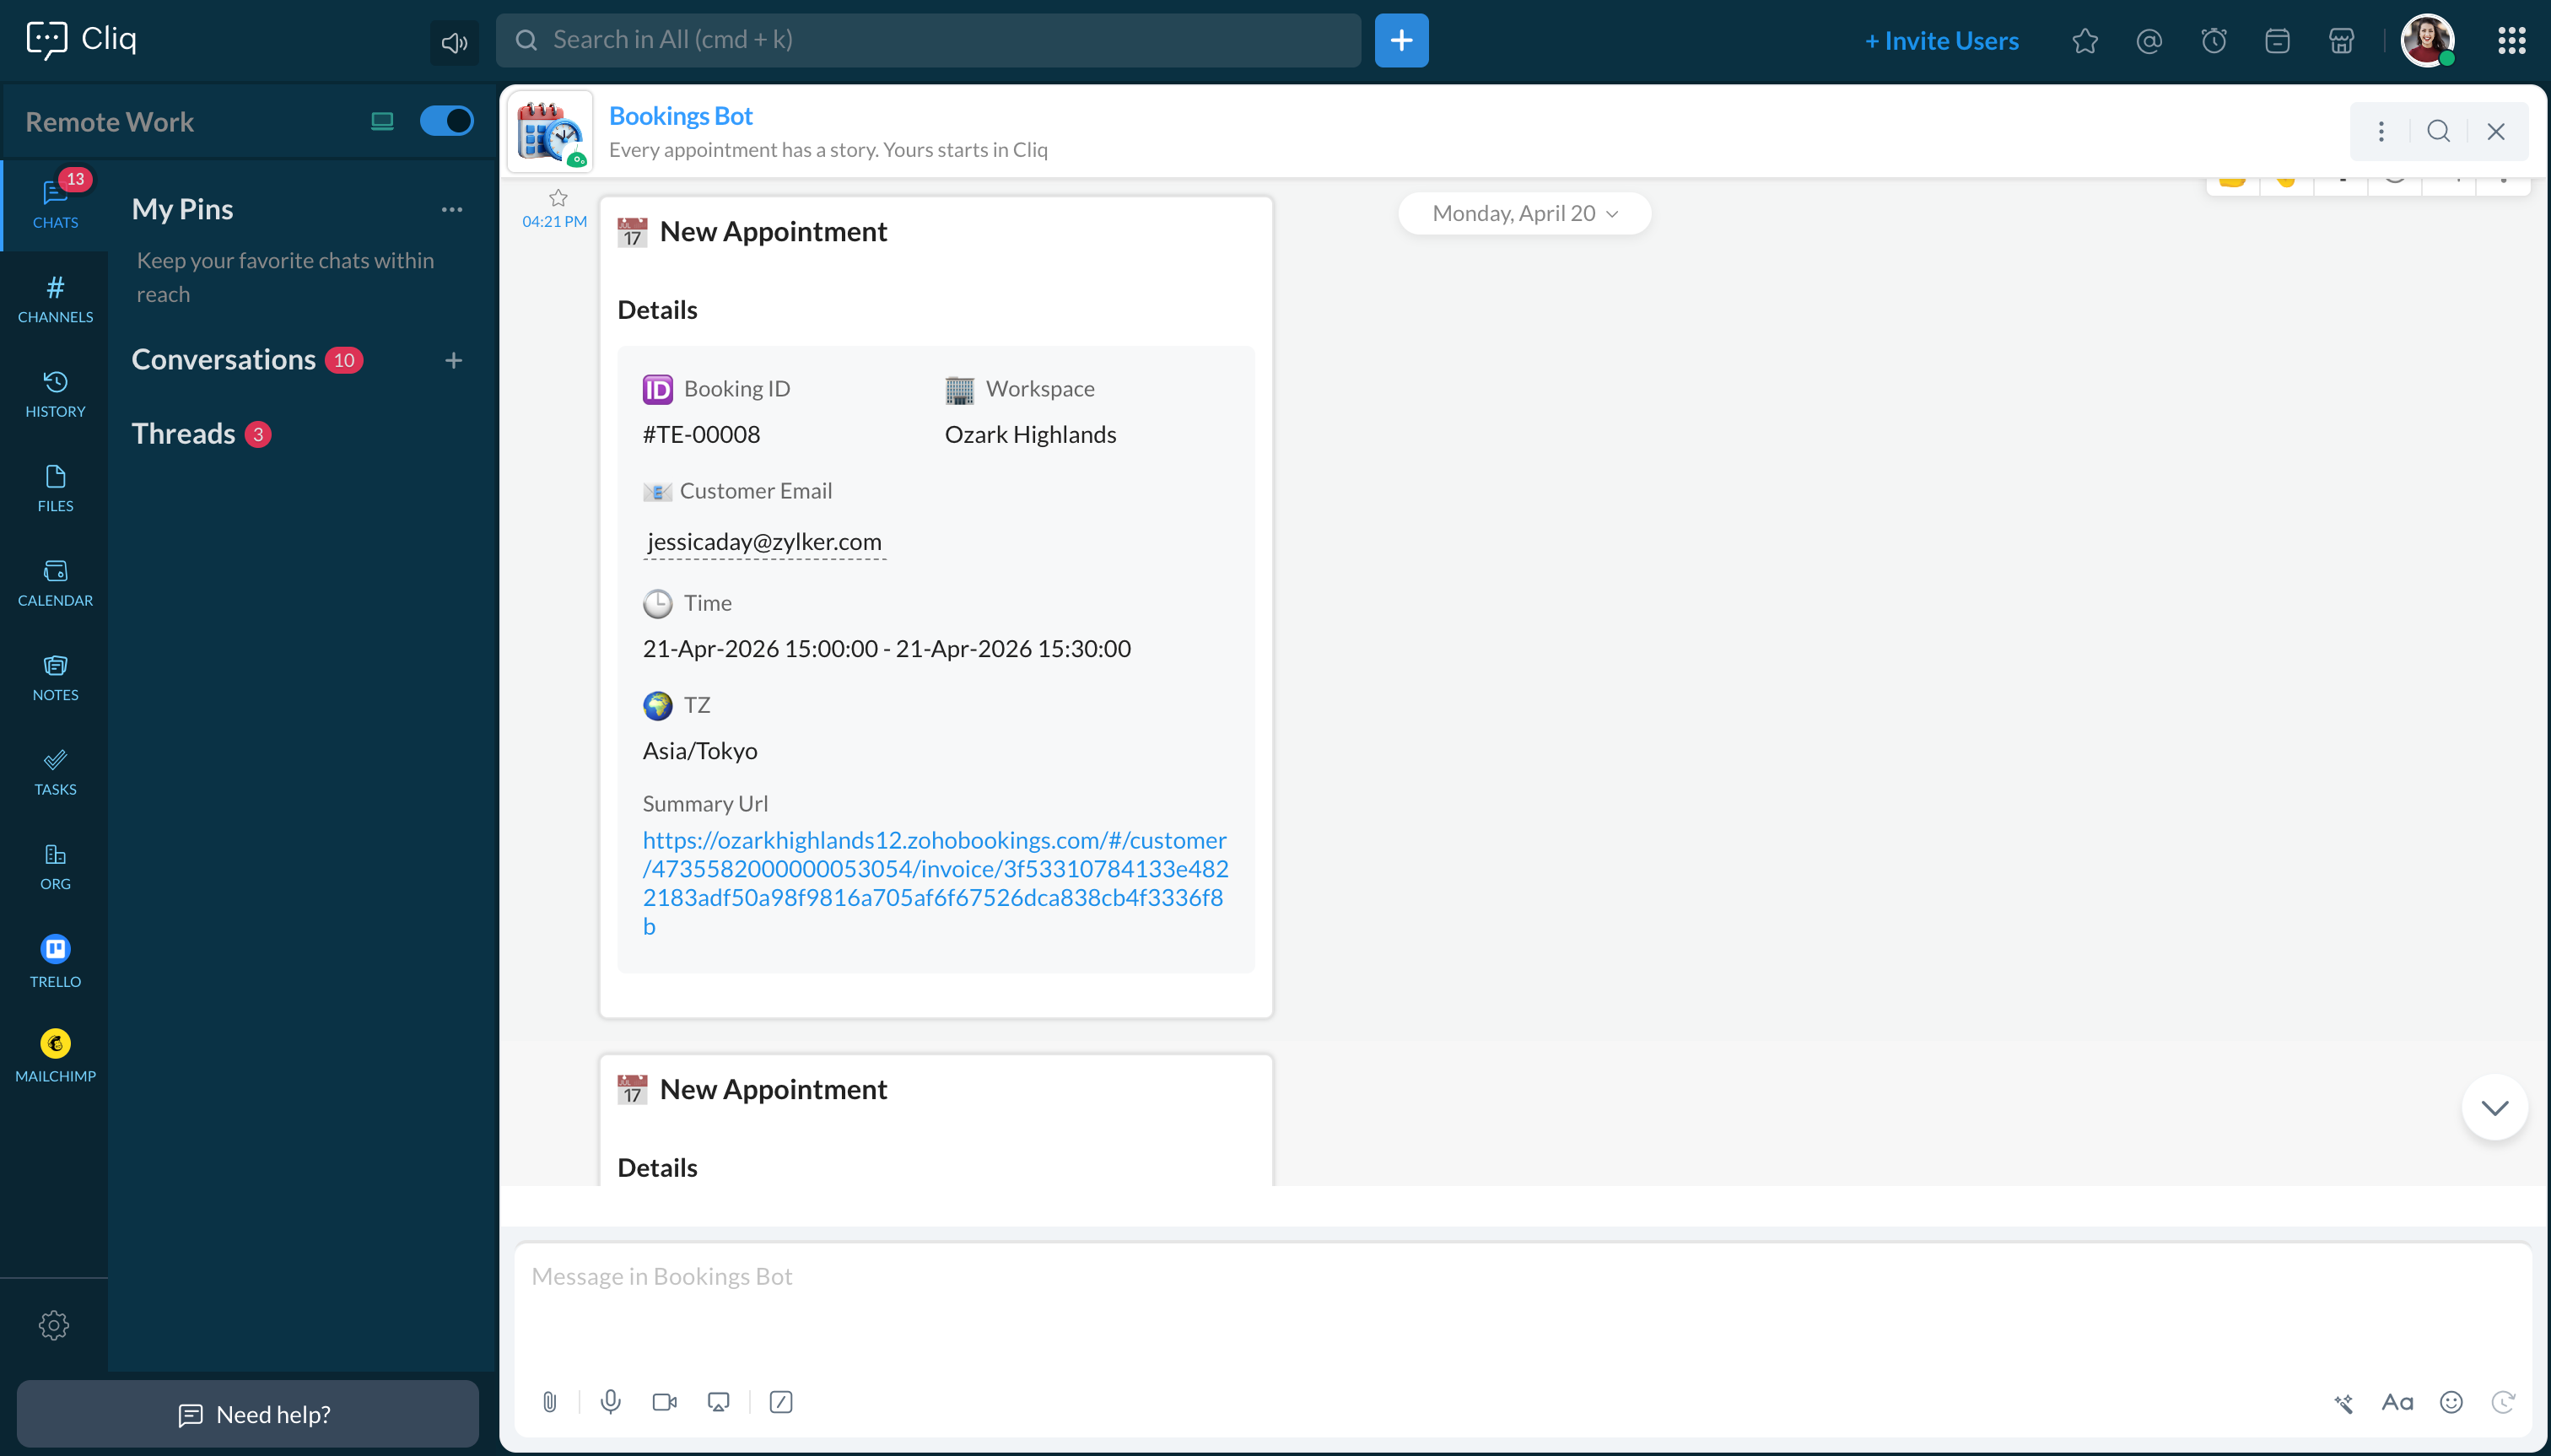
- responseMsgCard = {"text":"### 📅 New Appointment","card":{"theme":"modern-inline"},"slides":{{"type":"label","title":"Details","buttons": [
- {"label": "Open Summary","action": {"type": "open.url","data": {"web":summaryUrl}}}],"data":{{"🆔 Booking ID":bookingID},{"🏢 Workspace":workspaceName},{"📧Customer Email":customerEmail},{"🕒 Time":startTime + " - " + endTime},{"🌍 TZ":timeZone}}}}};
- info zoho.cliq.postToBot("<bot unique name>",responseMsgCard);
- //Post to your Bot
- info zoho.cliq.postToChannelAsBot("<Channel unique name>","<bot unique name>",responseMsgCard);
- //It will send to channel with bot permission.
- //--------------------------------- To set reminder -------------------------------//
- eventTimeZone = bookingDetails.get("time_zone");
- info eventTimeZone;
- userTimeZone = user.get("timezone");
- dateTimeObj = bookingDetails.get("start_time").toTime("dd-MMM-yyyy HH:mm:ss",eventTimeZone).toString("dd-MM-yyyy HH:mm:ss");
- info dateTimeObj;
- info dateTimeObj.toTime("dd-MM-yyyy HH:mm:ss",user.get("timezone")).subMinutes(60);
- datetime_30min_sub = dateTimeObj.toTime("dd-MM-yyyy HH:mm:ss",userTimeZone).subMinutes(30).toString("dd-MMM-yyyy HH:mm:ss",userTimeZone);
- datetime_60min_sub = dateTimeObj.toTime("dd-MM-yyyy HH:mm:ss",userTimeZone).subMinutes(60).toString("dd-MMM-yyyy HH:mm:ss",userTimeZone);
- info datetime_60min_sub+"datetime_60min_sub";
- info datetime_30min_sub+"datetime_30min_sub";
- secondsVal_60sec_before = datetime_60min_sub.unixEpoch(userTimeZone);
- secondsVal_30sec_before = datetime_30min_sub.unixEpoch(userTimeZone);
- info secondsVal_60sec_before;
- info secondsVal_30sec_before;
- reminderTimes = list();
- reminderTimes.add(secondsVal_60sec_before);
- reminderTimes.add(secondsVal_30sec_before);
- for each reminderTime in reminderTimes
- {
- param = Map();
- content = "Zoho Bookings Reminder : " + bookingID;
- param.put("content",content);
- param.put("time",reminderTime);
- chatidsList = list();
- chatidsList.add("<Bot chat id>");
- param.put("chat_ids",chatidsList);
- createReminder = invokeurl
- [
- url :"https://cliq.zoho.com/api/v2/reminders"
- type :POST
- parameters:param + ""
- connection:"<your connection name>"
- ];
- info createReminder;
- }
- return response;