Kaizen #174 : Client Script Commands

Client Script Commands feature is a highly anticipated functionality that enables users to trigger Client Scripts anywhere within Zoho CRM, extending the scope of client script beyond standard pages and events. In this Kaizen post, we'll explore how to implement and utilize this feature effectively.
In this post,
What are Client Script Commands?
How to create and use Client Script Commands?
Using Command Palette
Using Keyboard Shortcuts
Scenario - 1
Solution
Scenario - 2
Solution
Summary
Related Links
1. What are Client Script Commands?
Client Script Commands feature is another dimension of Client Script that enables users to trigger them anytime and anywhere in CRM, extending their event-driven functionality beyond just specific modules and pages. This functionality can be accessed through custom keyboard shortcuts or a command palette, making it easier for users to perform repetitive tasks quickly
2. How to create and use Client Script Commands?
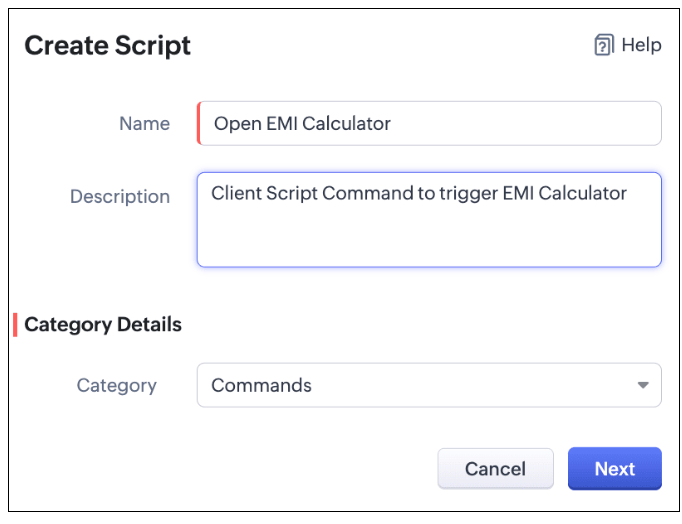
Create a command by specifying the Category as Commands (instead of module) while creating a Client Script.

Check this documentation for more details.
To trigger a Command, you can use one of the following ways.
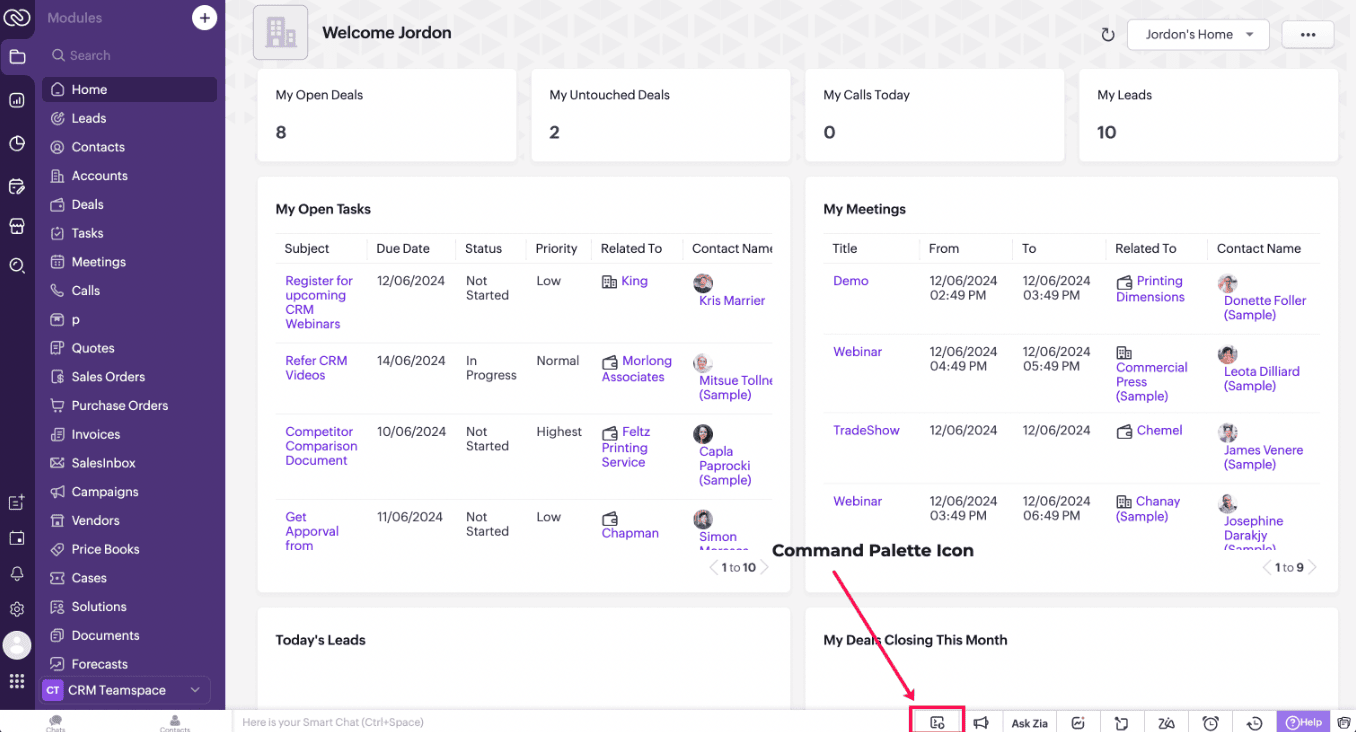
A. Using Command Palette
Click on the Command Palette icon in the footer of CRM and select the name of the Command that you want to trigger.
B. Using Keyboard shortcuts
You can also link each of the Commands to a shortcut key and trigger a Command using that designated shortcut key. Each user can set specific shortcuts based on individual preference and use them to trigger a Command.
Check this documentation for more details.
3. Scenario - 1
At Zylker, a financial company using Zoho CRM, Sales Advisors need a quick way to calculate EMI during customer phone calls. The solution should allow seamless access to an EMI Calculator from any page in Zoho CRM.
4. Solution
To achieve this in Zoho CRM, you need to create a Widget for EMI calculator and create a Client Script Command.
A. Create a Widget for EMI calculator
Install Zoho CLI, and follow the steps given in this document to create the Widget app folder. Then update the html, javascript, and css code as per your requirement.
index.html
<!DOCTYPE html>
<html lang="en">
<head>
<meta charset="UTF-8" />
<meta http-equiv="X-UA-Compatible" content="IE=edge" />
<meta name="viewport" content="width=device-width, initial-scale=1.0" />
<title>Document</title>
<link rel="stylesheet" href="style.css" />
</head>
<body>
<div class="loan-calculator">
<div class="top">
<h2>EMI Calculator</h2>
<form action="#">
<div class="group">
<div class="title">Amount</div>
<input type="range" min="1000" value="30000" max="50000" step="500" class="loan-amount" id="loanAmount" />
<div class="slider-label">$<span id="loanAmountValue"></span></div>
</div>
<div class="group">
<div class="title">Interest Rate</div>
<input type="range" min="5" value="6" max="100" step="1" class="interest-rate" id="interesRate" />
<div class="slider-label"><span id="interesRateValue"></span></div>
</div>
<div class="group">
<div class="title">Tenure (in months)</div>
<input type="range" min="6" max="100" step="1" value="12" class="loan-tenure" id="tenureMonth" />
<div class="slider-label"><span id="tenureMonthValue"></span></div>
</div>
</form>
</div>
<div class="result">
<div class="left">
<div class="loan-emi">
<h3>Loan EMI</h3>
<div class="value">123</div>
</div>
<div class="total-interest">
<h3>Total Interest Payable</h3>
<div class="value">1234</div>
</div>
<div class="total-amount">
<h3>Total Amount</h3>
<div class="value">12345</div>
<div class="right">
<canvas id="myChart" width="400" height="400"></canvas>
</div>
</div>
</div>
<script src="https://cdn.jsdelivr.net/npm/chart.js@3.6.2/dist/chart.min.js"></script>
<script src="https://live.zwidgets.com/js-sdk/1.2/ZohoEmbededAppSDK.min.js"></script>
<script src="main.js"></script>
</body>
</html>
Click here to view the complete code.
Once you have added the code, upload the zip file by following the below steps.
Go to Setup > Developer Space > Widgets.
Click Create New Widget and Fill in the details.
The Hosting should be "Zoho" and mention the html page of the app folder that you uploaded.

Note:
The widget should be of "button" type in order to render through a Client Script.
B. Create Client Script Commands.
Configure a Client Script Command by specifying the Name and Description The Category should be Commands. Click Next. Click here to know how to configure a Client Script.
Enter the following script and click Save.
ZDK.Client.openPopup({ api_name: 'emi_calculator', type: 'widget', header: 'EMI Calculator', animation_type: 4, height: '750px', width: '500px', top:'100px',left: '500px' }, { data: 'sample data to be passed });
The syntax of openPopup() is as follows.
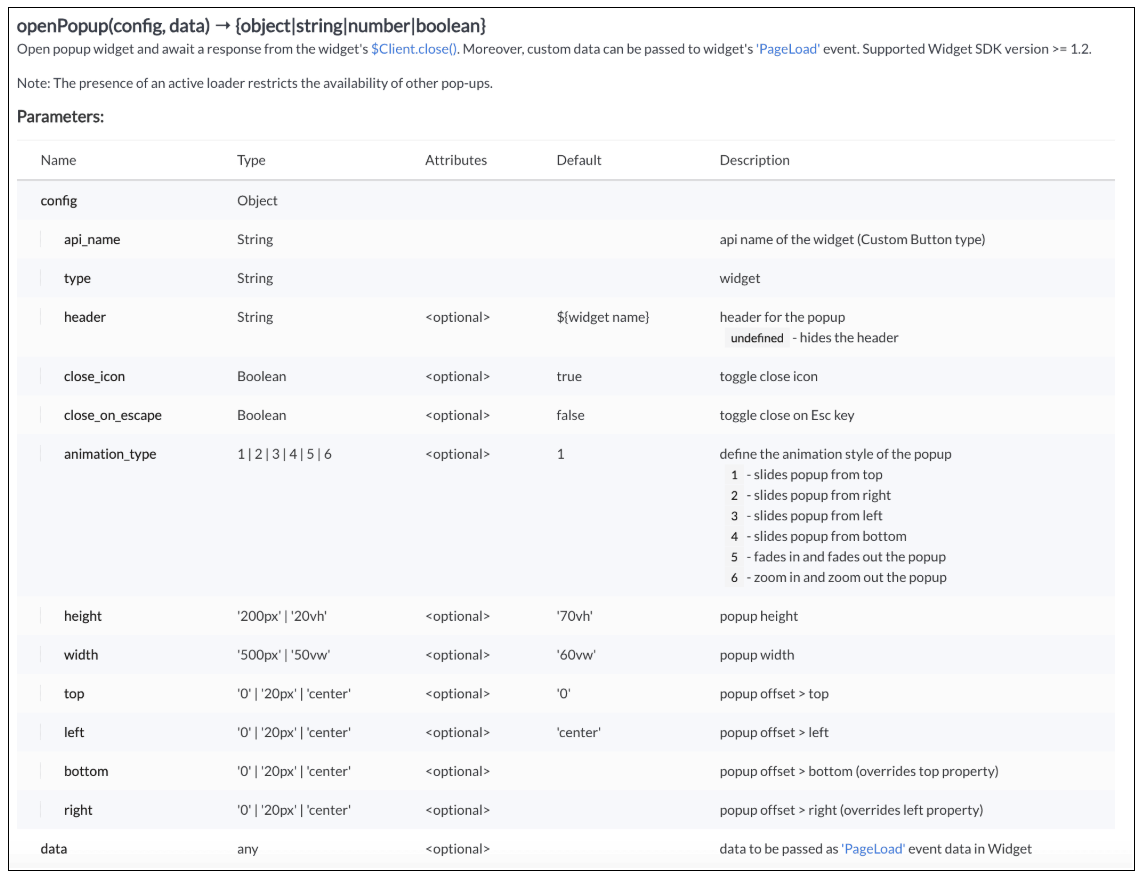
Here "emi_calculator" is the API name of the Widget,
Type is Widget,
Header is EMI Calculator,
animation type is 4 where the popup slides from the bottom.
The other parameters are optional and has default values as shown in the image.
Here is how the EMI Calculator appears as and when the salesperson needs. The user can either click on the Command Palette Icon at the footer or use a keyboard shortcut as per his convenience to open the calculator.
In the above gif, the keyboard shortcut is cmd O.
To customize the keyboard shortcut,
Go to Setup → General → Personal Settings. Select "Motor" from the Accessibility Tab and Click "View Shortcuts" as shown in the below gif.
4. Scenario - 2
At Zylker, an international wholesale company using Zoho CRM, salespeople need a quick way to check real-time gold rates from different countries while discussing bulk orders with retailers. The solution should provide seamless access to updated, region-specific gold rates directly within the CRM interface to assist with accurate pricing decisions during customer interactions.
5. Solution
To achieve this in Zoho CRM, you need to create a Widget for EMI calculator and create a Client Script Command.
A. Create a Widget for gold rate
Install Zoho CLI, and follow the steps given in this document to create the Widget app folder. Then update the html, javascript, and css code as per your requirement.
index.html
<!DOCTYPE html>
<html>
<head>
<meta charset="UTF-8">
<script src="https://live.zwidgets.com/js-sdk/1.2/ZohoEmbededAppSDK.min.js"></script>
<div class="container">
<div style="display: flex;">
<label for="country" style="width: 70%;font-weight: bolder;">Today's Gold rate:</label>
<select id="country" onchange="updateGoldRates()" style="width: 30%;">
<option value="USD" >United States</option>
<option value="INR" selected>India</option>
<option value="GBP">United Kingdom</option>
<option value="AUD">Australia</option>
</select>
</div>
<table id="goldRatesTable">
<thead>
<tr>
<th>Type</th>
<th>Rate (Per Gram)</th>
</tr>
</thead>
<tbody>
</tbody>
</table>
</div>
<script>
const goldRatesData = {
};
const symbol = ['₹', '$', '£', 'A$'];
async function getLiveData (currency) {
var myHeaders = new Headers();
myHeaders.append("x-access-token", "goldapi-4wvh4nslzb5p0d5-io");
myHeaders.append("Content-Type", "application/json");
var requestOptions = {
method: 'GET',
headers: myHeaders,
redirect: 'follow'
};
let response = await fetch(`https://www.goldapi.io/api/XAU/${currency}`, requestOptions);
let res = await response.text();
let data = JSON.parse(res);
let desig;
if(data.currency === 'INR'){
desig = symbol[0];
}
else if(data.currency === 'USD'){
desig = symbol[1];
}
else if(data.currency === 'GBP'){
desig = symbol[2];
}
else if(data.currency === 'AUD'){
desig = symbol[3];
}
goldRatesData[`${data.currency}`] = [
{ type: '24K Gold', price: `${desig + " " + data.price_gram_24k}` },
{ type: '22K Gold', price: `${desig + " " + data.price_gram_22k}` },
{ type: '18K Gold', price: `${desig + " " + data.price_gram_18k}` }
];
};
async function updateGoldRates() {
var currency = document.getElementById("country").value;
console.log("Event:: ",currency);
const country = document.getElementById('country').value;
const tableBody = document.querySelector('#goldRatesTable tbody');
tableBody.innerHTML = '';
await getLiveData(currency);
if (country && goldRatesData[country]) {
const rates = goldRatesData[country];
rates.forEach(rate => {
const row = document.createElement('tr');
row.innerHTML = `
<td>${rate.type}</td>
<td>${rate.price}</td>
`;
tableBody.appendChild(row);
});
}
}
updateGoldRates();
ZOHO.embeddedApp.on("PageLoad",function(res){
document.getElementById('msg').innerText = res.data;
});
ZOHO.embeddedApp.init();
</script>
</body>
</html>
Once you have added the code, upload the zip file by following the below steps.
Go to Setup > Developer Space > Widgets.
Click Create New Widget and Fill in the details.
The Hosting should be "Zoho" and mention the html page of the app folder that you uploaded.
B. Create Client Script Commands
Configure a Client Script Command by specifying the Name and Description and click Next. Click here to know how to configure a Client Script.

ZDK.Client.openPopup({ api_name: 'goldrate', type: 'widget',header: undefined, animation_type: 4, height: '350px', width: '300px', top:'100px',left: '500px' }, { data: 'sample data to be passed' }); |
Click here to know more about openPopup().
Consider that the user has created the shortcut CMD G to trigger Client Script.
Here is how the Gold Rate appears as and when the salesperson used the shortcut keys CMD G.
6. Summary
We have seen,
how to use Client Script Commands
how to create keyboard shortcuts for Commands
how to view Widget as a popup using Commands
7. Related Links
