Extension pointers #14: Extend end-user benefits and allow personalization by implementing extensions with custom actions
From our earlier post on custom actions, we know that we can create templated actions, share them with end users, and allow them to reuse those actions to achieve personalized outcomes. In this post, we'll look at how custom actions make it easy for users to carry out these templated tasks to get customized results.
Consider the following scenario: a hardware company that already uses Zoho CRM then utilizes Zoho Projects to implement and work on the deals they've won. Assume that the Zoho Projects portal has two projects: one for handling smaller revenue deals that require minimum development and less time, and the other for managing larger revenue dealsthat will eventually demand more time and resources for execution.
As an end user processing deals in Zoho CRM, it would be extremely convenient for the company to have the deals automatically fall into the appropriate projects, such as a task based on the expected revenue. Furthermore, it would be ideal to send emails to the customer with whom they have made the deal to request anything needed from their end in order to move forward with the implementation of the deal. Let's see how we can achieve this with the help of custom actions.
We have detailed posts on the steps to create a custom action along with a live example. Now, let's reiterate and go over the steps to achieving the above use case.
Developer activities
1. Create a connector for Zoho Projects.
2. Create a custom user interface (widget-connected app) that allows the user to select the project where the deal should be created as a task, as well as add the personalized email subject and body that will be sent to the user.
3. Create a custom action in the Zoho Developer console.
- Associate the custom user interface to the custom action.
- Define an action that creates a task in the selected project and also sends an email to the customer based on the values entered by the end user in the custom UI.
Extension/end-user activities
4. Create workflows as an end-user (i.e., set criteria on expected revenue; provide personalized values for email subject and body, and choose the project in which the deal fulfilling the set criteria should be created as a task) and assign a custom action to them.
Developer activities
1. Creating a connector
- Create a new connector in your extension for Zoho Projects using the Connectors feature under Utilities in the left panel of the Zoho Developer console.
Note: Zoho Projects follows the OAuth 2.0 protocol for its authentication mechanism. You can refer to this post to learn more about the steps to register Zoho Projects and retrieve your client credentials.
- Add the necessary connector APIs for your functionality.
- The Zoho Projects REST APIs added for our example are mentioned below.
Connector API Name | Method type | URL |
Get Projects | GET | https://projectsapi.zoho.com/restapi/portal/${portalid}/projects/ |
Create project task | POST | https://projectsapi.zoho.com/restapi/portal/${portalid}/projects/${projectid}/tasks/?name=${name}&description=${description} |
2. Create a custom user interface:
1. Create a custom user interface that allows the end user to select the project in which they want to create the deal as a task, as well as enter the email subject and body that should be sent to the contact associated with the deal.
2. You can find the HTML code for the custom UI as an attachment to the post.
- In the HTML code, we have two text fields to get the user inputs for the email subject and body.
- We have also invoked the connector API to get projects from a portal. The response is then populated and displayed as a dropdown list to allow the user to select the project in which they want the deal to be created as a task.
- In the HTML code snippet, we have hard coded a static value for the Zoho Projects portal.
Note: Depending on your business use case requirements, you can create custom variables to prompt the user to input their Zoho Project portal ID, or you can create a setting widget that displays the user's portals, allowing the user to choose the portal in which they want to have the deals created as tasks as well.
- ZOHO.CRM.ACTION.setConfig - In this example, we have utilized the setConfig method. This method can be used to set values to variables which can be retrieved later through the widget's page load response.
➤ For our example, we have used the setConfig method to set various Zoho CRM deal and email (subject and body) user input values to variables. We have later obtained these saved values through the widget's page load response, which contains a configdata key with these set data as its values.➤ Sample page load response when ZOHO.CRM.ACTION.setConfig is used in our example:
"module": "Deals", "configdata": { DealTest: "Sample Digital Marketing Project" Dealdescription: "${!Deals.Description}" Dealname: "${!Deals.Deal_Name}" Message: "Sample Message" Subject: "Deal Won!" To: "${!Deals.Contact_Name.Email}" |
➤ We have then used the preset saved values available in the configdata key to prepopulate the widget UI every time it loads.
3. Create a custom action
- Go to the Zoho Developer console and select the extension in which you want to create the custom action.
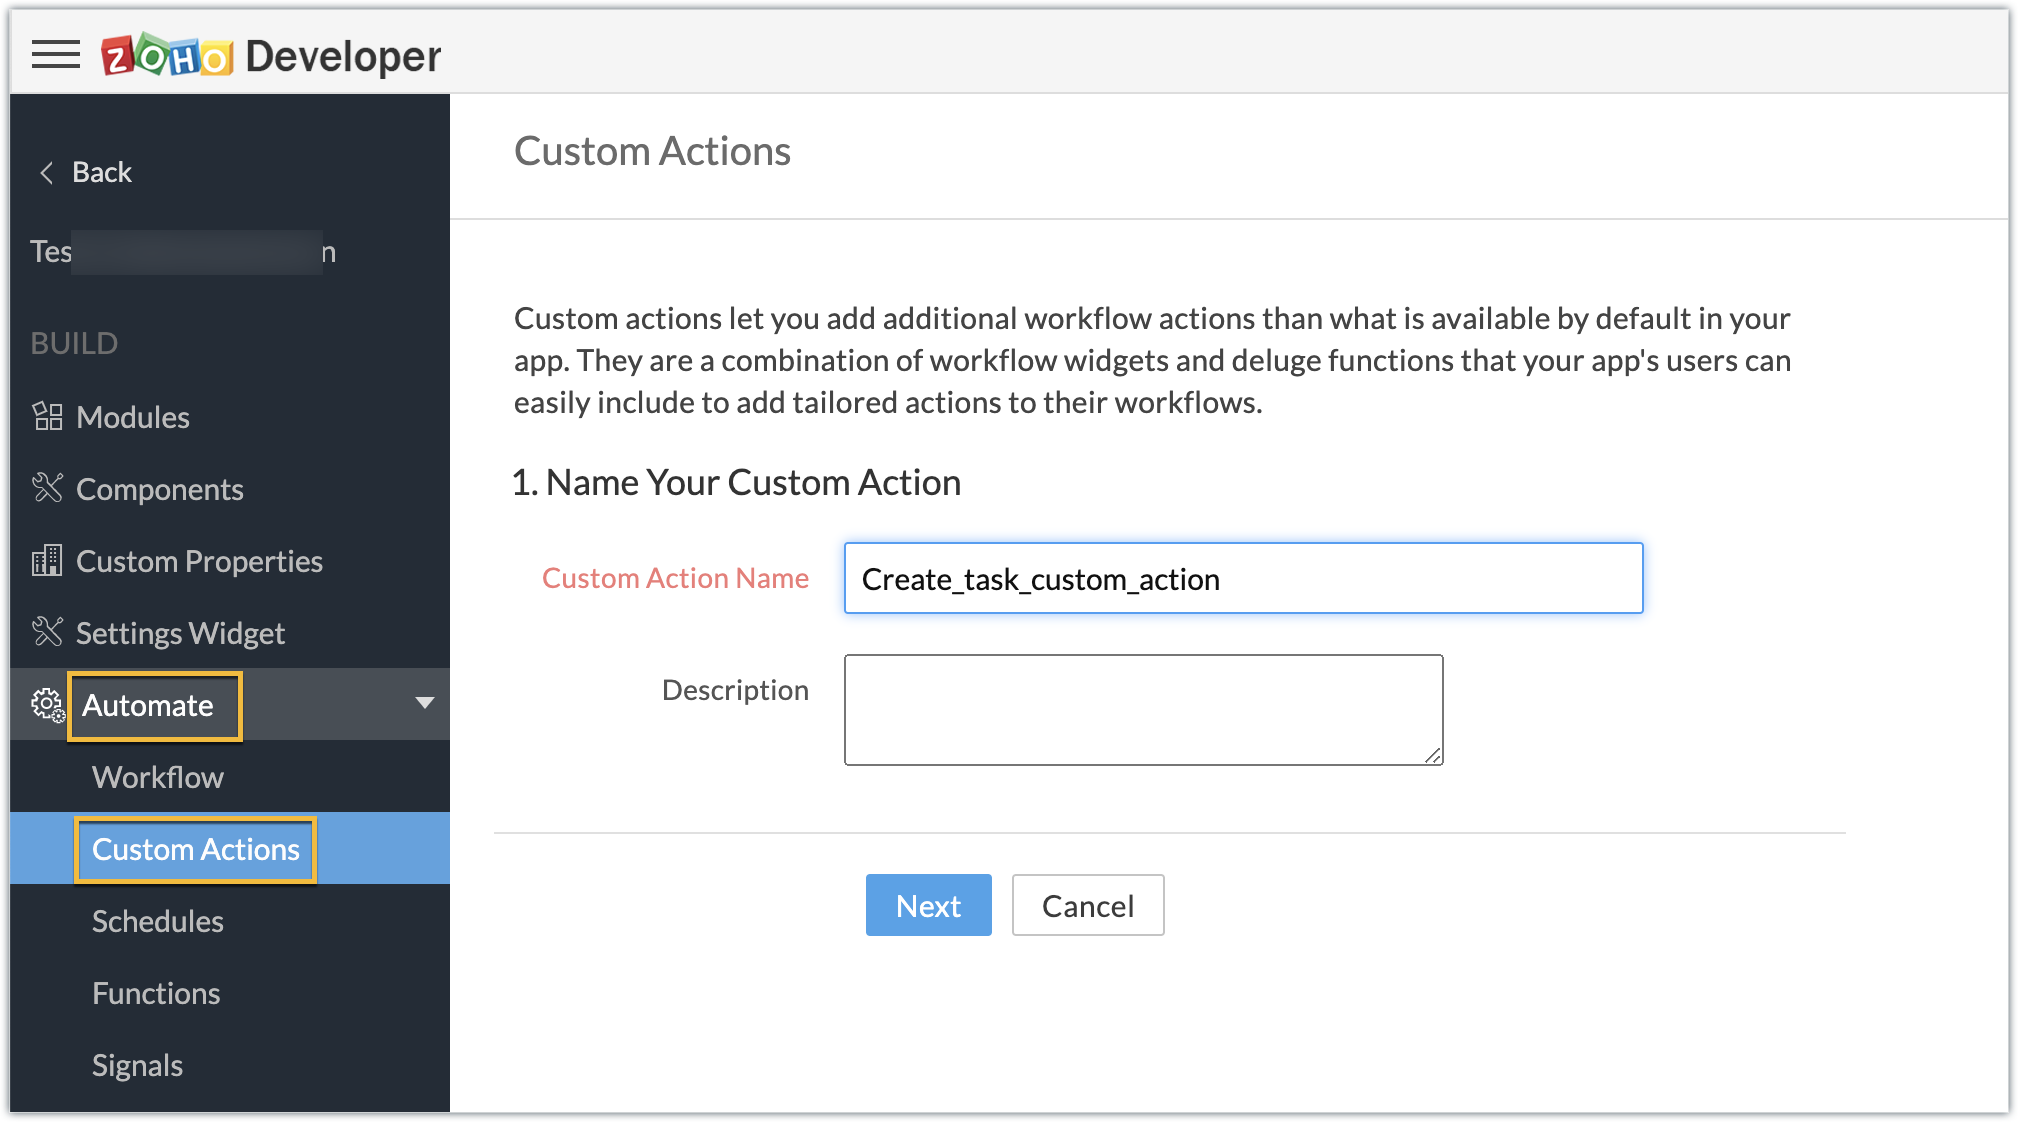
- Create a custom action by navigating through Automate - > Custom Actions, under the Build section in the left panel. Click Create Action.
- Enter the Custom Action Name and Description. Click Next.
- Provide the location of the html file (widget UI) to complete the resource path. Click Next, then click Create Function.
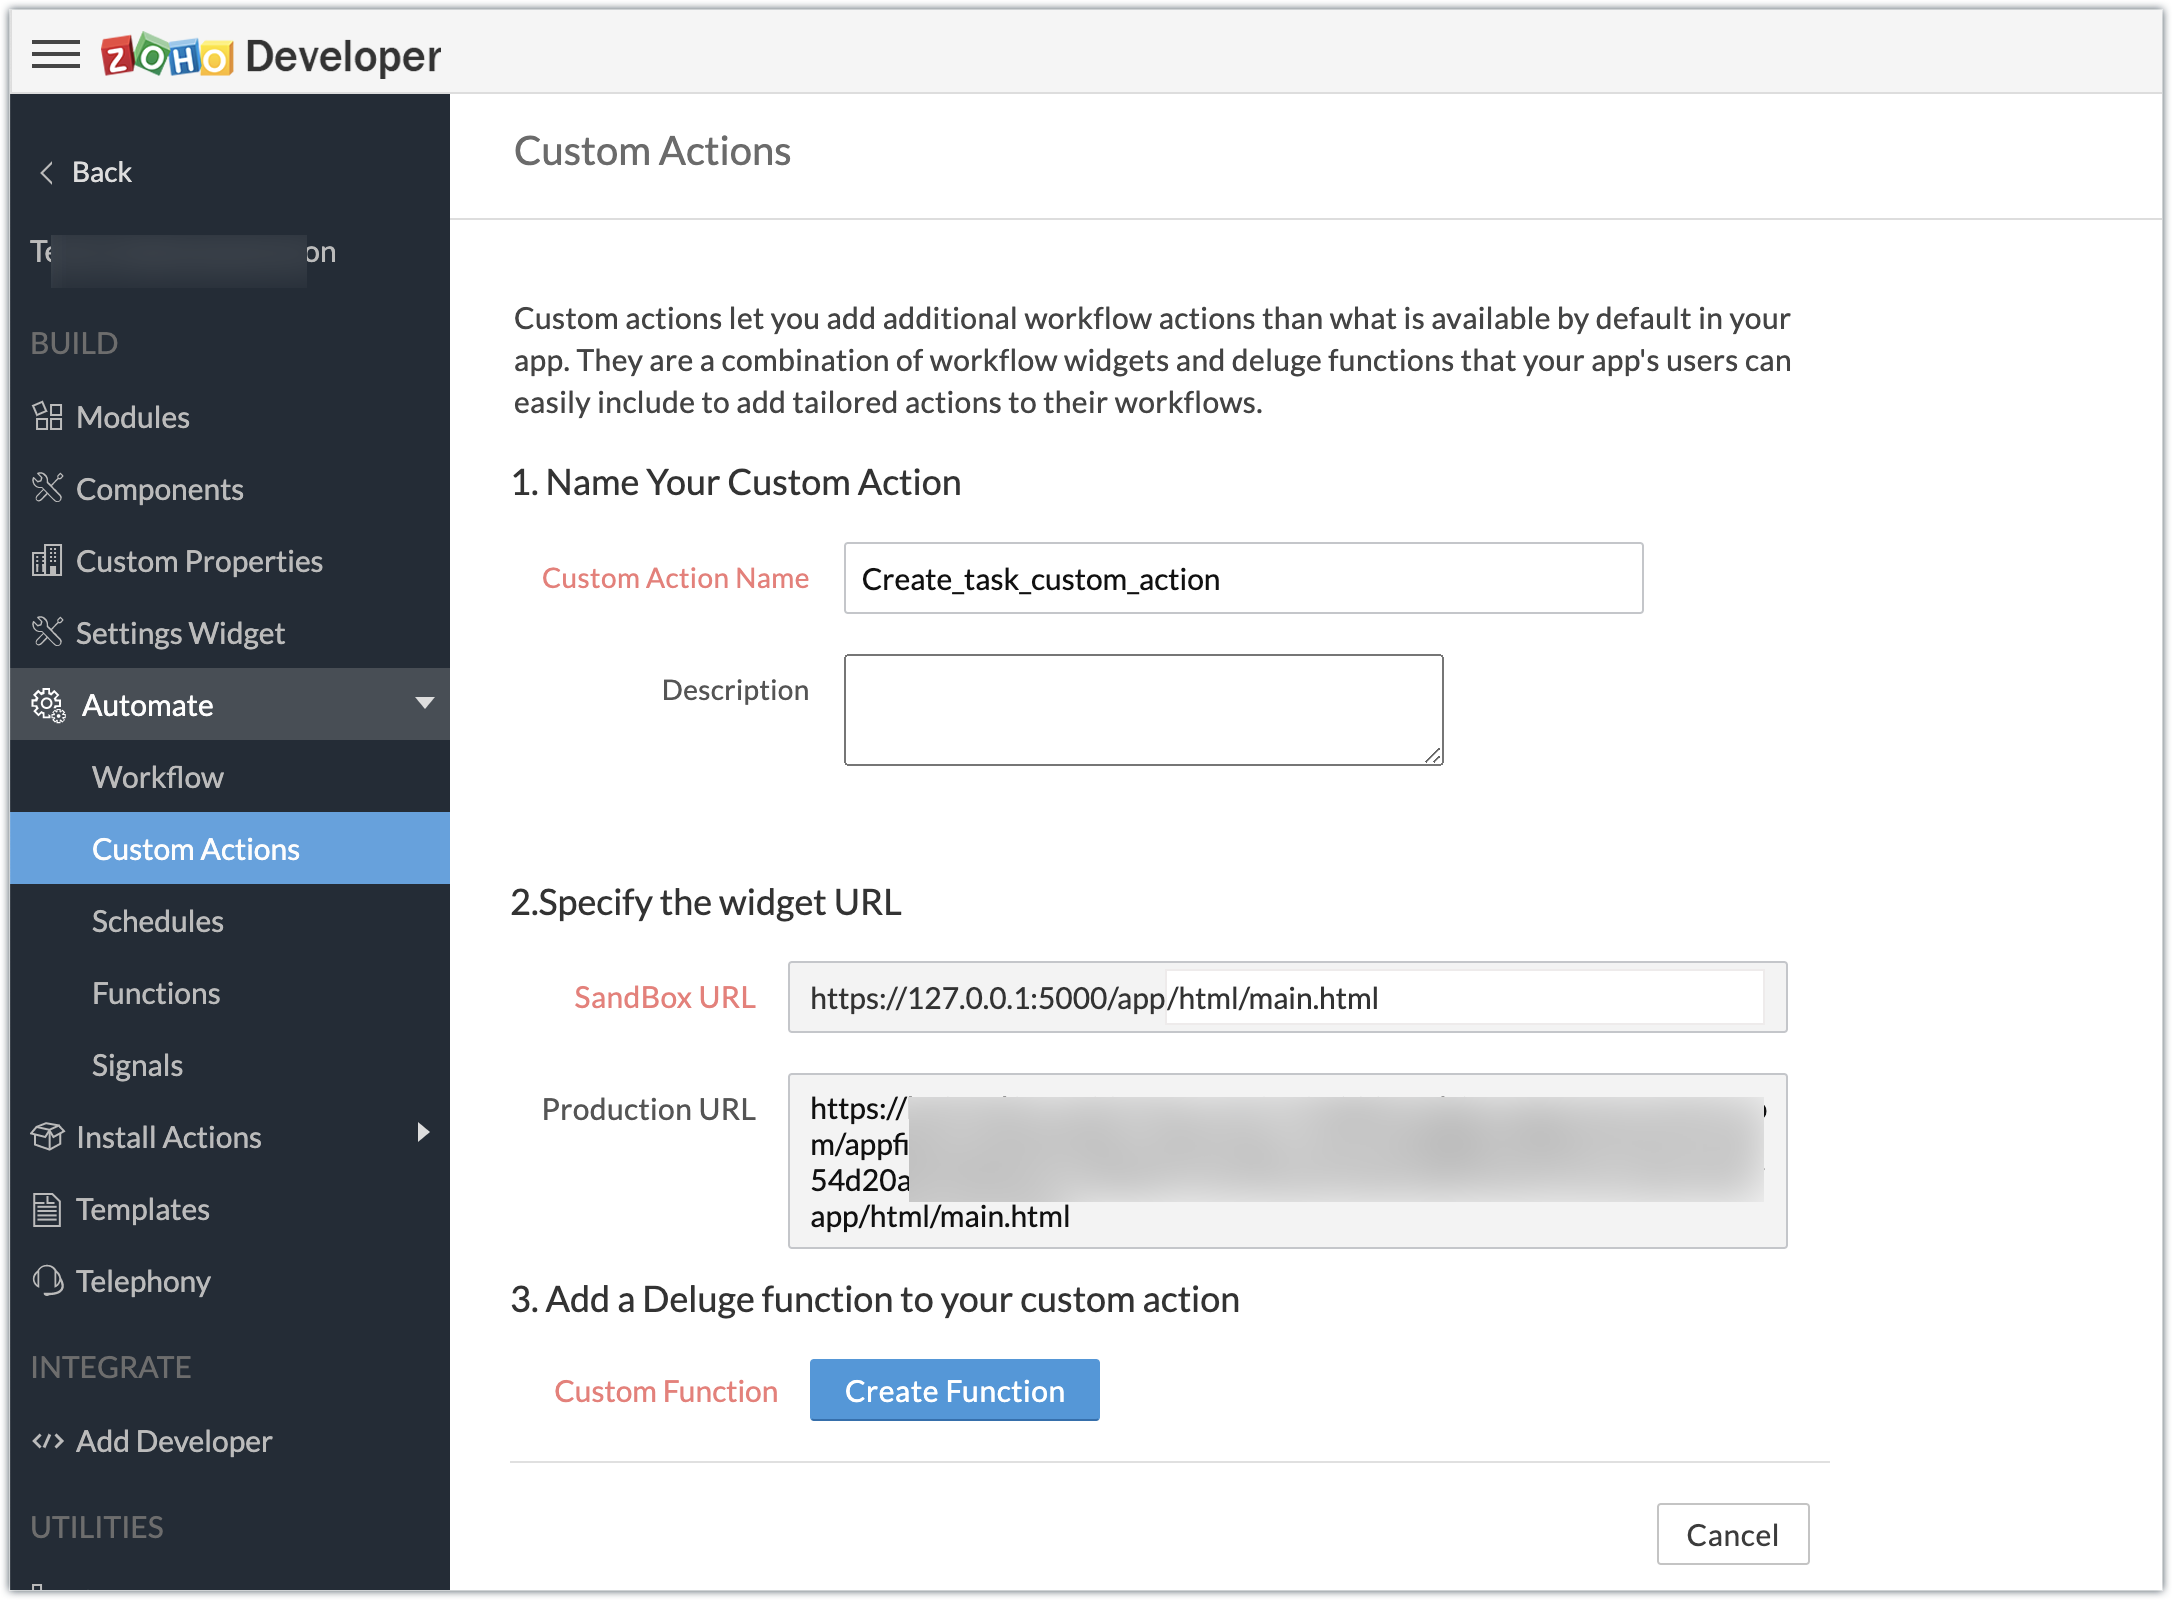
- Enter the Deluge function to perform our use case functionality.
- Click Save & Close, then click Save.
Deluge function code snippet:
dynamic_map = Map(); dynamic_map.put("portalid","xxxxxx"); dynamic_map.put("projectid",input.config.get("Dealproject")); dynamic_map.put("name",input.config.get("Dealname")); dynamic_map.put("description",input.config.get("Dealdescription")); response = zoho.crm.invokeConnector("xxxxx.zohoprojects.createprojecttask",dynamic_map); sendmail [ from :zoho.adminuserid to :input.config.get("To") subject :input.config.get("Subject") message :input.config.get("Message") ] |
- In the above Deluge code, we have performed the functionality of creating the deal as a task in Projects and sending an email to the deal's contact with the input provided by the end user in their CRM account while associating the custom action to a workflow.
Custom action in effect (End-user):
Create workflows:
- As an end user who has the extension which features the custom action installed in the Zoho CRM account, go ahead and create workflows to define criteria and associate the custom action.
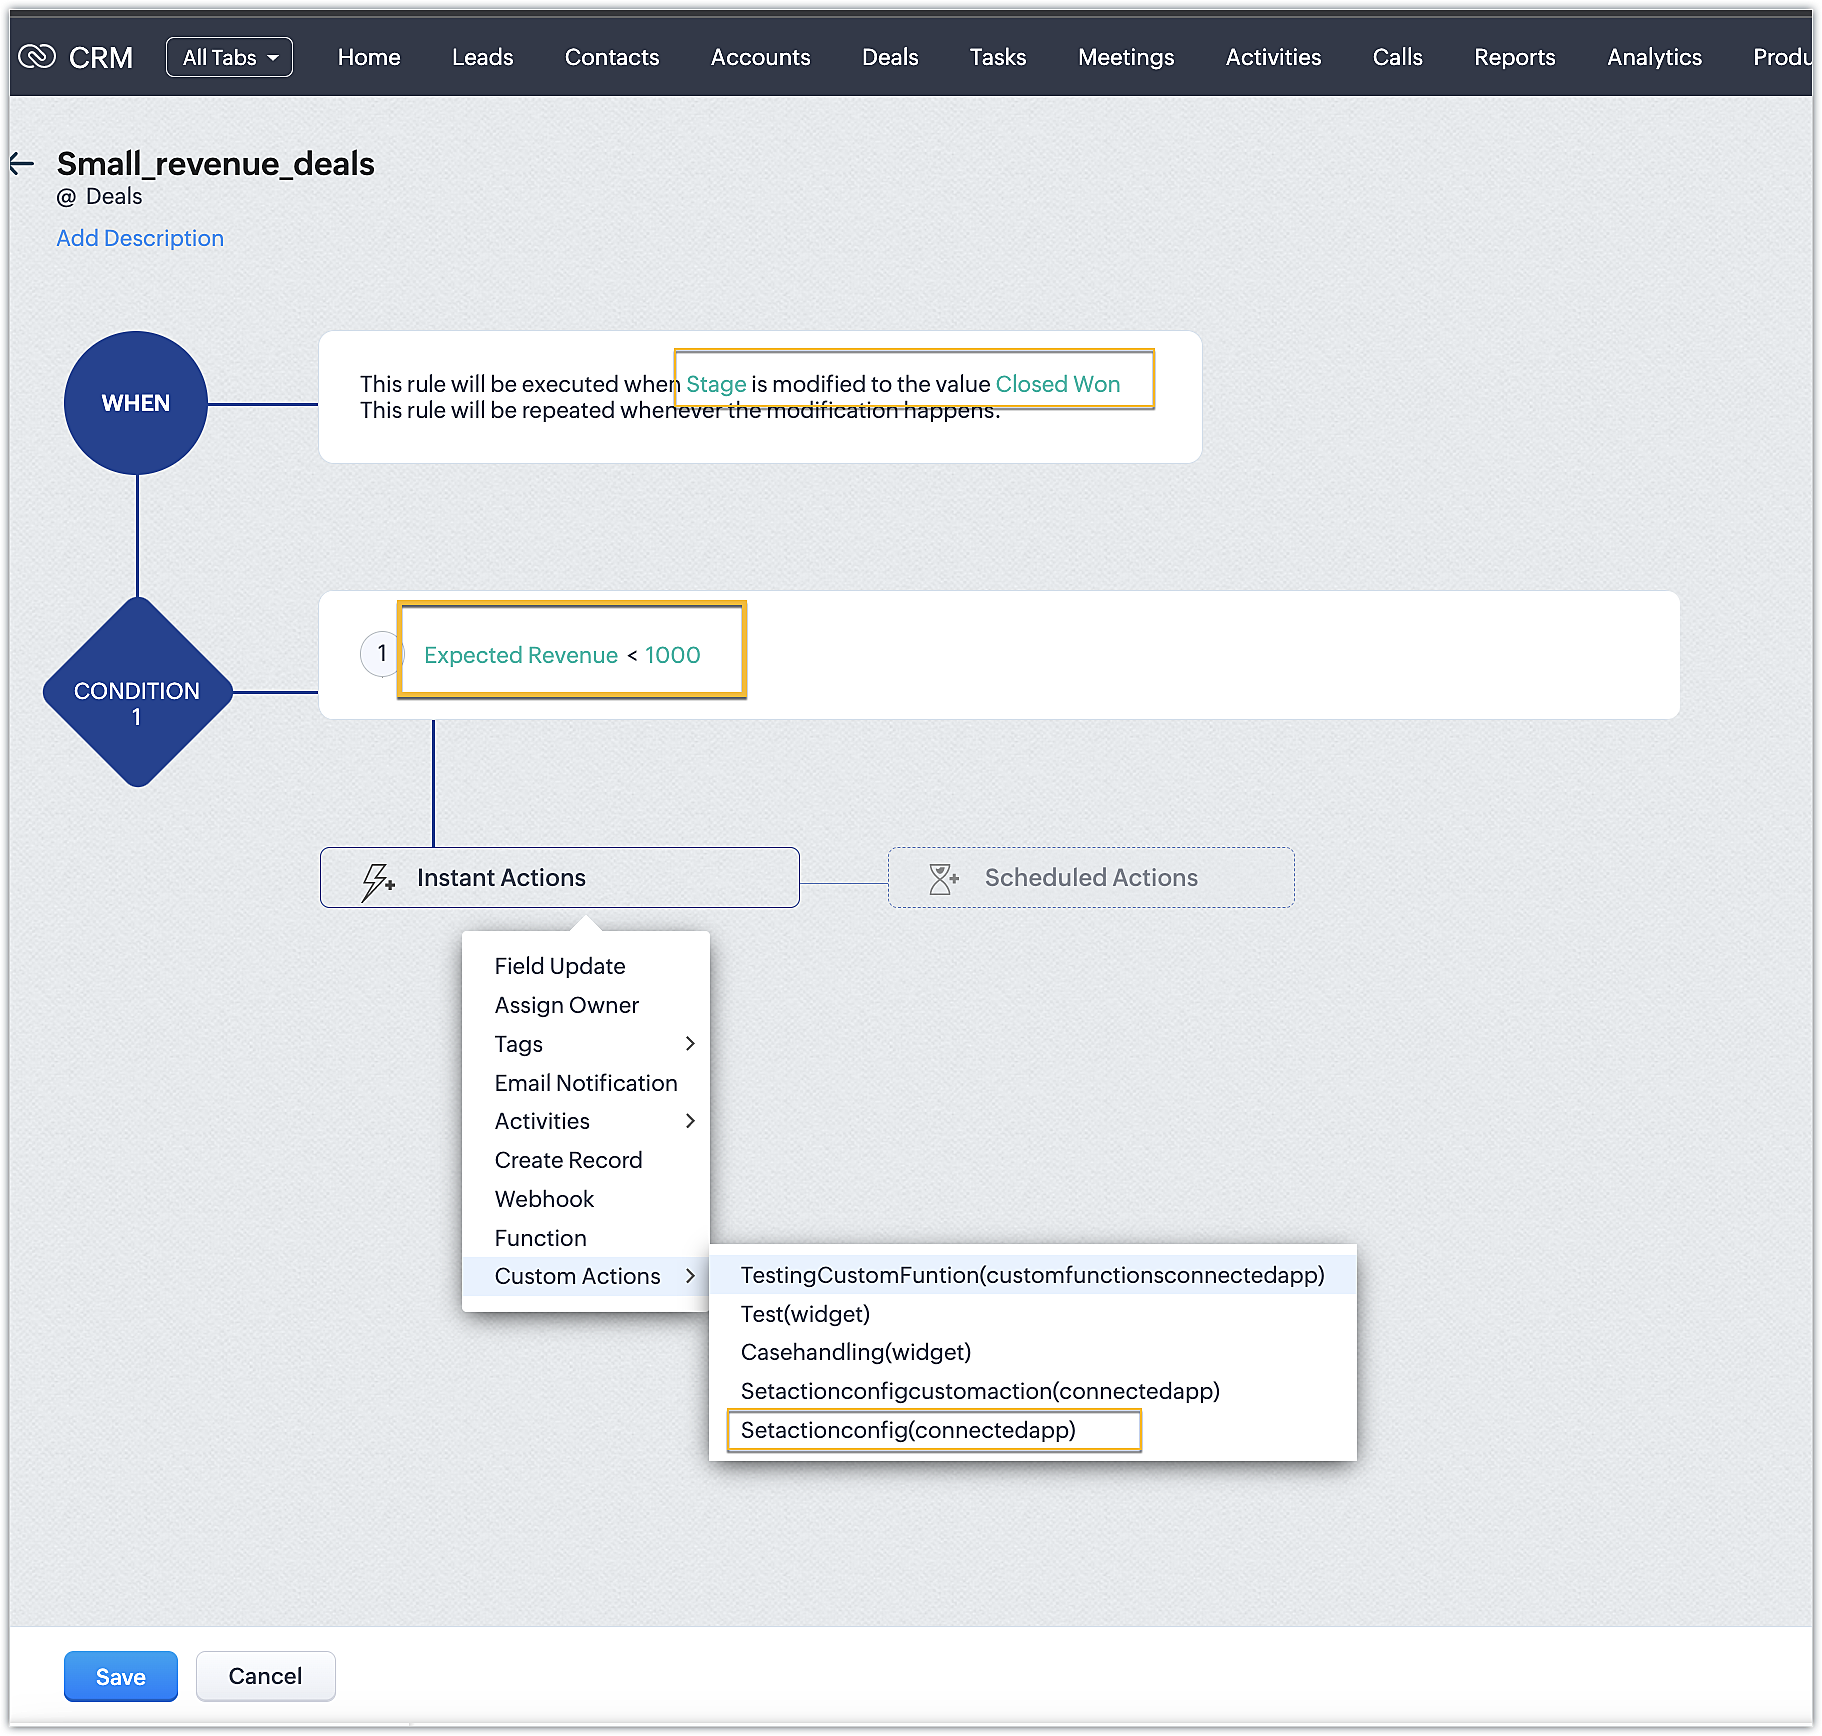
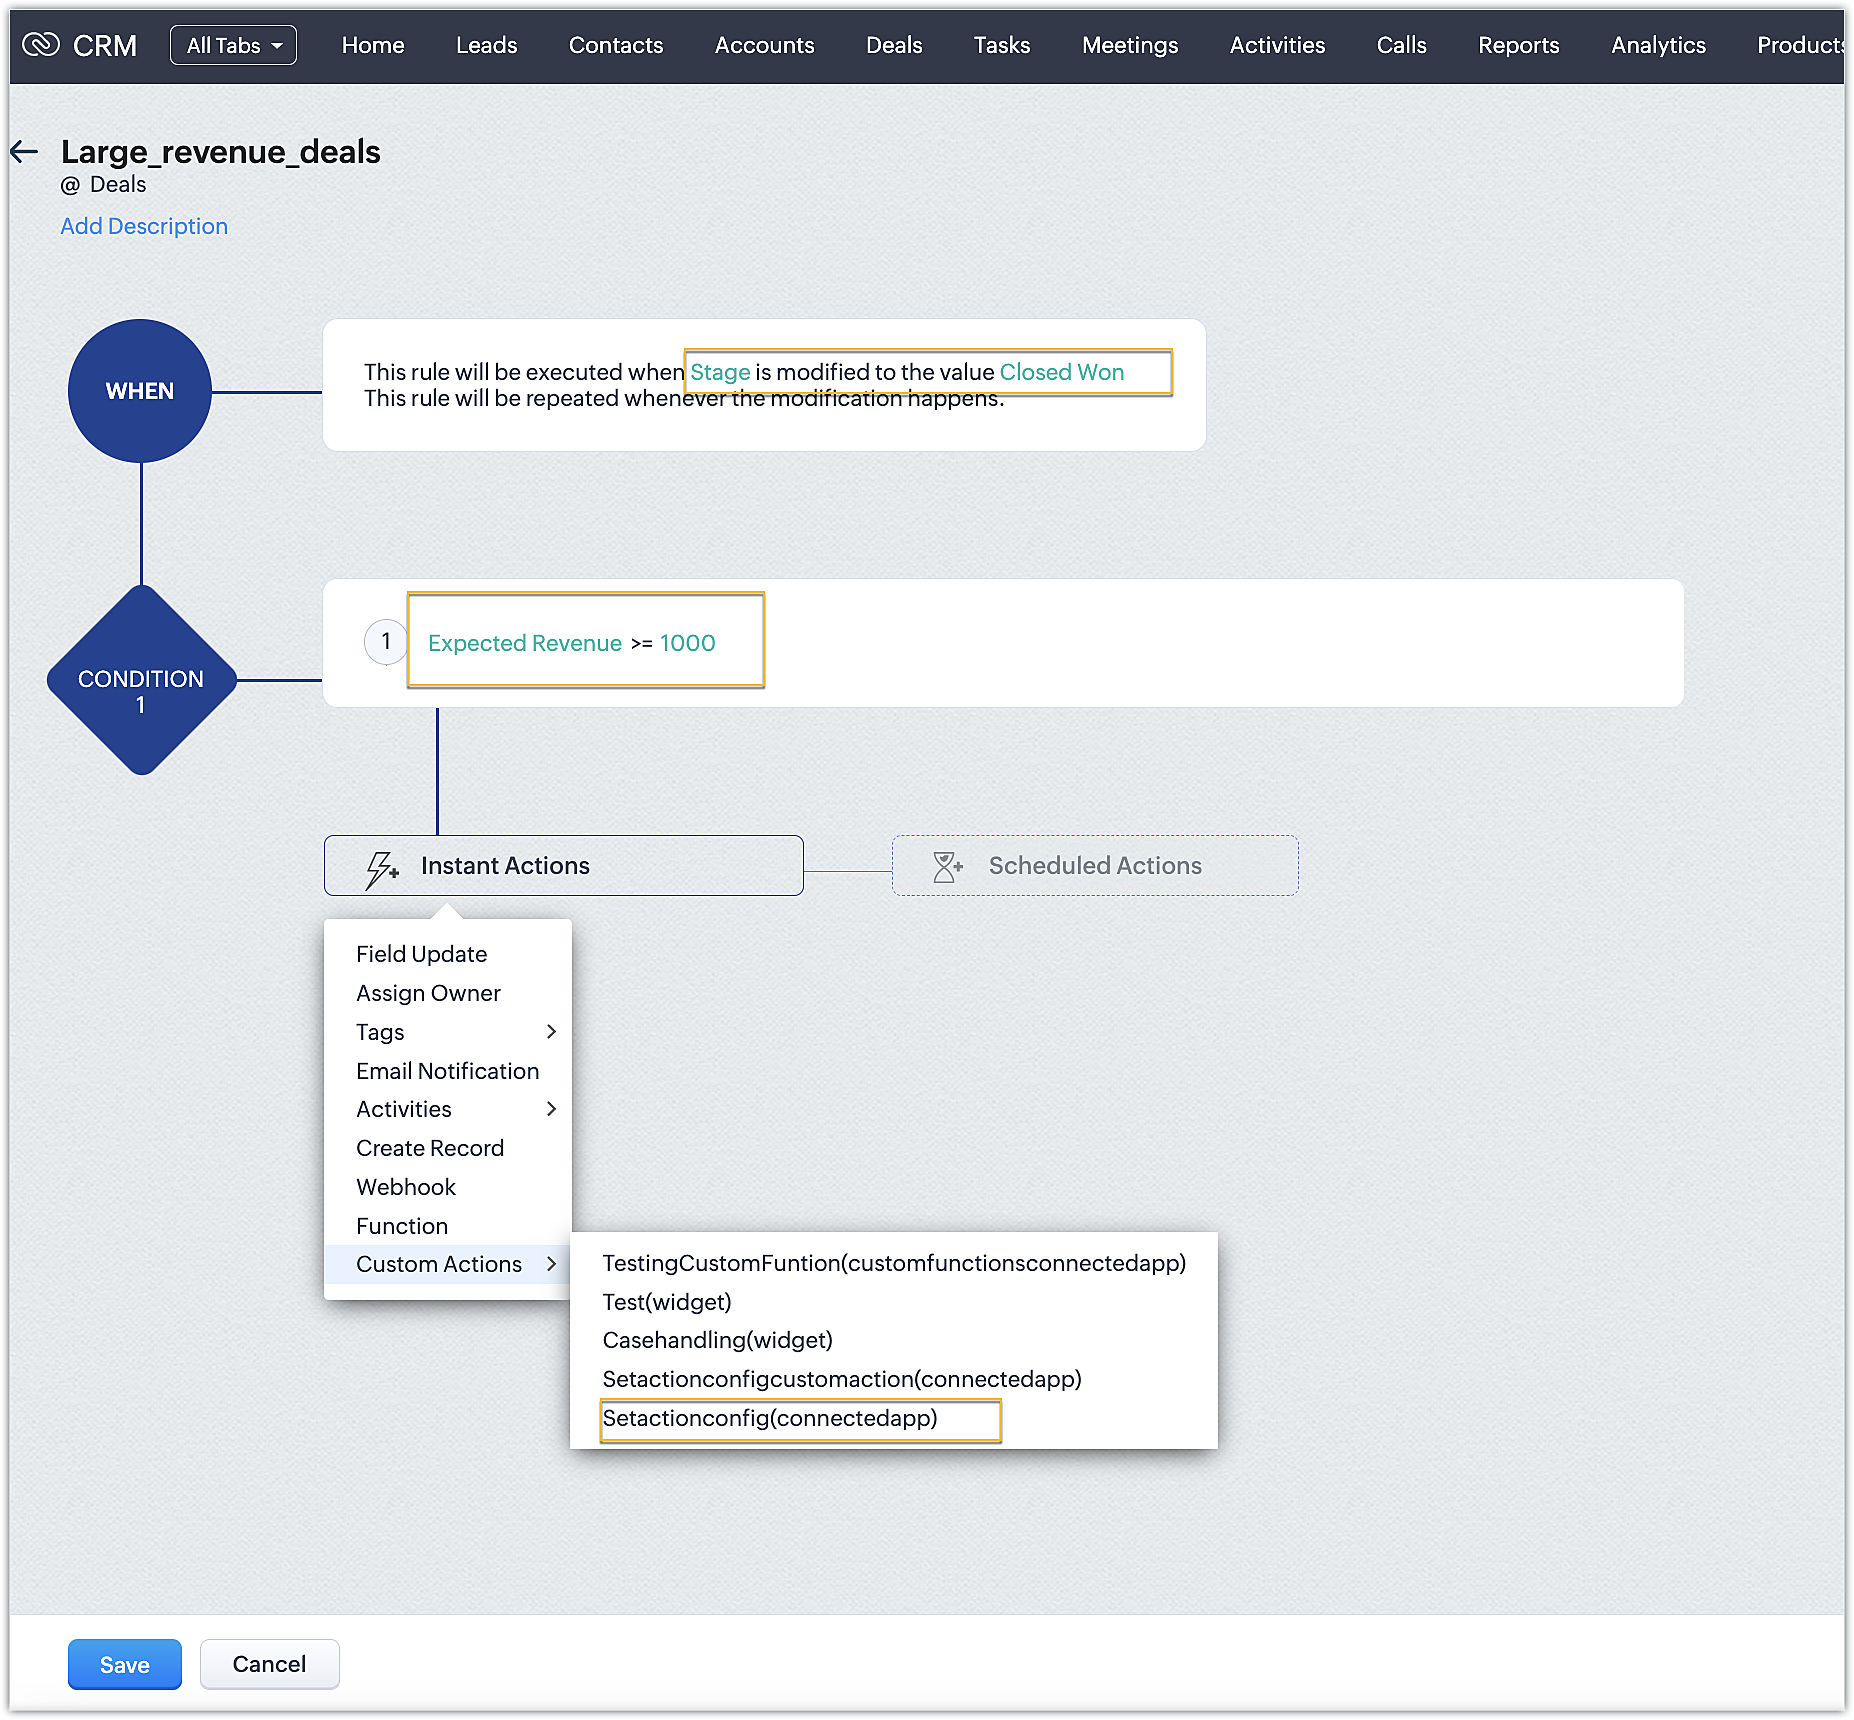
- In our case, we have two workflows:
➤ One for smaller deals where the expected revenue is less than 1000 USD
➤ One for larger deals where the expected revenue is greater than or equal to 1000USD
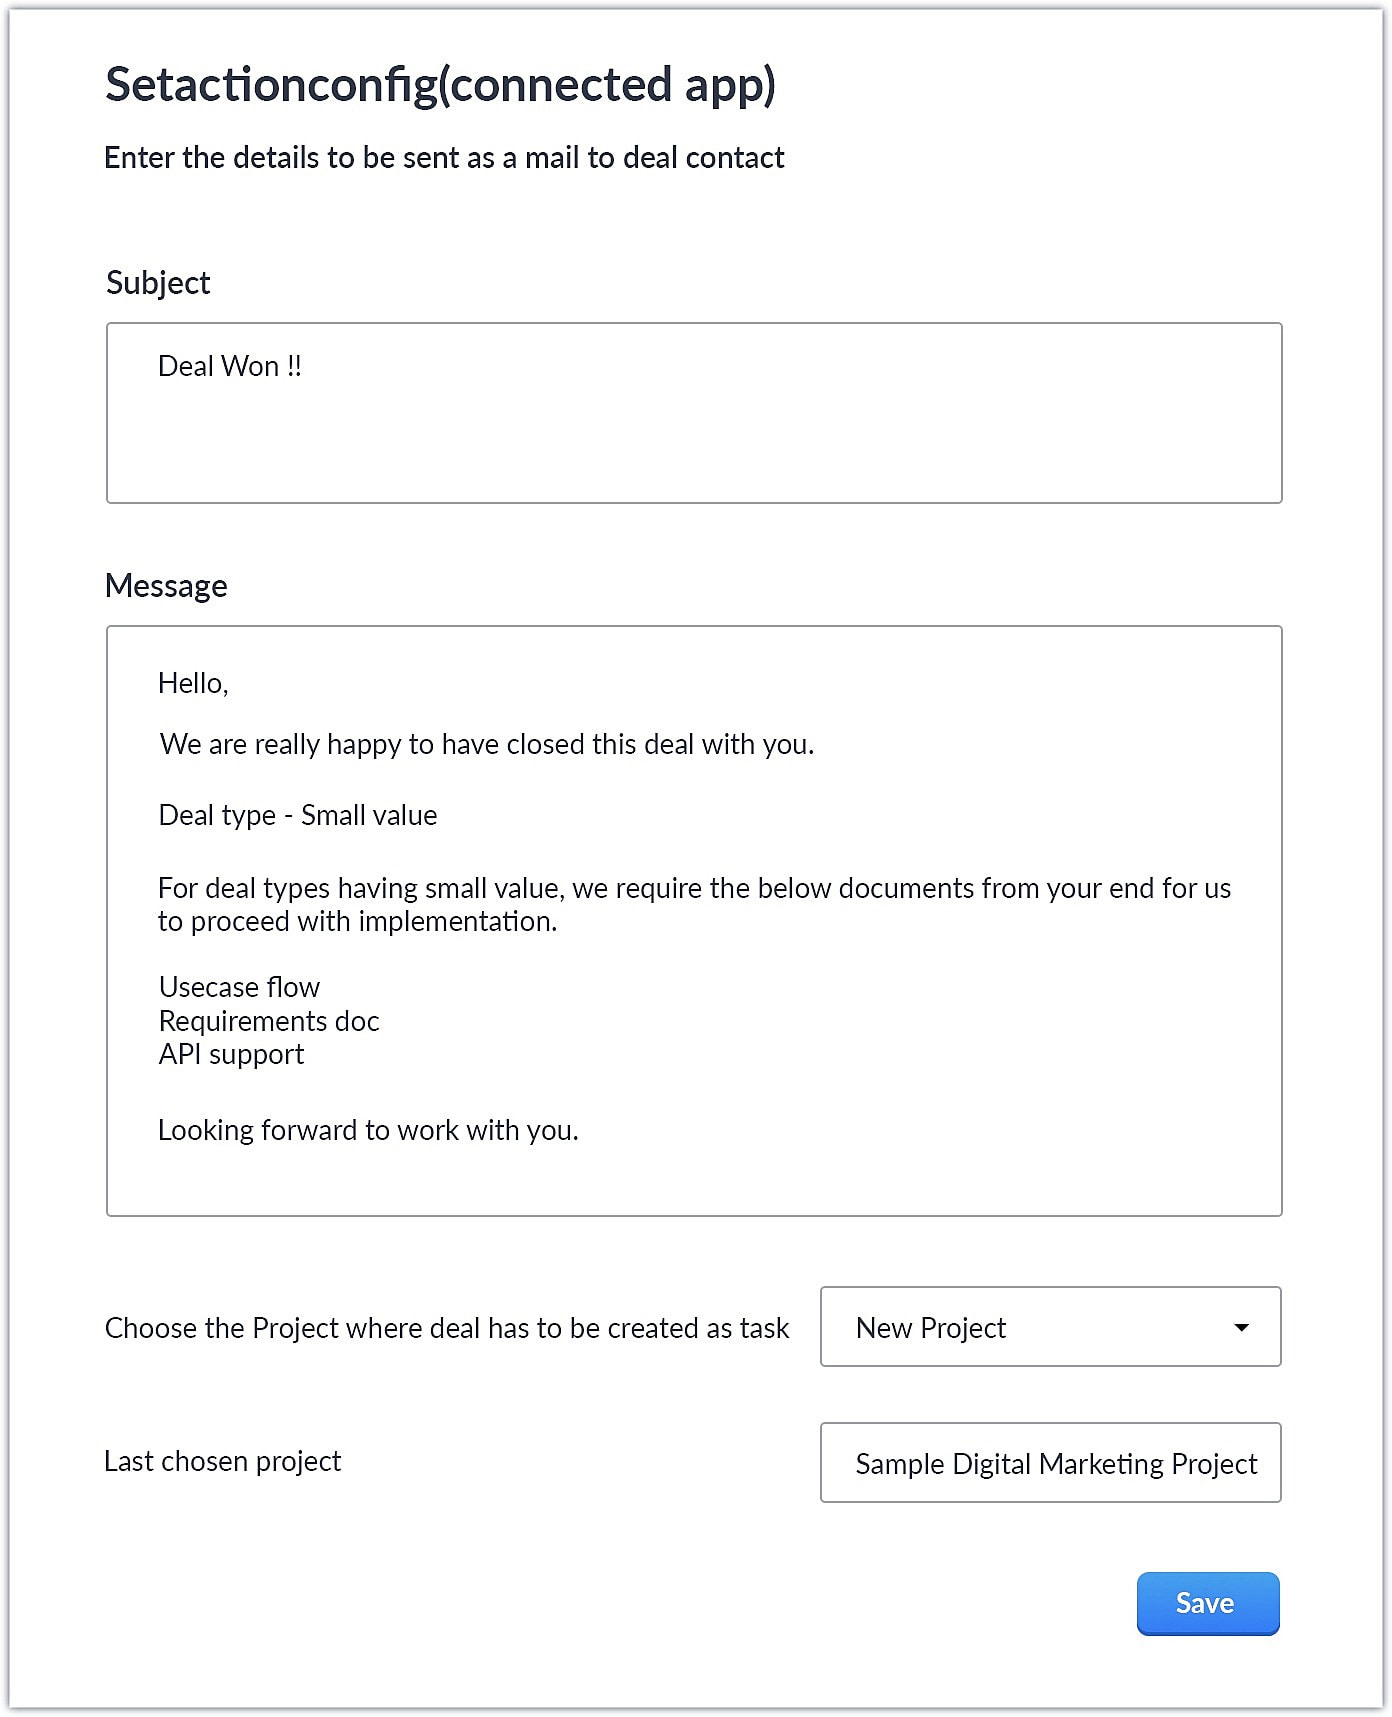
- Upon choosing the custom action, the custom UI appears where-in you can provide user specific input for email body and subject and also choose the project where you want deal to be created as a task in Zoho Projects.
Smaller revenue deals:
Larger revenue deals:
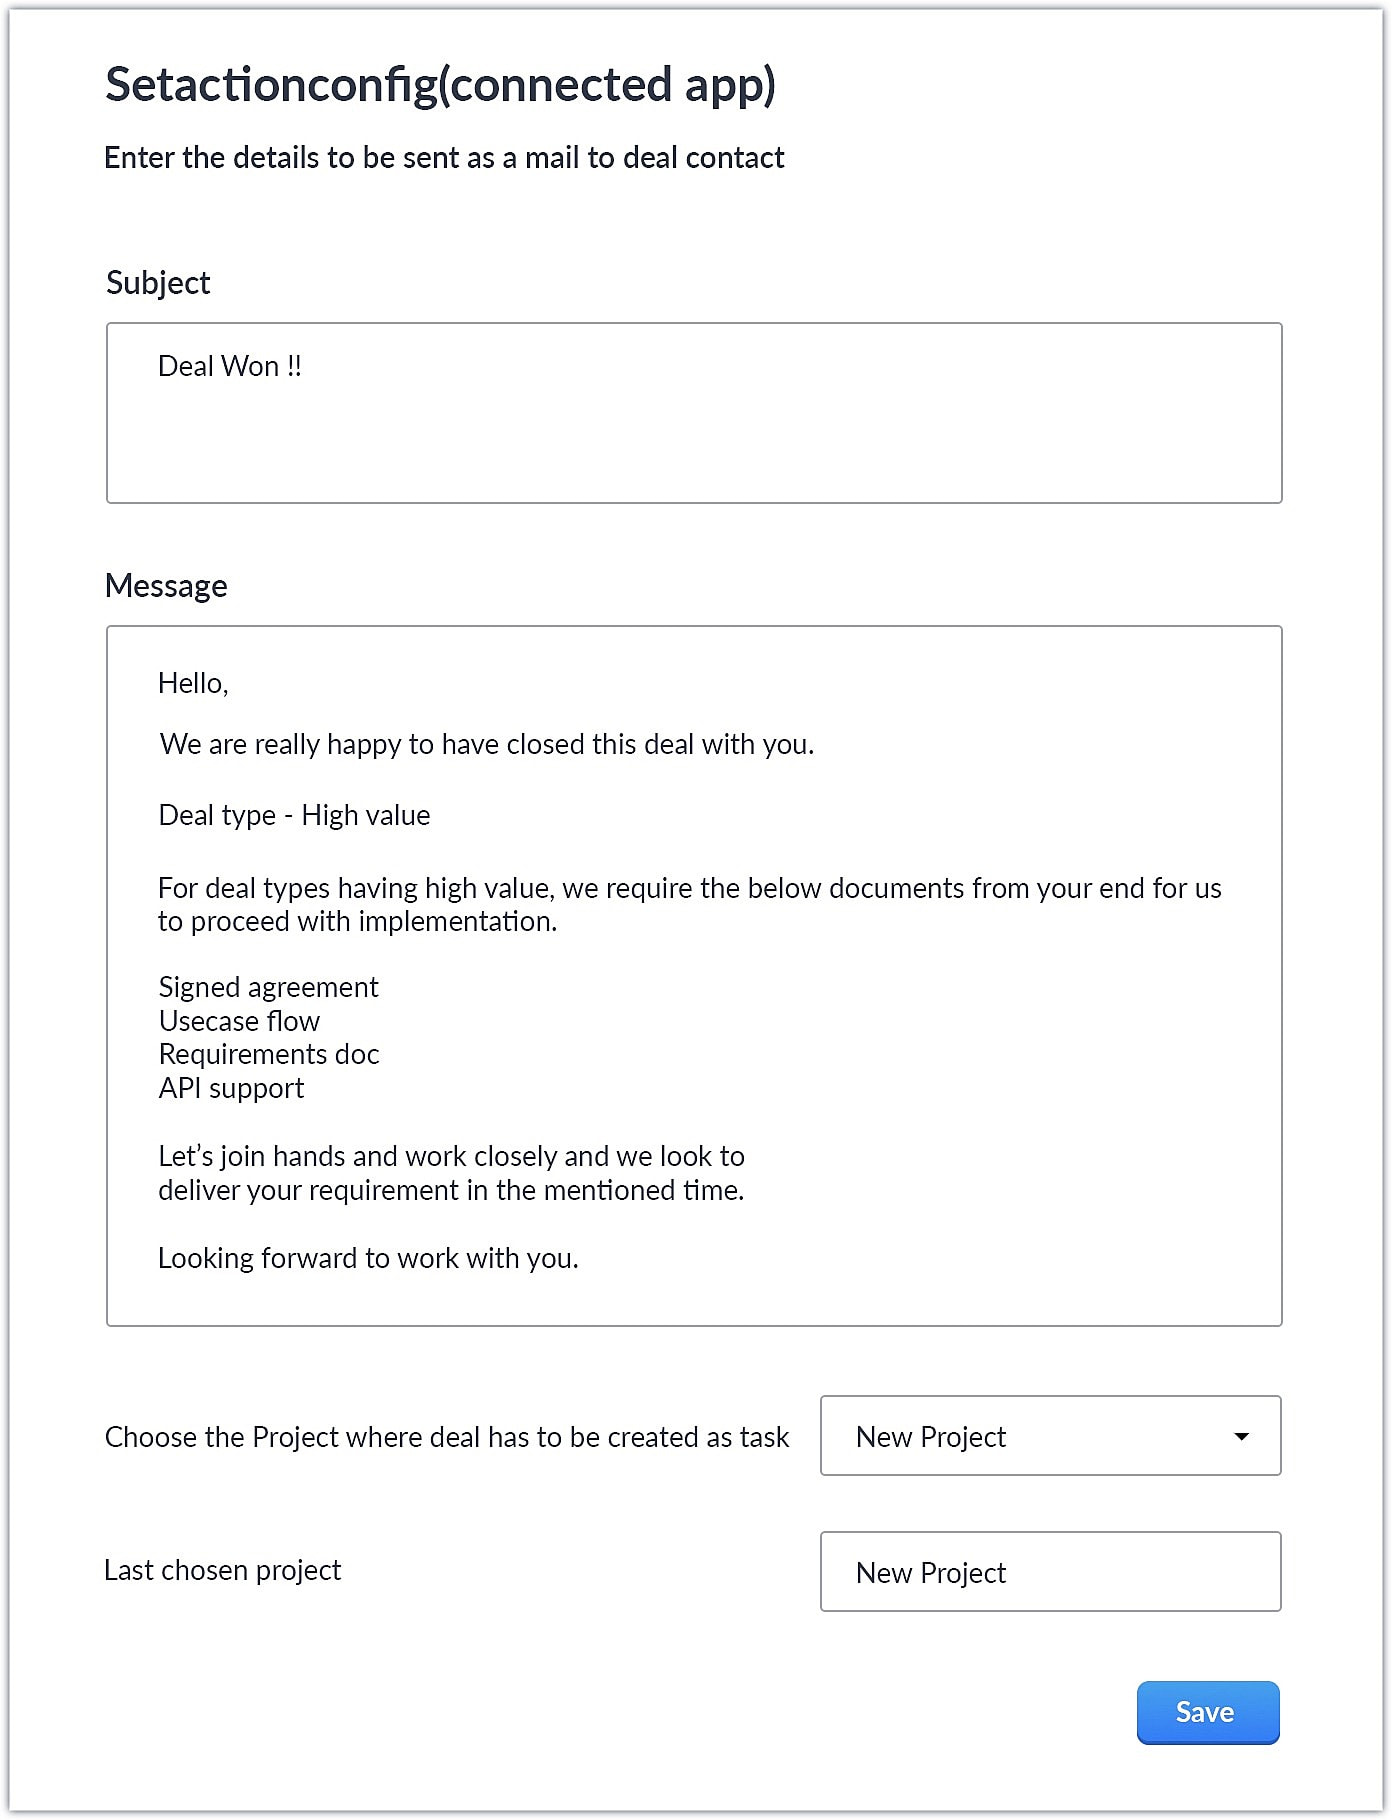
- When a deal with the necessary criteria is satisfied, an email is sent out to the deal's contact with the subject and body provided by the end user. A task is also created in Zoho Projects with some specific deal details.
This is one business case where you can use custom action. As a parallel use case to the above example itself, say you have multiple projects in Zoho Projects, each used to work on different case categories (bugs, issues, feature request, etc.). You could develop the same kind of template and allow end users to configure the criteria and outcomes accordingly.
You could also use custom actions feature to perform templated actions to obtain personalized outcomes depending on your business needs. We hope you found this information helpful. Keep following this space for more information!
SEE ALSO:
Centralize Knowledge. Transform Learning.
All-in-one knowledge management and training platform for your employees and customers.
New to Zoho Recruit?
Zoho Developer Community
New to Zoho LandingPage?
Zoho LandingPage Resources
New to Bigin?
Topic Participants
Nanditha Somasundaram Somasundaram
Sticky Posts
Kaizen #198: Using Client Script for Custom Validation in Blueprint
Nearing 200th Kaizen Post – 1 More to the Big Two-Oh-Oh! Do you have any questions, suggestions, or topics you would like us to cover in future posts? Your insights and suggestions help us shape future content and make this series better for everyone.Kaizen #226: Using ZRC in Client Script
Hello everyone! Welcome to another week of Kaizen. In today's post, lets see what is ZRC (Zoho Request Client) and how we can use ZRC methods in Client Script to get inputs from a Salesperson and update the Lead status with a single button click. In thisKaizen #222 - Client Script Support for Notes Related List
Hello everyone! Welcome to another week of Kaizen. The final Kaizen post of the year 2025 is here! With the new Client Script support for the Notes Related List, you can validate, enrich, and manage notes across modules. In this post, we’ll explore howKaizen #217 - Actions APIs : Tasks
Welcome to another week of Kaizen! In last week's post we discussed Email Notifications APIs which act as the link between your Workflow automations and you. We have discussed how Zylker Cloud Services uses Email Notifications API in their custom dashboard.Kaizen #216 - Actions APIs : Email Notifications
Welcome to another week of Kaizen! For the last three weeks, we have been discussing Zylker's workflows. We successfully updated a dormant workflow, built a new one from the ground up and more. But our work is not finished—these automated processes are
New to Zoho TeamInbox?
Zoho TeamInbox Resources
Zoho CRM Plus Resources
Zoho Books Resources
Zoho Subscriptions Resources
Zoho Projects Resources
Zoho Sprints Resources
Qntrl Resources
Zoho Creator Resources
Zoho CRM Resources
Zoho Show Resources
Get Started. Write Away!
Writer is a powerful online word processor, designed for collaborative work.
Zoho CRM コンテンツ
-
オンラインヘルプ
-
Webセミナー
-
機能活用動画
-
よくある質問
-
Ebook
-
-
Zoho Campaigns
- Zoho サービスのWebセミナー
その他のサービス コンテンツ
Nederlandse Hulpbronnen
ご検討中の方
Recent Topics
Bug Causing Major Sync & SO Access Failures in Zoho POS
We are experiencing critical and recurring issues in Zoho POS that all trace back to role-permission handling defects in the latest POS app version. These issues directly affect syncing, login ability, and Sales Order access for role-restricted usersChange Last Name to not required in Leads
I would like to upload 500 target companies as leads but I don't yet have contact people for them. Can you enable the option for me to turn this requirement off to need a Second Name? Moderation update (10-Jun-23): As we explore potential solutions for"Temporary" Field Value?
I have a custom action in Form A report Detail View that passes the Rec ID and updates a Temp Record ID lookup field in the Form B record via openURL (and opens the Form B report in popup) . The updated Temp Record ID field value in Form B is then usedZoho CRM for Everyone's NextGen UI Gets an Upgrade
Hello Everyone We've made improvements to Zoho CRM for Everyone's Nextgen UI. These changes are the result of valuable feedback from you where we’ve focused on improving usability, providing wider screen space, and making navigation smoother so everythingTimesheet invalid data error
Getting the "Invalid Date" error when trying to add a time sheet to an appointment in a work order. I initially though the work order was corrupt or something so I deleted the work order and recreated it. I added the first time sheet to the AP and savedOAuth2 Scope Error - Incorrectly defaulting to CRM instead of Analytics.
Hello Zoho Team, I am trying to connect n8n to Zoho Analytics API V2 for a simple automation project. Despite using the correct Analytics-specific scopes, my OAuth handshake is failing with a CRM-related error. The Problem: The authorization screen shows:Add Custom Reports To Dashboard or Home Tab
Hi there, I think it would be great to be able to add our custom reports to the Home Tab or Dashboards. Thanks! Chad Announcement: The feature is being rolled out across DC's and Edition in phases. To know more refer to the announcement post here.Hiding Pre-defined Views
You can enhance Zoho with custom views - but you cannot hide the pre-defined views. Most users focus on 4 or 5 views. Right now for EVERY user EVERY time they want to move to one of their 4 or 5 views - they have to scroll down past a long list of pre-definedwhy can't agent see accounts & contacts
My new user, with 'Agent' privileges, cannot see records that don't belong to them. How can I give them access? Why isn't this the default configuration in Zoho?Sender Email Configuration Error.
Hello Team, Hope you are all doing well. We are in the process of creating the Zoho FSM environment in the UAE. When we try to add the sender email address “techsupportuae@stryker.com”, we receive the error message: “Error occurred while sending mail【Zoho CRM】フィルター機能のアップデート:ルックアップ項目を使ったデータフィルタリング
ユーザーの皆さま、こんにちは。コミュニティチームの藤澤です。 今回は「Zoho CRM アップデート情報」の中からフィルター機能のアップデートをご紹介します。 ルックアップ項目を使ったデータフィルタリングがより詳細に行えるようになりました。 この機能は詳細フィルターとカスタムビューで利用でき、必要な情報を正確に取得できます。 これにより、タブ間を移動することなく、より深く正確な方法でデータを絞り込むことが可能になります。 ◉できること 詳細フィルターとカスタムビューで、ルックアップ先タブの項目が選択可能This will be long, Please bear with me - Next Gen Layout - Search
In general, I think that Zoho are going in the right direction with the Next Gen UI. The latest update brings some nice improvements and all-in-all from a user's perspective I think the improvements are generally very good. However, there are some areasZoho Books | Product updates | July 2025
Hello users, We’ve rolled out new features and enhancements in Zoho Books. From plan-based trials to the option to mark PDF templates as inactive, explore the updates designed to enhance your bookkeeping experience. Introducing Plan Based Trials in ZohoZoho Books | Product updates | August 2025
Hello users, We’ve rolled out new features and enhancements in Zoho Books. From the right sidebar where you can manage all your widgets, to integrating Zoho Payments feeds in Zoho Books, explore the updates designed to enhance your bookkeeping experience.Quotes Approval
Hey all, Could you please help in the following: When creating quotes, how to configure it in a way, that its approval would work according to the quoted items description, not according to quote information. In my case, the quote should be sent to approvalImportant Update: Facebook Pages API Deprecation
Dear Zoho Analytics users, As of January 26, 2026, Facebook has officially deprecated Facebook Pages API version 18. This update involves the removal of several metrics that were previously supported by the API. As a result, these changes will affectAdding a Deal to and Existing Contact
I want to easily add a Deal to an existing Contact. If I click on New Deal on the Contact page this currently this is what happens: All of the mandatory field (and other field) information exists within the Contact. Is there a simple way for it to automaticallyEmail was sent out without our permission
Hi there, One customer just reached out to us about this email that we were not aware was being sent to our customers. Can you please check on your end?Flexible Partial-Use Coupons (Stored Value Credits)
Subject: Feature Request: Ability for users to apply partial coupon balances per transaction Problem Statement Currently, our coupons are "one-and-done." If a user has a $50 coupon but only spends $30, they either lose the remaining $20 or are forcedPrevent accidental duplicate entry of Customer Ordersome
Zoho Support has confirmed that Zoho currently does not have any method (using Deluge, flow or any other method) to alert a user when a sales order has been entered twice using the same customer reference number (i.e. a duplicate). Most ERP platformsCustomizing Helpcenter texts
I’m customizing the Zoho Desk Help Center and I’d like to change the wording of the standard widgets – for example, the text in the “Submit Ticket” banner that appears in the footer, or other built-in widget labels and messages. So far, I haven’t foundMigrating Brevo Automation Logic to Zoho Campaigns
Hello Zoho Campaigns Support Team, I am in the process of migrating my email marketing from Brevo to Zoho Campaigns. I have around 10,000 contacts, which I have already successfully exported from Brevo and imported into Zoho Campaigns. I now need guidanceIs there a way to delete workspaces?
I want to remove one of the workspaces in my Campaigns account. I don't see any obvious way to do this. Am I missing something?Boost your Zoho Desk's performance by archiving tickets!
The longer your help desk operations are, the more likely it is to accumulate tickets that are no longer relevant. For example, ticket records from a year ago are typically less relevant than currently open tickets. Such old tickets may eventually leadCollapsing and expanding of lists and paragraphs
hello Would you ever implement Collapsing and expanding of lists and paragraphs in zoho writer ? Best regardsNew Custom View -Sorting the Custom fields
While creating a New Custom View in invoice , Customers, Bills ,expense etc , the sorting of custom fields are not available , a query function "order by / sort by " may also be included in Define new criteria module which will be more beneficial toMake CAMPAIGNS email look as simple as possible
Hi there I'm trying to make my Campaigns email look as much like a normal email as possible. I'm a bit stuck with the "justification" of the email email block. Can I LEFT JUSTIFY the "whole email" to make it look "normal"? (Please see screenshot attached)[Webinar] Top 10 Most Used Zoho Analytics Features in 2025
Zoho Analytics has evolved significantly over the past year. Discover the most widely adopted features in Zoho Analytics in 2025, based on real customer usage patterns, best practices, and high-impact use cases. Learn how leading teams are turning dataSorry! we encountered some problems while sending your campaign. It will be sent automatically once we are ready. We apologize for the delay caused.
Hello. Lately we are having problems with some campaigns, which show us this error message. Sorry! we encountered some problems while sending your campaign. It will be sent automatically once we are ready. We apologize for the delay caused. We can't findCan I remove or divert certain contacts from an active Campaigns workflow?
I have created a workflow in Zoho Campaigns, which sends different emails, once contacts have been added to a mailing list. To choose which email to send to the contacts, there are conditions, which divert contacts based on their company type and their company size. There was a subsection of this workflow, where company size wasn't selected correctly, and some contacts have been sent down the wrong path and received the wrong email. The workflow contains a reminder loop and a further series of emails.File Upload field automatically replaces spaces with underscores – support experience
Hi everyone, I want to share my recent experience regarding the File Upload field behavior in Zoho Creator and my interaction with the Zoho support team. When a user uploads a file, the system automatically renames the document by replacing spaces inHow to map fields from Zoho Recruit to Zoho People
I've got these fields from my Job Offer that I'm trying to map to the Work information fields in Zoho People, but they arent showing up. For example, how do I get the department name field (in the job post) to map to the work information field in ZohoUTM in zoho campaigns
Helloo everybody!!! Someone know how IF ZOHO CAMPAIGNS has UTM for tracking the url of any campaigns. thank uFull Context of Zoho CRM Records for Zia in Zoho Desk for efficient AI Usage
Hello everyone, I have a question regarding the use of Zia in Zoho Desk in combination with CRM data. Is it possible to automatically feed the complete context of a CRM record into Zia, so that it can generate automated and highly accurate responses forKnowledge base printing
I saw a posting about printing the knowledge base as I was looking for the answer, but we would like the ability to print out the entire knowledge base with a click, keeping the same organization format. Bonus would include an index of keywords andSearch not working!
I have items in my notebook tagged but when I search for a tag nothing comes up! Any fix for this?Zoho Books | Product updates | January 2026
Hello users, We’ve rolled out new features and enhancements in Zoho Books. From e-filing Form 1099 directly with the IRS to corporation tax support, explore the updates designed to enhance your bookkeeping experience. E-File Form 1099 Directly With theUpdates for Zoho Campaigns: Merge tag, footer, and autoresponder migration
Hello everyone, We'd like to inform you of some upcoming changes with regard to Zoho Campaigns. We understand that change can be difficult, but we're dedicated to ensuring a smooth transition while keeping you all informed and engaged throughout the process.File Upload field not showing in workflow
Hi, I have added a field on Zoho CRM. I want to use it in a workflow where that particular field is updated based on another field, however it is not showing up in the field list to select it in the workflow. Why is this please?Drag 'n' Drop Fields to a Sub-Form and "Move Field To" Option
Hi, I would like to be able to move fields from the Main Page to a Sub-Form or from a Sub-Form to either the Main Page or another Sub-Form. Today if you change the design you have to delete and recreate every field, not just move them. Would be nice toNext Page


