Kaizen #104 - Bulk Write API using PHP SDK (v5) - Part II
Welcome to another exciting week of Kaizen! This week, we will continue our discussion on Bulk Write API. In last week's post, we covered the features of Bulk Write API, and explained in detail the first two steps involved in using Bulk Write API. Today, we'll discuss how to create a bulk write job, fetch the job status, and download the results.
1. Prepare the CSV file
2. Upload your zip file
3. Create a Bulk Write job
After uploading the file and obtaining the file ID, the next step is to create a bulk write job. For this, you will require the file ID, callback URL, and the field API names to perform one of the three operations: insert, update, or upsert. Upon a successful API call, the response will provide a job ID, with which you can check the job status in the next step.
The following are the keys you need to set.
- callback (JSON object, optional) : The CallBack object defines the callback URL and method for receiving notifications or updates about the job's status.
- character_encoding (string, optional) : Specify the encoding to be used for the data being written.
- operation (string, mandatory) : Specify the type of operation to be performed in the bulk write job. Possible values are insert, update and upsert.
- ignore_empty (Boolean, optional) : If you have a few empty fields while updating the record and you want the system to ignore it, input the value as TRUE.
- resource (JSON array, optional): Initiate an object of Resource class that contains the details of the module, file, and field mappings associated with the bulk write job. The resource array contains the file_id, module, find_by, field_mappings and type keys. For more details, refer to our help document here.
Mapping fields in bulk write jobs
To specify which value in the CSV file should be mapped to which field in the CRM module, you can use the field_mappings key in the resource array. This is an optional key, and if you omit it, the system will use the headers of the CSV file to map the fields. When the field_mappings is skipped, the CSV headers must be the field API names and, all the columns of your CSV file will be used for import. In this case, you should remove columns that you do not want to import into your CRM account.
Please note that the CSV headers will be ignored if field_mappings is used while creating the bulk write job.
When to use the field_mappings key?
You should use the field_mappings key if:
- The column headers in your CSV file are different from the field API names in the CRM module.
- You want to ignore certain columns in the CSV file.
- You want to specify a default value for a field in the CRM module.
Rules for using the field_mappings key
- When you map a field by specifying the field_mappings key, it is mandatory to specify either the index or the default_value key, or the system will throw an error.
- The index is the position of the field in the CSV file, starting from 0.
- The default_value key is used when you want to provide a default value for a field. By specifying a default value, you ensure that if a cell in the CSV file is empty, the system will populate it with the default value.
- Use the ignore_empty key when you want the system to skip updating fields that are empty in the source file. Please note that for insert operation, ignore_empty will be set as false by default.
Index | Default Value | Ignore Empty | Empty Cell | Action |
YES | YES/NO | TRUE/FALSE | NO | CSV Value |
YES | YES | TRUE/FALSE | YES | Default Value |
YES | NO | TRUE | YES | No Update |
YES | NO | FALSE | YES | Empty |
| NO | YES | TRUE/FALSE | YES/NO | Default Value |
- If you specify the index and there are no empty cells in the source file, the system will use the values from the CSV file for the corresponding fields. The default_value will be ignored in this case.
- For update and insert operations, when the index is specified and there are a few cells for which the value is empty in the source file, then for the corresponding records with empty value:
- If default_value is specified, the field will be updated with the default_value.
- If default_value is not specified, the system will handle the corresponding fields differently depending on the value of the ignore_empty key.
- The field will be left untouched if ignore_empty is set to TRUE.
- The field will be updated to an empty value if ignore_empty is FALSE.
- When the index is not specified, but a default_value is given, the system will update the corresponding fields in the CRM module with the specified default value.
Bulk Insert with lookup and user lookup data
Here is an example of a simple bulk write job request:
<?php namespace bulkwrite; use com\zoho\crm\api\bulkwrite\BulkWriteOperations; use com\zoho\crm\api\bulkwrite\RequestWrapper; use com\zoho\crm\api\bulkwrite\CallBack; use com\zoho\crm\api\util\Choice; use com\zoho\crm\api\bulkwrite\Resource; use com\zoho\crm\api\bulkwrite\FieldMapping; use com\zoho\crm\api\modules\MinifiedModule; use com\zoho\crm\api\bulkwrite\DefaultValue; require_once "vendor/autoload.php"; class CreateBulkWriteJob { public static function initialize() { // Add init code here. // Refer to this post for more details } public static function createBulkWriteJob(string $moduleAPIName, string $fileId) { $bulkWriteOperations = new BulkWriteOperations(); $requestWrapper = new RequestWrapper(); // Set the callback URL, and method $callback = new CallBack(); $callback->setUrl("add_your_callback_url_here"); $callback->setMethod(new Choice("post")); $requestWrapper->setCallback($callback); $requestWrapper->setCharacterEncoding("UTF-8"); //character encoding $requestWrapper->setOperation(new Choice("insert")); //specify the type of operation // module, file and field mapping details $resourceIns = new Resource(); // To set the type of module that you want to import. The value is data. $resourceIns->setType(new Choice("data")); $module = new MinifiedModule(); $module->setAPIName($moduleAPIName); $resourceIns->setModule($module); $resourceIns->setFileId($fileId); $resourceIns->setIgnoreEmpty(true); $fieldMapping1 = new FieldMapping(); $fieldMapping1->setAPIName("Account_Name"); $fieldMapping1->setIndex(0); $fieldMapping2 = new FieldMapping(); $fieldMapping2->setAPIName("Phone"); $fieldMapping2->setIndex(1); $fieldMapping3 = new FieldMapping(); $fieldMapping3->setAPIName("Parent_Account"); $fieldMapping3->setIndex(2); $fieldMapping3->setFindBy("id"); $fieldMapping4 = new FieldMapping(); $fieldMapping4->setAPIName("Referred_User"); $fieldMapping4->setIndex(3); $fieldMapping4->setFindBy("id"); $defaultValue = new DefaultValue(); $defaultValue->setValue("4876876327565"); $fieldMapping4->setDefaultValue($defaultValue); $resourceIns->setFieldMappings([$fieldMapping1, $fieldMapping2, $fieldMapping3, $fieldMapping4]); $requestWrapper->setResource([$resourceIns]); //Call createBulkWriteJob method that takes RequestWrapper instance as parameter $response = $bulkWriteOperations->createBulkWriteJob($requestWrapper); // Add your code to handle the response received in the $response. } } CreateBulkWriteJob::initialize(); $moduleAPIName = "Accounts"; //The module to which you want to insert the records $fileId = "48768764054001"; // add your file_id received in the response of Upload File CreateBulkWriteJob::createBulkWriteJob($moduleAPIName, $fileId); |
In the above code, Referred_User is a user lookup field, and Parent_Account is a lookup field in the Accounts module. The CSV file contains the unique ID of the corresponding records in the lookup modules.
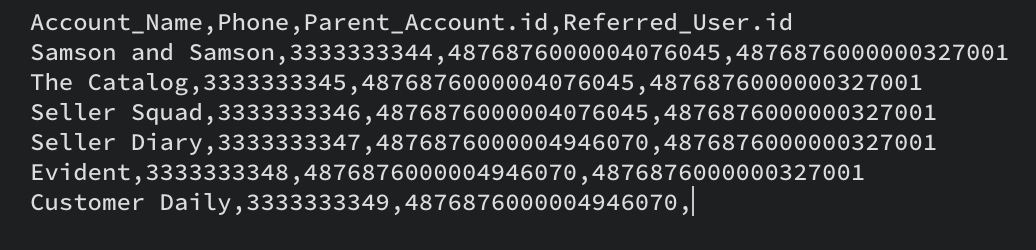
Here is a sample CSV file used for the above Bulk Insert job. Note that the unique record IDs of the lookup (Parent_Account) and user lookup(Referred_User ) fields. If you choose to schedule the job without using field mappings, ensure that you provide headers for these fields in the format field_api_name.id with the record IDs in the corresponding columns.
Updating or Upserting records by unique key:
During an update operation, the find_by field acts as a unique key that identifies the record to be updated. You can use the unique record id, or any other unique field for this. For example, if the Phone field is a unique field in the Accounts module, specifying setFindBy("Phone") allows updates based on the values present in the Phone field. Similarly, for an upsert operation, if there is no existing record matching the provided Phone number, a new record will be inserted. Conversely, if a matching record is found, it will be updated.
Here is the code snippet for the field_mapping for an update operation using the Phone field as the unique key.
//You can use setFindBy method to update/upsert records based on a unique field $resourceIns->setFindBy("Phone"); //fieldMapping for the unique field $fieldMapping1 = new FieldMapping(); $fieldMapping1->setAPIName("Phone"); $fieldMapping1->setIndex(1); $fieldMapping2 = new FieldMapping(); $fieldMapping2->setAPIName("Description"); $fieldMapping2->setIndex(8); |
Importing Subform Data
The Bulk Write API allows you to import and update records with subforms. To insert or update records with subforms, you must import the parent records first with Bulk Write API. For this bulk write job, $moduleAPIName has to be set with parent module with proper $fieldMapping. Refer to the first sample for more details.
Once you have imported the parent records, get the parent record ids, prepare the CSV file with the subform data, and create a Bulk Write job for the subform module. You can get the parent record ids from the result zip file in Step 5 (Download the result). Refer to our previous post to know how to prepare the CSV file with the Subform data.
Consider a subform named Contact_details in the Accounts module, with the fields Contact_Name, Contact_Email, and Contact_Phone. Here is the code snippet for the field_mapping to import the subform data.
//field_mapping for the Parent_Id $fieldMapping1 = new FieldMapping(); $fieldMapping1->setAPIName("Parent_Id"); $fieldMapping1->setIndex(0); $fieldMapping1->setFindBy("id"); //add proper field_mapping for the subform fields with the subform field API names |
Note that in this case, the $moduleAPIName is the api name of the subform (Contact_details) and the operation type should be insert. The subform data is added to the corresponding record specified by Parent_Id field in the subform CSV.
Multiselect Lookup Fields in Bulk Write API
To upload records with multiselect lookup fields, you can follow the same steps as for subforms. First, import the parent records using a Bulk Write job. Then, import the multiselect lookup field data using another Bulk Write job. For the multiselect lookup field data, the CSV file should contain both the parent record ID and the multiselect lookup field data. Please note that this method does not work for line items.
Consider a multiselect lookup field named Clients in the Accounts module, which is linked to the Contacts module. In your CSV file, ensure that you include both the Parent Record ID and the linked record IDs. For multiselect lookup data, the $moduleAPIName should be the API name of the linked module, and in the field_mappings, the API names used should correspond to the field API names from the lookup module. Check the following sample code for more details.
//field_mapping for module 1 (Contacts) $fieldMapping1 = new FieldMapping(); $fieldMapping1->setAPIName("Client_Account"); //field API name in the linked module $fieldMapping1->setIndex(0); $fieldMapping1->setFindBy("id"); // field_mapping for module 2 (Accounts) $fieldMapping2 = new FieldMapping(); $fieldMapping2->setAPIName("Account"); // field API name in the linked module $fieldMapping2->setIndex(1); $fieldMapping2->setFindBy("id"); |
4. Check job status
The Bulk Write API offers two options for monitoring the status of a job: polling and callback. If you prefer not to poll for job status, you can wait for the system to notify you of job completion by using the provided callback URL in the Create Bulk Write Job request. Alternatively, you can choose to poll the API using the job ID obtained from the previous step to check the status of the scheduled bulk write job. The job status can be one of the following: ADDED, INPROGRESS, or COMPLETED. Only completed jobs will include the download-URL key in the response.
Here is a code snippet to check the job status and get the download URL from the response.
public static function getBulkWriteJobDetails(string $jobId) { $bulkWriteOperations = new BulkWriteOperations(); //Call getBulkWriteJobDetails method that takes jobId as parameter $response = $bulkWriteOperations->getBulkWriteJobDetails($jobId); if ($response != null) { $responseWrapper = $response->getObject(); if ($responseWrapper instanceof BulkWriteResponse) { $result = $responseWrapper->getResult(); if ($result != null) echo ("Bulkwrite DownloadUrl: " . $result->getDownloadUrl() . "\n"); } } } |
5. Download the result
In this step, you can obtain the result of the bulk write job in a ZIP file that includes a CSV file containing the details of the job. Please note that you can get the details of only one bulk write job in a single API call.
To download the result, you need to use the download_url provided in the response. The CSV file will consist of the first three mapped columns from the uploaded file, as well as three additional columns: STATUS, RECORD_ID, and ERRORS.
{ public static function initialize() { // Add init code here. // Refer to this post for more details } public static function downloadBulkWriteResult(string $downloadUrl, string $destinationFolder) { $bulkWriteOperations = new BulkWriteOperations(); $response = $bulkWriteOperations->downloadBulkWriteResult($downloadUrl); // Add your code to handle the response received in the $response. } } DownloadBulkWriteResult::initialize(); $downloadUrl = "paste_your_download_url_here"; $destinationFolder = "/Documents"; DownloadBulkWriteResult::downloadBulkWriteResult( $downloadUrl,$destinationFolder); |
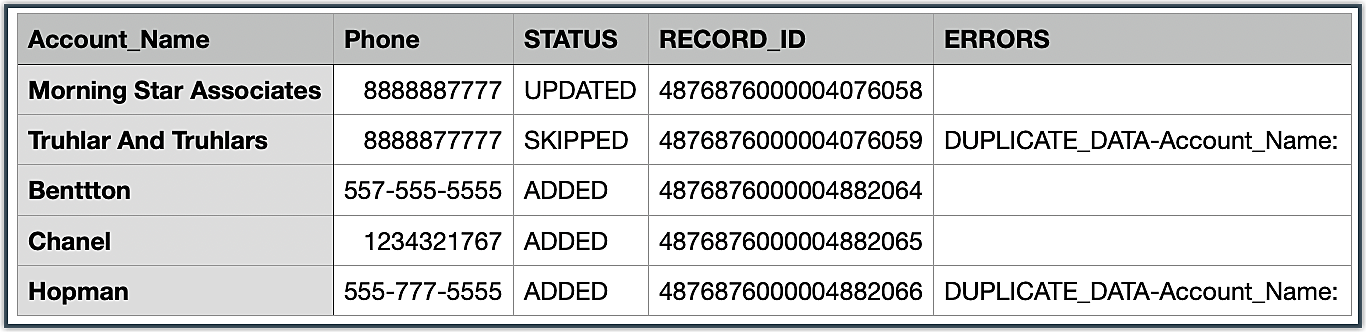
The image shows the result of an Upsert operation. As you can see, few of the records were skipped because the unique field had a duplicate value.
We hope you found this post useful. If you have any further questions, reach out to us at support@zohocrm.com or let us know in the comments section. We are looking forward to hearing from you!
Stay tuned for more useful posts in the series. See you all next week!