Kaizen #113 - Raising Signals in Zoho CRM through Zoho Flow
Hello everyone!
Welcome back to another post in the Kaizen series!
Last week, we discussed raising signals in Zoho CRM through functions. This week, we will discuss raising signals in Zoho CRM using Zoho Flow.
What is Zoho Flow?
Zoho Flow is an integration platform that allows you to automate workflows and connect various applications, including Zoho CRM. Using Zoho Flow to raise a signal in CRM can be beneficial in certain scenarios, particularly when you want to automate processes, trigger event-specific actions, or integrate CRM data with other applications.
Raising Signals using Zoho Flow
Consider the use case of Typeform. Typeform is an application that allows you to create forms and share them.
Let's consider you have a form in Typeform, where you get the details such as the Last Name, Company, Email. You also have a question if the user wants a demo of the product, and if yes, a convenient date for the same.
The aim is to create a lead in Zoho CRM when a form is submitted from the details obtained on the form in Typeform. You want to check if the user wants a demo. If yes, you want to raise a signal in Zoho CRM and create a task.
For data transfer to happen between Typeform, Zoho CRM and Zoho Flow, you must create connections with Zoho CRM and Zoho Flow, Typeform and Zoho Flow, respectively, and authorize them.
Here is a gist of the process.
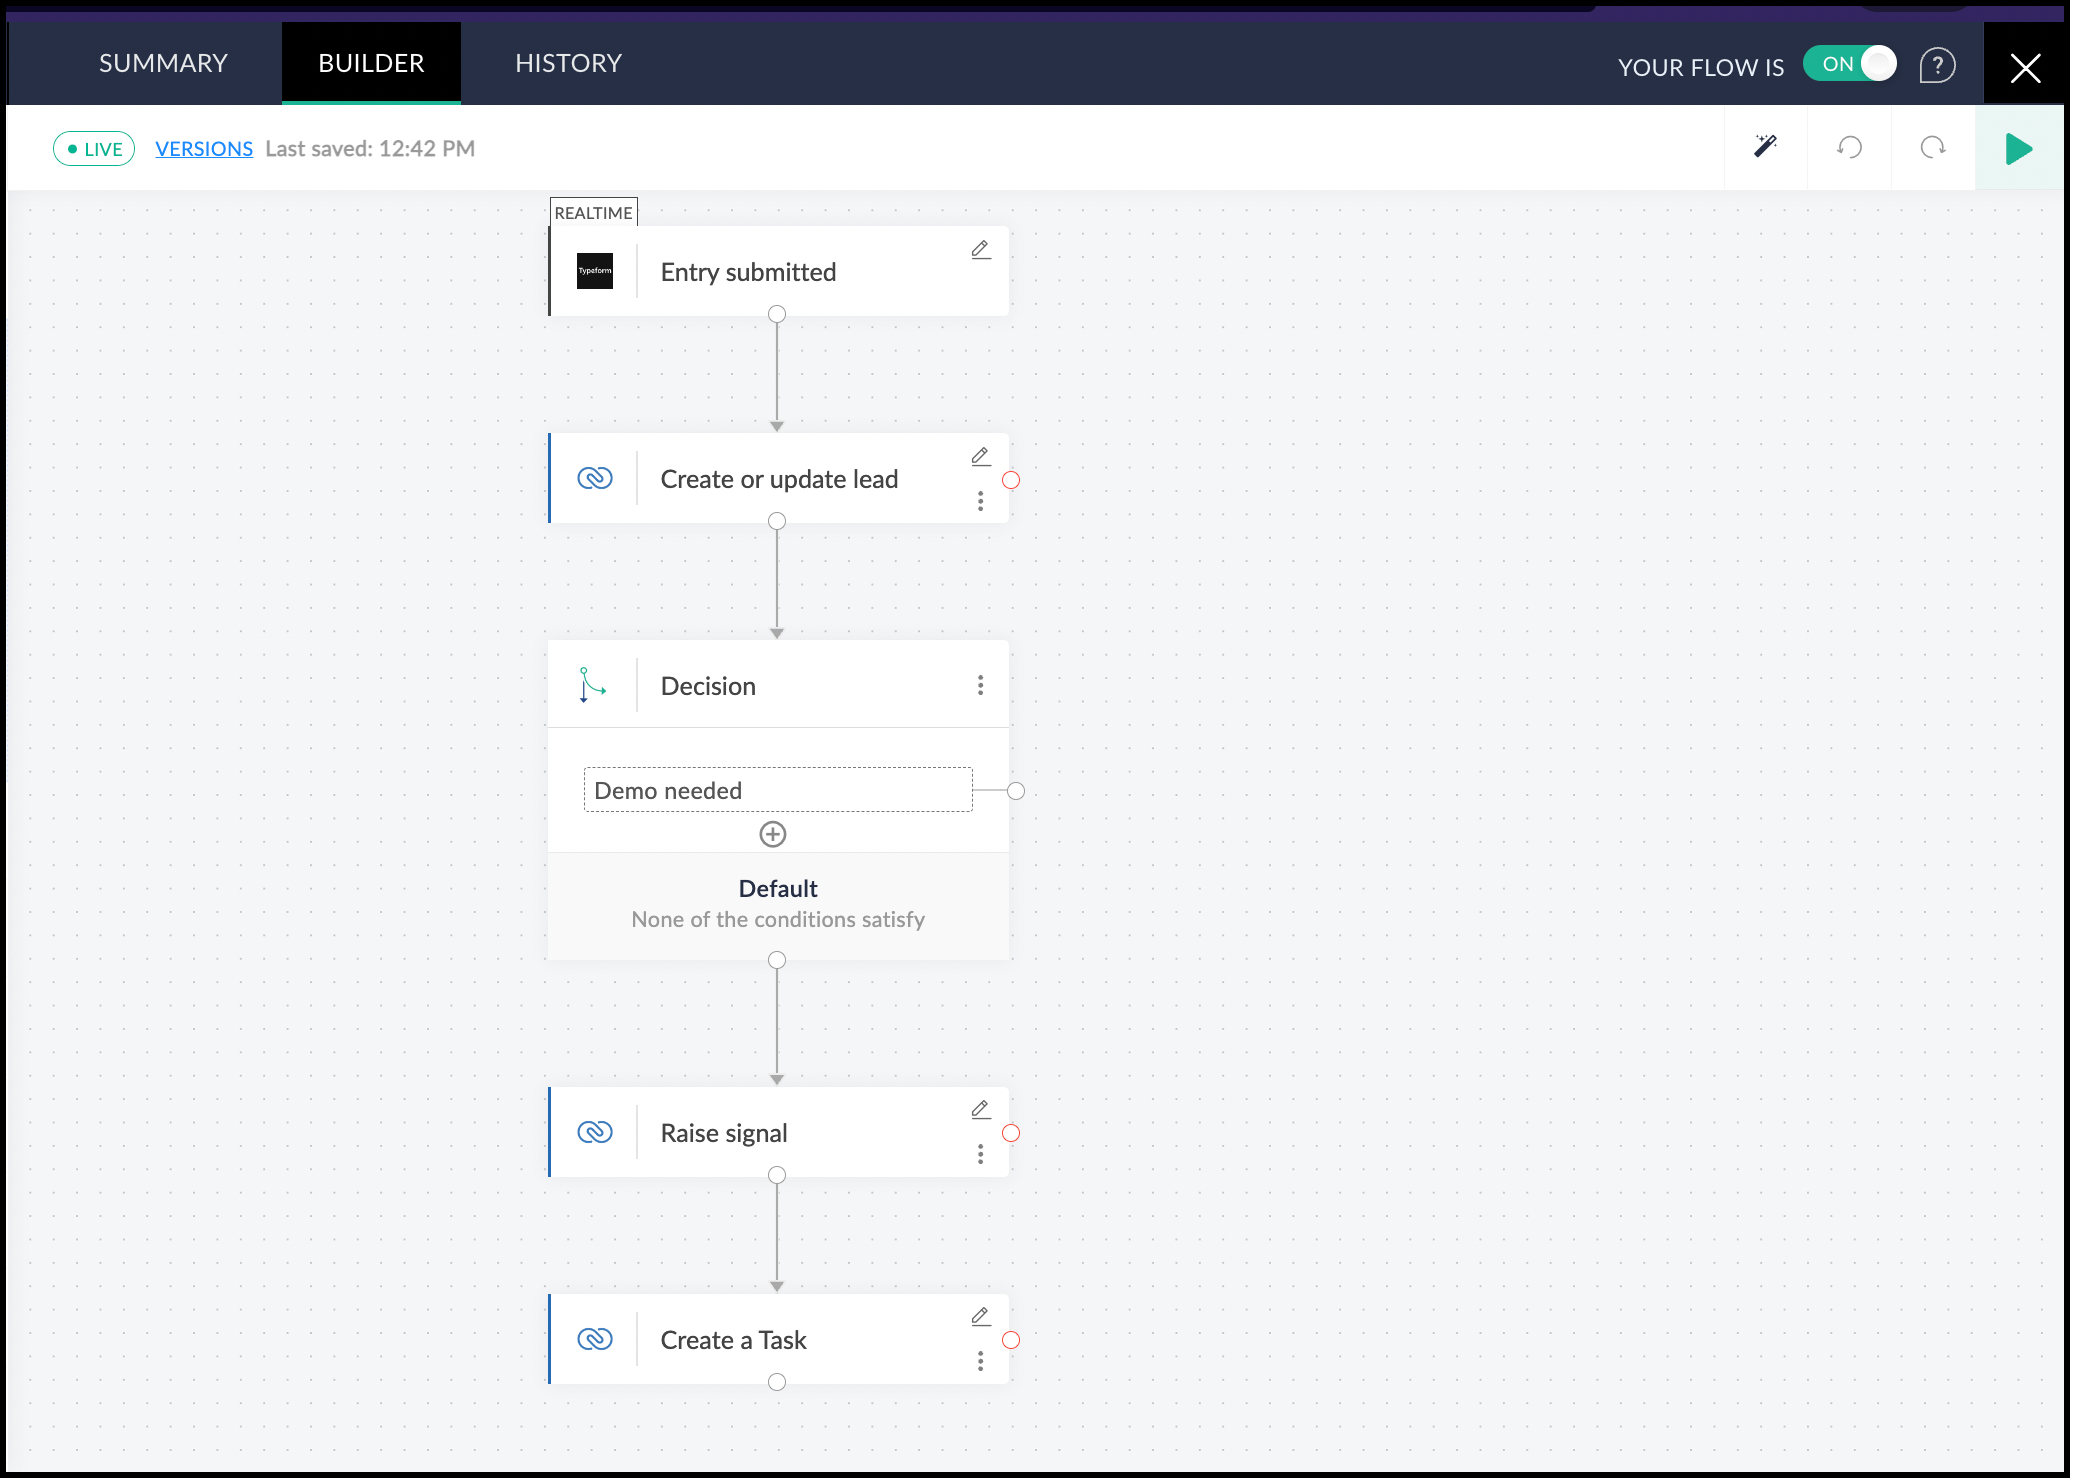
- Create a flow and choose the app that triggers the flow. In our case, it is Typeform that triggers the flow when a form is submitted.
- Next, you must choose the Typeform trigger. In our case, it is form submission.
- Now, create a connection between Zoho Flow and Typeform. This requires you to sign in to Typeform and provide your consent.
- Configure the trigger and choose the right form from the list of forms displayed.
- In Zoho Flow's Builder, you can see an action block for Typeform.
- Next, you want to create a lead in Zoho CRM from the details submitted on the form.
- For this, choose the app as Zoho CRM and create a connection between Zoho CRM and Zoho Flow, and authorize it.
- After authorization, choose the "Create or Update Lead" action block, and map the necessary fields.
- Add the Decision action block to check if the user wants a demo.
- If yes, add the Raise Signal action block.
- Test and debug your flow and then enable it.
Let us discuss these steps in detail.
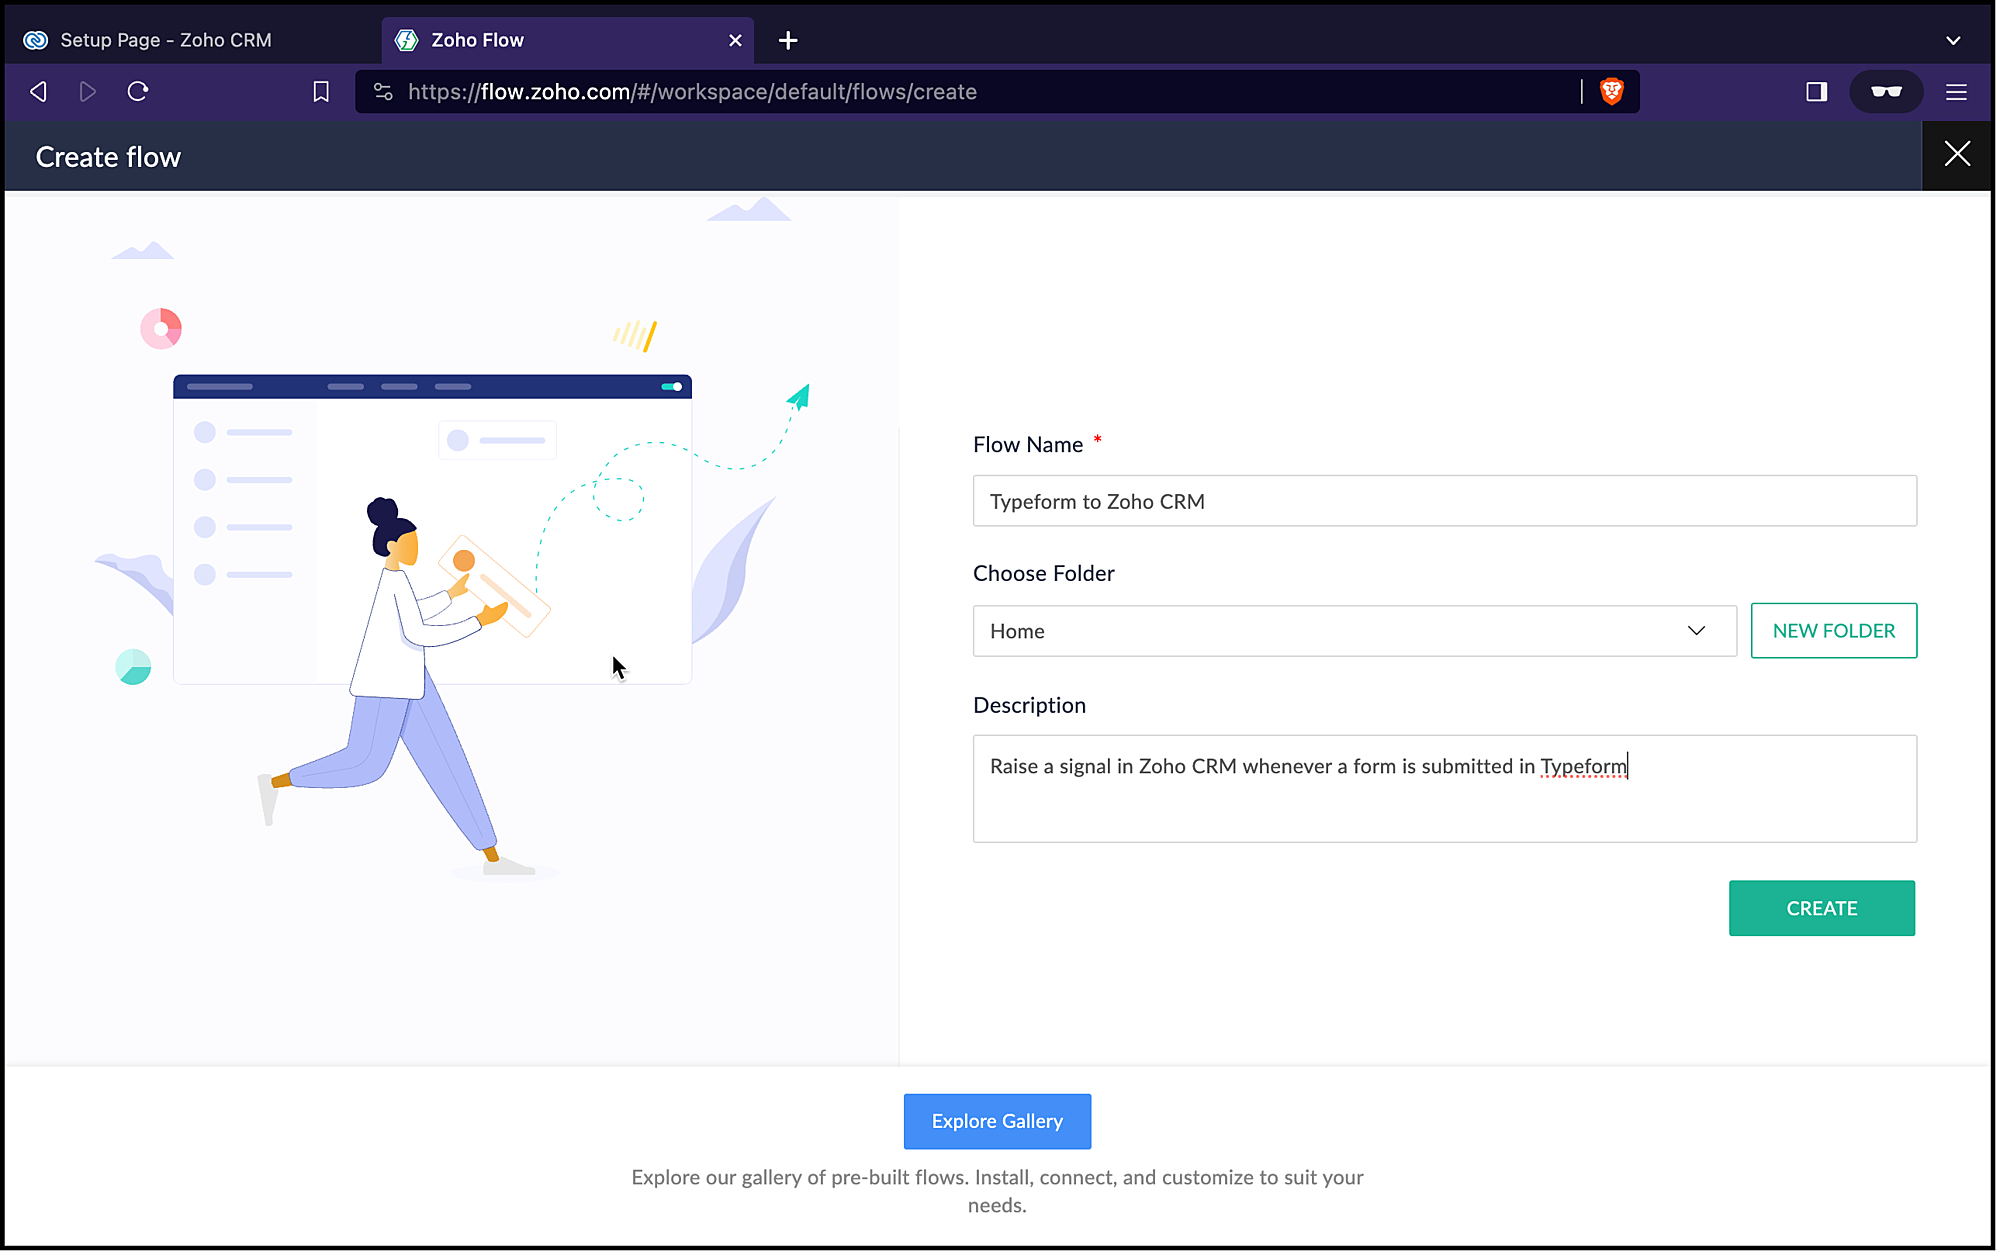
1. Creating a flow
- Log in to Zoho Flow.
- Give a name, description, and choose the folder for the flow.
- Click Create.
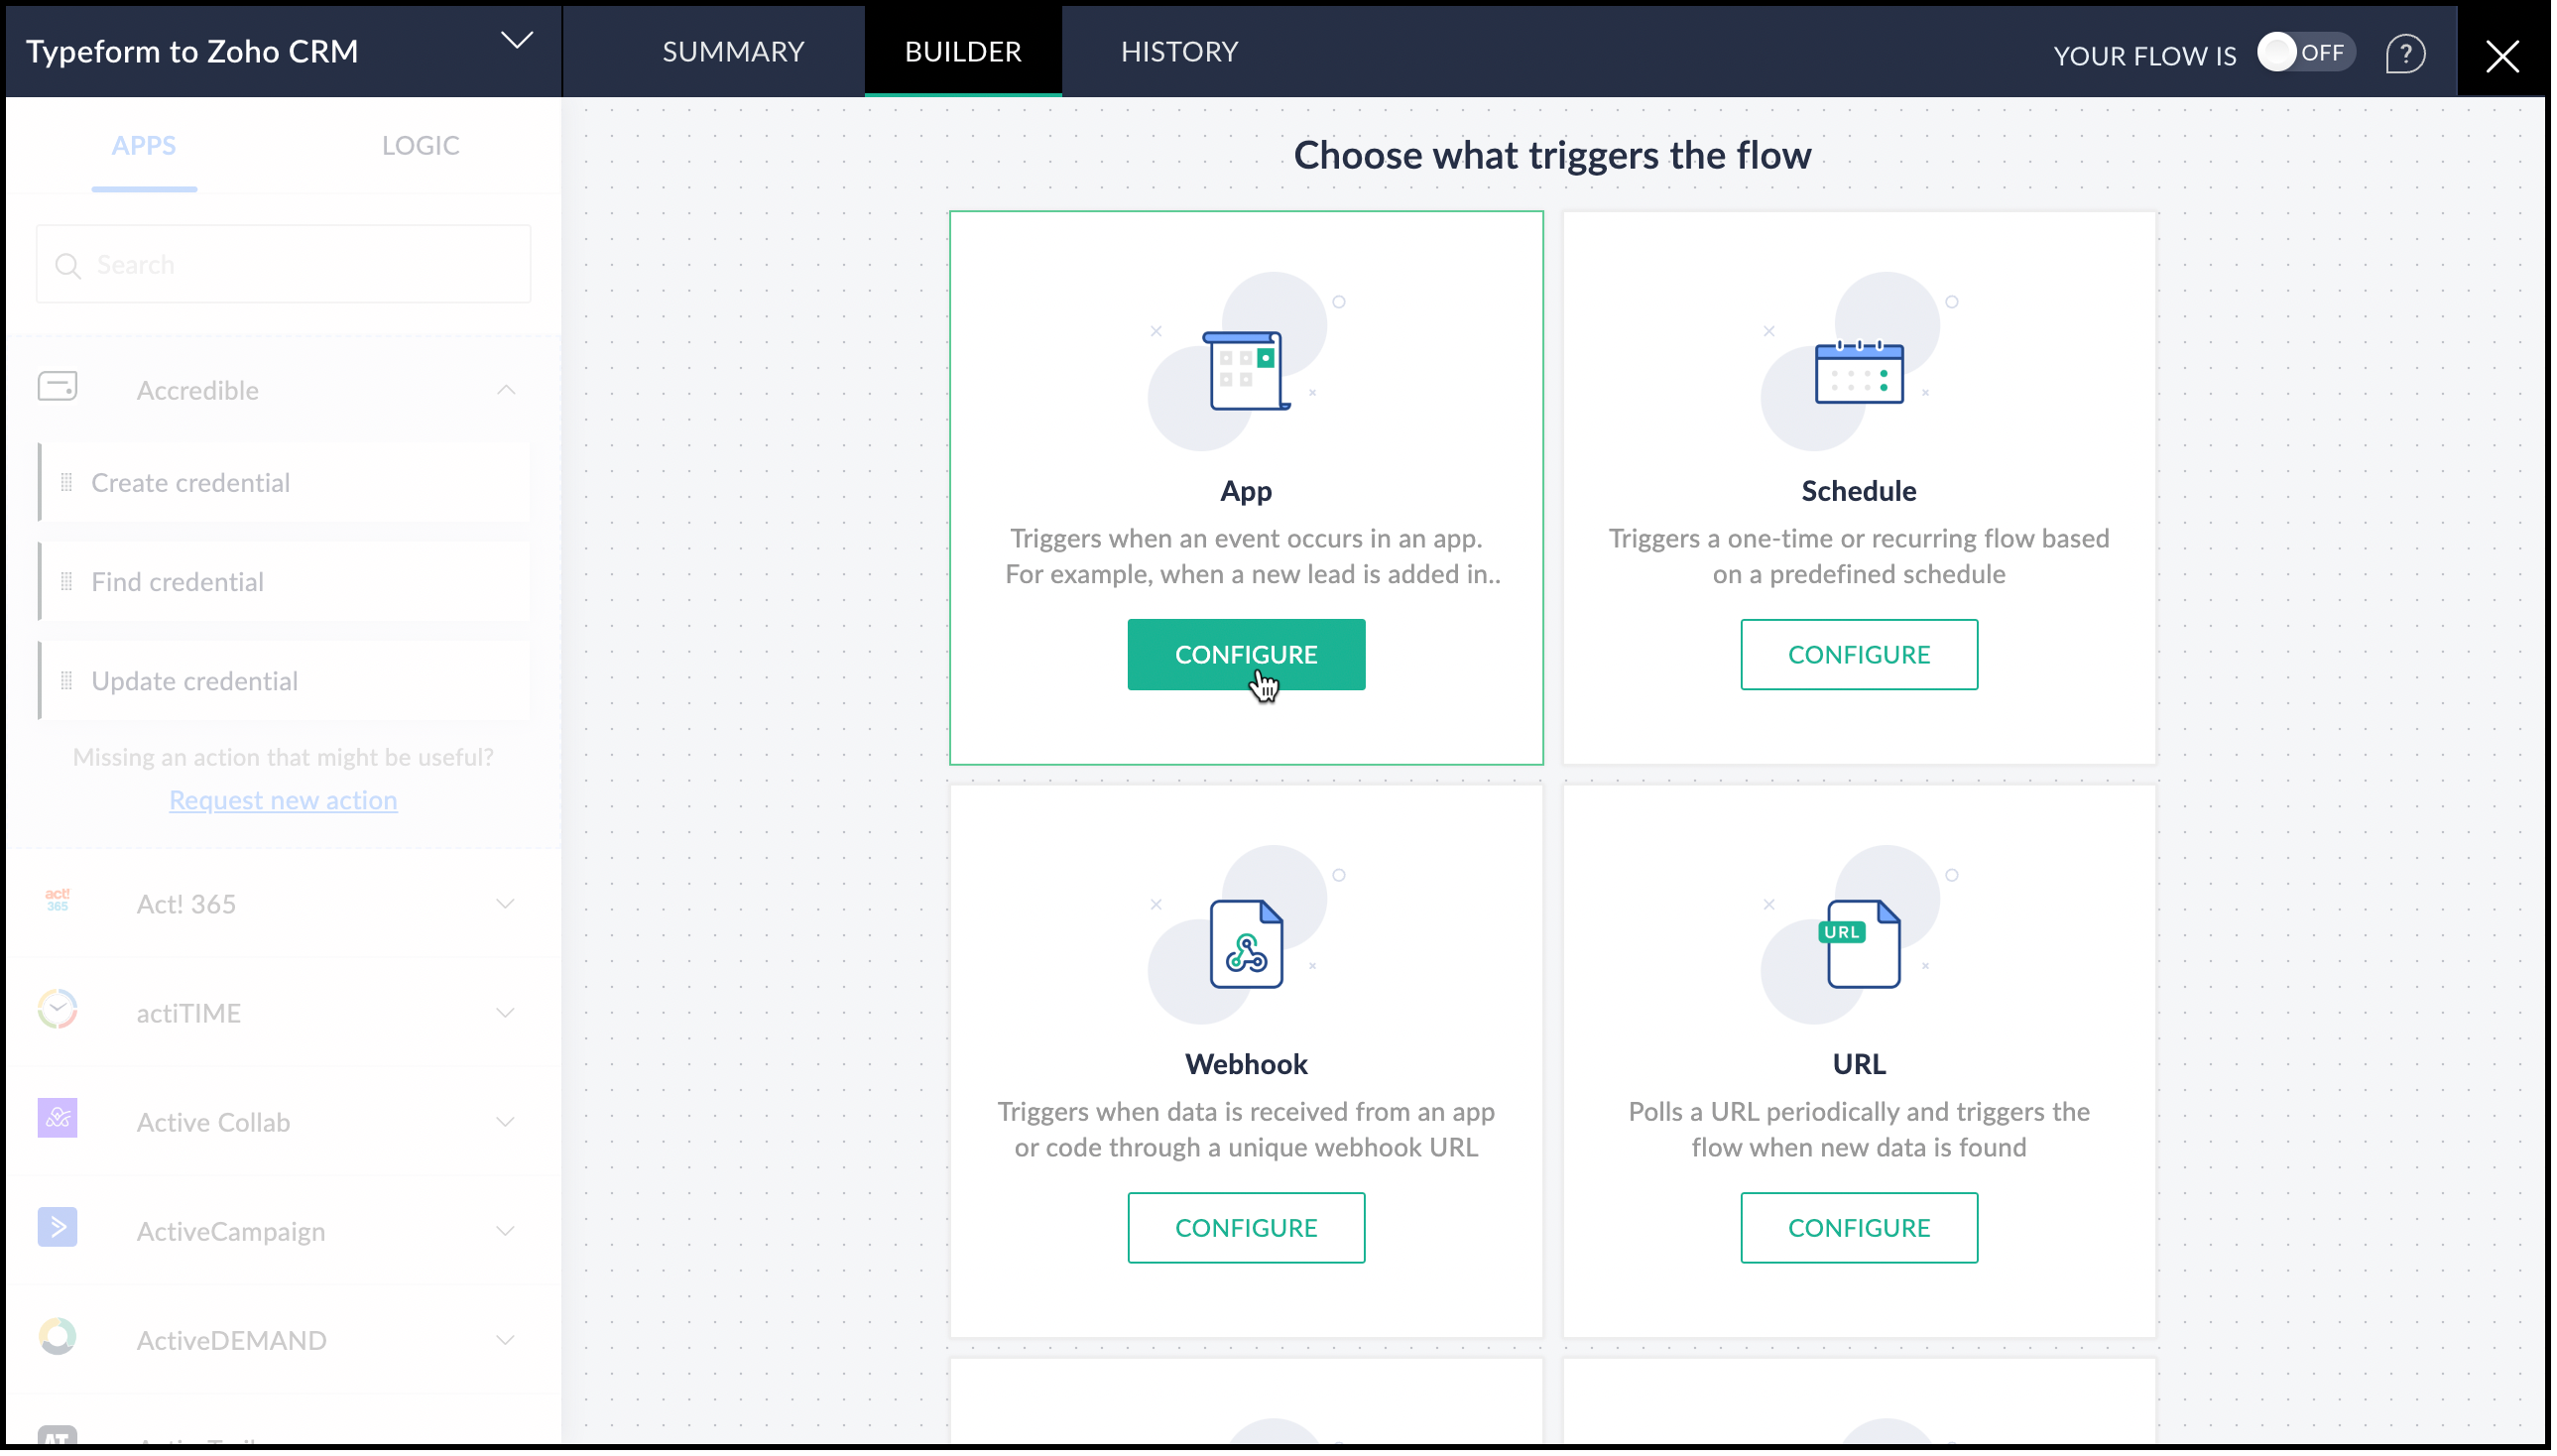
2. Choosing the trigger for the flow
- Since it is an app(Typeform) that triggers the flow, choose App and click Configure.
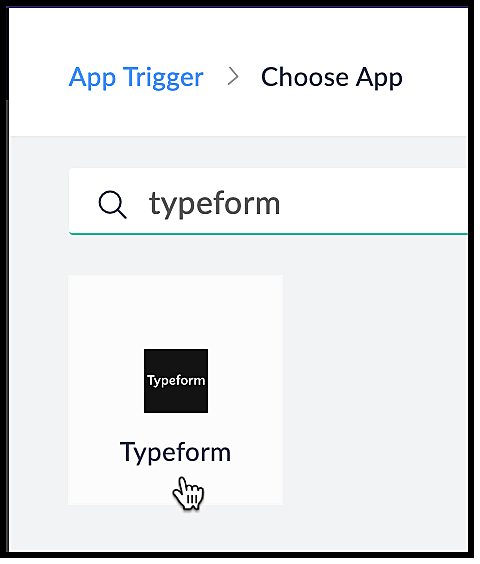
- From the list of applications displayed, search for Typeform.
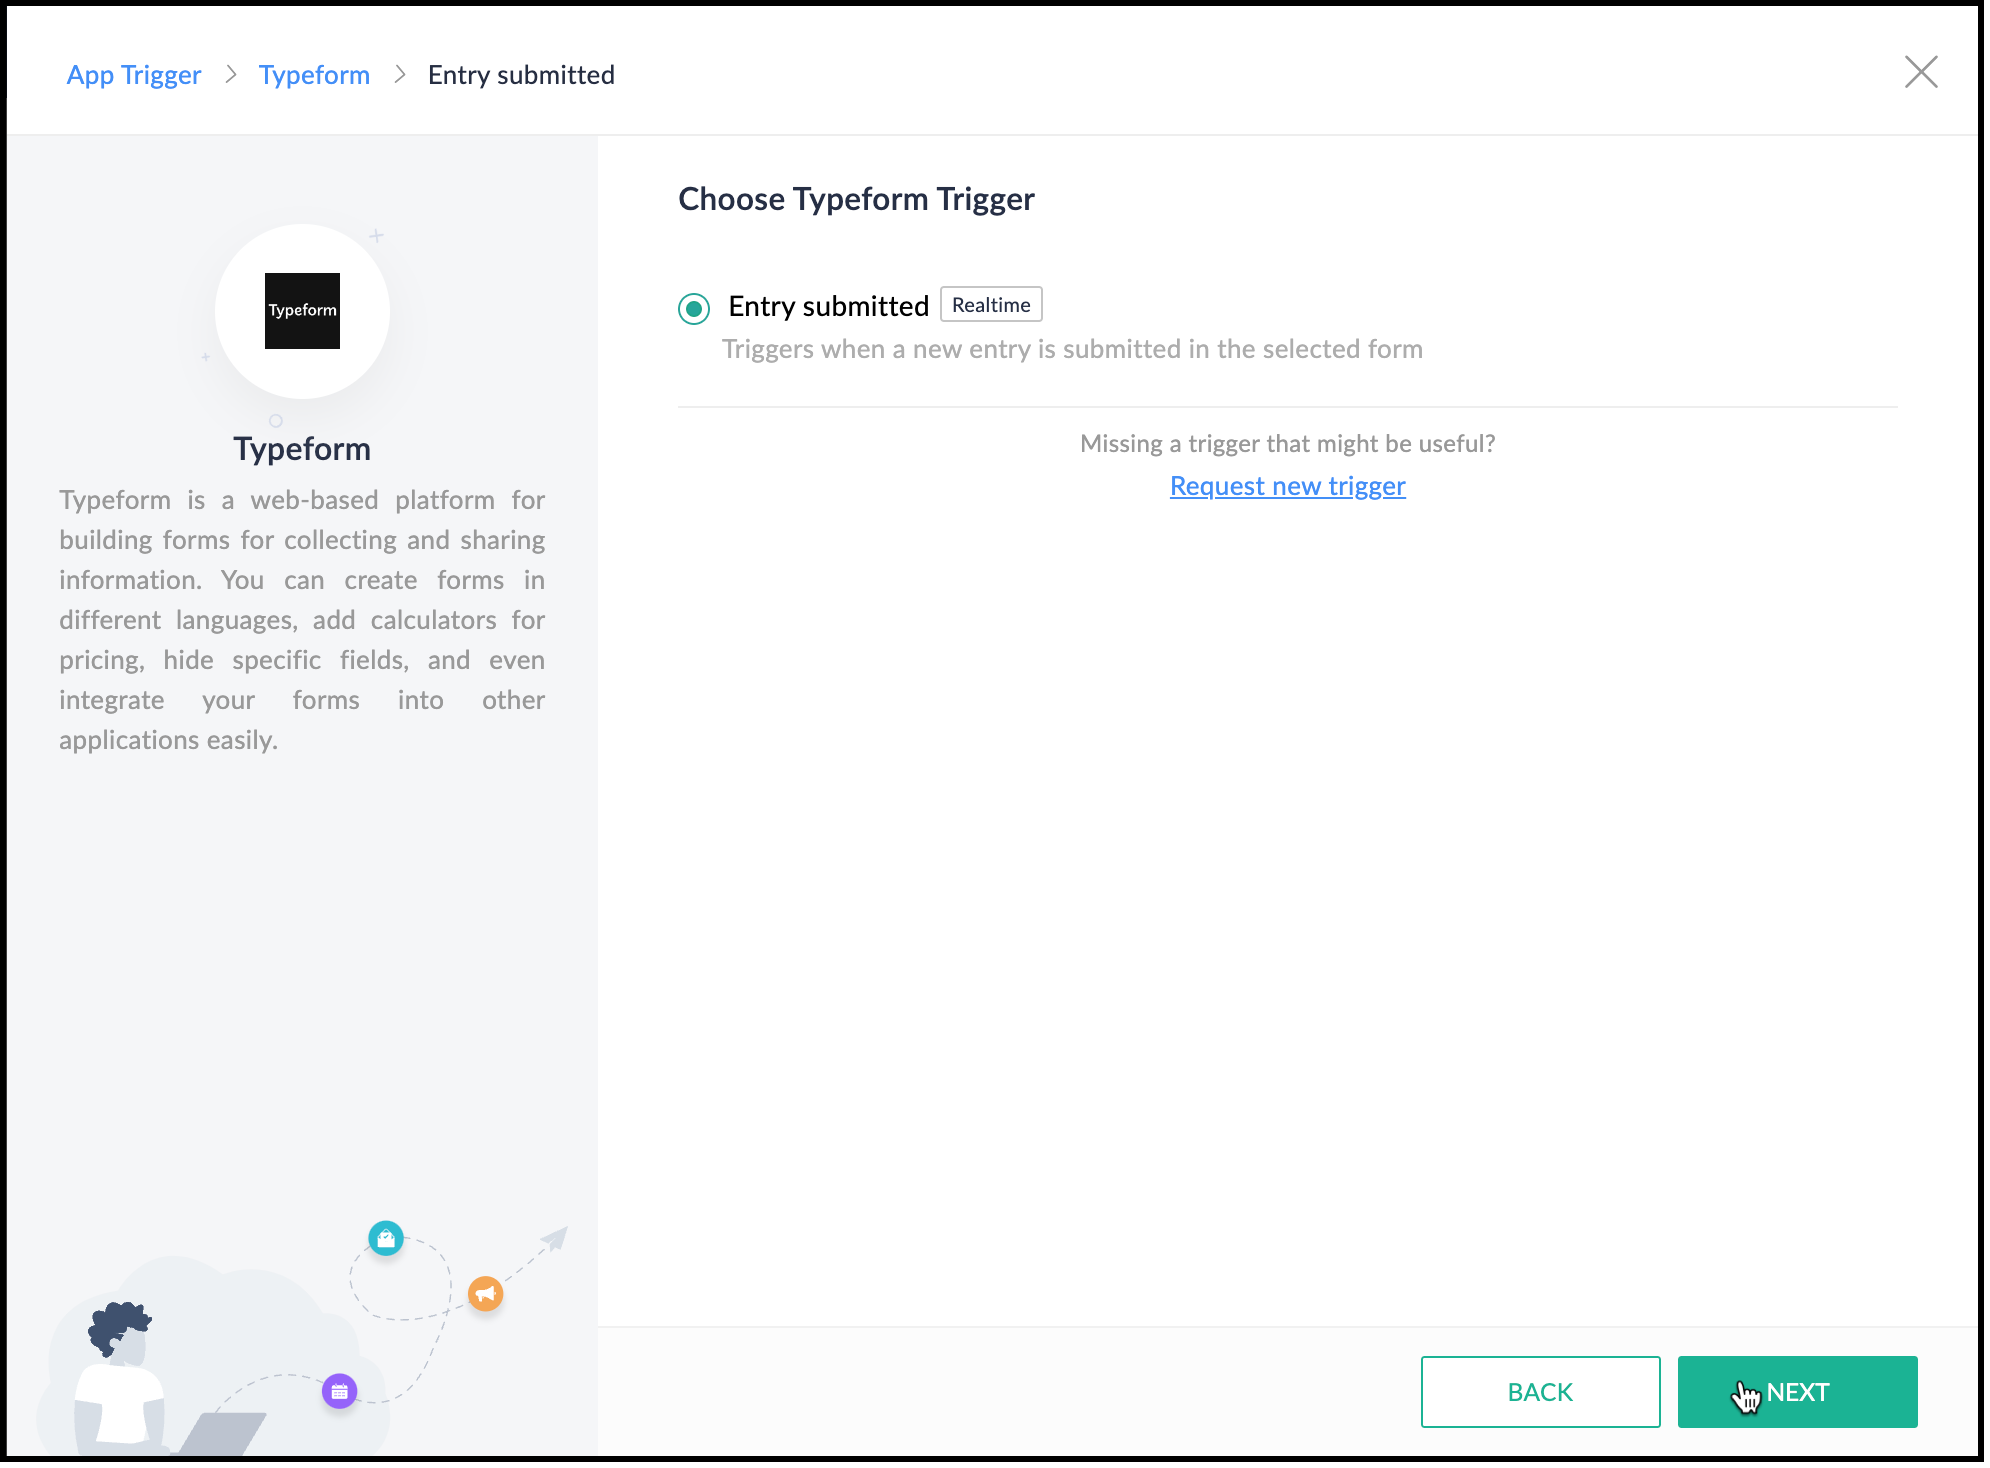
- Choose the Typeform trigger. In our case, it is Entry Submitted. Click Next.
3. Creating a connection between Zoho Flow and Typeform
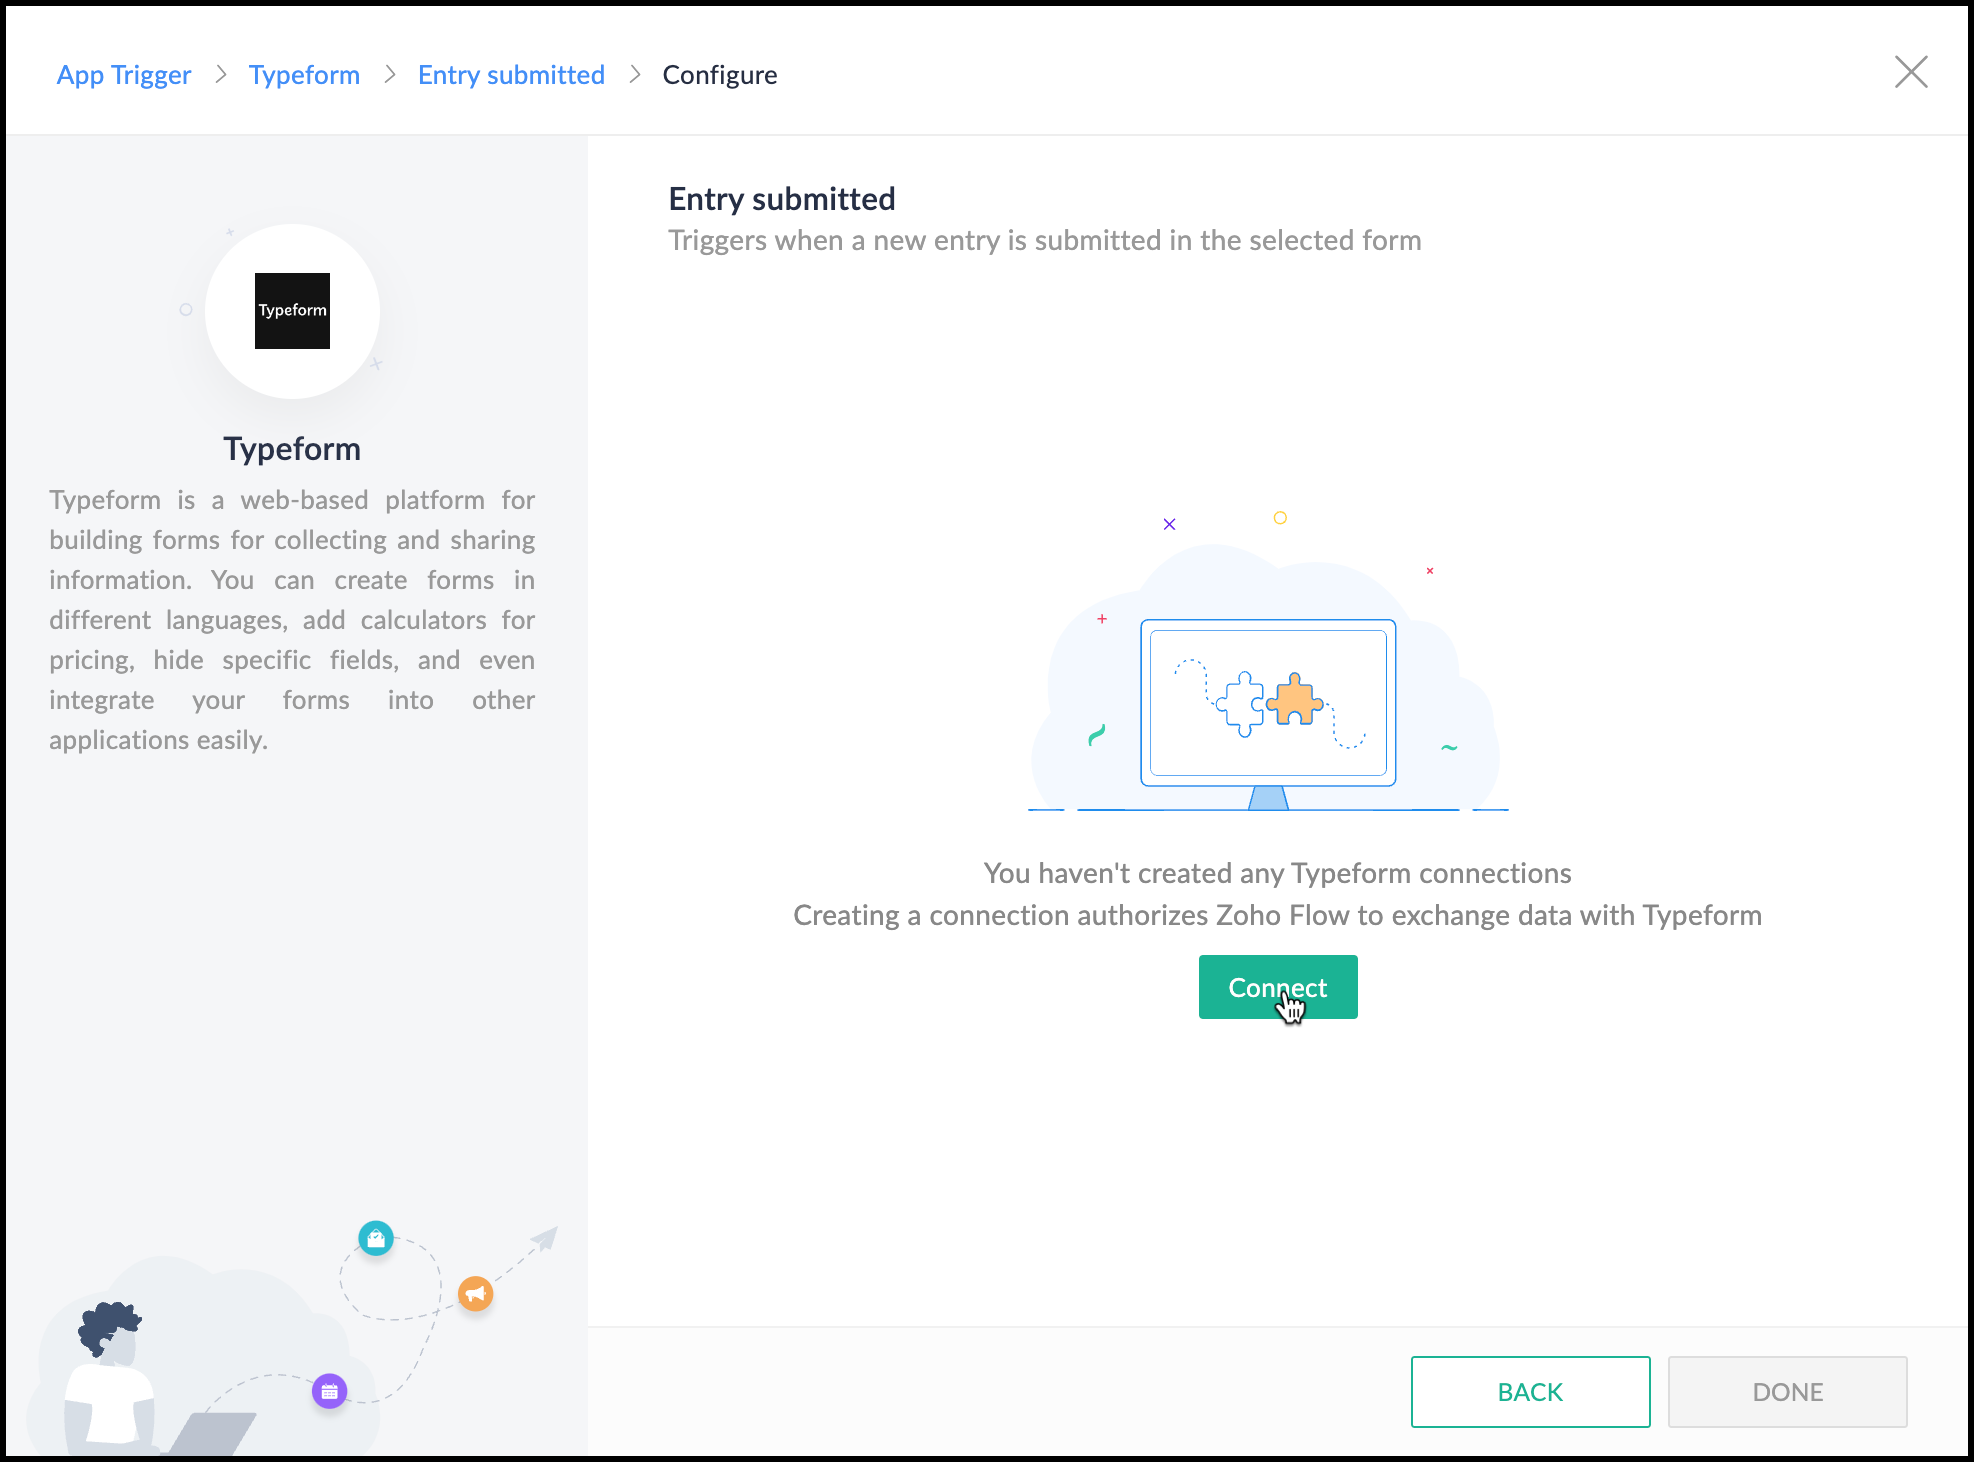
- Create a connection between Zoho Flow and Typeform for Zoho Flow to access Typeform's data. Click Connect.
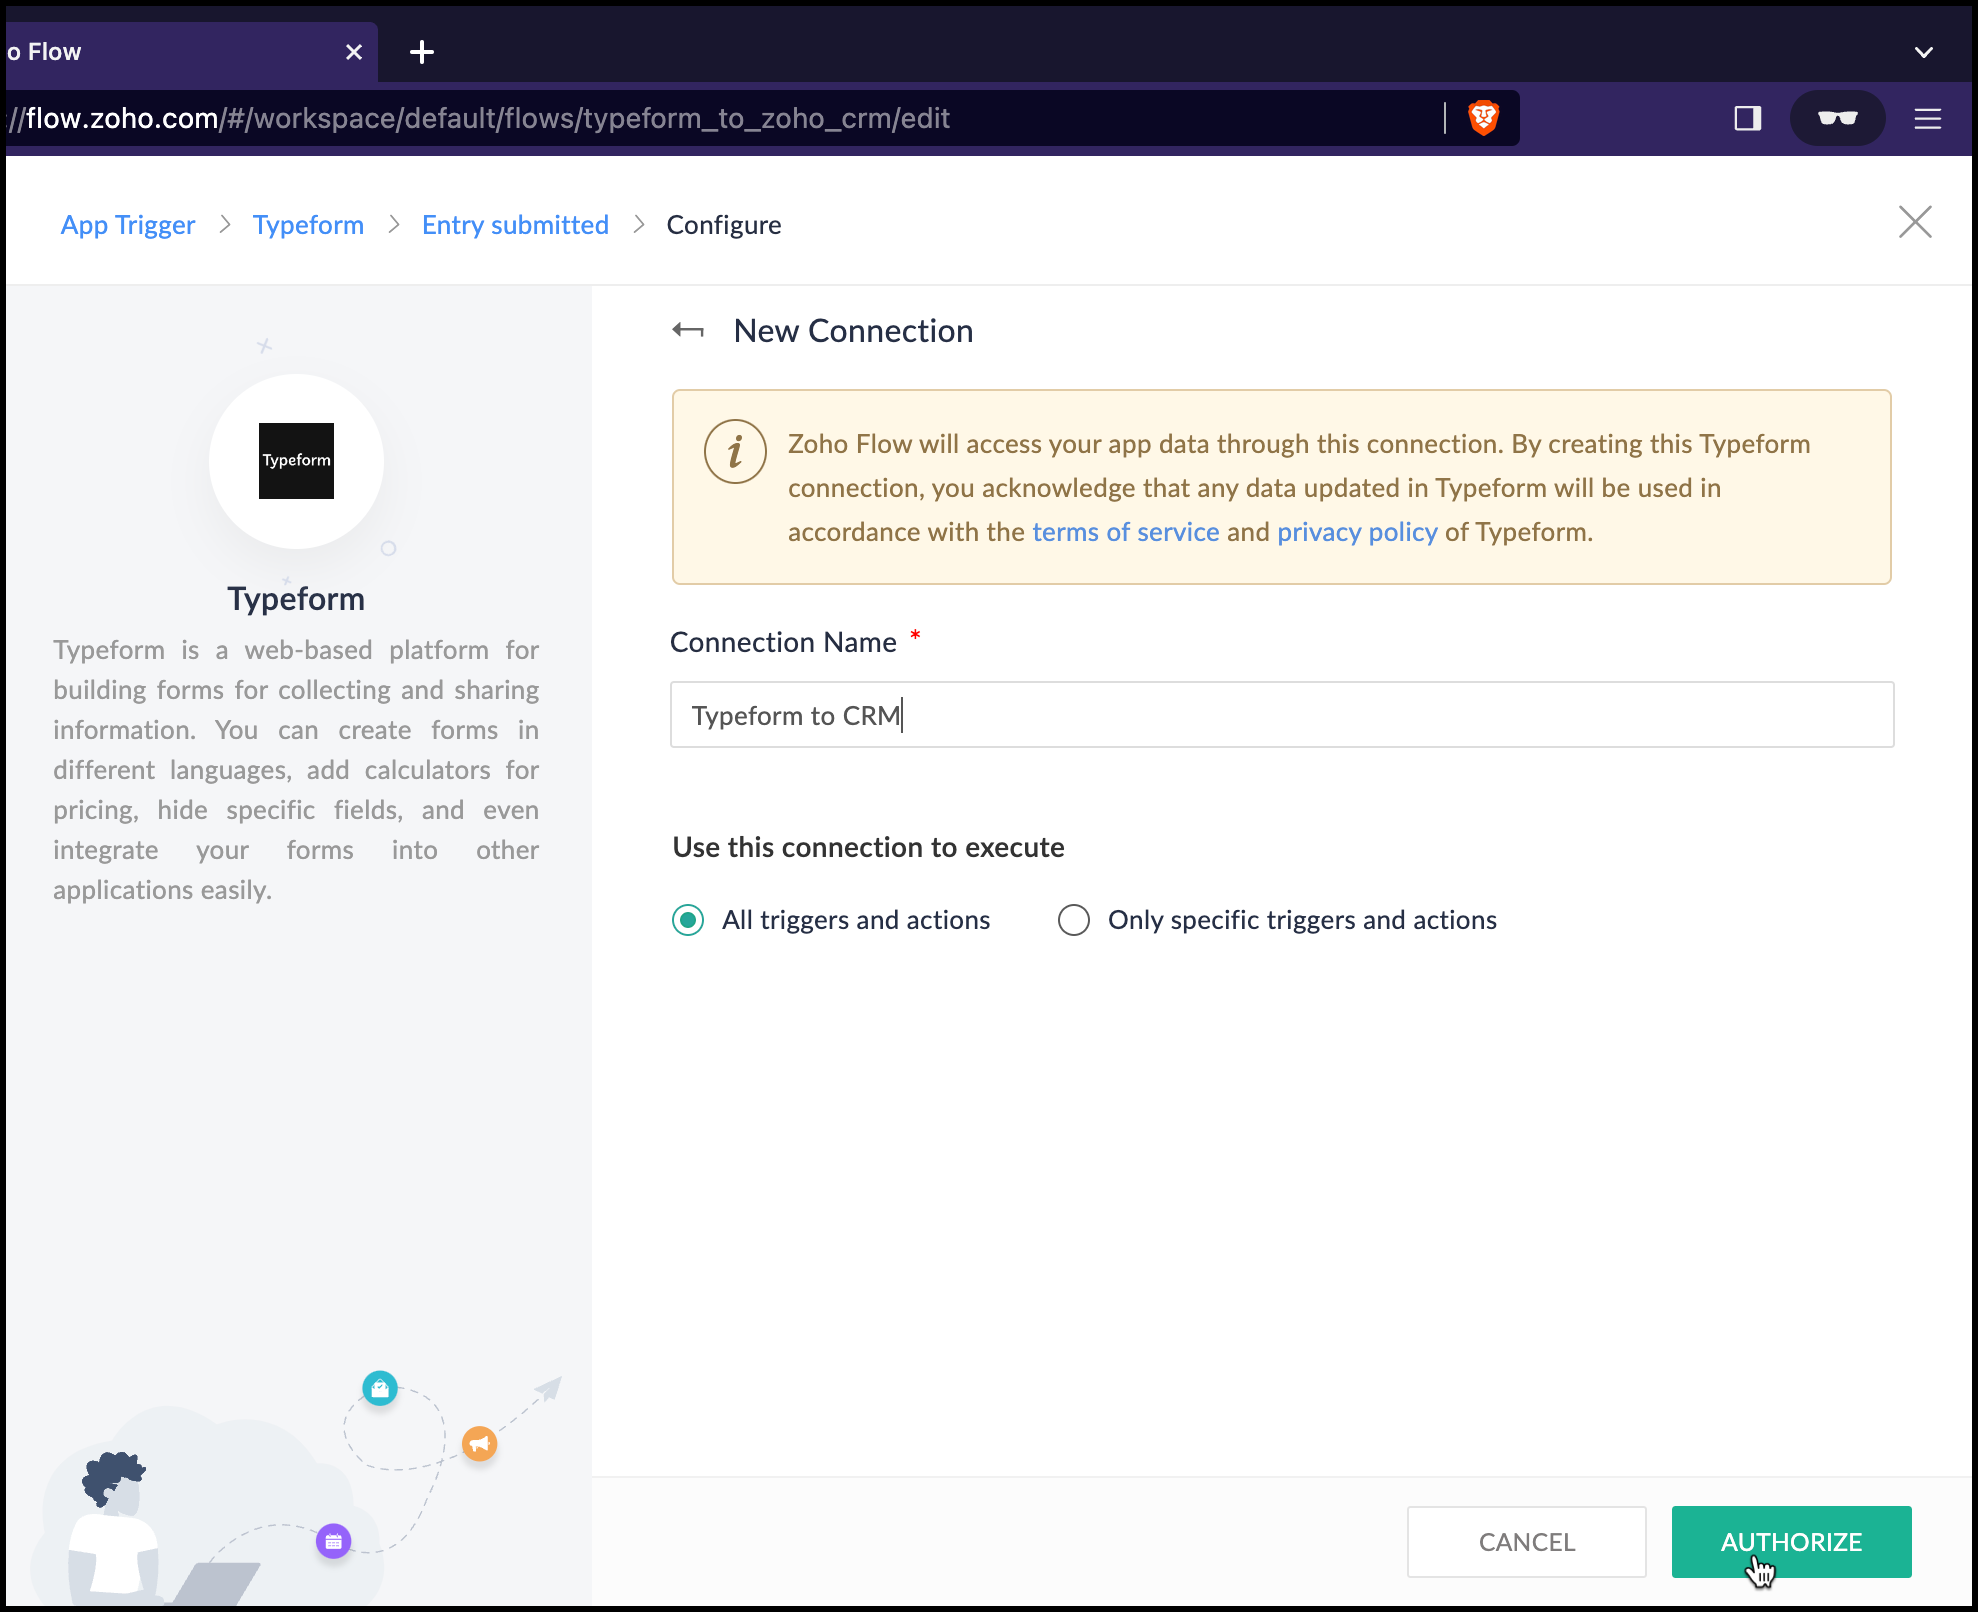
- Specify a connection name and choose what this connection should execute—All triggers and actions or specific triggers and actions.
- Click Authorize.
- You will be redirected to Typeform. Log in to Typeform and provide your consent for Zoho Flow to use Typeform's data.
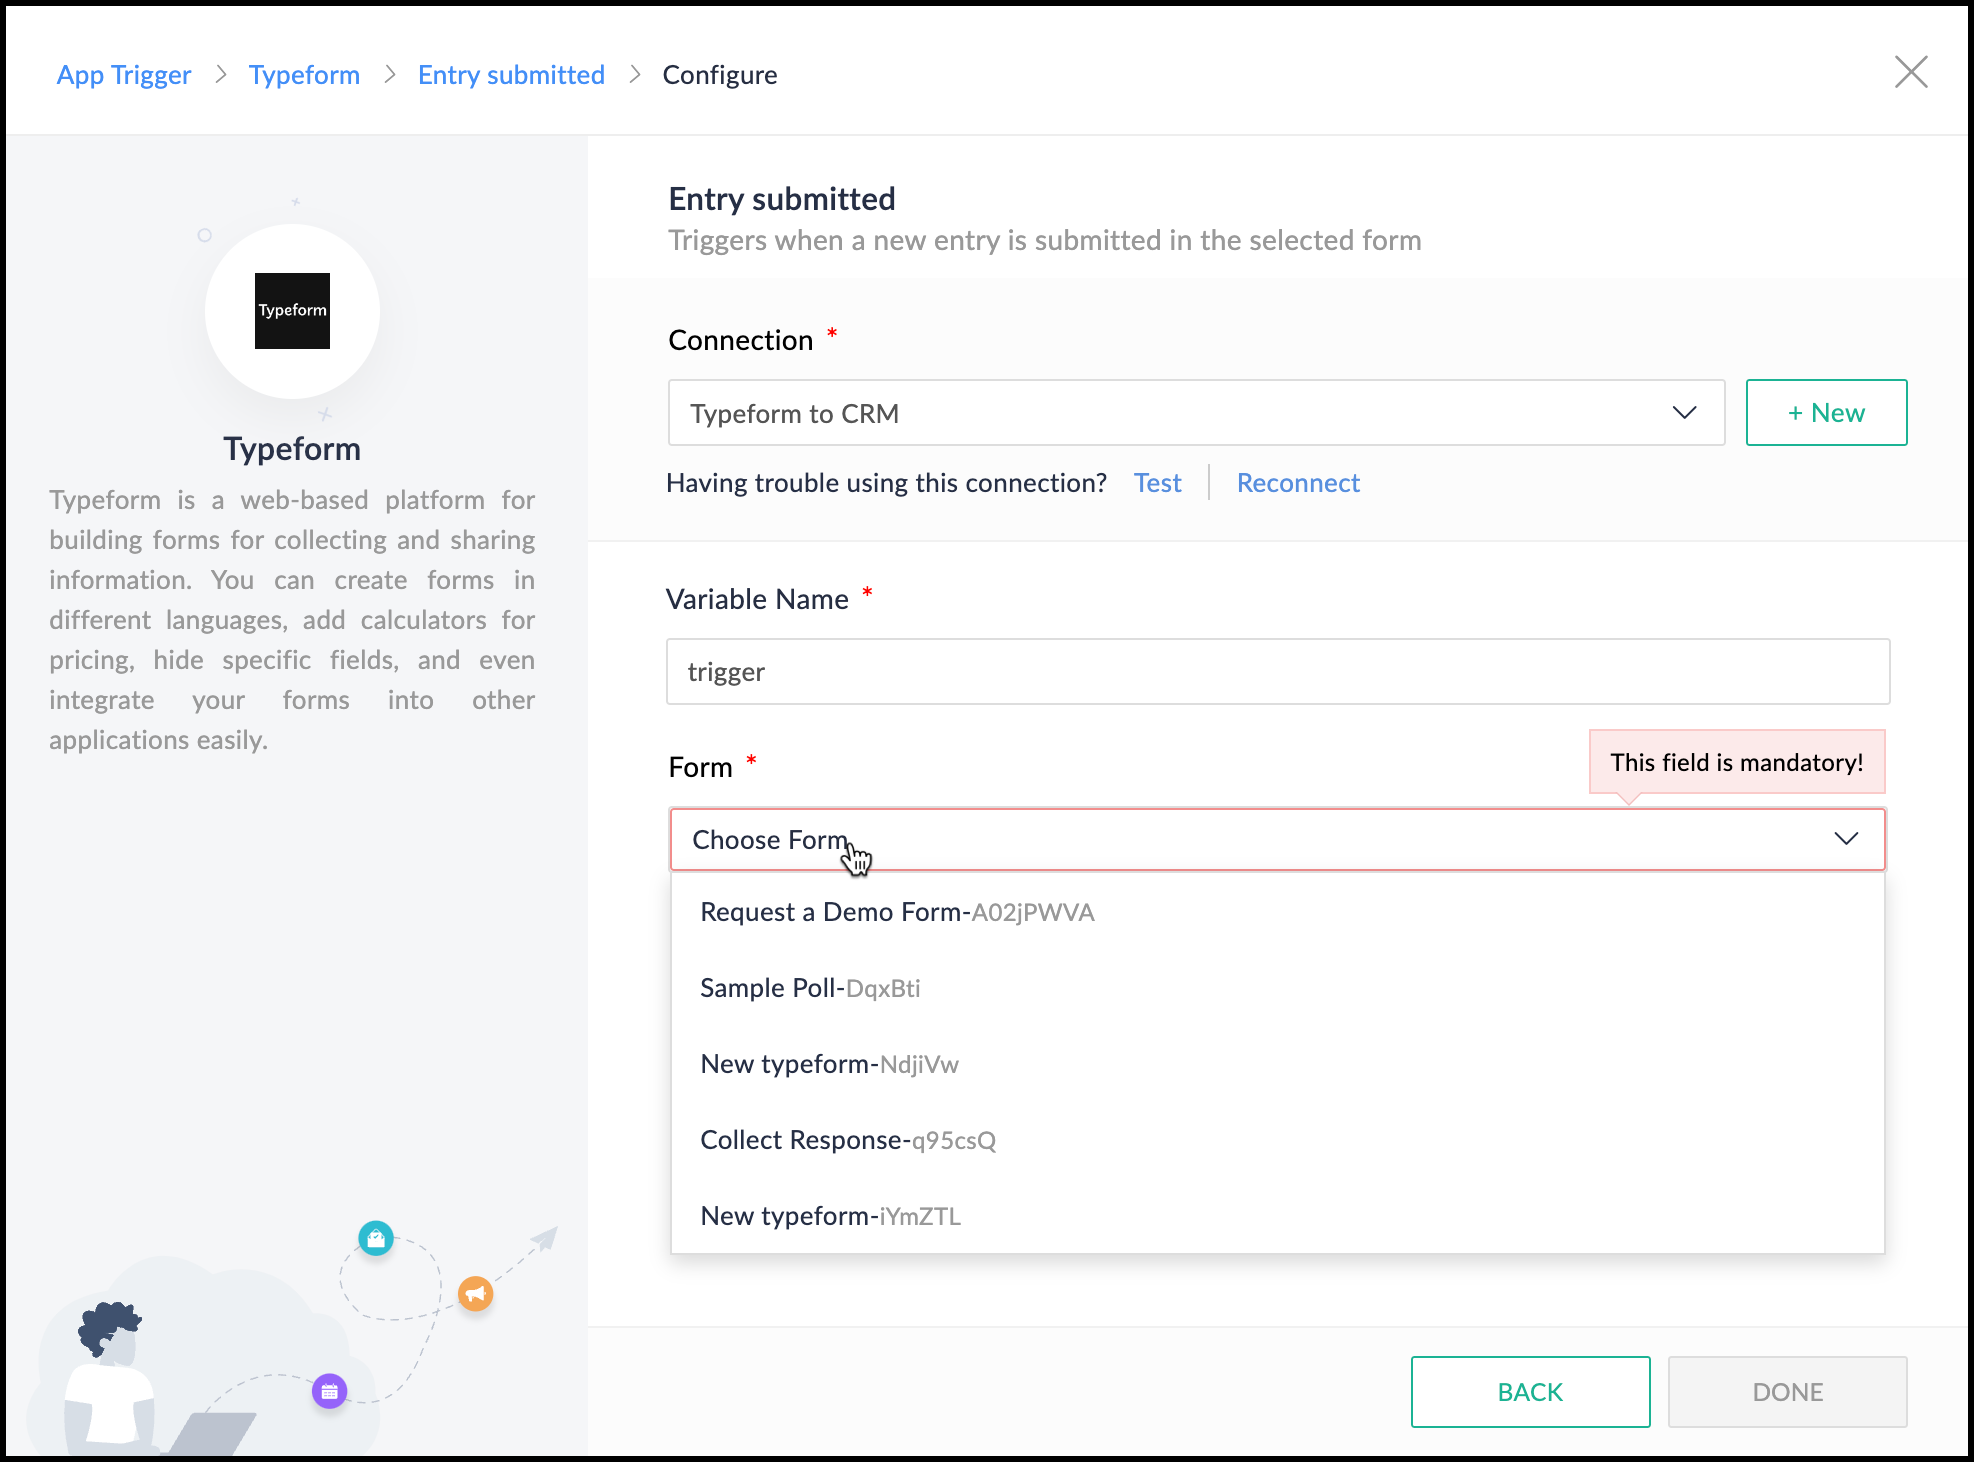
- Now, choose the form that you want Zoho Flow to use and click Done.
- Zoho Flow's Builder opens and you can see an action block for Typeform already in place.
4. Creating a lead in Zoho CRM
- After connecting Typeform and Zoho Flow, you want to create a lead in Zoho CRM. Choose the Create or Update Lead action block.
- For this, you must first connect Zoho Flow and Zoho CRM.
- Specify a connection name and choose what the connection should execute—All triggers and actions or specific triggers and actions.
- Click Authorize.

- You will be redirected to Zoho CRM's login page. Provide your credentials and your consent for Zoho Flow to use Zoho CRM.
- After successful authorization, the Create Lead form opens.
- The variable name will already be populated.
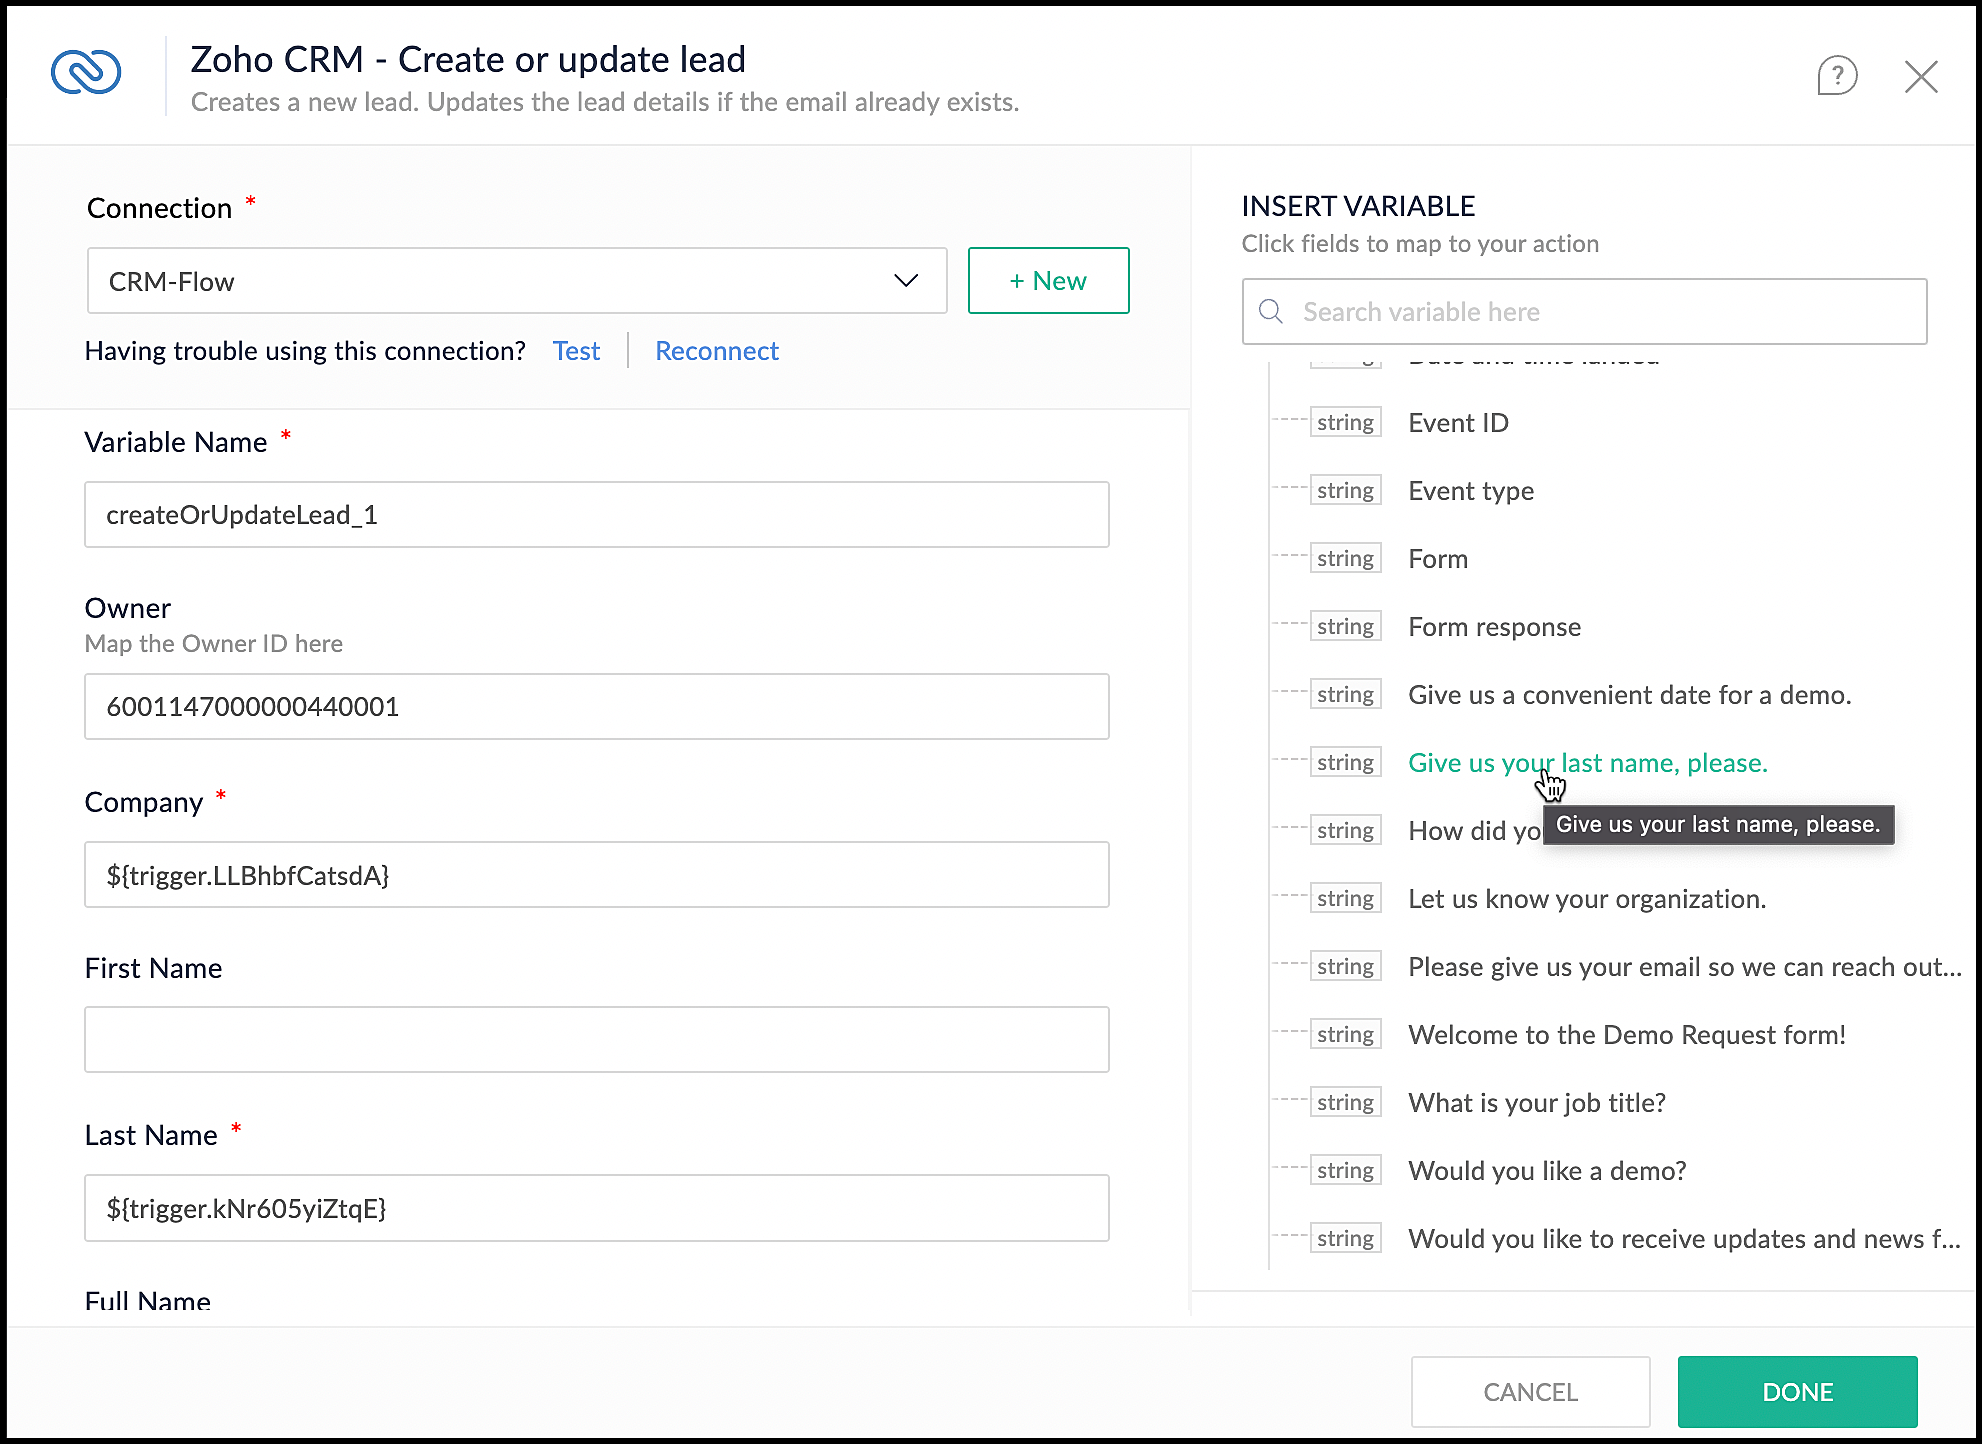
- Map the Owner ID in CRM, here.
- You can see that Last Name, Company, and Email are mandatory fields in the Leads module. These details are to be collected from the form and mapped with the fields in CRM.
- On the right pane, you can see the form. Click the drop-down arrow. You can see the fields on the form.
- Place the cursor on the Company field and click the field on the form that holds this data. It is the field "Give us your last name, please." field here. You can see that the field is populated by the $ key.
- Similarly, map the other fields.
- Click Done.
5. Checking if a demo is needed
- You want to check if the user needs a demo, and raise the signal in CRM only when they need it.
- On the left pane, click Logic.
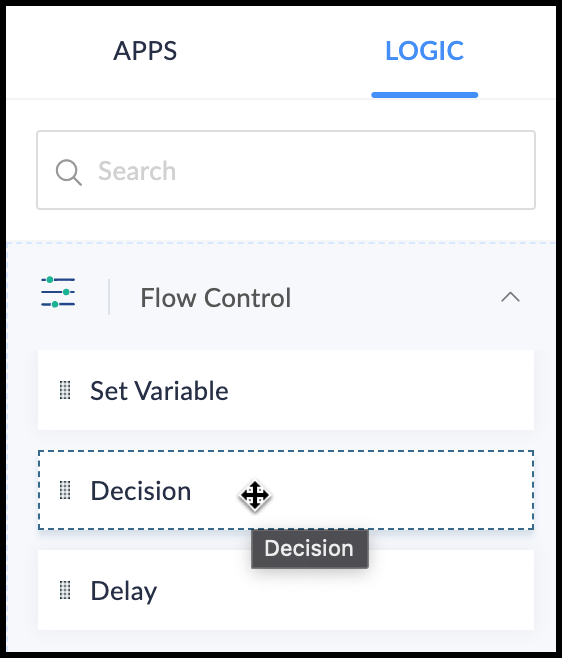
- Drag and drop the Decision block in the Builder.
- Choose the criteria to make the decision. In our case, the criterion is "Would you like a demo?", the operator is "contains" or "equals", and the value is "Yes".
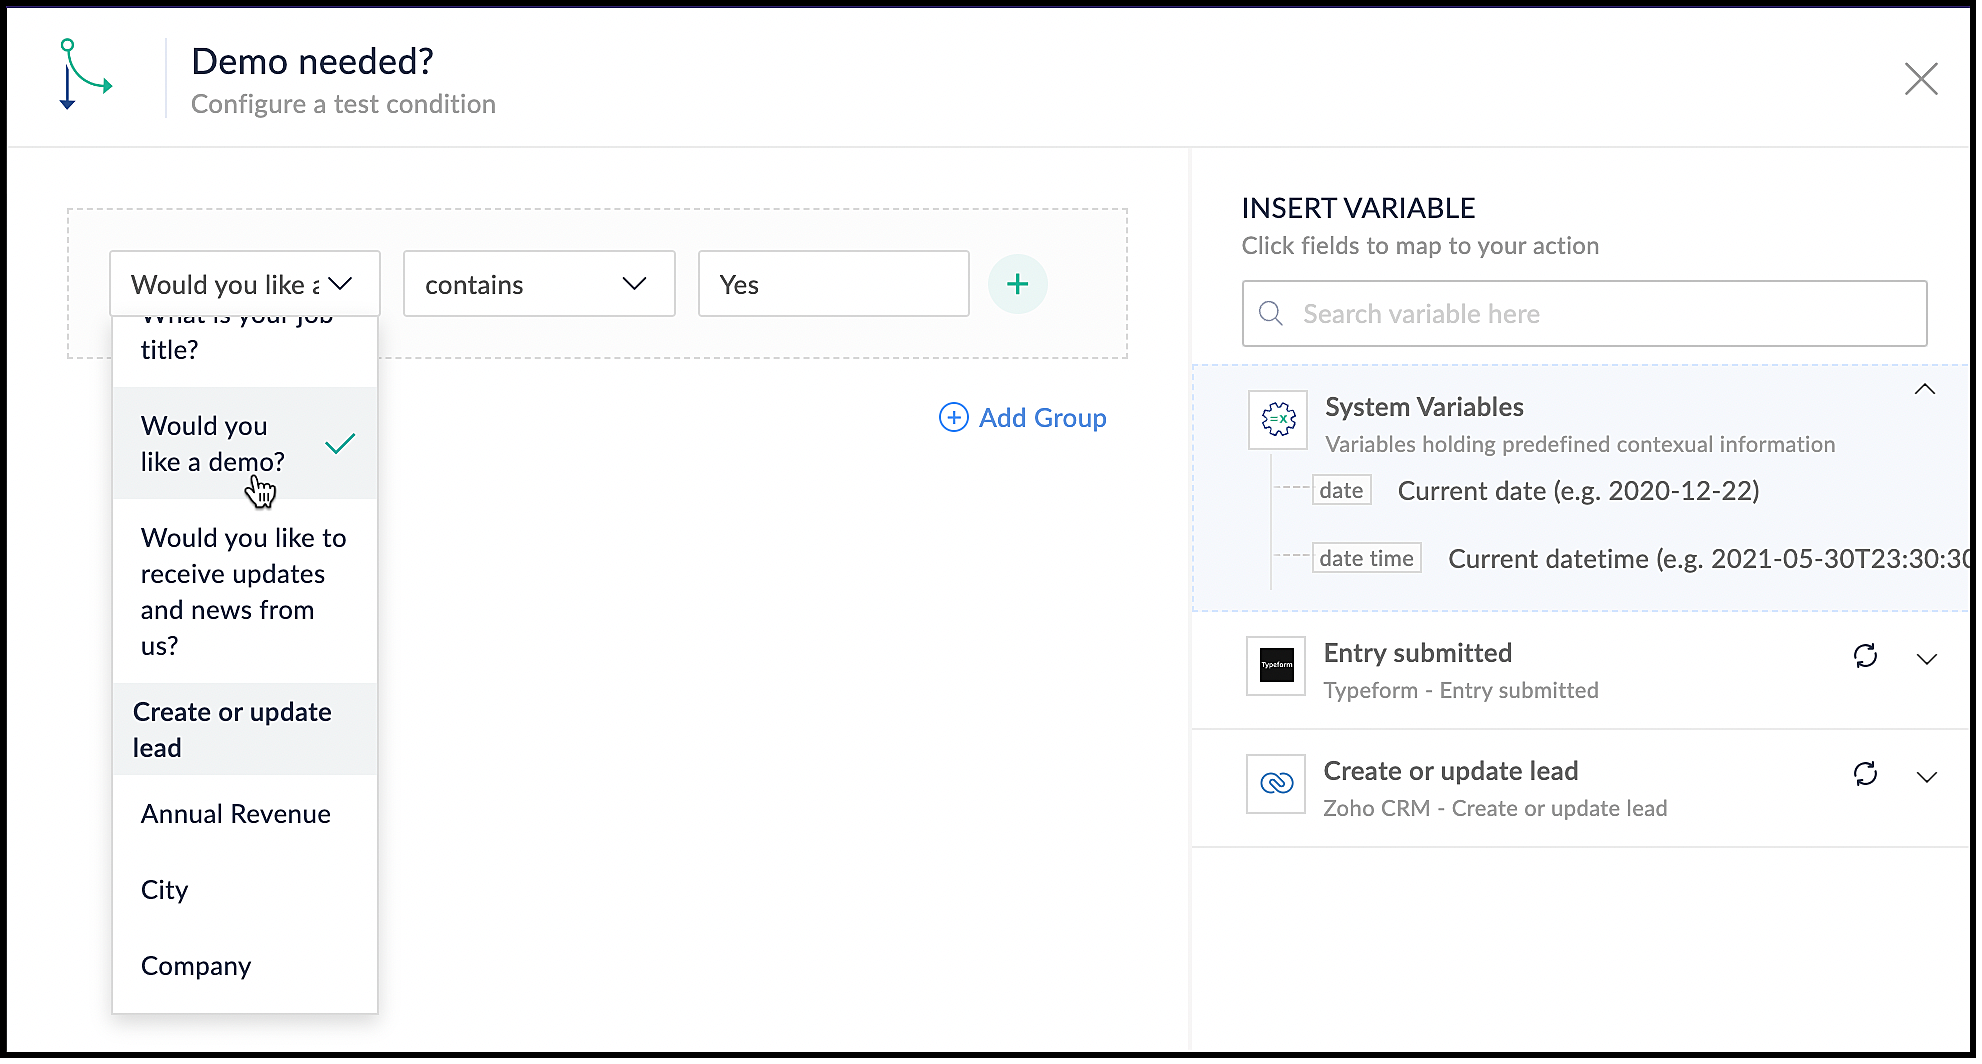
- Click Done.
6. Using the Raise Signal action block
- When the user wants a demo, you want to raise a signal in CRM and create a task.
- In the Builder, on the left, under Apps, search for Zoho CRM.
- Click the drop-down and choose the Raise Signal block.
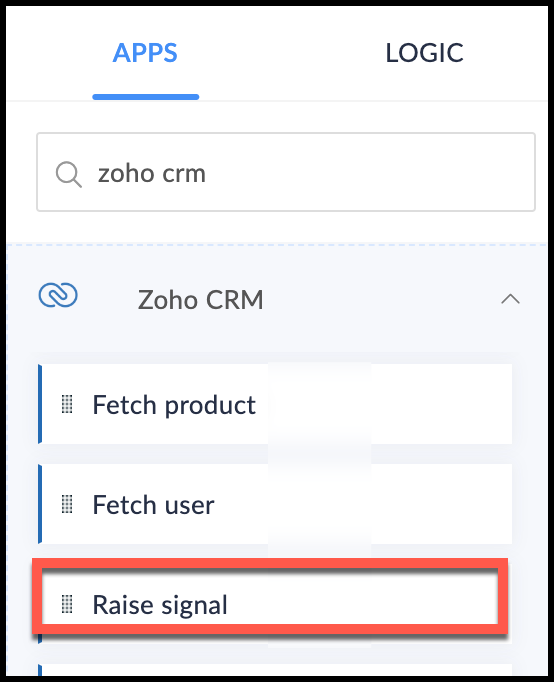
- The Raise Signal form opens.
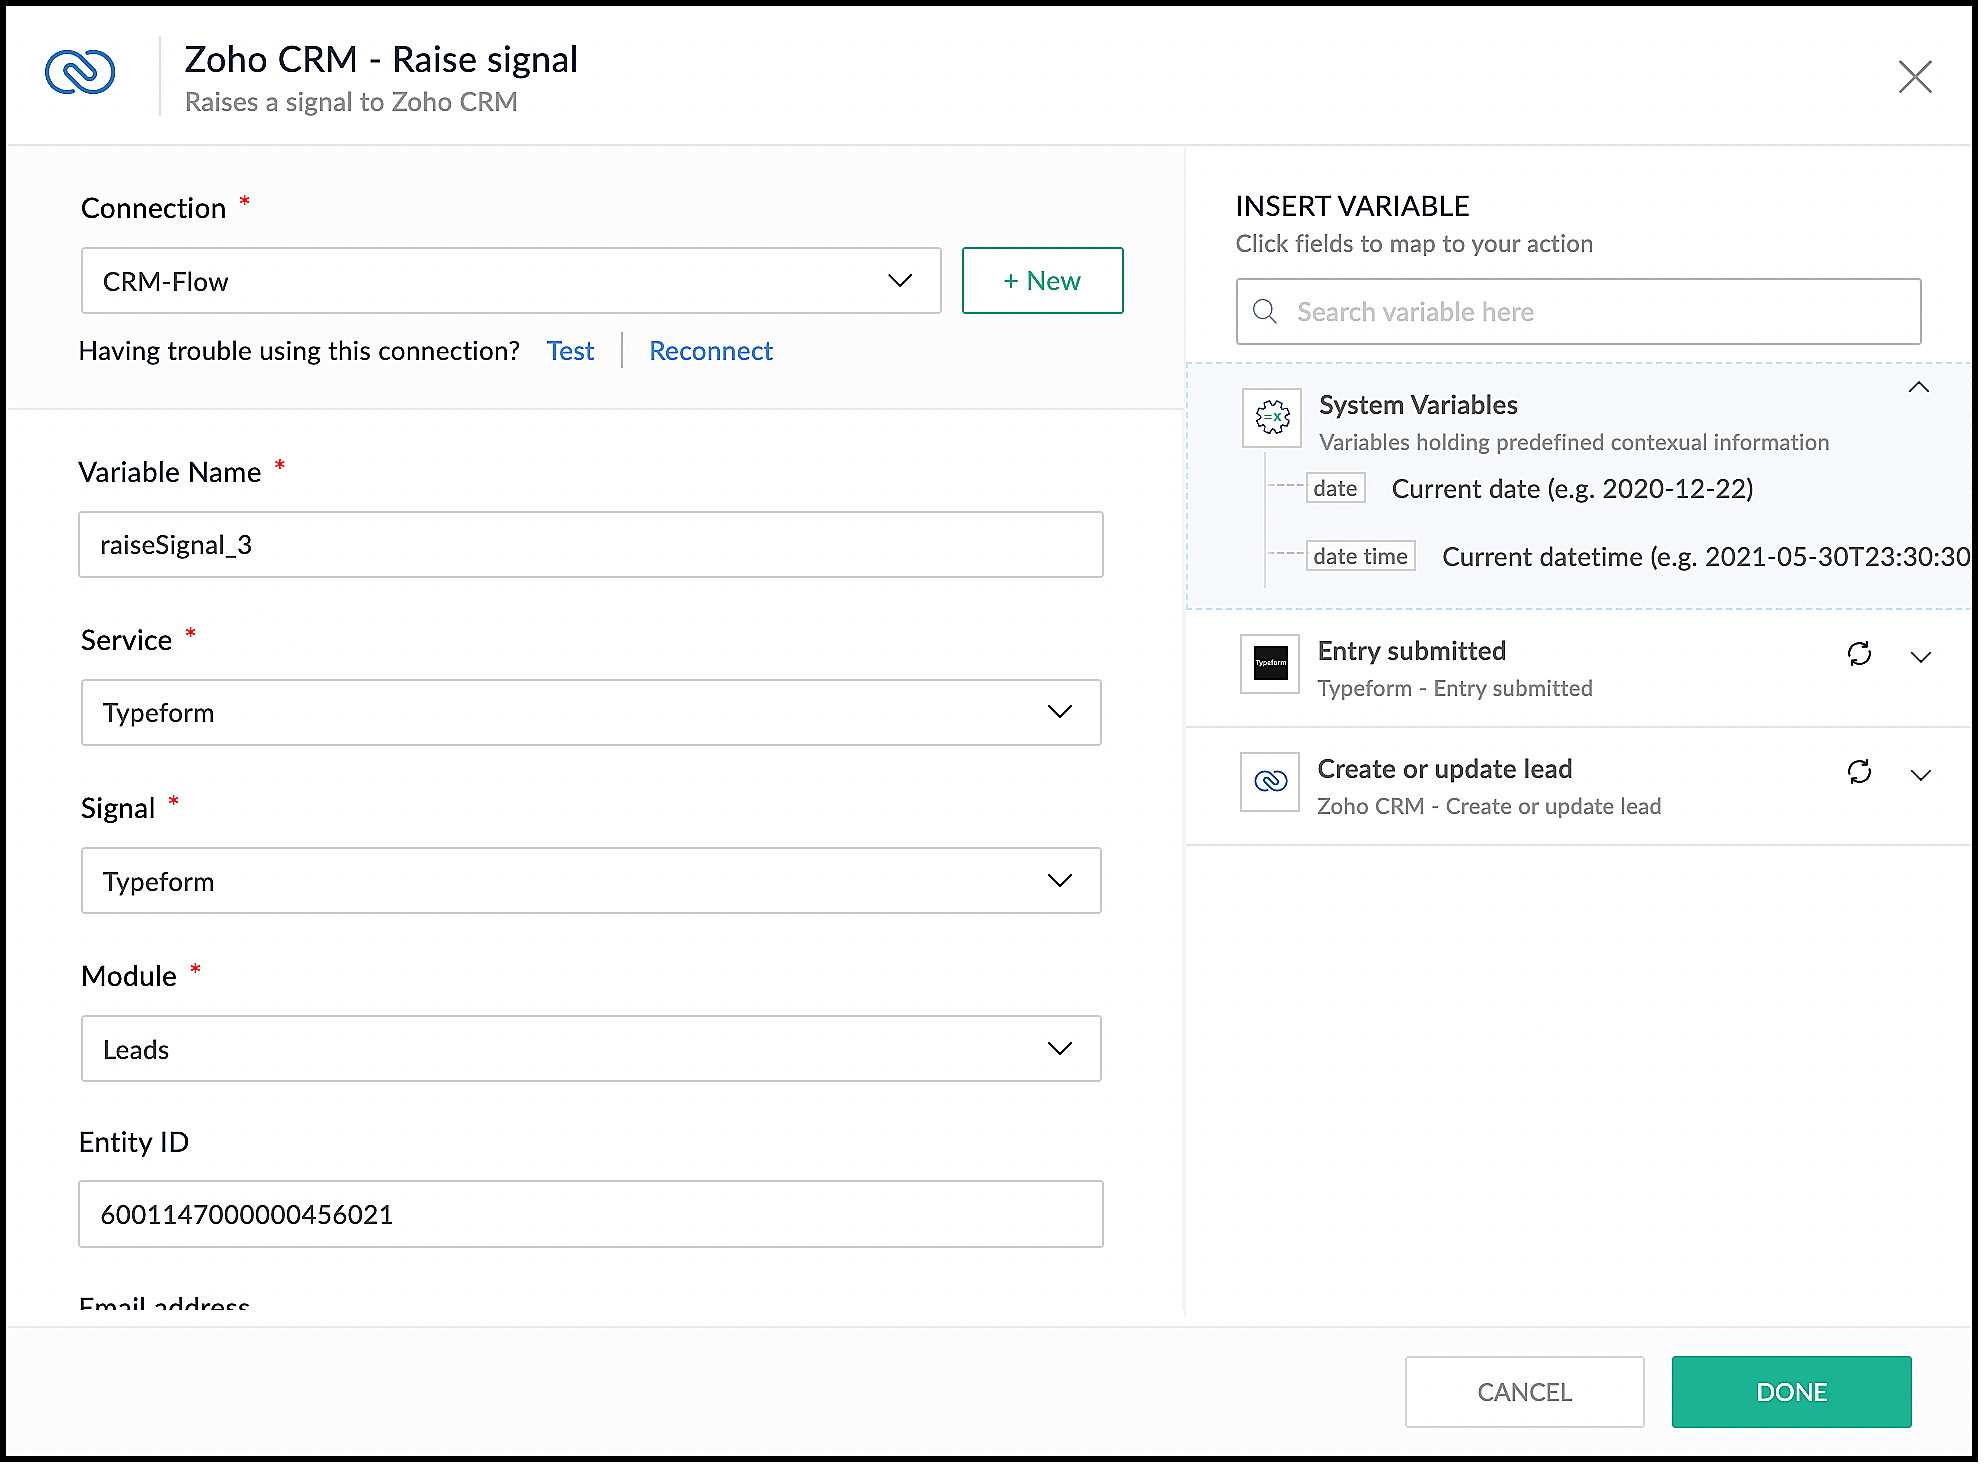
- Choose the module you want to associate the signal to and the record ID.
- Specify the Subject of the Signal.
- You can also construct the message you want to see when the signal is raised. For this, under the Message field, map your message with the right field on your form in Typeform. The right pane shows the list of fields available for you to map from the form's response.
- Click Done.
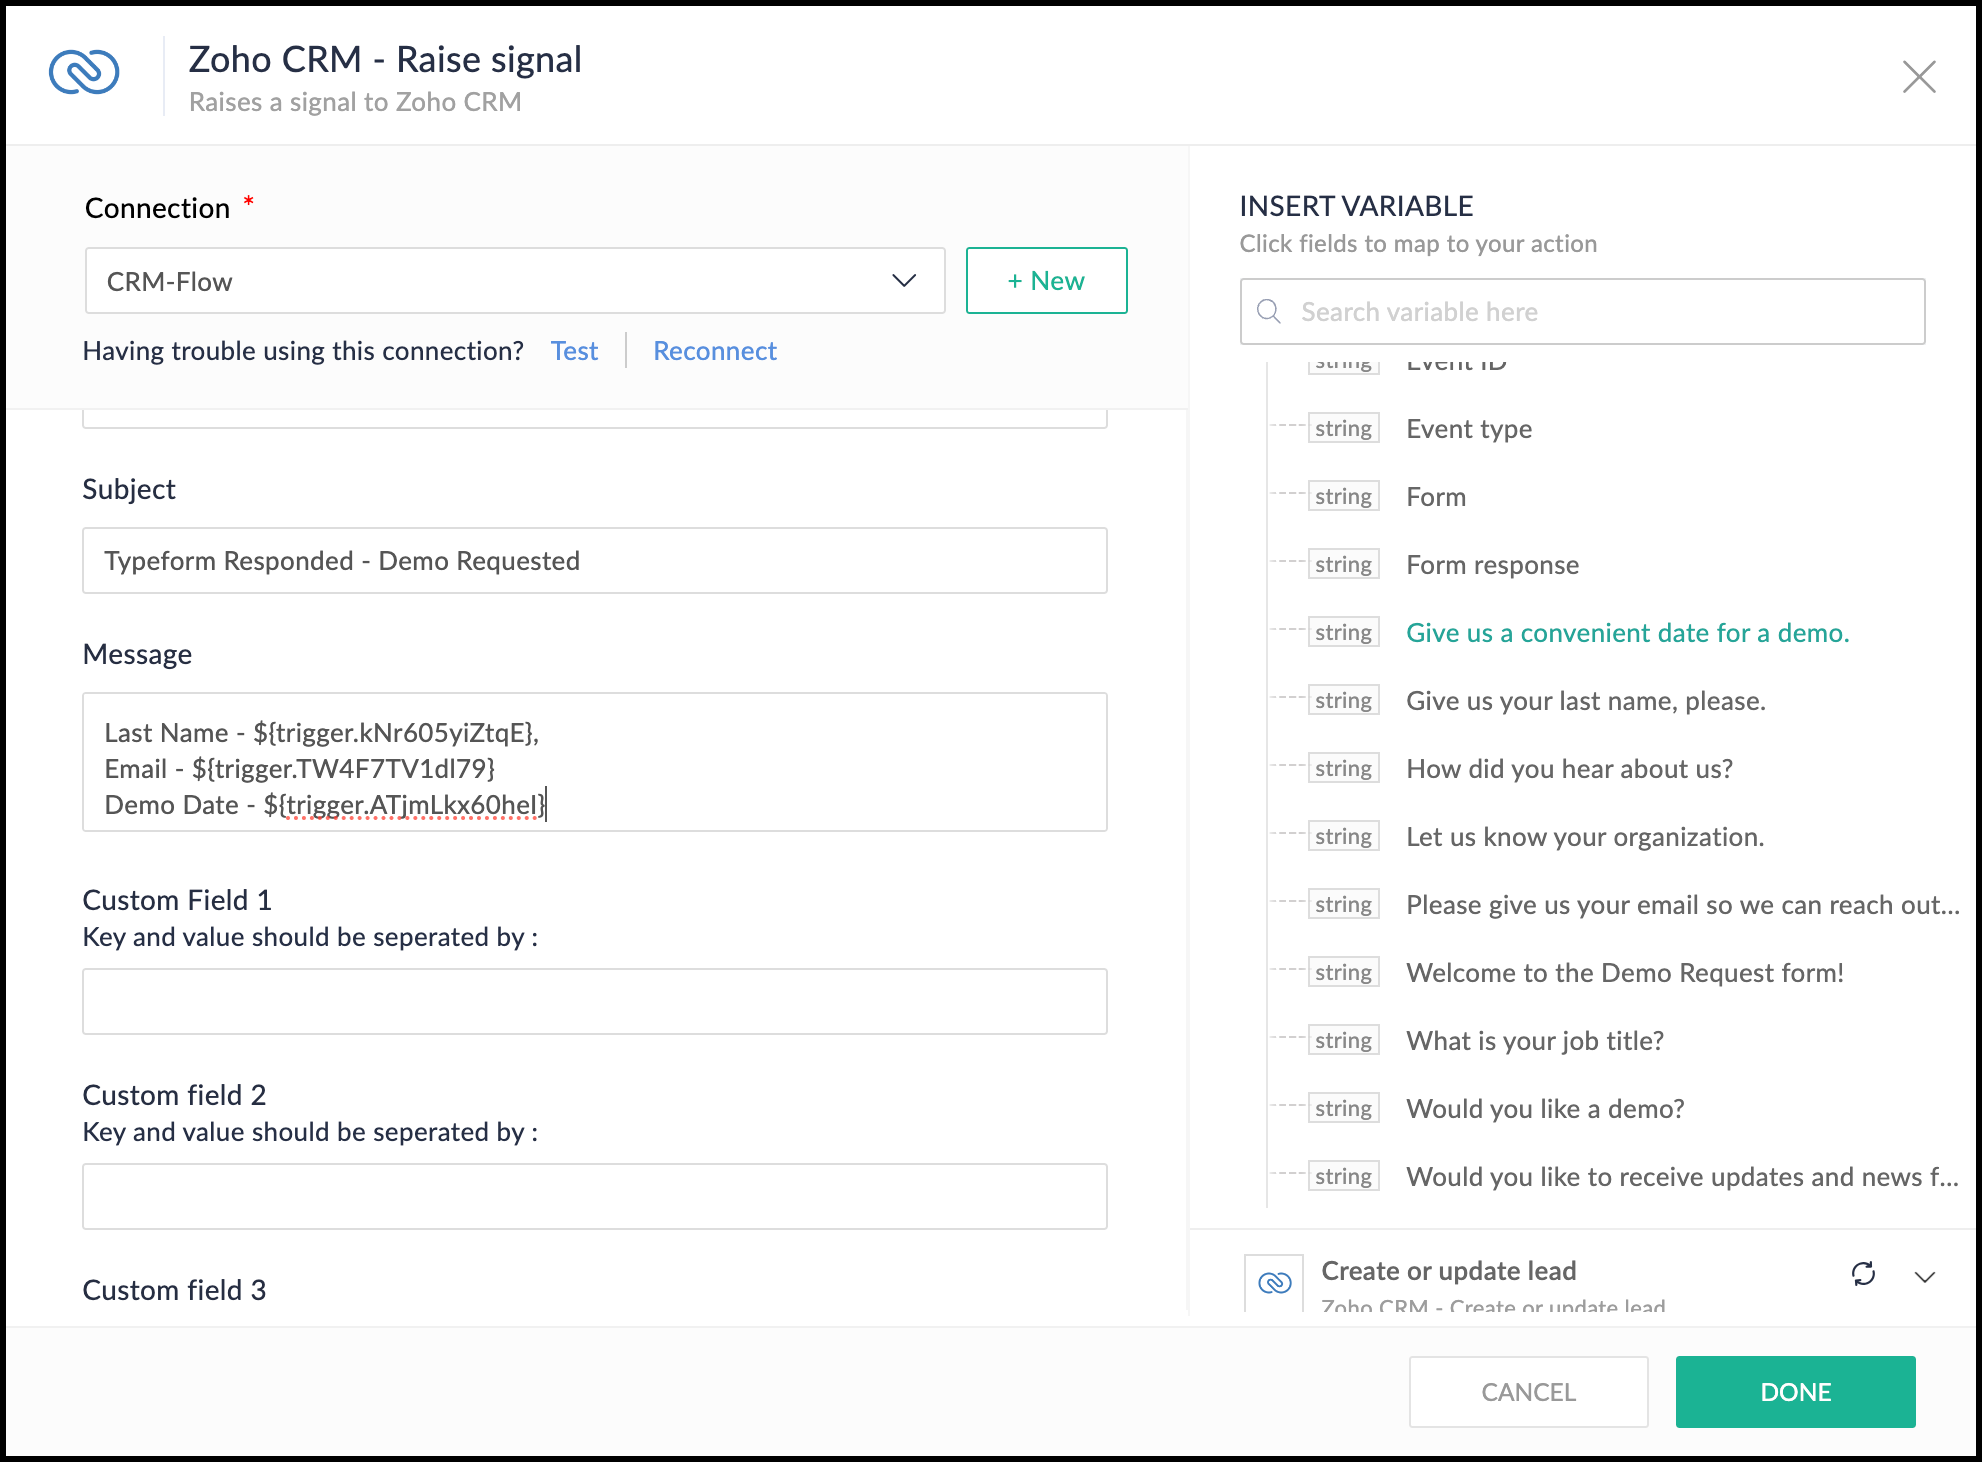
- This is what the complete flow would look like.
7. Testing the Flow
- Click the Play button in the builder at the top-right corner.
- Submit a test form in Typeform. This triggers the flow.
- In Zoho Flow, you can see the data for the form you submitted. Click Test.
- You can now see the action blocks being executed for Typeform and the subsequent action blocks.
- Each block has input and output tabs. Click them to see the execution.
8. Viewing the Signal in Zoho CRM
- Log in to Zoho CRM.
- Click the bell icon at the top-right corner.
- You can see the signal. Click the notification and you can view the body of the signal.

- You can also see that a lead with the name Smith will be created.
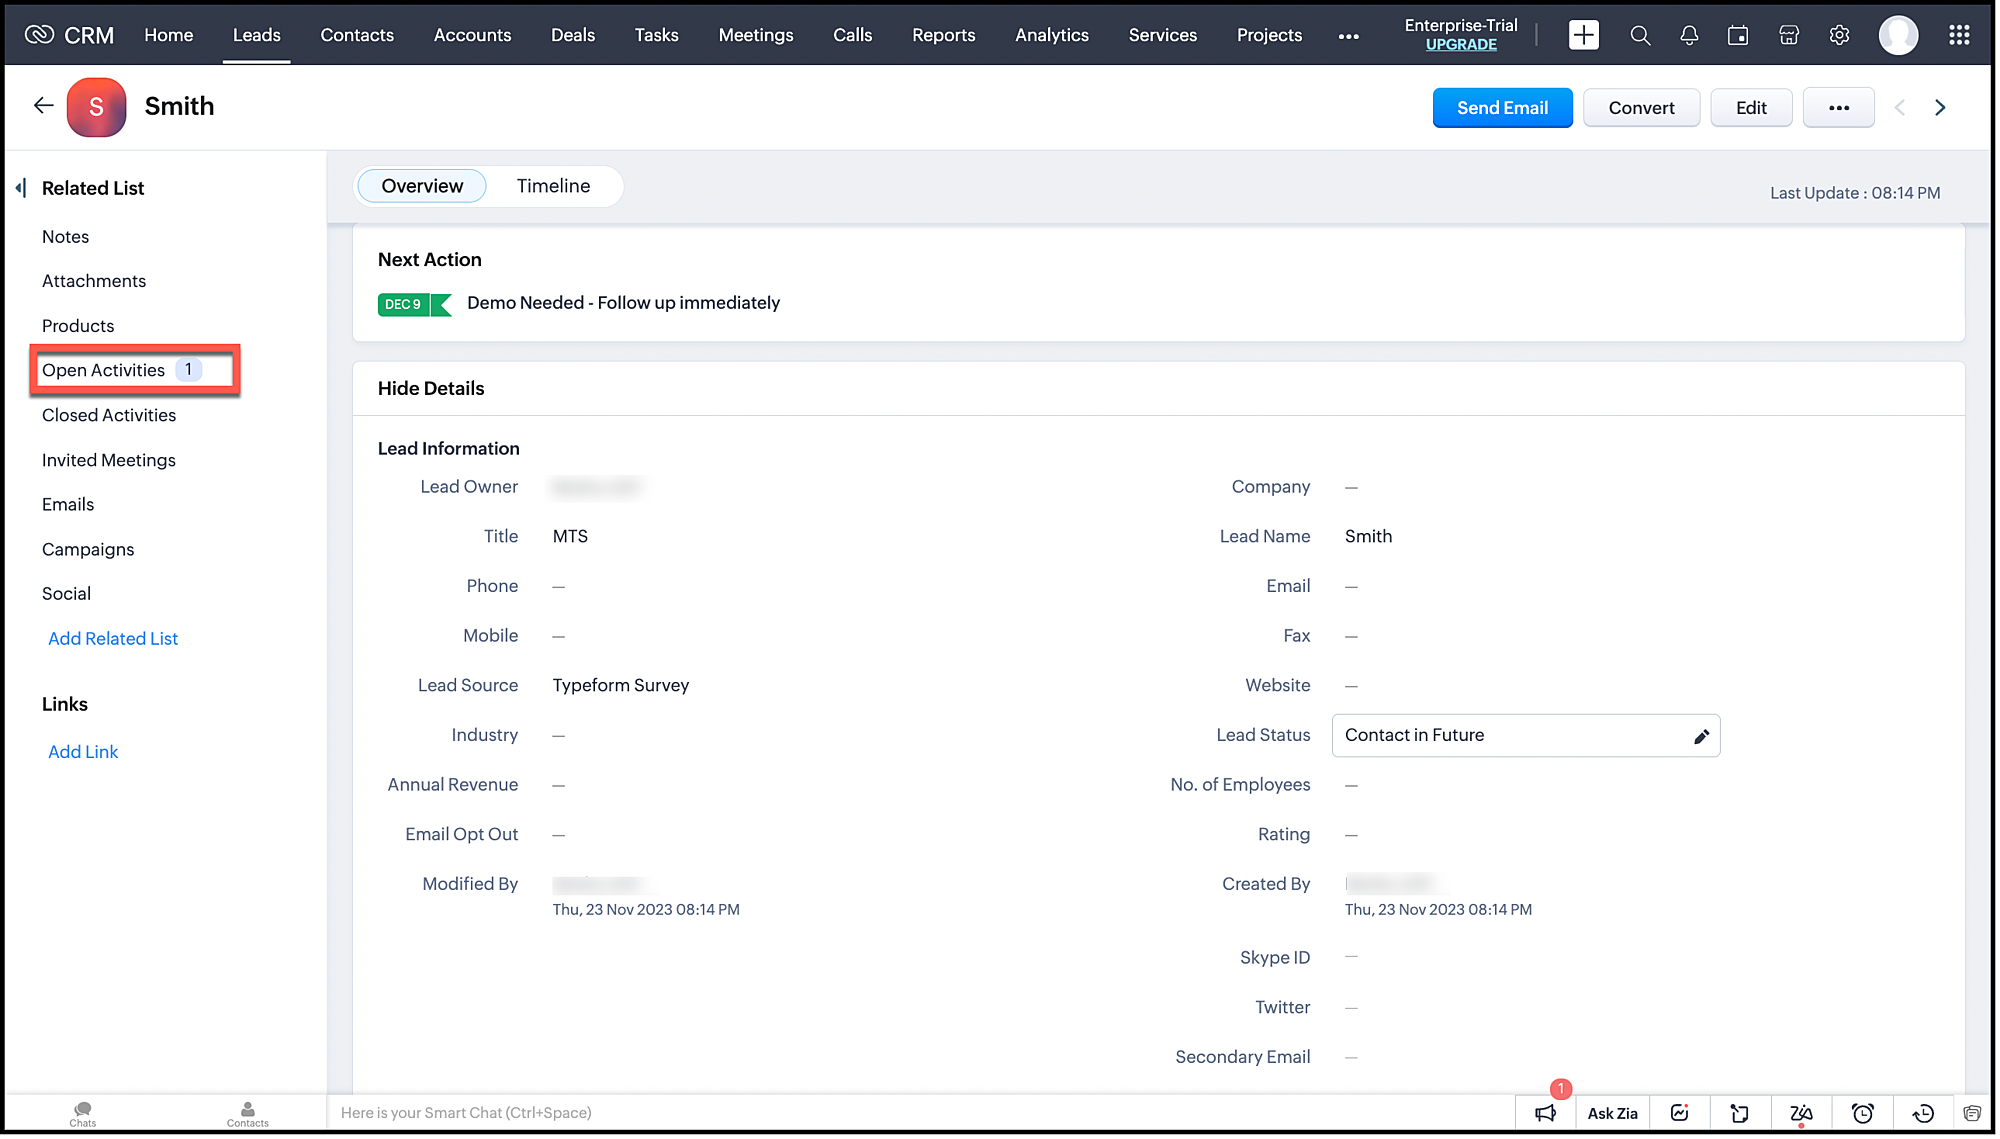
- This lead will also have an associated task.
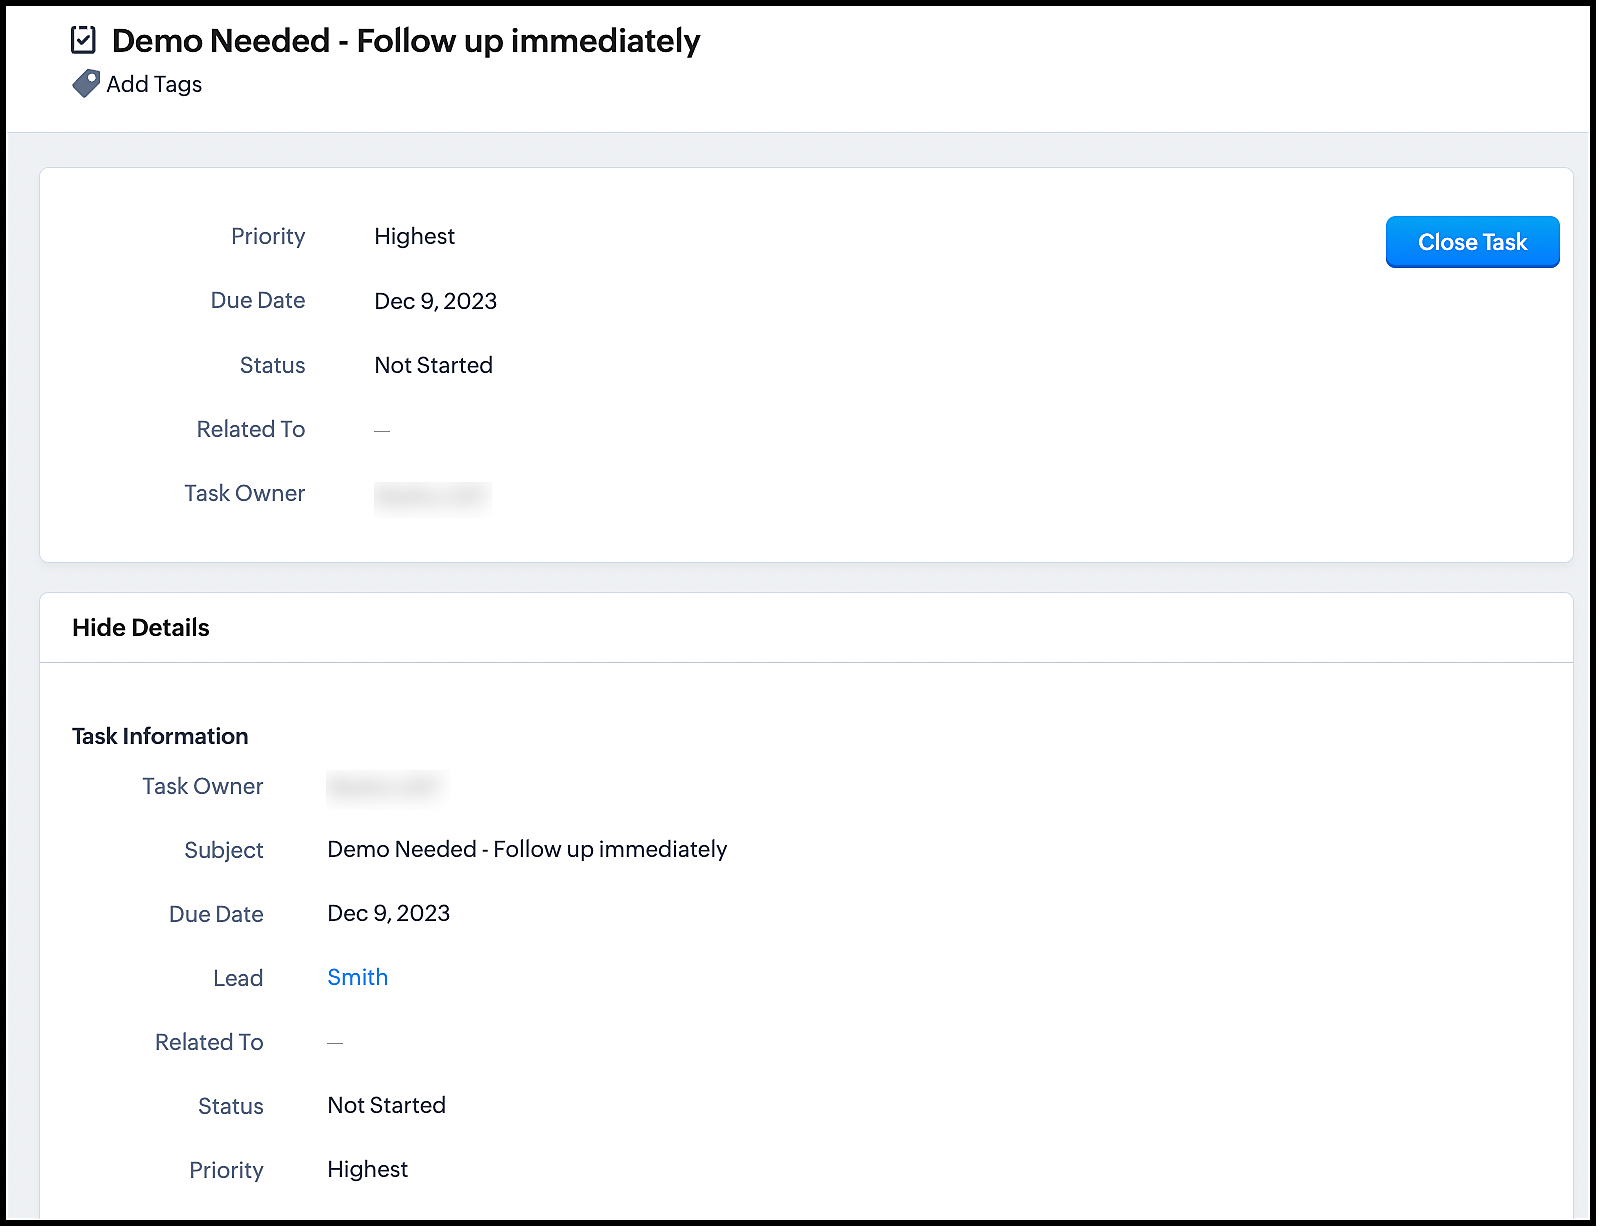
Now, turn on your flow and get instant notifications whenever users submit the form.
The advantage of using Zoho Flow is that it takes care of the logic of raising the signal through the Raise Signal action block, and does not require you to write the function in CRM. This also does not require much coding knowledge.
Once you set up the flow, it automates the entire process of lead generation, raising a signal and other actions.
Zoho Flow supports multiple apps and therefore, integrating between Zoho CRM and other apps through Zoho Flow is much easier.
We hope you liked this post. Let us know your questions in the comments.
Cheers!
Centralize Knowledge. Transform Learning.
All-in-one knowledge management and training platform for your employees and customers.
New to Zoho Recruit?
Zoho Developer Community
New to Zoho LandingPage?
Zoho LandingPage Resources
New to Bigin?
Topic Participants
Shylaja S
Sticky Posts
Kaizen #198: Using Client Script for Custom Validation in Blueprint
Nearing 200th Kaizen Post – 1 More to the Big Two-Oh-Oh! Do you have any questions, suggestions, or topics you would like us to cover in future posts? Your insights and suggestions help us shape future content and make this series better for everyone.Kaizen #226: Using ZRC in Client Script
Hello everyone! Welcome to another week of Kaizen. In today's post, lets see what is ZRC (Zoho Request Client) and how we can use ZRC methods in Client Script to get inputs from a Salesperson and update the Lead status with a single button click. In thisKaizen #222 - Client Script Support for Notes Related List
Hello everyone! Welcome to another week of Kaizen. The final Kaizen post of the year 2025 is here! With the new Client Script support for the Notes Related List, you can validate, enrich, and manage notes across modules. In this post, we’ll explore howKaizen #217 - Actions APIs : Tasks
Welcome to another week of Kaizen! In last week's post we discussed Email Notifications APIs which act as the link between your Workflow automations and you. We have discussed how Zylker Cloud Services uses Email Notifications API in their custom dashboard.Kaizen #216 - Actions APIs : Email Notifications
Welcome to another week of Kaizen! For the last three weeks, we have been discussing Zylker's workflows. We successfully updated a dormant workflow, built a new one from the ground up and more. But our work is not finished—these automated processes are
New to Zoho TeamInbox?
Zoho TeamInbox Resources
Zoho CRM Plus Resources
Zoho Books Resources
Zoho Subscriptions Resources
Zoho Projects Resources
Zoho Sprints Resources
Qntrl Resources
Zoho Creator Resources
Zoho CRM Resources
Zoho Show Resources
Get Started. Write Away!
Writer is a powerful online word processor, designed for collaborative work.
Zoho CRM コンテンツ
-
オンラインヘルプ
-
Webセミナー
-
機能活用動画
-
よくある質問
-
Ebook
-
-
Zoho Campaigns
- Zoho サービスのWebセミナー
その他のサービス コンテンツ
Nederlandse Hulpbronnen
ご検討中の方
Recent Topics
Multi-currency and Products
One of the main reasons I have gone down the Zoho route is because I need multi-currency support. However, I find that products can only be priced in the home currency, We sell to the US and UK. However, we maintain different price lists for each. ThereCliq iOS can't see shared screen
Hello, I had this morning a video call with a colleague. She is using Cliq Desktop MacOS and wanted to share her screen with me. I'm on iPad. I noticed, while she shared her screen, I could only see her video, but not the shared screen... Does Cliq iOS is able to display shared screen, or is it somewhere else to be found ? RegardsCOQL API in JS Widget only pulling 200 records
Hello! We've been building a custom homepage widget using the Zoho JS SDK, and it seems that this https://help.zwidgets.com/help/latest/ZOHO.CRM.API.html#.coql only allows 200 records. I thought the limit was 2000 for COQL queries, but am I mistaken?Passing the CRM
Hi, I am hoping someone can help. I have a zoho form that has a CRM lookup field. I was hoping to send this to my publicly to clients via a text message and the form then attaches the signed form back to the custom module. This work absolutely fine whenPaid Support Plans with Automated Billing
We (like many others, I'm sure) are designing or have paid support plans. Our design involves a given number of support hours in each plan. Here are my questions: 1) Are there any plans to add time-based plans in the Zoho Desk Support Plans feature? TheDo buttons and vba msgbox work on mobile, specifially the iPhone zoho sheets app?
In Zoho sheets on the web, I inserted a button and assigned a VBA macro to it. It pops up a msgbox with some text. When I go onto the iPhone mobile zoho sheets app, the button is there. When I click on that button, the spinning asterisk appears for aDifferent form submission results for submitter and internal users
I'm looking for suggestions on how to show an external submitter a few results while sending internal users all the results from the answers provided by the external user. The final page of our form has a section with detailed results and a section withColumn letter from number
Hello, I am trying to select a cell and i have the column number. How do i do this or is there a way of getting the letter from the number? Thank youHelp Desk Services Solution
I am here looking for Help Desk services solution for organization. I also searched this on many different website and found many solutions. We are bit confused to which one to choose. One of my friend suggest me this platform, and i am hoping i willFacing Issues with Sites Mobile font sizes
my page renediaz.com is facing issues mobile view, when i try to lower font sizes in home page, instead of changing the size, it changes the line spaceRemove 'This is an automated mail from Zoho Sign' in footer
Hi there, Is it possible to remove or change the text under the e-mail templates? I can't figure out how to do that: Would love to hear from you. Kind regards, TristanFormatting and slow
Creating campaigns are difficult. I'm fairly computer literate but some of the way Zoho Campaigns formatting works is painful. Images fail to upload or are very slow. To top it off, syncing the contacts is a pain as well as temperamental links to create Segments. At this rate I'm afraid we might need to migrate back to Mailchimp.Default Ticket View - Table?
Guys, We mostly use the table view to queue tickets. Maybe I am missing it - but how can I set that view as 'default" for all our agents? Thanks JVBoost your Zoho Desk's performance by archiving tickets!
The longer your help desk operations are, the more likely it is to accumulate tickets that are no longer relevant. For example, ticket records from a year ago are typically less relevant than currently open tickets. Such old tickets may eventually leadPaste emails to create segment
We are moving over from Mailchimp to ZOHO. However Mailchimp allows me to create a segment by pasting in emails from excel (or importing a .csv) can I do the same in Mailchimp?Getting the Record ID of a form once it is submitted - so that form can be edited later
In Zoho Forms, where can I access the record ID of a form once the form is submitted? - Record ID is not available in webhook payloads - It is not available to form fields, including in formulas - It is not available as a parameter in a thankyou pageAuto-Generate Line Numbers in Item Table Using HTML & CSS Counters (Zoho Books & Zoho Inventory Custom Templates)
<div> <style> /* Start counter from 0 inside tbody */ tbody#lineitem { counter-reset: rowNumber; } /* Increment counter for each row */ tbody#lineitem tr { counter-increment: rowNumber; } /* Show counter value in first column */ tbody#lineitem tr td:first-child::beforePossible to define default font and size in Zoho Campaigns?
Is it possible to define a default font (font, size and colour) for the text, H1 and H2 in Zoho Campaigns? For example: In a campaign, I add a text block, and the text is automatically century gothic, size 11, grey (6f6f6e) by default? Thank you!Zoho Sites - General Feedback
Hi Everyone-- Quick question for discussion: is it me or is working with Zoho Sites like entering the Twilight Zone? I've built many sites over the years, but this platform seems impossible. I've spent an entire day and a half trying to get a simple one-colorFile Upload field not showing in workflow
Hi, I have added a field on Zoho CRM. I want to use it in a workflow where that particular field is updated based on another field, however it is not showing up in the field list to select it in the workflow. Why is this please?You cannot send this email campaign as it doesn't have any eligible contacts in the selected mailing list. You can try adding contacts or choose other mailing lists.
please helpStrengthening the capabilities of CommandCenter in Zoho CRM Plus
When you look at the prospect-to-customer journey in most businesses 10 to 15 years ago, it was relatively straightforward. Many of us remember walking into a store, sharing our requirements with a sales associate, reviewing a few options, and makingWorld date & time format
Hello, Is there a timeline to get the worldwide used date and time format ? I mean not the american one... I mean day month year, and 24 hours clock. RegardsHow can Data Enrichment be automatically triggered when a new Lead is created in Zoho CRM?
Hi, I have a pipeline where a Lead is created automatically through the Zoho API and I've been trying to look for a way to automatically apply Data Enrichment on this created lead. 1) I did not find any way to do this through the Zoho API; it seems likeAnnouncing Kiosk 1.1 - Customize screen titles, configure new fields & actions, use values from your Kiosk to update fields, and more.
Hello all We are back again with more enhancements to Kiosk. So what's new? Enhancements made to the Components Add titles for your Kiosk screens and adjust its width to suit your viewing preferences. Three new fields can be added to your screen: Percentage,Any recommendations for Australian Telephony Integration providers?
HI, I am looking for some advice on phone providers as we are looking to upgrade our phone system, does anybody have experience with any of the Australian providers that integrate with CRM Telephony? So far we are looking at RingCentral and Amazon Connect, and would love to hear feedback on any of the other providers you might have tried. Thank youCRM Cadences recognise auto-responses
I have leads in a Cadence. I get an auto-responder reply "I'm out of the office..." Normally Cadences seems to know that isn't a real reply and keeps the lead enrolled in the cadence. However, today, Cadences has UNENROLLED a Lead who sent an auto-reponseZoho Campaigns Workspaces
Hi, I’m currently working on a Zoho CRM + Zoho Campaigns setup for a franchisee-based organization, where each franchise must only see and use its own contacts. At the moment, franchisees cannot properly access their contact lists in Zoho Campaigns unlessLimited System because of Limited Number of Fields for Car Dealership
Dear Zoho Support, we want to have all the information about a car inside of a car record. We want to have Zoho CRM as our single source of truth for our data, but the limited number of fields are not allowing that. The data consist of: technical dataAutomatically Update Form Attachment Service with Newly added Fields
Hi, When I have a Form Setup and connected to a 3rd Party Service such as OneDrive for Form Attachments, when I later add a new Upload Field I have to remove and redo the entire 3rd Party Setup from scratch. This needs to be improved, such as when newZoho CRM for Everyone's NextGen UI Gets an Upgrade
Hello Everyone We've made improvements to Zoho CRM for Everyone's Nextgen UI. These changes are the result of valuable feedback from you where we’ve focused on improving usability, providing wider screen space, and making navigation smoother so everythingNewsletter in multiple languages
Hi We are planning on starting to use Zoho Campaigns for our newsletters. Since we send our newsletters in three languages, I would need the "unsubscribe page" and other pages related to the NL (Thank you page and so on) to be available in different languagesFixed assets in Zoho One?
Hi, We use Zoho Books and have the fixed asset option in it. I started a trial for Zoho One and I do not see that as an option. Is the books that is part of zoho one equivalent to Zoho Books Elite subscription or is it a lesser version? Thanks, MattSet Default Status of Assembly to "Assembled" When Entered in UI
I've just discovered the new "confirmed" status of Assemblies within Inventory. While I understand the intent of this (allowing for manufacturing planning and raw material stock allocation), it was initially confusing to me when manually entering someI need to Record Vatable amount and non vatable amount separately in zoho books in a single line
I need to Record Vatable amount and non vatable amount separately in zoho books in a single line give me the customisation option and in invoice copy to customer the total amount should be inclusive 5%vat and no need to show the vatable and non vatableSort Legend & stacked bar chart by value
I'd love to see an option added to sort the legend of graphs by the value that is being represented. This way the items with the largest value in the graph are displayed top down in the legend. For example, let's say I have a large sales team and I createScanned Doc - selecting Item overwrites Rate
I have a Vendor Invoice which was uploaded to Documents. I select Add To > New Bill. The OCR is actually quite good, but it is reading an Item Description instead of an Item Number. I remove the description and select the correct Item Number... and itTimesheet invalid data error
Getting the "Invalid Date" error when trying to add a time sheet to an appointment in a work order. I initially though the work order was corrupt or something so I deleted the work order and recreated it. I added the first time sheet to the AP and savedConvert invoice from zoho to xml with all details
How to convert an Invoice to XML format with all detailsAny update on adding New Customer Payment Providers who support in store terminal devices?
Currently there is only one Customer payment provider listed for terminal devices in USA- Everyware. They charge a monthly fee of almost $149 minimum. Will you add other providers - like Zoho Payments or Stripe or Worldpay that would allow integratedNext Page


