Kaizen #114 - Geocoding Leads' Addresses in ZOHO CRM
Hola, code enthusiasts! buckle up for a new post on our Kaizen series.
This week, let us bring the theory to practice and explore a real-world scenario of sales representatives. We will look at how to create a Related List Widget map in Zoho CRM's Lead detail page with features such as lead location display, directions from the current user's location, and showcasing other leads in the same street or city as the current lead.
Significance of Geocoding Leads Addresses in ZOHO CRM
In this ever-evolving landscape of Customer Relationship Management, the ability to harness location data is increasingly vital. Thus, integrating geocoding functionality has emerged as a key enhancement in the lead management. Geocoding transform raw address information into valuable data, providing insights that go beyond mere location. By incorporating this in our widget, ZOHO CRM empowers the sales teams in the following ways.
1. Geo-Targeting for Marketing Campaigns
Understanding the concentration of leads in specific streets or cities can provide a competitive advantage by tailoring strategies to local market dynamics. This can enhance the relevance of marketing materials and increase the chances of engagement.
2. Quick Access to Information
While ZOHO CRM offers a Locate Map feature to display the lead's location on a map, having the location-related information readily available within the Lead detail page reduces the need for users to switch between different applications.
3. Data Driven Decision-Making
Displaying other leads in the same street or city as the current lead provides valuable context. It allow users to derive insights and help making informed decisions. It also aids in understanding the local business landscape and potential opportunities nearby.
4. Efficient Route Planning
For sales representatives who need to visit leads in person, having a map view helps in optimizing routes. This can lead to more efficient travel, saving time and resources.
5. Increased Productivity Based on Proximity
Strategic planning based on proximity, like arranging visits to leads in close proximity, minimizes the time spent traveling between distant leads. Representatives can allocate more time to engaging with leads and less time in transit. Additionally, this approach helps reduce travel-related expenses, including fuel costs and transportation expenses.
Empowering Sales Representatives with Geocoded Insights
Imagine you are a Sales Manager overseeing a team of sales representatives who handle a diverse portfolio of leads in ZOHO CRM. Your organization's territory extends across various regions, and your sales team frequently finds themselves on the move, meeting with potential clients.
Now, to increase the productivity and efficient traveling, you aim to develop a custom Related List Widget to dynamically display the lead's location and provide the shortest route to their destinations on a map.
Addedly, you want to show other leads in the same street or city as the current lead. This helps the sales team to plan their visits to multiple leads more efficiently by considering the proximity of leads in the same street or city. It reduces travel time and allows representatives to cover more leads in a given timeframe.
Let us walk you through the configuration process of this widget.
Step 1: Check this post to carry out the initial set up for creating a widget in ZOHO CRM.
Step 2: Once you have created a project for ZOHO CRM service via terminal, open the project locally and navigate to the app folder to find the widget.html file.

Step 3: In the widget.html file, integrate your third party map application and design your Related List Widget.
To keep this demo simple, we have used the Google Maps JavaScript API in the provided sample code. You can access the sample code by downloading the attached zip file in this post.
Step 4: Now in the terminal, validate and pack the application to create a zip file which can be uploaded to the ZOHO CRM.
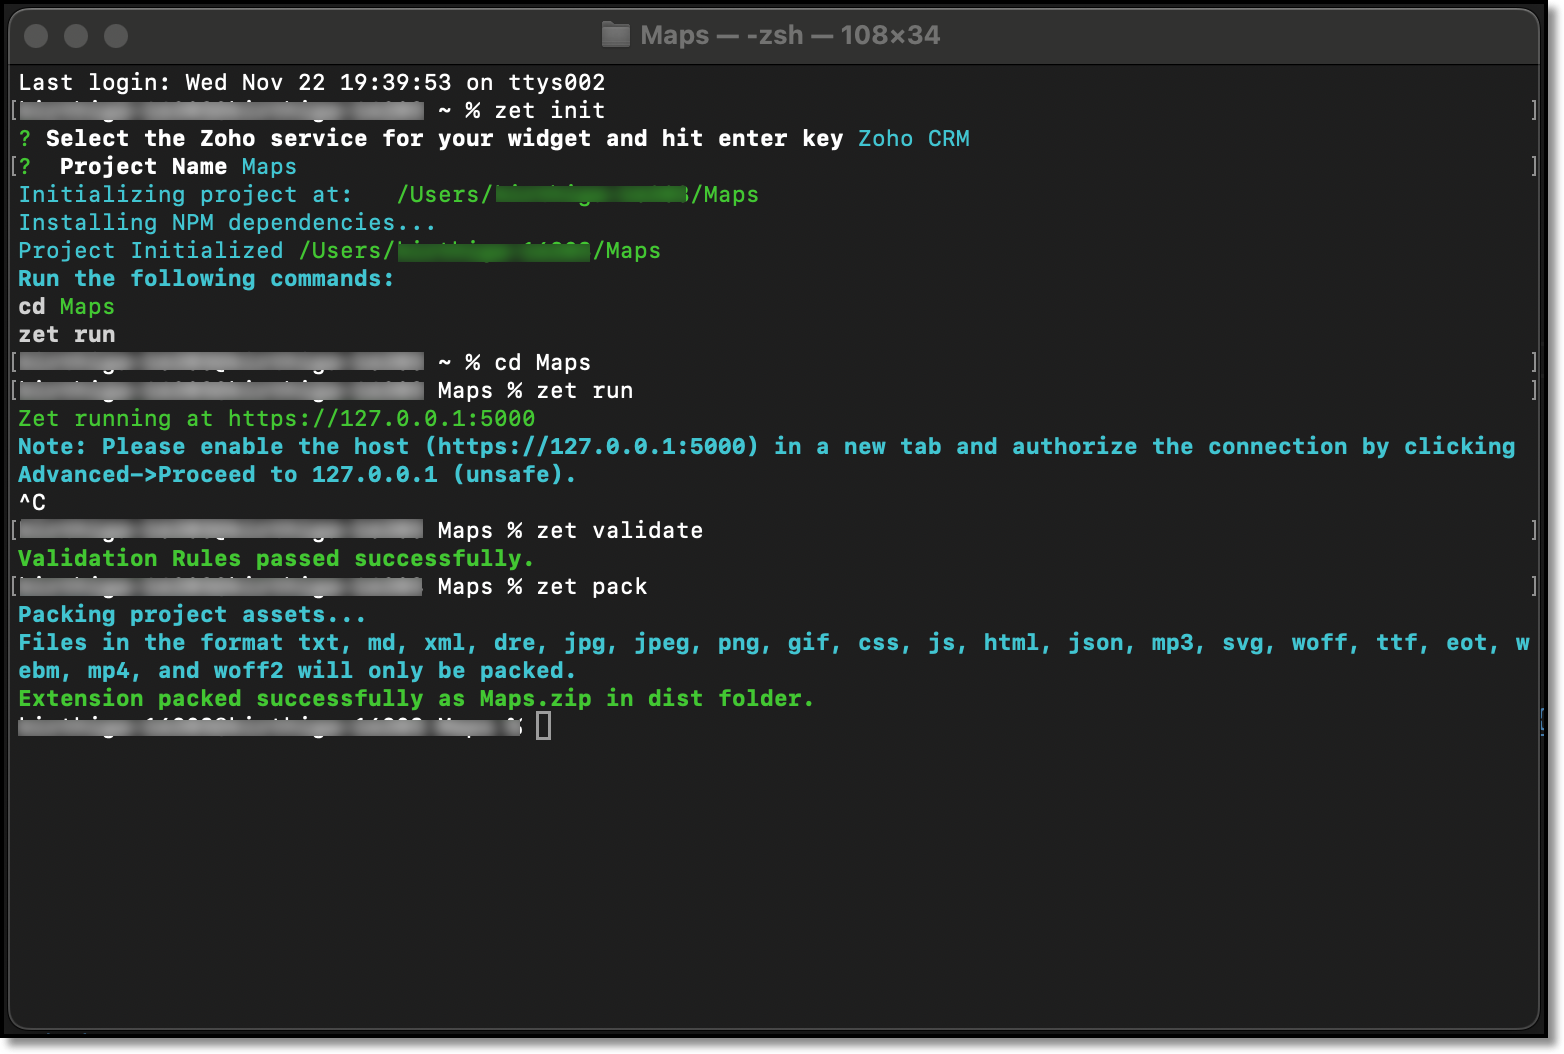
Step 5: Log in to your ZOHO CRM account and navigate to Setup > Developer Space > Widgets > Create New Widget.
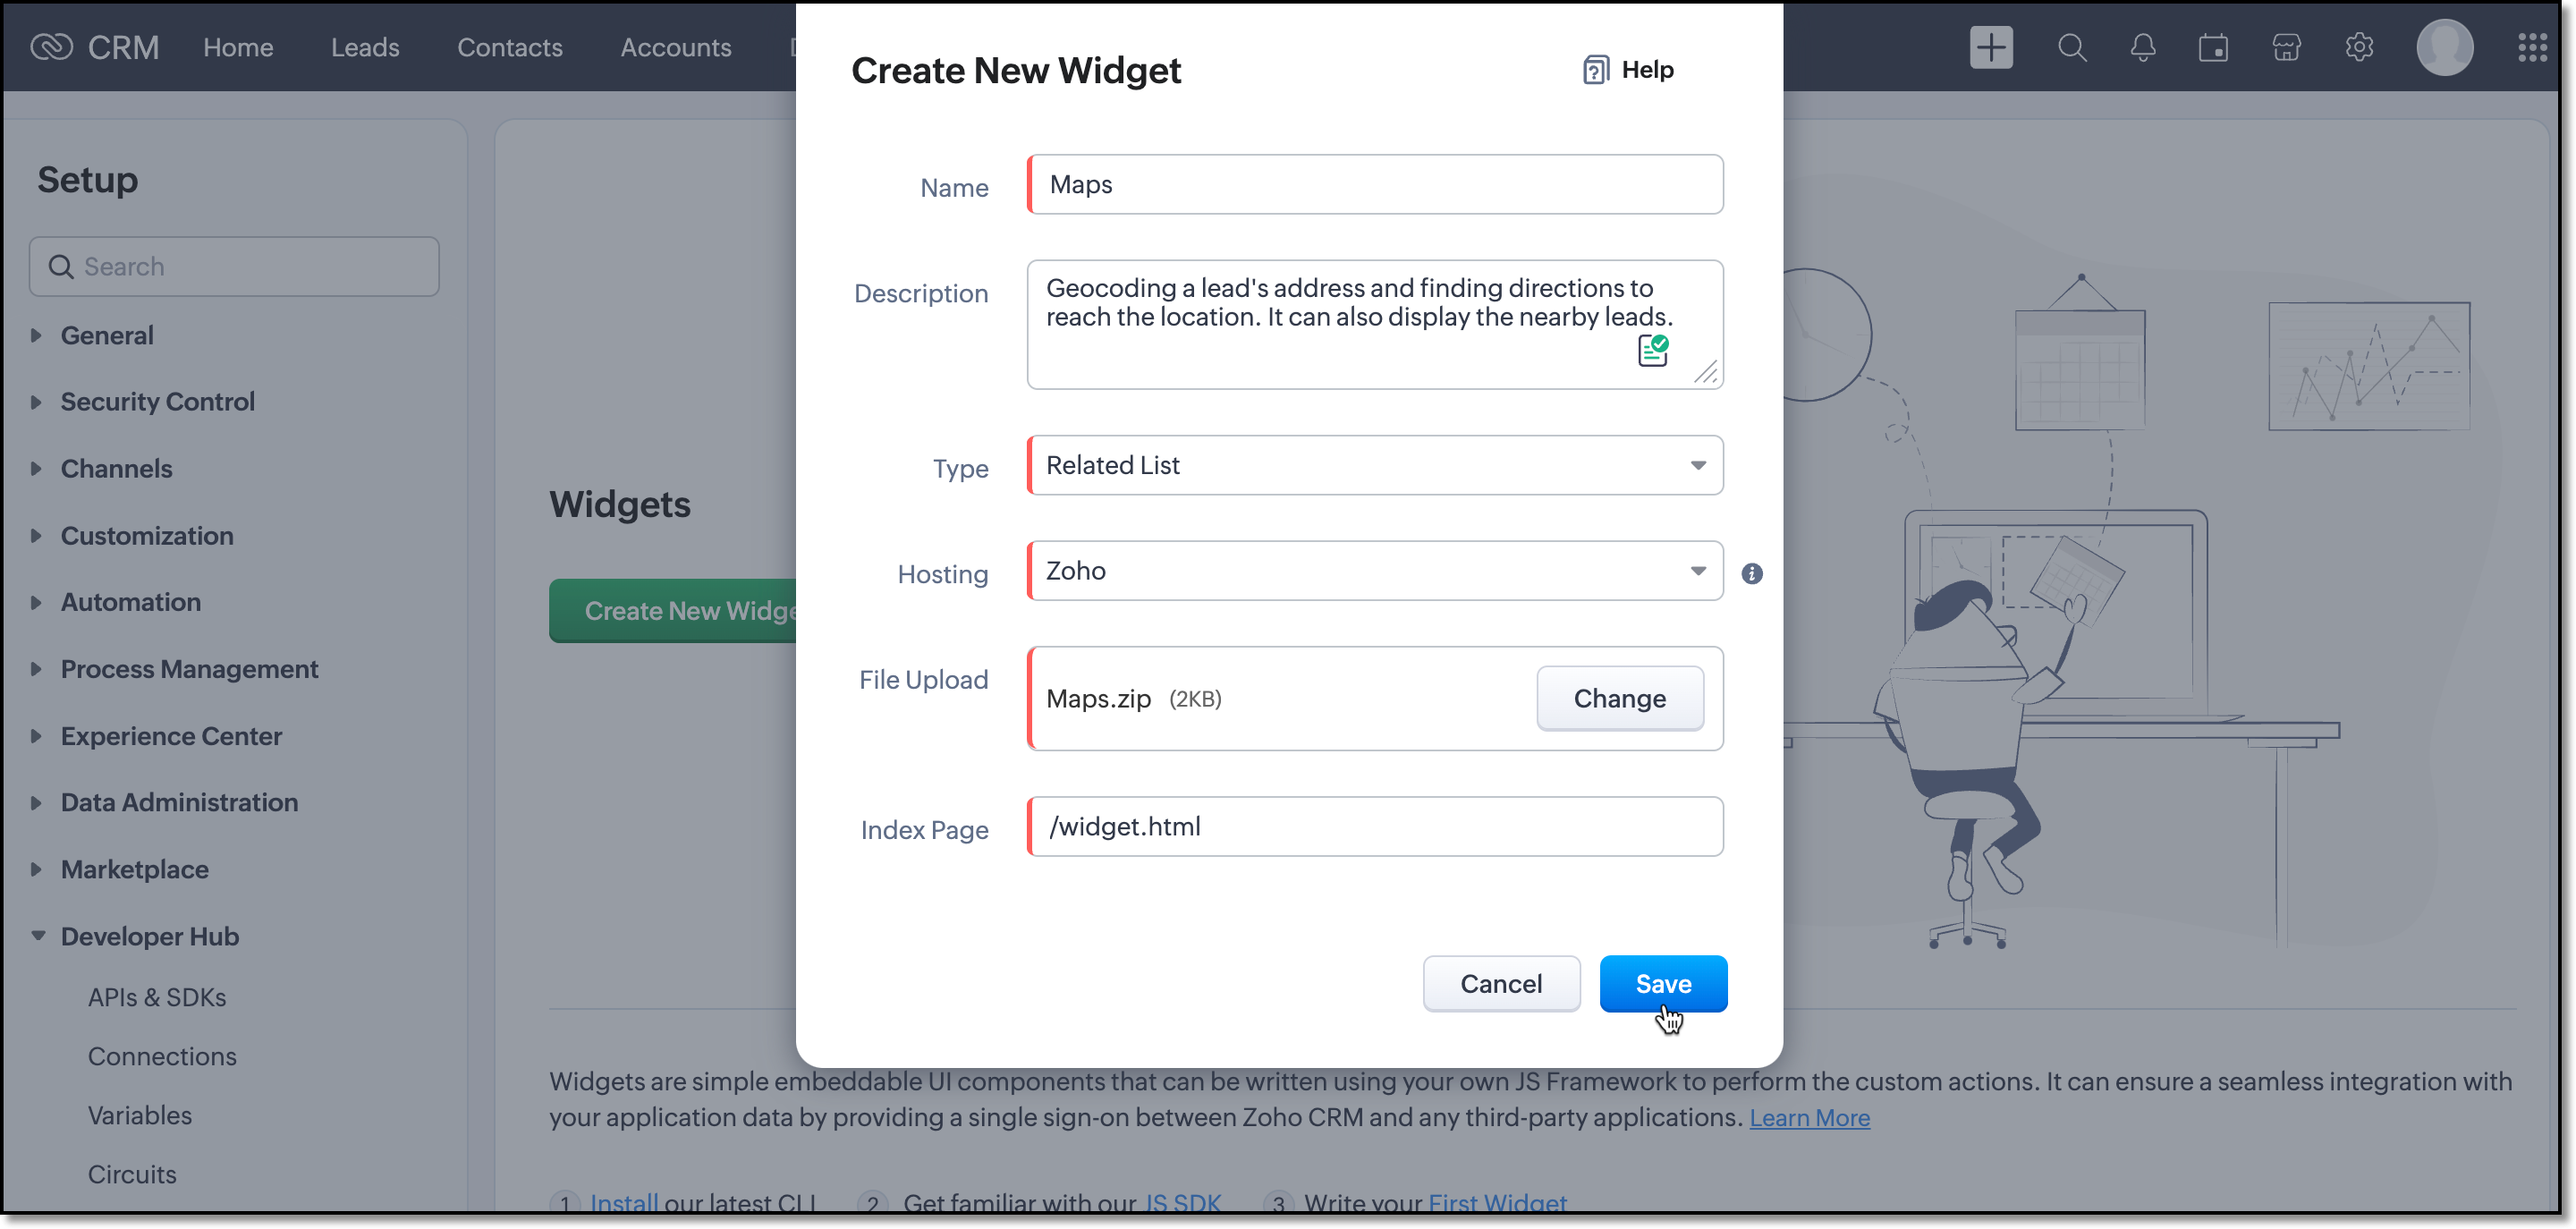
Step 6: Upload the zipped file and fill in the details as shown in the above image.
Step 7: Now, go to Setup > Customization > Modules and Fields > Leads > Layouts > Standard > Detail View.
You can install a custom widget in any of your layouts based on your requirements. In this sample, we will install it in the 'Standard' layout.
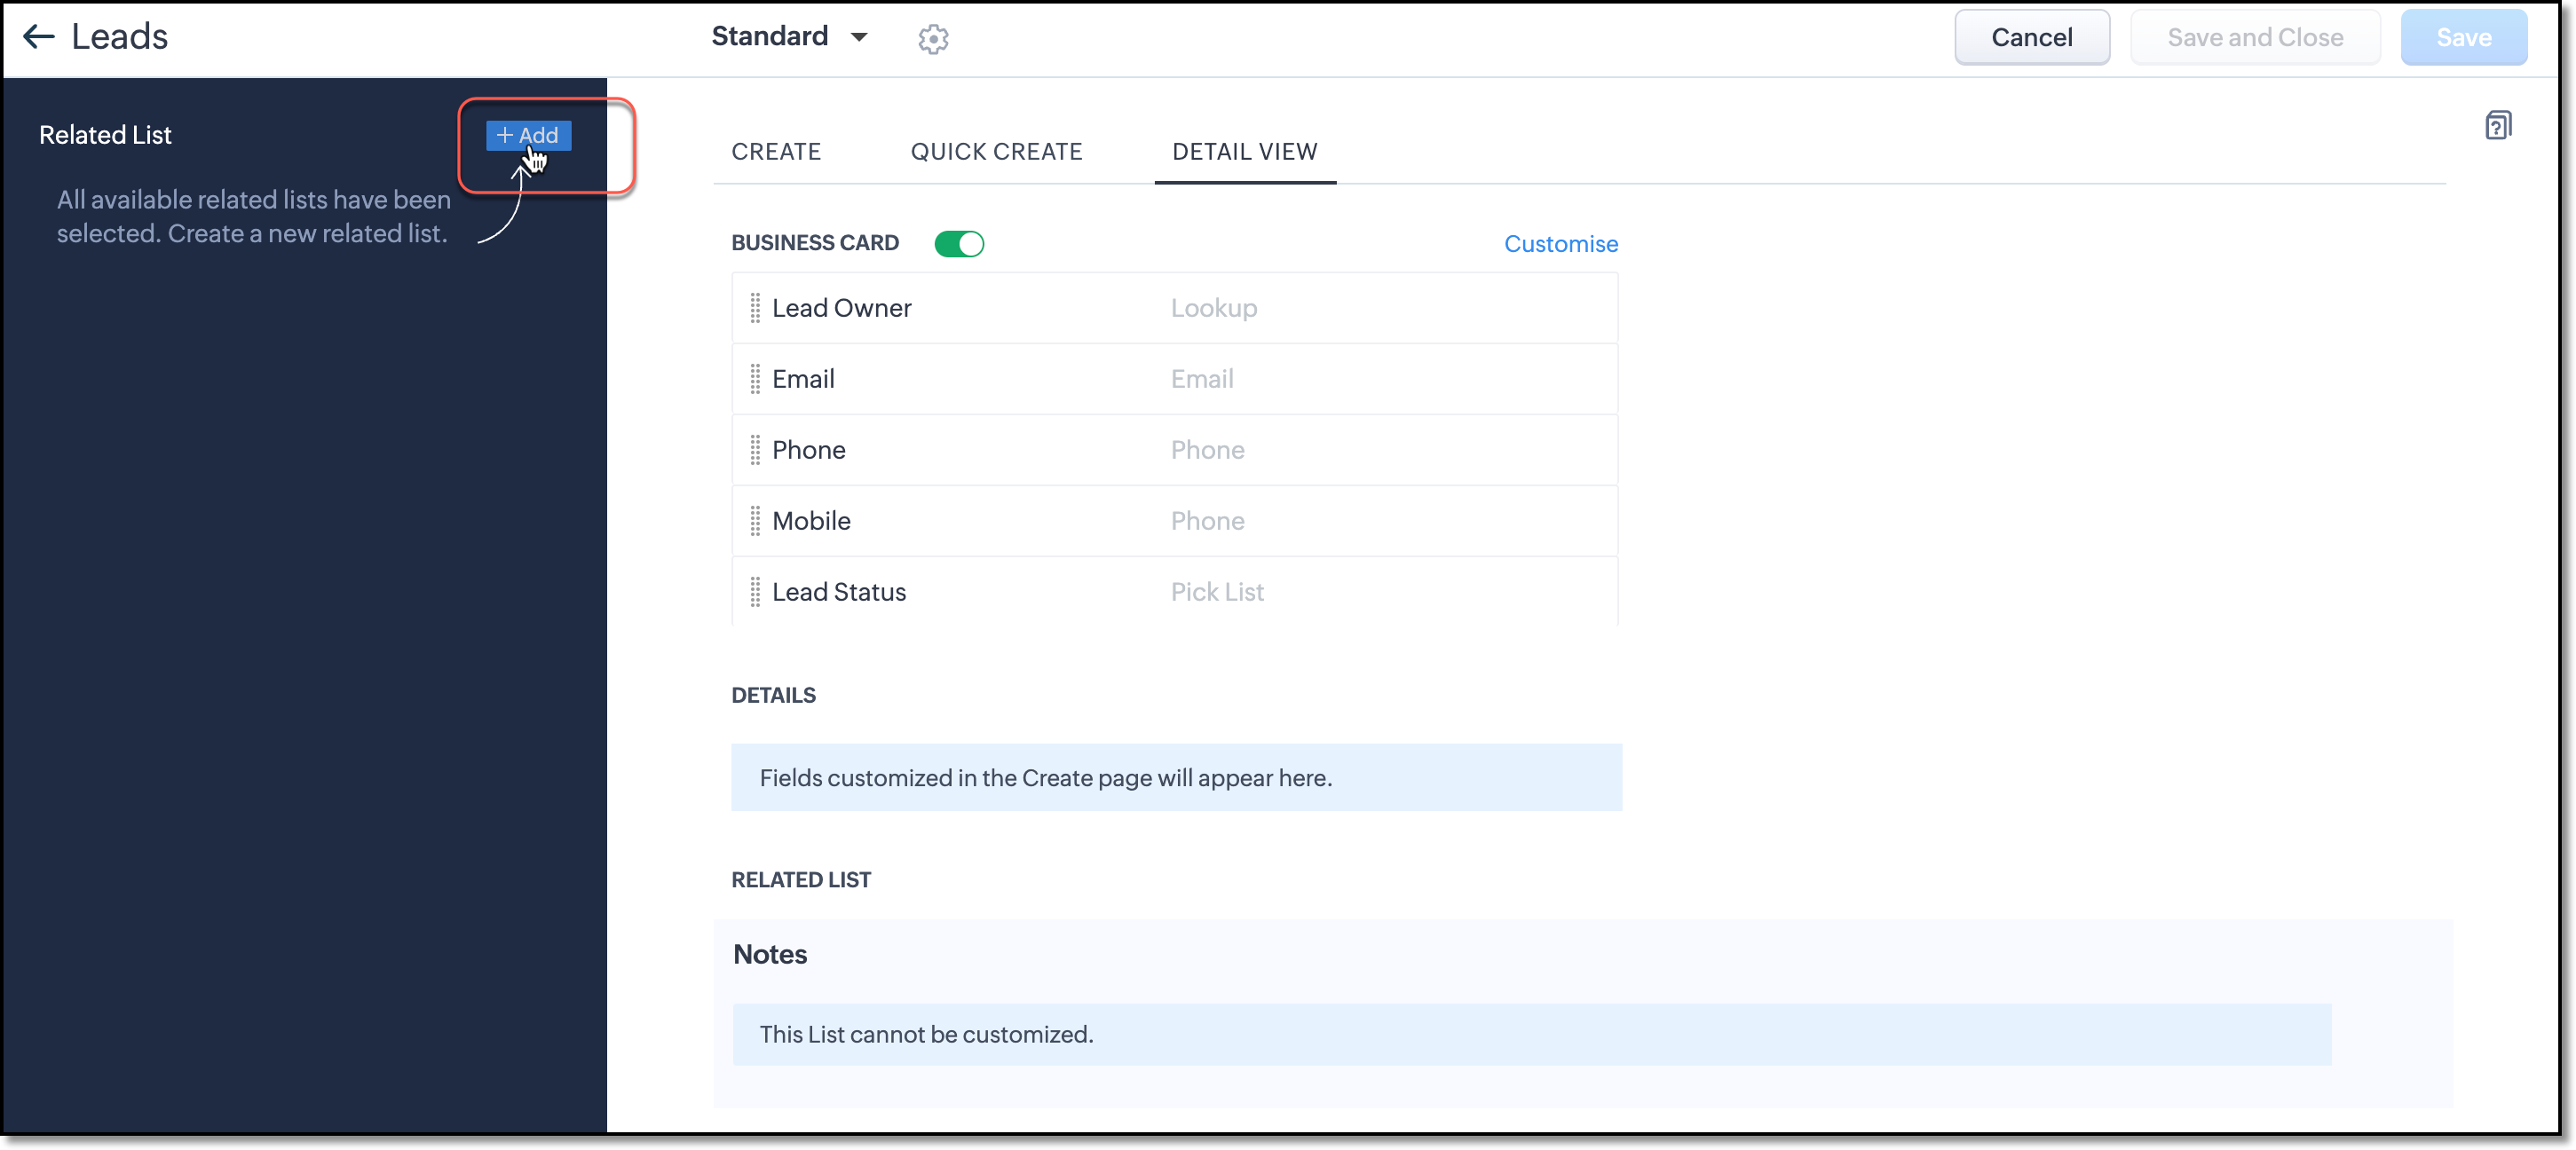
Step 8: Click 'Add' on the left menu and select Widgets.
This will list you the available widgets in your organization. Install the widget 'Maps', which was uploaded a few minutes ago.
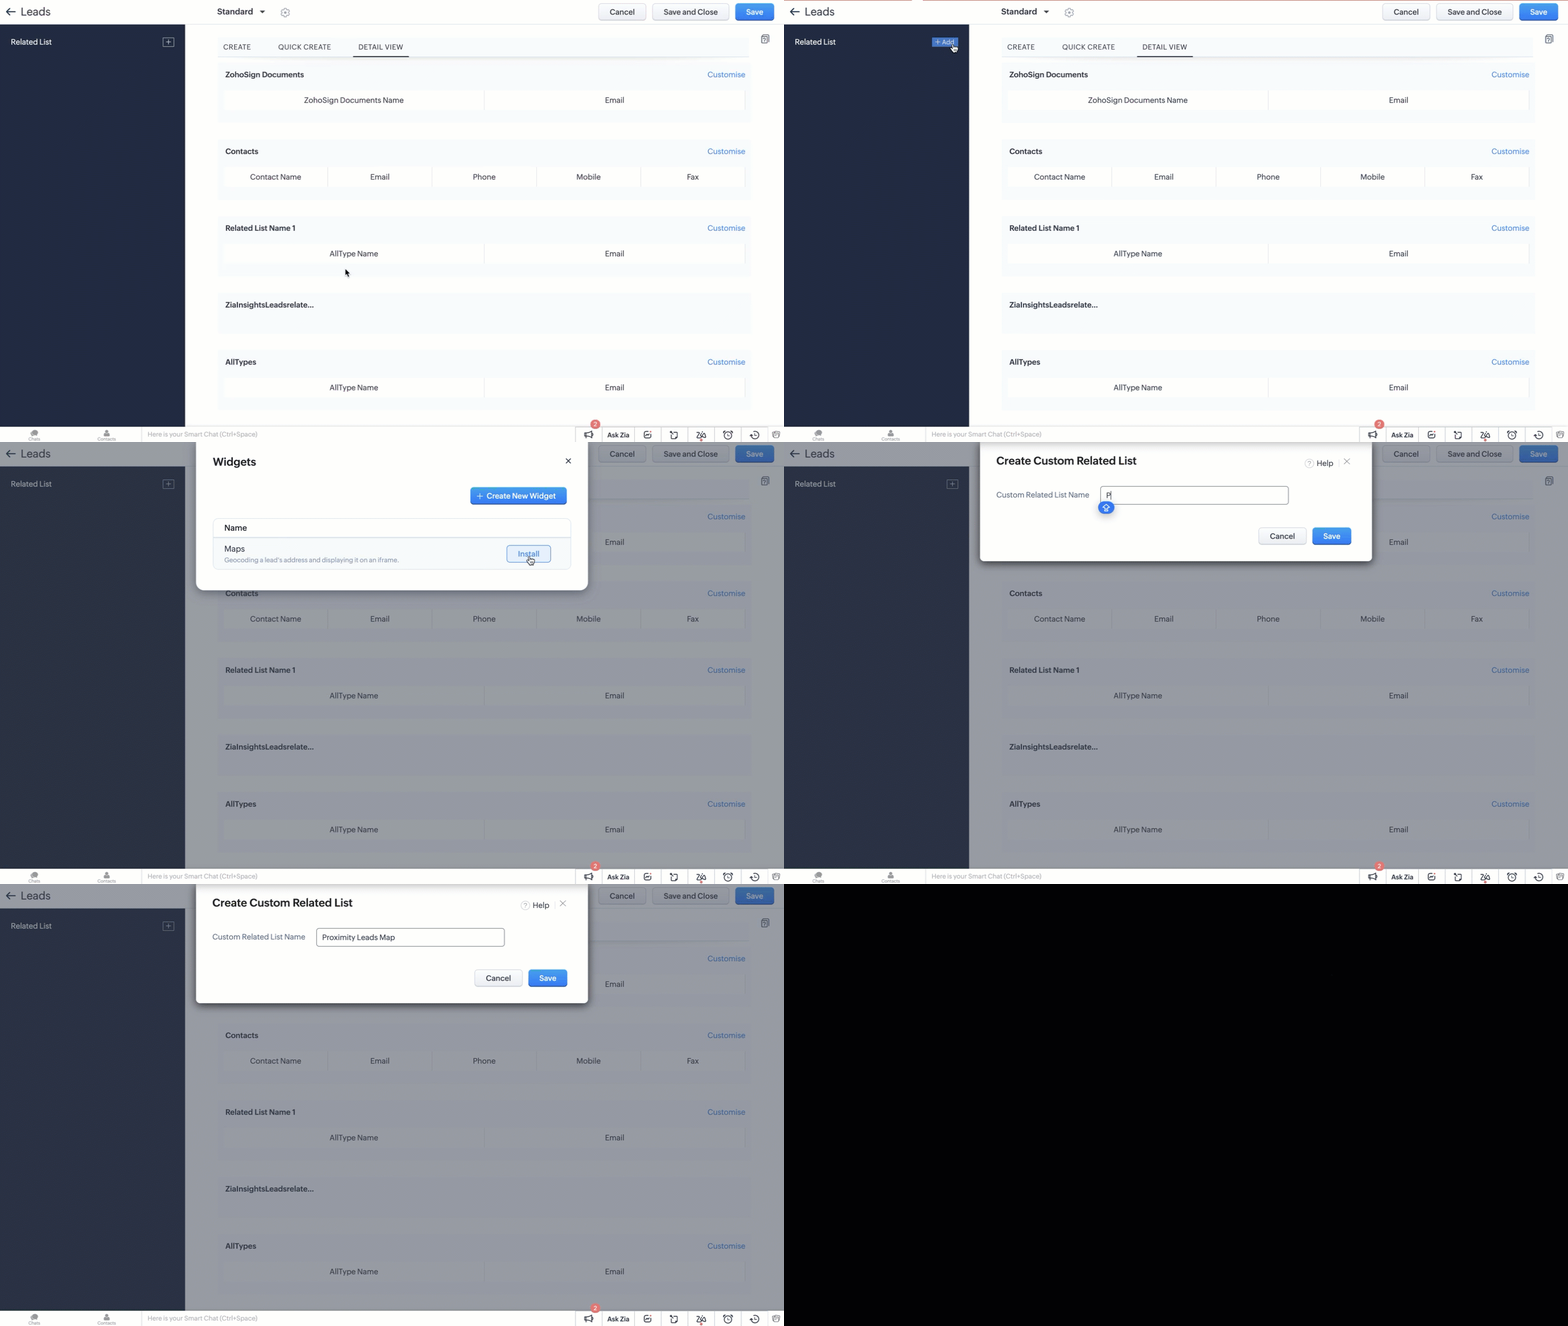
Ta-da, It is done! Let us go check this new Related List widget from the Leads module.
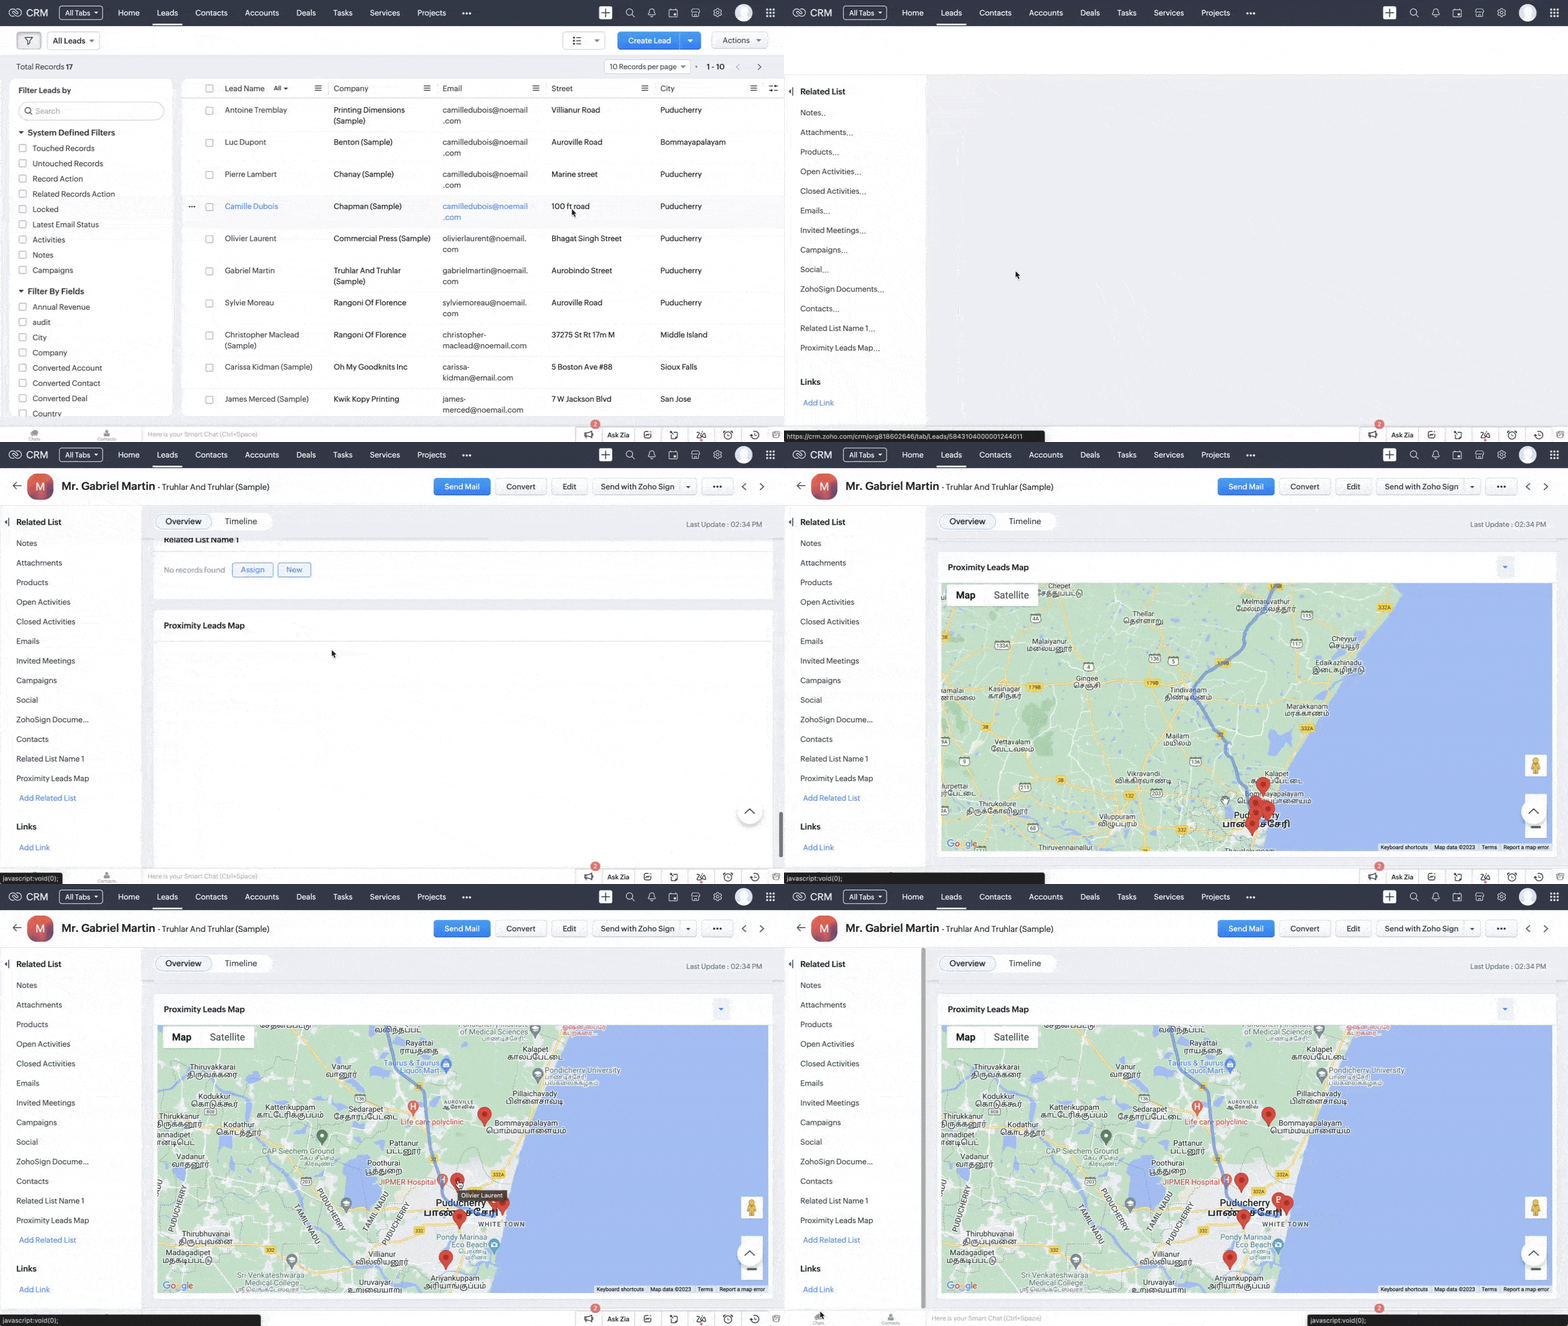
We hope this post was both informative and beneficial!
If you have suggestions for future topics or questions, drop a comment or send us an email at support@zohocrm.com. We are here to listen and engage with you.
Cheers!
Additional Reading
- Widgets in ZOHO CRM
- Widgets - An Introduction
- How is a Widget Used in a Blueprint?
- Render Widgets Using Client Script
Previous 'Kaizen' - #113 Raising Signals in ZOHO CRM through ZOHO Flow
Head over here to refer to our Kaizen collection.
Centralize Knowledge. Transform Learning.
All-in-one knowledge management and training platform for your employees and customers.
New to Zoho Recruit?
Zoho Developer Community
New to Zoho LandingPage?
Zoho LandingPage Resources
New to Bigin?
Topic Participants
Kiruthiga G
Sticky Posts
Kaizen #198: Using Client Script for Custom Validation in Blueprint
Nearing 200th Kaizen Post – 1 More to the Big Two-Oh-Oh! Do you have any questions, suggestions, or topics you would like us to cover in future posts? Your insights and suggestions help us shape future content and make this series better for everyone.Kaizen #226: Using ZRC in Client Script
Hello everyone! Welcome to another week of Kaizen. In today's post, lets see what is ZRC (Zoho Request Client) and how we can use ZRC methods in Client Script to get inputs from a Salesperson and update the Lead status with a single button click. In thisKaizen #222 - Client Script Support for Notes Related List
Hello everyone! Welcome to another week of Kaizen. The final Kaizen post of the year 2025 is here! With the new Client Script support for the Notes Related List, you can validate, enrich, and manage notes across modules. In this post, we’ll explore howKaizen #217 - Actions APIs : Tasks
Welcome to another week of Kaizen! In last week's post we discussed Email Notifications APIs which act as the link between your Workflow automations and you. We have discussed how Zylker Cloud Services uses Email Notifications API in their custom dashboard.Kaizen #216 - Actions APIs : Email Notifications
Welcome to another week of Kaizen! For the last three weeks, we have been discussing Zylker's workflows. We successfully updated a dormant workflow, built a new one from the ground up and more. But our work is not finished—these automated processes are
New to Zoho TeamInbox?
Zoho TeamInbox Resources
Zoho CRM Plus Resources
Zoho Books Resources
Zoho Subscriptions Resources
Zoho Projects Resources
Zoho Sprints Resources
Qntrl Resources
Zoho Creator Resources
Zoho CRM Resources
Zoho Show Resources
Get Started. Write Away!
Writer is a powerful online word processor, designed for collaborative work.
Zoho CRM コンテンツ
-
オンラインヘルプ
-
Webセミナー
-
機能活用動画
-
よくある質問
-
Ebook
-
-
Zoho Campaigns
- Zoho サービスのWebセミナー
その他のサービス コンテンツ
Nederlandse Hulpbronnen
ご検討中の方
Recent Topics
Zoho CRM for Everyone's NextGen UI Gets an Upgrade
Hello Everyone We've made improvements to Zoho CRM for Everyone's Nextgen UI. These changes are the result of valuable feedback from you where we’ve focused on improving usability, providing wider screen space, and making navigation smoother so everythingFile Upload field automatically replaces spaces with underscores – support experience
Hi everyone, I want to share my recent experience regarding the File Upload field behavior in Zoho Creator and my interaction with the Zoho support team. When a user uploads a file, the system automatically renames the document by replacing spaces inDeluge function to copy parent record file upload field to child record file upload field
I'm stuck trying to write a deluge function that is triggered via automation in child record "Appointments," confirms if a file is in file upload "Report" field of parent "Contacts" record via Contacts lookup field "Contact_Name". If no file is in parentZoho Books Sandbox environment
Hello. Is there a free sandbox environment for the developers using Zoho Books API? I am working on the Zoho Books add-on and currently not ready to buy a premium service - maybe later when my add-on will start to bring money. Right now I just need aMake panel configuration interface wider
Hi there, The same way you changed the custom function editor's interface wider, it would be nice to be able to edit panels in pages using the full width of the screen rather than the currently max-width: 1368px. Is there a reason for having the configuration panel not taking the full width? Its impossible at this width to edit panels that have a lot of elements. Please change it to 100% so we can better edit the layouts. Thanks! B.Image Compression Options
Much better if we have level of options to compress the image [20%, 40%...] We are dealing with service reports daily that has before and after photos (image field)- the file size too large and one thing, the current limit is 10mb or 15mb for reportCannot get code to work with v2.mergeAndStore!
Please can someone help me pass subform items into a repeating mail merge table row using v2.mergeAndStore? I have a mail merge template created in Writer and stored in Workdrive. This template is referenced by a custom CRM function which merges all ofHow to hide or archive a blog post temporarily in Zoho commerce website builder?
I would like to temporarily hide or archive a blog post in zoho commerce website builder so that it doesnt appear on my website till I enable it again. I tried to look for this option but could not find it. It only allows me to permanently delete a blogFounders using Zoho — are you leveraging Zoho Campaigns + Zoho Social for thought leadership… or just sending emails?
I’ve noticed something interesting in the Zoho ecosystem. Many founders use Zoho Campaigns and Zoho Social for basic marketing—newsletters, scheduled posts, and announcements. But very few are using these tools strategically to: • Position themselvesWATERFALL CHART IN ZOHO ANALYTICS
Hi Team, I would like to know whether Zoho Analytics currently supports a Waterfall Chart as a built-in visualization type. If yes, could you please share the steps to create one? If not, is there any workaround or recommended method to build a WaterfallHow to mix different types of inputs (such as dropdown list and textbox)
Hi, I'm creating a form called "Room Reservations" for a company. I created a "table" using "Matrix Choice". I created "Room 1", "Room 2" and "Room 3" with the "Questions". I would then like to create two columns with the "Answers", one called "Department"Full Context of Zoho CRM Records for Zia in Zoho Desk for efficient AI Usage
Hello everyone, I have a question regarding the use of Zia in Zoho Desk in combination with CRM data. Is it possible to automatically feed the complete context of a CRM record into Zia, so that it can generate automated and highly accurate responses forAbility to assign Invoice Ownership through Deluge in FSM
Hi, As part of our process, when a service appointment is completed, we automated the creation of the invoice based on a specific business logic using Deluge. When we do that, the "Owner" of the invoice in Zoho FSM is defaulted to the SuperAdmin. ThisReply to Email for SO/PO
Hello, We are new to Zoho Books and running into an issue. Our support@ email is our integration user. When our team is sending out PO/SO's we are updating the sender email, but for some reason many of our responses are coming back to our support@ emailHow to Convert NSF to PST Format Effortlessly? - SYSessential
It is highly recommended to obtain the error-free solution of the SYSessential NSF to PST converter to convert NSF files from Lotus Notes. Using this professional software, it becomes easier to convert all NSF database items, including emails, journals,Zoho Commerce - Poor Features Set for Blogging
Hi Zoho Commerce team, I'm sure you will have noticed that I have been asking many questions about the Blogs feature in Commerce. I thought that it would be useful if I share my feedback in a constructive way, to highlight the areas which I feel needPass shipping info to payment gateway Zoho Books to Authorize.net
For some reason the integration from Zoho books to Authorize.net does not pass the shipping address. Authorize.net is ready to receive it, but zoho books does not send itMassive Zoho Books failure
We have not received any communication or notification from Zoho, but we have detected that Zoho Books is not working for all our users. We cannot access or use Zoho Books. This is critical. We are trying to contact Zoho on the Spain telephone number,Does the Customer “Company Name” field appear anywhere in the Zoho Books UI outside of PDFs?
Hi everyone, I’m trying to understand how the Company Name field is actually used in Zoho Books. There is a Company Name field on the customer record, but when viewing transactions like a Sales Order in the normal UI (non-PDF view), that field doesn’tEmail outbox is now available in the sandbox
Hello all! Testing emails without visibility has always been a blind spot in the sandbox. With the new Outbox, that gap is closed. You can now view and verify every email triggered from your sandbox, whether it’s through workflows, approvals, or massZoho Desk blank screen
opened a ticket from my email, zoho desk comes up blank, nothing loads. our receptionist also gets the same thing under her login on her computer. our sales rep also gets same thing on zoho desk at his home on a different computer. I tried clearing cache/history/cookies,Subform edits don't appear in parent record timeline?
Is it possible to have subform edits (like add row/delete row) appear in the Timeline for parent records? A user can edit a record, only edit the subform, and it doesn't appear in the timeline. Is there a workaround or way that we can show when a userLooking For Recruit Developer
Hi everyone, I am looking for a Zoho Certified Developer to assist with a development project for MetalXpert. We are building a software system designed to bridge the gap between a candidate mobile app and an employer web portal using Zoho Recruit assales IQ issue on website
i integrated the zoho sales IQ code on the website but it is comming in distroted form i am sharing the screenshot below the website is bulit in wix platformMulti-currency and Products
One of the main reasons I have gone down the Zoho route is because I need multi-currency support. However, I find that products can only be priced in the home currency, We sell to the US and UK. However, we maintain different price lists for each. ThereDeprecation of the Zoho OAuth connector
Hello everyone, At Zoho, we continuously evaluate our integrations to ensure they meet the highest standards of security, reliability, and compliance. As part of these ongoing efforts, we've made the decision to deprecate the Zoho OAuth default connectorI need to know the IP address of ZOHO CRM.
The link below is the IP address for Analytics, do you have CRM's? IP address for Analytics I would like to know the IP address of ZOHO CRM to allow communication as the API server I am developing is also run from CRM. Moderation Update: The post belowImportant Update: Google Ads & YouTube Ads API Migration
To maintain platform performance and align with Google's newest requirements, we are updating the Google Ads and YouTube Ads integrations by migrating from API v19 to the newer v22, before the official deprecation of v19 on February 11, 2026. Reference:Importing into the 'file upload' field
Can you import attachments into the file upload field. I would expect it to work the same way as attachments do, But can't seem to get it to work.Zoho recruit's blueprint configuration is not functioning as mapped
Current Status: Zoho Blueprint is not functioning as configured. Issue: We are moving a Candidate status in Zoho Recruit "for active file" but we encountered: "Status cannot be changed for records involved in Blueprint." This happens to various clientSuper Admin Logging in as another User
How can a Super Admin login as another user. For example, I have a sales rep that is having issues with their Accounts and I want to view their Zoho Account with out having to do a GTM and sharing screens. Moderation Update (8th Aug 2025): We are workingBlocklist candidates in Zoho Recruit
We’re introducing Block Candidate, which helps recruiters to permanently restrict a candidate from applying to current/future job openings. Once the candidate is blocked, they will no longer be able to participate in the recruitment process. This willLayout Rules Don't Apply To Blueprints
Hi Zoho the conditional layout rules for fields and making fields required don't work well with with Blueprints if those same fields are called DURING a Blueprint. Example. I have field A that is used in layout rule. If value of field A is "1" it is supposed to show and make required field B. If the value to field A is "2" it is supposed to show and make required field C. Now I have a Blueprint that says when last stage moves to "Closed," during the transition, the agent must fill out field A. NowFrom Zoho CRM to Paper : Design & Print Data Directly using Canvas Print View
Hello Everyone, We are excited to announce a new addition to your Canvas in Zoho CRM - Print View. Canvas print view helps you transform your custom CRM layouts into print-ready documents, so you can bring your digital data to the physical world withAdmin asked me for Backend Details when I wanted to verify my ZeptoMail Account
Please provide the backend details where you will be adding the SMTP/API information of ZeptoMail Who knows what this means?Zoho Desk - Upsert Ticket
Hi Desk Team, It is common to request more information from end-users. Using forms is a great way to ensure all the required information is collected. It would be great if there were an "upsert" option on the Zoho Form -> Zoho Desk integration which wouldAll new Address Field in Zoho CRM: maintain structured and accurate address inputs
The address field will be available exclusively for IN DC users. We'll keep you updated on the DC-specific rollout soon. It's currently available for all new sign-ups and for existing Zoho CRM orgs which are in the Professional edition. Latest updateClient Side Scripts for Meetings Module
Will zoho please add client side scripting support to the meetings module? Our workflow requires most meeting details have a specific format to work with other software we have. So we rely on a custom function to auto fill certain things. We currentlyIntroducing Multiple Sandbox Types and Support for Module's Data Population
Register here for the upcoming Focus Group webinar on Multiple Sandbox | Help documentation to learn more about the new enhancements Hello everyone, Sandbox in CRM is a testing environment for users to create and test new configurations like workflowCRM x WorkDrive: File storage for new CRM signups is now powered by WorkDrive
Availability Editions: All DCs: All Release plan: Released for new signups in all DCs. It will be enabled for existing users in a phased manner in the upcoming months. Help documentation: Documents in Zoho CRM Manage folders in Documents tab Manage filesNext Page


