Real-Time Stock Visibility
Hello everyone!
Welcome to another exciting Kaizen post!
In this edition, we'll explore how to use Queries in SlyteUI to build a real-time stock visibility component that fetches product stock information from a third-party system, displays it in a Custom Table, and launches from a custom button on the Orders Create Page.
In day-to-day CRM operations, users often need quick access to inventory information while creating orders. When stock data resides in an external system, users may have to switch between applications to verify product availability. With Queries in SlyteUI, you can fetch, display, and filter data from third-party systems directly within the Zoho CRM interface, enabling users to stay in context and work more efficiently.
In this kaizen post,
1. Using Queries in SlyteUI2. Contextual and event based Queries3. Use Case4. Implementation5. Summary6. Related Links
1. Using Queries in SlyteUI
Queries in SlyteUI enable seamless data interaction by fetching information from Zoho CRM and external APIs and binding it to UI components. They provide a structured way to retrieve data, execute logic, and drive dynamic behavior in real time. With SlyteUI Queries, you can fetch CRM data in real time, connect and use external APIs and REST services within components. Using SlyteUI you can trigger queries based on events (Event Based Queries) or re-run the query automatically when the value of a referenced variable changes(Contextual Queries). Click here to know more about Queries in SlyteUI.
2. Contextual and event based Queries

3. Use Case

4. Implementation
To implement this solution, you need to create a SlyteUI component that defines the required layout, query, and functionality. Once the component is ready, it should be properly configured and published for use within Zoho CRM. After publishing, the component must be linked to a custom button placed on the Create Page of the Orders module. This enables users to access and execute the SlyteUI component while creating orders.

I. Creating SlyteUI Component
- Navigate to Setup → Developer Hub → SlyteUI.
- Click New Component.
- Enter a name for the component and click Save. The SlyteUI IDE opens.
1. Container Layout Setup with component placement
- Drag and drop the Container layout onto the artboard. Configure the layout by setting the Layout Type to Flex, enabling Divisions, and selecting the appropriate Direction values. Split the container into two horizontal sections, then divide the top section into two columns, as shown below.

- Add the following components to the artboard as shown in the gif.
- Custom Table component
- Text Box
- Button

- Click the button component and change the Button name to "Search" on the right pane.
- Click the text box component and remove the label of the Text Box using the Properties pane on the right. Note the name of the textbox. Here it is lyteInput3 and lyteInput3.ltPropValue will hold the value entered in the text box
2. Custom Table Configuration:
- Select the “Custom Table” component and configure the headers by specifying each column label along with its corresponding field name to be populated. For the table content, use {{stock.result}}, where stock is the name of the query (to be created)and result is the returned data set. This configuration should be done in the properties section of the right pane.

3. Query creation
- First create a Source inside Queries.
- To do this, go to Setup--> Developer Hub--> Queries--> Sources and click "Create Source". Enter the source name and Base URL.

- This source will now be available inside the "Queries" tab of SlyteUI. Click here to know more about Sources in Queries
- Now get back to SlyteUI, navigate to Queries on the left pane, click Add New Query.
- Specify Query name. Select the source as "Products ERP".
- Enter the name of the query as "stock ".

- Here, {{lyteInput3.ltPropValue}} represents the value entered in the lyteInput box.
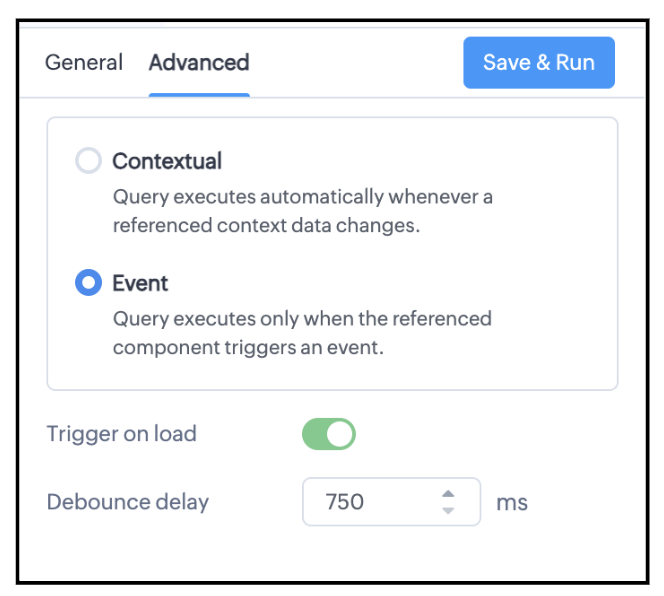
4. Contextual Query setup
- If you want the query to run every time this input value changes, make sure the query type is set to Contextual. By default, every new query you create is set to the Contextual type. You can see this in the "Advanced" tab as shown below.

-In the Advanced tab the following options are also available.
- Trigger on Load : Enable this to automatically execute the query when the page or component loads.
- Debounce Delay : Adds a short wait time between rapid trigger events to prevent repeated or unnecessary query executions.
- Switch to Run mode and observe how the table displays filtered results as you type in the text box. Here is how the SlyteUI component will work.

- As you type characters in the text box, the table automatically shows records whose product names contain those characters.
5. Event -Based Query setup
- Now, let's say you want the filtered records to appear only after the button is clicked.
- To do this, first change the query type to Event.II. Add a custom button named “Stock Details” on the Create Page of Orders Module.
- Navigate to Setup → Customization → Modules and Fields.
- Select the Orders module, open the Buttons tab, and click Create New Button.
- Enter the button name, add the SlyteUI component name, and configure the required details as illustrated below.
- Next, click the Search button and select Actions in the right pane. Add a new event with the following details and click Done.

- Now switch to Run mode.

- You can see that the table displays search results only after the button is clicked, rather than every time you type in the text box.
- Click Save as Draft to save your changes.
- Click Publish to make the component available for use in Zoho CRM pages.

Note:
Only published components can be linked to Zoho CRM pages.
II. Add a custom button named “Stock Details” on the Create Page of Orders Module.
- Navigate to Setup → Customization → Modules and Fields.
- Select the Orders module, open the Buttons tab, and click Create New Button.
- Enter the button name, add the SlyteUI component name, and configure the required details as illustrated below.

Here is how the final implementation works.

5. Summary
In this post, we have discussed the answers for the following.
- Create queries in SlyteUI
- Bind query results to a Custom Table
- Configure Contextual and Event-Based Queries
- Trigger queries through user actions
- Publish and embed SlyteUI components in Zoho CRM
