Guide to Building a Multilingual Help Center
Businesses operating globally or expanding into new markets need to support customers in their native language. Knowledge base articles are less effective if customers cannot understand them. Many customers prefer reading in their native language rather than English. A multilingual help center helps cater to a wider audience. This serves as a valuable self-service resource for customers to find solutions independently.
Zoho Desk allows users to translate, publish, and update help articles in multiple languages. For more information on supported languages, refer to Supported Languages.
 Permission Required
 Users with the Support Channels administrative permission can access this feature.
Check Feature Availability and Limits
Setting the default language
Before enabling multilingual support, the administrator must set the default language for the Help Center. This is typically the most common language spoken by customers. Customers who visit the help center for the first time will view the articles in the default language. All existing articles in the knowledge base will be automatically mapped to the default language. The default language can be changed when required.

Note:
- Before changing the default language, ensure that the help articles are already translated in the new default language. For example, if the default language is changed to French, the help articles must be translated in French before updating the language. If the articles are not translated, they will not be displayed in the knowledge base.
- If the default language is updated, deleted, or disabled, the article translations that are in progress will be removed from the translation queue.
- The default language will be displayed with a crown icon (
) for easy identification.
To set the default language
- Navigate to Setup > Channels > Help Center.
- Select the help center.
- Select Languages and choose a default language from the drop-down.
Enabling multilingual support
For the articles to be displayed in multiple languages, the multilingual option must be enabled. The languages added can be enabled or disabled at any time.
Note:
- Zoho Desk will not display the Help Center based on the customer's browser language setting.
- For multi-brand setups, multilingual support must be enabled for each brand. Also, default and additional languages must be configured.
To enable multilingual support
- Navigate to Setup > Channels > Help Center.
- Select the help center.
- Select Languages and toggle the MultiLingual option.
- Click Add Additional Languages.
- Add the required languages and click Save.
Types of translation
There are two ways to translate articles:
- Manual – The articles must be translated and uploaded to the Knowledge Base module.
- Automatic – The articles will be automatically translated by the selected translation engine.
There are three translation engines available: Google Translate, Unbabel, and Zia.
Setting up manual translation
On selecting manual translation, the categories, sections, and articles must be translated individually by the administrators. Before displaying the help articles in various languages, language-specific versions of the categories, sections, and articles must be published.
For example, if the Help Center supports English, German, and French, articles must be created in all these languages.
Note: If an article is not published in a specific language, it will not be available in the language version of the help center. Also, if the category (or any section) is not translated, but the article is published, the category will be displayed in the default language.
To set up manual translation
- Navigate to Setup > Channels > Help Center.
- Select the help center.
- Select Languages and select the Translation Type as Manual.
Translating a category manually
A category is the root folder of your knowledge base. This must be translated before translating the articles within it.
To translate a category
- Navigate to Knowledge Base > Manage KB > Organize Categories.
- Hover on the category and click the Edit icon.
- On the Edit Category page, select the required languages and enter the translated name and description for the category.
- Click Save.
Translating a section manually
Sections are used to organize related articles under a category so that users can easily find what they are looking for.
To translate sections
- Navigate to Knowledge Base > Manage KB > Organize Categories.
- Select a category, click the More icon and click Edit.
- On the Edit Section page, select the required languages and enter the translated name and description for the section.
- Click Save.
Translating an article manually
Once the categories and sections are translated, the articles can also be translated. Each article is color-coded based on the state they are in for quick identification.
Note:
- Translation for an individual article can be started or stopped at any time. The required languages to which it should be translated can also be selected while the translation is ongoing.
- All the articles for which the translation is in progress can be filtered and stopped at once.
Adding a translated version of an existing article
After publishing an article in the default language, switch to the language to add a translation for. This can be done either from the list view or the article's detail page.
To add a translated article
- Navigate to the Knowledge Base module.
- On the Article List page, click the Language icon (
) in the top-right corner of the page.
- Select the required language.
- Enter the translated content along with the meta title, description, and tags.
- Click Publish.
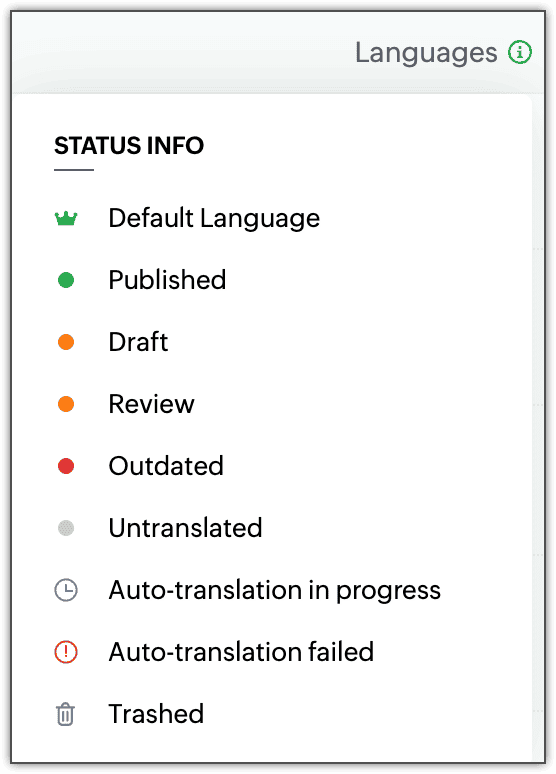
Article statuses in Zoho Desk
When an article is being translated, it is important to understand its current status. If multiple articles (for example, 10 at once) are being translated, each one may be in a different stage of the process. By checking the status, users can quickly identify the current state of an article and take the appropriate action.
There are several statuses involved in the translation workflow, such as Published, Draft, Review, and Auto-translation in progress.
The following are the different statuses available in Zoho Desk.
Setting up auto-translation
On selecting auto-translation, the articles will be translated automatically in the languages selected.
The article drafted in the default language will be considered as the Master Article. The master article can be requested for auto-translation during publishing. Translation of the article will be carried out for the particular version in which it was requested. For example, if translation is requested for version 2.0, the translation will be done only for the content in that version. Making further changes to the Master Article will not affect the translated articles unless an auto-translation is requested after the changes. After the translation is done, it will be stored as a draft and this needs to be published manually.
Auto-translation of articles can be done using one of the following translation engines:
- Google Translate
- Unbabel
- Zia
Authentication details like username and apikey are required if Google Translate or Unbabel is selected. For more information on creating a Google Translator API key, refer to Getting the Google Translator API Key. For Unbabel, check the Unbabel account and obtain the corresponding API key.
Note:
Auto-translation will be applied to the article title, content, tags, SEO Title, Meta Description, and Meta Keywords. The categories, sections, and sub-sections of your Knowledge Base need to be manually translated.
To set up auto-translation
- Navigate to Setup > Channels > Help Center.
- Select the help center.
- Select Languages and select the Translation Type as Automatic.
- Select any one of the three translation extensions.
- Provide the corresponding apikey if Google Translate or Unbabel is selected.
- Click the Language icon (
).
- Select the languages to auto-translate the articles.
- Click Save.
Note:
- Among the additional languages mentioned in the multilingual support, only the languages supported by the selected translation extension will be displayed here.
- Languages supported by Zia:
- de – German
- ru – Russian
- sv – Swedish
- pt – Portuguese
- it – Italian
- fr – French
- hu – Hungarian
- zh – Chinese
- es – Spanish
- cs – Czech
- ar – Arabic
- ja – Japanese
- pl – Polish
- ro – Romanian
- nl – Dutch
- de – German
To auto-translate a newly created article
- Navigate to the Knowledge Base module and click the Add Article button.
- Enter the article title, content, tags, and SEO details.
- Select Publish and translate from the drop-down.
- Click the languages drop-down to know the status of the auto-translation.
- Click the particular language that shows Updated to view the translated draft article.
- Select Publish.
- Click History of the respective language's article to refer to its auto-translation logs.
Restarting translation
If the translation fails for any language, the status is displayed as Auto-translation failed. The translation can be restarted at any time.
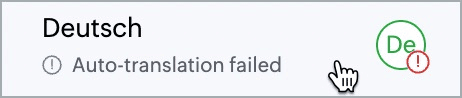
To restart translation
- In the article, click the languages drop-down to know the status of the auto-translation.
- Click the status of the failed translation language.
- Select Restart Translation.
- When auto-translation of an article is in progress, another translation cannot be requested for the same article. However, the master article can still be updated and published without being translated.
Marking articles outdated
While re-publishing the article in the default language, the best practice is to mark the translated articles outdated. This helps in tracking the articles that must be updated. This option will be available for articles that need manual translation of additional languages.
Note: This is not applicable for articles having languages with only auto-translation.
To mark versions of an article as outdated
- Navigate to the Knowledge Base module.
- Edit the article and make the required changes.
- Select Publish and translate or Publish from the drop-down at the top.
- Select Mark as outdated in the confirmation box.
To update outdated versions from the article
- Open the outdated version of the article.
- Click Edit and make the required changes.
- Click Mark as up-to-date on the right panel.
- Click Publish to publish the version.
To update outdated versions from the KB
- Navigate to the Knowledge Base module.
- In the list view, click Outdated of an article.
- Select the languages to mark as up-to-date.
- Click Mark up to date.
Viewing article status by language
The translated versions of articles can be saved as a draft, set with an expiry, or marked as outdated. With so many statuses to update and monitor, it is essential to organize articles by their language. View the publishing status of articles like outdated, expired, drafts, etc. for a specific language. Select the required language from the language selector drop-down menu and view the entire knowledge base in the chosen language.
