Certificates
Overview
Create professional, branded certificates for your event participants using Zoho Backstage’s Certificate Builder. You can generate and distribute participation, appreciation, or recognition certificates for different roles such as attendees, speakers, staff, sponsors, and more, with complete design flexibility. You can customize the certificate with event and user-specific fields, apply background colors or images, include QR codes for authenticity, and even upload signature images. Templates can be reused across events or cloned from previous ones for faster setup. Once finalized, certificates can be downloaded or emailed directly to participants.
Creating a Certificate Template
Start by defining who the certificate is for. Whether you’re honoring attendees, acknowledging staff, or thanking speakers and sponsors, this initial step helps you tailor your message to the right audience.
- Navigate to Design > Certificates from the Dock.
- Click Create Certificate.
- If you've already created a certificate, click the Add Certificate button.
- Choose the recipient group. Available options include:
- Attendee (common for all attendees or specific to a ticket type)
- Organizer
- Staff
- Speaker
- Sponsors (common for all categories)
- Exhibitors (common for all categories)
- If you select Attendee, you’ll be prompted to choose between:
- A common certificate for all attendees
- A specific certificate for each ticket class
- Click Continue once you've made your selection.
- Adjust the layout:
- Select the Certificate Size:
- A4 (default)
- US Letter (8.5 × 11 in)
- Select the Orientation:
- Portrait
- Landscape
- Click Continue to proceed.
- Choose a certificate template. You can customize it later in the certificate builder.
- Click Done.
The certificate will now open in the Certificate Builder, where you can begin designing your template.

If your event includes companion tickets, you can configure certificates specifically for those ticket classes as well. This ensures companions receive personalized certificates distinct from the primary attendee, if needed.

Only one certificate template can be created per recipient group. If you’d like to create a new one, you’ll need to delete the existing template first.
Cloning a Certificate Template
Reuse certificate designs from either the same event or another event by cloning an existing template. This is useful when you want to maintain design consistency across events or roles without building a new certificate from scratch.
Cloning from Another Event
- Navigate to Design > Certificates from the Dock.
- Click Clone from Another Event.
- Alternatively, if you’ve already created certificates, click the Clone Certificate dropdown at the top of the Certificates page.
- Choose From Another Event from the dropdown options.
- In the Clone Certificate dialog box:
- Select the source event from the Event list.
- Select the Certificate to Clone from the source event.
- Choose the Target Role for which this cloned certificate should be applied in your current event.
- Click Clone. The certificate will be copied into your current event’s Certificates section.
You can now edit this cloned certificate just like any other template—change background, add QR codes, adjust user/event fields, etc.
Cloning from This Event
If you want to duplicate a certificate within the same event (for example, reuse a speaker certificate for a staff member), follow these steps:
- Navigate to Design > Certificates from the Dock.
- Click the Clone Certificate dropdown at the top of the Certificates page.
- Choose From This Event from the dropdown.
- In the Clone Certificate dialog box:
- Select the Certificate to Clone from the current event.
- Choose the Target Role you want to apply the cloned template to.
- Click Clone. The new certificate will appear under the Certificates list for the selected role.
Only one certificate can exist per recipient group. If a certificate already exists for the target role, you’ll need to delete it before cloning.
Understanding the Certificate Builder
The Certificate Builder editor is split into two key sections: the central preview area and the right-side editor panel.
Certificate Preview Area
The center of the screen displays a live preview of your certificate. This area reflects all changes made in real time, helping you position, format, and design content precisely.
Above the certificate preview, you’ll find tools to manage your workspace:
- Zoom Level: Adjust the zoom percentage to view your certificate in finer detail or as a whole.
- Maximize/Minimize View: Use the lens icons to toggle full-screen mode or return to the normal layout.
- Gridlines: Turn on or off gridlines to help align text, images, and design elements more accurately.
Editor Panel (Right Side)
The right-side editor contains three tabs, each offering different design and customization tools.
Design Tab Options
- User Info: Add participant-specific fields like name, email, ticket class, etc.
- Event Info: Insert dynamic event fields like event name, date, location.
- QR Code: Add a scannable code linked to a custom URL.
- Background: Customize the certificate’s background with an image, gradient, or solid color.
- Static Fields: Add fixed elements such as text, images (logos or signatures), or shapes.
Properties Tab Options
Use the Properties tab after selecting any field or element to control its appearance. The available options in this tab vary depending on the type of field you’ve selected (e.g., text field, image, QR code, shape). Common controls include:
- Geometry: Set the exact position and size of the selected element using numerical inputs.
- Typography: Choose the font, style (bold, italic), size, and color for text-based fields.
- Text Alignment: Align text horizontally (left, center, right) and vertically (top, middle, bottom).
- Text Casing: Modify text to appear in uppercase, lowercase, or title case.
- Stroke: For user avatar and QR codes, add borders by selecting stroke color and width.
- Background Fill: For static shapes and text fields, you can apply a solid fill color to enhance visibility or match your event’s branding. This option is not available for images or QR codes.
Some fields, such as QR codes or static images, will show different controls relevant to their function.
Customizing a Certificate Template
User Information
The User Info section allows you to add participant-specific data fields to your certificates. These fields automatically populate with information from your event registration system, including participant names, email addresses, ticket classes, and other role-based details. These dynamic fields eliminate manual data entry while ensuring personalized certificates for each recipient. The Properties tab provides formatting controls for typography, positioning, alignment, and text casing to customize how participant information appears on your certificates.
Adding User Information
- Navigate to Design > Certificates from the Dock.
- Click the Menu icon for a certificate template.
- Click Edit to open the certificate builder.
- In the right panel, click the Design tab.
- Expand the User Info section. A list of participant fields (like name, email, ticket class, etc.) will be displayed.
- Drag and drop it onto the certificate to add it to the design.
If participant data is available, these fields will populate with actual values. Otherwise, placeholders will appear for preview purposes. Click a field to customize its appearance.
The available user info fields may vary depending on the recipient group selected when creating the certificate. Only the fields relevant to the selected role will be available for use in the certificate design.
Editing User Field Properties
After you add a user-specific field to your certificate, use the Properties tab to customize how the information appears. The available settings will vary depending on the selected field type.
For text-based user fields (e.g., name, ticket class):
- Click the Properties tab.
- In the Geometry section, adjust the element’s X (horizontal) and Y (vertical) position, as well as its Width (W) and Height (H).
- Choose a Font, Font Style (bold/regular/medium/light), Font Size, and Font Color to match your event’s branding.
- Use the alignment icons to position text:
- Horizontal alignment: Left, Center, Right
- Vertical alignment: Top, Middle, Bottom
- Set the Text Casing: Uppercase, Lowercase, or Title Case.
- Apply a Field Fill (background color) to the text block for improved visibility.
- In the Text Style dropdown, select the formatting option.
- In Display Options, choose where this field should appear:
- Both Sides (Front and Back)
- Left Side Only
- Right Side Only
For the User Avatar field:
- Click the Properties tab after selecting the avatar element.
- In the Geometry section, adjust the avatar’s X, Y, W, and H values to position and size the image.
- Under Image Shape, select either:
- Square
- Round
- In the Stroke section, apply a border to the avatar:
- Choose a Color
- Set the Width of the border in pixels
These controls help you present user data professionally and consistently across all generated certificates.
Event Information
Event Info fields insert relevant event details into your certificate design. These fields pull data directly from your event configuration, including event names, dates, locations, and other event-specific information. This automatic data integration ensures accuracy and consistency across all certificates while reducing setup time. Field properties can be customized through the Properties tab to control appearance and positioning within your design.
Adding Event Information
- Navigate to Design > Certificates from the Dock.
- Click the Menu icon for a certificate template.
- Click Edit to open the certificate builder. The template appears on the left, and design tools appear on the right.
- In the Design tab, expand the Event Info section.
- Click on a field or drag and drop it onto the certificate.
These fields pull data from your event setup (like event name, venue, dates, etc.). Click a field to configure its appearance.
Editing Event Field Properties
- Select the field and go to the Properties tab.
- Adjust the field’s position in the Geometry section.
- Choose typography settings and text alignment.
- Use casing controls to adjust the field’s display text.
QR Code
QR codes can be added to certificates for verification purposes or to link to additional resources. Each QR code connects to a custom URL that you specify during creation.
Adding a QR Code
Include a QR code to verify certificate authenticity or link to a custom URL.
- Navigate to Design > Certificates from the Dock.
- Click the Menu icon for a certificate template.
- Click Edit to open the certificate builder. The template appears on the left, and design tools appear on the right.
- Go to the Design tab and expand the QR Code section.
- Click the QR Code icon. The QR Code dialog box will appear.
- Enter a custom URL.
- Click Create.
QR codes can link to verification pages, forms, or any custom destination. You can also associate custom fields with the QR code.
Editing QR Code Properties
- Select the QR code and open the Properties tab.
- Use Geometry controls to position the element.
- In the Stroke section, click the + icon to apply border color.
- Set a Width value for the QR code border.
Background
Adding a Background
Set a background to reflect your branding style.
- Navigate to Design > Certificates from the Dock.
- Click the Menu icon for a certificate template.
- Click Edit to open the certificate builder. The template appears on the left, and design tools appear on the right.
- In the right panel, click the Design tab.
- Click Background. Choose one of the following:
- Image
- In the Choose Image dialog, upload a new image or choose an existing one.
- Click Select to apply it to your certificate.
- Gradient
- Expand Background and select Gradient.
- Use the picker to choose or adjust colors.
- Add, rearrange, or modify color stops.
- Set a Direction value to control the gradient’s angle.
- Click Select to apply.
- Color
- Choose a color from the palette.
- Click Select to apply it to your certificate.
- None
- To remove a background, choose the None option.
Static Fields
Static fields add consistent elements across all certificates, including text blocks, images, and shapes. These elements remain the same regardless of recipient-specific information. Common static field applications include organizational logos, certificate titles, signature lines, and decorative elements. The Properties tab provides full control over positioning, styling, and formatting for each static element.
Adding a Static Field
Add static content like titles, labels, shapes, or logos.
- Open the certificate in Edit mode.
- In the right panel, click the Design tab.
- Expand the Static Fields section.
- Drag and drop elements like Text, Image, or Shape.
Editing Static Field Properties
For text-based user fields (e.g., name, ticket class):
- Select the field and go to the Properties tab.
- In the Geometry section, adjust the element’s X (horizontal) and Y (vertical) position, as well as its Width (W) and Height (H).
- Choose a Font, Font Style (bold/regular/medium/light), Font Size, and Font Color to match your event’s branding.
- Use the alignment icons to position text:
- Horizontal alignment: Left, Center, Right
- Vertical alignment: Top, Middle, Bottom
- Set the Text Casing: Uppercase, Lowercase, or Title Case.
- Apply a Field Fill (background color) to the text block for improved visibility.
For the User Avatar field:
- Click the Properties tab after selecting the avatar element.
- In the Geometry section, adjust the avatar’s X, Y, W, and H values to position and size the image.
- Under Image Shape, select either:
- Square
- Round
- In the Stroke section, apply a border to the avatar:
- Choose a Color.
- Set the Width of the border in pixels.
E-Signature
Currently, signature functionality is available through image uploads. You can add scanned signatures, digital signature graphics, or official stamps by uploading them as static images. Signature images can be positioned and sized using the Properties controls to create the desired appearance on your certificates. To personalize your certificate with a digital signature:
- Navigate to Design > Certificates from the Dock.
- Click the Menu icon for a certificate template.
- Click Edit to open the certificate builder. The template appears on the left, and design tools appear on the right.
- In the right panel, click the Design tab.
- Expand the Static Fields section and select Image.
- Upload the signature image and place it where needed.
- Use the Properties tab to resize and align it properly.
Generating and Downloading Certificates
- Navigate to Design > Certificates from the Dock.
- All previously created certificate designs will be listed here. You can view, edit, clone, or delete templates from this section.
- Click the certificate. The certificate details page will open.
You’ll see:
- A preview of the certificate template on the left.
- Design settings such as size, orientation, and margins under the Layout Settings section.
- Generation status: total recipients, already generated certificates, and pending generation under the Generate and Download Certificate section.
Downloading a Sample Certificate
Preview the certificate design as a watermarked PDF for internal review and approval.
- Navigate to Design > Certificates from the Dock.
- Click the certificate. The certificate details page will open.
- In to the Generate and Download Certificates section, click Download Sample.
A watermarked PDF will be downloaded. This is useful for confirming placement, design fidelity, and branding alignment.
Generating Certificate PDFs
Create digital certificates populated with actual participant data.
- Navigate to Design > Certificates from the Dock.
- Click the certificate you want to generate.
- In the Generate and Download Certificate section, click Generate PDF.
- In the Generate Certificate pop-up, select the group you want to generate for:
- All recipients
- Recently added recipients
- Specific recipient
- Choose a participant from the dropdown.
- Click Done to begin the generation process.
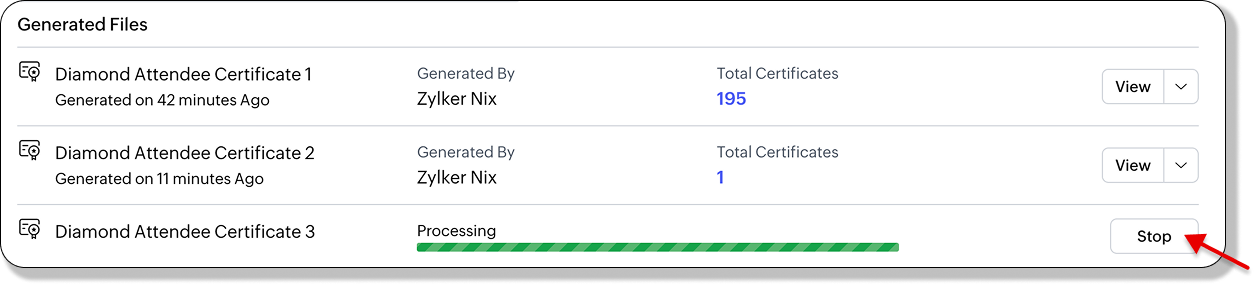
Progress messages and estimated time of completion will be displayed. You can STOP the generation mid-way if needed.
Downloading Generated Certificates
Download the certificates as password-protected PDFs if required.
- Navigate to Design > Certificates from the Dock.
- Click the certificate.
- Under Generated Files, click the dropdown icon next to a file and click Download. The Download PDF dialog box will appear.
- (Optional) Enable the Password protect the file checkbox.
- Enter a Password.
- Click Download.
The file will be saved to your system as a printable PDF.
Regenerating Certificates
If you’ve made edits to the certificate design or layout after generating:
- Navigate to Design > Certificates from the Dock.
- Click the certificate.
- In the Generated Files section, click Regenerate next to the outdated file.
- Click Stop to cancel regeneration mid-way, if needed.
This option is available only if the design has changed after the last generation.
Deleting Generated Certificates
Remove previously generated files to clear up space or fix mistakes.
- Navigate to Design > Certificates from the Dock.
- Click the certificate.
- Under Generated Files, click the dropdown next to the file you want to delete.
- Click Delete.
- Confirm deletion in the dialog box.
This will remove the file from your generated files list. You can generate a new version at any time.
Sharing Certificates
- Navigate to Communicate > Emails > Scheduled Emails from the Dock. The Scheduled tab will be selected by default.
- Click the Create New Email button.
- Select a recipient group from the dropdown menu. This will open the email designer.
- Go to the Content tab and drag content blocks into the Email Design area. Edit the content as necessary.
- Use merge tags to personalize your message with participant-specific details.
- Drag a Button into the layout if it’s not already present.
- Click the button to open the Button Properties panel.
- In the Link dropdown, select Download Certificate.
- (Optional) Change the button text to something like “Download Your Certificate”.
- Click Preview to check the email design.
- Send a test email to yourself to confirm the certificate download link works.
- Click Save to Draft to save your changes without scheduling. Or, click Save and Schedule, set a date and time, and confirm.
- On event day, you can use the SEND NOW option to send an email instantly.
Make sure your certificate is fully designed and generated before sending. The attached PDF will reflect the latest saved version.