Forms
Overview
Forms are an effective business tool that help small businesses gather a wide variety of details from customers. By using the form builder in Bigin, small businesses can create customized forms for lead generation, customer support, registrations, online orders, feedback, and more. They can then automatically add the details to the Pipelines and Contacts module. This helps them streamline their data collection process and helps businesses build stronger relationships with their customers. These forms can be shared as a link, QR code, and they can even be embedded on a website.
Some instances where small businesses can use forms are:
- Create a support form that captures details like the customer's name, the problem they're facing, their email address, phone number, screenshots, and similar relevant information for the customer support pipeline.
- Create a feedback form that captures details like a customer's name, happiness rating, feedback, email address, and similar relevant information for the customer testimonial pipeline.
- Create a webinar registration form that captures details like customer name, email address, phone number, and similar relevant information for the Contacts module.
- Create a request form that captures details like the requester's name, employee ID, asset required, email address, and similar relevant information for the IT Asset request pipeline.
Availability
- Forms are available for all paid editions - Express, Premier and Bigin 360.
Permission
- Users with Forms permission in their profile can build and configure forms.
- Users with Approve records permission can approve the records submitted via Forms.
Setting up a form
You can easily set up a form in three steps.
Step 1: Build a form
This section focuses on the appearance of the form. That is what are all the fields that will appear in the form, the title to be displayed at the top of the form, the back-ground color, font style, etc.
- Enter the Form name which will be displayed at the top of the form.
- Drag and drop the fields you need in the form. Rename the field, mark it as mandatory, and provide field descriptions.
- Insert a captcha.
- Add the option to upload files, if needed.
- Insert your privacy policy, if any.
- Set font, font size, and background color of the form.
Step 2: Configure Submission Rules
In this section you can specify the set of actions that need to be executed when your prospect/customer submits the form after filling it.
- Assign owner for the records created via forms.
- Enable Duplicate Management to avoid duplicate records.
- Add tags, if any to distinguish records created through forms.
- Enable double opt-in.
- Acknowledge visitors.
- Request for approval.
- Set a "Thank you" message or redirect users to an appropriate landing page.
- Enter fields that need to be filled out automatically when the form is submitted.
Step 3: Share the form
- Share the form with your customers via a link, QR code, share on social media or embed the form on your website.
Designing forms
Once you create your form, you can design them according to your business theme and create your own branding. Described below are the design features you can use to add themes to your forms.
Brand your form with your company logo
With every form you create, you can establish your business branding by adding your business/organization's logo. This logo field is located in the form header and can't be moved. To add a logo, click the Upload Logo button and upload your business's logo.
You can preview the logo you've added by clicking the Preview button at the top-left corner.
Note:
- The maximum size for an image file is 5 MB.
- You can remove/delete the logo anytime you want.
Multiple sections
You can create custom sections within each form, which enables you to categorize forms into multiple sections. Each form includes at least one section by default. Additionally, you can personalize the title and description of each section, and optionally hide them if required. The title and description fields are not mandatory.
Let's say a real estate agency is using this feature to customize a listing form. They can categorize fields into sections such as property details, amenities, and contact information. Each section can be customized with relevant titles and descriptions, providing clarity to both the agent and potential buyers. If certain sections are deemed unnecessary for a specific listing, they can easily hide their titles and descriptions.
To add a section, click the +Add Section button at the bottom of the form.
Note:
- You can add a maximum of five sections.
- File Upload field is only available in paid editions.
- You can use validations to the fields used within the form.
- The Email field allows restrictions to block specific domains.
- The Phone Number field can be configured to restrict alphabetic input or display the country code.
Background images
You can further personalize forms by uploading your own custom images to serve as backgrounds, thereby enhancing the visual appeal and branding consistency.
To add a background image, click the background color icon on the form builder.
You can choose from the standard colors available or use the gradient to choose specific colors. You can also use some of the default images provided.
Apart from that, you can upload your own images as backgrounds. To add custom images, click the upload icon in the photos section and choose the image you want to add as a background.
You can also preview the background images you've added by clicking the Preview button at the top-left corner.
Note:
- The maximum size for an image file is 5 MB.
Button customization
You can now customize the position and shape of the submit button in a form.
To customize the button, click on the Settings icon that appears when you hover over the button section.
In the Button Properties tab, you can add a label to your button and pick a color for it. Once you add your button, you can set its position as left, center, or right, and change the button's shape.
Form Link
Users can now include links to forms in their emails so that their contacts can fill them out. To add a form link in email go to,
- Go to Contacts module > Select the desired contact(s).
- Click the Send Email button.
- In the email editor, select the Form Link option from the link button.
- Choose the appropriate module and the corresponding form. Also you can give a name to the link that redirects you to the form.
- You can also have a quick preview of the form before attaching it.
Social Sharing Forms
Once the form is build the user can now directly add form links to Twitter, Facebook and Whatsapp. Choose the appropriate icon after creating a form, and send it directly.
Google reCAPTCHA
Google's reCAPTCHA service aids in the prevention of spam on your websites by stopping form submissions produced by bots or other spam services when used with Bigin Forms. To add Google reCPTCHA, go to Setup > Forms > Tools > Google reCPTCHA. Click and drop it into the form. Once dropped, you will be asked for a Site Key and Secret Key. To get the keys, go to Google ReCPTCHA, where you'll be redirected to the reCAPTCHA creation page. Provide the necessary details, such as a label name, reCAPTCHA type, and a domain name. Google offers a number of reCAPTCHA variations; however, Bigin only accepts the "I am not a robot" version (reCAPTCHA V2). So please choose the reCAPTCHA V2 option while generating the key.
The domain you set should be "crm.zohopublic.com". This is mandatory for the Google reCAPTCHA to function properly. Once you submit the form, the keys will be generated.
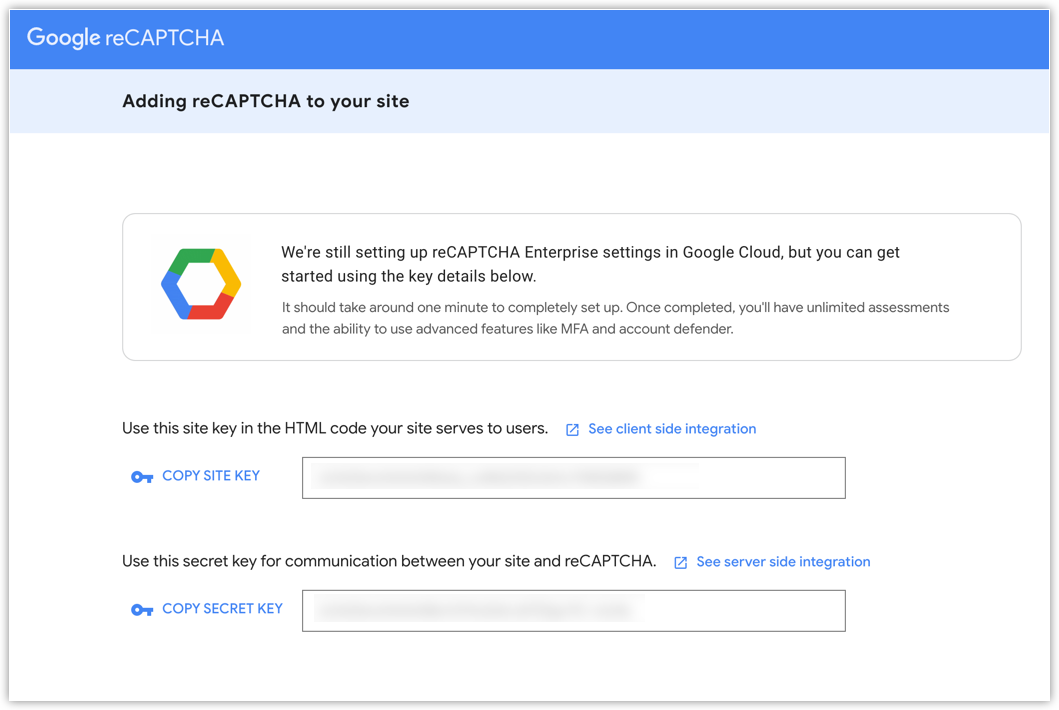
You can copy and paste the keys in the Google reCAPTCHA Settings tab.
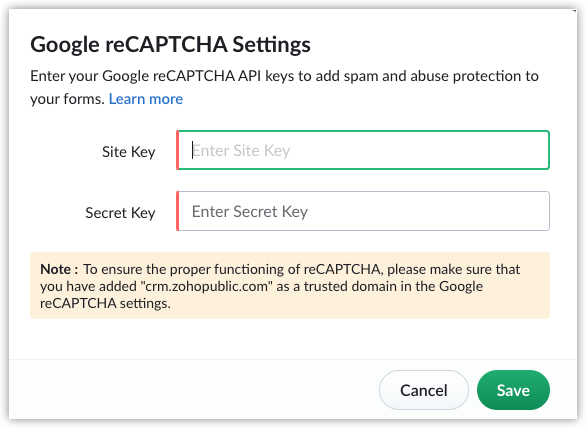
Once the keys are entered, the captcha field will be added to the form. You can always create new key whenever you want. This field is marked as mandatory by default.
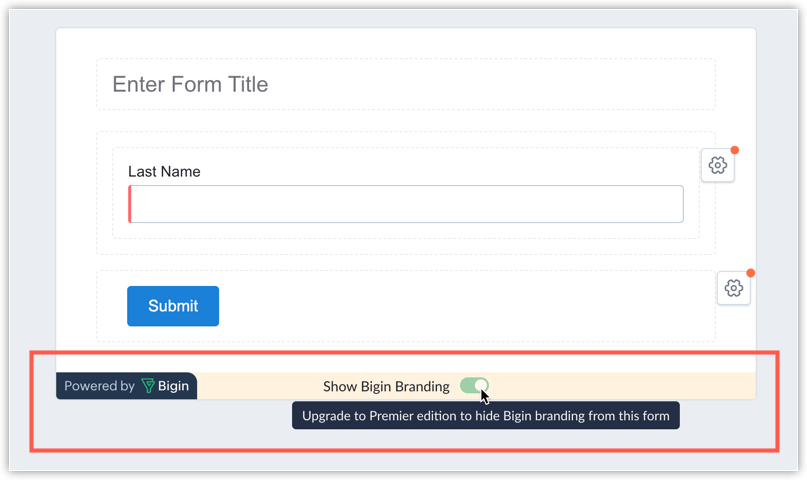
Powered by Bigin branding in forms
A "Powered by Bigin" bar will be included on forms by default. Users using the Free, Trial, and Express editions cannot remove this branding; however, users using the Premier and Bigin 360 edition can hide it.
Form Link Customization
Access forms more easily with recognizable and branded links. The link format is <dc>.bigin.online/{org access url}/forms/{form-link-name}. Note that the "dc" part changes based on your data center.
For example, if you're in the US data center and have a form called "Contact Us," the link would be us.bigin.online/zylkertravels/forms/contact-us. You can customize the form link name when creating or editing a form.
To change the organization name in the URL, modify the organization access URL in the organization details. Learn more
If you want to use your own domain to host the form instead of the bigin.online URL, you can map your custom domain using our domain mapping feature. To know more about Custom Domain Mapping, click on this help document.
Acknowledge Visitor
You can send an acknowledgement to your visitors once they submit a form. This helps confirm receipt of their submission and provides them immediate reassurance that their request is being processed.
When you set up your form, you can enable how you want to acknowledge your visitors, either via email, WhatsApp, or both.
Acknowledge visitor via Email
Enable this option to send an automatic acknowledgement email to the visitor after the form is submitted. You can choose an email template for the acknowledgement email. This works best when your customer prefers email communication and helps ensure they get an immediate confirmation of their submission.
Acknowledge visitor via WhatsApp
Enable this option to send an automatic WhatsApp acknowledgment message to visitors when they submit a form. You can choose WhatsApp template for the acknowledgement message.

Note:
This option appears on the form submission page only when:
This option appears on the form submission page only when:
- The form has a phone field mapped to the Contacts module
- WhatsApp integration is enabled for your organization
If the form collects more than one phone number, you will be prompted to select which phone number field should be used for sending the WhatsApp confirmation. This ensures the message is sent to the correct contact number.
Fields to be Auto-Filled on Submission
The Auto-Fill Submission option helps you manipulate data collected through a form and use it to populate other required fields. These fields are not exposed to customers, but are filled automatically when a form is submitted.
For example, if a lead is generated through a form, the Lead Source field can be set to “Form” automatically. Once your customer submits the form, this value gets added to the record without requiring any input from them.
Auto-Fill Submission also supports dynamic values. To do so, select the field you want to auto-fill, click the # merge icon, and insert the appropriate merge fields.
Examples
- If you collect a customer’s first name and last name separately, but also need a full name field, you can merge the two and auto-fill the full name automatically.
- Similarly, if you collect a contact’s phone number and already know that their company’s phone number is the same, you can set the company phone field to be auto-filled using the contact’s phone number instead of asking for it again or updating it manually.
Notes:
- The merge field type must always match the auto-fill field type.
- Deal Name remains a required field when creating a record. If you remove Deal Name from the form, you must add it in the Auto-Fill section.
- A form cannot be created if Deal Name is missing in both places, it must be provided either by the customer or through auto-fill.
Duplicate Management
When a new record is submitted through Bigin forms, the system checks for duplicates based on unique field data. You can configure how the system should handle duplicate submissions within the form submission rules.
The Duplicate Management option will be available by default in the form submission rules for Contacts and Companies records. While it's always accessible, it functions effectively only when the form includes fields marked as unique within the module.
In this settings, you have three options to manage how duplicate records are handled during form submissions. Your choice will determine how the system handles records that match existing contacts or companies:
- Manually Approve Duplicates: This is selected by default. When a record submitted through this form matches an existing contact or company, it will be sent for manual approval. During the approval process, you can choose to either create a new duplicate record or merge the new information with an existing record.
- Merge Duplicates: If you choose this option, the system will automatically update the matching record with the new data. If multiple matching records are detected against the submitted record, it will be sent for manual approval.
- Allow Duplicates: Selecting this option means that all submitted data will be created as new records, regardless of whether they match existing unique values. This ensures that no records are filtered out due to duplication.
Notes
- If no unique fields are configured in the module, the duplicate check will be skipped, and all submissions will be treated as new records.
- By default, all forms are set to 'Manually Approve Duplicates.' You can adjust this setting anytime to fit your preferences.
Use Case
Zylker Realty is a small real estate firm that specializes in residential sales and property management. Let's create the following forms for them:
- Contact form – The form will be embedded on their website to capture the details of visitors like their name, email address, phone number, and a message so the realtors can reach out to them. The details collected will be converted to a contact and added to their Contacts module.
- Enquiry form for rental property listing – The form will be shared as a link in an email campaign. This form will capture details about the property owner, the type of property for listing, details about the property like the address, property size etc. The details will be added as an Opportunity to their Property Management Pipeline.
Contact form
Using the example from above, here is how you can create a contact form.
- Go to Settings (
) > Forms.
- Click +New Form.
- Choose the form type. Since we are building a contact form, click Create a Contact Form.
- On the form builder page, do the following:
- Enter the form name as "Contact Us."
- Drag and drop the required fields in the WYSIWYG editor.
- By default, the Last Name field is already added to the form as it is mandatory to create a record in the Contacts module.
- To have custom fields in the form, you need to create them in the Contacts module first. See Create Custom Fields for instructions.
- When you add the Company Name field in the form, a record will be created in the Companies module in Bigin for the contact. If a company with the same name already exists in your Bigin account, a record will not be created when the form details are submitted.
- Click the Settings icon next to the field to edit the field name. You can mark the field mandatory by selecting the checkbox.
Use the Description field to share any information or instructions to the customer filling out that field. - Click the Delete icon next to the field to remove fields you do not want. Mandatory fields cannot be removed.
- Drag and drop the Captcha field to prevent bots from automatically submitting unwanted content in your form. This acts as a secured gateway where records will only be considered upon successful completion of this test.
- Drag and drop the Privacy Policy field to explain how your company will look after and deal with customers’ private information. Adding this in your form allows customers to legally agree to your company's privacy policy or end-user license agreement. When this is added in your form, the customer can submit it only after reading and enabling the checkbox.
- Use the File Upload field to allow the user to upload files such as screenshots, invoice request, and more that will be added as attachments to the record automatically in your Bigin account. Please note that visitors can upload 3 files at a time, with each file allowed to be up to 20 MB in size. File Upload field is only available in paid editions.
- Click the font type icon
to set the desired font style.
- Click the font size icon
to set a suitable font size.
- Click the alignment icon
to set the field alignment.
- Click the background color icon
to change the background color.
- Click the preview button to see how your form looks before publishing.
- Switch between the Desktop, Tablet, and Mobile icon to see how the form would appear on different devices.
- Click Next Step.
- In the Form Details section, do the following:
- Assign Owner: Select a user from the dropdown. All the records generated through the form will be assigned to the selected user. Enable the checkbox to notify the user when a form is submitted.
- Tag: Add relevant tags, if applicable, from the list of existing tags for the module. The chosen tags will be added to all of the records captured from the Form module. The chosen tag will be added to all of the records captured from the form.
- Enable Double Opt-in: Enabling this option will send a confirmation email to the customer for additional verification once the form is submitted. Note that this option can be used only if the primary email field is added to the form.
- Acknowledge Visitor: Enabling this option will send an acknowledgement email to the customer once the form is submitted.
- Request for Approval: Enable the Request for Approval option if you want to submit the records for approval. Note that users with the Approve Contacts permission in the profile can approve the records.
- For the "What should the visitors see when they submit the form," select one of the following options:
- Thank you message: Enter a message to be displayed when the form is submitted.
- Redirect to a page: Alternatively, you can also enter the URL of your website or other appropriate webpage to redirect the customer to when the form is submitted.
- In the Fields to be Auto-Filled on Submission section, enter the default value for the fields you want to be automatically filled out when a record is created but not displayed on the form. For example, you can have a field called "Contact source" in the Contacts module and whenever a contact is created via this form, you can add a default value of "Form" to that field.
- Click Save and Next.
- On the Share Your Form page, you will find the form link, QR code, Share via social media apps and three different formats of code (Source, Java Script and iFrame) to embed on your website or app.
- Click Done.
Here's how the form will appear when a customer accesses it.
Pipeline form
Using the example from above, here is how you can create a pipeline form.
- Go to Settings (
) > Forms.
- Click +New Form.
- Choose the form type. Since we are building a pipeline form, click Create a Pipeline Form.
- On the Form builder page, do the following:
- Enter the form name as "Enquiry form for rental property listing."
- Drag and drop the required fields in the WYSIWYG editor.
- By default, the Pipeline_record Name field is already added to the form as it is mandatory for a record in the Pipelines module.
- To have custom fields in the form, you need to create them in the Pipelines module first. See Create Custom Fields for instructions.
- When you add any field from the Contacts section, the Last Name field will be automatically added to the form. Similarly, when you add any field from the Companies section, the Company Name field will be automatically added to the form. When the pipeline record is created, a contact or company record will also be created simultaneously and mapped with the pipeline record. If a contact with same email exists or if a company with the same name already exists in your Bigin account, a new record will not be created under Contacts and Company when the form details are submitted. The pipeline record will be associated to the existing contact and company record.
- Click the Settings icon next to the field to edit the field name. Select the checkbox to mark the field as mandatory. Use the Description field to share any information or instructions to the customer filling out that field.
- Drag and drop the Captcha field to prevents bots from automatically submitting unwanted content in your form. This acts as a secured gateway where the records will only be considered upon successful completion of this test.
- Drag and drop the Privacy Policy field to explain how your company will look after and deal with customers’ private information. Adding this in your form allows the customers to legally agree to your company's privacy policy or end-user license agreement. When this is added in your form, the customer can submit only after reading and enabling the checkbox.
- Drag and drop the File Upload field to allow the user to upload files related to the property and they will be added as attachments to the record automatically in your Bigin account. Please note that file sizes up to 20 MB are permitted.
- Click the font type icon
to set the desired font style.
- Click the font size icon
to set a suitable font size.
- Click the alignment icon
to set the form alignment.
- Click the background color icon
to change the background color.
- Click the preview icon to see how your form looks before publishing.
- Switch between the Desktop, Tablet and Mobile icon to see how the form would appear on different devices.
- Click Next Step.
- In the Form Details section, do the following:
- Assign Owner: Select a user from the dropdown. All the records generated through the form will be assigned to the selected user. Enable the checkbox to notify the user when a form is submitted.
- Sub-pipeline and Stage: Select the sub-pipeline and stage to assign when the record is created.
- Tag: Add relevant tags, if applicable, from the list of existing tags for the module. The chosen tags will be added to all of the records captured from the form.
- Enable Double Opt-in: Enabling this option will send a confirmation email to the customer for additional verification once the form is submitted. Note that this option can be used only if the primary email field is added to the form.
- Acknowledge Visitor: Enabling this option will send an acknowledgement email to the customer once the form is submitted.
- Request for Approval: Enable the Request for Approval option if you want to submit the records for approval.
Note that users with the Approve records permission in the profile can approve the records. Go to the the Approval Icon and you will see all the list of records waiting for approgva click the more icon > Select Approve Pipeline_Record to access the records that are waiting for approval. - For the "What should the visitors see when they submit the form," select one of the following options:
- Thank you message: Enter a message to be displayed when the form is submitted.
- Redirect to a page: Alternatively, you can also enter the URL of your website or other appropriate webpage to redirect the customer to when the form is submitted.
- In the Fields to be auto filled on submission section, enter the default value for the fields you want to be automatically filled out when a record is created but not displayed on the form. For example, you can have a field "Source" in the Pipelines module and whenever a record is created via this form, you can add a default value of "Form" to that field.
- Click Save and Next.
- In the Share your form page, you will find the form link, QR code, Share via social media and three different formats of code (Source, Java Script and iFrame) to embed on your website or app.
- Click Done.
Note:
- The form builder has default validation rules in place. When the customer misses a required field, a message will prompt the customer to fill in the required field. This helps you collect the required data from your customer without any hiccups.
- For users with 'Acknowledge Visitor' enabled, you can only receive up to 2000 acknowledgment emails per day. If the limit is exceeded, you will not receive any emails. However, this will not affect the creation of records.