Managing Payment Links in Bigin
Managing payments effectively is vital for any business’s growth and stability. Bigin helps you manage operations and sell products, and with this feature, you can have a better control over your payments. This integrated payment feature lets you create and send payment links from Bigin to your customers, making payment collection easier. This improves customer experience and streamlines operations.
Availability:
- Payment links feature is available in all paid editions of Bigin.
- Supported in US, IN, EU, AU, CA, and UAE data centers (DCs).
Activating Payment Links
Payment links can be activated in two ways
- The Collect Payment button: You can find the Collect Payment button in all the records in the Pipeline module.
- If the payment link is not activated yet, you can do it from the pipeline record page.
- Click on the record to find the Collect Payment button.
- Click Get Started. You will be prompted to create a Zoho Checkout account.
- If you already have a Checkout account, you can directly select the Checkout account, or you can quickly create one by providing the necessary details.
- In the next step, based on your country, you will see all payment gateways supported by Zoho Checkout that are available to you. Connect your preferred payment gateway to get started.
- Payments Settings: You can find the Payments tab inside the settings.
- Go to Settings > Organizations > Payments, and follow the steps mentioned above.
You can connect any of the available gateway payments, according to your preference.
Payment Gateway Integrations
To integrate Stripe with Bigin
- Navigate to Settings > Organization > Payments > Stripe > Connect.
- You will be redirected to the Stripe website. If you already have a Stripe account, log in. Otherwise, you can create a new account.
- You will be asked to enter a OTP, that will be send to your respective mobile number.
- Once you enter your OTP, you will be able to login into Stripe. After this, you will be able to integrate it with Bigin.
To integrate Razorpay with Bigin
- Navigate to Settings > Organization > Payments > Razorpay > Connect.
- You will be redirected to the Razorpay website. If you already have a Razorpay account, log in. Otherwise, you can create a new account.
- After logging in, you can authorize. You will be integrated with Bigin.
To integrate Paytm with Bigin
- Navigate to Settings > Organization > Payments > Paytm > Configure.
- Enter your Paytm Merchant ID and Merchant Key and click on the Confirm button to integrate Paytm with Bigin.
To integrate Paypal with Bigin
- Navigate to Settings > Organization > Payments > Paypal > Connect.
- You will be redirected to the Paypal website. If you already have a Paypal account, log in. Otherwise, you can create a new account.
- After logging in, you can authorize and you will be integrated with Bigin.
To integrate other payment gateways with Bigin
In addition to PayPal, Razorpay, Stripe, and Paytm, Bigin supports all payment gateways available in Zoho Checkout.

The supported payment gateways are:
- Zoho Payments
- Stripe
- Razorpay
- PayPal
- Authorize.Net
- CSG Forte
- Verifone (2Checkout)
- Braintree
- PayTabs
- Paytm
- Mercado Pago
- Safaricom M-PESA
To enable a payment gateway:
- Navigate to Settings > Organization > Payments.
- Under Payment Gateways, select a payment gateway you want to integrate.
- You will be redirected to Zoho Checkout to complete the configuration process.
- Follow the on-screen instructions to configure and authorize the payment gateway.
Once the configuration is completed successfully, the payment gateway will be available for use in Bigin.
Collecting Payments via Payment Links
To start collecting payments, you should first create a payment link for the record.
To create a payment link, go to any of the records in the Pipelines module and follow these steps:
- Click the Collect Payment button in a pipeline record.
- Choose your preferred Amount Type:
- From the Amount Field: This type collects the amount mentioned in the amount field in the pipeline record. If you have multiple currency type fields in your account, you can choose a desired field from the provided picklist.
- Fixed Amount: You can enter a fixed amount that your customer needs to pay. Remember, it cannot be changed once the link is created.
- Decided by Customer: With this type of amount, you can let your customers choose the amount they want to pay, and you can define a minimum amount that can be paid. This field can be used in scenarios like donation.
- After choosing a type, you can set a due date for the payment. The due date is the anticipated date for payment.
- Apart from the due date, you also have the option to choose a grace period. A grace period is like an extended due date. Once the grace period ends, your customers will no longer be able to make payments.
- You can also add a description about the payment.
- Once you are done, click on the Create Link button. Your payment link will be created.
- Once you create the link, you can share it right away with your customer via email or copy the link and use it anywhere required.
- Your customers can make payments using the provided link. The payment status in the related list updates based on their action:
- Received: Payment has been successfully completed.
- Failed: Payment was unsuccessful.
- Overdue: Payment is past the due date.
- Pending: Awaiting payment.
- Expired: Payment link is no longer valid.
- If payment is successfully completed, an email containing the invoice as an attachment will be automatically sent to the customer.
- If no grace period is configured, the payment link will expire on the due date. If a grace period is added, the link will expire on the due date plus the number of grace days. For example, if the due date is June 15, and the grace period is 10 days, the link will expire on June 25.
- You can only delete a payment link before any successful payment is made.
 Note:
Note: You can also view the invoice in Zoho Checkout. Navigate to Zoho Checkout > Payments to view all payment transactions. Click the corresponding invoice number to open and view the invoice.
Note: Bigin currently supports collecting online payments from Pipeline records and the Product Catalog using the Payment Links feature.
Automating Payment Links using Workflows
In addition to creating payment links manually, you can automate payment collection using workflows. With the Collect Payment workflow action, Bigin can automatically generate payment links and send them to customers via email whenever specified workflow conditions are met.
For example, a retail business can create a workflow that automatically generates a payment link whenever an order record reaches the Ready for Payment stage. As soon as the workflow conditions are met, the customer receives a payment email without requiring any manual action from the sales team.
Configuring payment collection
To configure payment collection using workflows:
- Navigate to Settings > Automation > Workflows.
- Create a new workflow or edit an existing workflow.
- Choose the Pipelines module and configure the workflow trigger and condition.
- Under Instant Actions or Scheduled Actions, click + New Action.
- Select Collect Payments.
- Configure the payment and email details.
- Click Save.
Note: Payments can only be collected through pipeline records, so the Pipelines module must be selected when configuring the workflow.
Once the workflow is configured, payment links will be automatically generated whenever the defined workflow conditions are met.
Payment workflow triggers
The Collect Payments action can be configured using any of the existing workflow triggers available in Bigin. In addition, Bigin provides a dedicated workflow trigger called On a Payment link Action for pipeline-related workflows. This trigger enables workflows to be executed automatically whenever a payment-related events occur.
The following payment-related events are supported:
- Created – Trigger workflows when a payment link is generated.
- Amount Paid – Trigger workflows when a customer completes a payment.
- Overdue – Trigger workflows when a payment remains unpaid beyond its due date.
- Expired – Trigger workflows when a payment link expires.
These triggers help you automate payment-related processes such as sending payment reminders, updating records, assigning follow-up tasks, or notifying users whenever a payment status changes.
For example, a training provider can send a payment link for a workshop registration. Once the customer completes the payment, Bigin can automatically move the deal to Closed Won and send a confirmation email with event details, which helps teams eliminate manual tracking and follow-up.
Criteria Configuration
When configuring workflows using the On a Payment link Action trigger, criteria can be defined using fields from both the Pipelines and Payments modules.
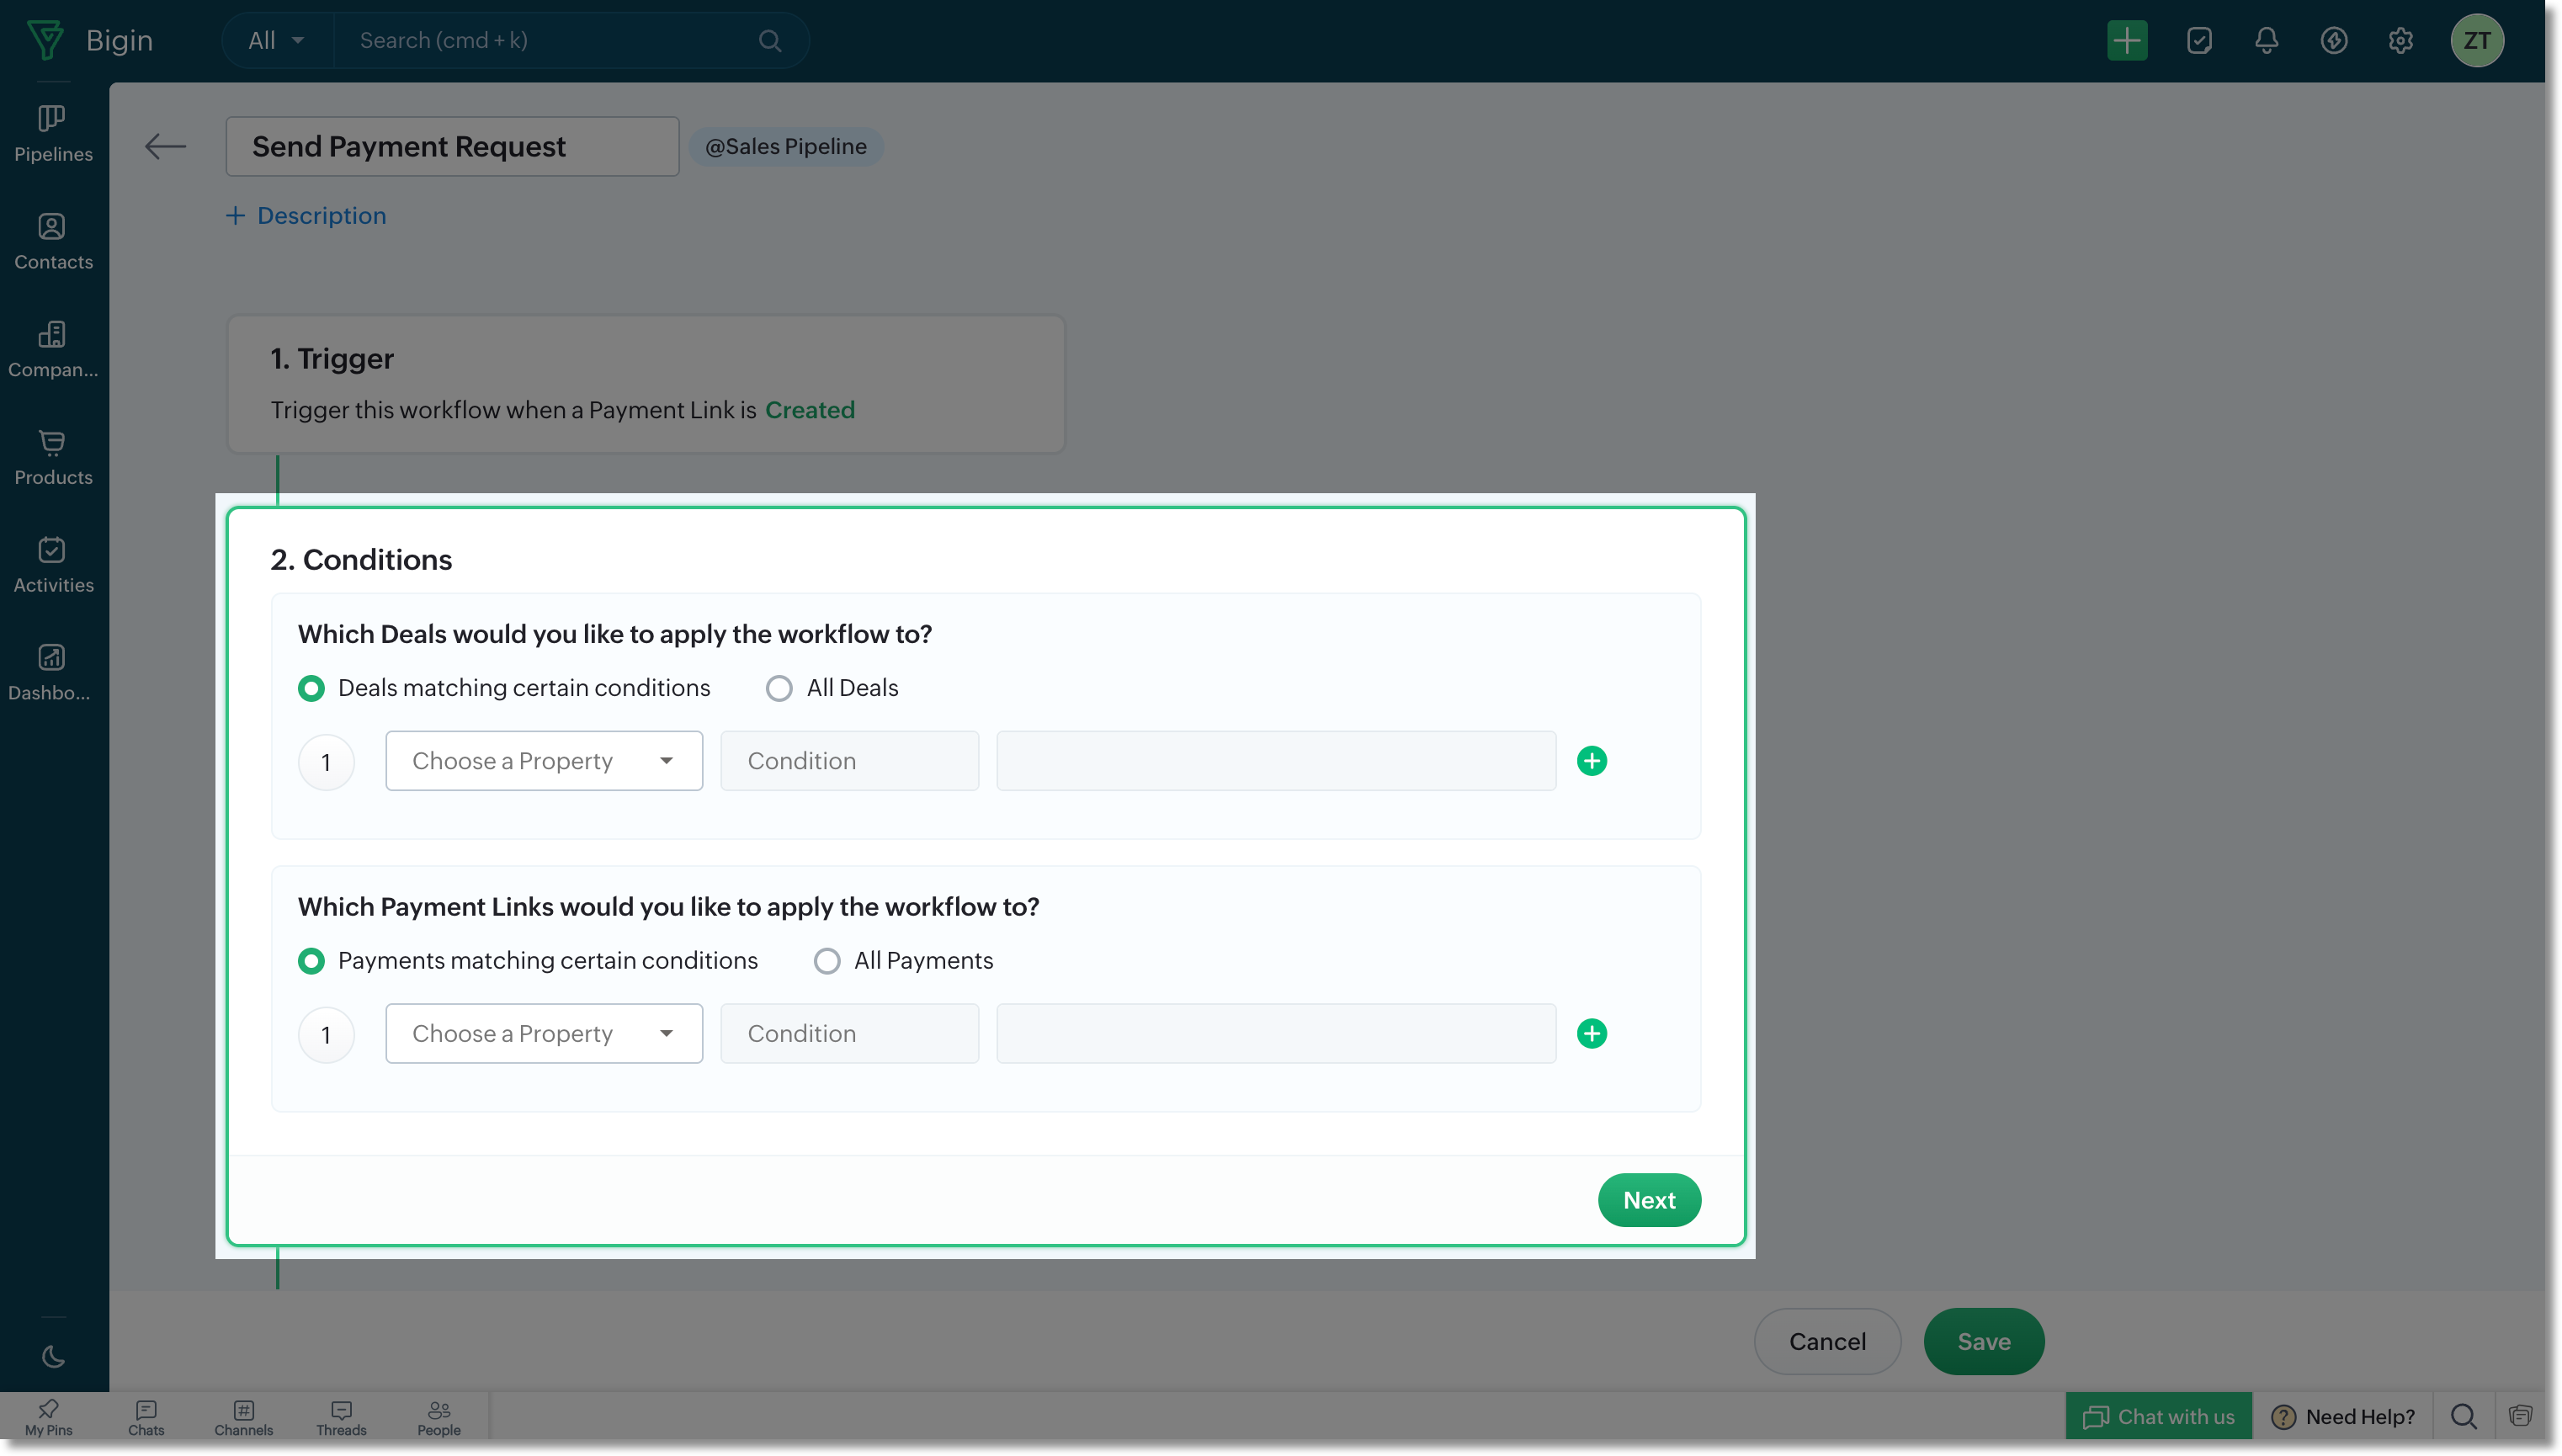
This allows users to create workflow conditions based on deal-specific information, payment details, or a combination of both, enabling targeted payment automation.
For example, you can create a workflow that sends payment reminders only for payments above $1,000 that are marked as Overdue. Similarly, you can trigger notifications only for payments associated with deals in a specific pipeline stage.
Email template support
When configuring the Collect Payments action, users can choose how payment emails are sent. They can either:
- Configure static email content directly within the workflow action's setup page.
- Select an existing Email Template of a pipeline record.
Payment merge fields are supported in both static email content and Pipeline Record's Email Templates. This enables payment details to be dynamically inserted into outgoing emails. Customers receive accurate and personalized communications with information such as the payment amount, payment link, due date, and payment status.
For example, a university can use an email template that automatically includes the student's name, tuition fee amount, payment due date, and payment link. When the workflow is triggered, Bigin populates these details dynamically and sends a personalized payment request to each student.
Deactivating Payments
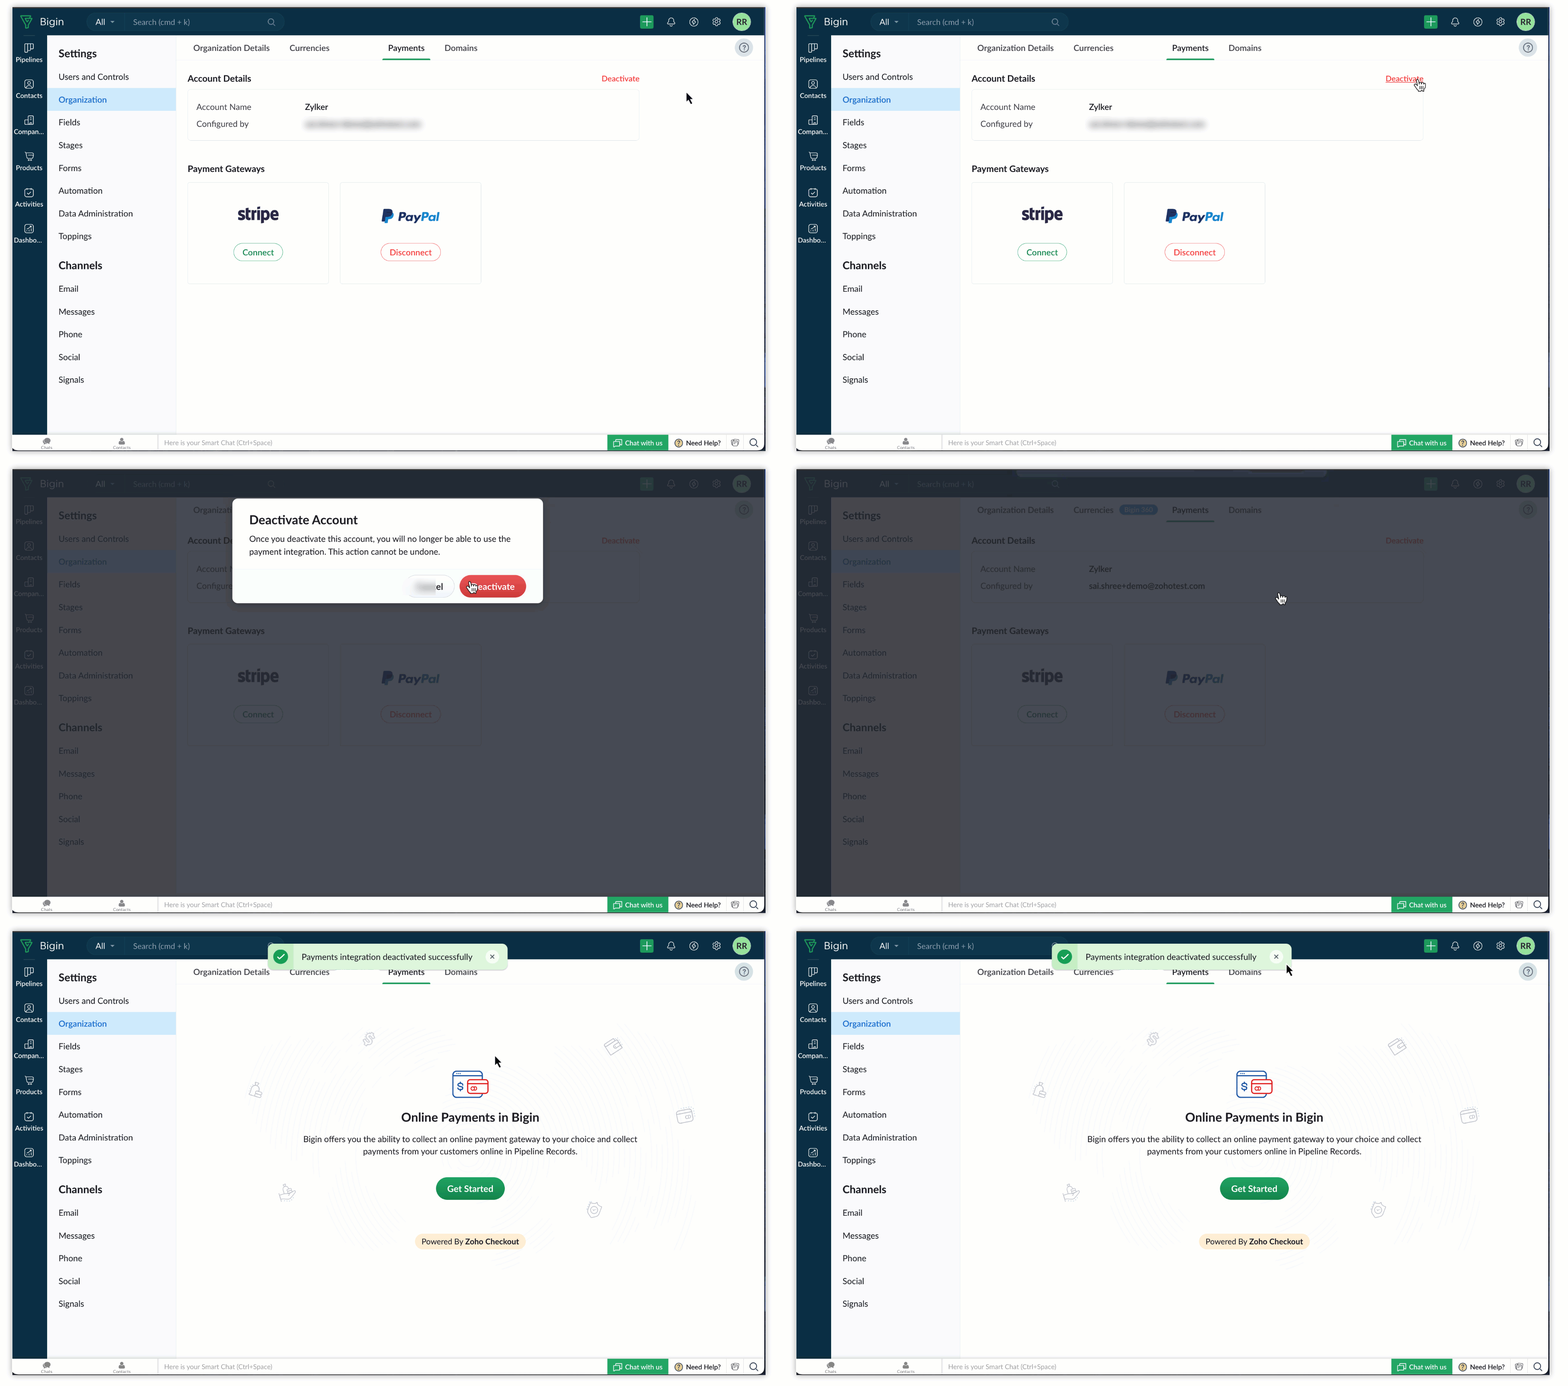
You can deactivate any of the gateways any time you want. To deactivate a gateway, go to Settings > Organizations > Payments > Deactivate.
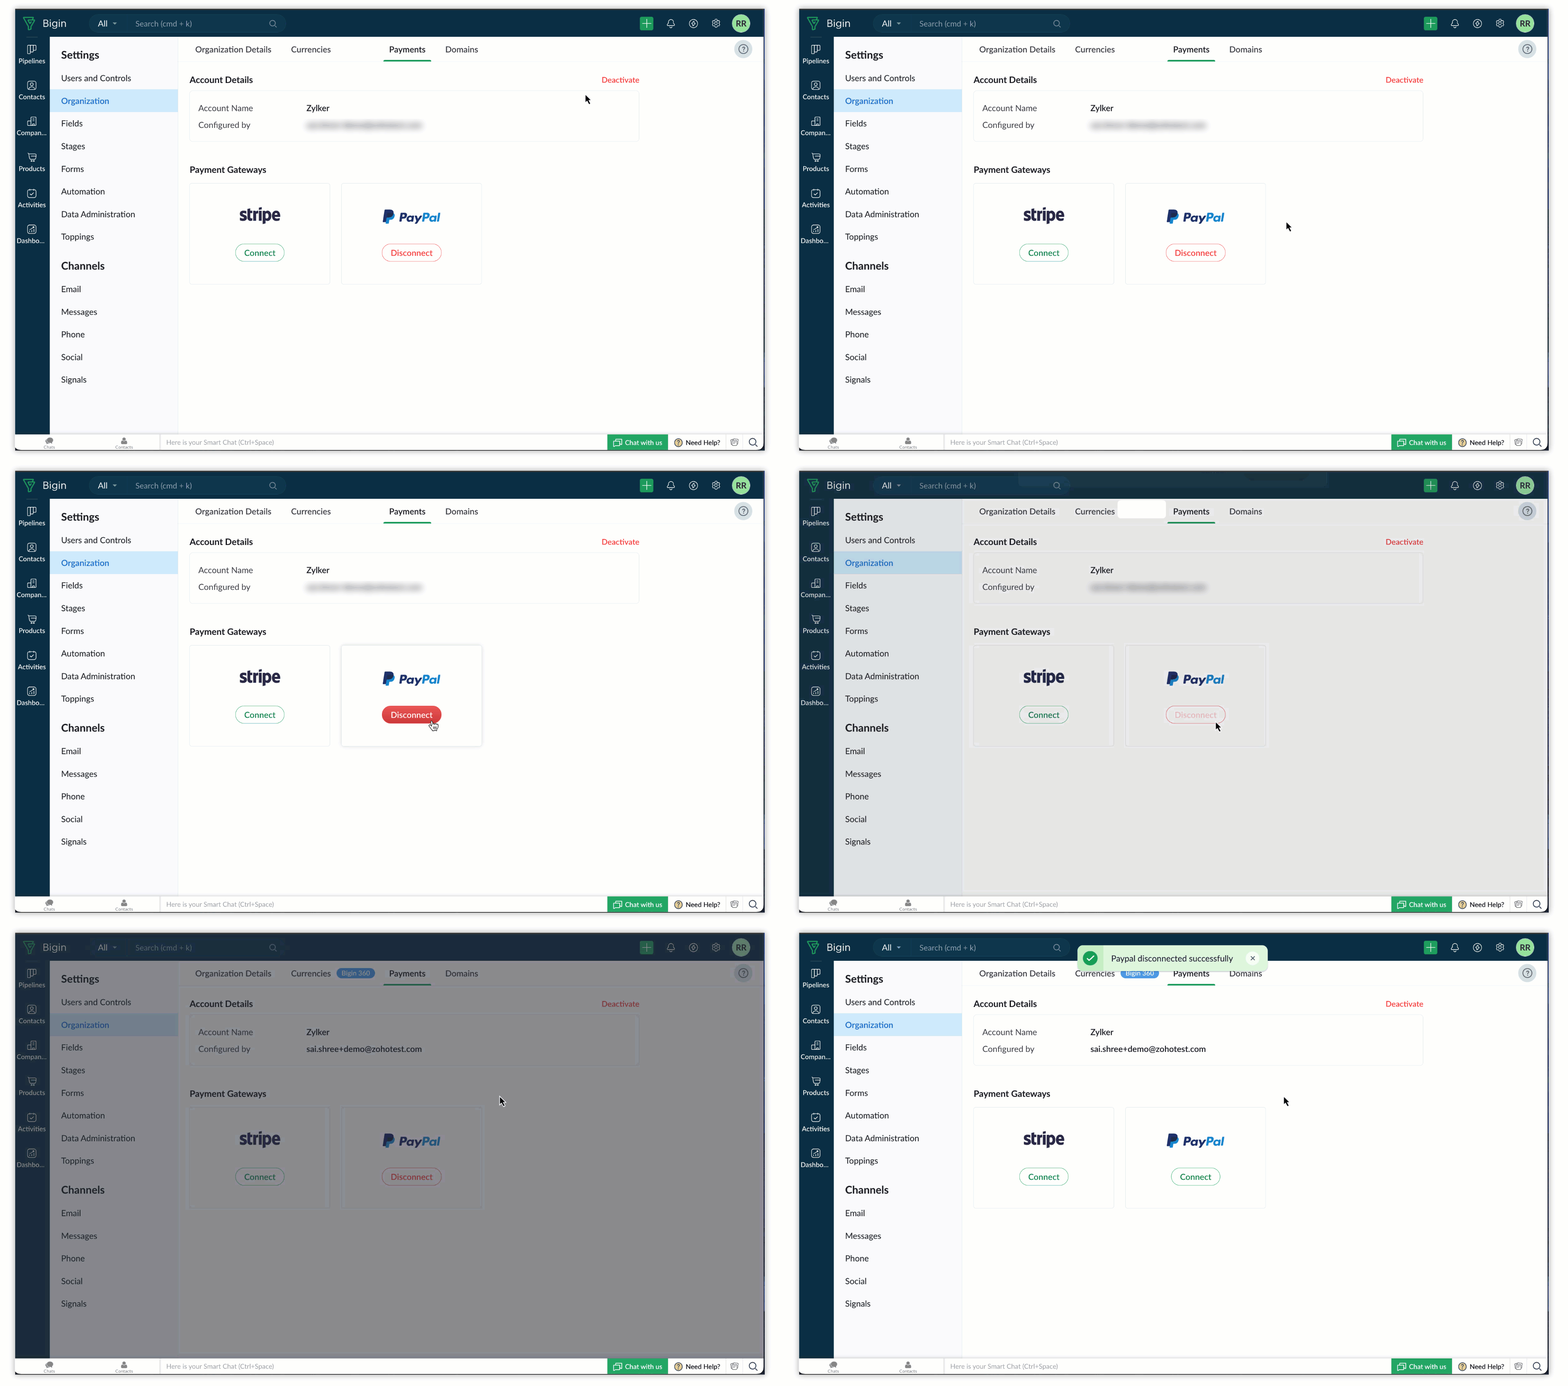
You can also disconnect from the gateways; to do so, go to Settings > Organizations > Payment > Disconnect button.
Dashboards
You can create dashboard components based on the status of the payment link. For example, you can generate reports for all payments made so far, failed payments, successful payments, and more, according to your requirements.
To create a payment details report, select the Payments module within any dashboard component. You can generate various types of reports based on your needs, such as reports for all payments made, failed payments, successful payments, and more.
To generate a payment report:
- Go to Dashboards > + Component > Chart.
- Assign a name to the component as required.
- Choose Payments as the module.
- Set the measure to one of the monetary fields from the Payments module that you wish to visualize in the chart.
- Group the data by Created Time or any other field of your preference.
Use cases
From the Amount Field
Imagine you run a store and use Bigin's payment feature to simplify the payment process for product purchases. You can generate a payment link for the exact amount of a purchase using the amount field. For example, when a customer orders a pair of wireless headphones priced at $150, you can create a payment link for this amount. You can then send this link via email to the customer, who can conveniently click on it to be directed to a secure payment page.
Fixed Amount
Imagine you own an educational institution and use Bigin's payment feature to send payment links for the fixed tuition fees required for each course or semester. This simplifies fee collection by providing clear, predefined amounts. For example, a university can send a $1,000 payment link for semester tuition, and a training center can issue a $500 link for a coding course. This ensures precise and straightforward payment collection for educational services.
Decided by Customer
Imagine you manage an NGO and use payment links for donations, enabling donors to contribute any amount they choose. This method is effective for fundraising campaigns aimed at gathering donations of varying amounts from diverse donors. You can also set a minimum donation amount if necessary. For example, during a disaster relief campaign, your NGO can send a payment link allowing supporters to donate any preferred amount, promoting flexibility and encouraging broader participation.