Pipeline permissions
Within Bigin, team pipelines serve as visual representations of your sales or workflow processes, allowing your teams to track and manage leads, deals, or tasks efficiently. These pipelines provide a clear overview of the progress of each stage. With Pipeline Permissions, you can fine-tune access permissions for who can access the pipeline, based on the roles or profiles they belong to.
You have the option to set up your permissions in the Pipeline Permissions section of the pipeline creation tab. In this section, you will find six different levels:
- Organizer: Organizers can manage the team pipeline and have full access to actions like adding users, customizing stages or fields within the pipeline, and automating workflow processes.
- Manager: Managers have comprehensive access to all records within the pipeline, including the ability to create, edit, and delete records. However, they do not have permissions to organize or customize the pipeline, nor can they add or remove users in the respective team pipelines.
- Member: Users in the Members level can view all records in the pipeline, but can only edit or deletethe records that they own. They can't modify or delete other's records. If the Enable Role Hierarchy option is turned on for this pipeline, then they can also modify/delete records owned by their subordinates.
- Participant: Participants can only view, edit, or delete the records that they own. They can't view other's records in the pipeline.
- Viewer: Viewers have view-only access to all the records in the pipeline. They can't edit or delete any records in the pipeline.
- Requester: Requesters are typically users outside a team pipeline who can add records to a pipeline and track their status, but they cannot edit or delete records they created. The Requester permission is designed to address a unique use case in organizations. Consider an example where an organization uses Bigin to manage work between multiple teams like Sales, Help Desk, HR. In this case, members of the respective teams will be in the respective pipeline and won't have access to other pipelines. Let's say a sales rep needs to report an issue faced by their prospect to the Help Desk team. In this case, the sales representatives can be added as requesters to the Help Desk pipeline. This way, they can create a ticket in the Help Desk pipeline from the My Requests section and track the ticket's progress.
Notes:
- For Organizer, Role Hierarchy doesn't affect Administrator Profiles and Super Admins, even when role hierarchy is enabled.
- For viewers, Sheet View is not provided, as they do not have the permissions to edit, but they can have a quick preview of the records.
- For requesters, they have the option to preview the records quickly, but they do not have access to view the notes. They can view the records only in a list view, and they cannot export the records.
- Organizers of a team pipeline are the only ones who can access the advanced features of that team pipeline. Users with other permission levels, even if they are the owners or creators of the configuration, will not have access to them.
Advanced Features - WorkFlow, Webform, Bulk Actions, Stage Transition Rules, Restrict Deal Closure, Stage Automation, Email Templates, Data Administration and Integrations.
The permission levels for different actions are outlined below for each role.
Permission level | Organiser | Manager | Member | Participants | Viewer | Requester | |
Add/ Remove users | All records | No | No | No | No | No | |
Customize Stages & Fields | All records | No | No | No | No | No | |
Record Visibility | Role Enabled | Own, Shared, and Subordinate | Own, Shared, and Subordinate | Own, Shared, and Subordinate | Own records | Own, Shared, and Subordinate | Created records |
Role Disabled | All records | All records | All Records | Own records | All Records | Created records | |
Create Records | Yes | Yes | Yes | Yes | No | Yes | |
Edit Records | Role Enabled | Own, Shared, and Subordinate | Own, Shared and Subordinate | Own, Shared, and Subordinate | Own records | No | No |
Role Disabled | All records | All records | Own records | Own records | No | No | |
Delete Records | Role Enabled | Own, Shared, and Subordinate | Own, Shared, and Subordinate | Own, Shared, and Subordinate | Own records | No | No |
Role Disabled | All records | All records | Own records | Own records | No | No | |
These details are also available in a table format, as well as a tooltip in the Pipeline Permissions section.
Edit Pipeline Permissions
Admins can edit Pipeline Permissions in two ways:
Through Settings:
- Go to Settings > Fields > Pipeline Fields.
Select the desired pipeline.
Click the More icon and choose Edit Permissions.
From the Main View:
- On the main pipeline view page, click the More icon next to the pipeline name.
- Select Edit Permissions.
After making the necessary changes, click Save to apply them.
Use Cases
Consider a scenario where you are the admin of a real estate company, and you are using Bigin to manage your customer data. You have different pipelines to manage each stage of the process, and you want to provide precise permissions on who can access those pipelines. To start with, we will have a look at the permissions that you will have as an admin.
Organizer: As the admin, you have the authority to add new team members, configure property listings, arrange meetings, and streamline the workflow of property transactions. You can also set up automation for tasks such as property inquiries, scheduling viewings, and sending notifications to relevant parties.
Manager: The manager of your company will a able to oversee multiple properties and transactions. With full access to all property records and transaction details, your manager can monitor the progress of deals, coordinate with clients and agents, and make necessary adjustments to listings or contracts. However, your manager doesn't have the authority to modify the pipeline's structure or add/remove users.
Member: The realtors in your organization are responsible for handling property listings, communicating with clients, and facilitating transactions. They can create, edit, and manage property listings within their profiles, as well as collaborate with colleagues on shared listings.
Participant: Consider a scenario where you have a potential home buyer or tenant. Their access is limited to properties assigned to them by her agent or properties they have interest in. They can view property details, schedule viewings, and communicate with the agent regarding their preferences and questions.
Viewer: The CEO/owner of the company will be an observer, perhaps a supervisor or analytics specialist. While they don't have the ability to create or modify property listings, they can access all data and metrics related to property transactions and market trends. They focus on analyzing the information to provide insights and recommendations to the management team.
Requester:
A Bigin user becomes a Requester: Imagine a realtor who needs to request maintenance or repairs for a rental property. They can navigate to the maintenance request section and submit a new request detailing the issue. As a requester, they can track the status of their maintenance requests and ensure timely resolution to maintain their property's condition and tenant satisfaction.
An outsider/public user becomes a Requester: Imagine a potential buyer or seller interested in providing feedback on their experience. The agency enables public feedback submission through their website, allowing them to submit feedback on property viewings, agent interactions, or overall satisfaction with the service provided.
Share Pipeline Records with your customers
The external sharing feature allows you to share specific pipeline records with external stakeholders like customers. By generating a shareable link, your customers can view the details of the shared record. This makes it easier than ever to keep your customers informed about the progress of their tickets or orders, without requiring manual updates from your team. It enables customers to track the status of their tickets or projects in real time, reducing back-and-forth communication.
For example, in a ticketing pipeline, a customer submits a ticket for an issue they are experiencing. As the ticket progresses through stages like Open, In Progress, and Resolved, your team can use the external sharing feature to send a link to the customer. The customer can then access the link to view the status and updates of their ticket.
Availability
This feature is available to all editions, including the trail editions.
Permissions
You can grant External Share permissions to users through their profiles by navigating to Setup > Users and Control > Profiles and enabling the External Share option under Pipeline Records.
Sharing records
To share a record, you should first enable the external sharing option for that pipeline. To enable external sharing, click the More icon of the pipeline of the record that you want to share and enable external sharing.
Once you enable this, you will be able to see an icon on the records indicating the availability of sharing. If the icon is gray, it is yet to be shared, and if the icon is green, it means that the record has already been shared.
Choose the record you want to share and click on the gray sharing icon. A pop-up notification appears displaying all the details about the external sharing option. Click Review Permissions and Share to select the fields that should be displayed to customers when they open the link.
Once you click the Share this Deal button, you will be redirected to the email composer with the sharing link automatically attached. You can then send the email directly to the email address mentioned in the selected record. Additionally, a shareable link will also be provided for your use.
Accessing the link
Once the link is shared, your customers can access the public page using the shared link. By default, the link is secured with an OTP, but you can disable this feature if desired.
If OTP sharing is enabled, your customer will receive an OTP via email when they attempt to access the link.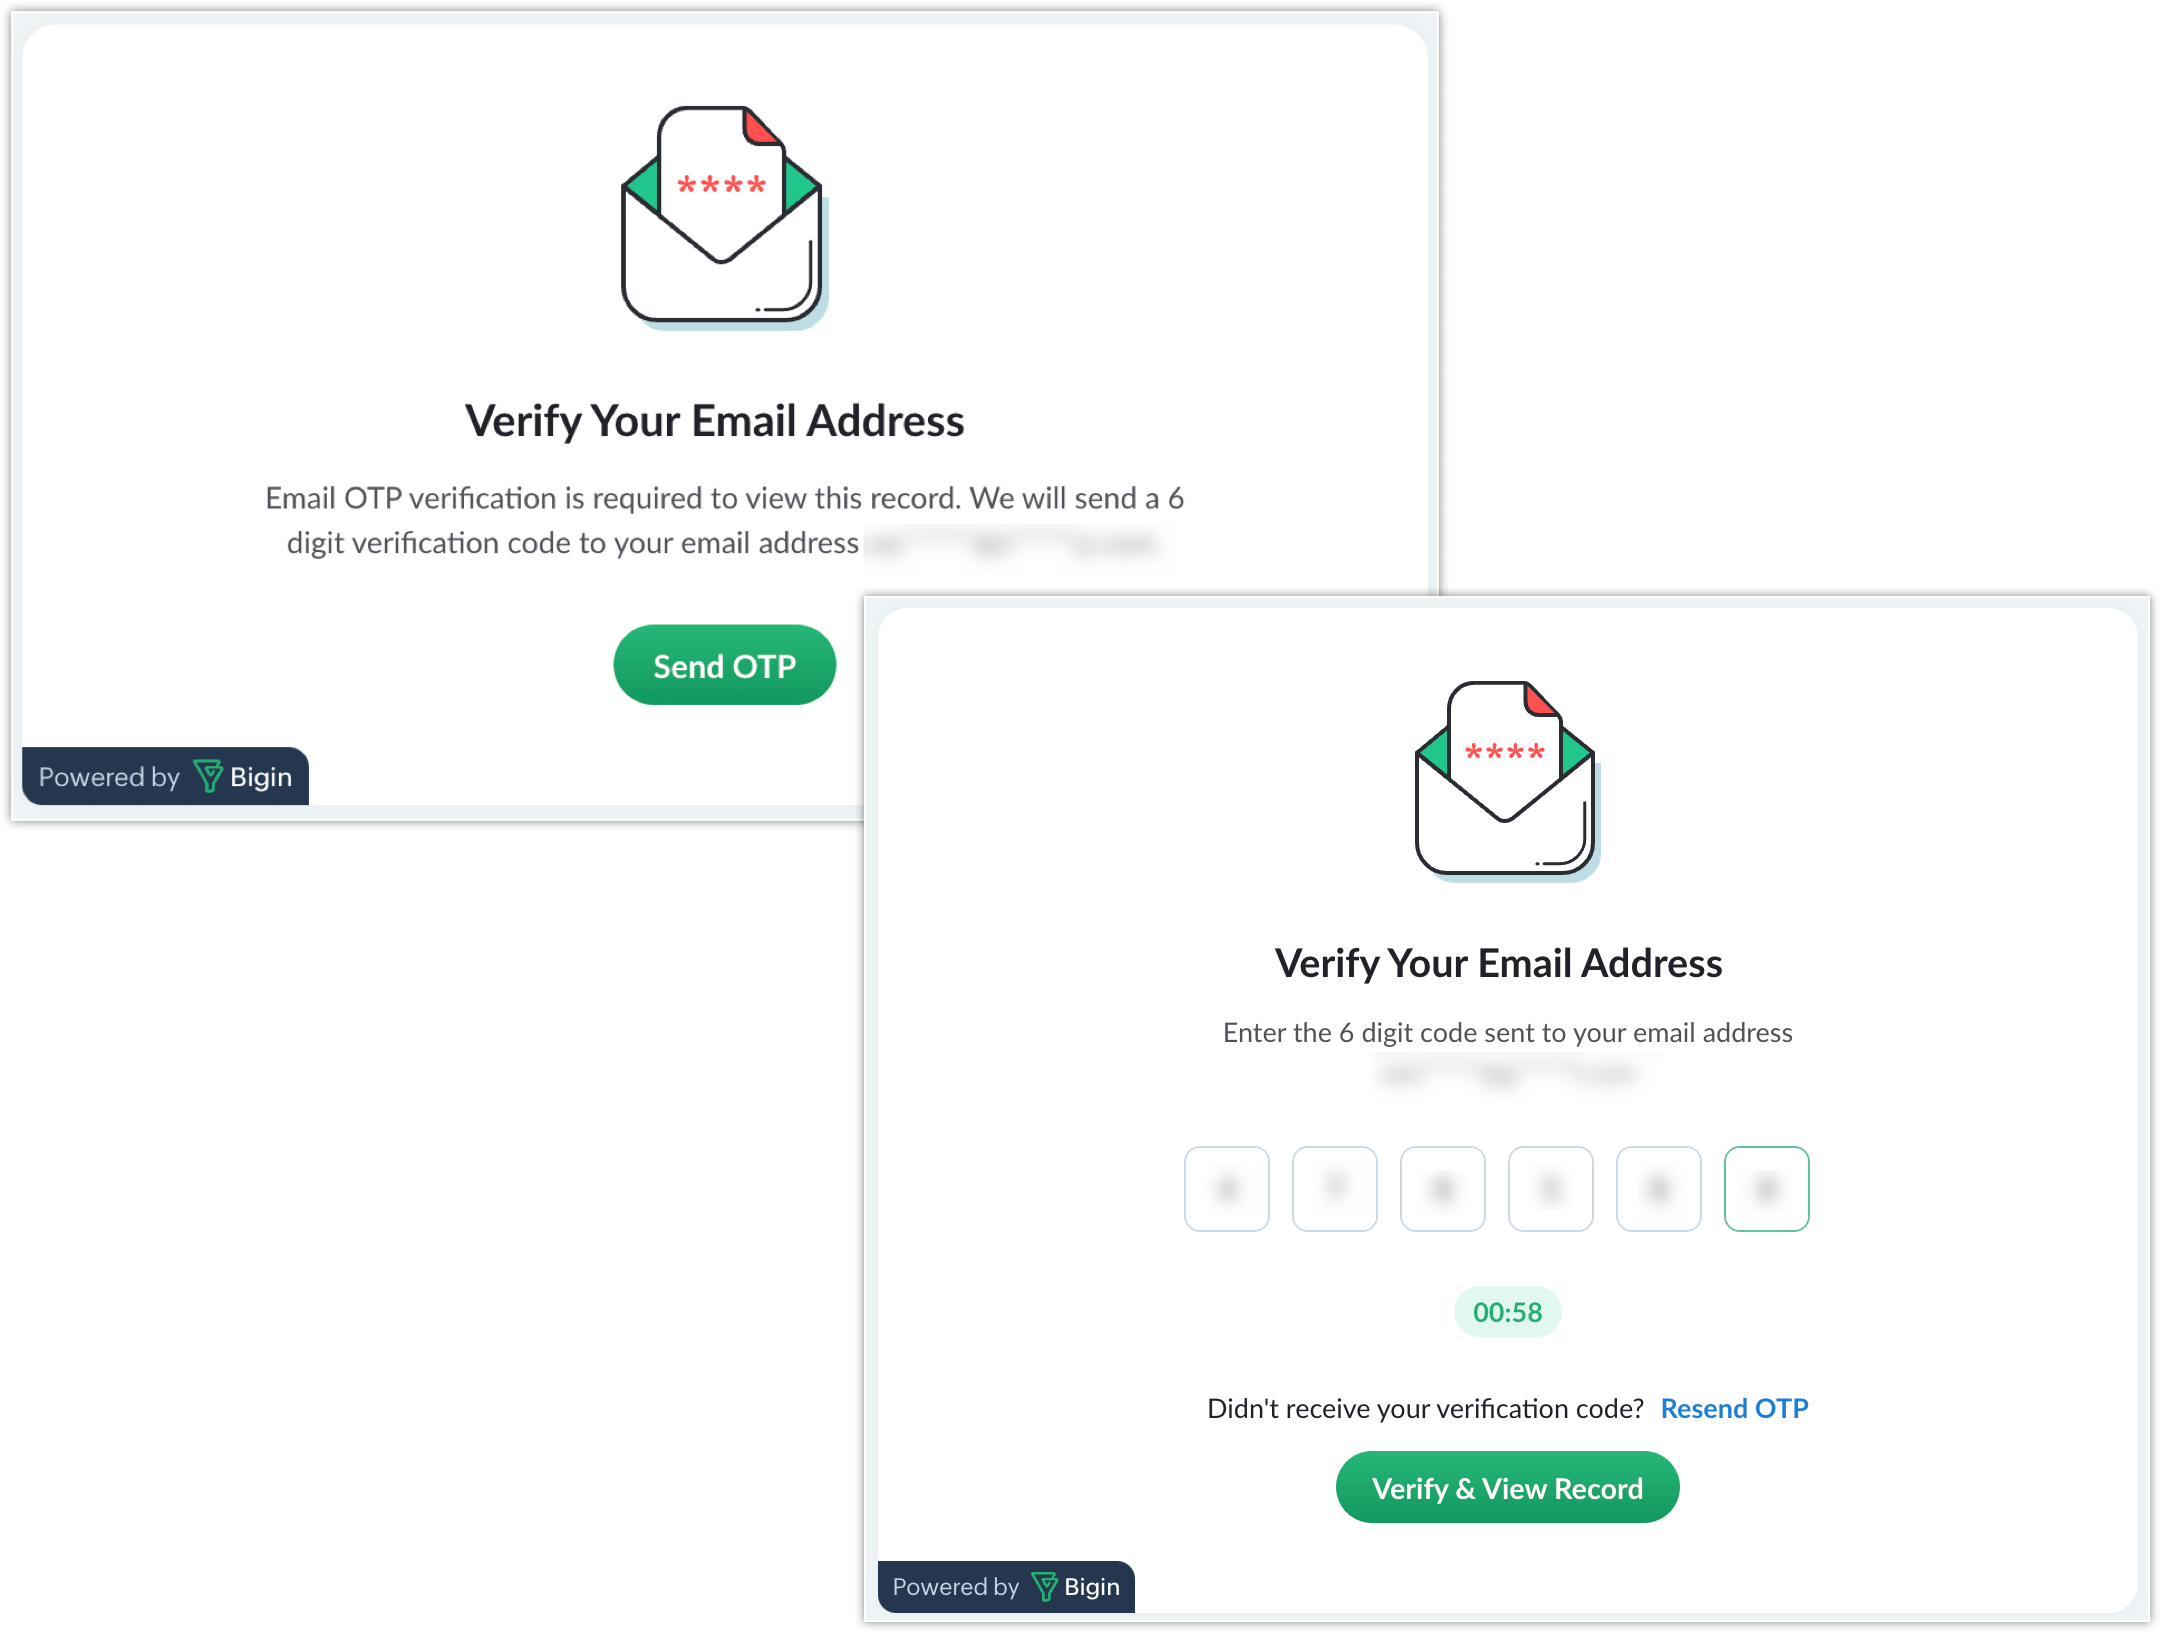
If OTP sharing is disabled, your customers can access the link directly.
Automate sharing records
You can automate record sharing and unsharing using Workflow or Stage Automation. For pipelines with the Share Pipeline Records option enabled, you can set up Workflow or Stage Automation with the Share Ticket Externally action. In Workflow, the option is available under both Instant Actions and Scheduled Actions.
Custom View
When you enable Share Pipeline Records, a new custom view All External Shared Records will be added.
Customer's view (Public Page)
Your customers will be able to view a read-only public page. You can modify the details displayed on the public page. To do this, click the More icon and select Edit Sharing Permission.
External sharing permissions are divided into two stages:
1. Field Permissions: All the fields available in the pipelines are listed here, and you can choose which ones to display.
- For the Contact Name field, there is a sub-category to select contact-related fields.
- If the OTP option is disabled, the sub-category selection for the Contact Name field will not be available.
- For the Stage field, you can select the stages you want to display from the sub-category.
- Once you set all the field permissions, click on Save & Next.

Note
To select or deselect all fields, click the checkbox in the table header.
To select or deselect all fields, click the checkbox in the table header.
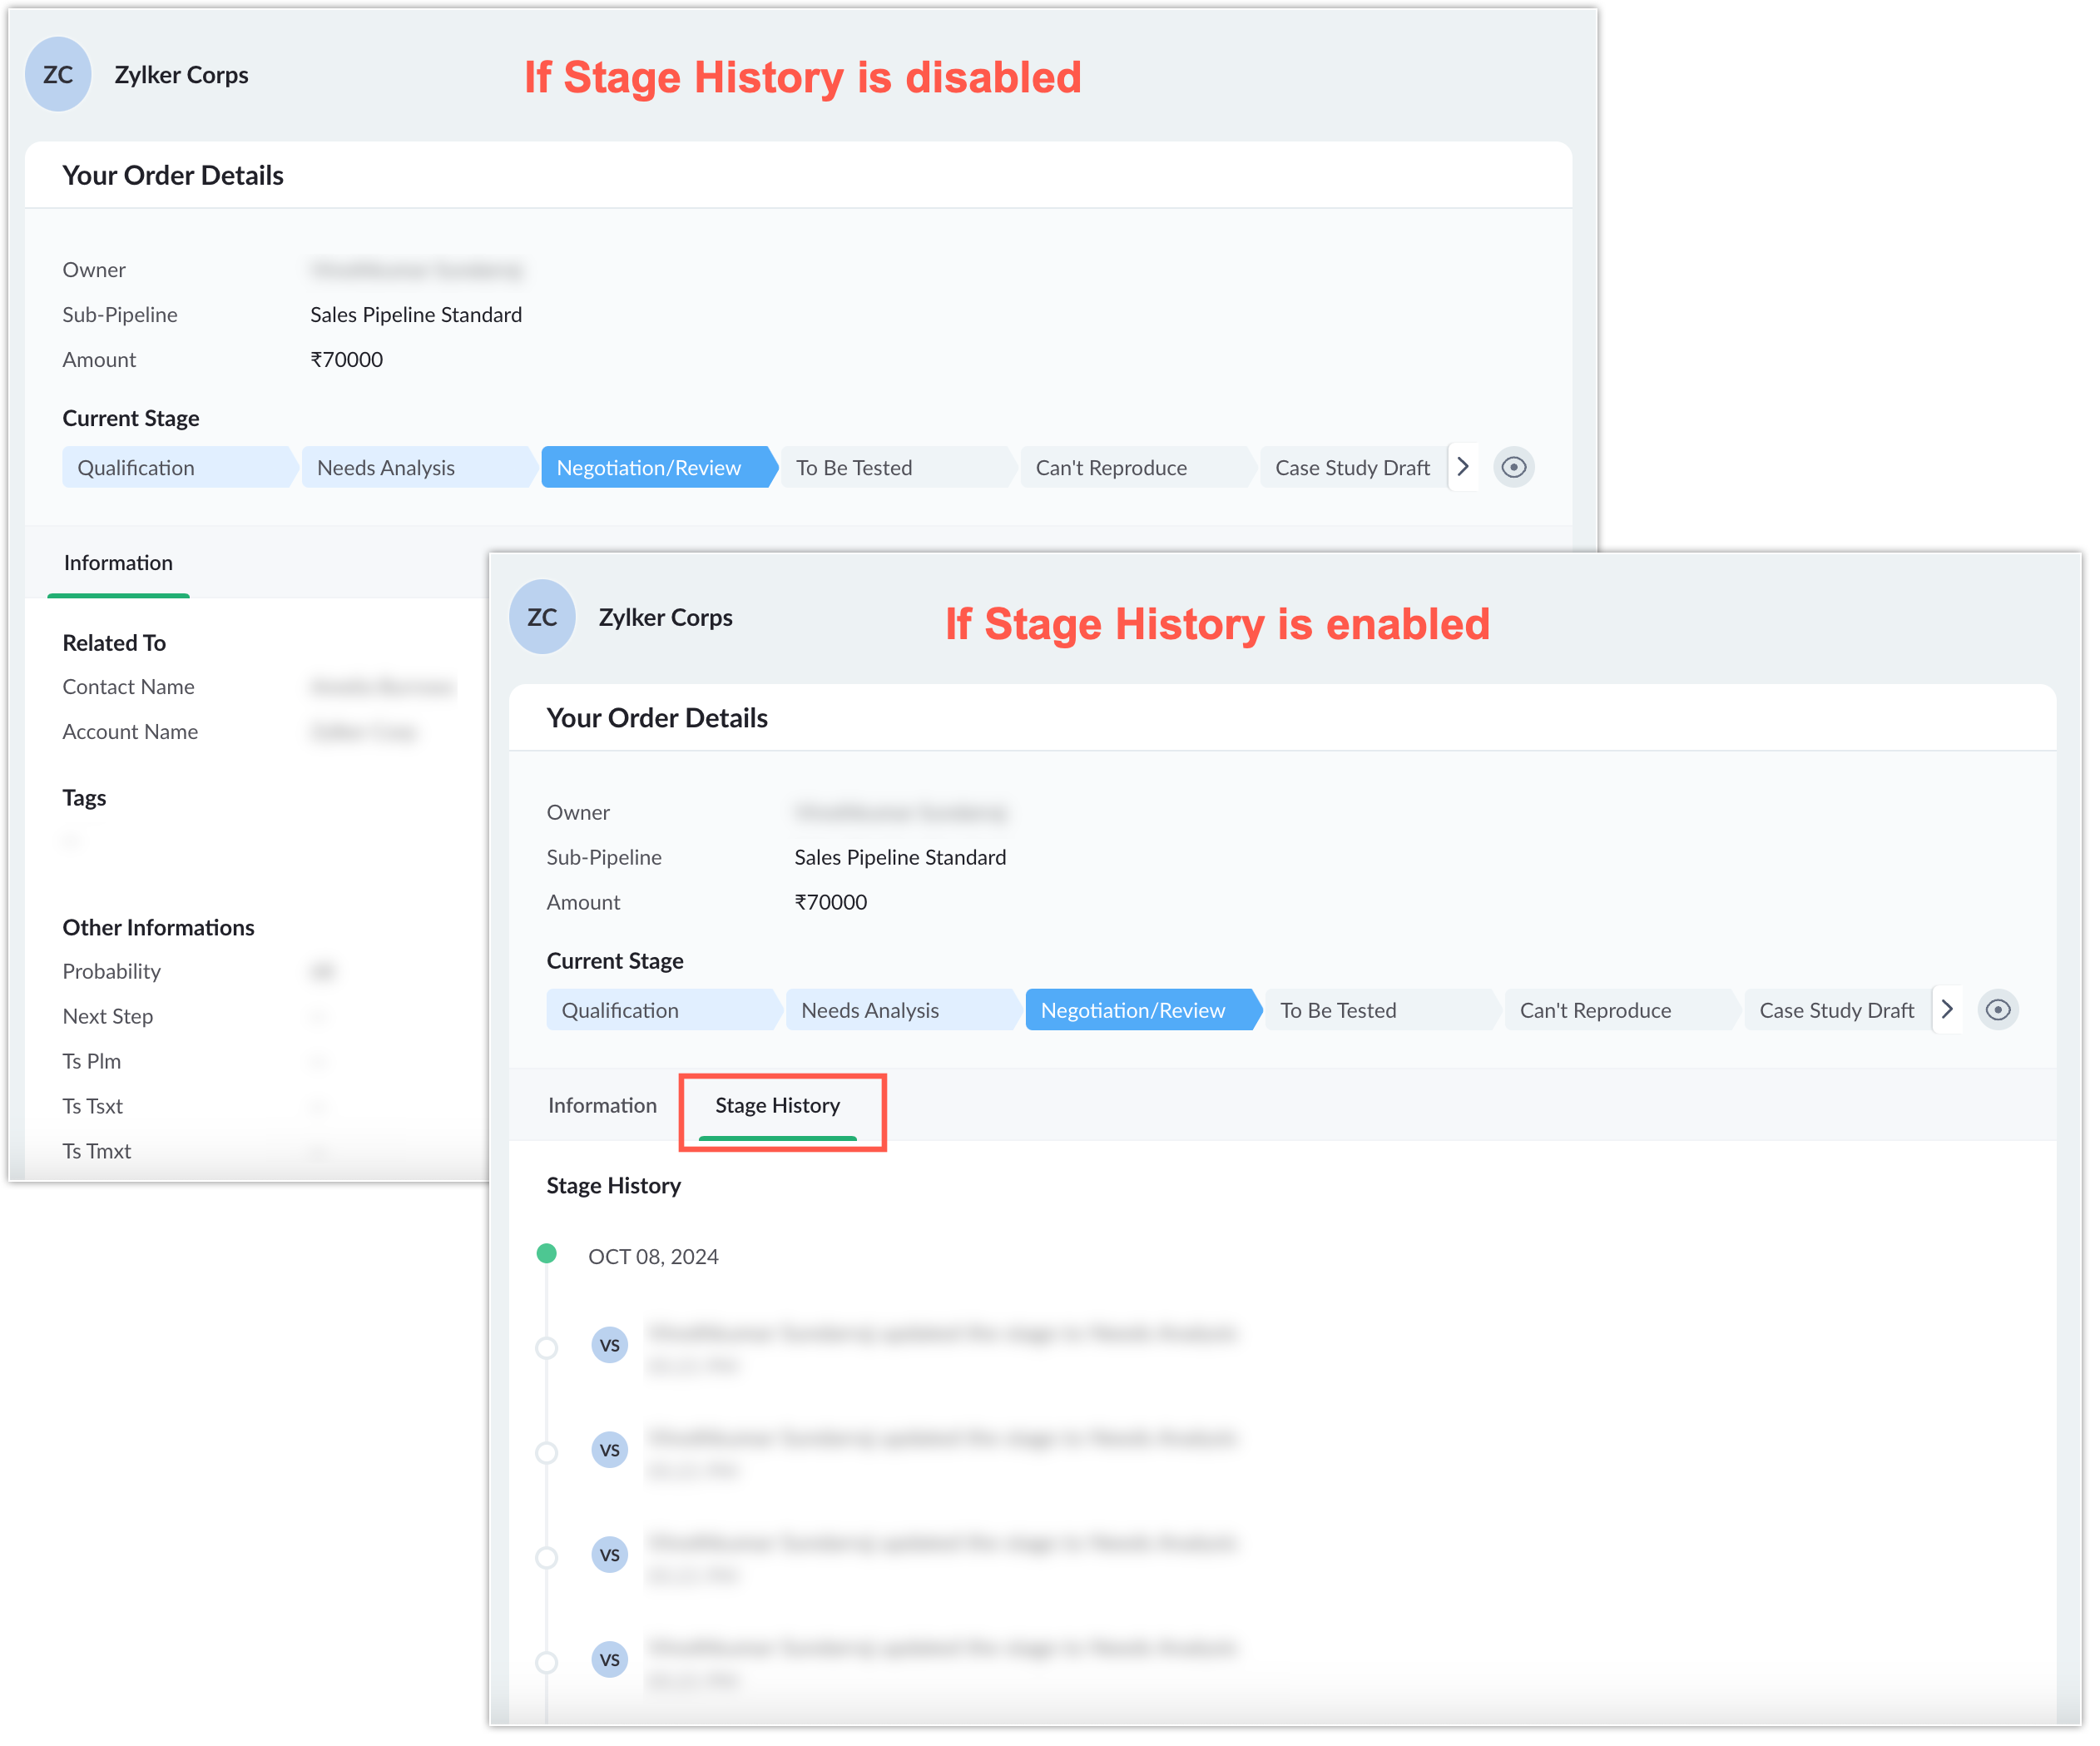
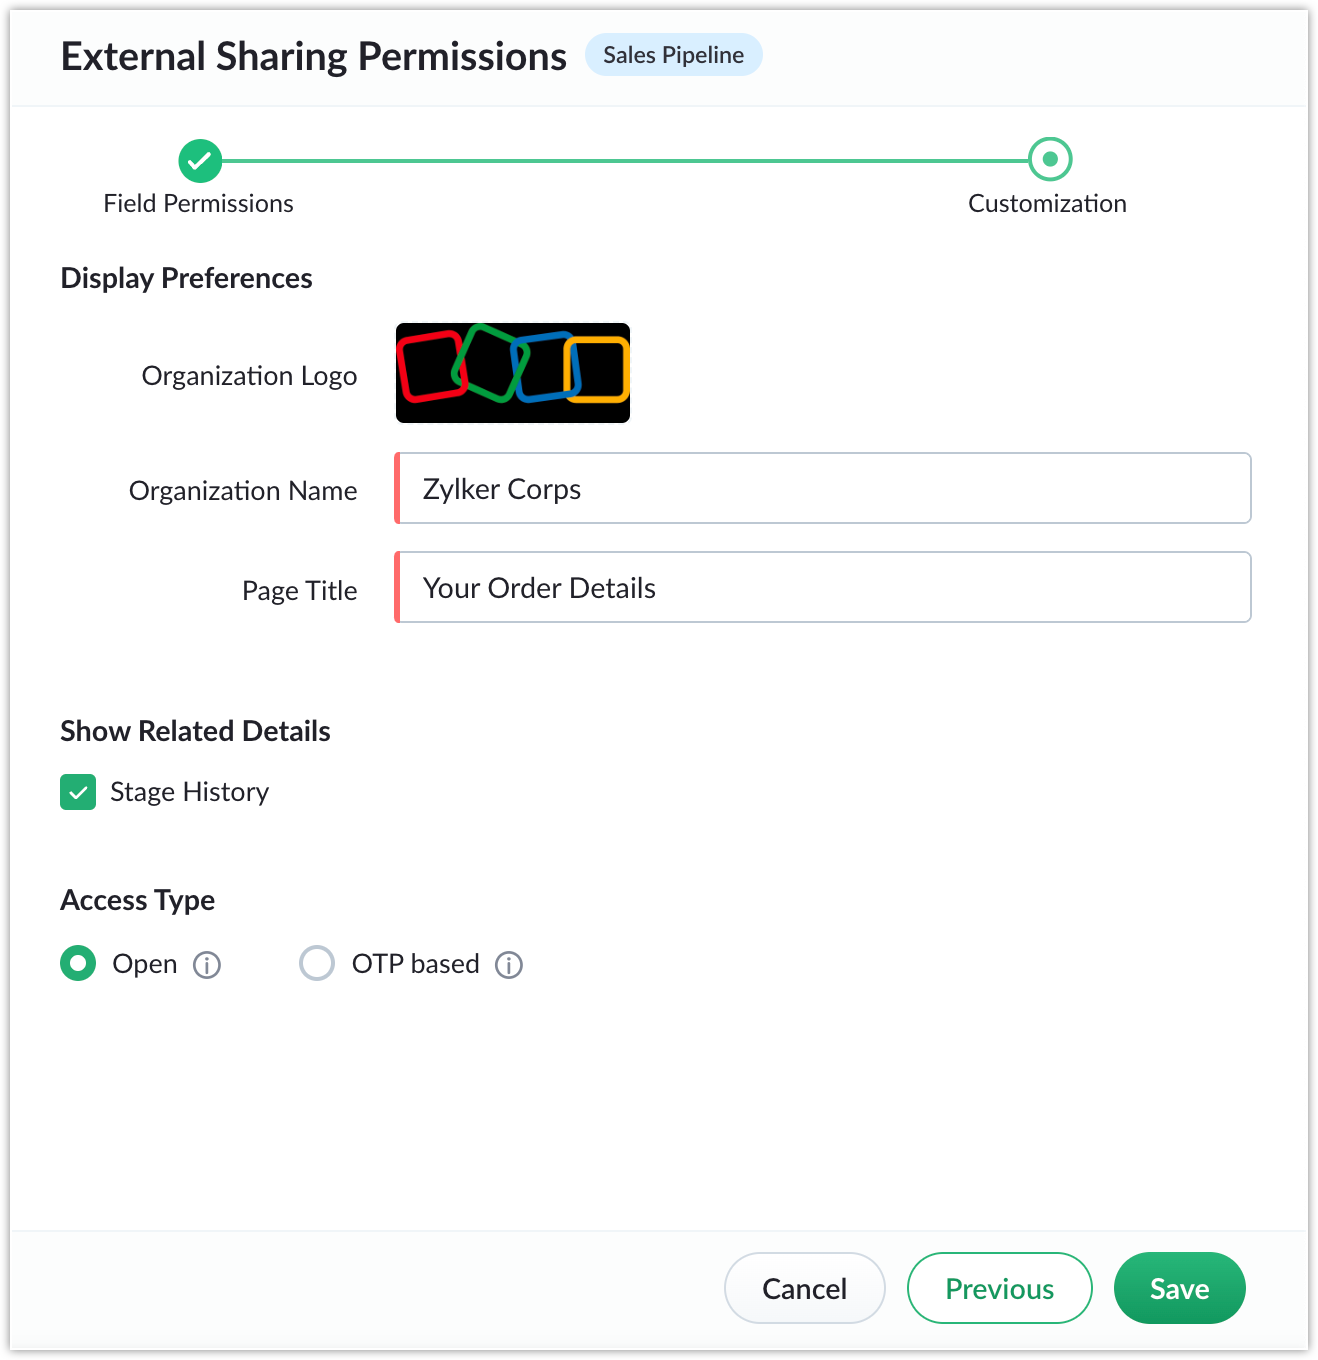
2. Customization: Here, you can customize the page preferences, such as the Organization Logo, Organization Name, and Page Title. Additionally, you have the option to hide stage history details.
This tab also allows you to set the access type to either Open or OTP.
This tab also allows you to set the access type to either Open or OTP.
Unsharing records
You can unshare a record at any time. To do so, go to the record you want to unshare, click the sharing icon, and select Unshare Record.
To revoke sharing access for all records in a pipeline, click the respective pipeline’s More icon, then go to External Sharing > Disable Sharing.