Setting Up QR/Barcode field
1. In a nutshell
This page provides an overview of how to use the QR/Barcode field in Creator, including setting it up, configuring encoding formats, and entering/providing the appropriate input data.
Learn more about the versatility of the QR/Barcode field here before getting started.

2. Availability
- Super admins, admins, and developers can add this field to a form, while users can access the form and enter data into it.
3. Setting up QR/Barcode field
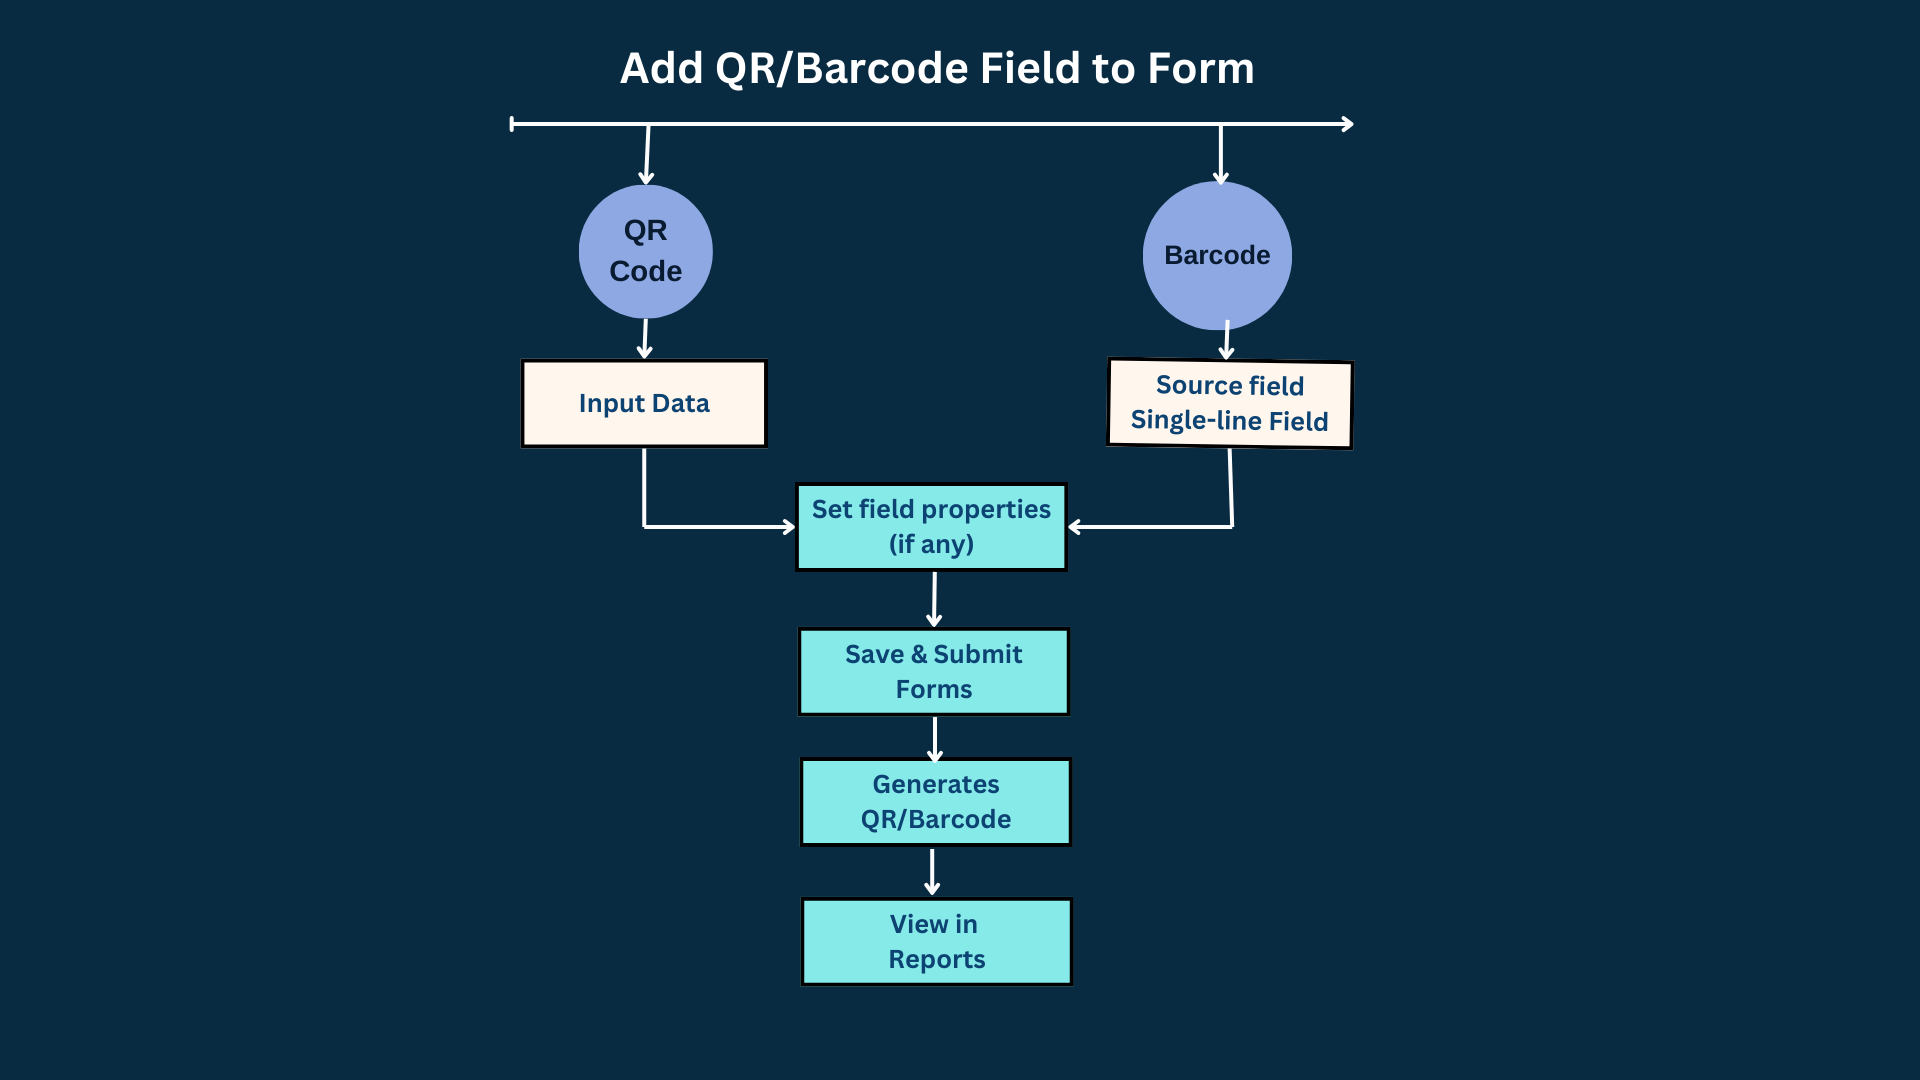
3.1. QR/Barcode field creation flow
 3.2. See how to configure
3.3. How to add QR/Barcode field to a form?
1. Open the component pane as shown below, then select the required form. Its Design page will appear.
2. Hover on the form's preview, then click Open Form Builder. The form builder will open.
3. Drag and drop the QR/Barcode field from the field palette displayed on the left. You can also double-click on the field to add it to the form.
4. Select the Code Type as shown below.
- For Barcodes, further select the intended barcode type.
- For a QR code, input data can be directly provided based on which the code will be generated.
5. Click Add Field to add this field into the form.
3.4. Steps for QR/Barcode input
Setting input data for this field involves defining the length and character compatibility in appropriate format, ensuring the generated QR or Barcode accurately reflects(as output) based on your input.
➤ Setting Barcode Input
➤ Setting QR Code Input
Setting barcode input:
The barcode source field is typically a single-line field which contains the data to be converted into a barcode. This has an exception for Code 128, which requires manual input of data. This input can be a combination of both static values and dynamic data from other form fields, which ideally helps structure the field information when scanned.
Following are the steps for setting input for all barcode types:

Note: As a pre-requisite, ensure the source field, i.e. single-line field, is added to the form beforehand.
Upon adding the QR/Barcode field to the form builder, an input pop-up will be displayed.
1. In the QR/Barcode Input pop up, select the intended Barcode Type from the dropdown list of EAN 8, EAN 13, UPC-A & UPC-E (except Code128).
2. Select the source field as a single line field.
Note: To edit the field name, field link name, or input, go to Field Properties on the right pane of the form builder.
Example:
Source field could be a single line field which holds a unique ID to identify the Product.
Result: That product ID will be converted into the barcode.
3. For Code-128 enter the input Data based on which the barcode will be calculated and generated in your report. You can also insert form fields by clicking Insert Fields (similar to QR code, refer below).
Setting QR code input:
1. In the QR/Barcode Input pop up, select the Code Type as QR Code
2. Input Data field will appear below, where you can key in the actual static values and form fields by clicking on Insert Fields, which will then be returned as output when the QR codes are scanned (similar to Code 128).
Note: These fields are restricted for QR Code and Code128 in Insert Fields: Rich Text, Users, Subform, Prediction, Keyword Extraction, Sentiment Analysis, Object Detection, OCR, AR, Formula and QR/Barcode.

Info:
Static Value: This can be a url or any text values.
Fields: This is ideally any field eg: ${Single_Line}, ${Date_field}, ${Number}, etc that you select from the Insert fields at the right corner of the Input Data field.
Example:
This sample URL combines static and dynamic components: the static part is http://www.zylker.com/bookingID?, and the dynamic part is ${bookingID}.
Result: When the above input is scanned, it will resolve into http://www.zylker.com/bookingID?ZIXMAK with the correct booking ID
3. Click Add Field to add this field into the form (as said above).
Input data character limit:
Note: By default QR code only supports upto 255 characters, if you want to encode more data choose over 255, but some restrictions will apply.
The Input Data has a specific character limit that can be set from the Character Limit option in Field Properties. You can choose between Upto 255 and Over 255 characters. Selecting 'Upto 255' limits the field to a maximum of 255 characters. Selecting 'Over 255' removes this restriction, allowing longer strings to be entered.
Setting character limit:
Once QR Code is selected as the code type, you can define the character limit in the Field Properties pane on the right.
Note: After setting the character limit, you can switch between the dropdown options. By default it will be set to upto 255 or if you initially select 'Upto 255' and later switch to 'Over 255,' this allows more than 255 characters. But it might limit the field's functionality (see table below). Conversely, switching back to 'Upto 255' from 'Over 255' will restrict the input to 255 characters, and QR codes for existing records that exceed this limit will be truncated.
Navigate to the Field Properties on the right pane where you can choose between Upto 255 or Over 255 in the dropdown.
The following limitations in Creator depend on the selected character limit for generating QR codes.
Module | Property | Upto 255 | Over 255 |
Form | Yes | No | |
Yes | No | ||
Yes | No | ||
Report | Criteria Builder across modules(set criteria) | Yes | No |
Yes | No | ||
Yes | No | ||
Search | Yes | No | |
Deluge | Criteria filter | Yes | No |
Aggregate records (Count, Sum, Distinct Count, Maximum, Minimum) | Yes | No | |
Pages | Yes | No | |
Chart - X, Y axis | Yes | No | |
API | Criteria Usages | Yes | No |
Mobile | Search in reports | Yes | No |
Grouping in reports | Yes | No | |
Sorting in reports | Yes | No | |
Search | Yes | No |
4. Handling edge cases
Here are a few instances where QR/Barcode may not be generated on your report, and below is how to resolve it.
Instance | Solution |
Input data character limit not met | Provide an exact character limit for each code type |
Input data contains unsupported characters | Remove unsupported characters of the selected (bar)code or preferably choose QR code which supports a wider range of characters |
One or more input fields are empty | All input fields must be filled |
Using an incorrect barcode for the purpose | Select a barcode that fits your needs; if unsure, QR codes are a versatile choice |
5. Limitations
A maximum of two QR/Barcode fields is allowed per form. Adding a third will prompt a warning to remove an existing QR/Barcode field.
6. Points to note
Here are some of the key points to consider for effectively using and generating QR/Barcode fields in your application.
- QR/Barcodes will not be visible in the form, it is visible only in the Reports.
- To create a valid barcode, ensure the input complies with the specific barcode type's rules, including the required length, allowed characters, and a valid check digit (typically the last digit).
- The final digit, known as the check digit, verifies the barcode's accuracy and ensures it scans correctly.
- Avoid common errors such as leading zeros, inserting unsupported characters, or adding extra spaces, as these can cause errors.