Creating and managing custom APIs

This help page is for users in Creator 6. Find your Creator version.
1. What does this page cover
Learn how to create a custom API and authenticate it to integrate with in Zoho Creator.
Before moving ahead, click here to learn more about custom APIs.
2. Availability

Custom APIs:
- can be created and managed in all plans of Creator, where as the invoke limit varies according to the subscribed plan.
- can only be created and managed by the super admin and admins, while other types of users can invoke them based on the configured user scope.
3. Creating custom APIs
3.1 Custom API creation flow
3.2 See how to configure
3.3 Steps to create and manage a custom API
- Create a custom API
- View custom API details
- Manage custom API
- Delete and disable custom API
- Call a custom API
Create a custom API
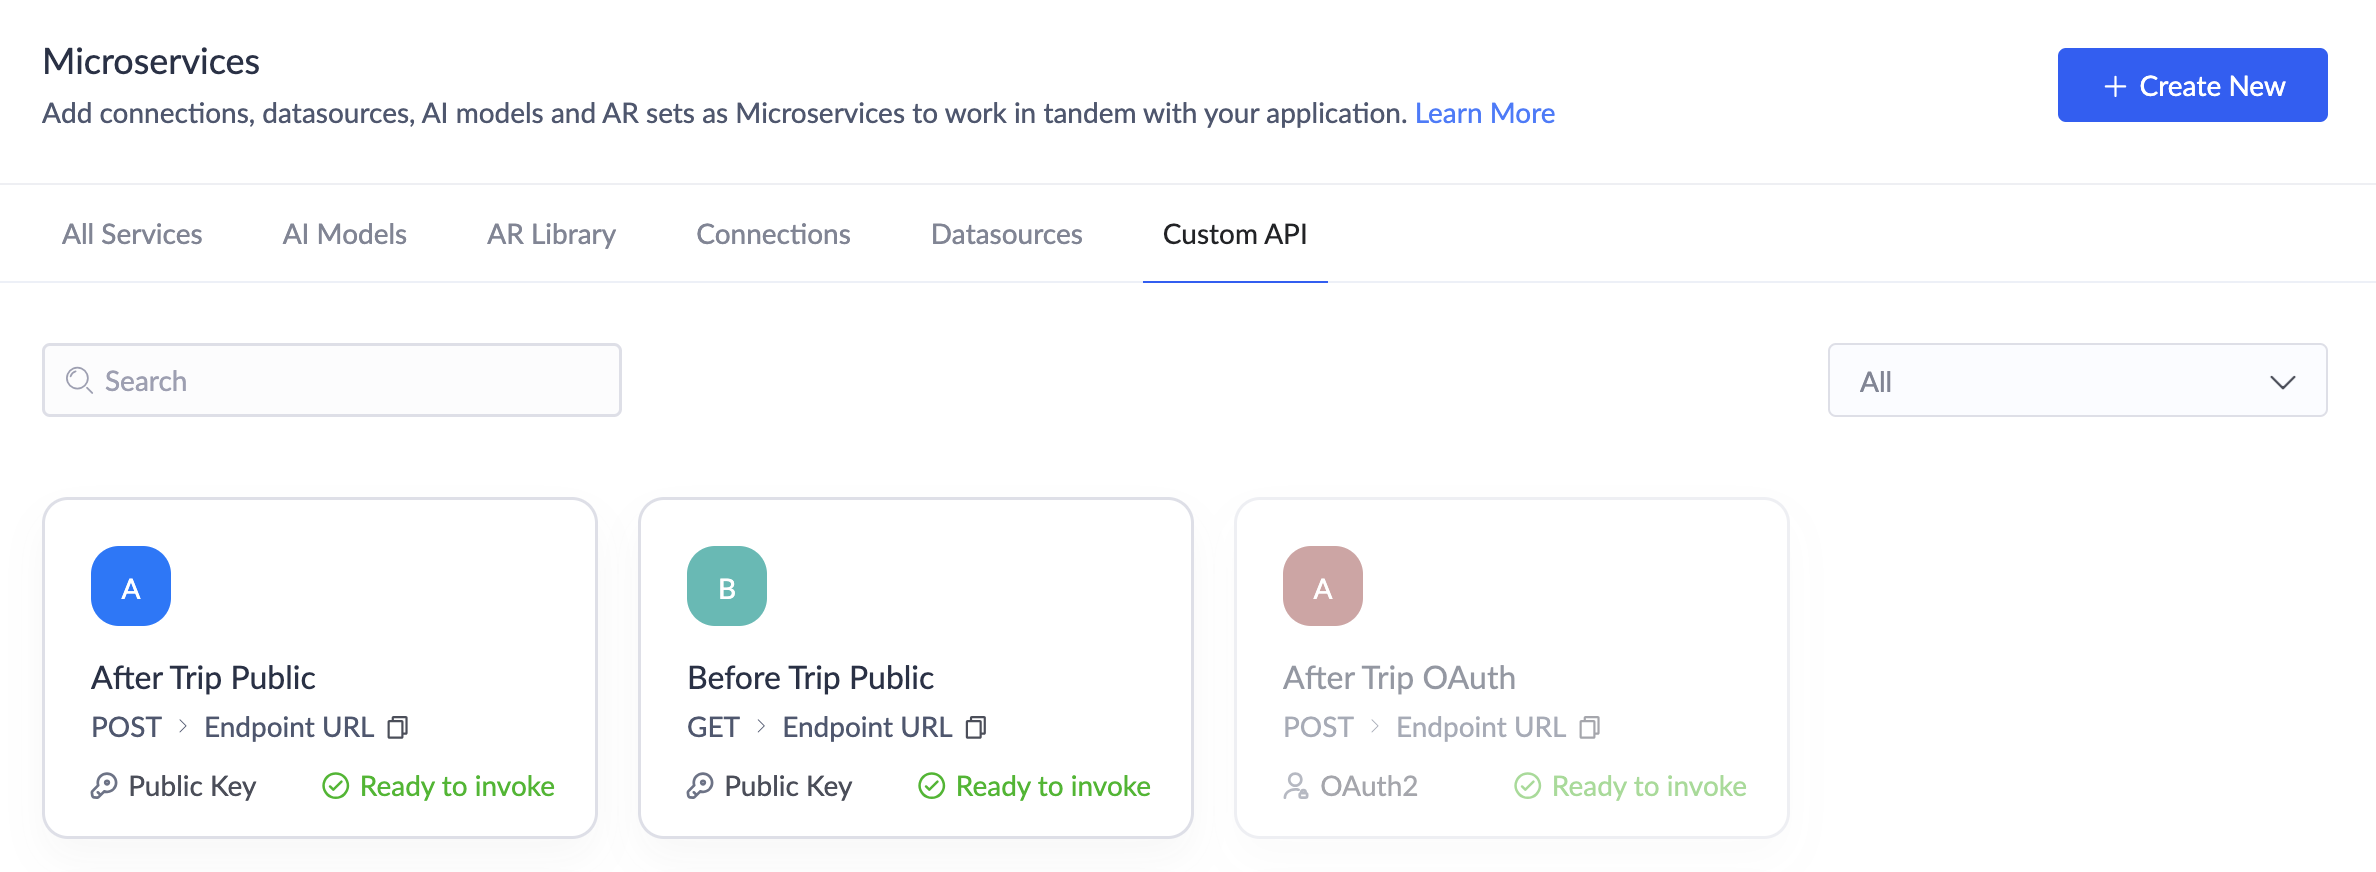
1. Navigate to the Microservices page in your Creator account.
2. Click + Create New at the top-right corner.
You can also select the Custom API tab and click + Create Custom API if you're creating a custom API for the first time. The Custom API builder will appear, which can only be accessed by the super admin and admins.
3. Click Create in the Custom API card. The Custom API builder will appear.
Step 1: Specify basic inputs to define your custom API
In the Basic Details tab, you can specify the name, link name, and description of the custom API.
1. Enter a display name for your custom API. This name will be displayed in the respective card listed in the Microservices module.
It is essential to choose names for your custom APIs that are descriptive, memorable, and reflective of their functionality.
2. Enter a suitable link name based on the entered display name. For example, if the name of your custom API is 'CreateApp API', the relevant link name would be 'create_app_api'.
The link name of your custom API cannot contain special characters such as !@#$%^&*.>
3. Describe the purpose of your custom API in no more than 200 words, and click Next.
Step 2: Provide essential request details
In the Request tab, you can specify the method, authentication, user scope, and content type used in the body of the custom API request.
1. Choose the method type, GET, POST, PUT or DELETE, depending on the type of action you want to perform.
The scope required to perform these methods is Zohocreator.customapi.EXECUTE.
2. Select the Content Type as either application/json or multipart/form-data. This is used to specify how the request payload should be interpreted by the server.
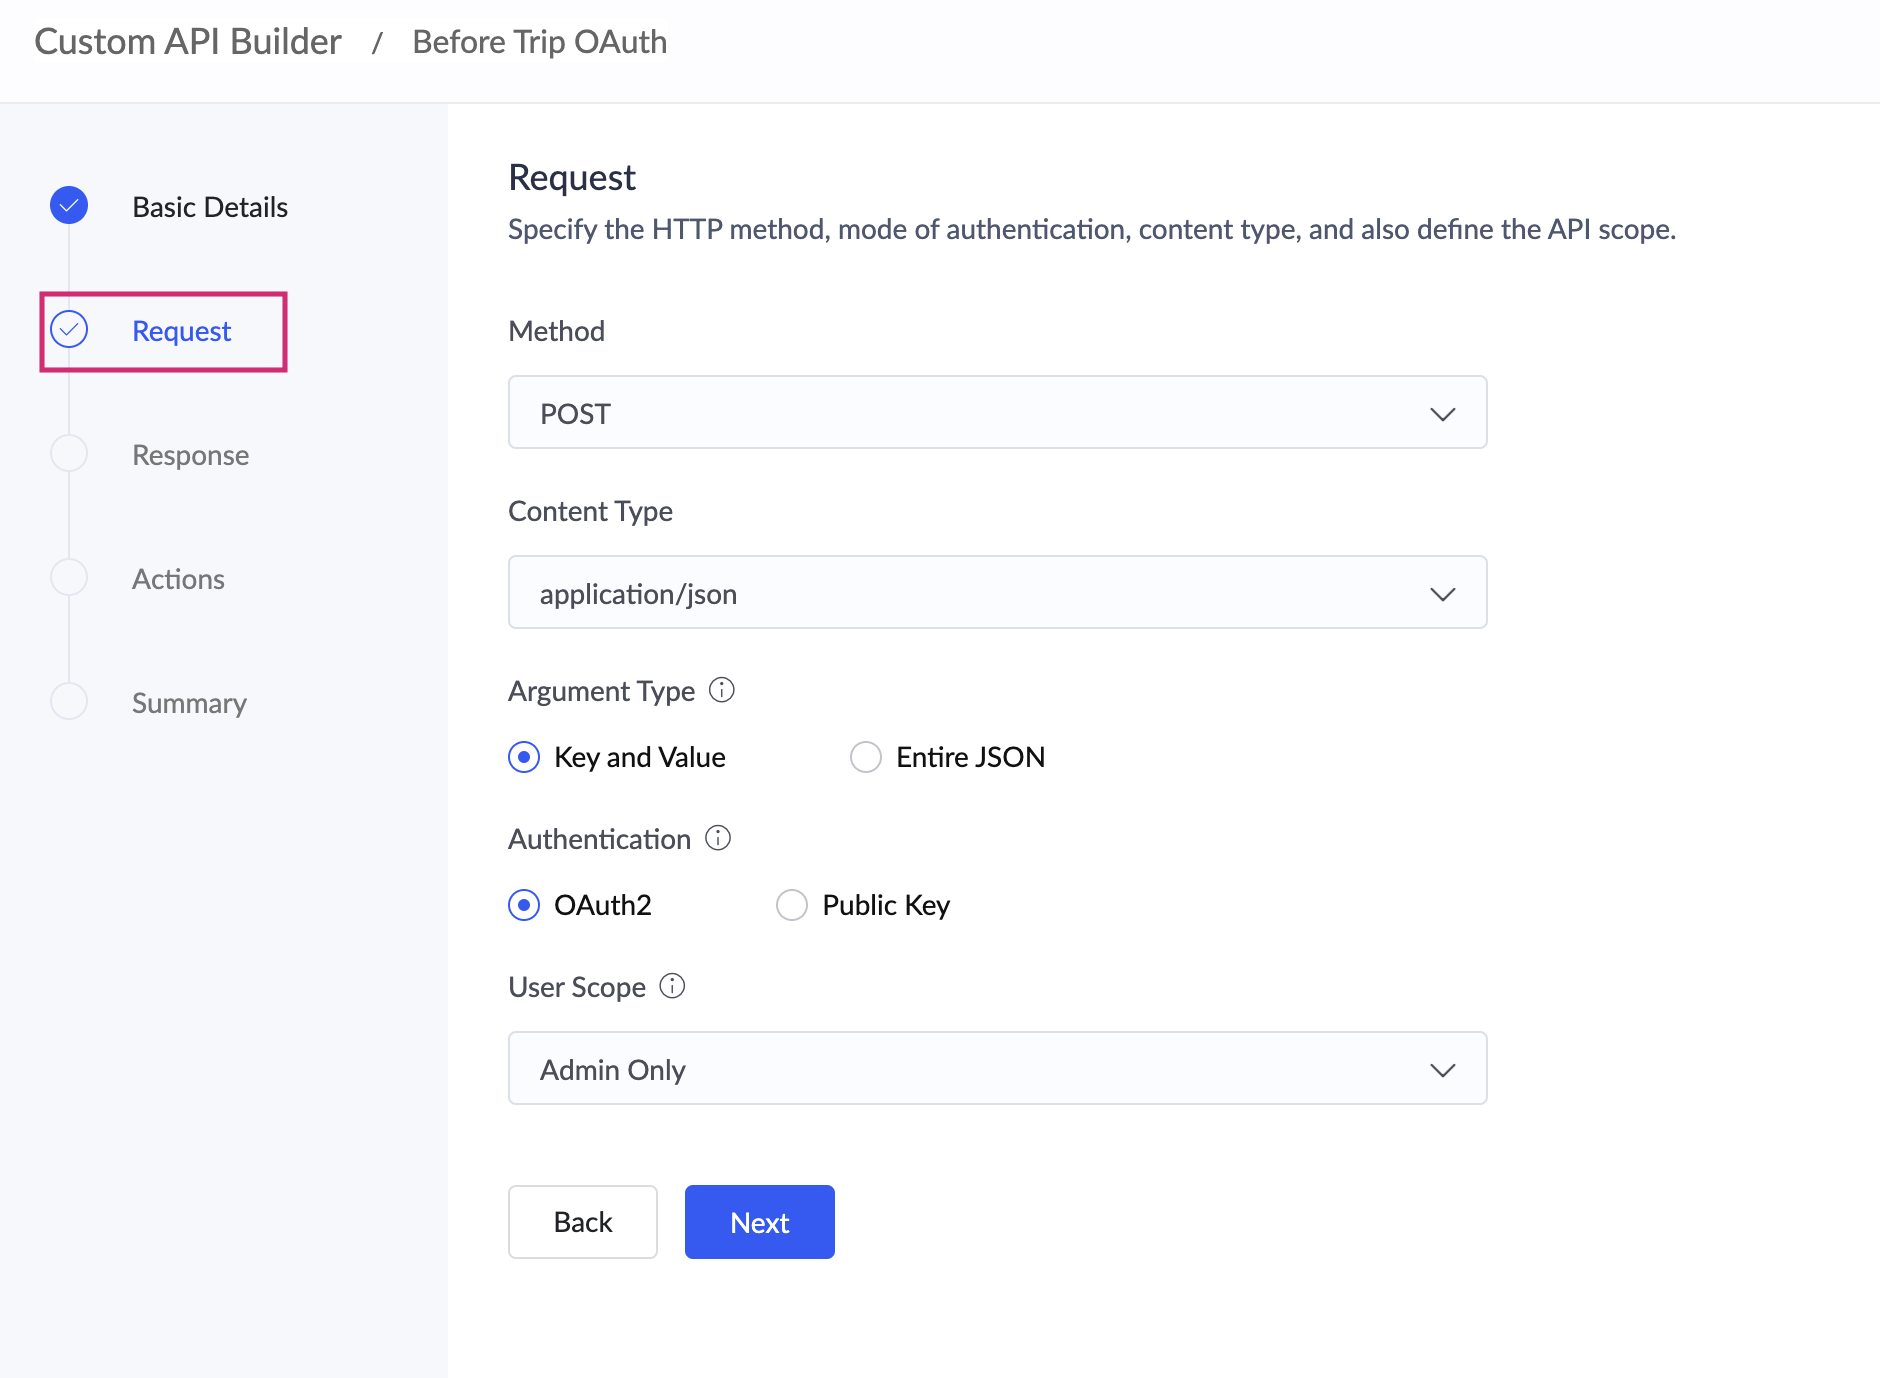
3. Select the Argument Type as either Key and Value or Entire JSON. Learn More
When you choose the argument type as entire JSON for your custom API, ensure that you specify only one argument of string datatype.
4. Select the authentication type from OAuth2 or Public Key. By default, OAuth2 will be selected.
5. Define the user scope of your custom API that determines who can access and invoke the custom API for different types of users:
- Admin only - Super admin and admins
- Selective users - Super admin, admins, and users specified using their email addresses in the input field when this option is chosen
- Portal users - Approved portal users who have been added in the portal of the application selected in the Actions tab
Note: If Portal users is selected, the custom API can be invoked only from within a widget. Learn more
- All - Every active user from the Users module in the Creator account
6. Click Next.
Step 3: Provide format type for response
In the Response tab, you can choose a relevant response type and specify appropriate error codes.
Custom response lets you specify the status code and respective response codes.
1. Choose a corresponding response type: Standard or Custom.
- If you've chosen the Standard response type, the response will return status codes.
- If you've chosen the Custom option, the Add Custom Response slider opens below.
- Enter a suitable Status Code. For example, you can enter status codes like 200, 202, 401, and so on.
- Enter corresponding Response Codes for the status codes you've entered. For example, the response codes could be 2002, 3400, 4434, and so on.
2. Click the + icon beside the added code to add more status codes and respective response codes.
3. Click the delete icon to delete the a status code and its respective response codes.
4. Click Next.
Step 4: Specify the details of function execution
In the Actions tab, specify the details of the function to be executed when called.
1. Choose the required application from the Application dropdown.

The applications will be listed with a mention of the environment (Development or Stage) they are currently in.
2. Select the respective Name Space that groups the function you want to be called.

Note: If no namespace is specified for your created function, then that function will be added to the Default namespace.
3. Select the required Deluge function that needs to be executed when called from the dropdown.
Step 5: Preview and create custom API
In the Summary tab, you can review your custom API details before completing its creation.
The below image shows Summary tab for standard response.
The below image shows Summary tab for custom response.
- View the endpoint URL from the URL preview card.
- Check the details displayed in the Overview, Request Body, and Response Body tabs.
- Click Back to make changes to previous tabs. Your custom API will be saved as a draft.
- Click Save after reviewing the changes. Your custom API will be created successfully and you'll be taken to the Detail View page of the created custom API.
- If you close the Custom API builder unknowingly, your changes will be saved as draft and you can continue editing them anytime from Microservices > Custom API > required custom API card.
- URL preview will be generated based on the specified link name in the following format. This URL lets you and your users access and execute the associated function. You can copy and use the URL as required.
www.zohoapis.com/creator/custom/AdminName/CustomAPIName
View custom API details
Below is the Detail View page of the custom API you've created in which you can view the following details.
Only super admin and admins can view API hits i.e., users cannot view API hits.
To access this page,
- Navigate to the Microservices page in your Creator account.
- Click the Custom API tab at the top-right corner.
- Click the required custom API card. The Detail View page will appear.
You can view the essential details of the custom API, the application in which it is used, and its installation and updation details. You can also view the API hits filtered by the users who invoked the API, log date and time, status code, and status of the API (success or failure). Additionally, you can also view the following.
- Click the dropdown arrow beside Last 60 days to view the API logs at different time periods. The API logs will display the logs of last 30 days by default.
- Click the Filter icon to view the API hits based on either Status Codes or API Status (success or failure), then click Apply.
- If you've chosen the Status Code, enter the required value and click Apply.
- If you've chosen the API Status, choose either Success or Failure and view the respective logs.
You can also click the Failure status to view additional error details.
- Click the Prev or Next buttons at the bottom the page to view more logs of API hits.
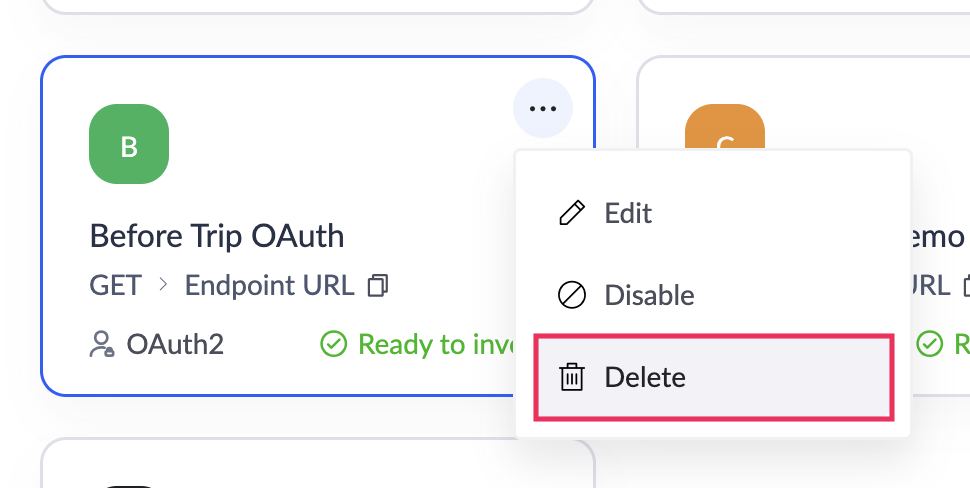
- Click the ellipsis icon (triple dots) at the top-right to edit, delete or disable the custom API.
4. Manage custom API
Manage users
- Navigate to the Microservices page in your Creator account.
- Click the Custom API tab at the top-right corner.
- Select the required custom API card.
- Click (n) Users under User Scope to add more users if you'd selected the Selective Users option in the user scope configuration.
- Add the email addresses of admins and users in the Manage Users popup that appears, and click Save.
Note: You cannot edit the User Scope inside the API Detail View page.
Edit custom API
- Navigate to the Microservices page in your Creator account.
- Click the Custom API tab at the top-right corner.
- Click the ellipsis icon (triple dots) in the required custom API card.
- Click Edit API to edit your custom API. The Custom API builder will appear.
- Make the required changes in the respective sections and click Save after previewing the changes.
Filter based on custom API state
- Navigate to the Microservices page in your Creator account.
- Click the Custom API tab at the top-right corner.
- Click the filter icon at the right corner of the Custom API tab.
- Select the status - enabled, disabled or draft to view the custom APIs created in the respective stages.
Delete and disable custom API
1. Navigate to the Microservices page in your Creator account.
2. Click the Custom API tab at the top-right corner.
3. Click the ellipsis icon (triple dots) in the required custom API card.
4. Select the Disable option to disable the custom API.
When you invoke a disabled API, an empty response will be returned. Invoking a disabled API will produce a record in API logs, but will not be registered as an API hit.
5. Click Disable in the Disable Custom API popup that appears. The respective API will be disabled in the Microservices section.
You can click Enable to enable it.
6. Click Delete to delete the required custom API.
Note: When a custom API is deleted, it is removed from Microservices but the function associated with that custom API is retained in it's respective Creator application.
- Before you can delete a function used in your Custom API, you will have to remove the associated Custom API before deleting the respective function.
- When you update a function that is currently being used in any of your custom APIs, you will be notified that the API will be configured to the latest version of the updated function.
5. Calling a custom API
Before invoking a custom API, you need to perform the steps mentioned under each of the below headings. To invoke the custom API you've created, you can use the endpoint URL copied from the the detailed view of your Custom API in the external service from which you to perform the defined actions.
- Register the client application
- Request the authorization code
- Generate the access and refresh tokens
- Refresh the access token
- Revoke the refresh token
- If you've chosen the authentication type as OAuth2, the specified users or admins will be authenticated and they can directly invoke the endpoint URL in any external platform.
- If you've chosen the authentication type as Public Key, the public key will be displayed in the API Detail View page. This needs to be appended as a parameter to the Endpoint URL.
- Any user in your Creator application can invoke the custom API using this public key.
6. Points to note
- The link name of your custom API cannot contain special characters such as !@#$%^&*.>.
- The status codes in custom response can range from 100 to 599.
- The response codes in custom response must be in the range from 1 to 9999 and cannot contain special characters such as !@#$%^&*.>.
- When you change the user scope of your custom API from Selective users to Admin only, Portal users, or All, all the users you'd have previously added will be removed.
- If you close the Custom API builder without saving, your changes will still be saved as a draft and you can continue editing them anytime from Microservices > Custom API > required custom API card.
- When you invoke a disabled API, an empty response will be returned i.e., invoking a disabled API will produce a record in API logs but will not be registered as an API hit.
- Before you can delete a function used in your Custom API, you will have to remove the associated Custom API before deleting the respective function.
- If you’ve chosen the authentication type as Public Key, you need to append the same as a parameter in the Endpoint URL before invoking your custom API. For example, the Endpoint URL with the public key appended will look like:
7. Limitations
- In the Response tab, you can add upto 50 status codes.
- Your custom response codes can contain only upto 4 digits.