Connections in live and edit mode
What does this page cover
Learn to view and manage connections in the live and edit mode of your Zoho Creator application. Click here to learn more about connections.
Availability
Connections:
- Are available only for paid plans of Creator
- Can only be created and managed by the super admin, admins, and developers, while other users can authorize and access them
- Are available across all data centers
1. See how to view connections
In live mode:
In edit mode:
2. View connections
In addition to connections being listed under the Microservices section, they can also be viewed and accessed within applications in both live and edit modes. While this facility is accessible to all users, visibility of individual connections is based on the logged-in user type, user permissions for the application component, and the connection type. Admins and developers have access to view all types of connections, including system connections. Other application users can only see logged-in user type connections. Learn about the locations within the application where this connection panel is positioned.

Note:
- Connections to services hosted in different data centers may involve cross-border data transfers. While Zoho Creator handles data securely, ensure this aligns with your organization’s data residency and compliance requirements before proceeding.
- Connections created using locally hosted connectors depend on a configured databridge. To use or manage these connections, ensure that Qntrl is configured under System Integrations and associated with an active databridge. If the databridge is unavailable or stopped, connections using locally hosted connectors will not function.
Upon clicking integrations, a slider will open, displaying all connections and payment gateways used within the application in live mode. In edit mode, under the connections tab, it will show only the connections used in the specific component, along with basic details of each connection, such as:
- Service name: The name of the service for which the connection was created.
- Authorized account: The name associated with the account that authorized the connection. This auto-generated name can be edited by clicking the edit icon present beside the authorized account name.
- Status: Indicates the current status of the connection, whether it is connected or not connected.
- Authorize button: A button is provided to authorize the connection if it has not been authorized yet.
- Connection type: The connection type is represented by different icons, as shown in the table below.
Icon | Type |
Admin connection | |
System connection | |
User connection |
By clicking on a connection, you can view more details, such as permissions, references, and options to switch and revoke authorization.
2.1. Connection placement
To optimize accessibility and ease of usage, the users can directly view and manage from within the application in both live and edit modes.
To view connections in live mode:
- Click the settings icon (
) adjacent to your user name in the application.
- Click Connections.
 Note: The settings icon's (
To view connections in the edit mode:
- Click on the integrations icon (
) in the top-right corner of the builder.
Note: To view connections directly from the Deluge editor, select Integrations in the top bar of the editor.
2.2. Installed connections
Connections added to an installed application appear as Installed Connections. If the application uses a system connection and a connection with the same service already exists in your account, the application will reference the existing connection, maintaining consistency and avoiding duplication.
3. Authorizing the connections in live and edit mode
Users can directly authorize and use the connections from the respective components of the application. To authorize the connection in live mode:
- Navigate to the connection from the live or edit mode of your application. All connections in your application will be listed here.
- Click Authorize.
- Choose the environments for which the authorization is being used. This will be required only if the Use different authorization for each environment is chosen. Learn more
- Enter your authorization credentials and accept the access permissions before the time limit of 90 seconds expire.
Note: For OAuth2 type connection, once you click Authorize, a timer of 90 seconds will be triggered. You will be redirected to the service's authorization page, where you need to grant access.3.1. Behavior of application component with unauthorized connection
When an unauthorized connection is utilized within any component, workflow, function, or blueprint in your application, an authorization prompt will appear either upon accessing that component or during the workflow execution.
- For admin connections, only admins and super admin will be shown the prompt to authorize the connection. Other users will be unable to access those resources until authorized by the admin, and they will be shown a message instructing them to contact the admin. The admin must authorize the connection for users to access the form.
- For system connections, only super admin, admins and developers will be shown the prompt to authorize the connection. Other users will be unable to access those resources until authorized by the super admin, and they will be shown a message instructing them to contact the admin/super admin. The super admin must authorize the connection for users to access the form.
- For logged-in user connections, any type of user will be shown the prompt to authorize the connection.
Some of the examples for the authorization prompt cases in live mode are,
- Form with a workflow containing unauthorized connections configured to execute on load of a form.
- Page with a panel containing an unauthorized connection.
- Integration report with an unauthorized connection.
- When a live user accesses the form with an unauthorized admin connection or system connection.
Note: The same behavior applies when accessing an application component with a disabled connection or disabled connection access to an application. In such cases, the admin must enable it from the microservices to allow users to access them.
4. Switch authorization
Note:
- Switching the authorization of the system connection can only be done by the super admin, admins and developers.
- Admin connection authorization can be switched by all admins.
- Logged-in user connection authorization can only be switched by the authorization owner.
Switching the connection involves the process of granting a new authorization to the connection. It is also necessary in cases such as:
- Expiration of the authorization credentials linked to the connection
- Invalidation or deletion of the auth token from the third-party service
Note: When a connection authorization is switched, all the applications that utilize it will henceforth use the new authorization.
To switch authorization of a connection in live or edit mode of an application:
- Navigate to connections from live or edit mode of your application and click on the desired connection.
- Click Switch.
- Choose the name of authorization account and click Authorize.
- Enter your authorization credentials and accept the access permissions before the time limit of 90 seconds.
Note: For OAuth2 type connection, once you click Authorize, a timer of 90 seconds will be triggered. You will be redirected to the service's authorization page, where you need to grant access.5. Revoke authorization
When a connection authorization is revoked, the permissions and access to the third-party service will be removed and the components using that connection authorization will not function as intended.
Note:
- Revoking the authorization of the system connection can only be done by the super admin, admins and developers.
- Admin connection authorization can be revoked by all admins.
- Logged-in user connection authorization can only be revoked by the authorization owner. If the primary account linked to the logged-in user connection is revoked, an admin must mark a different admin's account as primary to enable users to authorize connection.
- Revoking a connection authorization will not affect other connections using the same authorization.
To revoke a connection authorization in live or edit mode of your application:
- Navigate to connections from the live or edit mode of your application and click on the desired connection.
- Click Revoke.
6. Update client credential
You can update the custom OAuth client credential used by a connection from the Connections slider in both edit and live mode.

Info: Updating the client credentials revokes all existing authorizations that reference the connection. If the credential is referenced in one or more connections, all of them will be revoked. This may temporarily affect your application’s functioning until the connection is reauthorized. Ensure that the actions configured in the connection fall within the scope defined in your registered OAuth app.
To update client credential
- Navigate to the live mode of your application. In the Connections slider, click the required connection.
- Under Client Credentials, click the Update button next to the listed credential name.
- In the popup that follows, choose a new Client Credential Name and the updated new Client Secret of your third-party OAuth app. You can also add a new Client ID and Client Secret. The existing client secret will not be revealed and can't be reused.
- Click Update and Authorize to restore the functioning of the connection.
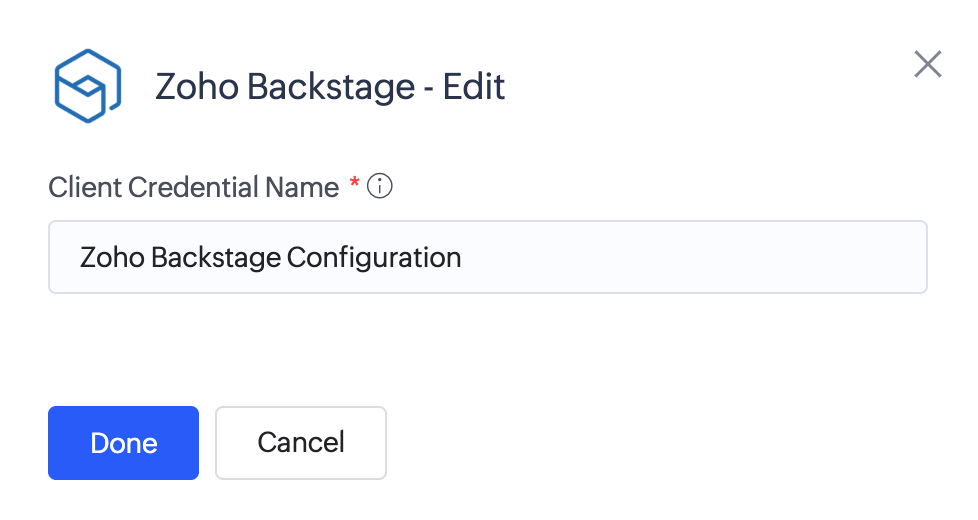
To edit client credential name:
When a connection is created with custom credentials, the client credential name is auto-generated. To edit the client credential name, click the edit icon in the Connections slider.
Note:
- Only the credential owners (the one who adds the credential). For other roles, the Update option is disabled and shown with a tooltip on hover.
- For developers, credential reuse is allowed only within the associated application.
- Shared users can't configure client credentials and need to contact their admins.
- If the connection is referenced in another application, it cannot be updated from live mode.
- If an imported application contains connections having custom mode configured, the relevant client credentials will not be transferred. The connection should be configured again by clicking Configure from the Connection details page and then authorized.
7. Associated datasources
When there's atleast one datasource associated to the connection, the Associated Datasources section appears in the Connections slider. This section lists the datasources in the respective application linked to the third-party service you (super admins, admins, and developers) are connected with. This section helps you display the basic details of each datasource and provides options to configure or reconfigure them if not yet set up, or to initiate a sync for integration fields where applicable.
For each datasource, you'll see a block that displays:
- Datasource name
- Module name
Along with these if your datasource has configurable fields or is associated with integration fields then you'll also find the following sections,
- Datasource Configuration
- Integration fields sync
Note: You can access and manage datasources from this slider in both live and edit modes of the application.
Datasource Configuration
If there are configuration fields specific to the associated datasource module, you can add or modify them from the Connections slider in live mode. Once the initial configuration is complete, you can revisit and update these fields anytime using the Reconfigure button. Learn more about configuration
If you've imported the datasource then you can configure it from the Connections slider,
1. Click the Configure button under the Datasource Configuration section of respective datasource in the Connections slider. You will be able to view the option to Configure, only if you've not yet configured the datasource settings and the datasource has fields that require to be configured.
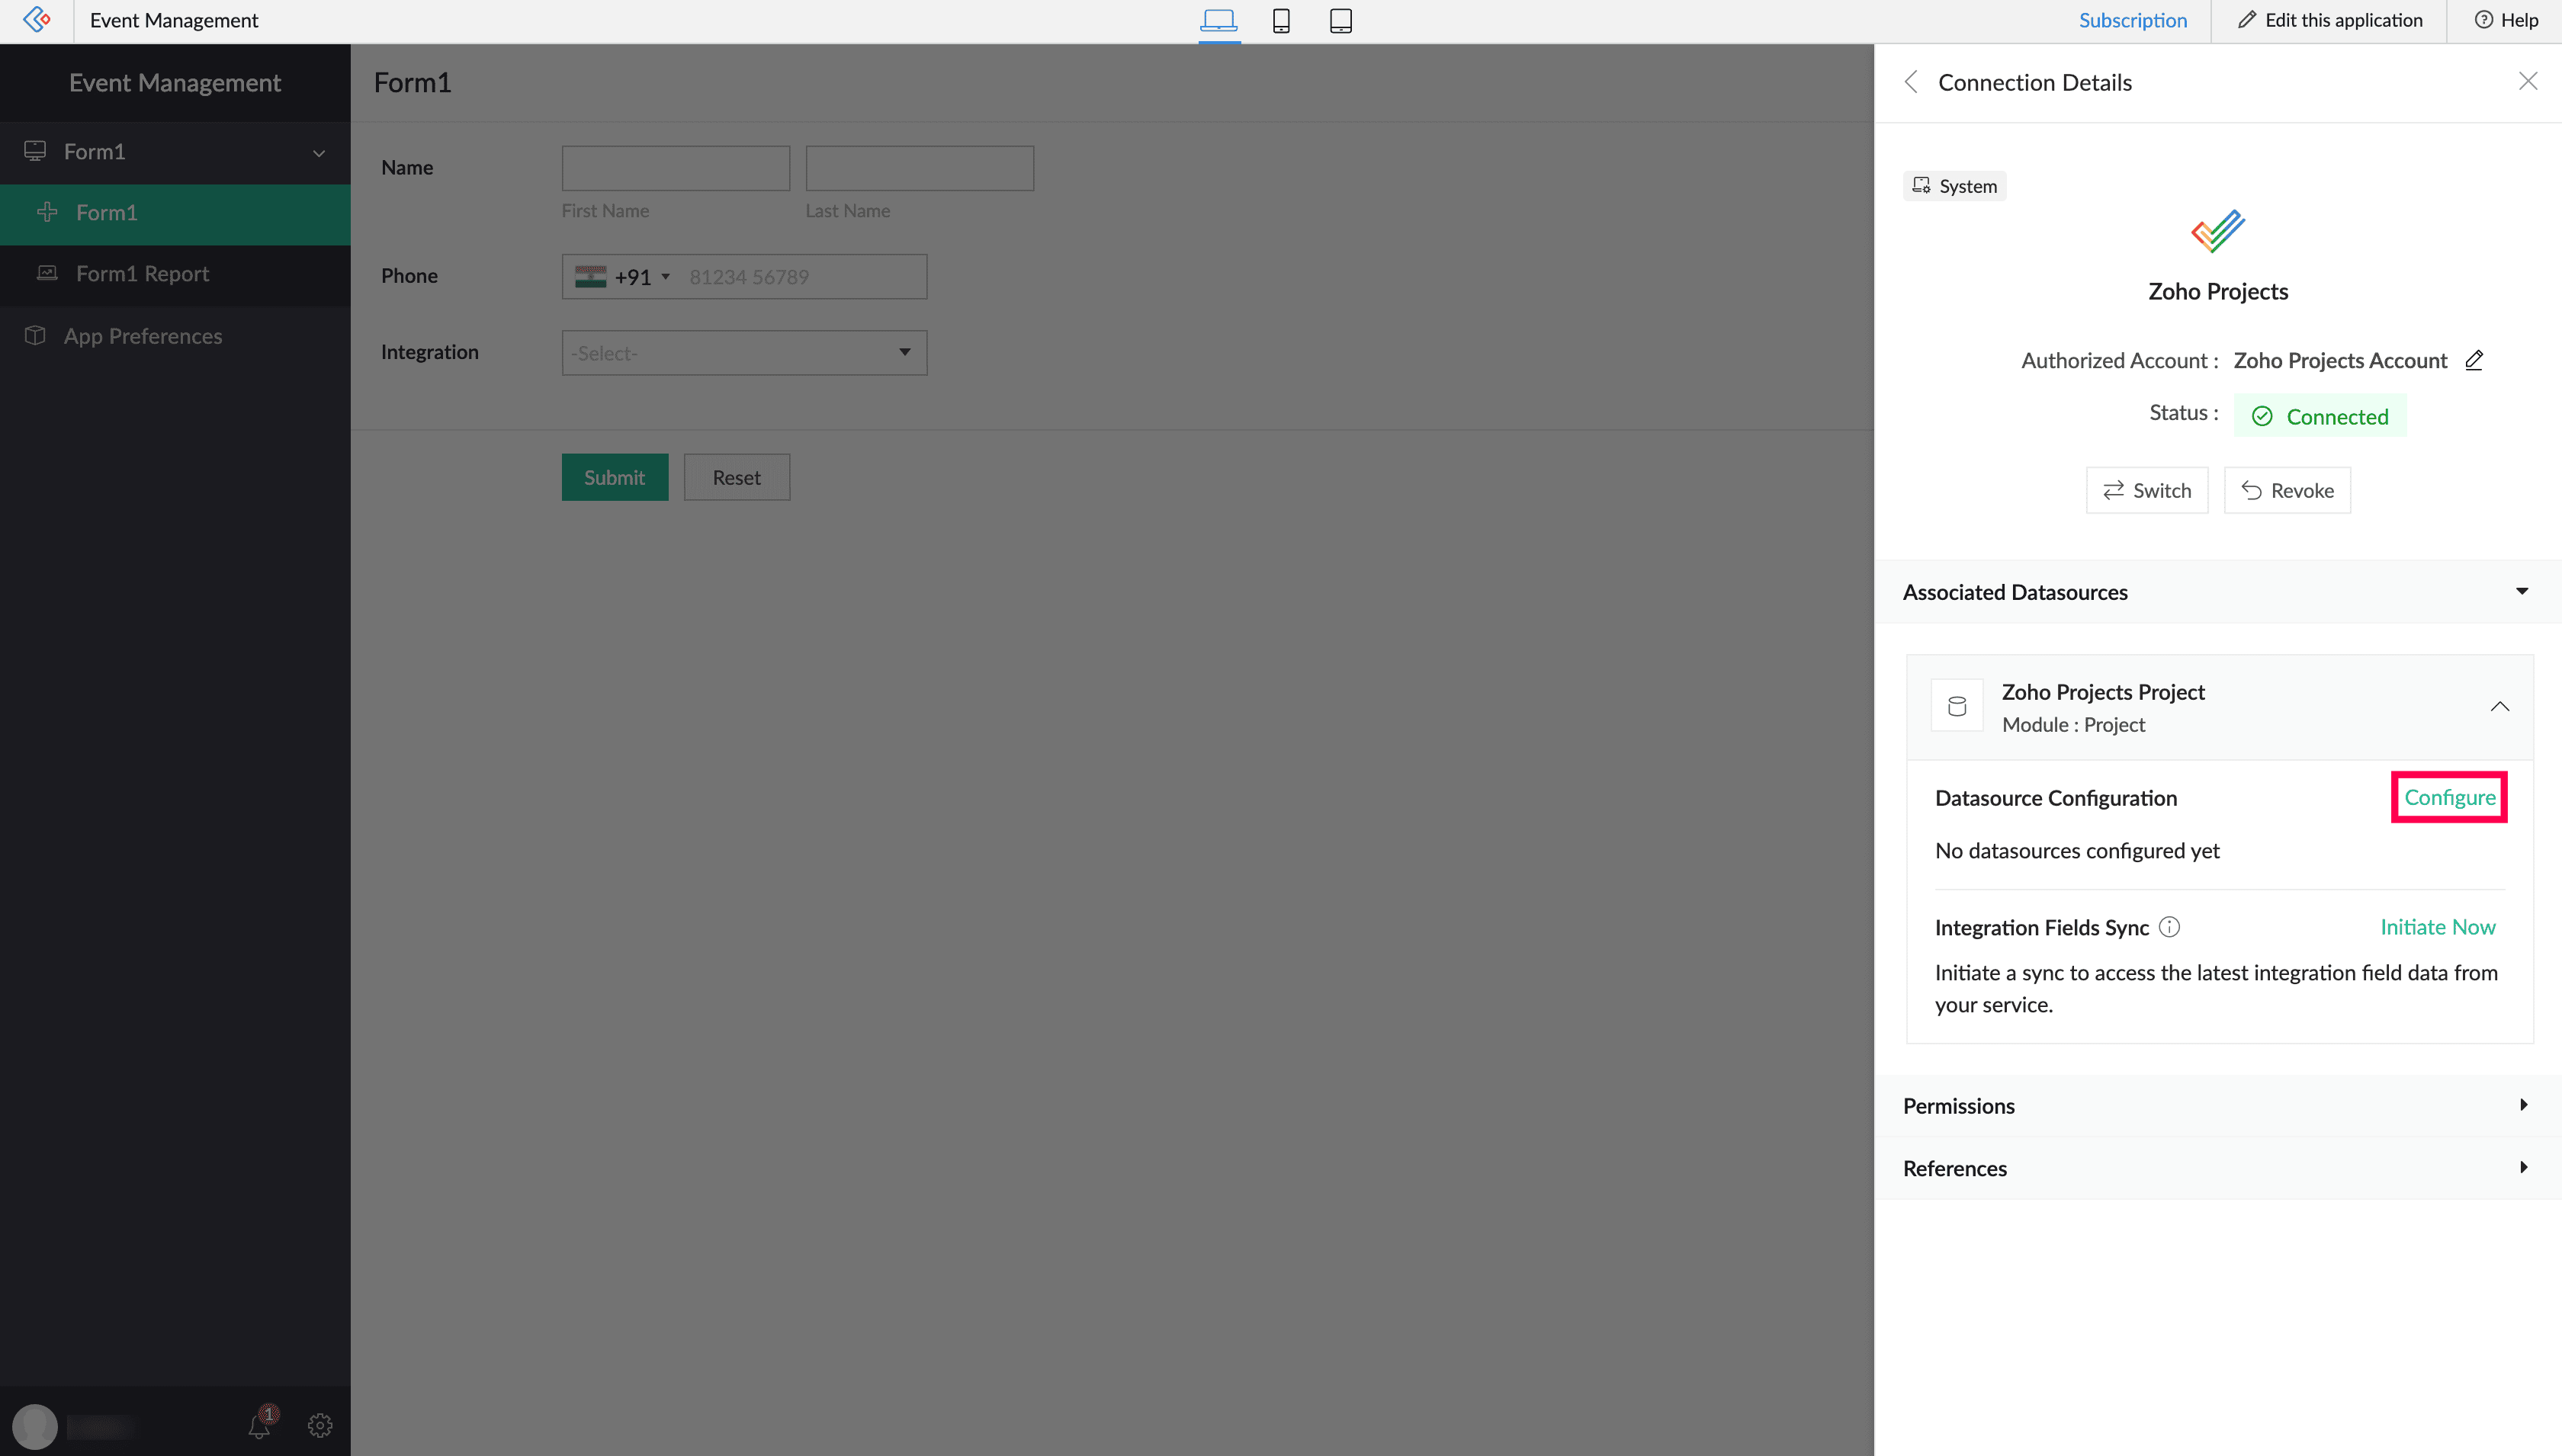
If you've already configured your datasource fields before, you'll be able to edit them using the Reconfigure button.
Note: The Configure option appears only under the following conditions:
- The connection is authorized
- The connection or datasource is enabled
- App access is enabled for the connection
If the connection is deprecated, configuration will not be possible. In such cases, take the necessary action to update or replace the connection before proceeding.
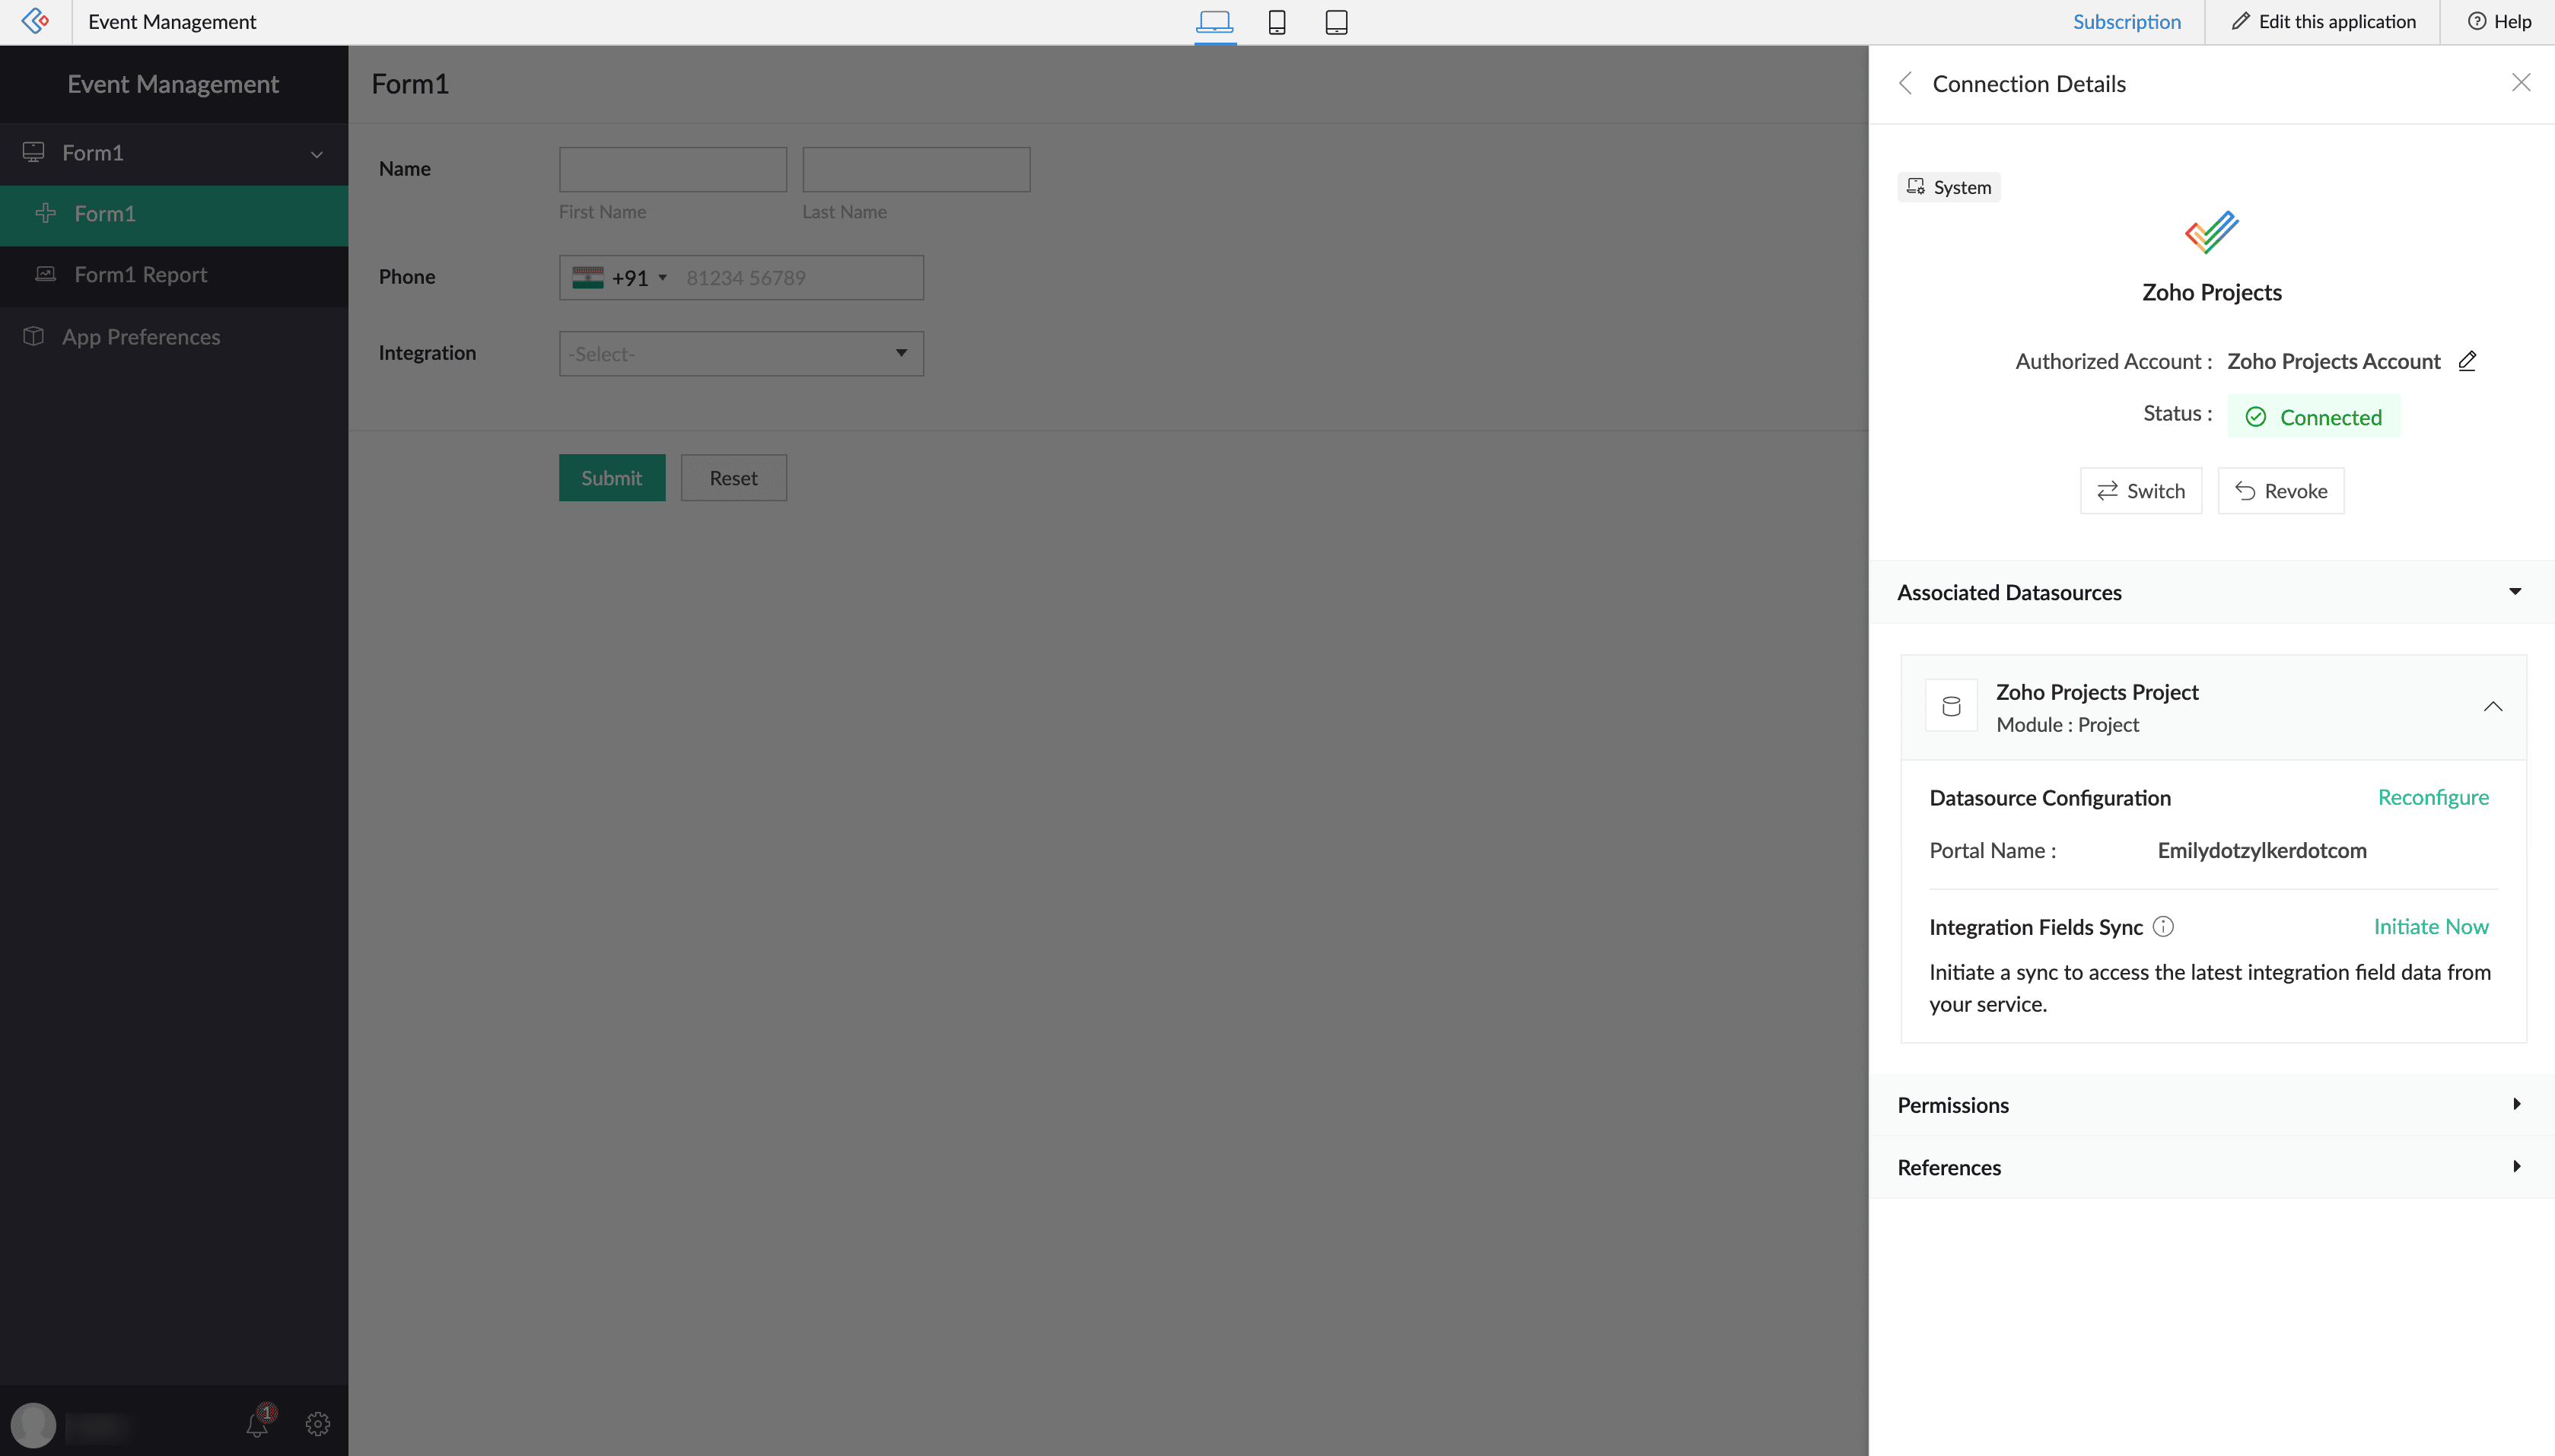
Integration Fields Sync
If your form contains integration fields, you can trigger a sync to fetch the latest data from the connected third-party service. This keeps integration field values in form records up to date and updates other parts of your application where these fields are used.
For example, if your form includes an integration field linked to the Deals module in Zoho CRM, syncing will pull the latest deal names into the relevant records.
In some cases, a datasource configuration is required. The sync option works only when the datasource is configured, and it updates integration fields based on that datasource. This sync is specific to integration fields linked to the configured datasource.
To sync data in your datasource from the Connections slider,
1. Click the Initiate button to trigger a sync.
a. The sync status will indicate whether it is 'Ongoing', 'Completed', or 'Failed'. If a sync fails, you can try initiating it again.
b. Once completed successfully, the data will reflect accordingly, and users will be able to see the last sync completed time in the slider.
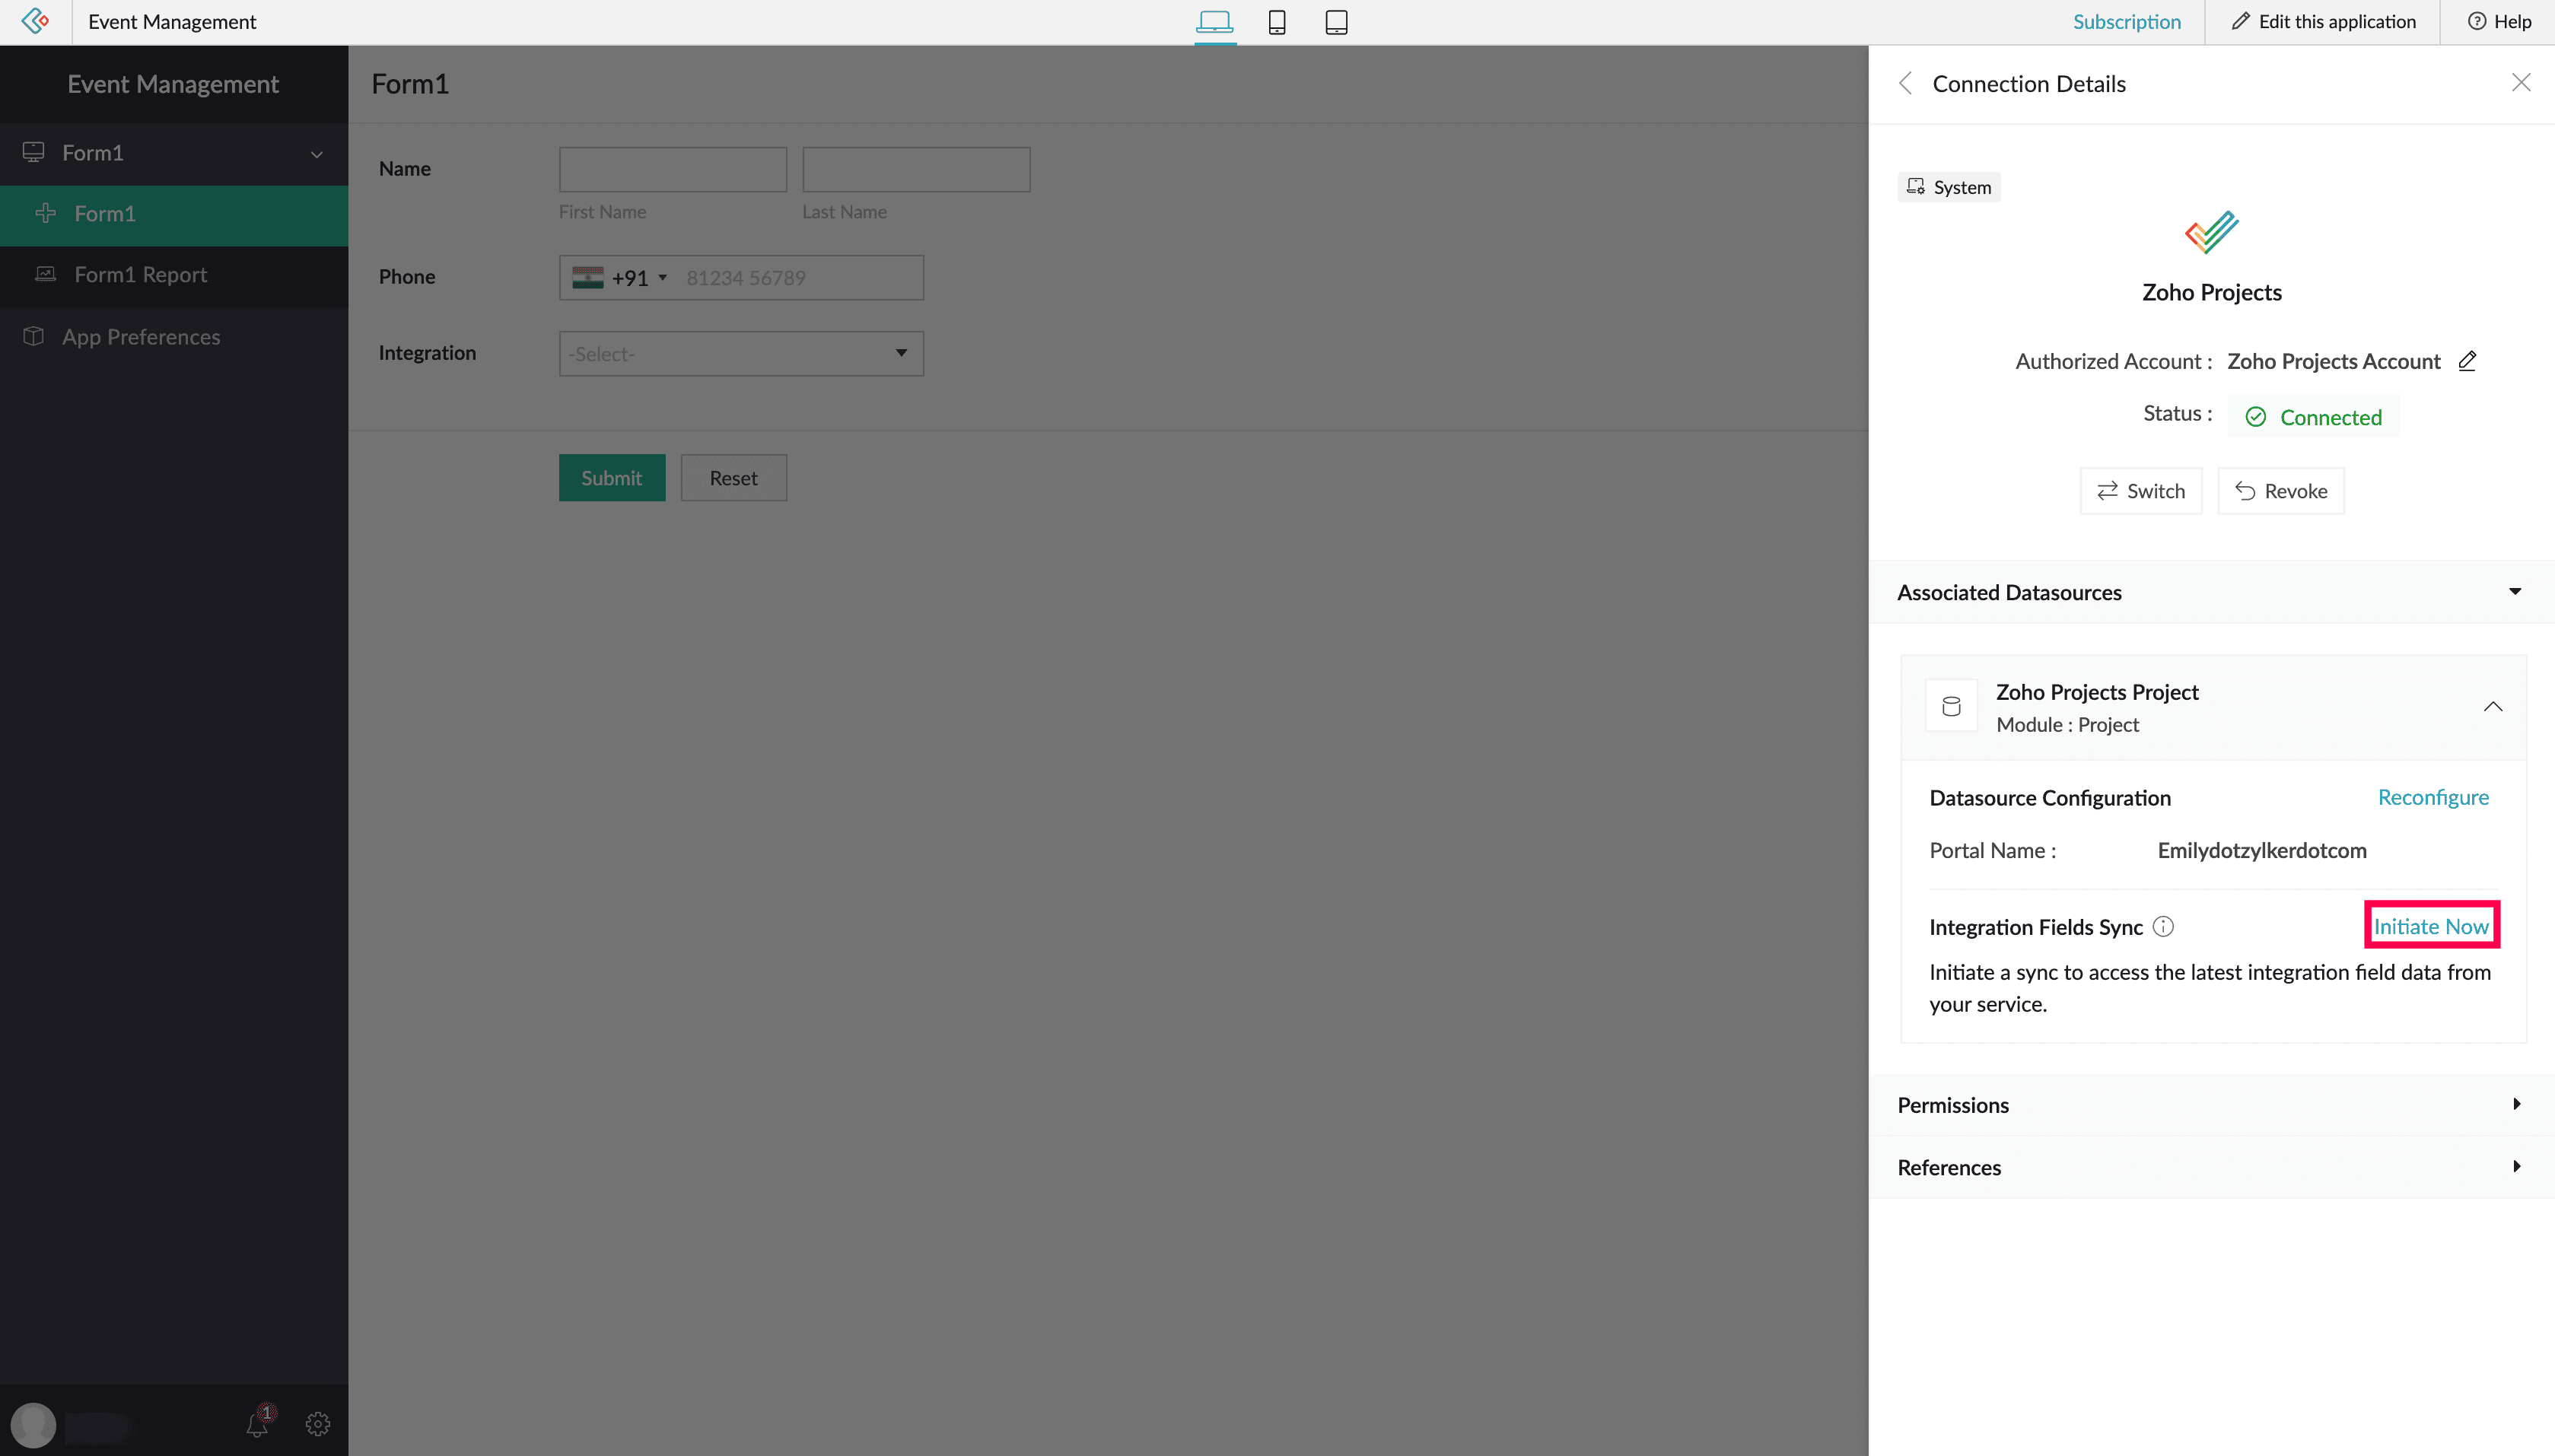
Note: Only the integration field data in the associated Creator form records is updated; no data is pushed back to the connected service.
- The Initiate button appears only when a datasource is configured (if applicable), connection is authorized, and app access enabled.
- A sync can be triggered once every 24 hours per user per datasource.
- The max limit that can be initiated with integration fields data sync at a time is 10.
- If multiple users attempt to sync the integration fields data of the same datasource within this window, only the first request is executed. Others will see the timestamp of the most recent sync.
- If sync fails then you can check your logs in Operations.
- When a user initiates a sync, it calls the external service’s APIs to fetch the latest data. These API calls may count against the usage limits of the user’s third-party account.
8. Points to note
- In the live and edit mode, the super admin, admins, and developers can view all types of connections in the applications. Other users can only view connections specific to their logged-in user type, depending on the associated permissions with the application component.
- If a logged-in user connections is used in datasources and schedules without the primary account authorization, the application users cannot authorize it until the admin authorizes it and configures a primary account.
- Both admins and developers have the ability to view all types of connections used within an application. However, when it comes to system connections, only the super admin, admins and developers can authorize them.
9. Related topics
What's next
Previous
What's next
Use connections in your workflows, integration fields, SMS actions, Deluge integration tasks, Deluge invokeURL tasks, and page panels.
Previous