Adding and managing portal users

This help page is for users in Creator 6. If you are in the older version (Creator 5), click here. Know your Creator version.
What does this page cover
Learn to add, import, export, and manage external users who are not an innate part of your organization, as portal users. This enables them to access applications and its data according to the portal permission sets assigned to them.
Availability
- Portals can be created only in the paid plans of Creator.
- Only the super admin and admin can create and manage portal users.
1. Setting up portal users
For external users to access your application's components (forms, reports, and pages) and the data within, you'll have to add or import them as portal users. Before adding users to a portal, make sure to check out everything you need to know about portal users.
1.1. Portal user addition/import flow
1.2. Add portal users
To add portal users who need to access an application's components and data:
1. Click Portal under DEPLOY in the left pane of the dashboard after you sign in to your Creator account.
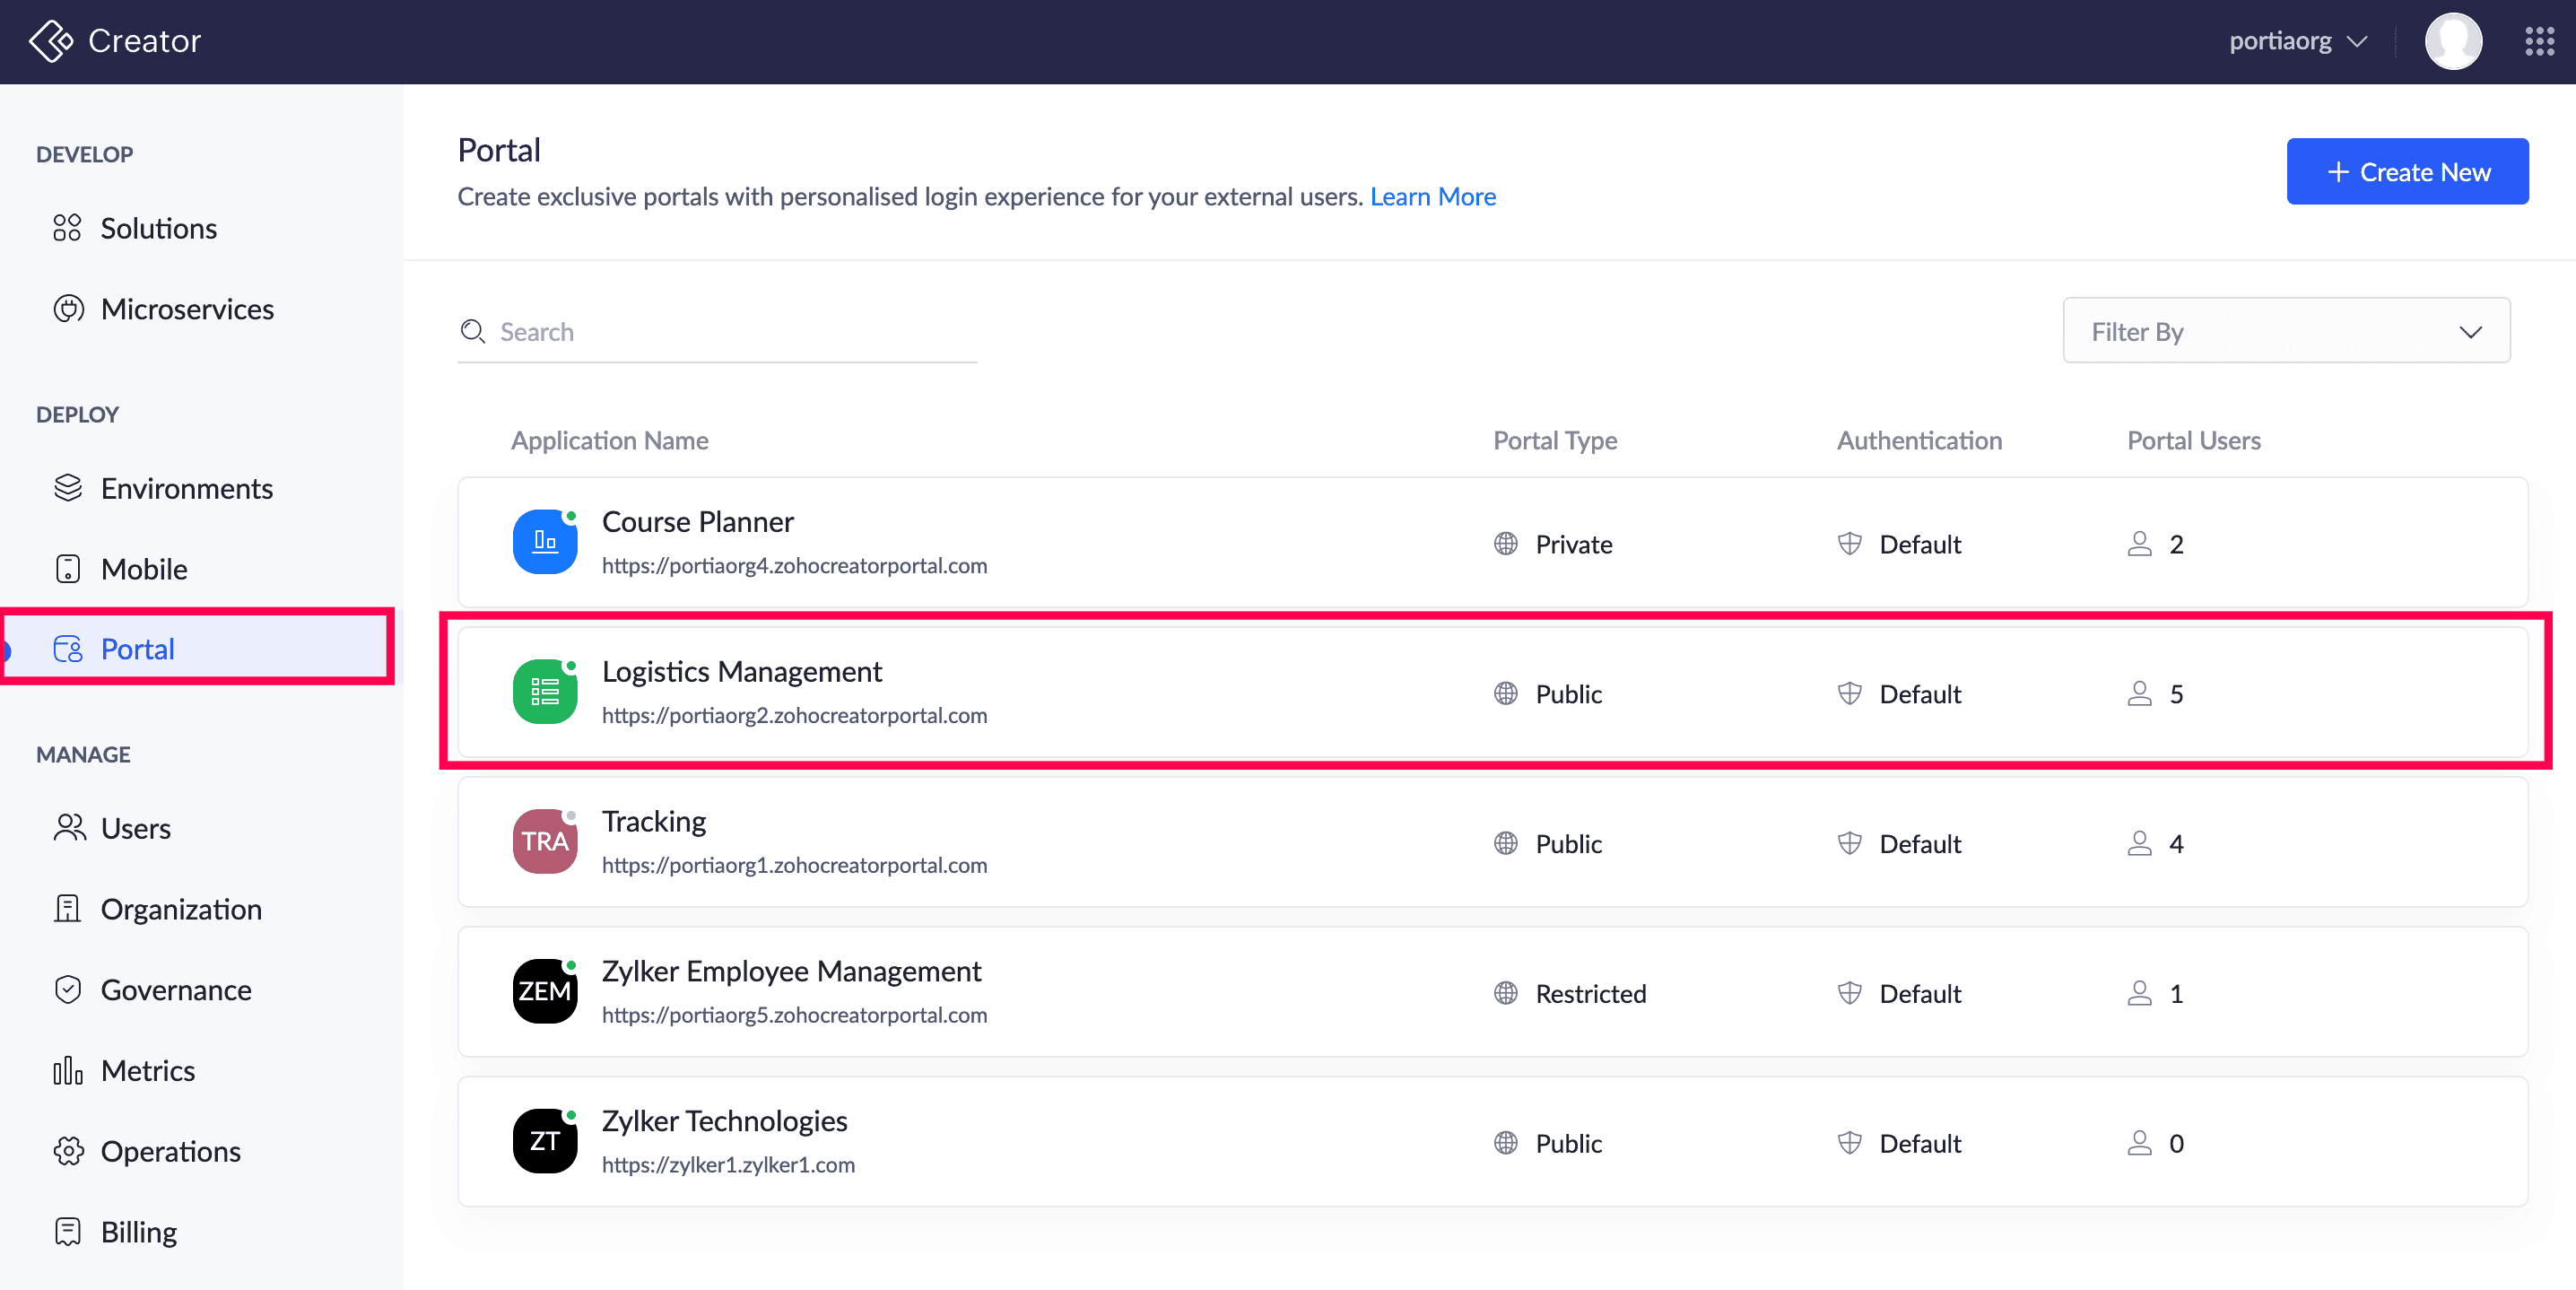
The list of portals will be displayed if you've already created them. Otherwise, create one before continuing.
2. Click on the portal to which portal users are to be added. In addition to adding portal users, you can also configure the authentication type used to let portal users log in, customize the email templates, and design their sign in, sign up, and reset password portal pages from here.
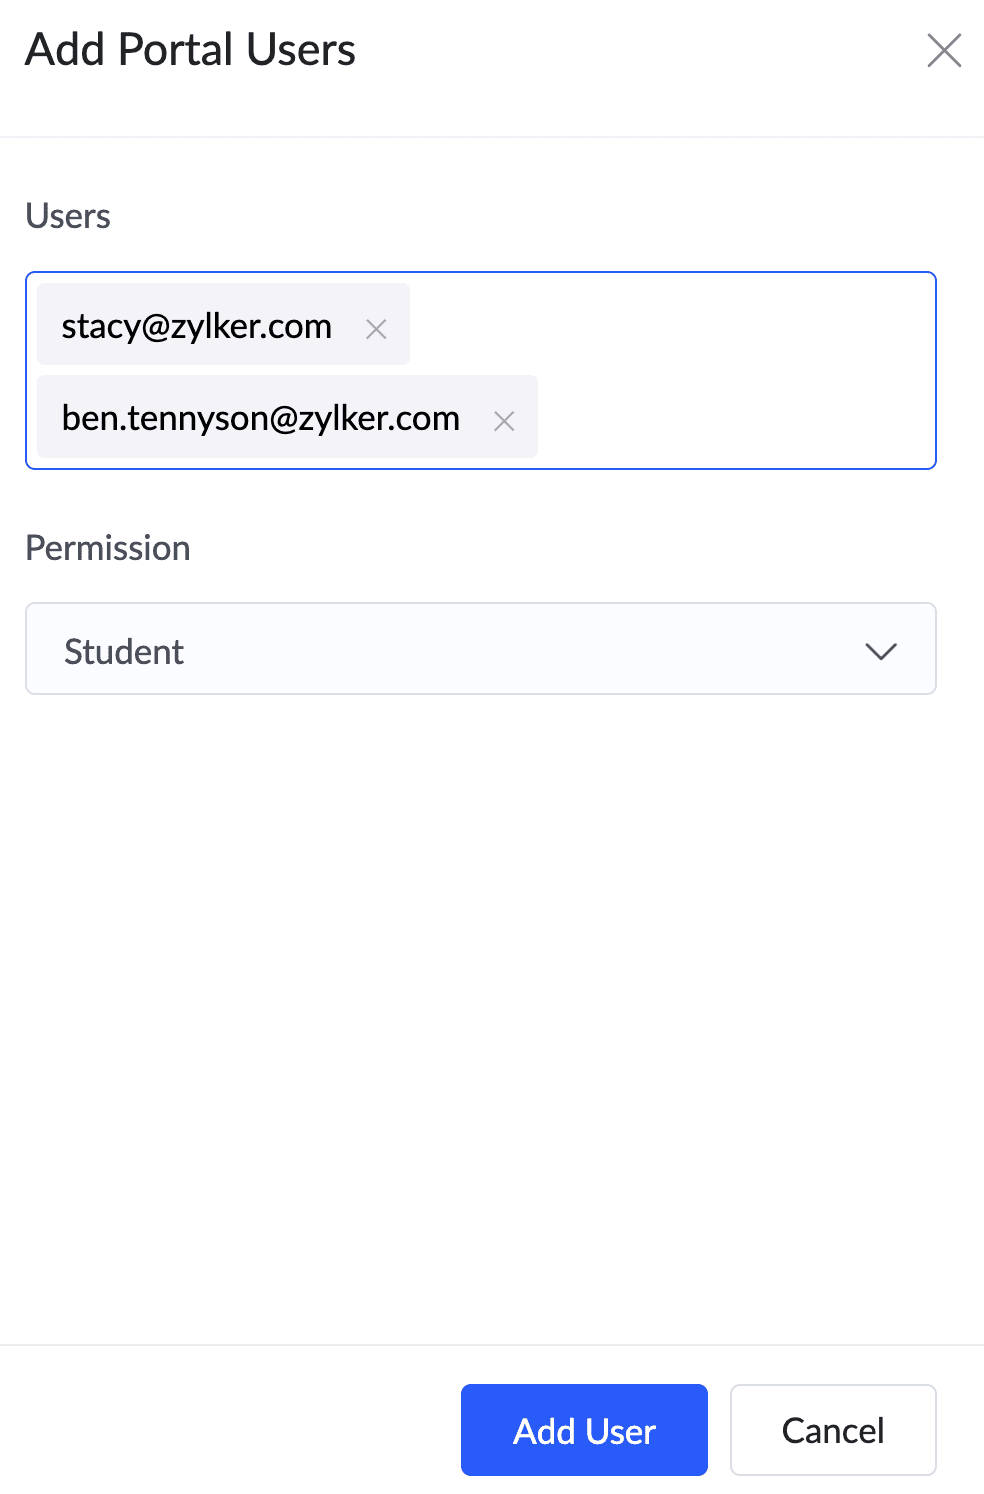
3. Click + Add Portal Users. This will be available in the center if you are adding portal users for the first time or will be in the top right corner if they've already been added.
4. Enter the email addresses in the Users field and select an appropriate permission set for them from the Permission dropdown. The default permission set selected while creating the portal will be assigned here by default, which can be changed according to your preference.

Note:
- The maximum number of five portal users can be added at once. To add them in bulk, use the Import option.
- You can create multiple permission sets for an application from within its Settings page. Learn more
5. Click Add User.
- Portal User Addition Failure/Partially Successful - A User Addition Summary popup will display the number of successful additions from the entered email addresses and a brief of the failures along with reasons.
- Portal User Addition Successful - The portal users will have been successfully added.
The added portal users will be confirmed once they accept the email invitation sent to them and set up their passwords.
Note: The portal user will receive an email invitation containing a link to set up the password for their account. The password:
- Should have a length between 8 to 250 characters.
- Cannot be the same as the username.
- Should have at least one number, special character, upper case, and lower case letters.
1.3. Import portal users
1. Click Portal under DEPLOY in the left pane, after you sign in to your Creator account.
The list of portals will be displayed if you've already created them. Otherwise, create one before continuing.
2. Click on the portal to which portal users are to be added. By default, you land in the Portal User tab.
3. Click Import. This will be situated in the center if you are adding portal users for the first time or will be available when you click the dropdown beside +Add Portal Users if you've previously added them.
4. Drag and drop a file in the dropbox or click Browse to upload a file from your local computer.
Note:
- The supported file types for the input file are XLS, XLSX, CSV, and TSV.
- The files must contain the portal users' names and email addresses in the first two rows, with a mandatory header row: Name, Email Address.
- A maximum of 500 portal users can be imported at once.
5. Select an appropriate portal permission set from the Permission dropdown. All imported portal users will be assigned with this permission set upon addition.
Note: Initially, the default permission set selected while creating the portal will be assigned here. It can be changed according to your preference.
6. Click Import. The valid email addresses will be displayed for in the Review email addresses before addition pane. Click Import again.
- Portal User Import Failure/Partially Successful - A Portal Users Import Summary email displaying the number of successful additions from the input file and a brief of the failures along with reasons.
- Portal User Import Successful - The portal users will have been successfully added to the portal.
The added portal users are confirmed once they accept the email invitation sent to them and set up their passwords.
Note: The portal user will receive an email invitation containing a link to setup the password for their account. The password:
- should have a length between 8 to 250 characters.
- cannot be the same as the username.
- should have at least one number, special character, upper case, and lower case alphabet.
2. Manage portal users
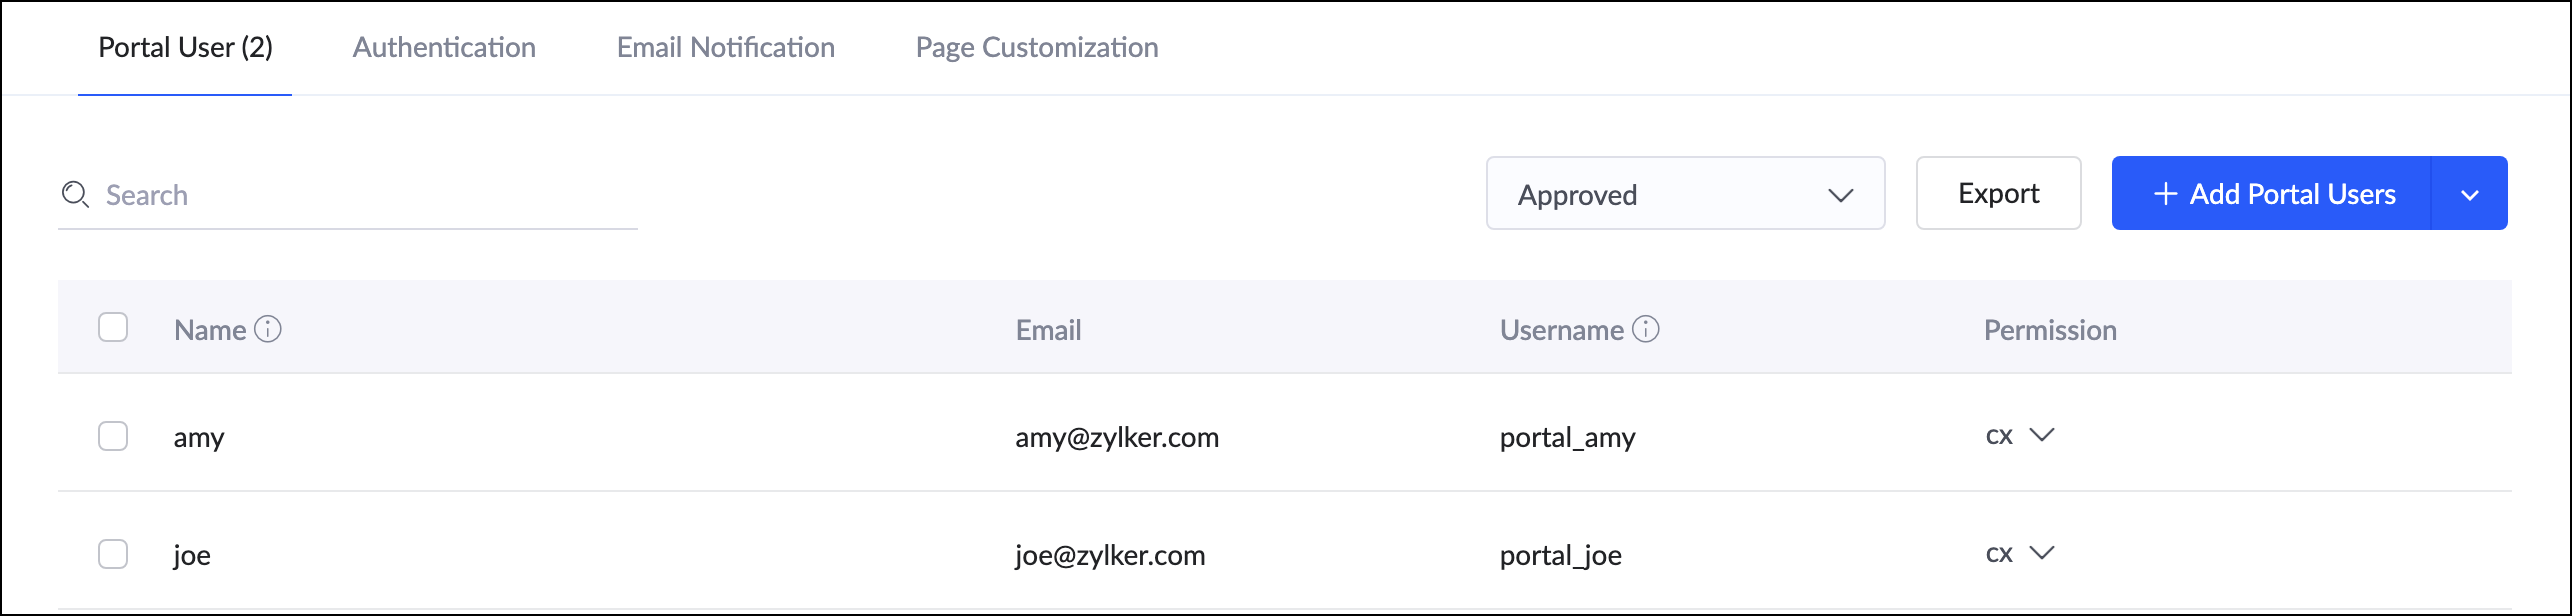
2.1. Filter portal users
Filter portal users based on their:
- Name using the Search bar: Enter your search keyword in the Search bar provided above the list of portal users. The filtration will work based on portal users' names.
- Status using the Dropdown:
- Approved - This is the list of portal users who have signed up for a portal and have been approved by an admin. It also enlists portal users who have accepted the access invitation sent by the admin.
- Unconfirmed - The list of portal users who have signed up for a portal and are pending confirmation by the admin.
- Pending - The list of portal users who are yet to accept the invitation sent by an admin, to join the portal.
2.2. Export portal users
To export users in portals:
1. Click Portal under DEPLOY in the left pane after you sign in to your Creator account. Click the portal from which you want to export portal users.
2. Click Export to download a list of portal users added to this portal.
3. Select the permission from the dropdown Filter by permission, based on which the portal users will be exported. By default, portal users will be exported regardless of which permission set they have been assigned to.
4. Select which portal users you want to export either based on their confirmation status or all of them irrespective of their status.
5. Choose the format of the export file that has the list of the portal users. By default, CSV is chosen.
6. Click Export. The file containing the list of portal users will be downloaded to your local computer. This file will include the user's email addresses and assigned permissions.
2.3. Change permission set
To reassign the permission set for:
- Individual Portal User : Click the dropdown of the Permission column for the relevant user. Select the required permission from the dropdown.
- Group of Portal Users : Tick the checkboxes present on the left side of the portal users. Choose the new permission set from the Select dropdown situated above the list of portal users.
- All Portal Users in Current View : Tick the checkbox present to the left of Name to select all 10 portal users displayed in the current view. Choose the new permission set from the Select dropdown situated above the list of portal users.
2.4. Edit name of portal user
Portals in Zoho Creator allow external users to access your applications. A field called ‘Name’ will be provided, which can be updated later by the Super Admin and Admin. This is especially helpful for ensuring consistency or applying a preferred display name.
Admins: The Edit Name option available under the Portal Users in the Portals module allows admins to customize how a portal user’s name appears within the portal.
Portal Users: Portal users can edit their names if the admin has granted the necessary permission. If granted, portal users can change their own name by selecting Edit Name under their My Profile section.
To edit the name of a portal user:
- Click the ellipsis (⋮) icon next to the portal user whose name you want to edit.
- Select Edit Name from the dropdown.
- Update the portal user's name as desired, then click Save.
2.5. Change email address of portal users
Admins can update the email addresses of portal users. This is useful when a user has changed their email. It can also be used to transfer record ownership of a portal user.
Note: Admins are responsible for ensuring the correct email address is entered when updating a portal user's email. Please verify the email address carefully before making any changes.
To change a portal user's email address:
- Select Change Email from the ellipsis icon (⋮) next to the portal user.
- Enter the new email address.
- Click Change and confirm the update.
A verification mail will be sent to the user's new email address. Please ask the user to use the link in the email to log in and confirm the change.
When a portal user attempts to access the portal without accepting the invitation, OTP verification is triggered. Open the portal and enter your new email address. Check your inbox for the OTP and enter it on the login page to gain access. The user can then log in using the new email address and their existing password.
2.6. Delete portal users
To delete:
- Individual Portal User: Click the ellipsis (⋮) icon next to the portal user and select Delete to remove them.
- Group of Portal Users: Tick the checkboxes present on the left side of the portal users. Click Delete above the list of portal users to remove them.
- All Portal Users in Current View : Tick the checkbox present to the left of Name to select all 10 portal users displayed in the current view. Click Delete above the list of portal users to remove them.
2.7 Reset MFA
Admins can reset the Multi-Factor Authentication (MFA) configuration for portal users from the Portal User section of the portal module.
To reset MFA:
- Select the checkboxes on the left side of the required portal users. Once selected, the Reset button will appear at the top.
- Click Reset to reset MFA for the selected users.
Note: After MFA is reset, the affected portal users must configure MFA again during their next sign-in.
3. Points to note
- The limit of portal users that can be added to all your portals combined, depends on the add-on you've chosen with your plan. They will not be counted as internal users.
- Portal user emails cannot have the same domain as the super admin’s email or internal user's email, as portal users are considered external to the organization. To add members within your organization, add them as internal users instead.
- You can monitor the current and total count of portal users you have purchased in the Billing page.
- If a portal user is added to two different portals of the same Creator account, both additions are counted in the portal user limit.
- When you're upgrading your Creator account, you can purchase the add-on, which allows you to add up to 500000 portal users to your portal. To add more than 500000, please contact support at support@zohocreator.com.
- If you've configured SAML authentication for a public portal, portal users who sign up for the portal will be directly listed as confirmed portal users in the Portal User tab.
4. Related topics
What's next
Previous
What's next