MFA for portal users
Multi-Factor Authentication (MFA) for portal users
1. In a nutshell
When a portal user signs in to your portal, they must verify their identity using their username and password. Multi-factor authentication (MFA) requires your portal users to additionally verify themselves via configured OTP authenticators while signing in. This enhances security by ensuring that only authorized users can access your portal, even if their passwords are compromised.

2. Availability
- Only in the paid plans.
- Super admins and admins can configure MFA for portal users across all their applications, while portal users can login using their configured OTP authenticator.
3. Overview
MFA provides an added security layer by requiring additional authentication factors, thereby preventing unauthorized access and allowing multiple authentication methods for convenience.
Once MFA is enabled for the required portal in your Creator account, portal users will need to verify their identity each time they sign in to their portal applications to ensure that their account isn't accessed by unknown users. This verification can be done using an OTP Authenticator.
There are two ways in which you can set up MFA for your account:
- Admin-enforced: If you are a super admin/admin, you can enable MFA for portal users in your respective portals.
- Self-configured: Portal users have the option to setup MFA on their own to secure their account, if the super-admin or admin hasn't enabled it already.
4. Setting up MFA
4.1 Flowchart
4.2 How to enable MFA for portal users (admin-enforced)?

You won't be able to enable MFA if you've configured SAML for your portal.
As a super-admin or admin, you can enable MFA for your portal users in the Portal Settings slider by following the below steps.
1. Click Portal under the Deploy section in the left pane. A list of already configured portals will be displayed

Note: If you haven't created any portal, you can check this page to know how to create one.
2. Click the ellipsis icon (...) at the end of the required portal for which you want to enable MFA, and then select Settings.
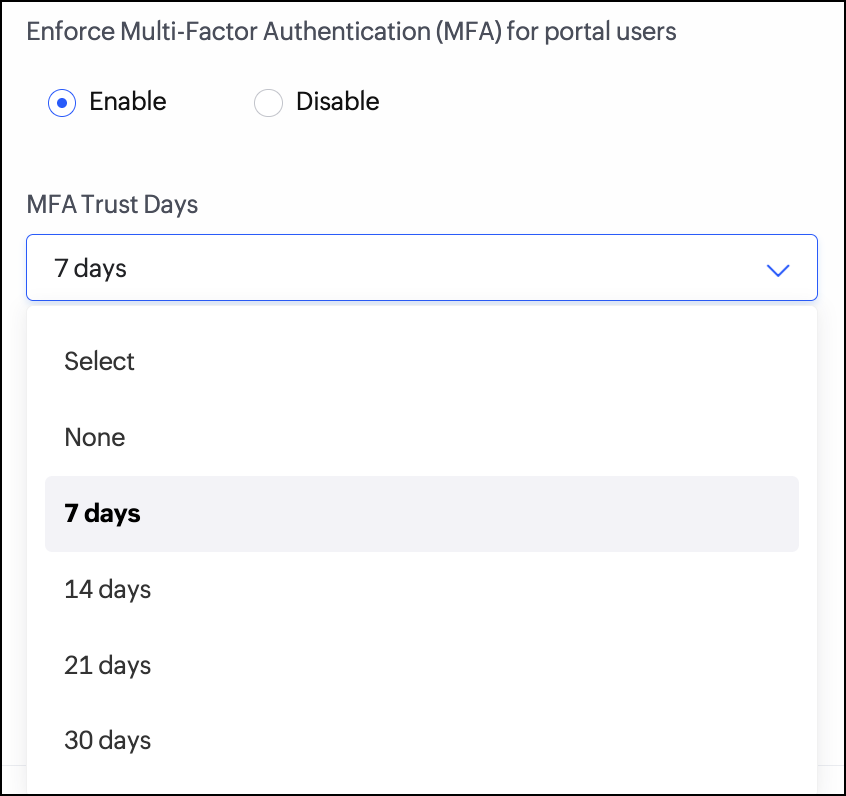
3. The Update Portal Settings slider will appear. Click Enable under Enforce Multi-Factor Authentication (MFA) for portal users in this slider.
When multi-factor authentication (MFA) is enabled, the MFA trust days option becomes available. This setting allows admins to configure the number of days after which users must re-authenticate. By default, the MFA trust period is set to 7 days. However, admins can customize this value anywhere between none and 30 days.
Note: - If you're setting up a portal for the first time, you can enable MFA in the Create Portal slider and click Create New to finish creating your portal.
4. Click Update to save the settings.
 Info: You can also disable MFA by clicking Disable under the Enforce Multi-Factor Authentication (MFA) for portal users section. Please note that disabling MFA removes the extra layer of security, making your portals more vulnerable to unauthorized access.
4.2.1 Setup authenticator and sign in
Note:
- This section is for portal users.
- As a prerequisite, an authenticator app (of your choice) is required and should be downloaded on your device to to set it up and sign in to your portal app.
Now that the super-admin or admin has enabled MFA for your portal, as a portal user, all your future sign-ins will require authentication via an OTP Authenticator.
Info: OTP authenticators are mobile applications that can be used to set up multi-factor authentication (MFA) by generating Time based OTPs for authenticating users for your account. These applications generate one-time passwords (OTPs) that change for every 'n' seconds. Some of the prominent OTP authenticator apps are Authy, Microsoft Authenticator, and Google Authenticator. We also have our in-house authenticator app called Zoho OneAuth.
As a portal user, follow the below steps to sign in and authenticate yourself via the configured OTP authenticator.
1. Access your portal Sign In page and enter your email address, then click Next.
2. In the password field, type in your password, and click Sign In.
3. A screen prompt to configure OTP Authenticator MFA will appear. Click Configure beneath the OTP Authenticator card.
4. The Set up OTP Authenticator pop up will appear, in which a QR code and an alphanumeric code will be shown. Click Next after performing either of the following.
- To register using a QR code, use the authenticator app (in your mobile) to scan the QR code displayed on the screen.
- To register manually, enter the alphanumeric code displayed on the screen into the authenticator app on your device.
5. An OTP will be generated on your app. Click Verify after entering this OTP in the input box within OTP Authenticator card.
Info:
In the next screen,
In the next screen,
- You can choose to change the configuration and choose a different authenticator in the next screen by clicking the Change Configuration button. Click Yes, Proceed in the popup that appears, and repeat steps 4 & 5.
- You can also delete the configured authenticator by clicking the Delete Configuration button. Click Yes, Delete in the popup that appears, and you'll be taken to step 4 of this section to configure a new authenticator.
6. Click Enable MFA, once you've verified the code and configured the OTP authenticator.
7. Click Generate Backup Codes in the popup that appears.
Info: It is recommended to generate backup verification codes. These codes will help you recover your account if you lose access to your mobile number and can't sign in. Learn more
8. Download or copy and paste the codes someplace where you can easily recover them when required.
9. Click Continue to Sign In. You'll be taken to your portal application's Homepage.
4.3 How can portal users self-configure MFA?
If the super-admin or admin hasn't enabled MFA for your portal, you can configure it on your own. See the steps below to get started.
1. After you sign-in to the portal, click My Account from either the top right or bottom left corner, depending on your theme settings.
2. Click on Multi-Factor Authentication in the left-pane. MFA modes will be shown.
3. Click Set up Now beneath the OTP Authenticator card.
4. The Set up OTP Authenticator pop up will appear, where a QR code and an alphanumeric code will be shown. Click Next
after performing either of the following.
after performing either of the following.
- To register using a QR code, use the authenticator app (in your mobile) to scan the QR code displayed on the screen.
- To register manually, enter the alphanumeric code displayed on the screen into the authenticator app on your device.
5. An OTP will be generated on your app. Click Verify after entering this OTP beneath the Enter OTP input box to complete the MFA configuration.
You can choose to change the configuration and choose a different authenticator by following the below steps.
1. Go to My Account and click Multi-Factor Authentication in the left pane.
2. Click Change Configuration in the OTP Authenticator card. The Set up OTP Authenticator pop up will appear.
3. Repeat steps 4-5 in the above section 4.3 to choose another authenticator.
You can also delete your existing configured authenticator by following the below steps.
1. Hover on the OTP Authenticator card and click the delete
2. Click Continue in the Delete MFA Mode pop up to delete the configuration.
Note:
- You cannot delete your existing authenticator app if MFA for your portal account has been enforced by your super admin.
- After deleting your existing authenticator, you need to choose a different authenticator by following the steps in section 4.3.
4.3.1 Steps for sign-in as a portal user
- In the portal user Sign In screen, enter your email address and click Next.
2. In the password field, type in the password, and click Sign In. A screen prompt to enter time-based (TOTP) will appear.
3. Enter the TOTP generated on your mobile authenticator app in the input box provided and then click Verify to sign in to your portal account.
6. Related topics
- Introduction to multi-factor authentication (MFA)
- Understanding users
- Understanding portals
- Understanding portal users
- Manage portal settings