Managing connections
1. What does this page cover?
Learn about managing the created connections and the types supported in Developer Console for connecting your application with other services.

2. Availability
Connections can be created and managed only by the super admin and developers in Developer Console. The clients can authorize and access them after they install the application.
3. Manage connections
Managing connections offers the following abilities:
- Accessing connection details page
- Edit a connection
- Switch authorization
- Revoke authorization
- Edit authorization name
- View connection references
- Delete a connection
- Use different authorizations for different environments
- View and manage authorizations of logged-in user connections
Managing connections in the Developer Console offers various features that ensure smooth integration with third-party services, allowing developers to view, edit, and manage connections effectively.
3.1. Accessing the Connections page
3.1.1 From the Microservices tab
1. Navigate to Microservices and click the required connection card under Connections.
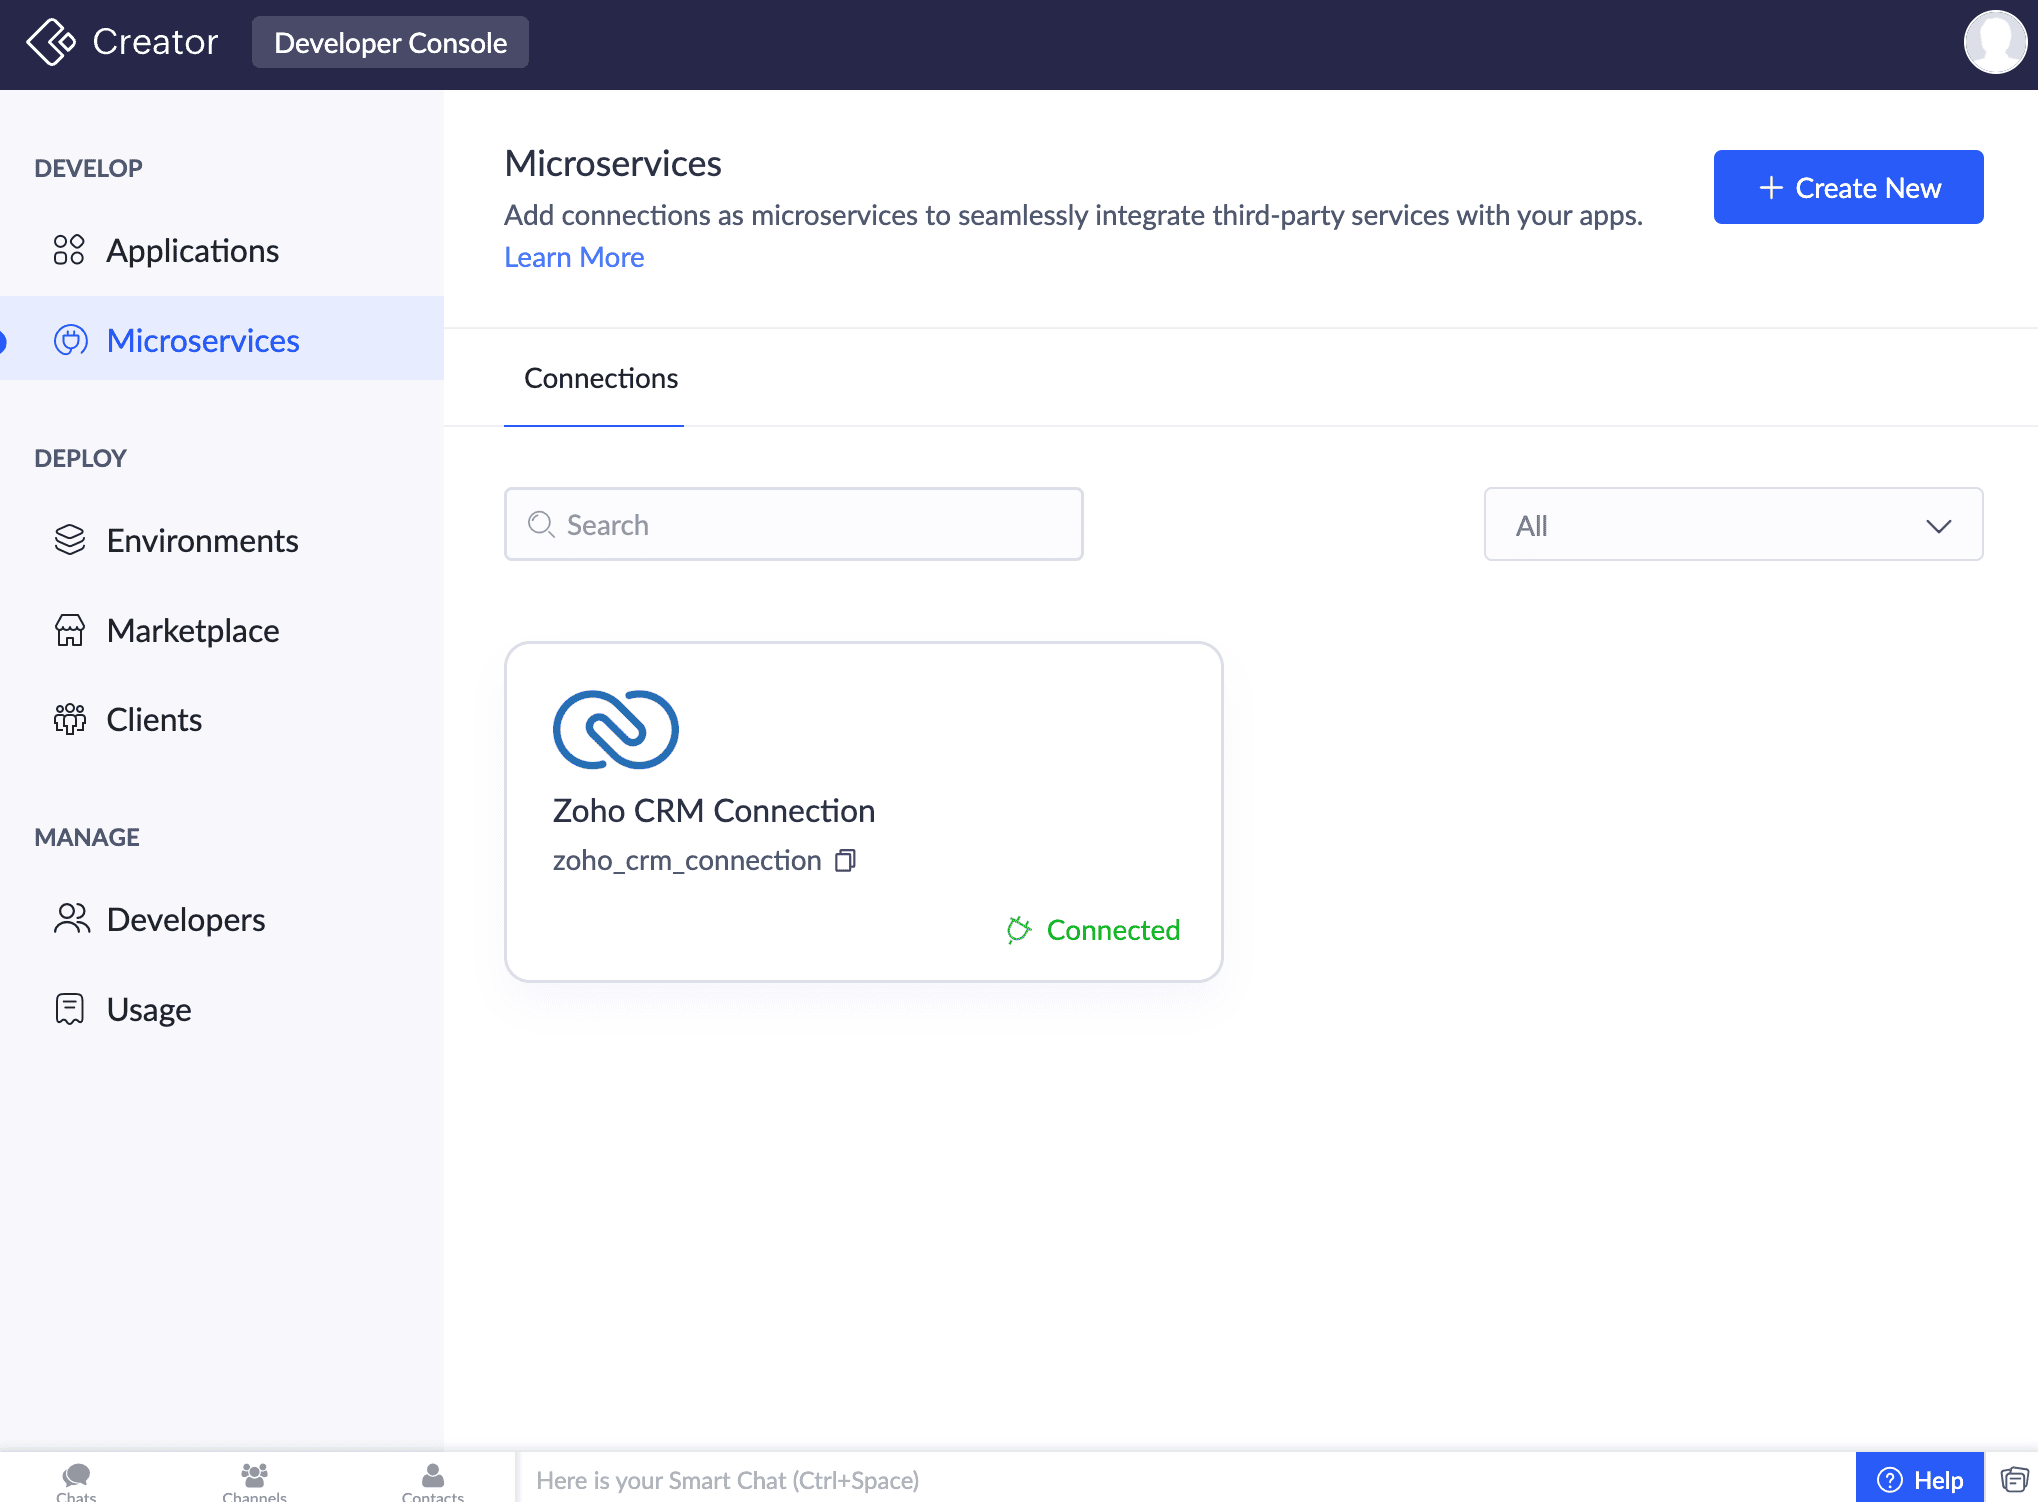
2. The following details are displayed:
- Connection Name: Editable via the edit icon.
- Link Name: Auto-generated and used for Deluge tasks and scripts.
- Permissions: Scopes selected during creation.
- Authorization Details: Specifies if the same authorization is used across environments or if separate ones exist.
- Authorized Account: Editable name displayed for connected accounts.

Note:
- For applications with environments enabled, authorized account names are listed per environment.
- If a third-party service doesn’t provide an account name, the system generates one in the format, <service-name> Account <sequence> (e.g., Twilio Account 2).
- If a third-party account name exists, it is displayed.
- Other Details: Created by/on, modified by/on.
- Connection Access: Enable or disable application access and view references to locate usage. (This is only possible if the connection is not used in any apps).
3.1.2 From the live mode
Click Connections on the top pane to open a slider displaying all the connections used in the application. For a developer, this can be accessed from the Development or Stage live mode in Developer Console and for the clients in the live mode of their installed Creator application.
The slider shows only the connections used in the specific component, along with basic details of each connection, such as:
- Service name: The name of the service for which the connection was created.
- Link Name: A unique name generated for the connection in the backend. This can be used in Deluge integration tasks and invoke URL scripts to establish authorization.
- Permission: The scopes that were selected by the user while creating the connection.
- Authorization Owner: Represents whether the connection can be authorized only by admin (Admin connection) or by any user (Logged-in user connection)
- Authorization: Specifies if the same authorization is used across all environments or different authorizations are used for each environment.
- Authorized Account: The display name of the connected account if the connection is authorized. This auto-generated name can be edited by clicking the edit icon present beside the authorized account name.
- Connection access: Enable or disable the connection's access to a specific application or view its references to find the accurate places where the connection is used in an application.
- Others: Information such as Created by, Created on, Last modified by, and Last modified on.
- Connection type: The connection type is represented by different icons, as shown in the table below.
Icon Types
Icon | Type |
Admin connection | |
System connection | |
User connection |
Note: All of the connection settings mentioned below can be accessed from both the Connections Details page and from the live mode.
3.1.3 Accessing from edit mode
Accessing from the workflows-
You can click the Connections button in the top right corner of the page.
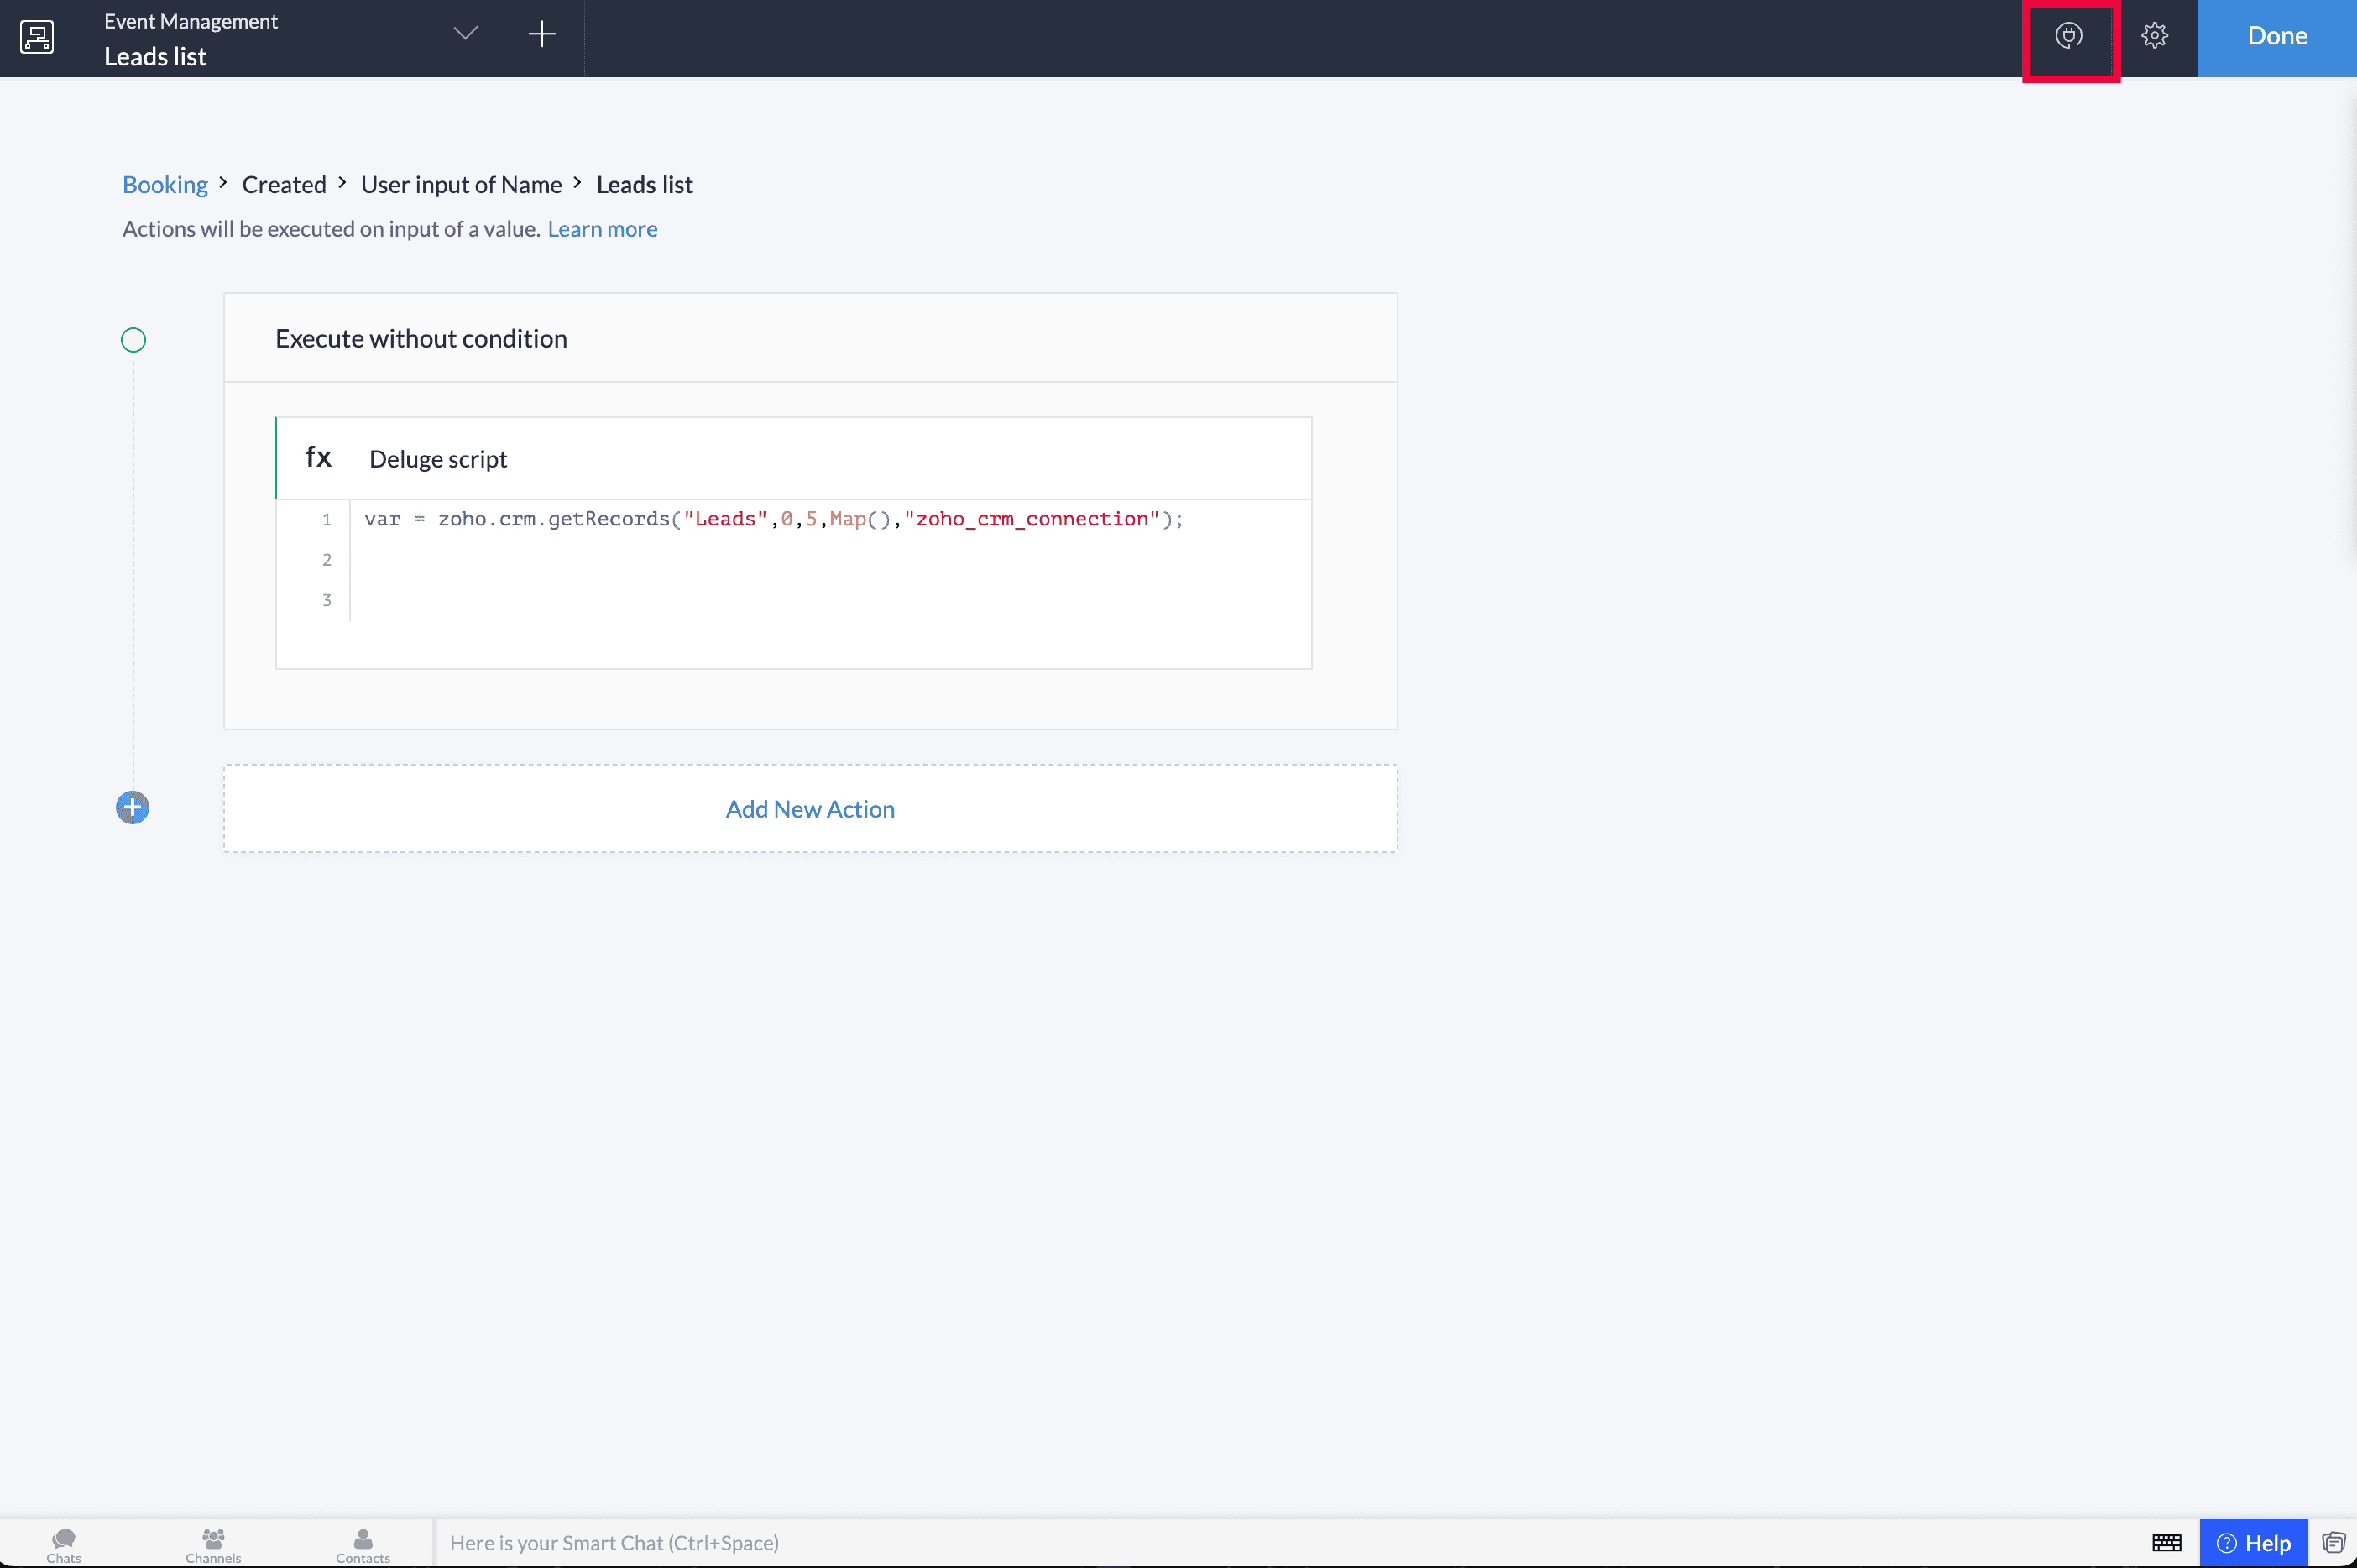
Accessing from the Deluge editor -
Accessing from the Deluge editor -
You can click the Connections button in the top pane of the editor.

The connection settings mentioned below can be accessed from the Connections Details page, the edit mode, and also from the Connections slider in the live mode, in development or stage environment. Only editing and deleting a connection will be available from the Connections Details page.
3.2. Edit a connection
- Select the required connection under Microservices > Connection Details page.
- Click the ellipsis (three dots) and select Edit Connection.
- Modify details like connection name or scopes and click Update.
Note: To update the scopes of your connection, you will be required to reauthorize the connection.
3.3. Switch authorization
Switching the connection involves granting a new authorization to the connection. Developers can switch authorization if the current credentials expire or are invalidated.
Note: Switching the authorization of the connection can be done by super admin or developers. Switching is applicable for admin and system connections. Logged-in user connection authorization can only be switched by the authorization owner. When a connection authorization is switched, all applications that utilize it will henceforth use the new authorization.
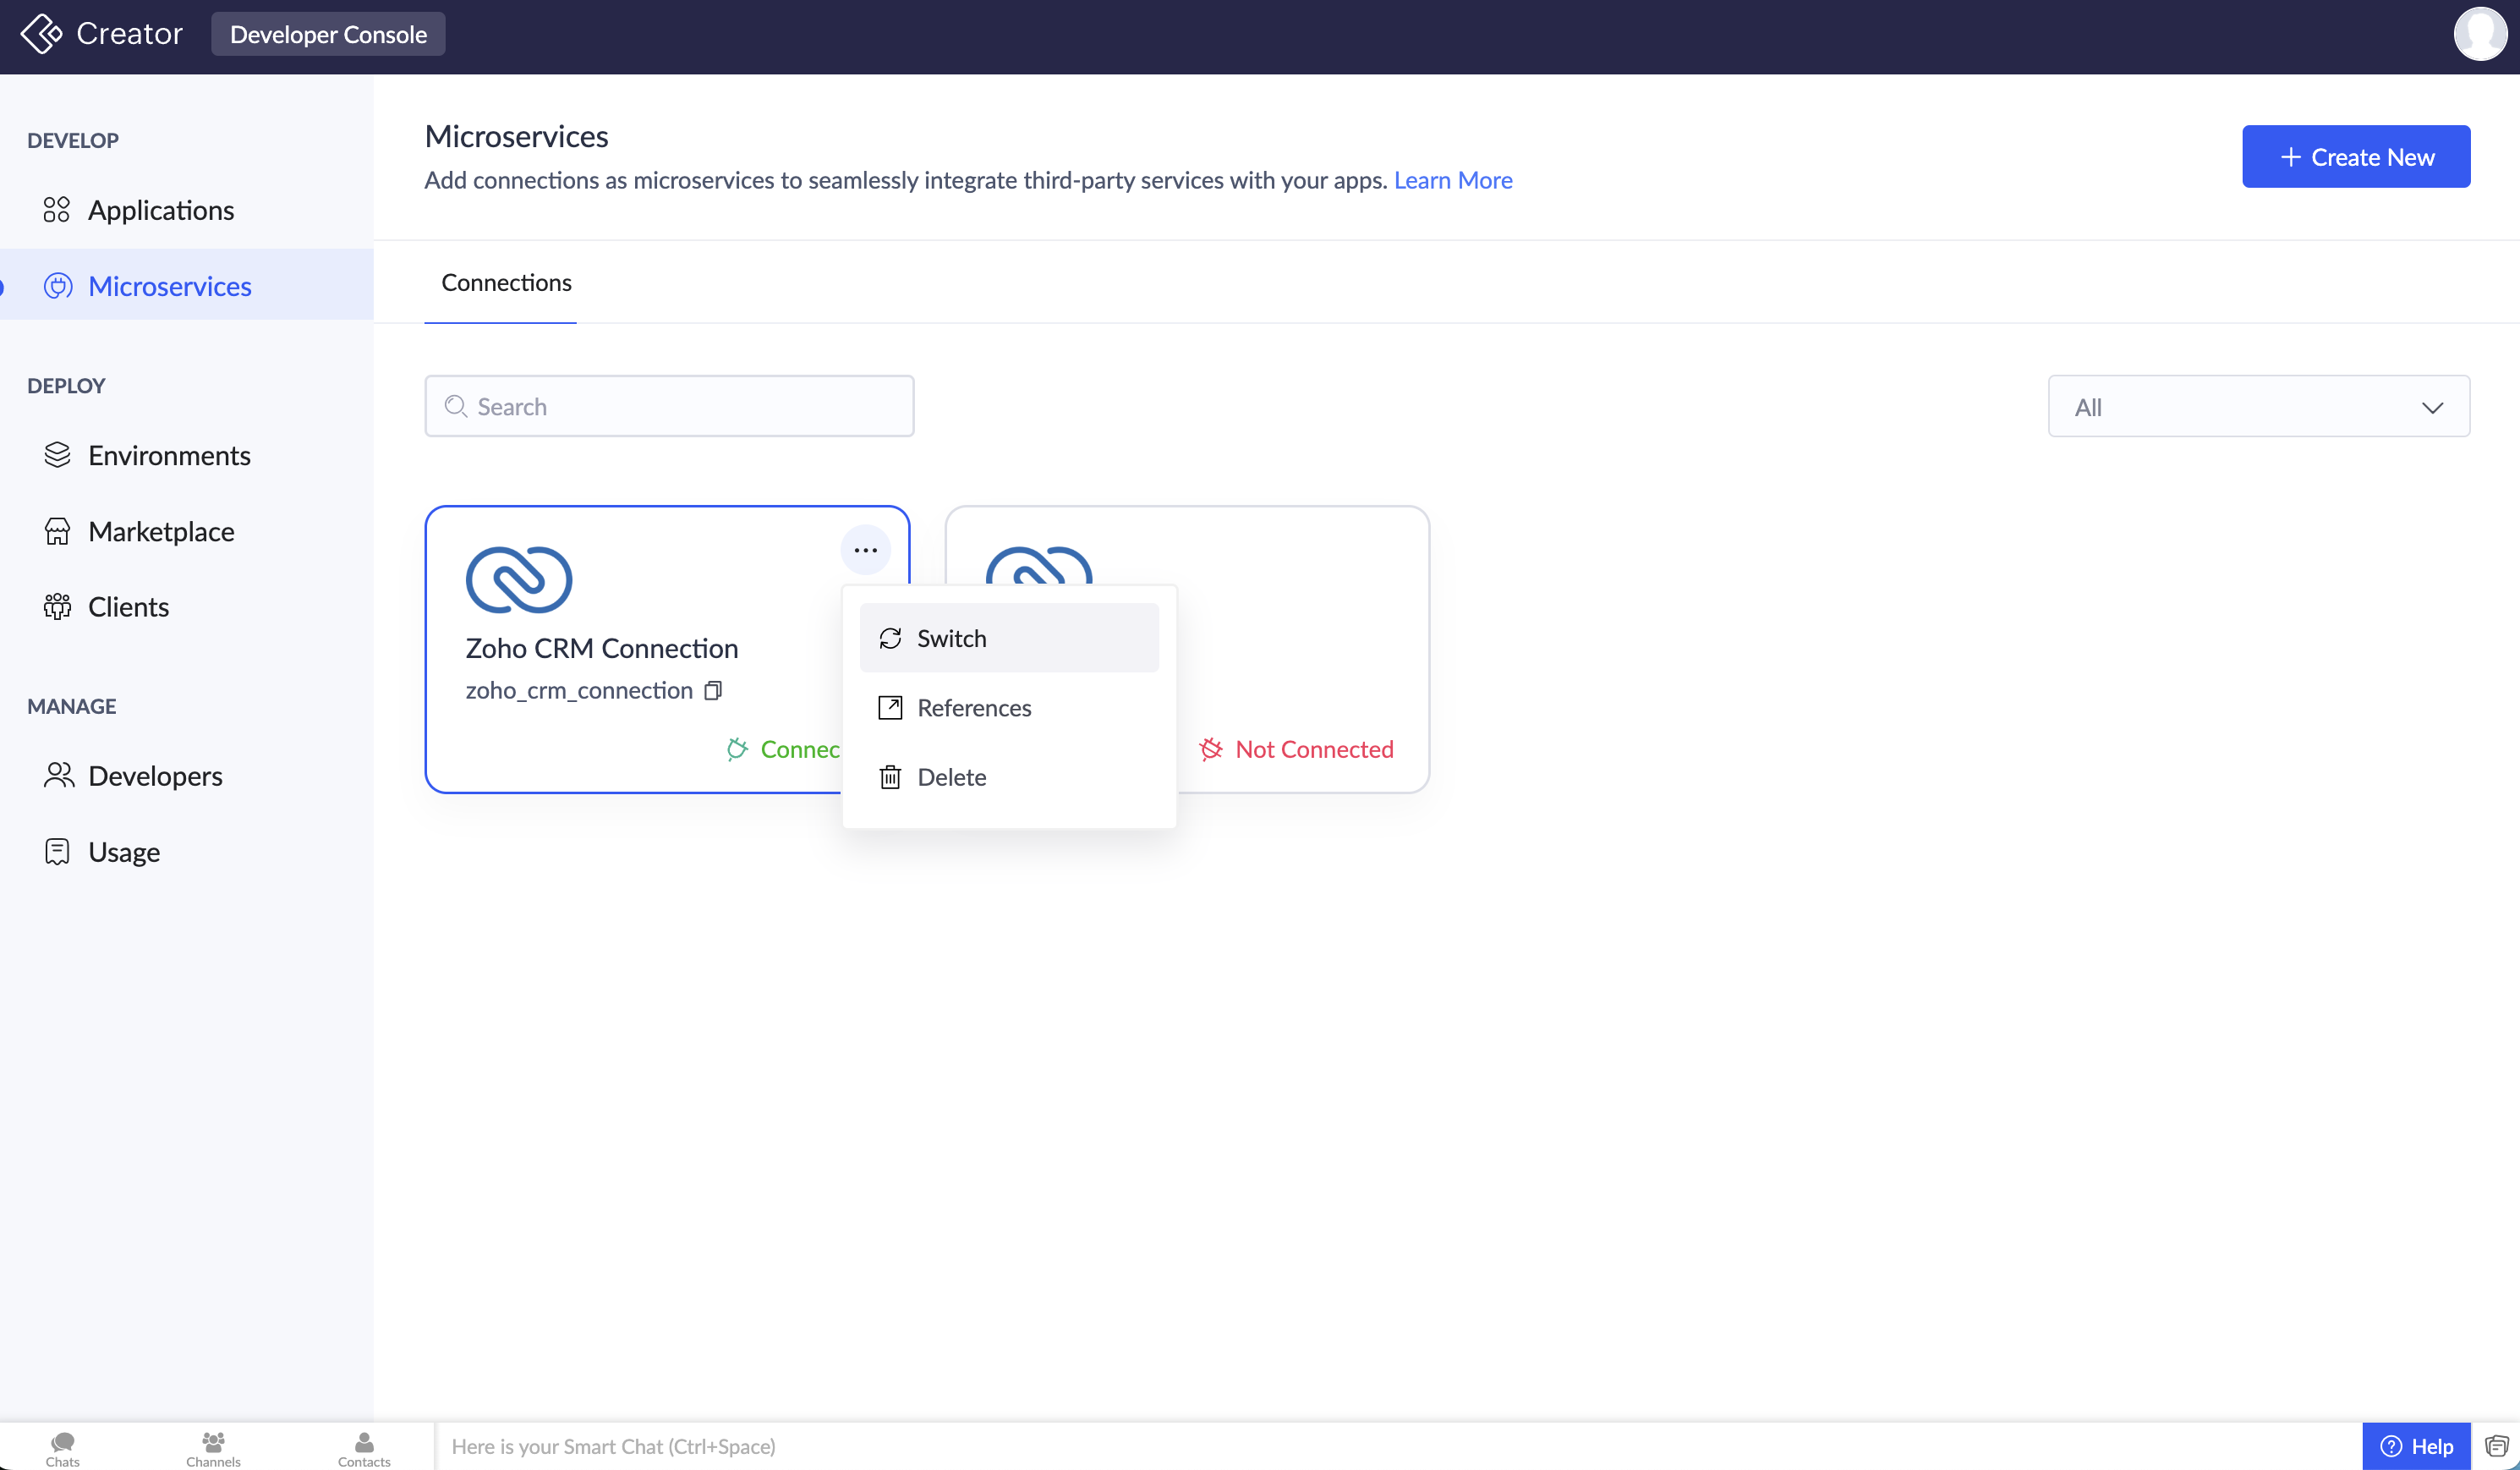
1. Hover over the card, click the ellipsis, and select Switch.
2. Choose an existing account or link a new one for authorization.
Note: For environment-specific authorizations, select the required environment during this process.
3.4. Revoke authorization
When a connection authorization is revoked, the permissions and access to third-party services will be removed, and components using that connection authorization will not function as intended. Only super admins and developers can revoke system/admin connections.
Note:
Revoking an authorization does not affect other connections using the same credentials.
All components using this connection will stop functioning.
- Navigate to the connection details page and select the desired connection.
- Click the revoke icon, and Confirm.
3.5. Edit authorization name
- Access the connection details page and choose a connection.
- Click the edit icon next to the authorization name, provide a new name, and save.
3.6. View connection references
Lists all the areas where the connection is used in the application. You can access it via the ellipsis menu on the connection card.

3.7. Delete a connection
1. Hover over the card, click the ellipsis, and select Delete.
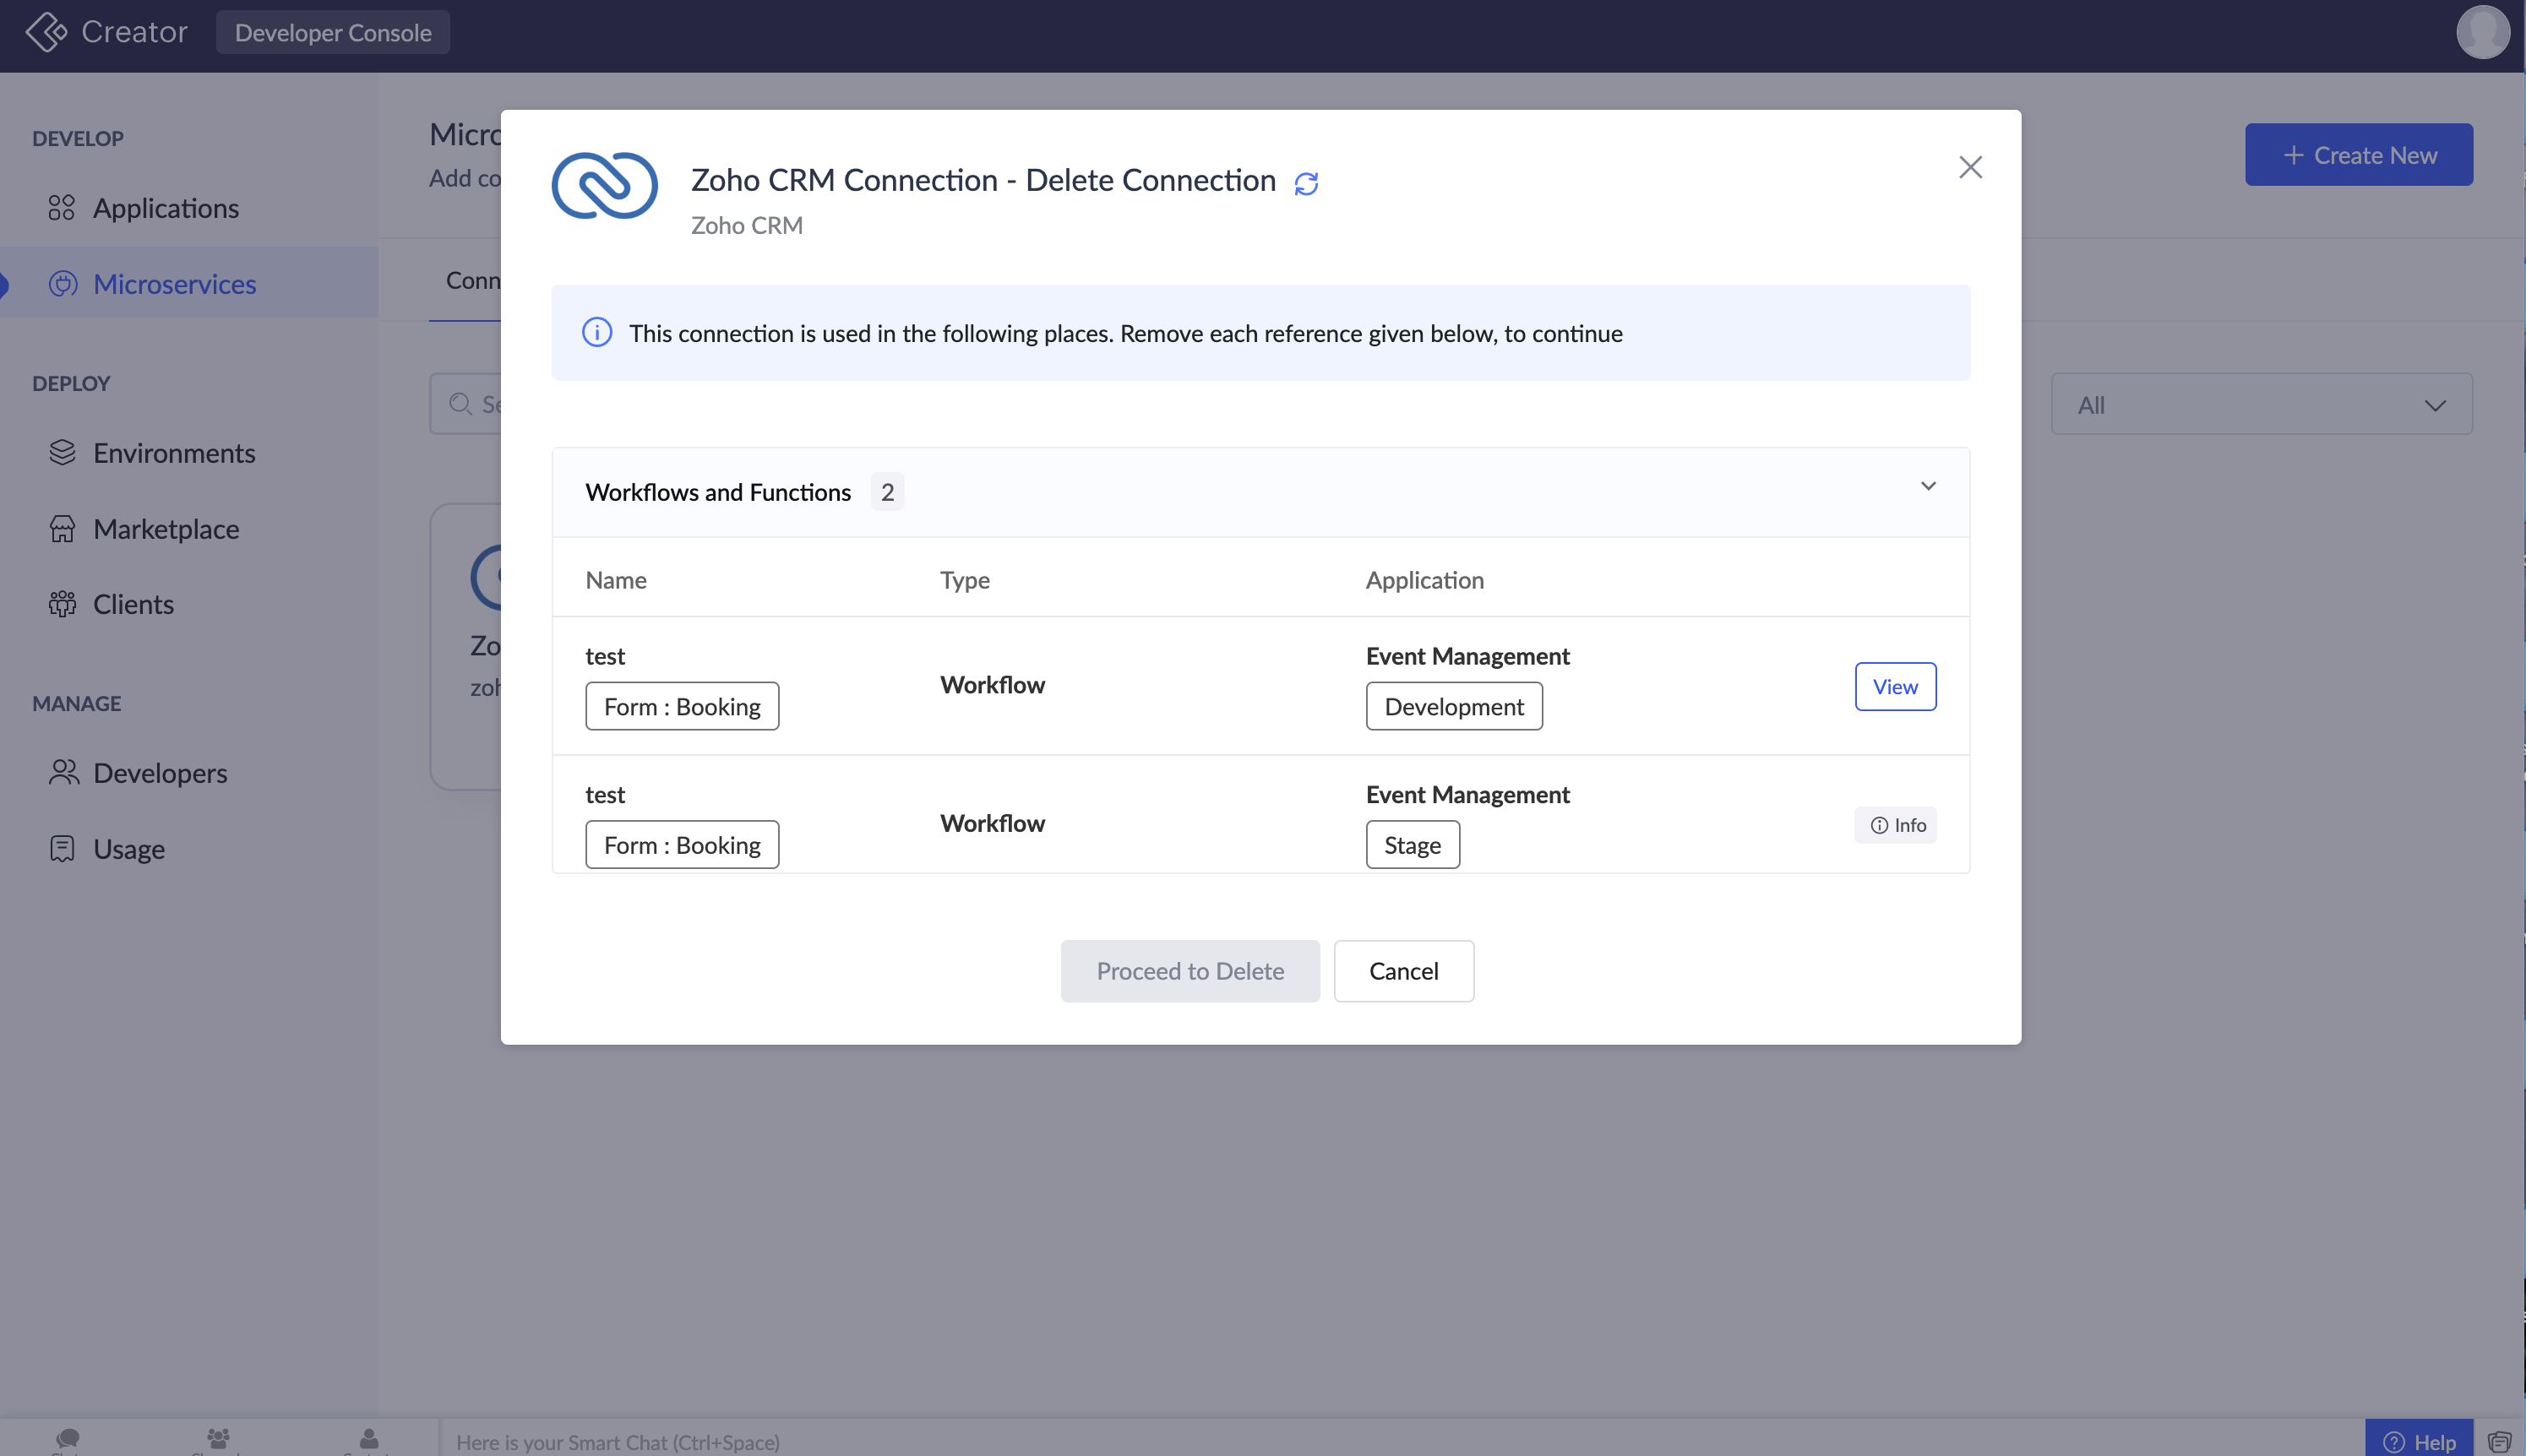
Note:
- If the connection is unused, deletion occurs immediately.
- If the connection is in use in any of the applications, you cannot delete it until the references are removed.
Alternatively, delete the connection via the Connection Details page.
3.8. Per Environment Authorization
When a connection is created, by default the same authorization is used for environment: development, stage, unless you choose to configure them separately. This setup is ideal when your integration uses the same credentials in every environment. If you later decide to use different credentials, Creator provides the flexibility to enable Per-Environment Authorization which allows you to configure unique authorizations for each environment. Using different authorizations lets you tailor access and permissions to suit the needs of each environment while still maintaining environment-specific privileges.
However, there are situations where separate authorizations are necessary, such as when testing with different API keys in staging or development before publishing it to clients.
Enabling Per Environment Authorization
You can enable Per Environment Authorization while creating a connection. If you skip it during creation, you can later enable it for an existing connection by the following ways:
- From the Connections listing page, select Use Per-Environment Authorization from the ellipsis menu next to the connection.
- From the Connection details page, click the Use Per Environment button next to the authorization.
After this, authorization will be prompted by selecting any environment.
Note:
- Per-environment authorizations configured by the developer will not be applied to the applications that clients install. Installed connections will continue to use the default same authorization unless the client enables per-environment authorization.
- Once per-environment authorization is enabled, you cannot revert to a same authorization for all environments. However, you can achieve the same result by selecting all environments and completing the authorization.
Follow the steps given below to authorize the connection to the desired environment.
3.8.1. Authorizing for Different Environments
If Per Environment Authorization is enabled but the authorization is not yet completed, follow the steps below to authorize your environments.
1. Navigate to the connection details page by clicking the connection card. Click Authorize.
2. Select the Authorized Account from the dropdown and select the environment. Click Reuse.

Note: Ensure you have enabled the Use different authorizations for different environments property when creating the connection itself. Only if you've enabled the property, can you select the environments here.
3. Click Link New Account to authorize a connection with a different credential. Select the environment where the authorization needs to be mandated. Click Authorize.
3.9. Manage authorizations of logged-in user connections
When a logged-in user connection is created, it can be authorized and accessed by any logged-in user of that particular application in live or edit mode. However, all the authorization details can be viewed and managed by the super admins. Managing the logged-in user connections includes:
3.9.1. View all authorizations
The View All Authorizations page provides a comprehensive list of all authorizations associated with the connection. To view all authorizations:
- Navigate to the connection details page by clicking the connection card and click View all Authorizations.
- You can view all the authorizations listed with the details of user name, authorization date, user email, and user type as shown. You can search for a specific user using the search bar or filter the user list based on user type and environment.

3.9.2. Switch authorization
Note: Super admins can only switch their own authorizations for the connection from the View all Authorizations page.
When a connection authorization is switched, all the applications that utilize it will henceforth use the new authorization. To switch authorization:
- Navigate to View all Authorizations page and hover over your authorization.
- Click the horizontal ellipsis and click Switch. You will be prompted to switch the authorization of a connection.
- Choose from the Authorized Account dropdown whether you want to reuse an already saved account.
Note: Only if you've chosen Use different authorization for each environment you can select the environments here.
Alternatively, click the Link New Account to authorize the connection with different account credentials. Choose the environments in the popup and click Authorize.
3.9.3. Revoke authorization
When a connection authorization is revoked, the permissions and access to the third-party service gets removed, and the components using that connection authorization will not function as intended.
Note:
- Super admins can only revoke their own authorizations for the connection from the View all Authorizations page.
- Revoking a connection authorization of connection will not affect other connections or environments using the same authorization.
- Before revoking a primary account, it is recommended to designate another account as the primary. This step is essential to maintain uninterrupted application's functionality, as un-linking the primary account may result in the disconnection of linked schedulers.
To revoke authorization:
- Navigate to the View all Authorizations page and hover over your authorization.
- Click the horizontal ellipsis and click Revoke.
3.9.4. Mark as primary
When a logged-in user connection is created, the super admin's account, that authorized it for the first time, will be designated as a primary account. However, this primary account status can be transferred to another account. For a logged-in user connection, a primary account is required for creating schedulers to channelize integrated services through a single account.
Follow the steps given below to mark an account as primary.
Note: Only super admin can switch the primary account status to another account.
To mark an account as primary:
- Navigate to the View all Authorizations page and hover over another authorization that you want to mark as primary.
- Click the horizontal ellipsis and click Mark as Primary.
- Select Proceed in the confirmation pop-up that appears.
The account will be marked as primary.
4. Points to note
- Connections can be created and managed only by super admin and developers.
- Connections can be authorized for testing purpose by super admin and developers.