Using Built-In Telephony
Once built-in telephony is set up, users can personalize their phone preferences, manage user availability, make outgoing calls, receive calls, view calls in conversation and calls in queue, and add follow-up activities in CRM.
Set User Availability
A user can set their status as online or offline and incoming calls can be routed to voice mail or declined with a message to the caller when the user is offline.
To set user availability
- Click the Phone option at the bottom of CRM.
- Select either Online or Offline based on your availability to answer incoming calls.
Set Preferences
Each user can set their own individual preferences to manage outgoing calls. They can customize how the calls will be connected (Browser or Custom Phone ) and define Caller ID settings.
- If Browser is selected, the calls will be made directly from the browser.
- If Custom Phone is selected, the calls will be connected through a specified phone number. The custom phone number can be either a landline phone or a mobile phone.
To set preferences
- Click the Phone option at the bottom of CRM and select Preferences .
- Select Browser or Custom Phone from the Make my calls through dropdown.
If you select Custom Phone, enter the phone number to connect the calls through.
Manage Custom Caller ID
If the caller ID option is enabled for a user, the phone number which outgoing calls are made from will be hidden and an alternative number will be displayed. This is useful if you do not want the outgoing call number to be made public or if you want to route return calls to a specific number, you can set that number as the called ID number.
For example, in call centers, incoming calls and outbound calls are managed by different teams. When caller ID is enabled, all outgoing calls will display the incoming customer support phone number so that if a customer calls back, the call will be routed to the support team who handles incoming calls.
To enable caller ID
- Navigate to Setup > Channels > Telephony > Installed > Built-in > Details.
- In the Built-In Telephony page, click the Telephony Users tab.
- Hover over the telephony user for whom caller ID needs to be enabled and click the More (...) icon.
- Select Edit Telephony User.
- In the Edit Telephony User popup, enable the Allow to add custom outgoing caller IDs checkbox.
- Click Save.
To add caller ID
- Click the Phone option at the bottom of CRM and select Preferences .
- Select the +New Caller ID option on the Preferences page.
- Add the phone number with the country code on the Add Caller ID page and click Verify .
- Answer the automated phone call and enter the 6-digit validation code displayed on the Add Caller ID Page to verify the phone number.
Notes:

- Any phone number can be added as caller ID.
- If a user adds more than one caller ID, then the caller ID will have to be chosen every time an outgoing call is made.
- The phone number must be verified to enable the caller ID feature.
- The incoming (return) calls will be routed via the existing service provider.
- If you want to receive incoming calls via Zoho, you will have to contact your service provider to forward the calls to the number you purchased in Zoho CRM. Alternatively, you can contact us for porting assistance.
Make Outgoing Calls
A user can make outgoing calls either from records or by dialing the number manually in the dial pad.
To make an outgoing call from record
- Go to the record.
- Click the Call icon next to the phone or mobile number on the record detail page.
To make an outgoing call from the dial pad
- Click the Dial pad option at the bottom of CRM .
- Dial the number and press Call.
Receive Incoming Calls
When a user receives an incoming call from a contact, a business card view of the contact will be displayed.
The following actions can be made while receiving calls in your CRM:
- The call can be put on hold, resumed, and muted as required.
- A call summary can be added to the Call description for future reference.
- The end call option can be used to finish the call.
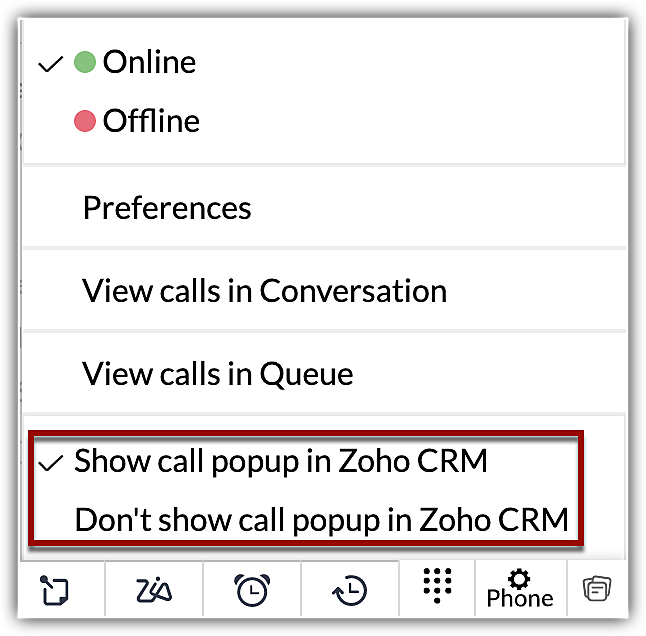
You can also choose to show or hide the call pop-up in Zoho CRM.
View Calls in Conversation
You can view all the calls that are ongoing within your organization at that moment, the phone number of the caller, call duration, and the user who started the conversation.
To view calls in conversation
- Click the Phone option at the bottom of Zoho CRM.
- Click View calls in Conversation.
View Calls in Queue
If your organisation has set up call queuing option, all the calls waiting in queue can be viewed at a glance. In the call bar, details like phone number and the wait time are displayed. Users can also answer calls from queue.
To view calls in queue
- Click the Phone option at the bottom of Zoho CRM.
- Click View calls in Queue.
To answer a call from queue
- Click on the three dots beside the caller's name/number.
- Click Answer the call.
NOTE: Users can answer a call from the queue if they are not in any ongoing call.Follow-up activities
At the end of every call, a user can add a follow-up call or a follow-up task from the Call Ended window. These will be automatically associated with the record.
See Also: