Creating Kanban Views
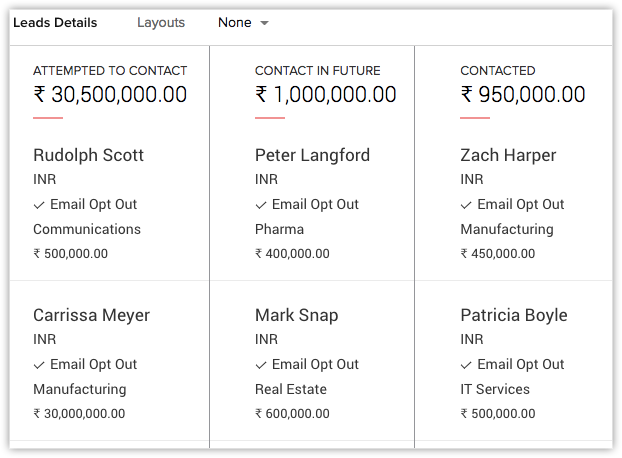
Below is an instance, where the leads are listed down based on their current state along with their probable revenues. The information is displayed in two ways: List View and Kanban View.
In comparison to List View, where all the records are listed one after the other, a Kanban view segregates your data based upon the lead status giving a clearer picture. You can also view the aggregate revenue under each status. You can create such kanban views for all modules except Socials, and Visits.

- Social
- Visits
You can create a Kanban view for any module. To create a Kanban view you have to enter the following details:
- Kanban View name - You can enter any name for the Kanban view created, for example, "Lead Details".
- Categorize by - Select the category in which you want to segregate the data, for example "Lead Status".
- Aggregate by - Select a currency for which you want the aggregated value. For example "Expected revenue, cost per conversion, cost per click etc. ". A summed up value for each category will be displayed.
 Note: This field is not mandatory. The user can configure them according to their usage. The supported fields are integer, decimal, currency, formula, rollup summary.
- Select Fields - Select the fields that you want to view within each record.
- Header style - Choose mono color or random colors for the headers.
You can create multiple Kanban views per module (which will vary depending on the edition).
Users will have the ability to save multiple Kanban views, each with a different 'Categorize By' field. This will help streamline the user experience, making it more convenient and less laborious for users who regularly utilize the Kanban view.
|
Categories
|
Headers
|
|
Event Promotions Status
|
Event Promotions Status
Event Websites
Facebook Event
Social Media Groups
Influencer Marketing
Landing Page Launch
Event Hashtags
Announcement Email
Early Bird Discounts and Perks
|
|
Logistic Status
|
Venue
Transportation
Contingency Plan
Planning
Timeline
Event Goals
Technology
Warehousing
Attendee Transportation
Budget
Catering
Signage
Staff
Theme
Communication Strategy
|
| Venue Booking Status |
Event Requirement
Event Budget
Attendee Number
Location
Possible Event Venues
Confirm with Company
Book
|
Within the Deals module:
|
Category
|
Details
|
|
Business Scale
|
Large Scale
Small Scale |
|
Customer Source
|
Advertisement
Referral
Partner
|
|
Stage
|
Qualification
Needs Analysis
Value Proposition
|
|
Reason for Loss
|
Price
Unqualified Customer
Wrong Target
|
Event Promo status is Published
Venue Booking status is Still Hunting, and
Organizers' Tickets status is Under Process.
The user therefore needs a separate Kanban view for each of the above fields and they can view their records based on the field they use to sort them.
Create a Kanban View
Creating a Kanban view will give you precise information about all the records at one click. You can create a Kanban view for all the modules except activities, visits and finances.
To create Kanban view
- In Zoho CRM, go to a Module.
-
In the Module page, click the Kanban View icon.

- In the Kanban View Settings pop-up, fill the following details:
a) Kanban View Name
b) Categorized By
c) Aggregate By
d) Select Fields - Click Save.
Given that you can create multiple views per module, you can also manage and delete views based on your requirement. Managing views would mean that you can reorder the Kanban views based on your individual preference.
Re-ordering is user specific. If User A reorders their list views as 1-2-3, it will not affect User B's view. They can re-order it to 2-1-3.
After you create Kanban view for a module, you can either add or delete the information based on your requirement.
To edit the Kanban settings
- In the Modules page, click Kanban View Settings.
- In the pop-up, edit the details.
- Click Save.
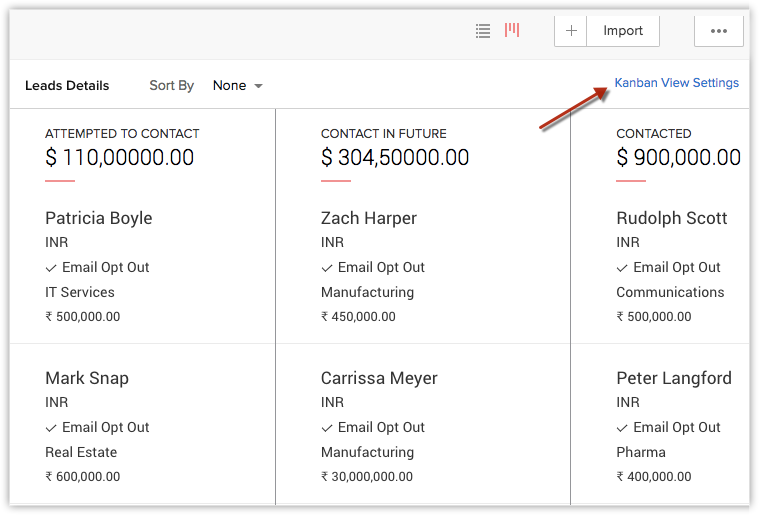

- The Kanban view settings option is enabled only if the picklist fields are available in the selected module.
Working with Kanban View
In addition to viewing the record details in an organized manner you can perform several other operations from the Kanban view. Let us take a look at each of them:
- Drag and Drop - You can drag and drop a record from one column to another based on the requirement. For instance, a lead listed under "attempted to contact" has declined the present offer and you want to keep them in pipeline for future reference. So, instead of editing the record and changing the status you can simply drag and drop the record to the desired column to automatically change the status. Also, the aggregated value of the respective column will get updated.
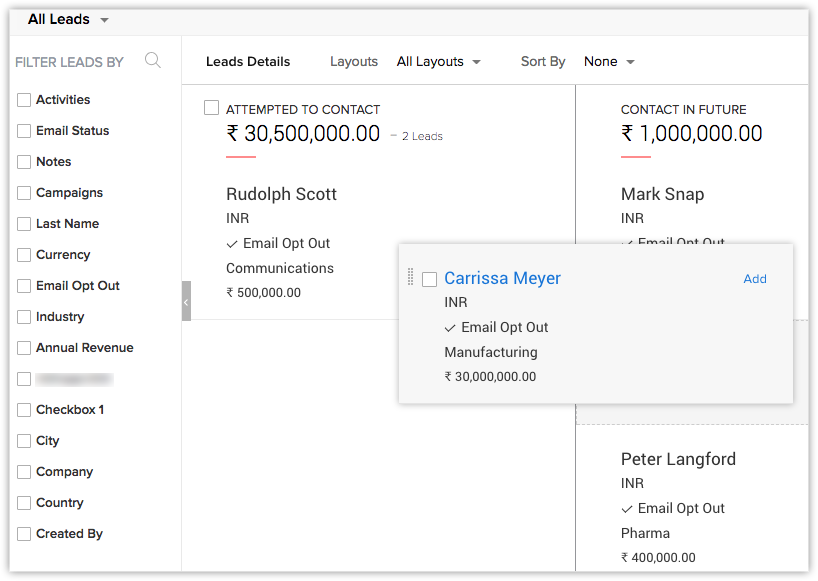
- Expand and Collapse - You can now expand and collapse each stage within your view. Besides, you can also drag and drop cards to collapsed stages.
* Only me
* Everyone
* Selected users
Note. If you have territories within your organization, territories with subordinates will be displayed in the drop down.
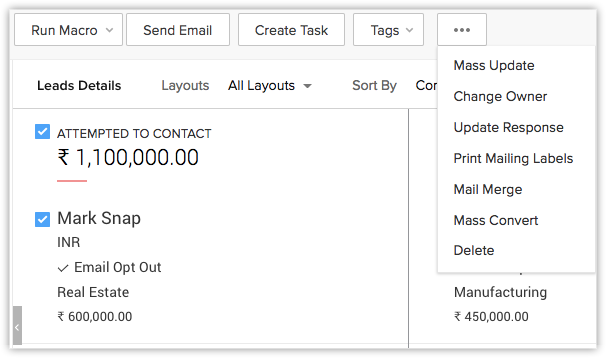
- Mass Operations - You can send mass emails, create tasks, create macros and so on. From the More Actions icon, you can change owner, mass update a field, mass convert the leads or delete leads.
- Select a Layout - A user can select a layout in which they want to view the module.
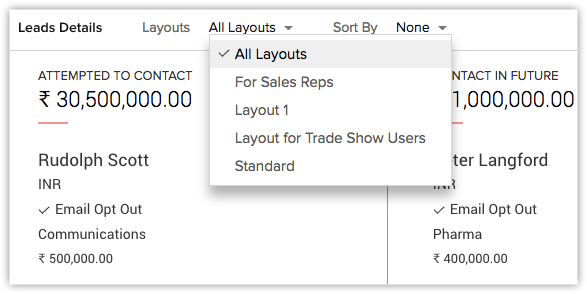
- Select a Pipeline - A user can select a pipeline in which they want to view the stage picklist.

The applied layout and pipeline will be persisted user-specifically for the respective Kanban View.
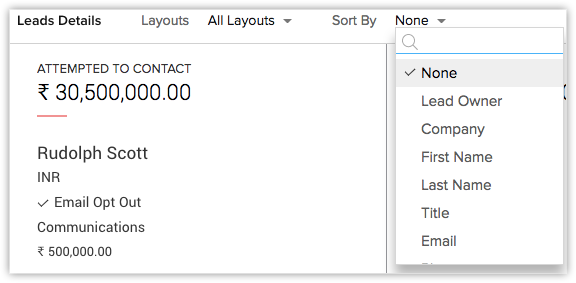
- Sort Records - A user can sort the records based on the fields they want to view like company, first name, last name, lead owner and so on.
Zoho CRM Training Programs
Learn how to use the best tools for sales force automation and better customer engagement from Zoho's implementation specialists.
Zoho DataPrep Personalized Demo
If you'd like a personalized walk-through of our data preparation tool, please request a demo and we'll be happy to show you how to get the best out of Zoho DataPrep.
You are currently viewing the help pages of Qntrl’s earlier version. Click here to view our latest version—Qntrl 3.0's help articles.
Zoho Sheet Resources
Zoho Forms Resources
Zoho Sign Resources
Zoho TeamInbox Resources
Related Articles
FAQ: Kanban View
1. What is a Kanban view and what are its benefits? The Kanban view is a card-based view that displays records in different categories. The user can choose the criteria for the categories. For example, customers can be segregated based on the ...FAQ: Grid View in Zoho CRM
What is Grid View in Zoho CRM, and how does it enhance record management? Grid View in Zoho CRM lets you work with your records in a convenient spreadsheet-style layout. It makes it easy to add or update data directly, quickly perform bulk edits, ...Module Views - An Overview
Introduction Businesses, irrespective of industry, all have one thing in common—an ever-growing database. From customer information to transactional records, product portfolio, or even communication bytes—your data of all types grows at the same pace ...Kanban Board for Zoho CRM - FAQs
What is the Kanban Board for Zoho CRM extension? The Kanban Board for Zoho CRM extension is a powerful visual tool that enhances your sales pipeline management. It provides real-time visibility into the various stages of your sales process, allowing ...Kanban Board for Zoho CRM
When a business project increases in size or your team grows, there will be a substantial amount of things for you to manage as a team lead or a manager. The Kanban Board extension for Zoho CRM provides an organized way to keep track of all the ...


