What is Data Migration wizard in Zoho CRM?
The data migration wizard in Zoho CRM ensures that your data is migrated correctly and helps you reduce much of the manual work. It automatically maps import files to CRM modules and matches data columns to the appropriate fields in Zoho CRM. In situations where your pre-existing data requires modules that aren't already available, Zoho CRM creates the modules and maps the relevant data to them. The tool gives you a clear indication of the number of files that are mapped, unmapped, and any that are not supported.
See also>> Data Migration
Can I migrate data from other CRMs to Zoho CRM?
Yes, you can switch from other CRMs to Zoho CRM. You have two options: do it yourself or get help from our experts.
Before you start, make sure your data backup file from your old CRM is in the right format:
-
Excel (XLS, XLSX)
-
Comma Separated Value (CSV)
-
Business Card
-
vCard Format (VCF)
To make the process smooth, customize your account by adding any needed fields before moving data. This helps with field mapping, ensuring a successful transfer.
Check out the complete migration checklist
here and follow the best practices for a smooth transfer of data. You can also find CRM-specific migration guides here.
How can I migrate my data to Zoho CRM?
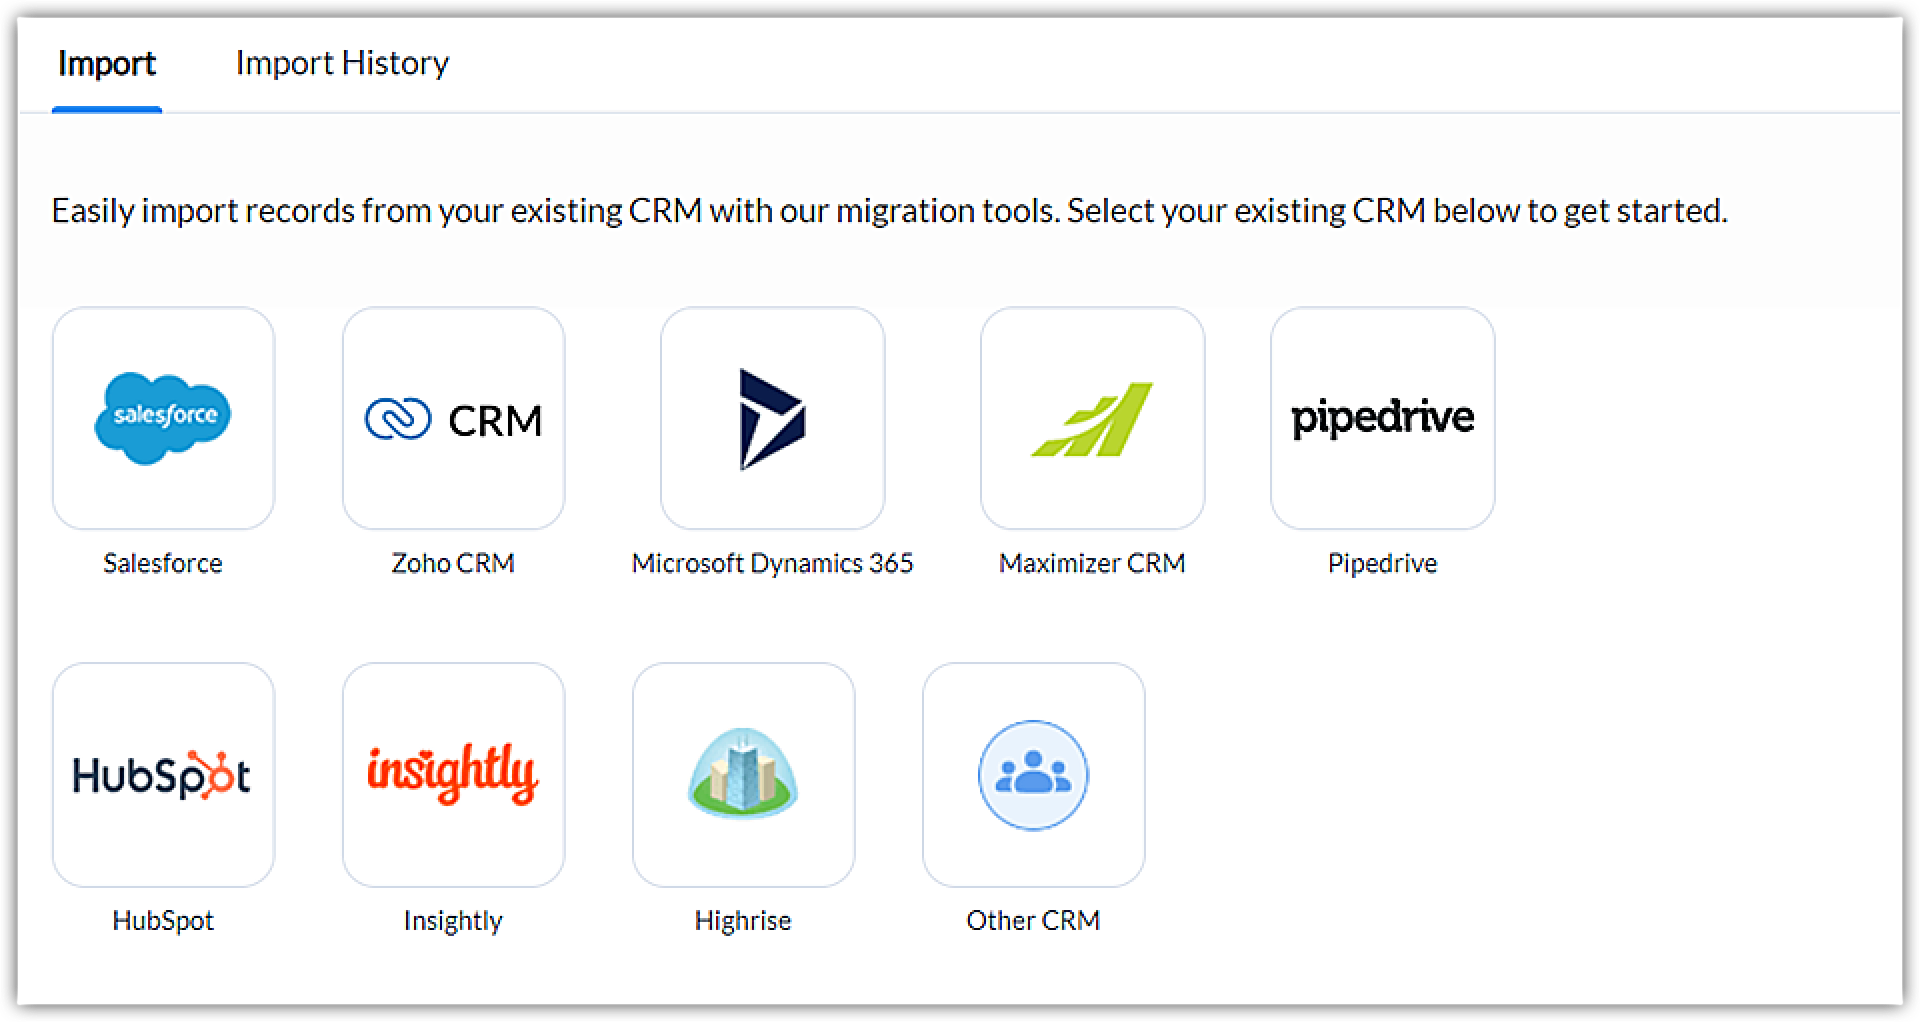
In your CRM account, go to Setup > Data administration > Import and then choose the CRM from which you’re migrating.
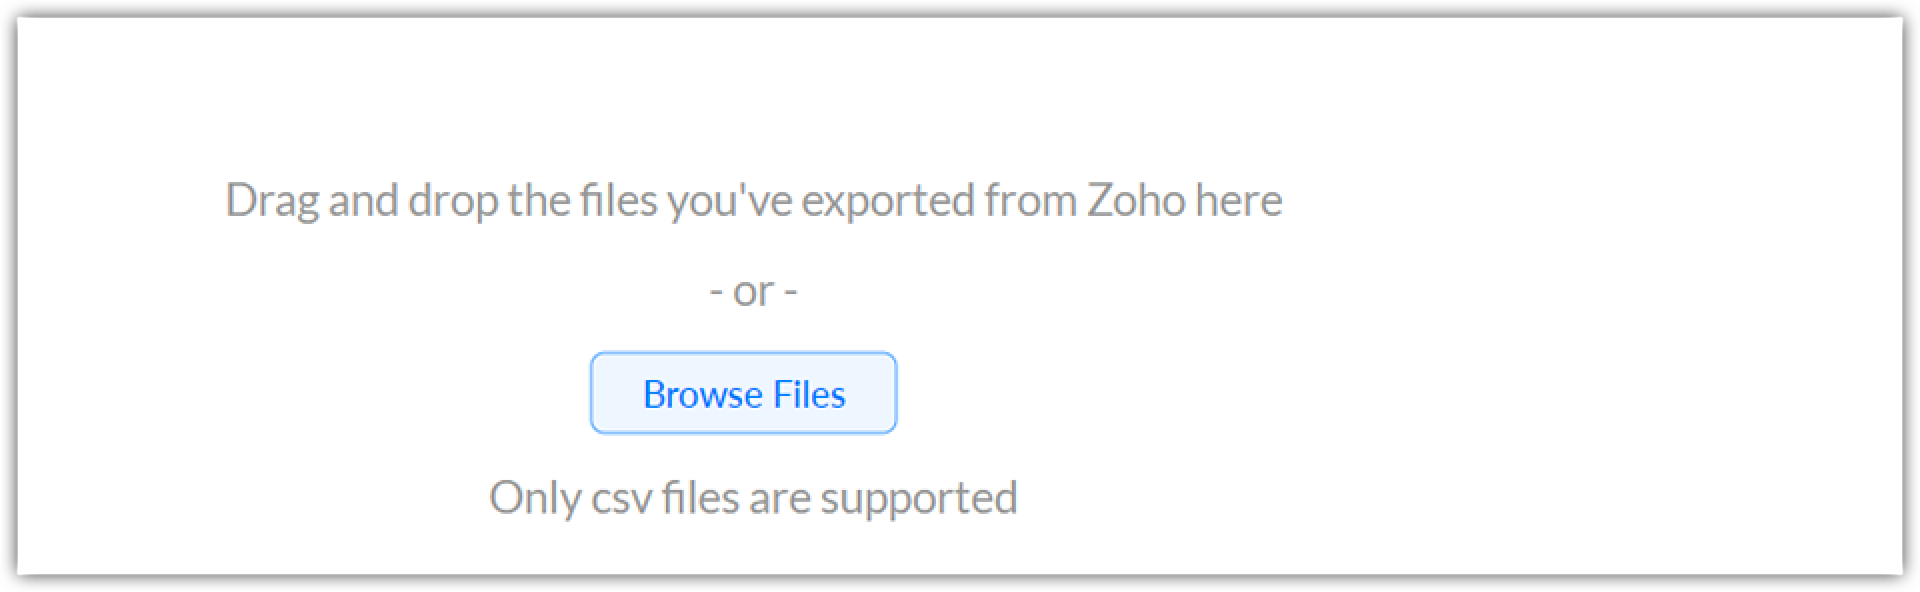
If you’re uploading CSV files that are already saved on your device to perform the migration, click Other CRM. Click on the Browse Files button and select the CSV file for migration.
How does Data Migration work?
Data migration works based on unique identifiers. Migration IDs are used to associate records between modules and for record owners.
To migrate records, we must make sure, we have inserted a unique ID for each record.
What is a Migration Id?
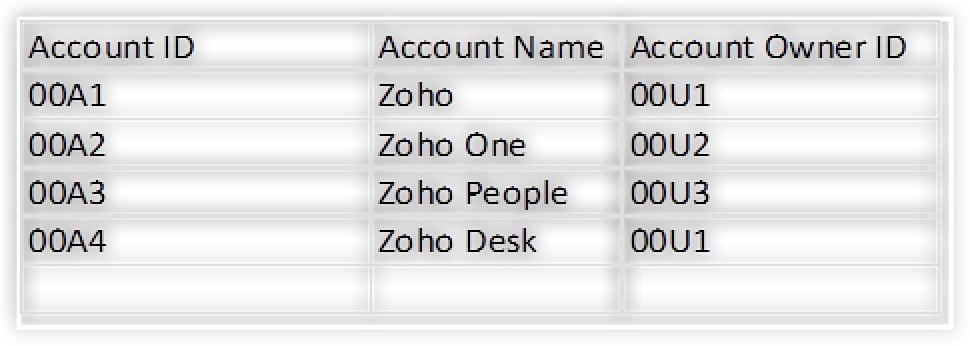
Migration IDs are used to associate records between modules and for record owners. Every record should have a unique ID. Contacts and accounts are interconnected with each other. Multiple contacts can be associated with one account.
In the screenshot below, you can see a contact named Sathish with the ID 00C1 (this ID is only for backend purposes). It will be associated with the Zoho account.
When you go to Account modules and click Zoho. You can find the Contact Sathish. The process is the same for all the modules.
Why do you need to migrate your data?
Whenever our customers plan to switch to Zoho CRM from their old CRM tool or a non CRM tool, they can opt to migrate their pre-existing data into Zoho CRM. Since, In module wise Import options there are few restrictions. Therefore, we recommend migration for those customers who have moved from a different CRM to Zoho CRM.
Wherein, through migration, you can migrate the records to all the modules. We have the option to migrate the record Images, Inventory modules, Activities, attachments, documents etc.
Note: The maximum file size for each file is 2GB, with a limit of importing 200 files at once, and a total file size cap of 25 GB.
How can we create Migration Ids?
Migrations works based on the unique ID’s. If there is no unique ID’s in your data file you can create your Own ID’s. It can be numeric, alphanumeric or Alphabets. But it should be unique across all modules and all records.
The ID’s used in Contacts module can not be used as unique ID for Account modules.
Above is a sample data with manual ID generation 00A1 is the ID that is used for your CRM account.
How can I associate records between modules?
Id’s - Main concept for Migrations. Let take a scenario to check how it works;
Accounts and Contacts are interrelated with each other. One Account can hold Multiple Contacts. When you open the Account module records, you can view all the associated Contacts in it. This purely works based on the ID’s
How can I assign the records to the Owner?
Associating records to owner is based on the migration Ids. In order to associate the record owner, we need to first migrate the user.csv while migrating other modules.
User .csv file should contain first name, last name, email and user Id within it. Here, in the below table you can see that the owner Id is 00U1, 00U2, 00U3, etc,.
Supported formats for migrations are ZIP folder and CSV. Upon uploading the ZIP folder, you must make sure that there are no sub-folders in it. When you open the ZIP folder, It should show only the CSV files in it.
Note: The ZIP files size should be up to 10 GB or 200 csv files.
What are the types of Error messages one can find during Migration?
Generally, there are 5 types of errors which may occur during a migration process.
- Mandatory fields are empty
- Parent record not found
- File not found
- Child record not found
- Inserted file format is wrong
-
Mandatory field left empty error: This type of error occurs when the defined mandatory field/s are left empty or aren't filled properly.
For example, the Lastname field inside the Lead generation modules is a system-defined mandatory field. If the entry's last name field is empty, all records would be skipped, and an error would be thrown "mandatory fields left empty".
-
Parent record not found: If the record for the parent module is not migrated along with the file, this error will occur.
For example, suppose the contacts and the accounts modules are linked in the data. However, the account data was either not migrated or the Ids you used to migrate the accounts were not the same as the ones you had stored in the file.This will throw "parent record not found error".
If you have utilized the above sheet for migration, The Ids used for the migration of the accounts module are different from the Ids shown in the contacts module sample. This is one such situation in which the error "Parent Id not found" appear.
This error will occur whenever the associated records are not migrated.
-
File not found: This error occurs when the attachment files are not found during migration. To eliminate this error, make sure that the attachment folder consists of all the attachments. Attachments in the record are stored in CSV format. Now if, that attachment e.g; Alpha.jpeg is present in the CSV format but is missing from the folder, we will encounter this error.
-
Child record not found: Whenever you migrate the Inventory modules such as Quotes, Sales Order, Purchase Order, etc, you must make sure that the corresponding parent module/s(products) are migrated. If the product Id is not present in the file or if it is not migrated along with the file this error will occur.
For Instance, if you’re migrating the Quotes module and Quotes line item file. In the line item file, if you miss to add the product Id or if the products are not migrated with the file, you will encounter this error.
-
Inserted file format is wrong: This type of error occurs when the file format being added is other than .csv file. The Zip folder should contain .csv files while migration. Make sure there are no other subfolders in the Zip folder before inserting it otherwise, this error will be reflected.
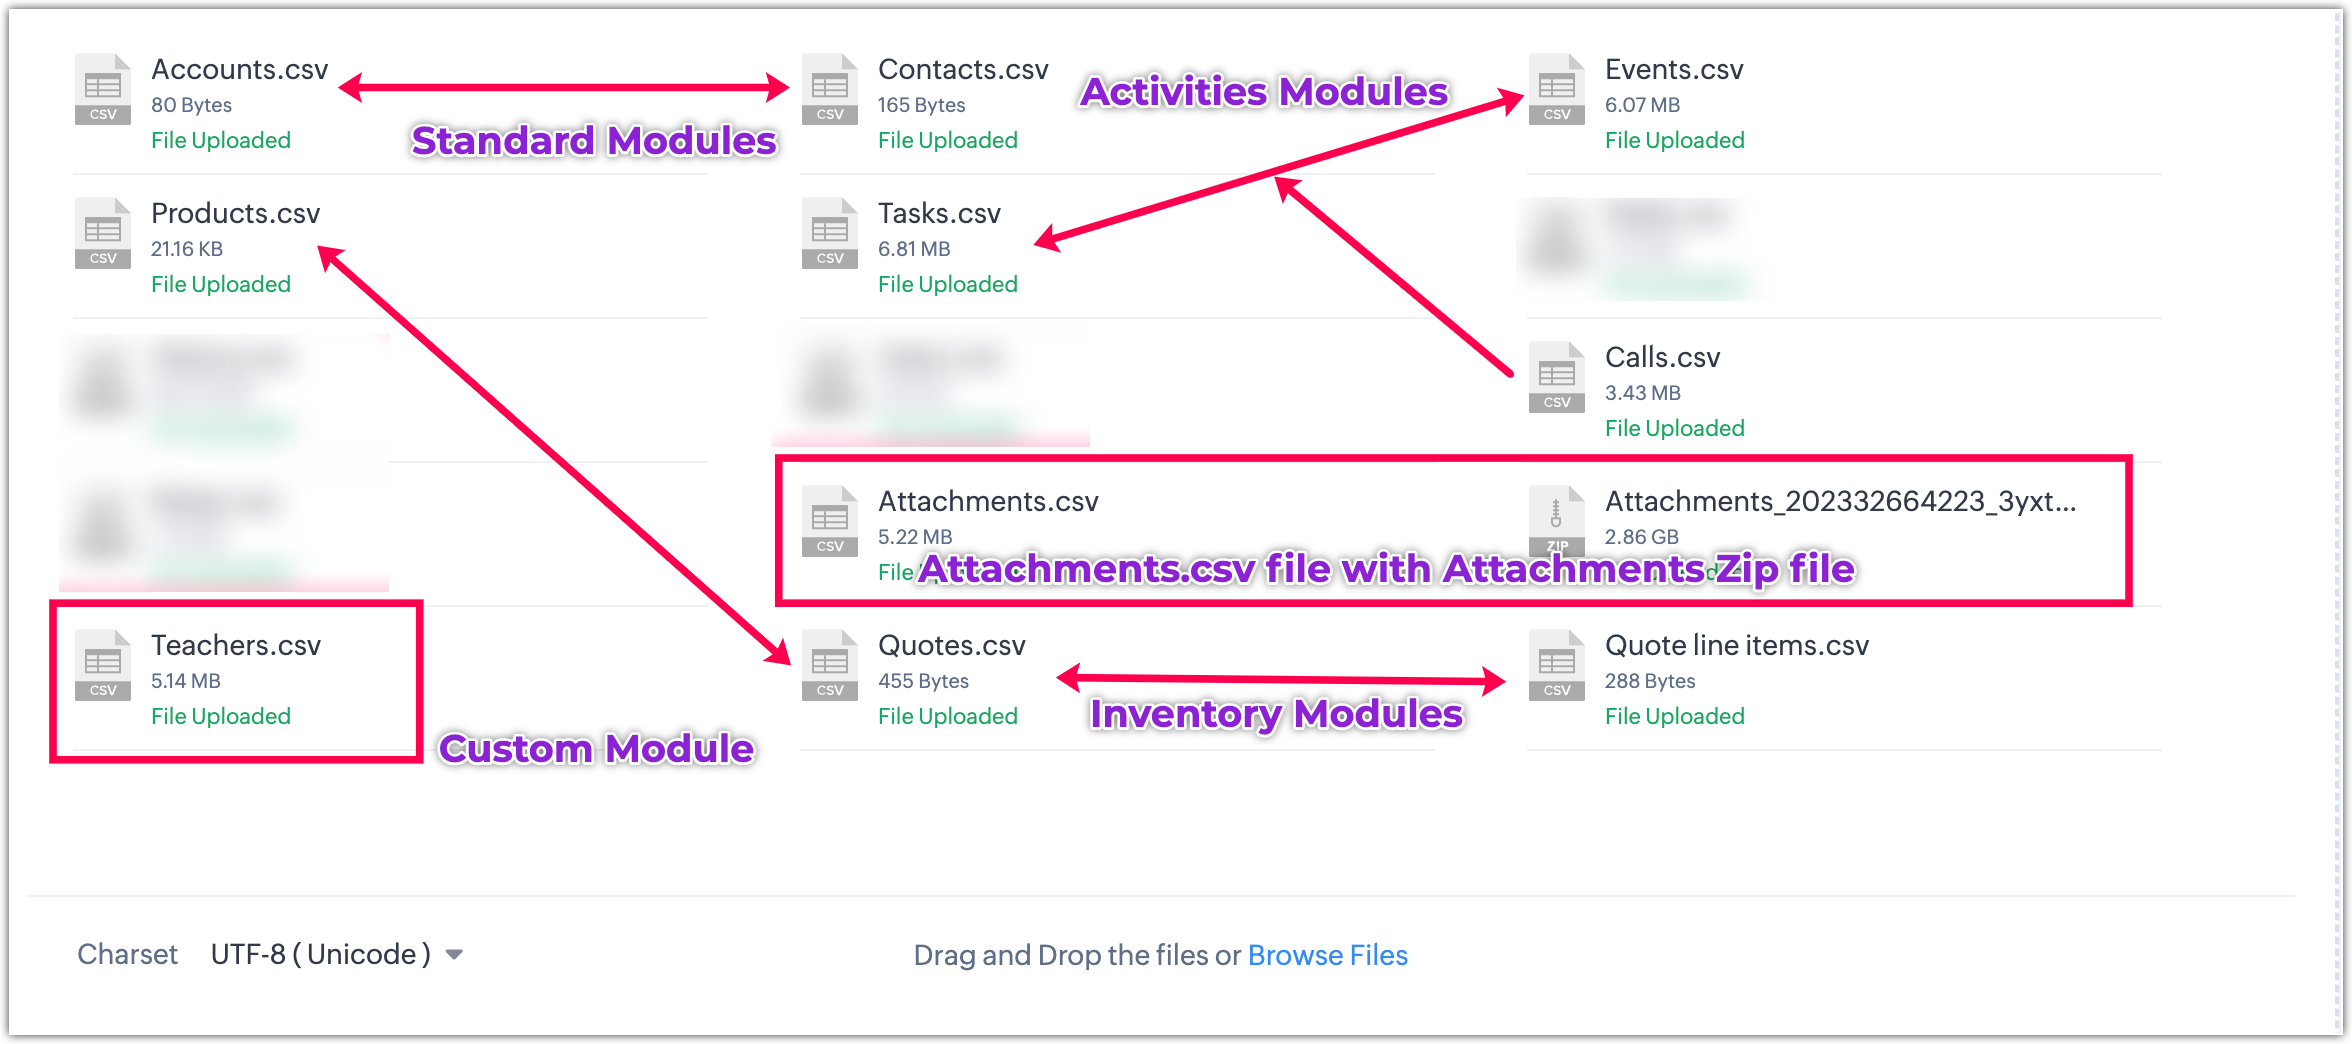
What are the types of Modules that can be migrated to the Zoho CRM?
All the standard module's data (Leads, Contacts, Accounts, Deals), Calls, Meetings, Tasks (Activity modules data), and Inventory modules data can be migrated into the Zoho CRM.
Moreover, if a client has any other files or custom modules that need to be migrated, those modules can be migrated into the Zoho CRM by creating the custom modules separately.
How do the sample files look for the Migration?
Data can be uploaded in two different ways in Zoho CRM migration widget.
- Module wise individual .csv files.
- Zip files - All the required .csv files are kept in a single folder and that folder is zipped (compressed).
However, please keep in mind that within a zip file there shouldn't be any other zip files. It should contain .CSV files inside a zip folder.
Please refer to the images mentioned below of the Individual files and Zip files.
Individual files:

Zip files:
Arrange all the individual files in one folder, as shown below:
What are the unsupported file types while migrating to Zoho CRM?
XLS file types that lack any data under the column headers will be deemed unsupported if uploaded for migration. Similarly, corrupted files will also be classified as unsupported.
When attempting to upload an individual file or a file within a zip archive that contains no data except for the column headers, the system will display an error message.
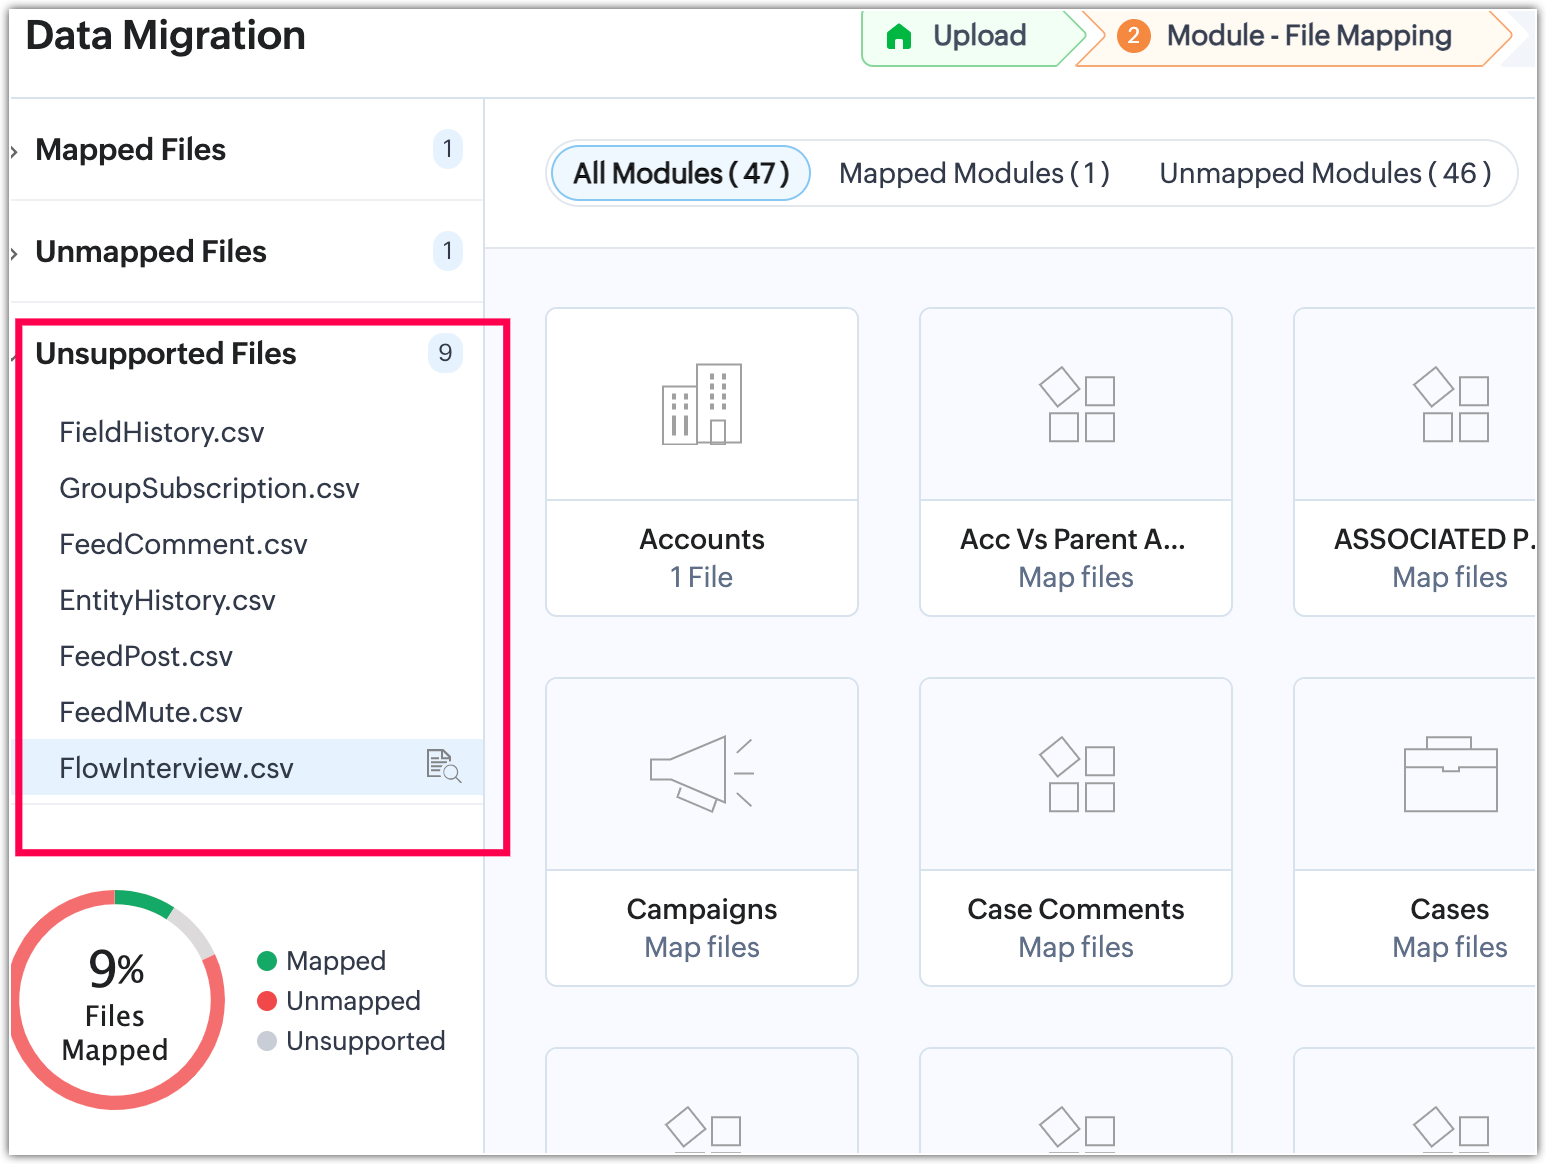
What is the difference between the unsupported and unmapped files while migrating data in Zoho CRM?
Unsupported files refer to files that do not contain any data and are therefore unsuitable for migration purposes. Additionally, if a file is corrupted, it will also be classified as unsupported during the module mapping stage.
On the other hand, unmapped files are files that contain data but have not yet been linked to an existing module or created as a custom module during the module mapping stage. Furthermore, any irrelevant files uploaded alongside a group of files or within a zip file will be recognized as unmapped files by the system during the migration process.
Please refer to the unmapped files image below:

Refer to the unsupported files image below:
How can I migrate data to the custom layouts in Zoho CRM?
To migrate data into the custom layouts, you need a supported layout file.
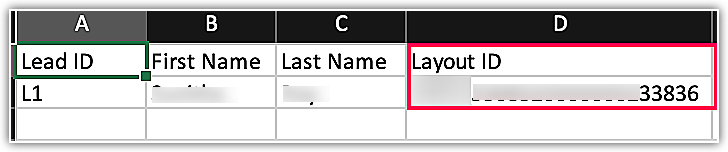
Please refer to the sample layout file, which is shown below. It should contain the Layout ID, Layout Name, and Tab Name (Module).
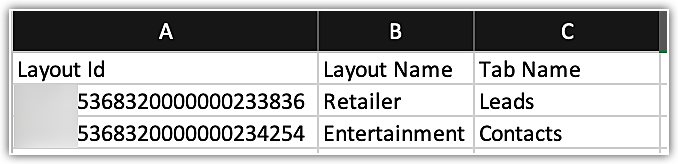
Let's take an example: we want to migrate the leads data to the respective module layout named "Retailer". Now, look at the leads file where layout ID will be present as same as the ID in the layout file in the Leads row.
Let's upload the layout file and Leads file for migration, as shown below:
Module Mapping:
Field Mapping:
1. Layouts:
2. Leads:
Once the data is migrated, you can find the separate layout with the name " Retailers" in the Leads module, while the respective lead record will be under the Retailers module.
Data in the Leads module under "Retailer" layout:
Please follow the above process for the migration of records to the respective Layout in your modules.
How do I migrate the User Lookup data in Zoho CRM Data Migration?
The User lookup field serves to associate users with their respective records in modules. There are two types of User lookup fields:
- Single User
- Multiple Users
Please note that the multiple user lookup field must be created in the layout before proceeding with the migration. It is not possible to create the multiple user lookup during the migration process.
Please select the user lookup field in the New fields section in the module's layout.
Now, let's create a Single User and Multiple Users lookup fields in the contacts module with names "Person and Agents".
To create the user lookup field, go to the Module layout and follow the sequence of steps:
- To create Single User: Select the User lookup field from the New fields section, then drag and drop the field in layout. Select the type Single User and give a field label, then Save the layout.
- To create Multiple Users: Select the user lookup field from the New fields section, then drag and drop the field in layout. Select the type Multiple Users and give a field label, then Save the layout.
Let's take an example where we need to assign a few users in the contacts module using multiple users lookup field and assign a single user using the Single User lookup field.
Now, let's arrange the data in the files that will be used for the migration to get the data of single user and multiple users.
- To migrate the data of a single user: Two files are required: the user file and the contacts file.
- To migrate the data of Multiple users: Three files are required: theuser file, the contacts file, and the linking module file (user ID X module ID)
Let's migrate the data for the single user and multiple users lookup fields:
User file:
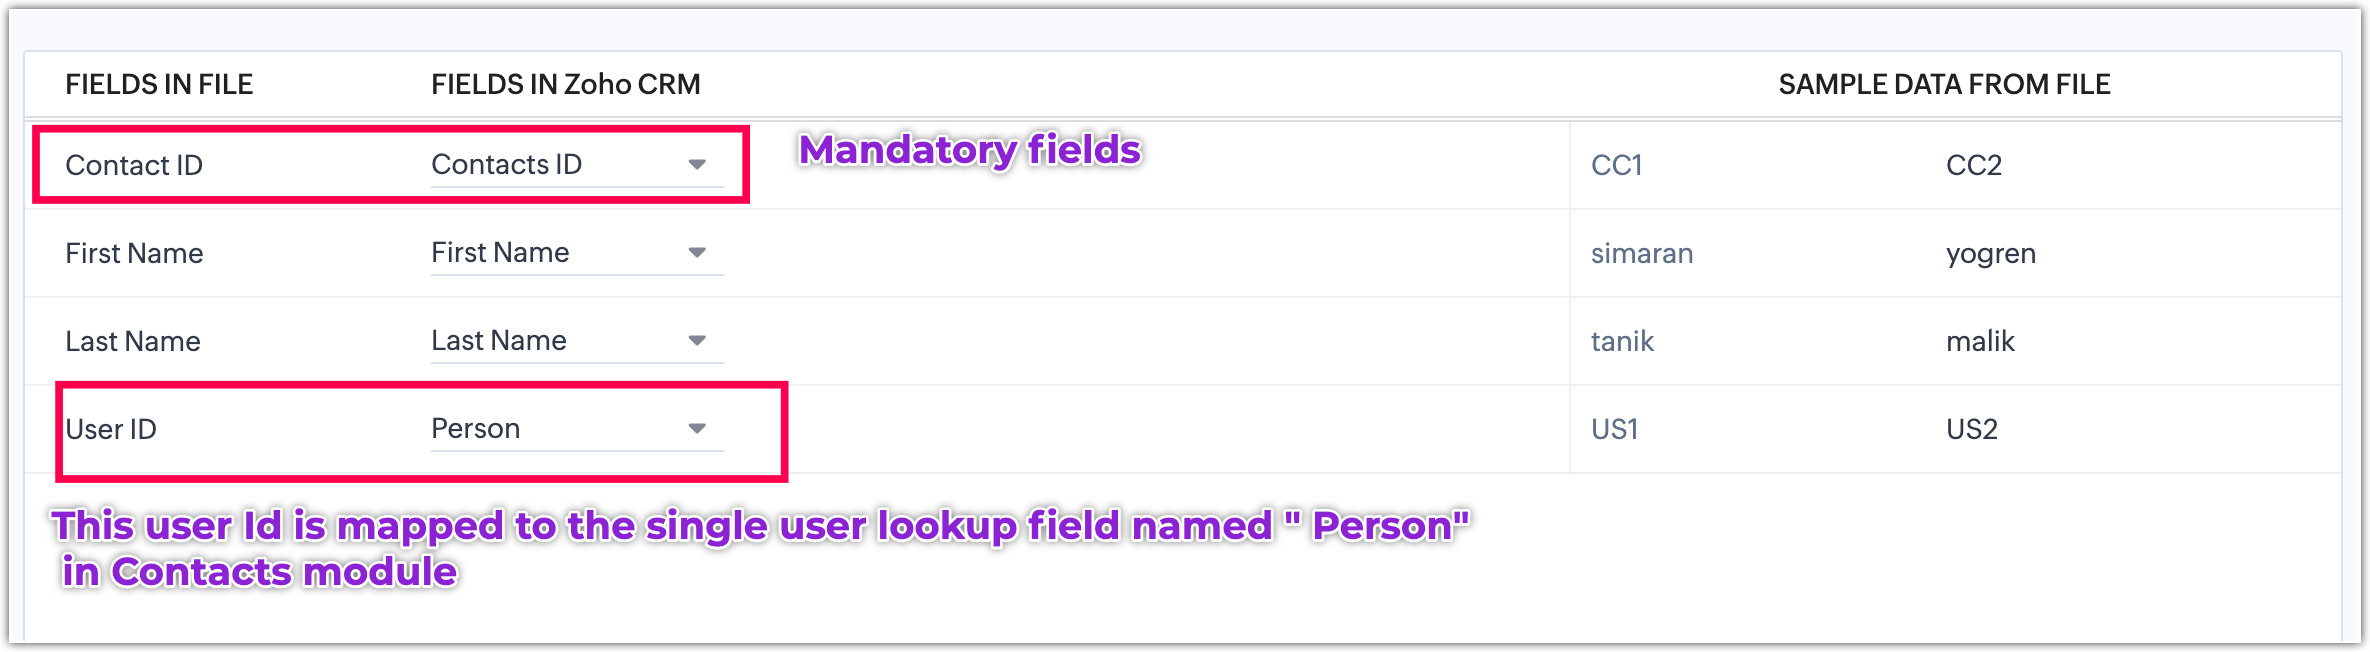
Contact file:
The user ID in the contact file is specifically utilized for assigning users to the Single User lookup field, which is labeled as "Person." However, it is important to clarify that this user ID is not intended for assigning the record owner, nor is it meant for Multiple User assignments.
Linking module: This is only used for the" Multiple Users" data migration
Let's proceed with themMigration. Here we are going to see the migration for Single User and Multiple Users.
Uploading files: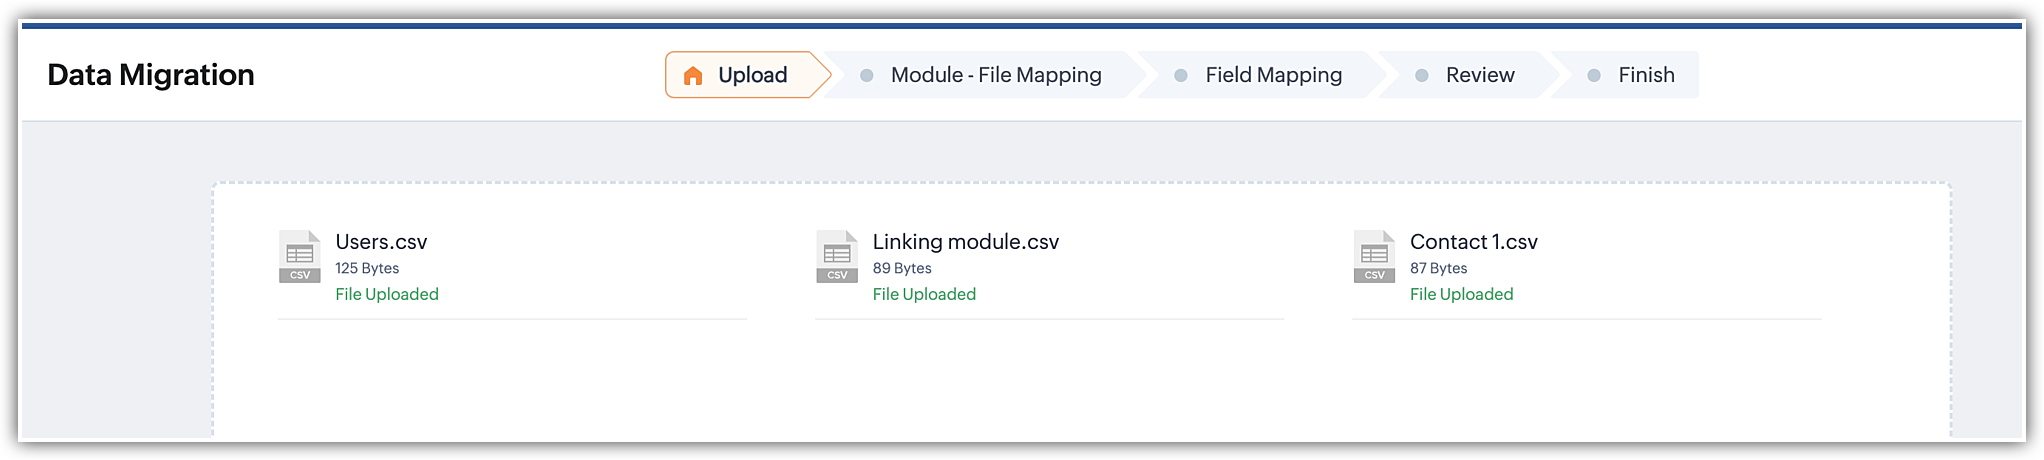
Module mapping: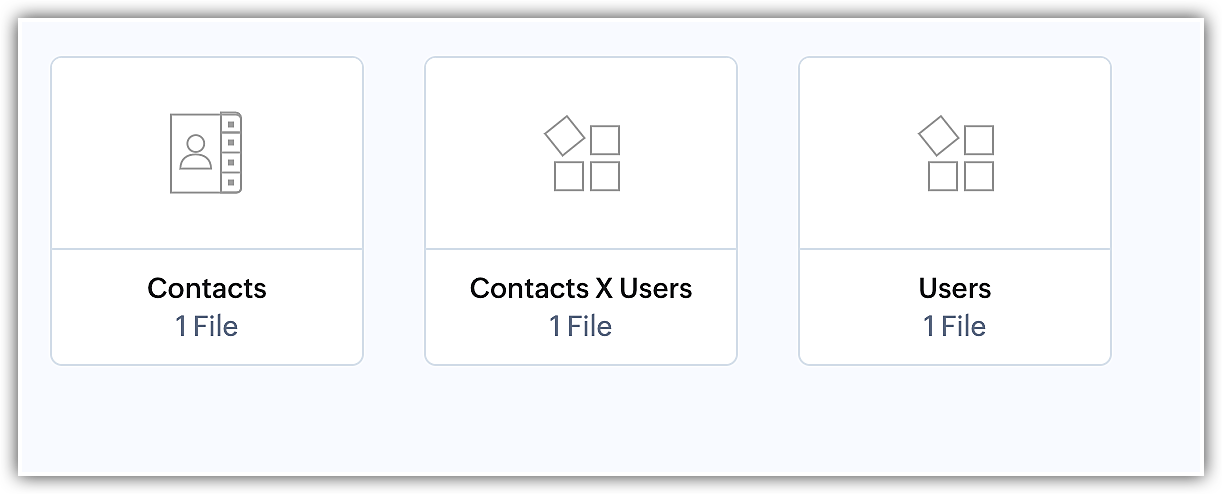
To enable the Multiple Users lookup field in the contact module, a linking module between Contacts and Users will be created automatically. During the migration process, it is essential to map the linking module that has been created to facilitate the proper functioning of the Multiple Users lookup field.
Field mapping:
- Contact module filed mapping:
-
Users field mapping: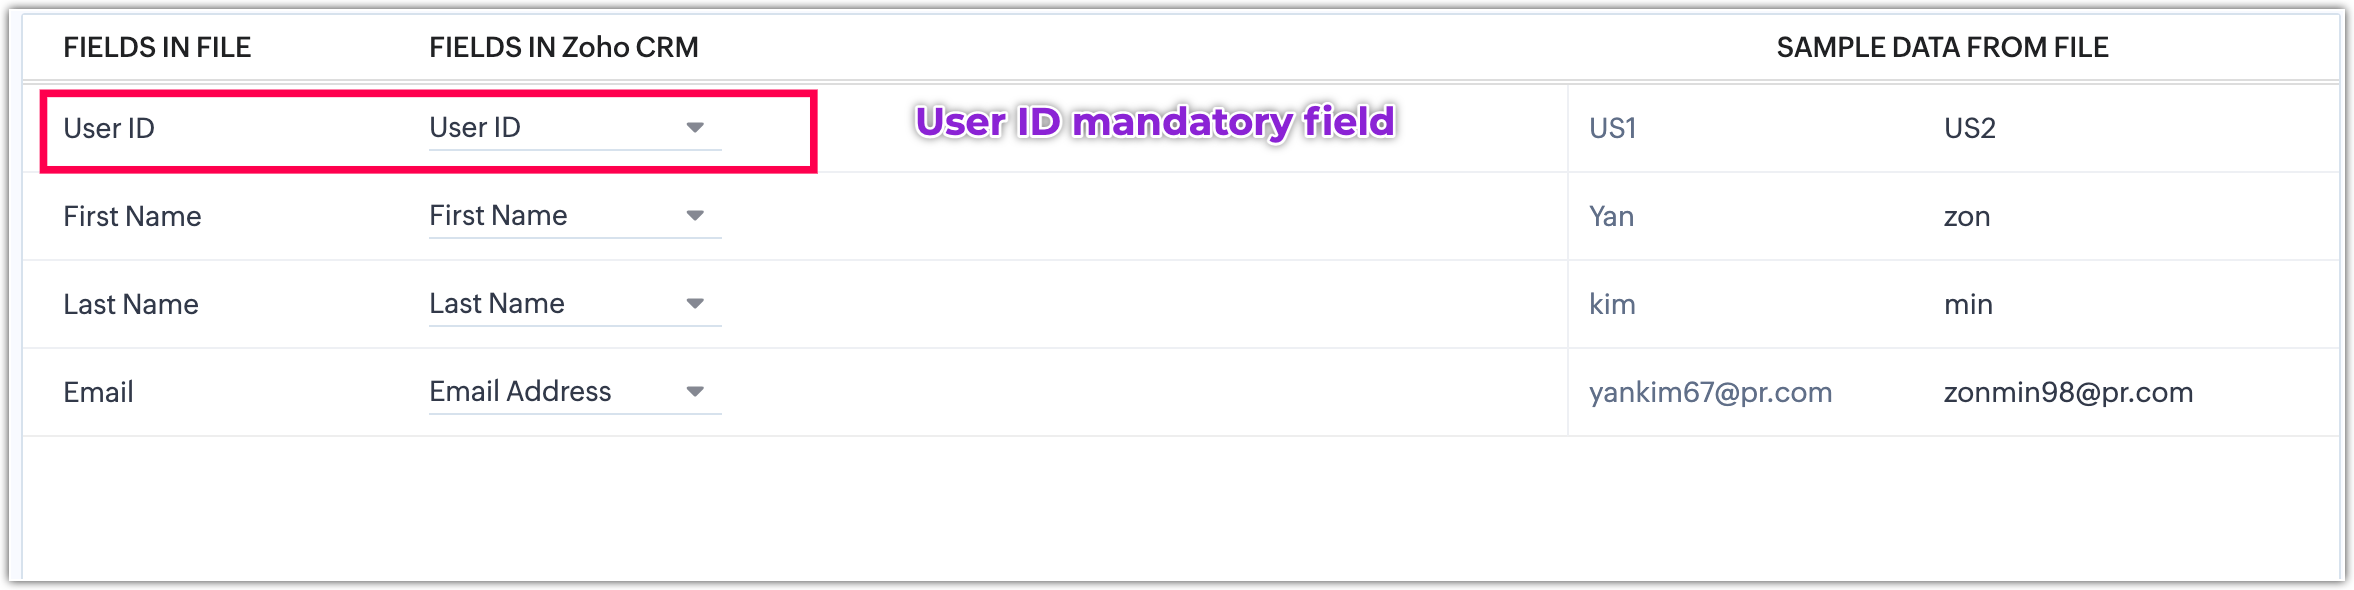
-
Contacts and Users field mapping: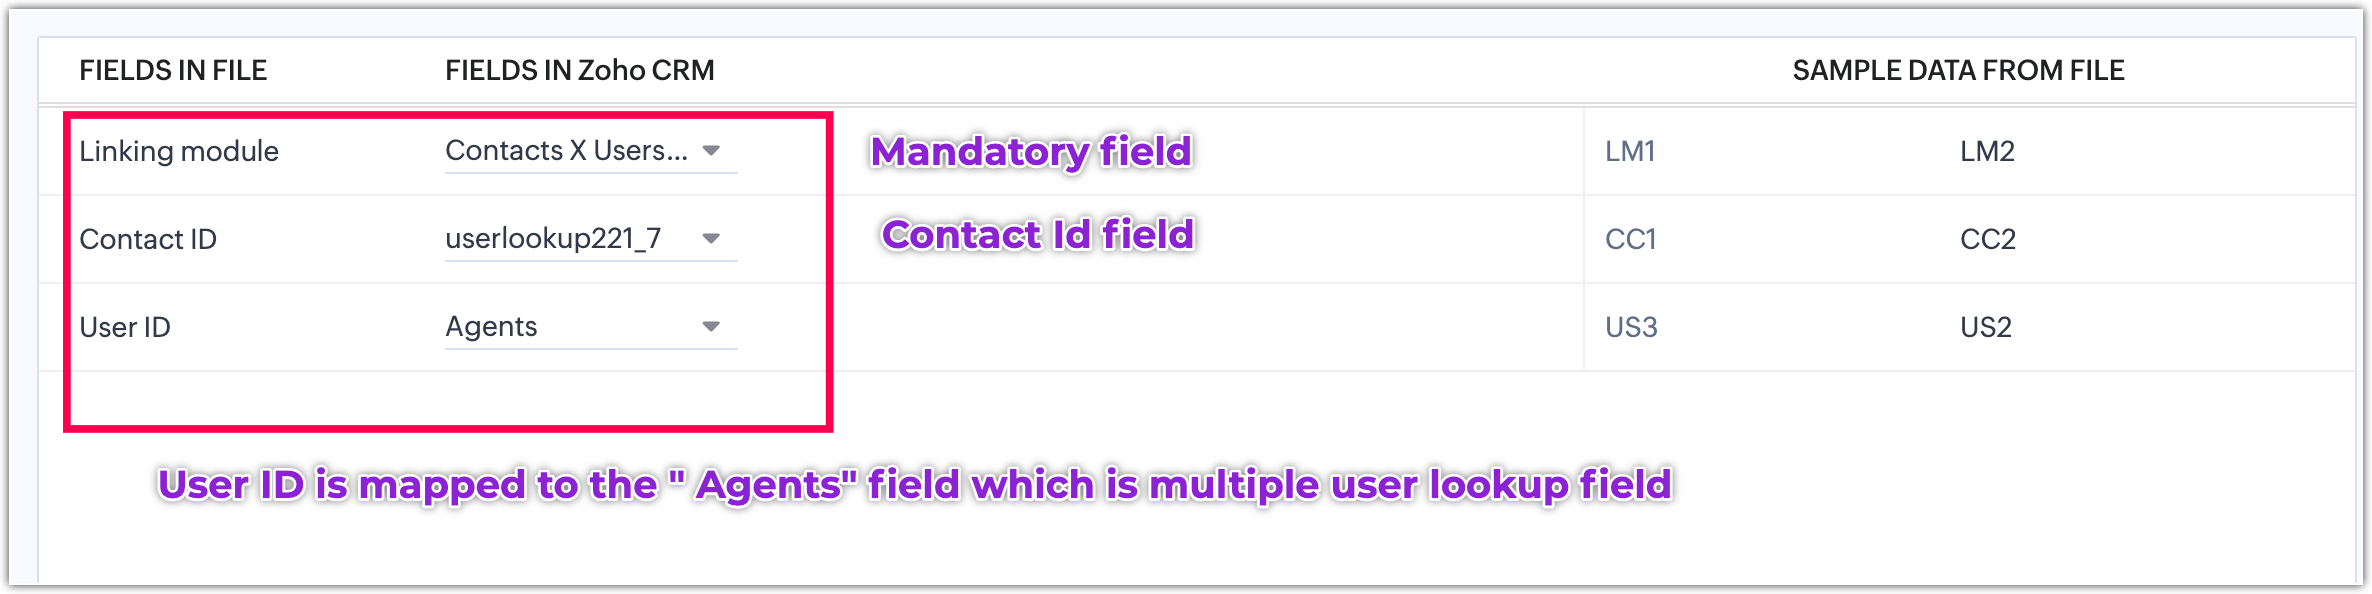
Once the data is migrated the results with assigned users are shown below :
The Person and Agents user lookup fields shows the data as per the file information.
How to migrate the multi select lookup field data in to the Zoho CRM?
The Multi-select lookup field allows you to associate multiple lookup values with a single record, creating a Many-to-many module association between two modules.
For example, consider the following example: We aim to migrate data into both the Contacts module and the Buildings custom module, utilizing the multi-select lookup field to associate contacts with multiple buildings. This association enables a flexible and robust relationship between the two modules, allowing a contact to be linked with multiple buildings and vice versa.
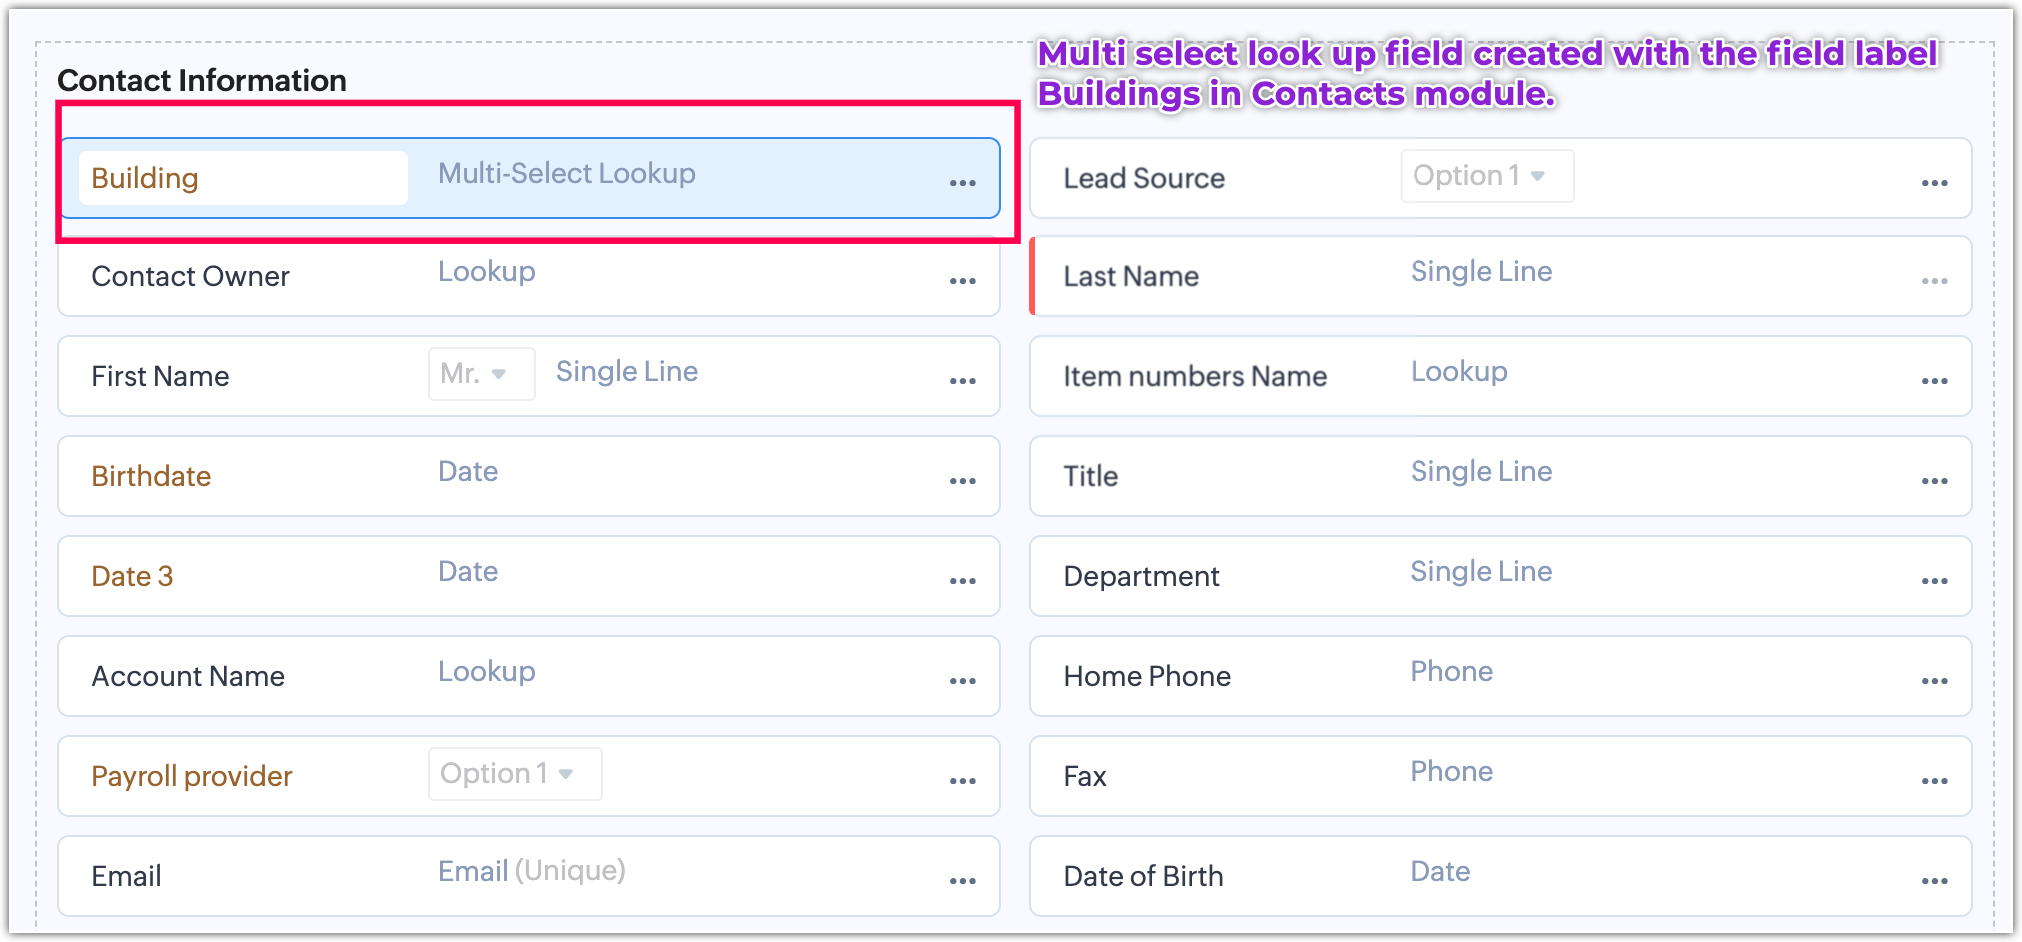
Let's create a Multi-select lookup field in the contacts module and enable the Linking module.
Enabling the Linking module:
After the creation of the field, it will appear as follows. Save the layout.
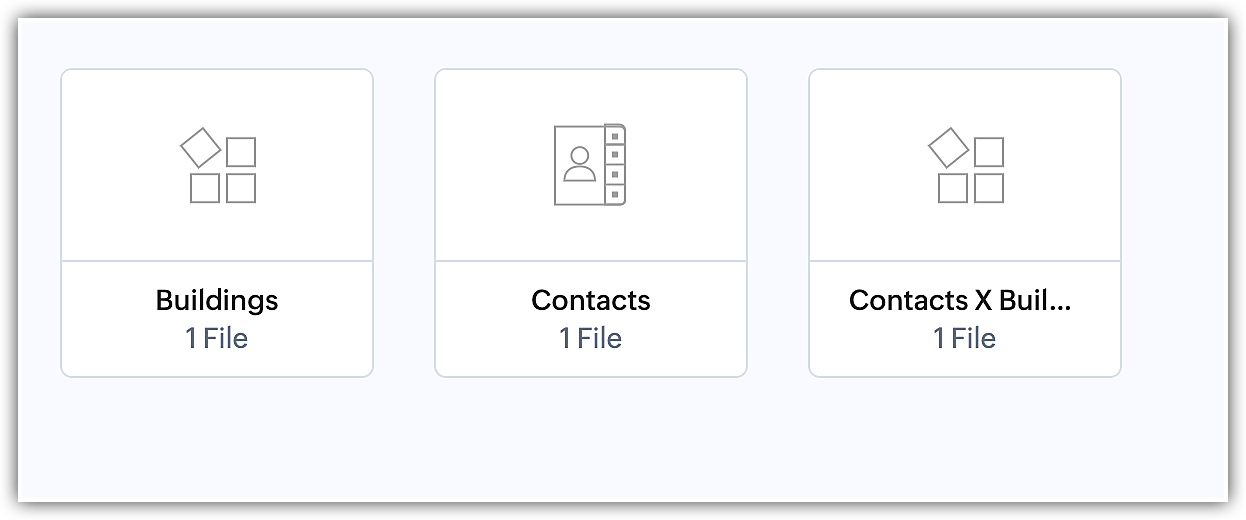
To migrate the data with Many-to-Many relationships between Contacts and Buildings, you will need three files:
- Contacts file
- Buildings file
- Linking module file (Contacts and Buildings)
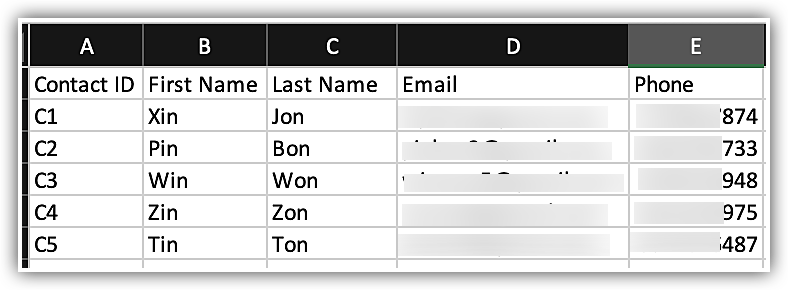
For the Contacts file arrangement, refer to the example shown below for a clear understanding.
For the Building file arrangement, refer to the example shown below for a clear understanding.
For the linking module's file arrangement, refer to the example shown below for a clear understanding.

The linking module ID can be created according to our preference, allowing for alphanumeric, numeric, or alphabetical values. However, it must be unique to avoid conflicts.
To establish a Many-to-Many relationship between contacts and buildings, place the Contact ID and Building ID in the same row to create the association. For example, C1 (Xin Jon) is associated with two buildings, B1 (Oxygen Towers) and B3 (King's Palace).
During the file upload into the migration widget, ensure all three files mentioned above are uploaded. Next, map Contacts to the Contacts module, Buildings to the Buildings module, and the Linking module to the Linking module (Contacts X Buildings).
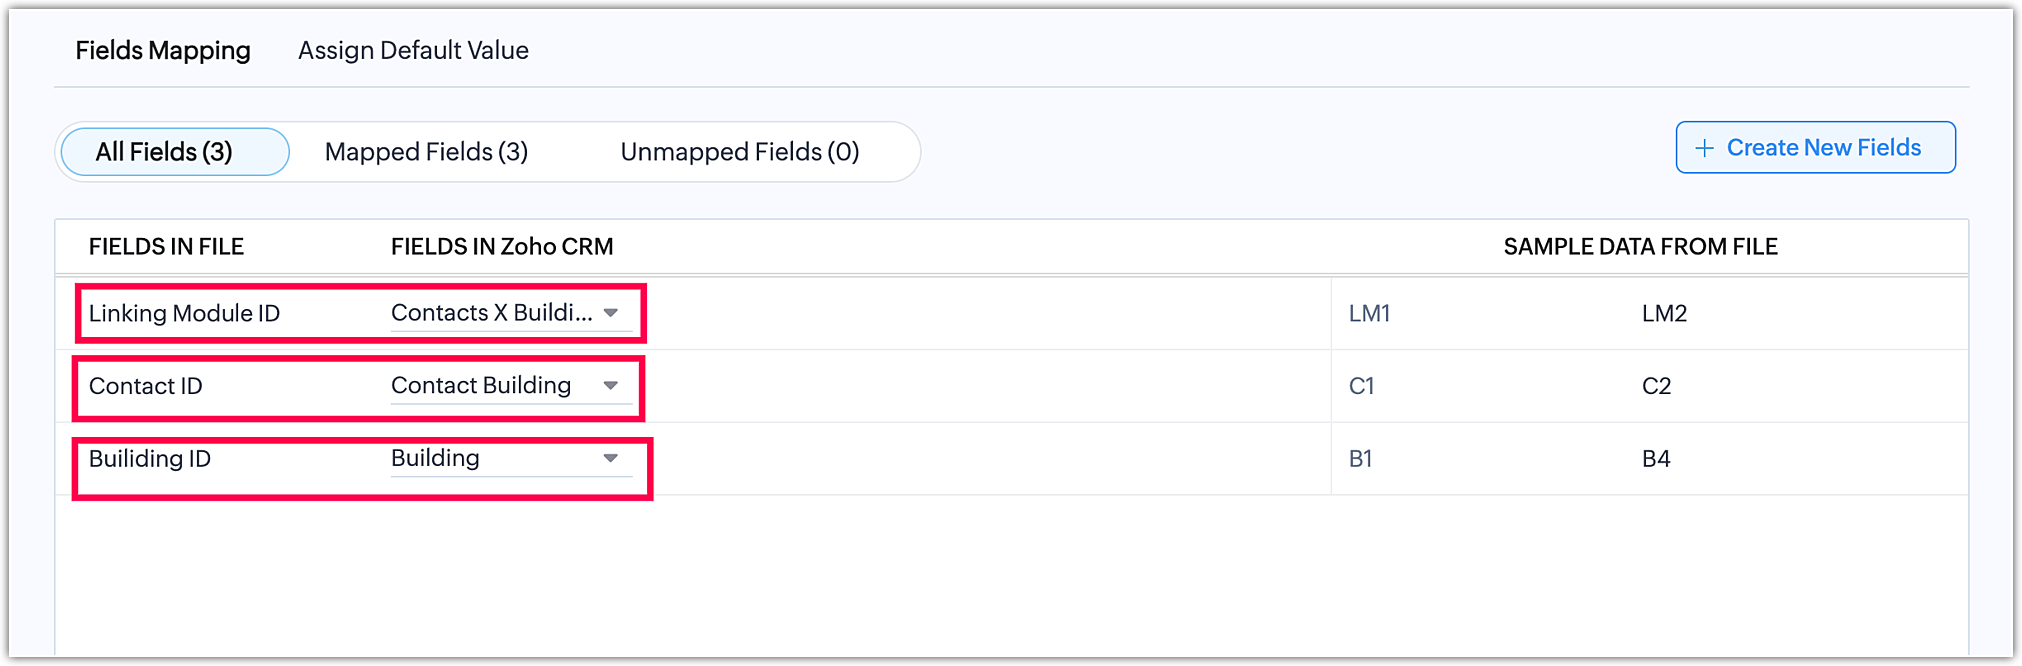
For further reference, please consult the images provided for module mapping and field mapping.
Module Mapping:
Field mapping:
Buildings:
Contacts:
Linking module:
Migrated data (shown below):
- In contact's module:

- In Building's module:
- Linking module :
Based on the file information, the data has been successfully migrated, and the contacts were appropriately associated with their respective buildings.
For a more comprehensive understanding of how to migrate data for the Multi-select lookup field and establish One-to-Many and Many-to-Many relationships between modules, please refer to the video provided. It will offer a more clear and detailed explanation of the migration process.
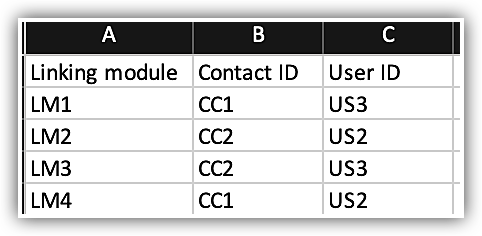
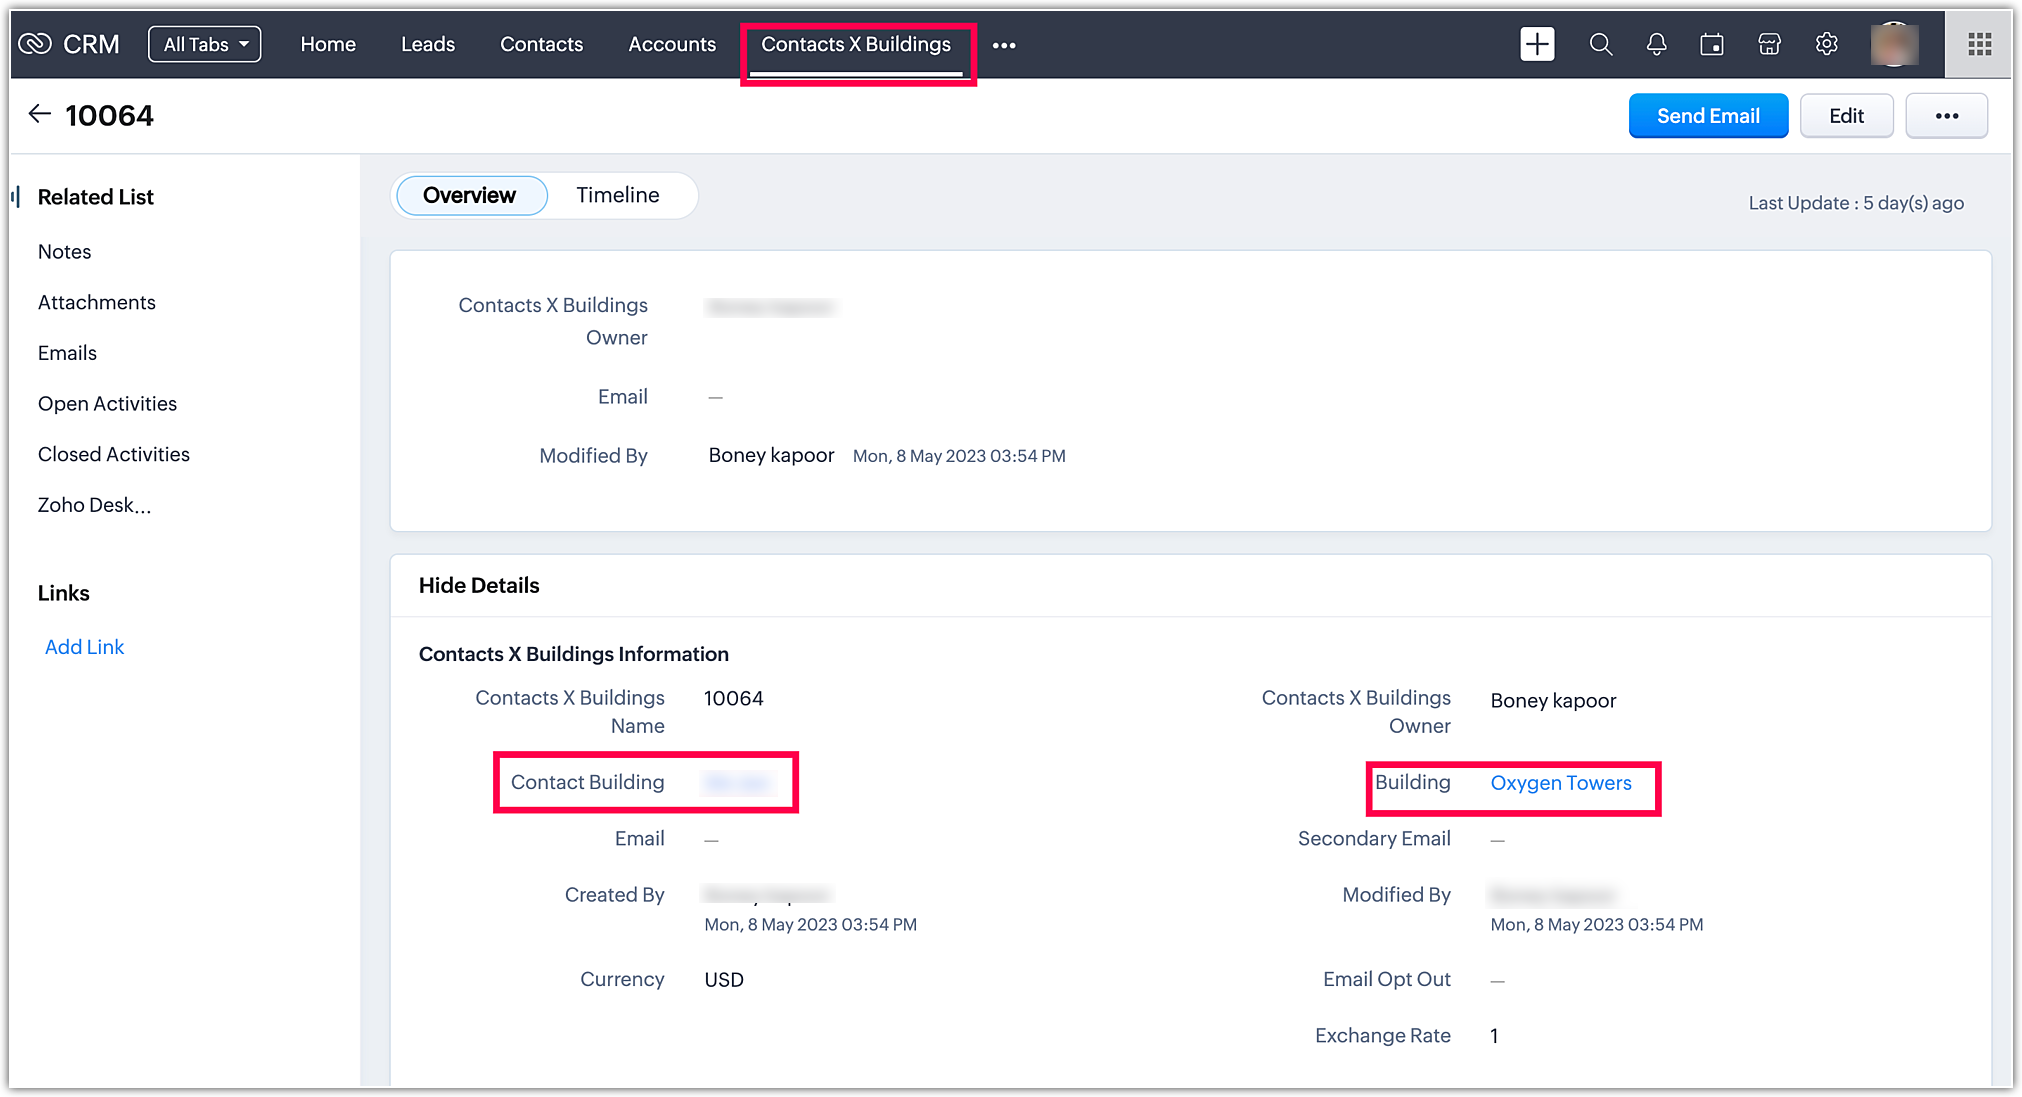
What is a Linking module and how does data appear in a Linking module when data is migrated?
A Linking module acts as an intermediary that facilitates connections between two modules through a Multi-select lookup field.
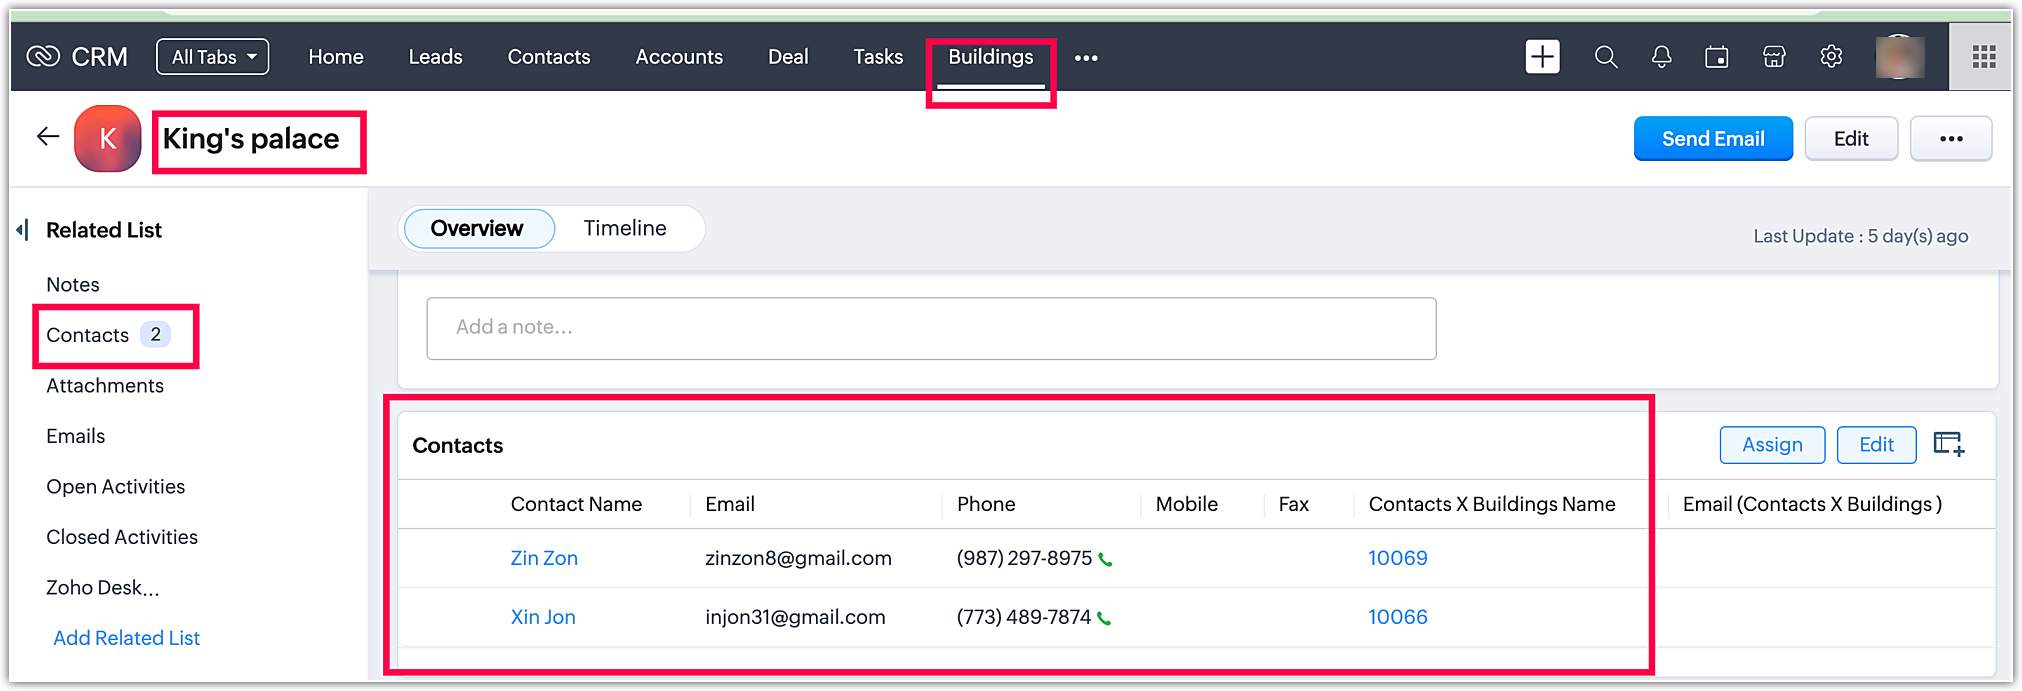
This linking module becomes necessary when we want to establish One-to-Many or Many-to-Many relationships between the modules. Consider the scenario of Contacts and Buildings. If we aim to associate one contact with many buildings within the same Contacts record, describing all the buildings in the related list of Notes and Attachments (if any) can become cumbersome. The linking module provides a solution by displaying multiple associations between contacts and buildings as individual records. This approach simplifies the process of describing contacts and buildings individually without confusion, while maintaining the uniqueness of one-to-one associations, even when a contact has multiple associations with different buildings.
For example, in the case of contacts and buildings, the images below illustrate how the Linking module data appears after migration, along with the file arrangement of the Linking module.
Linking module file arrangement:
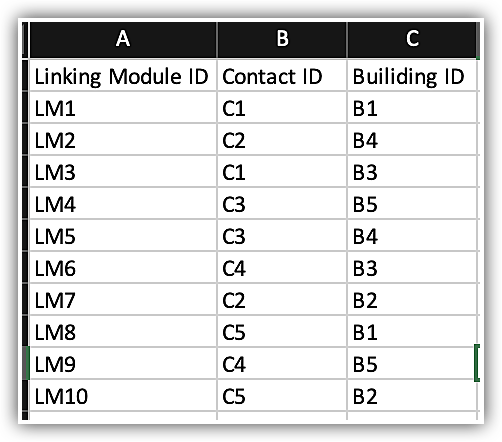
The Linking module must have a unique ID, and within each row of the Linking module, the Contact ID should be arranged alongside the respective Building ID to establish the association between the contact and the building.
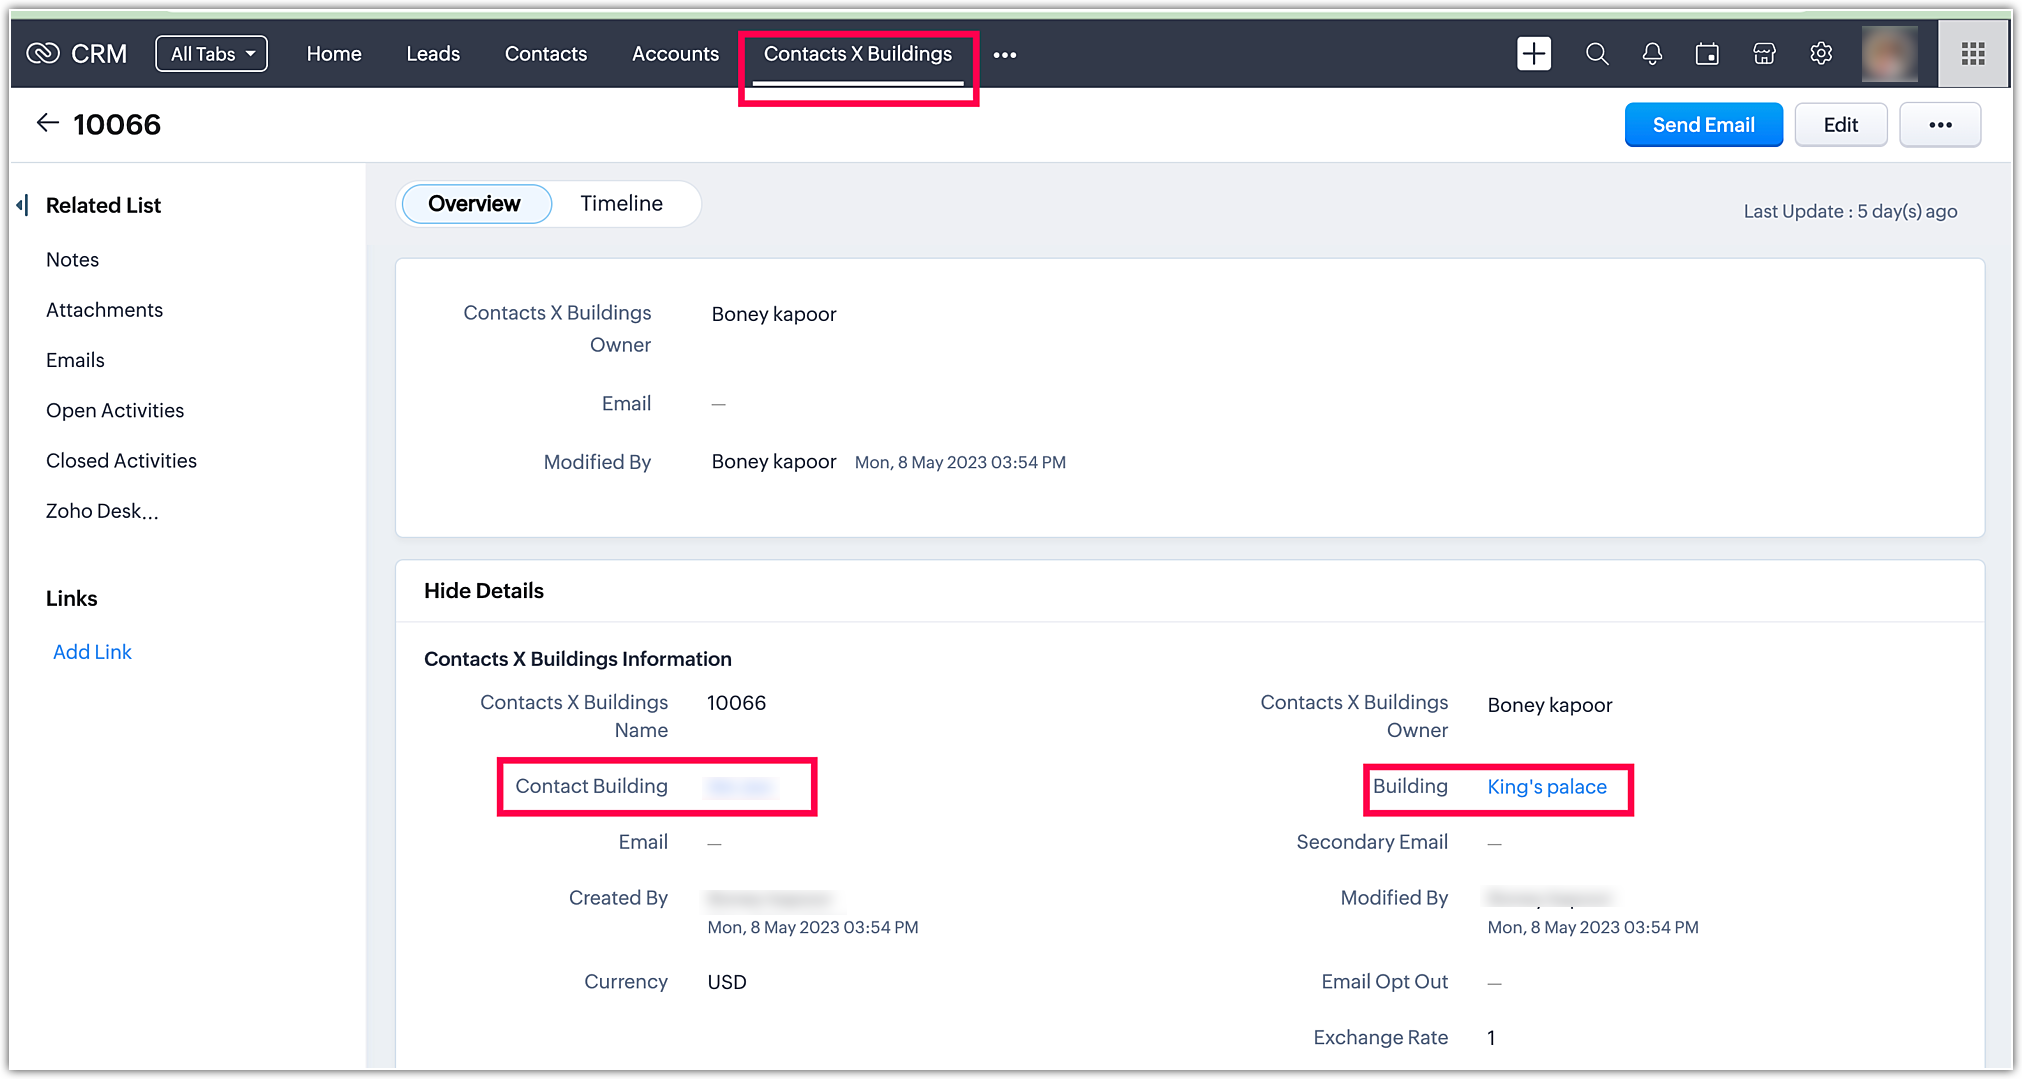
The appearance of the individual contact and building in the Linking module is shown below:
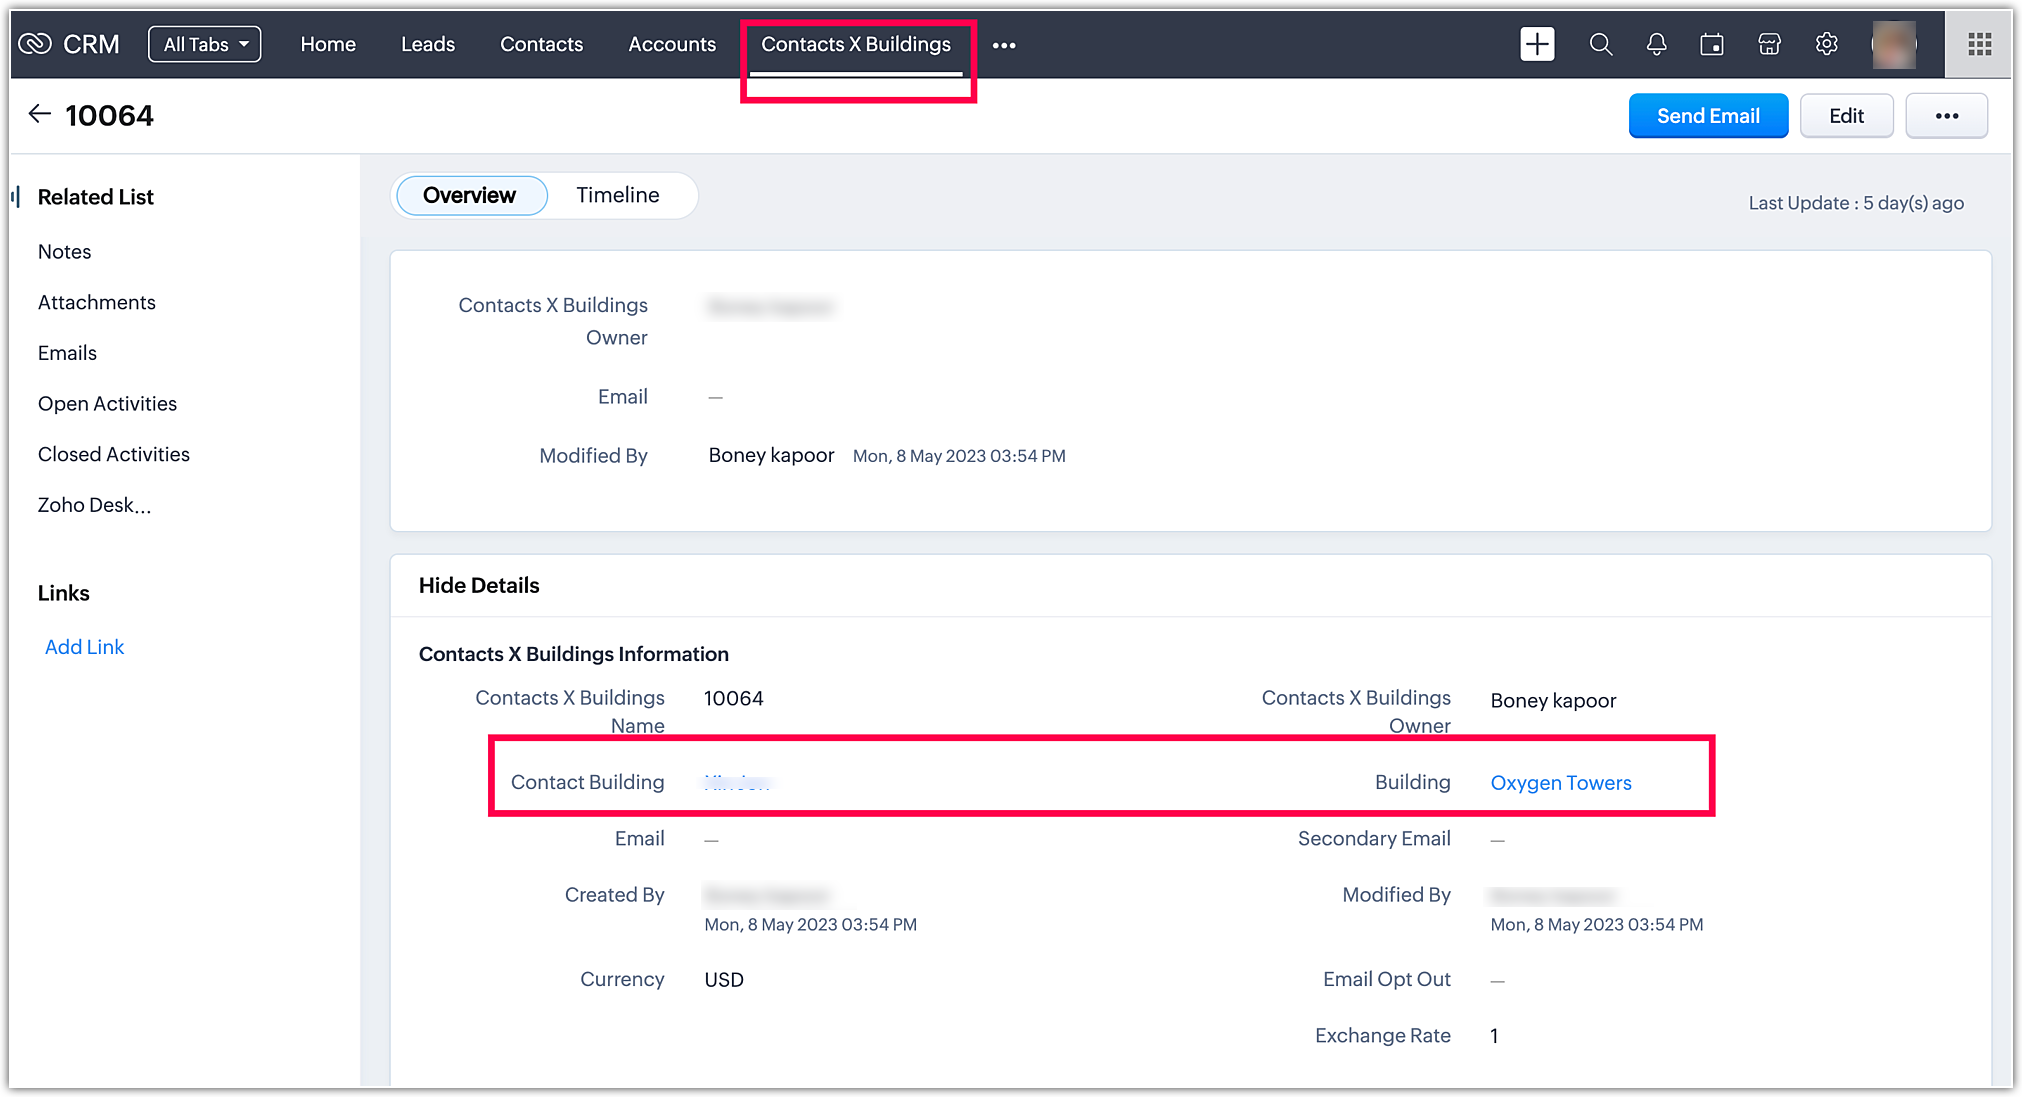
The appearance of other associated buildings and contact records individually in a linking module is shown below:
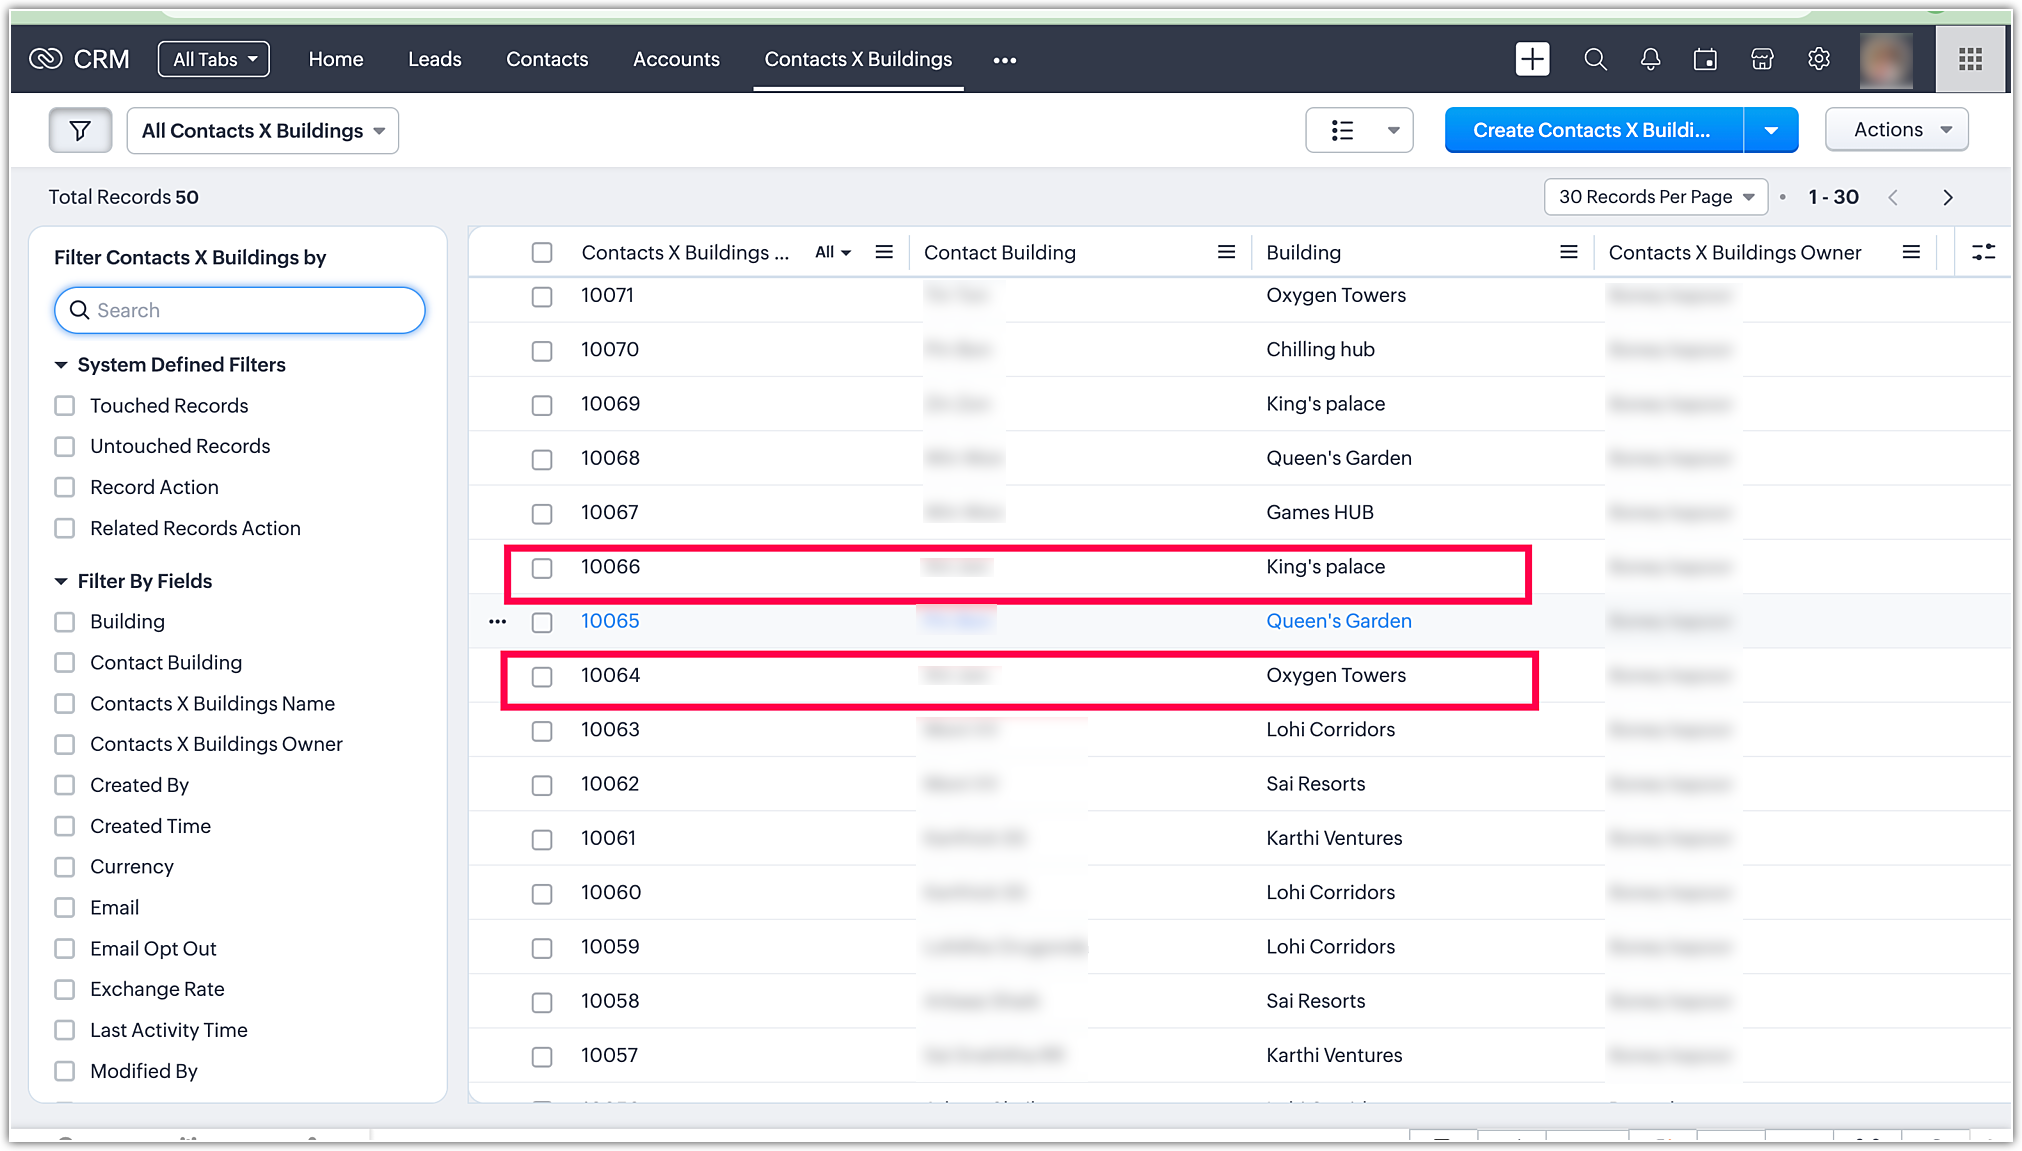
The data displayed above represents the migrated data in the linking module. Please review the highlighted records, as they have been individually migrated in the linking module.
How does Charset Works in CRM Data Migration?
The data file that requires migration might contain various special characters, and it is essential to ensure the accurate migration of this special character data into the system.
To manage the special character data during migration, you can access the "charset" option by clicking on any of the CRM widgets. Once the files are uploaded, you will find the "charset" option located in the bottom-left corner of the page, as demonstrated below:
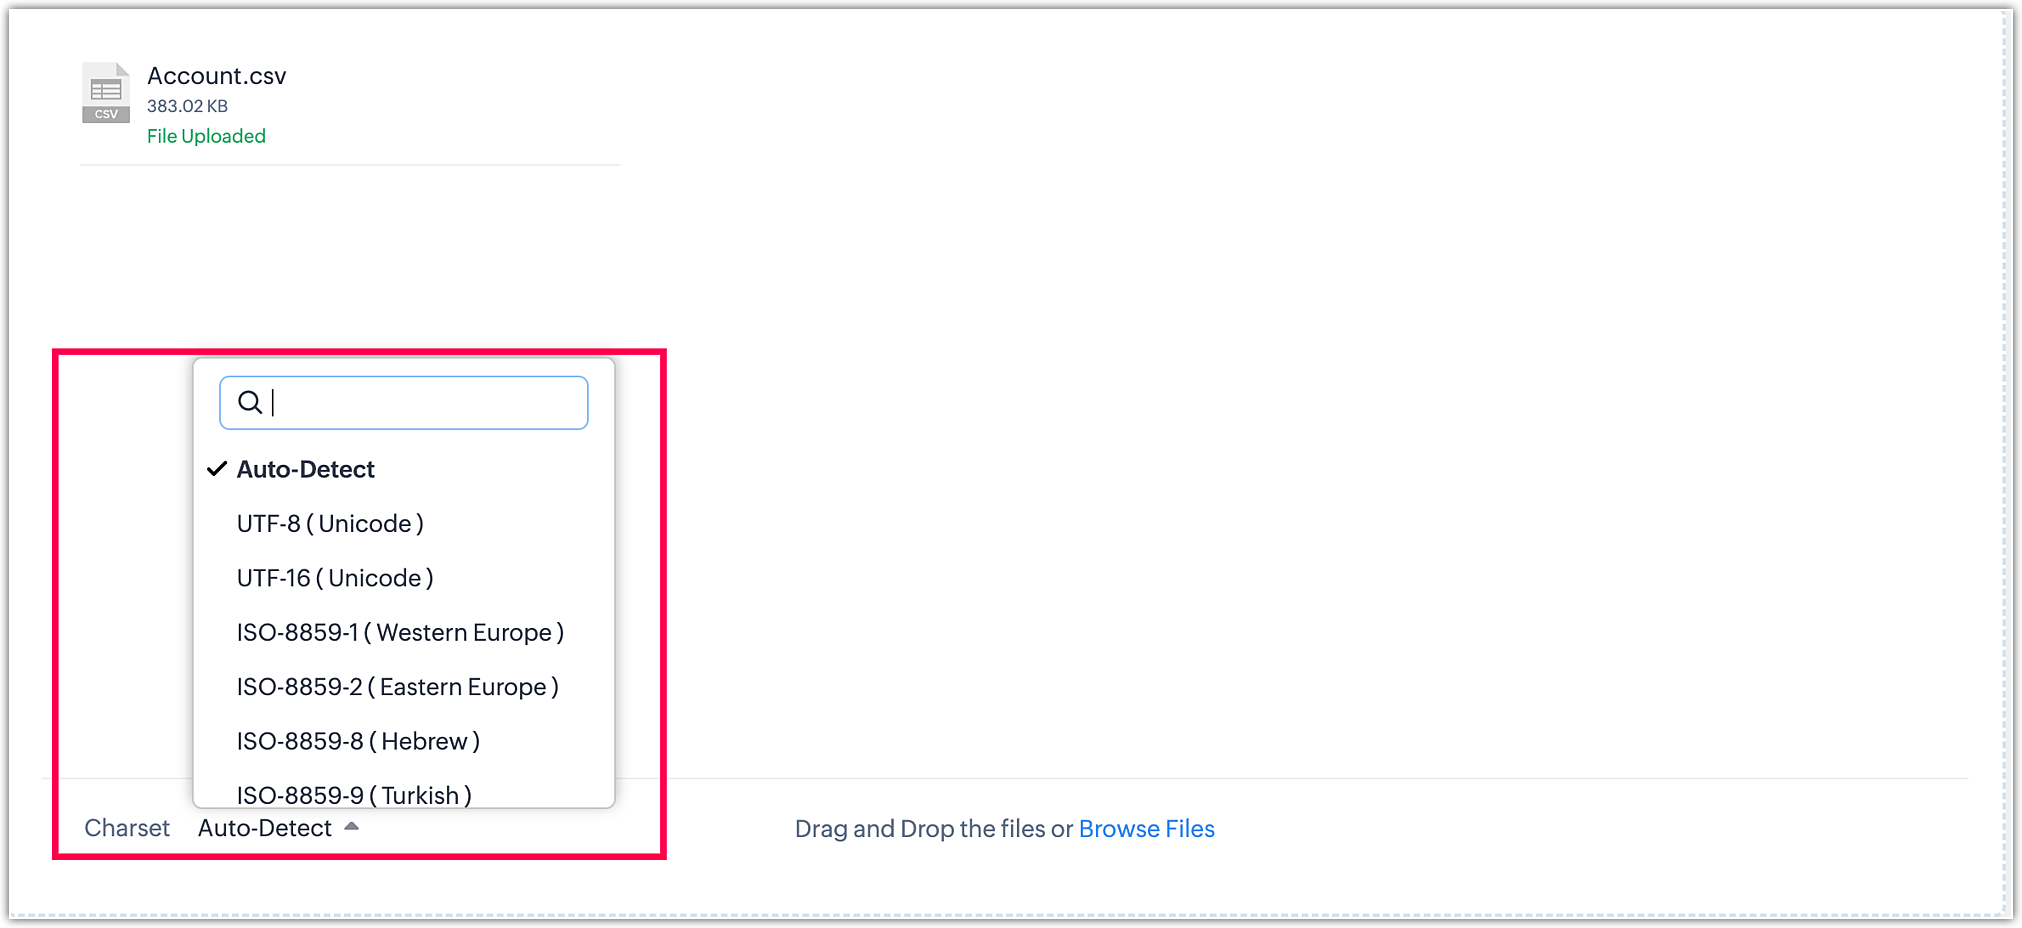
There are many options in the Charset based on the Special characters and Languages. The options are mentioned below:
- Auto-Detect
- UTF-8 (Unicode)
- UTF-16 (Unicode)
- SO-8859-1(Western Europe)
- ISO-8859-2 (Eastern Europe)
- ISO-8859-8 (Hebrew)
- ISO-8859-9 (Turkish)
- ISO-8859-11(Thai)
- GB2312 (Simplified Chinese)
- GBK
- Big5 (Traditional Chinese)
- Shift_JIS( Japanese)
- Windows-1251 (Cyrillic)
The character sets mentioned above are used based on the characters present in the file.
While using the Auto-Detect option, the system identifies the character set of the uploaded files and proceeds with the same character set. However, this method has limitations, particularly when dealing with files that contain a mix of English characters and special characters. For example, if a file has 20,000 records and only some of them contain special characters, the Auto-Detect might identify the characters of the initial 100 to 500 records (which may lack special characters) and continue with the same character set for the rest. As a result, the remaining records with special characters may not migrate accurately, leading to incorrect values.
To ensure precise migration of files containing special characters, it is essential to identify the special characters in the file and choose the appropriate character set while uploading the files, before proceeding with the module mapping. In general, UTF-8 Unicode is used to handle special characters of languages other than Chinese, Japanese, and European languages. For other languages, respective character sets should be selected to ensure the data is migrated accurately.
The contact name with special characters in the file is shown below:
The migrated data with the selection of Charset UTF-8 Unicode is shown below:

Select the suitable charset based on the Languages and the Characteristics and proceed with the module.
How do I do field mapping and module mapping during data migration?
To prepare the files for migration, ensure they are in .CSV file format. Once the files are ready, follow these steps to upload them and initiate the migration process:
- Log in to your Zoho CRM account.
- Go to Setup and navigate to Data Administration.
- Select Import and choose the specific CRM widget you want to work with.
- Upload the prepared files.
- Proceed with Module Mapping to define how the data aligns with the CRM modules.
- Perform Field Mapping to map the fields in your files to the corresponding fields in Zoho CRM.
- Review the setup to ensure accuracy.
- Click Finish to confirm your configuration.
- Click Start Migration.
Follow these steps to do the above sequential process:
-
Choose the appropriate CRM widget, and proceed to upload all the required files. You can upload files related to standard modules, activity modules, inventory modules, and custom modules. If you need to upload attachments or documents, please ensure you upload both the Attachments or Documents .CSV file and the corresponding folder containing the attachments or documents, zipped together. This ensures a seamless migration of all necessary data and related files.
-
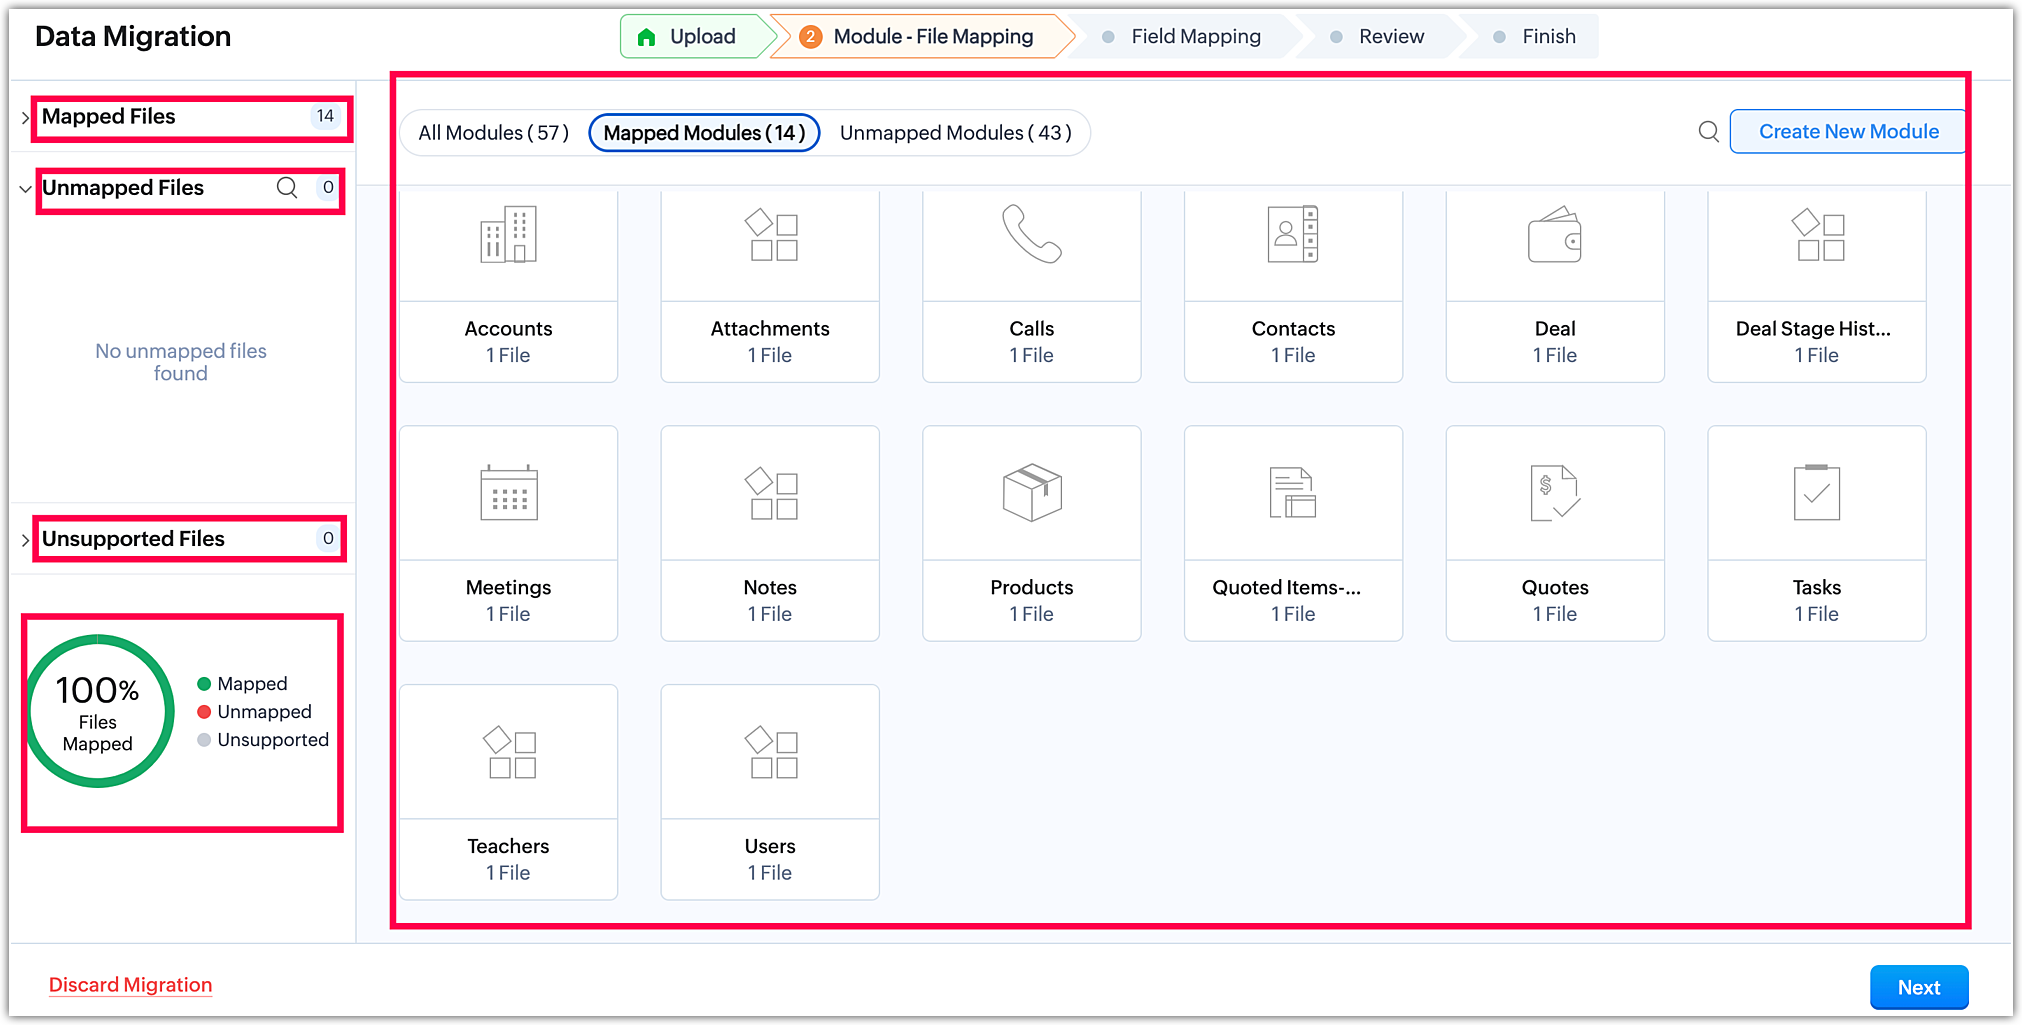
Module Mapping:
You have two options for mapping the files to their respective modules. You can either drag and drop the files onto the corresponding module or click the Map Files option located under the module to establish the mapping.
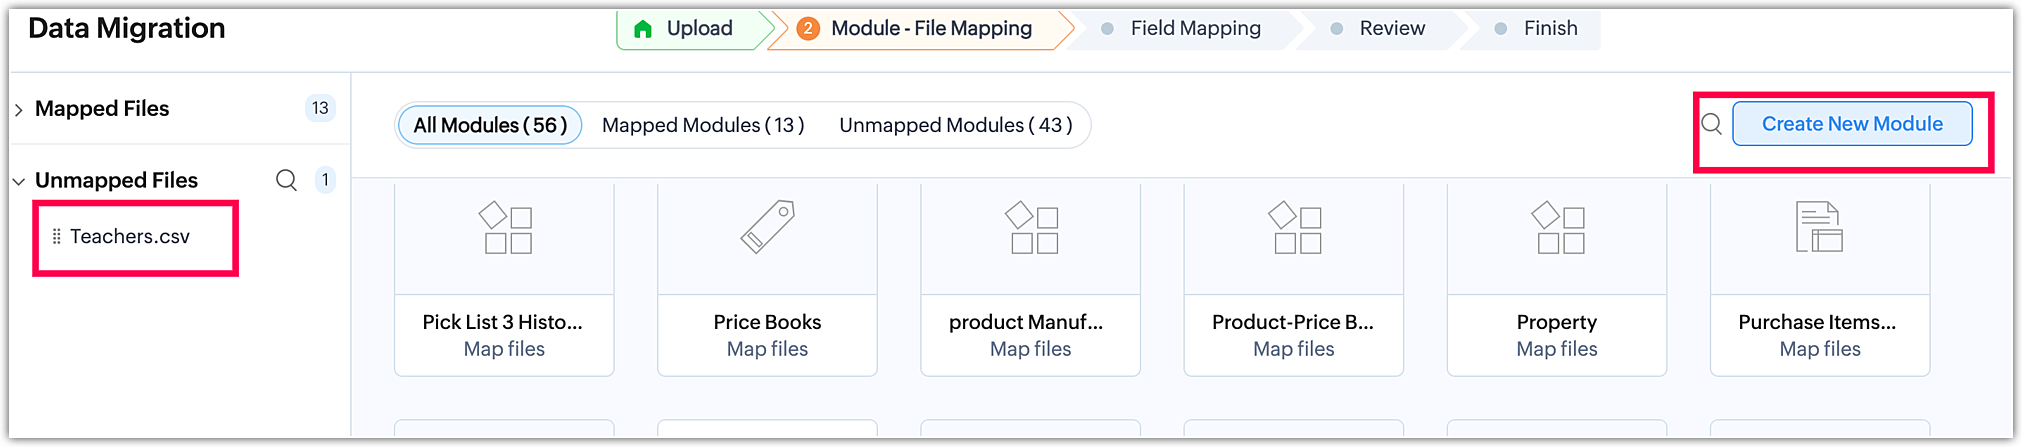
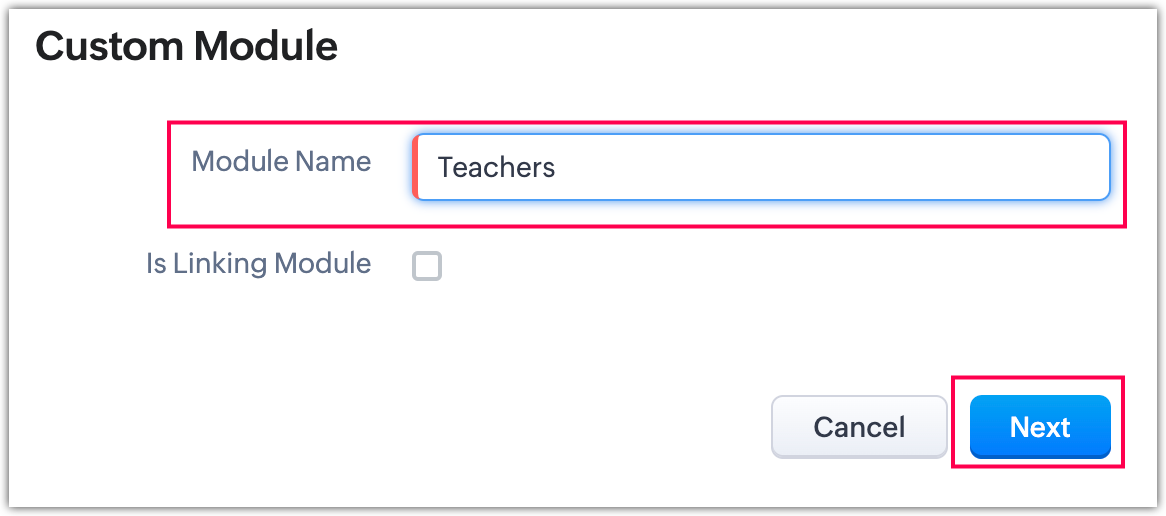
During the module mapping process, if there are any custom modules you need to create (e.g., "Teachers"), you can do so directly. Simply click on the Create Module option located in the top-left corner while in the module mapping interface. This allows you to efficiently create any required custom modules as you proceed with the mapping process.
Note: The "Teachers file" is a custom module data that requires the creation of a custom module for mapping the file.
- Creating Custom module:
-
Module mapping:
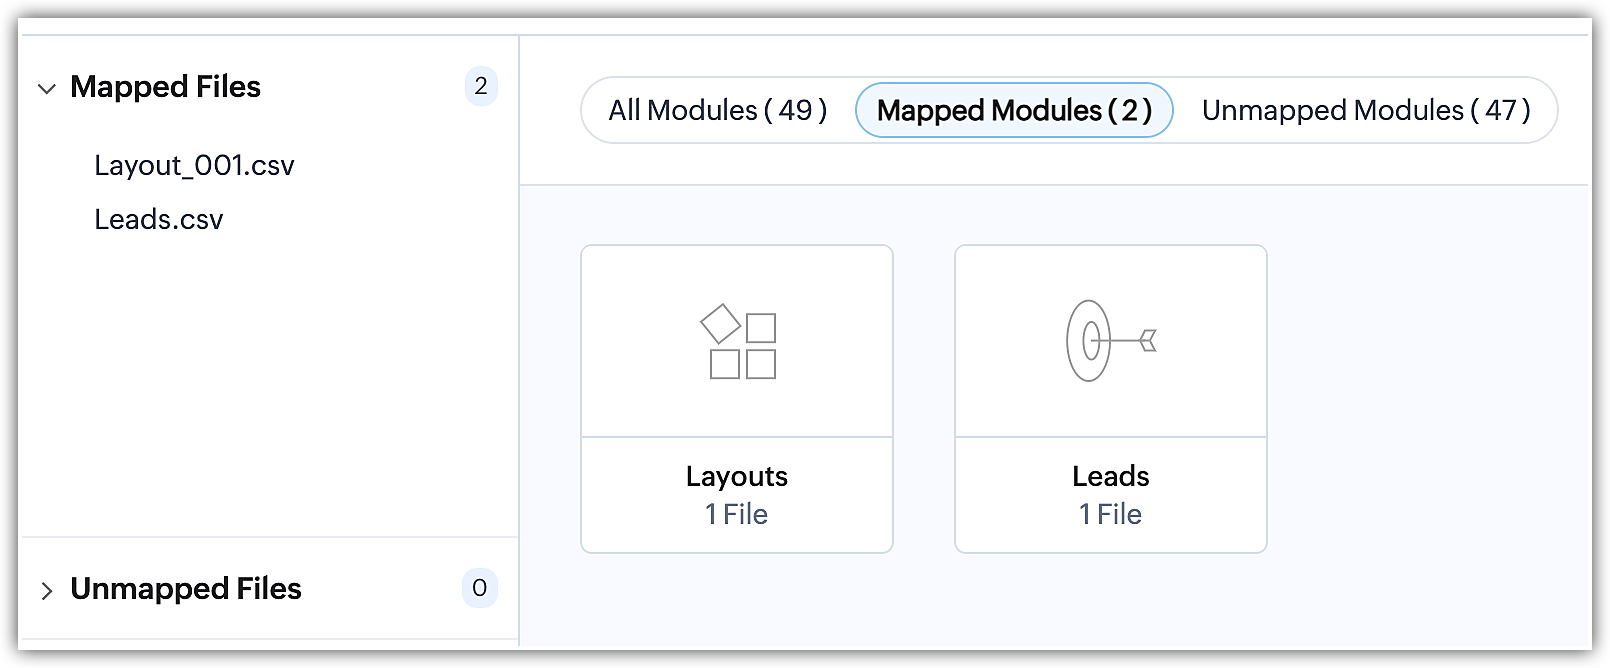
At the module mapping stage, you can access information about Mapped files, Unmapped files, and Unsupported files. These file statistics are conveniently located on the left side of the page, providing a clear overview of each category.
-
Field mapping:
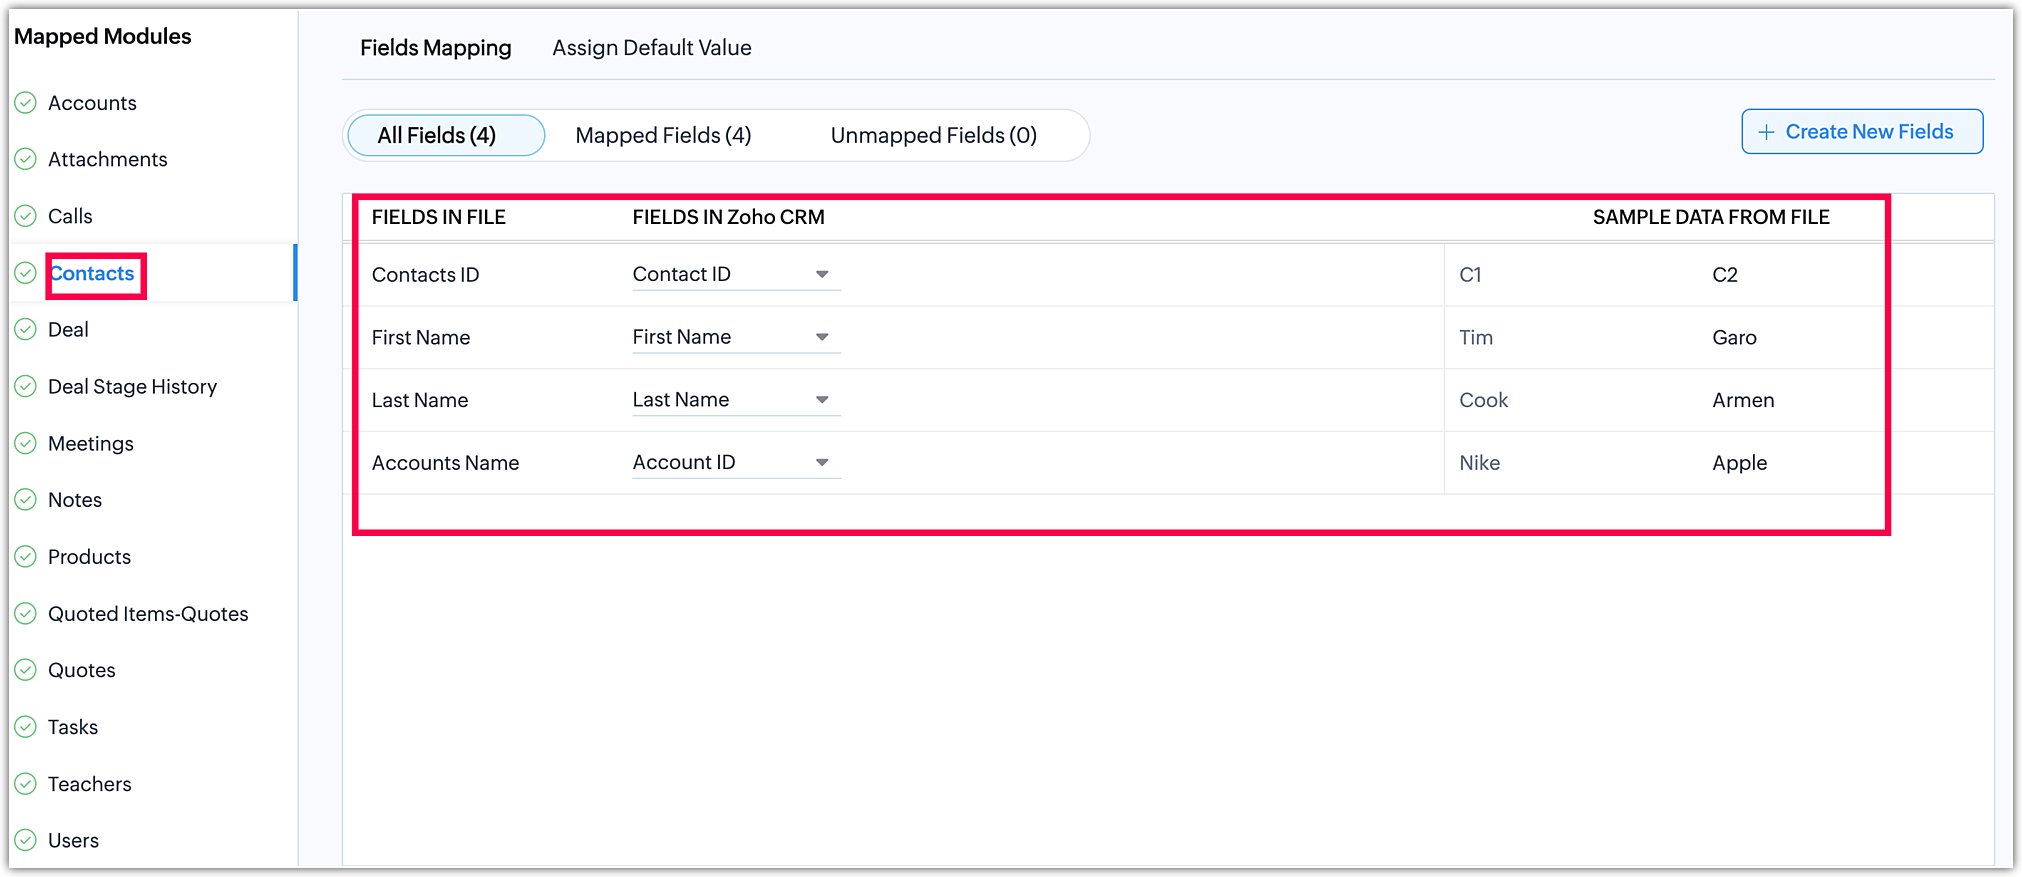
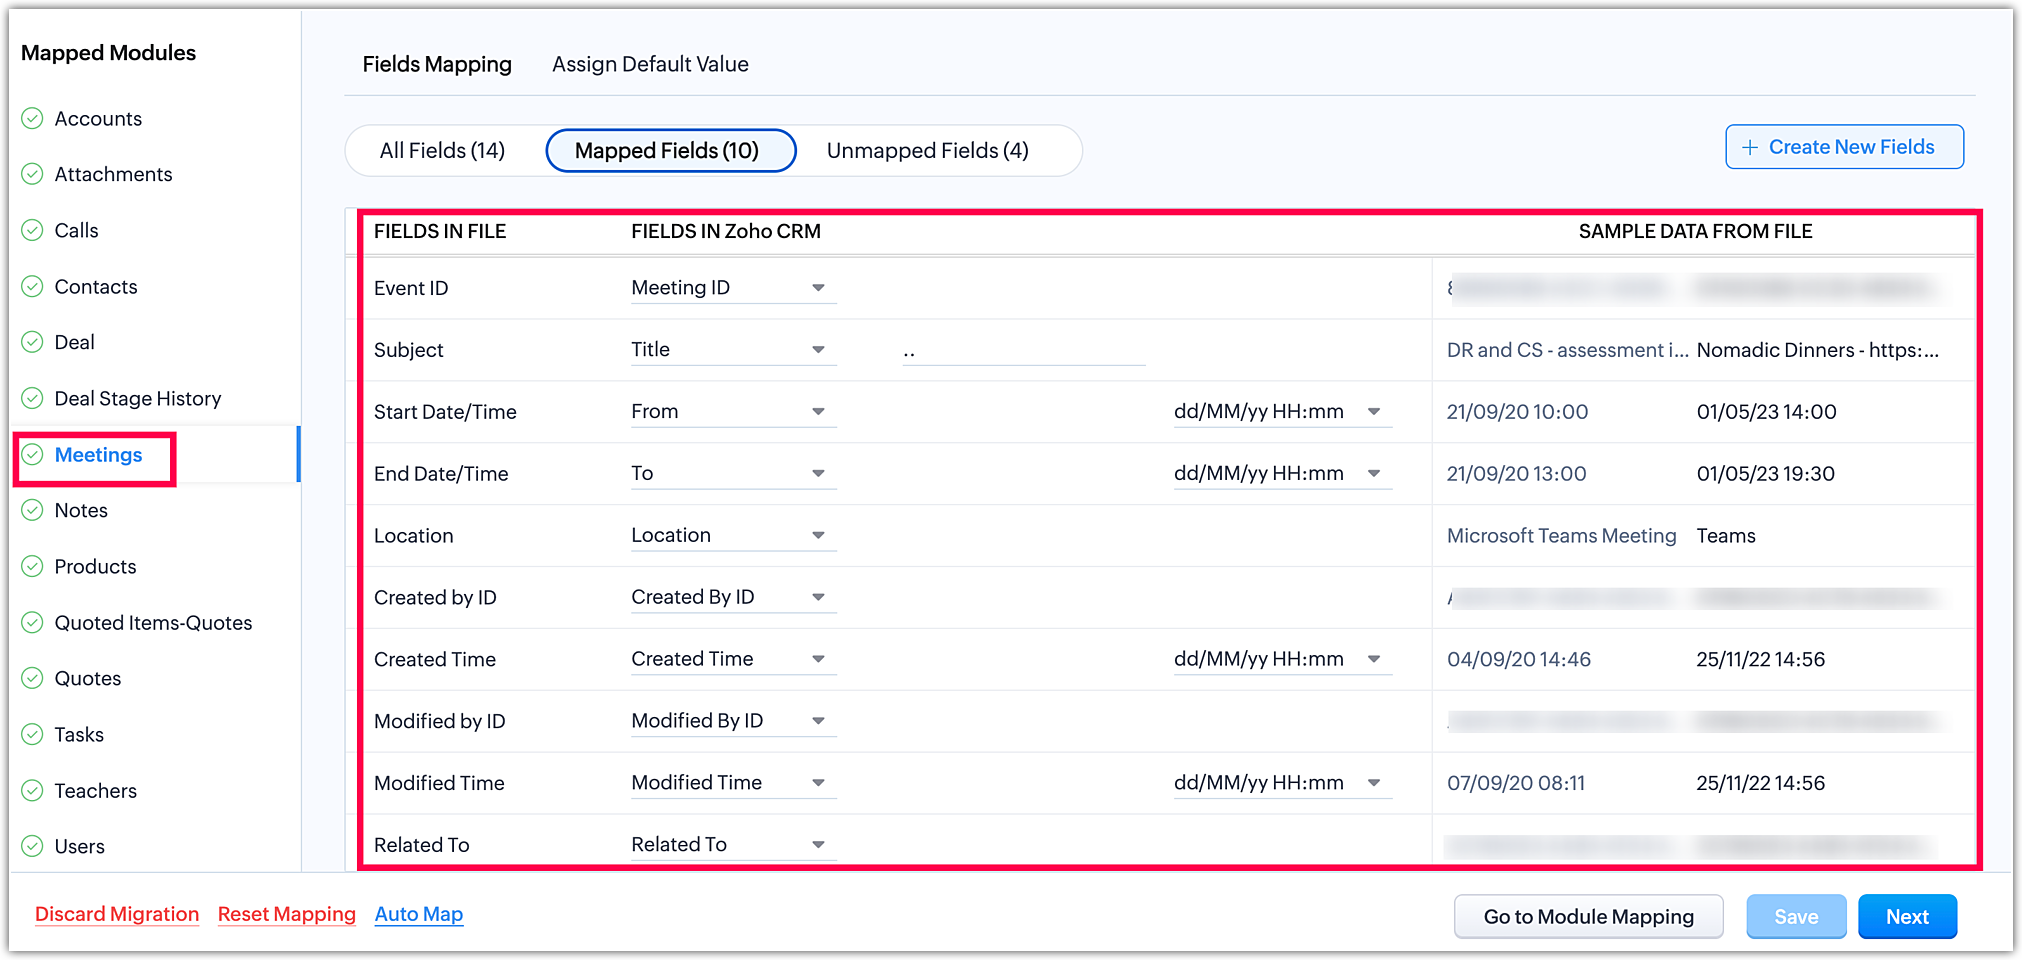
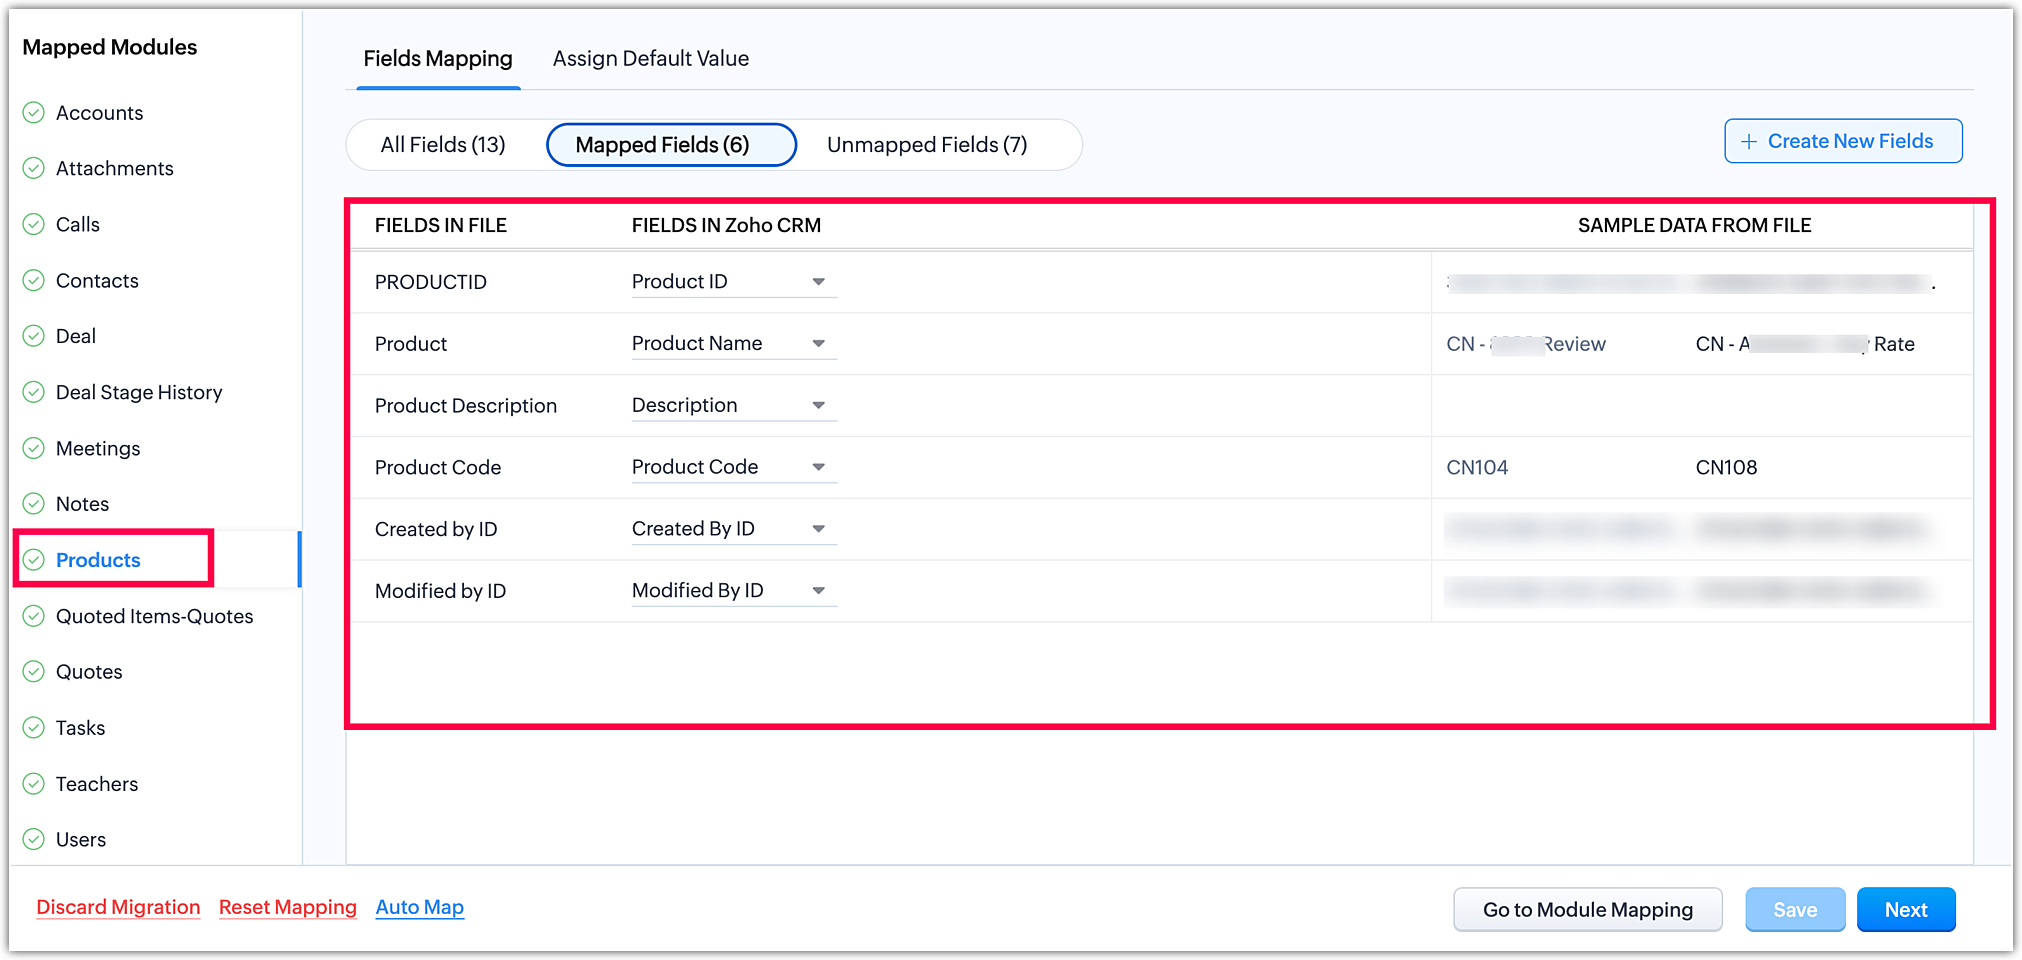
Once you have completed the module mapping, click Next in the bottom-right corner to initiate the field mapping stage.
-
Standard module field mapping:
Contacts
- Note module field mapping:
Notes

- Activities Module field mapping:
Events
- Inventory module field mapping:
Products
- Quote Line items
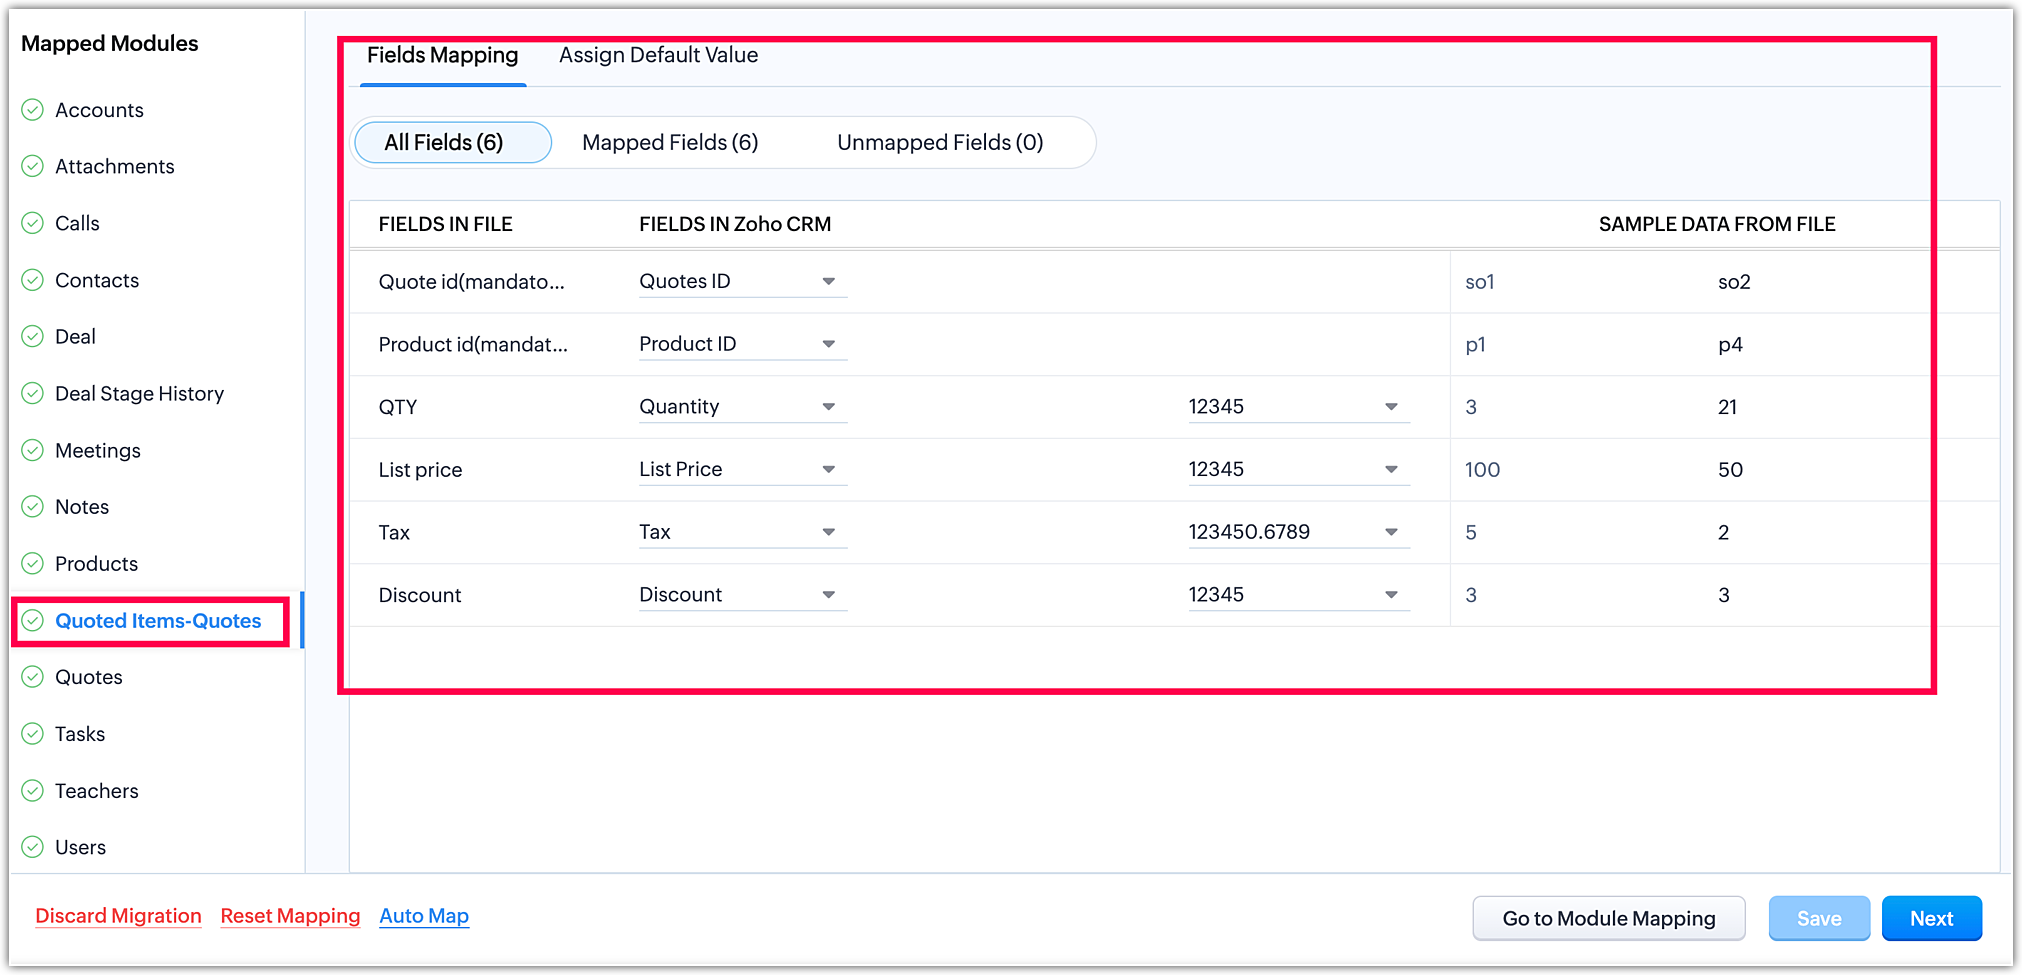
Quotes
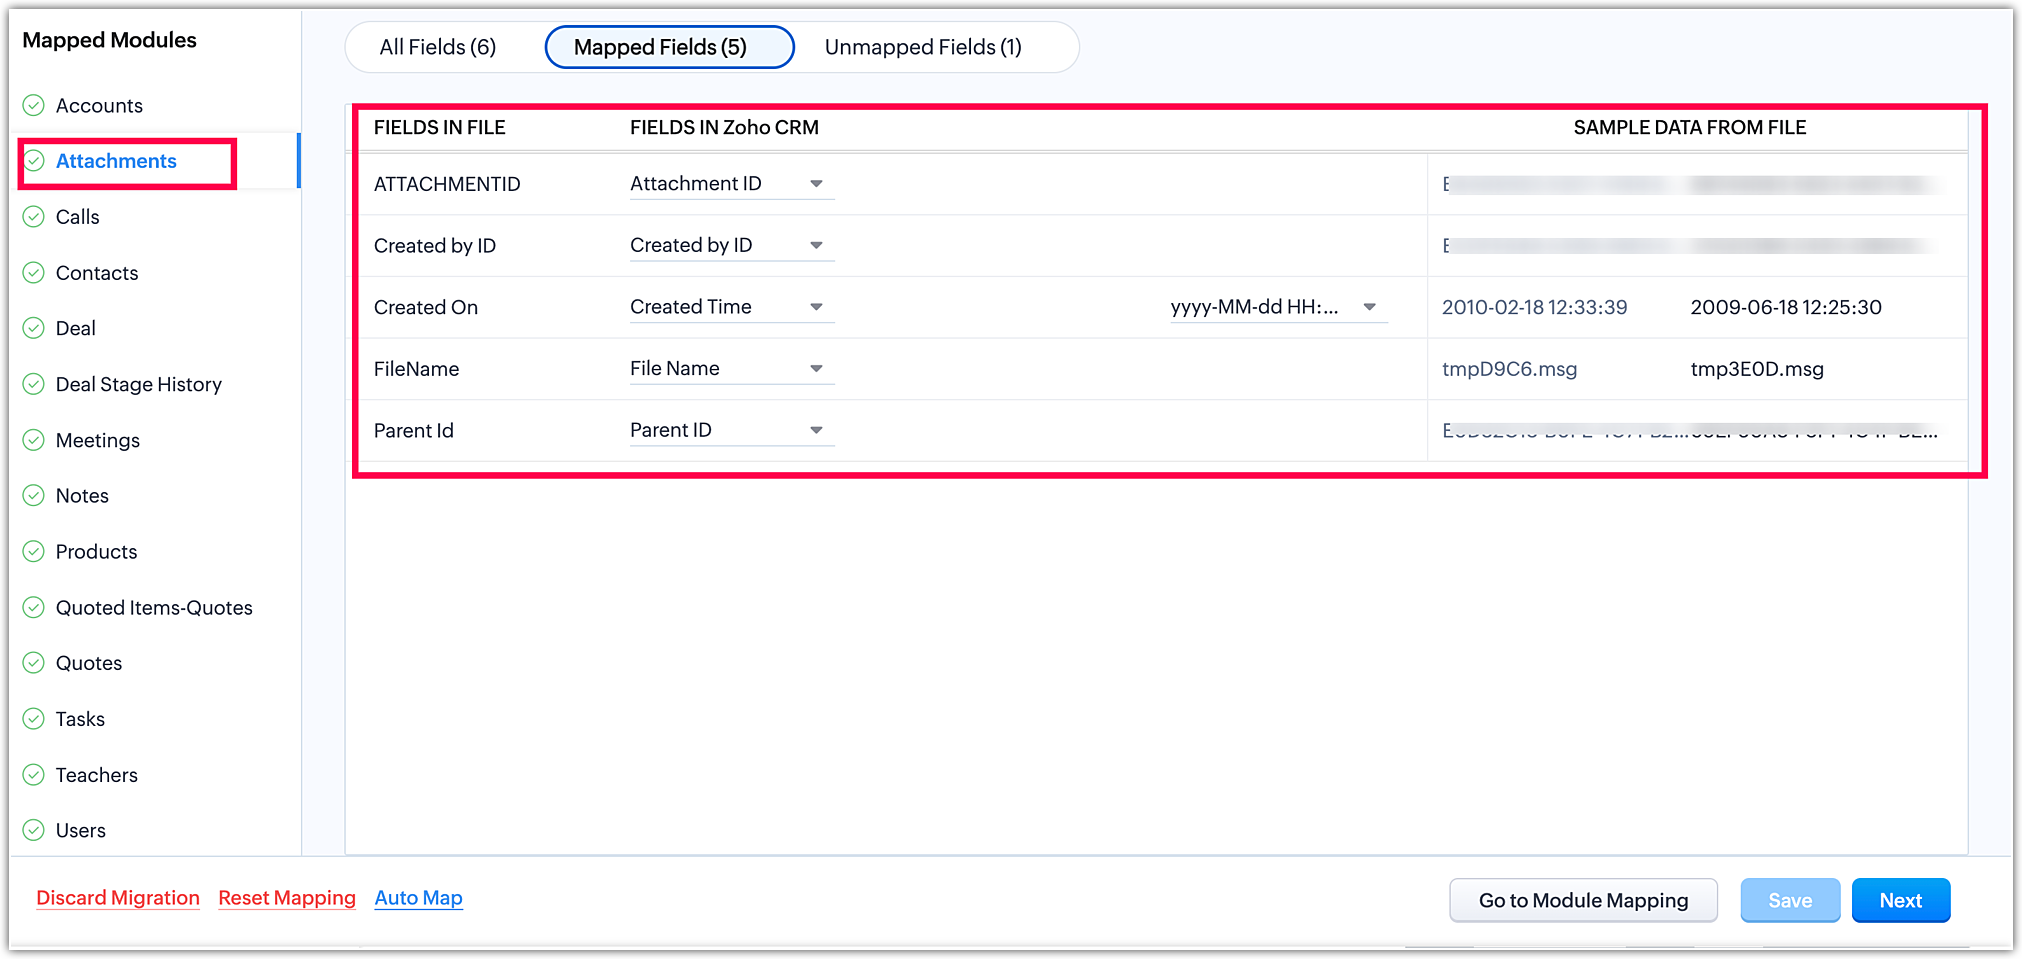
- Attachments module field mapping:
Attachments
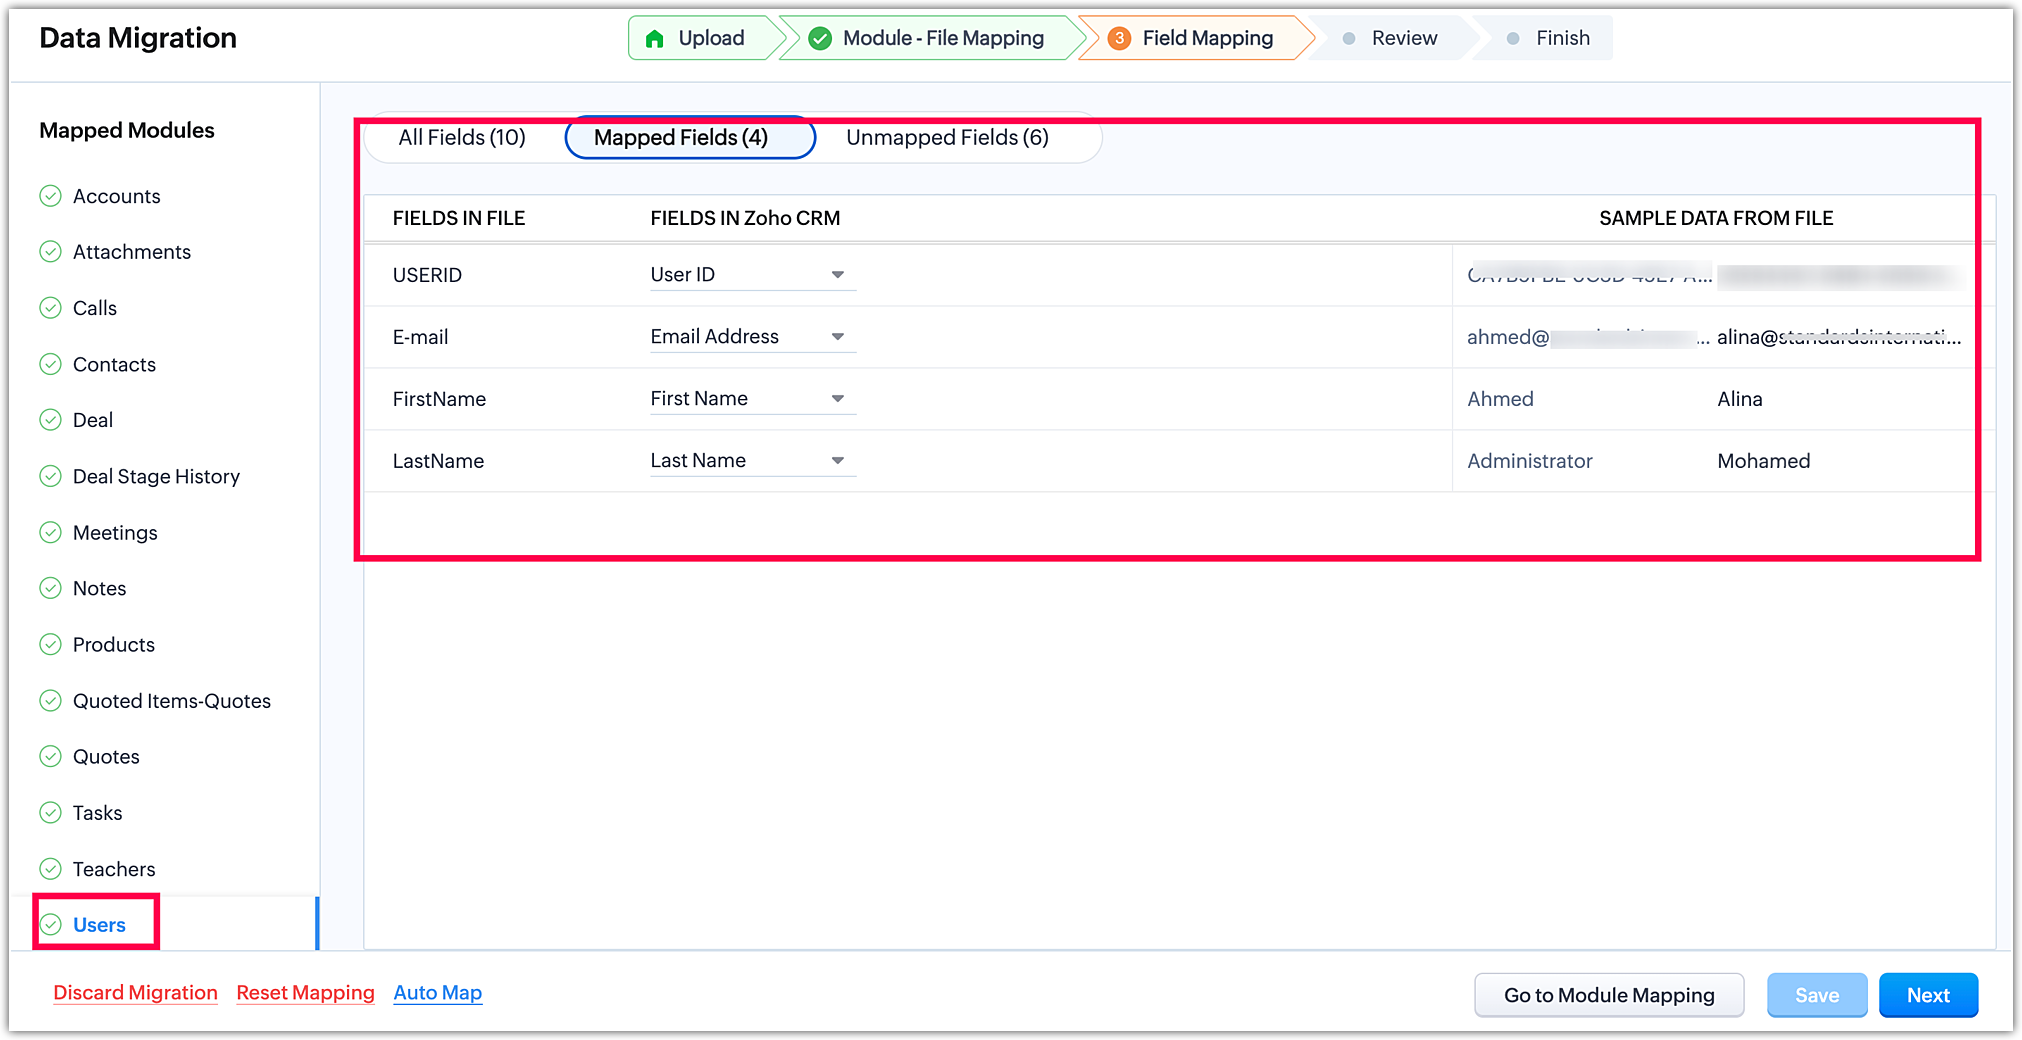
- Users module field mapping:
Users
- Custom module field mapping:
Teachers
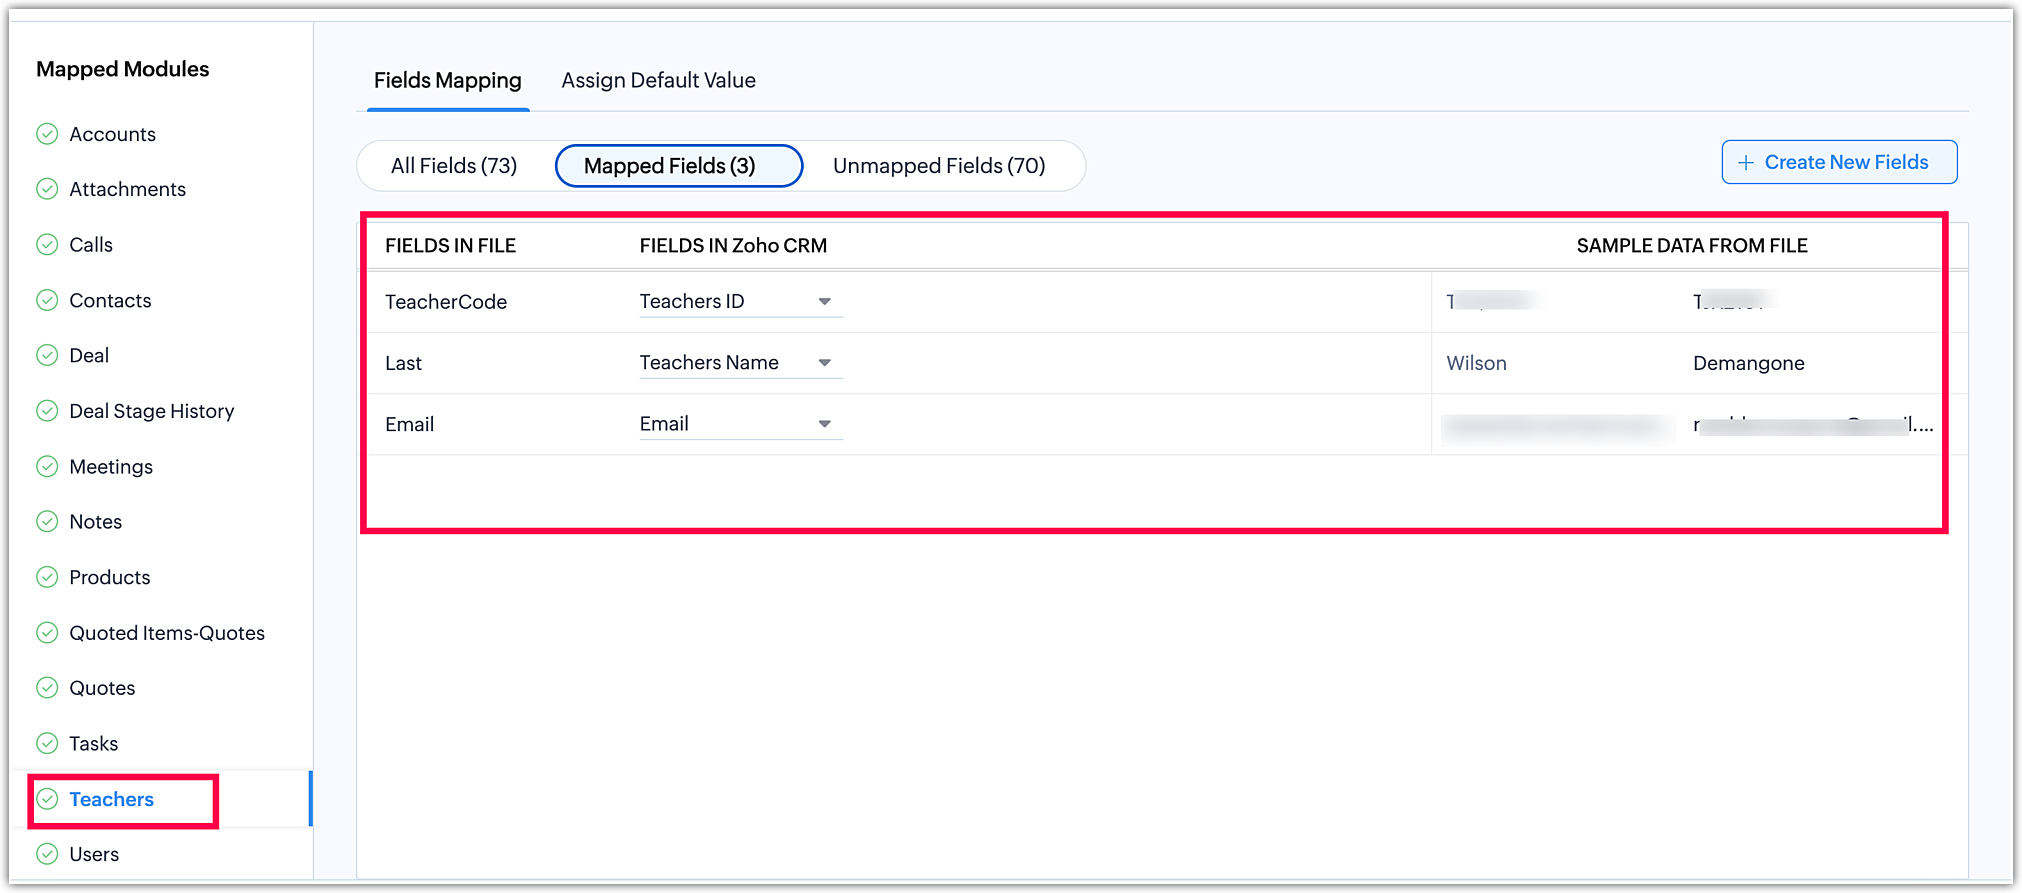
As shown above, you can perform the field mapping of the different module files.
The fields statistics (All fields, Mapped fields, Unmapped fields) can be observed in the top bar of the field mapping itself.
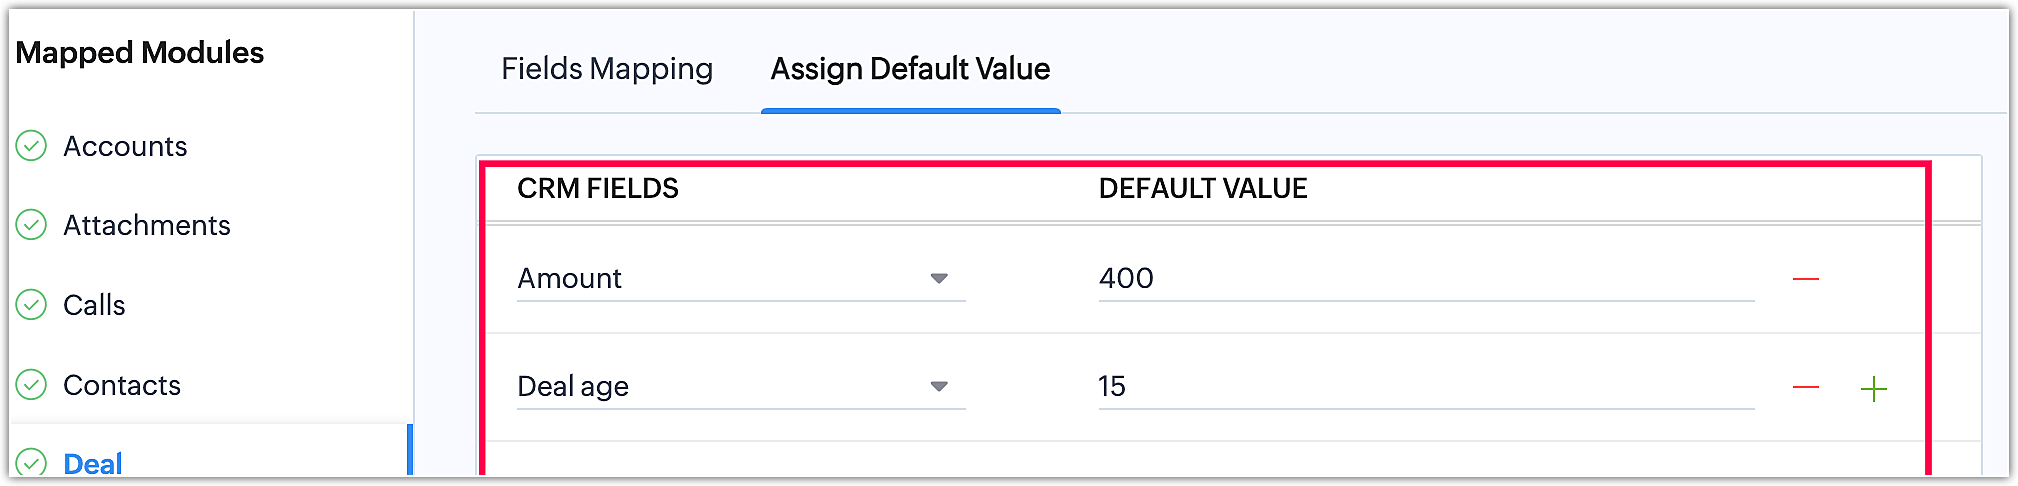
You can assign a default values for the fields present in the module layout. However, you cannot assign a default values to the respective module ID, since it should be unique.
- Assignment of Default values to the fields.
Some fields can be automatically mapped if they match the fields in the module. The auto-mapping feature applies to standard CRM fields present in the Import Widget page (e.g., Salesforce, Zoho, ACT, etc.).
If any mapping is incorrect during the auto-mapping process, don't worry. You can simply reset the mapping and proceed with the field mapping manually, according to your preference.
In case you miss any files that should have been migrated along with the others at the beginning, there is an option to discard the migration. This allows you to make necessary adjustments before initiating the migration when it is more convenient or required.
How do I create new fields while doing the field mapping?
During the field mapping stage of the migration, if there is a need to create new fields, you can easily do so by clicking on the Create Field option in the top-right corner of the field mapping page. This enables a smooth process for adding and mapping new fields as required.
Please refer the below image to view the option of Create New fields in the Field mapping page:
To create new fields, you need to select the field type from the dropdown. Please refer to the below image to select the field type to create a new field.
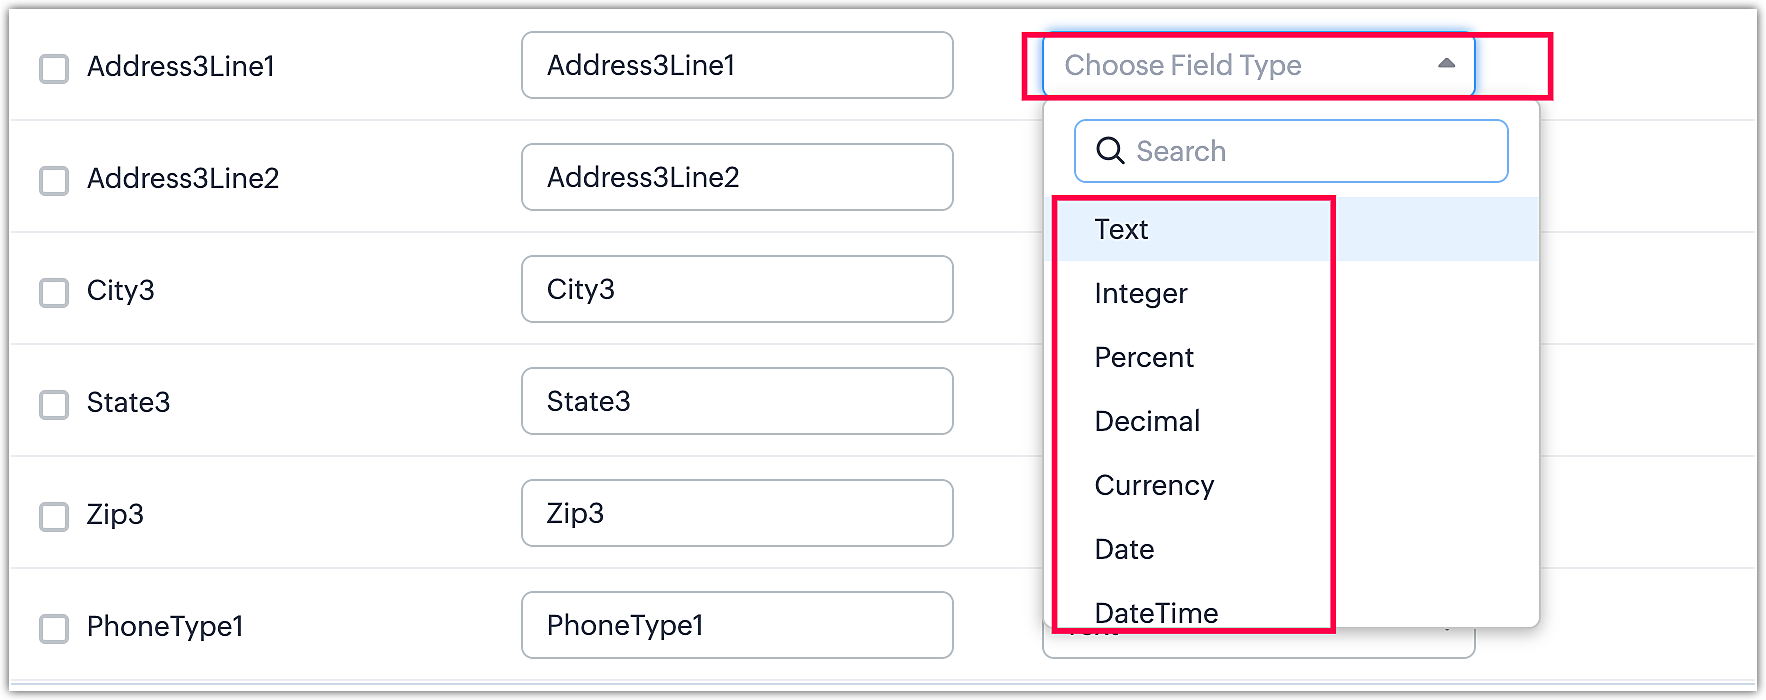
The different fields types are :
- Text
- Integer
- Percent
- Decimal
- Currency
- Date
- Date & Time
- Email
- Phone
- Picklist
- URL
- Text Area
- Check box
- Multi-select picklist
- Long Integer
- Lookup
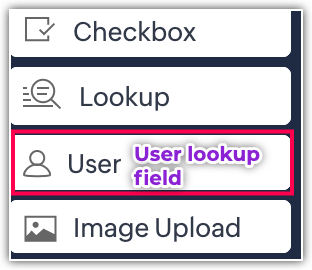
- User
Formula fields, Multi-select lookup fields, Sections, and Sub-forms cannot be created during the field mapping process. It is necessary to create these types of fields in the module builder before starting the migration.
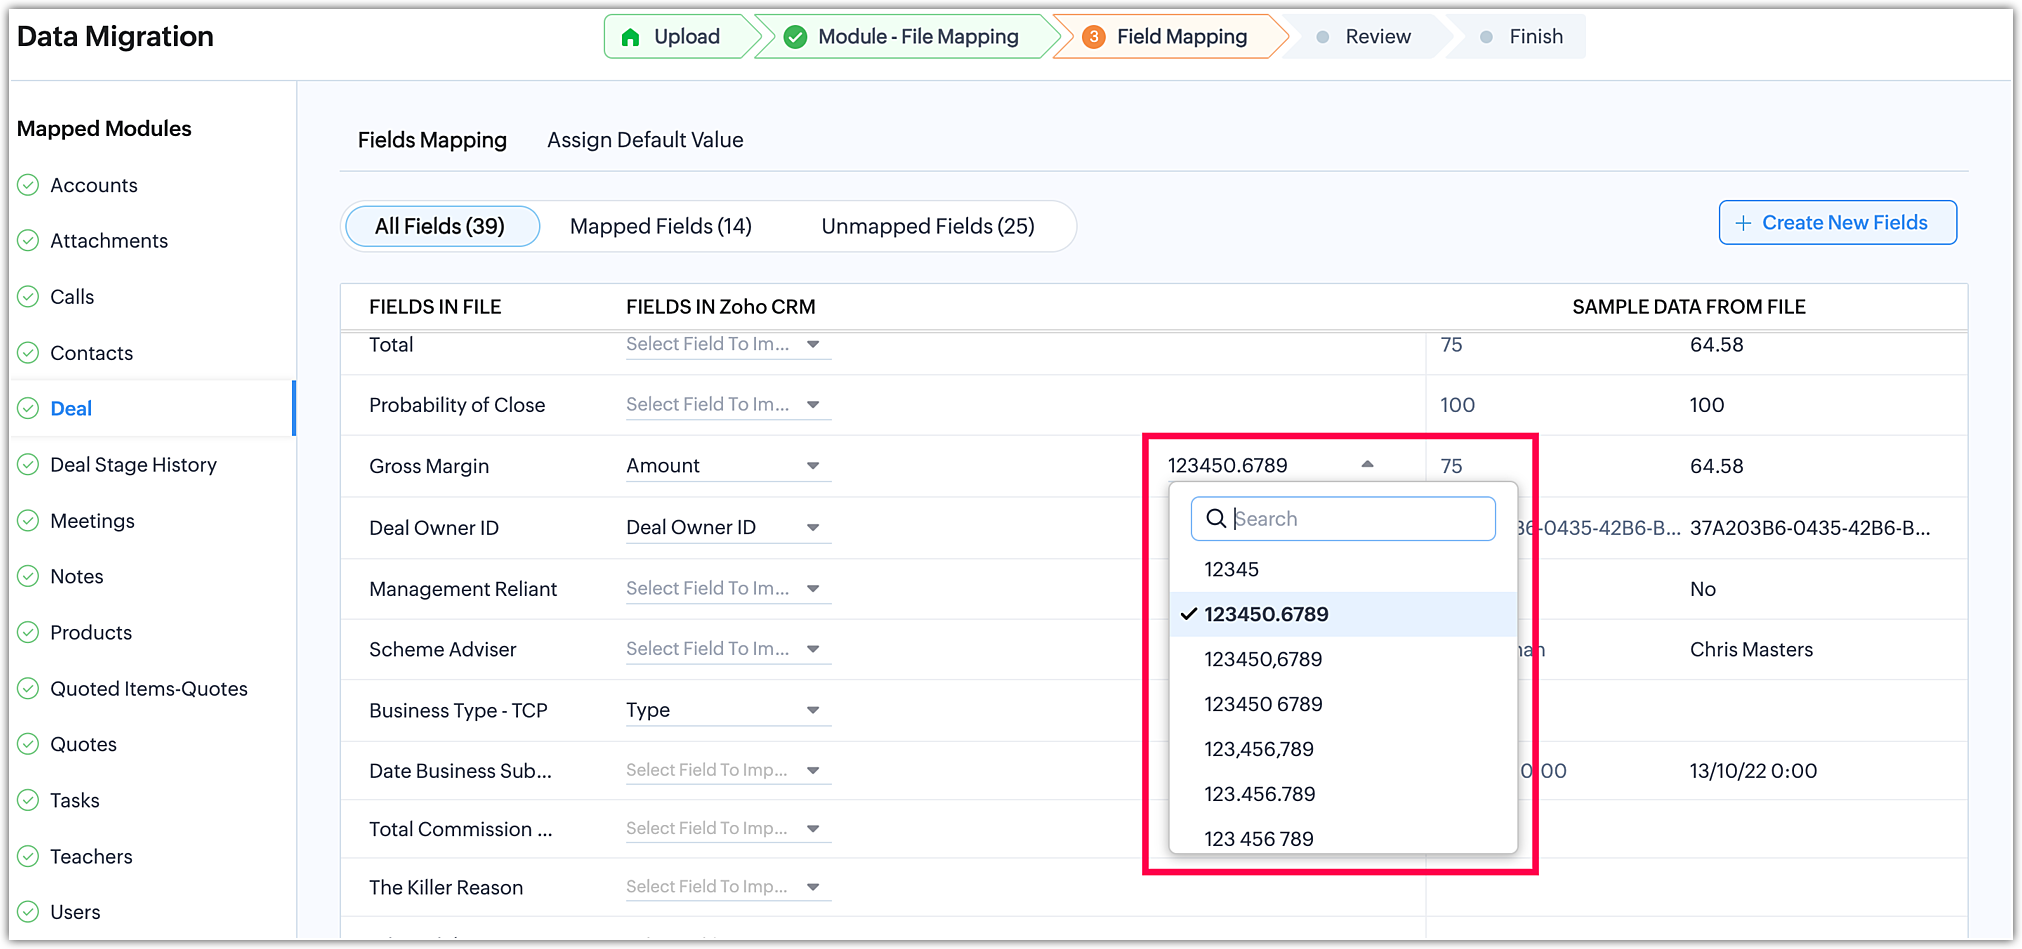
However, during the field mapping stage, you have the flexibility to set the formats for dates, date & time, and numbers. This includes customizing how dates are displayed and formatting numbers with separators like commas or periods, according to your preferences.
Date and time format:
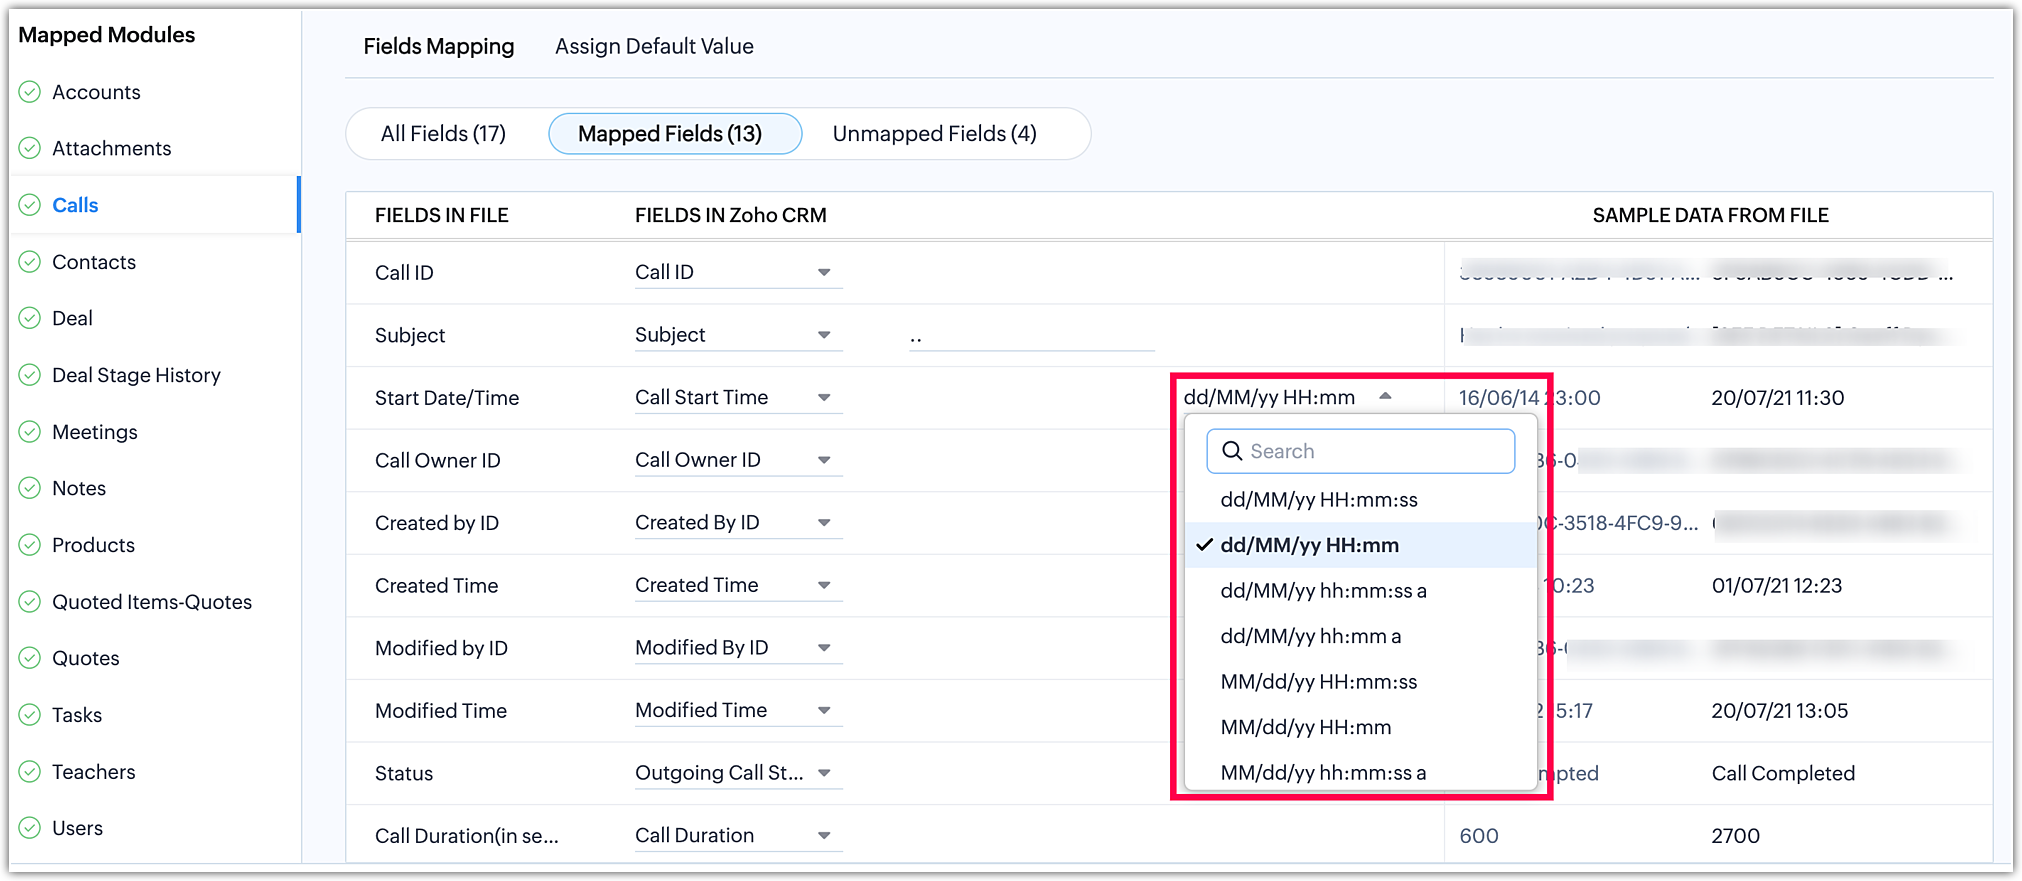
Number formats:
Date format:
As shown above, the fields can be created during the field mapping stage in migration process.
A sub-form is an auxiliary form or table that allows you to add multiple line items to a primary form in your CRM. Often, your CRM data is interdependent, and you may need to associate several items with a single record. These items are referred to as "line items." A sub-form provides the means to associate multiple line items with a single record.
To migrate sub-form data, follow these steps:
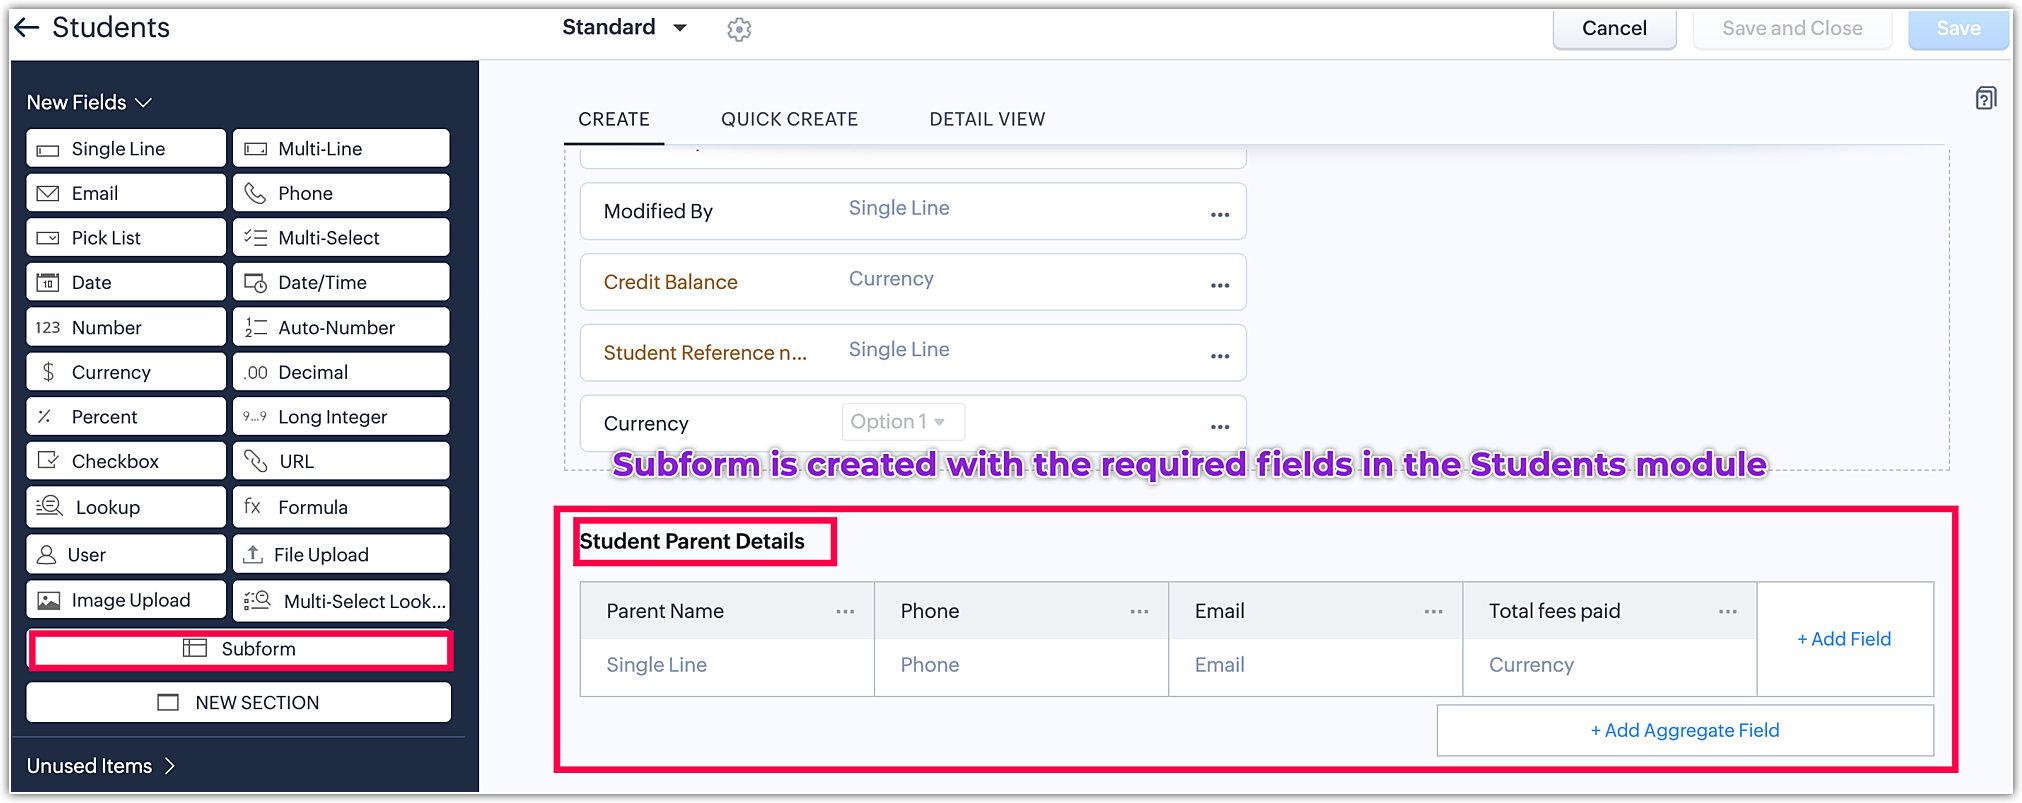
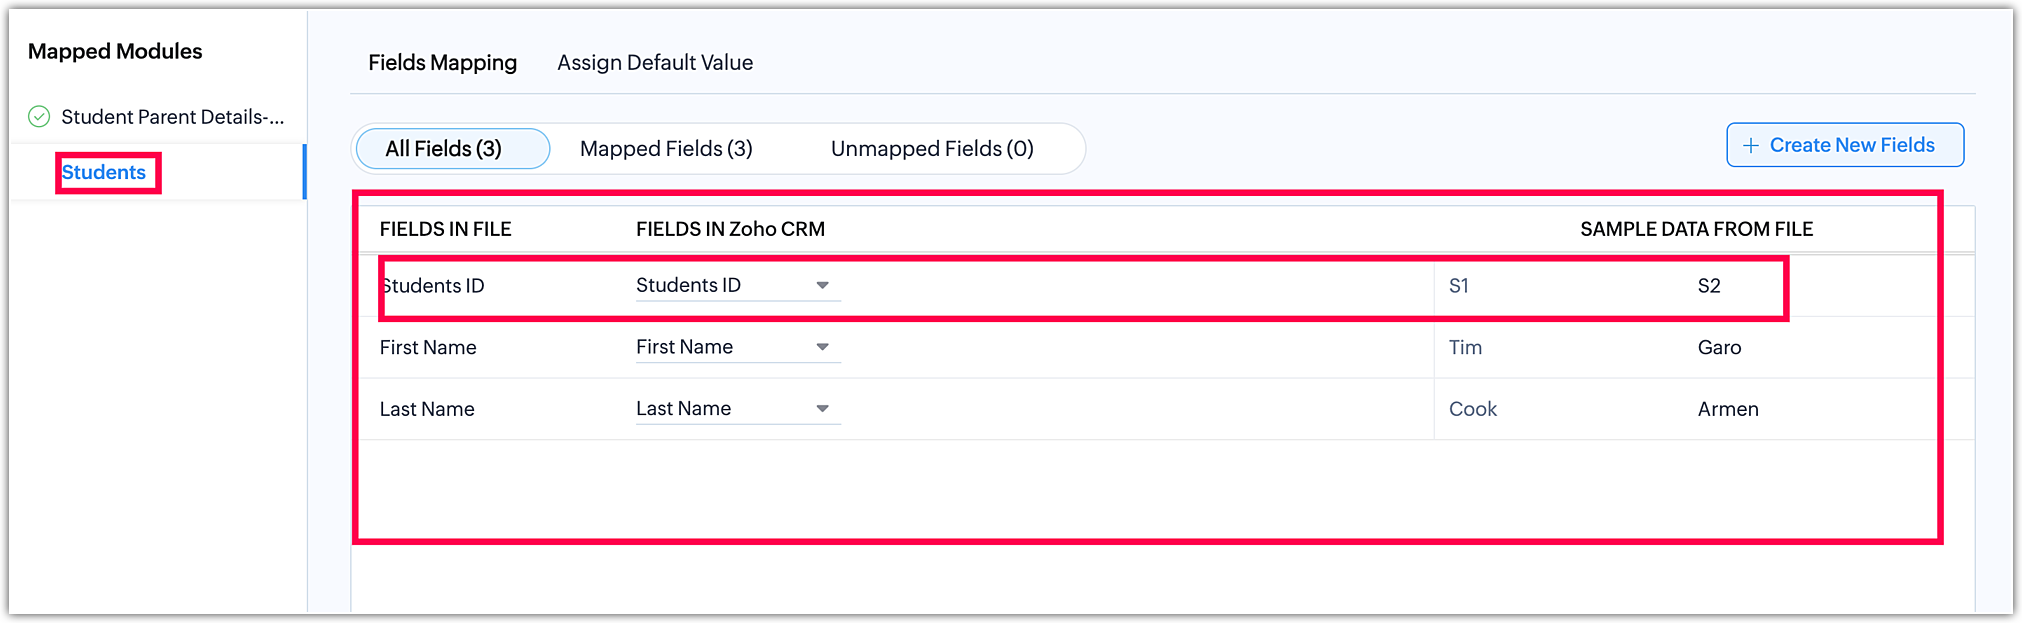
- Choose the module where the sub-form needs to be created. For example, if you have a Students module and need a sub-form for entering Student-Parent details, navigate to the students layout.
- Create the sub-form by adding the necessary fields required within the sub-form. You can include a maximum of 10 fields inside the sub-form to suit your specific needs.
The file arrangement is shown below to migrate the sub-form data.
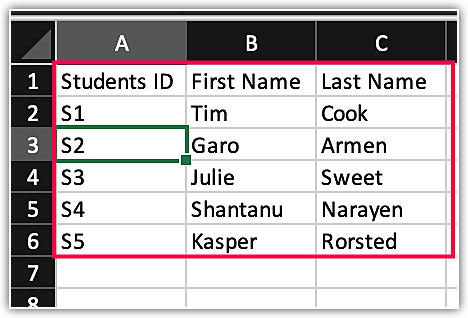
Students Data (Parents module data):
Student-Parents data(Sub-form data):

To associate the sub-form data with the parent data, the sub-form file must contain the Parent Data ID (Student ID), as demonstrated above.
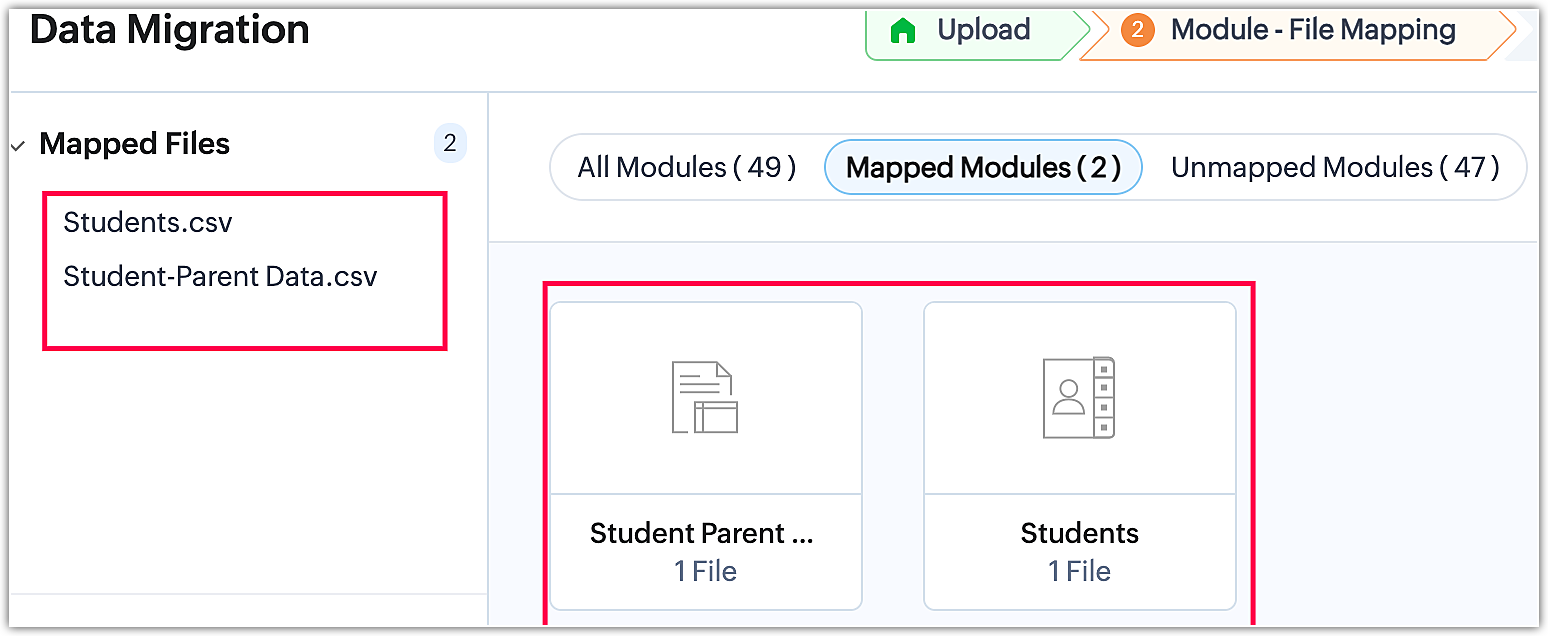
Module mapping and Field mapping of the sub-form and student data.
- Module mapping:
When you create a sub-form, it automatically generates a corresponding sub-form module with the same name. During the module mapping process, you will see this newly created sub-form module, as illustrated below.
- Field mapping:
Sub-form field mapping
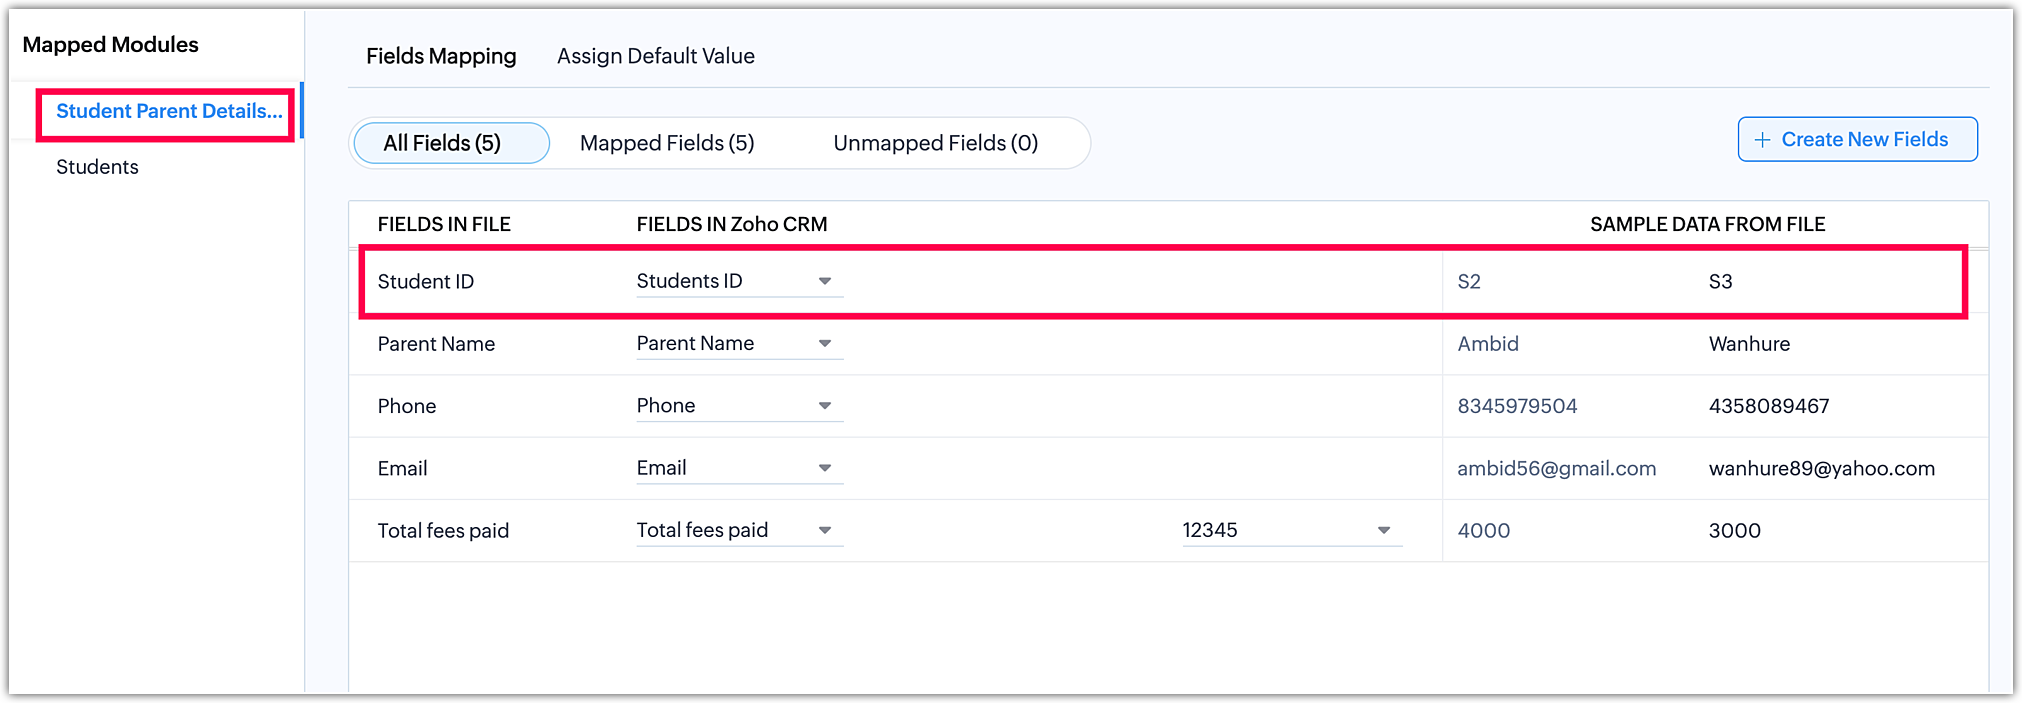
- Parent Module field mapping:
The appearance of sub-form data once the data is migrated.

In the parent data the Julie Sweet ID is S3 and S3 is there in the row of Wanhure (Parent Name), and is associated accordingly.
Note: All kinds of field types can be created in the sub-form except the Multi select lookup field.
 We hope that this list of frequently asked questions about data migration are informative. If you still have questions that haven't been addressed, please let us know here. We will be happy to discuss them with our subject matter experts and add them in the future. And please don't forget to share your rating below!

