Uploading Documents, Creating Files, and Other Functions

For new signups, the Documents tab is powered by WorkDrive. This update is being rolled out for existing users in phases. For help documentation related to that, please see: Documents in Zoho CRM and Manage files in Documents tab.
This page contains instructions for users without this update.
This page contains instructions for users without this update.
Upload Documents
In the Documents tab you can upload presentations, spreadsheets, PDFs, and the like for easy access. You can upload up to 10 files at a time.
Availability
Permission Required
Users with view, create, modify, and delete document permissions in their profile can access this feature.
To upload documents
- Click the Documents tab.
- In the Documents tab, click Upload.
Each file size should not exceed 100 MB. - Select the files from your local drive and upload.
You can also drag and drop the files from your desktop.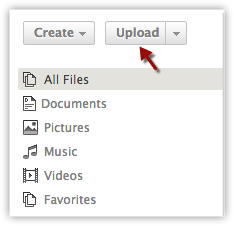

Note
- You can also upload folder with a maximum of 10 files in it, each not more than 100 MB in size. The option to upload folders is available only when you access Zoho CRM in Google Chrome.
- The maximum storage space available for the Documents tab is 5 GB.
Create Files
You can create documents, presentations and spreadsheets using Zoho Writer, Zoho Show and Zoho Sheet respectively.
To create a file
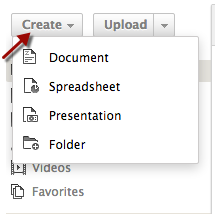
- Click the Documents tab.
- In the Documents tab, click Create.
- From the menu, click on the type of file that you want to create.
- In the popup box, specify a name for the file.
You will also see the folder under which the file will be saved. - Click the Change link to save the file in a different folder.
- Click Create.
A new file will be opened in Zoho Writer, Zoho Show or Zoho Sheet based on the type of file that you are creating.
Attach Files from Documents Tab
Files uploaded under the Documents tab can be linked to multiple records as attachments.
To attach a file from the Documents tab
- Click open the record to which you want to attach a file.
- In the Record Details page, under Attachments, click the Documents link.
- From the Attach from Documents pop-up box, select the files that you want to attach.
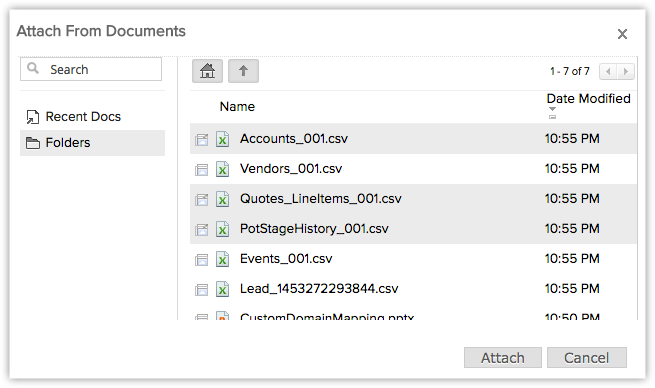
- Click Attach.
The files will be attached to the record.
Note
- By clicking on the attachment, you can download the files attached to a record.
- Using the getRecords API method when you retrieve records, the files attached from the Documents tab will not be downloaded.
- Using API, you cannot download the files that are attached from the Documents tab.
Delete Files
You can delete a folder only if you have the profile permission to delete a document folder. On deleting a folder, the files in it will also be deleted and moved to Trash.
To delete a file
- Click the Documents tab.
- In the Documents tab, click on the folder from which you want to delete a file.
- Right-click on the file that you want to delete and click Delete.
The deleted files will be listed under Trash.
Note
- You cannot recover the files and folders that you delete from Trash under the Documents tab.
Other Functions
Some of the other options available for documents are listed below in the table:
| Feature Options | Description |
| Download | Download files from folders and store them in your local drive. |
| Check-out | Check-out the documents and upload the updated versions of it. |
| Review | Write a review for the document. |