Design Blueprint | Online Help - Zoho CRM

Designing a Blueprint

Building a process is largely a 3-step procedure. 
  1. Enter Basic Info:
    Specify the  module layout, and field for which the process should be created.
  2. Define the Process Flow: 
    In the Blueprint Editor, define the process flow right from the  Starting or the Default State(whichever applicable) through to the  Exit State.
  3. Configure Transition Settings: 
    Configure Before, During, and After Transition settings between different States in the process as required. 

Step 1 - Enter Basic Information

  1. Go to Setup > Process Management > Blueprint.
  2. Click Create Blueprint.
  3. In the Create Blueprint popup, choose the module, layout and field for which the process is being created.
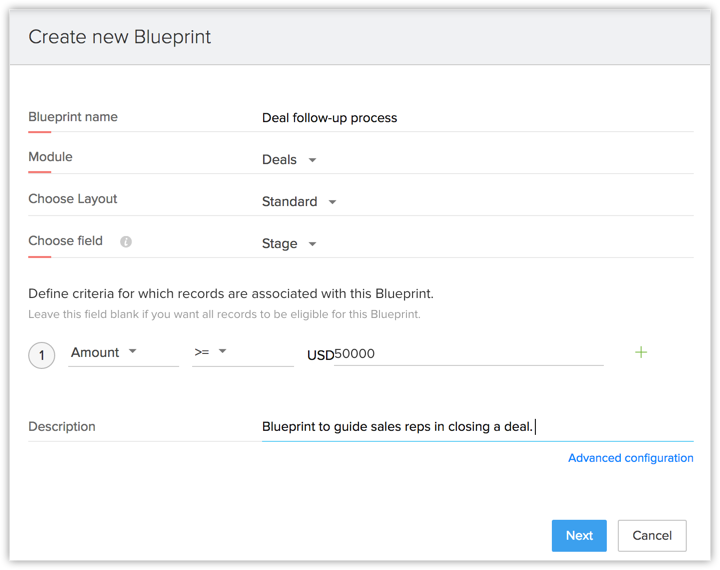

    In our scenario, since the process is Deal Follow-up, let us choose the Deals module, Standard  layout, and Stage field.
  4. Specify criteria for records to enter a process, if applicable. For example, Amount is >= 50000.
    If you don’t enter criteria, all records created in the layout will enter the process. Click Next .

Note
  • Under Advanced Configuration, you can create a continuous blueprint. A continuous blueprint is one that occurs without a pause - ideal for sales call scripts.
  • The primary field of the Blueprint can be updated via
    • Transition API
    • Workflow API 
    • Custom Functions in Workflows. 
    Aside from these three ways, there are no other channels via which the primary field of the Blueprint can be updated.  

Step 2 - Define the Process Flow in the Blueprint Editor

  1. In Blueprint Editor, drag and drop all the States (stages) that form a part of the process.
  2. Establish the process flow between the States by connecting the nodes in the State buttons .
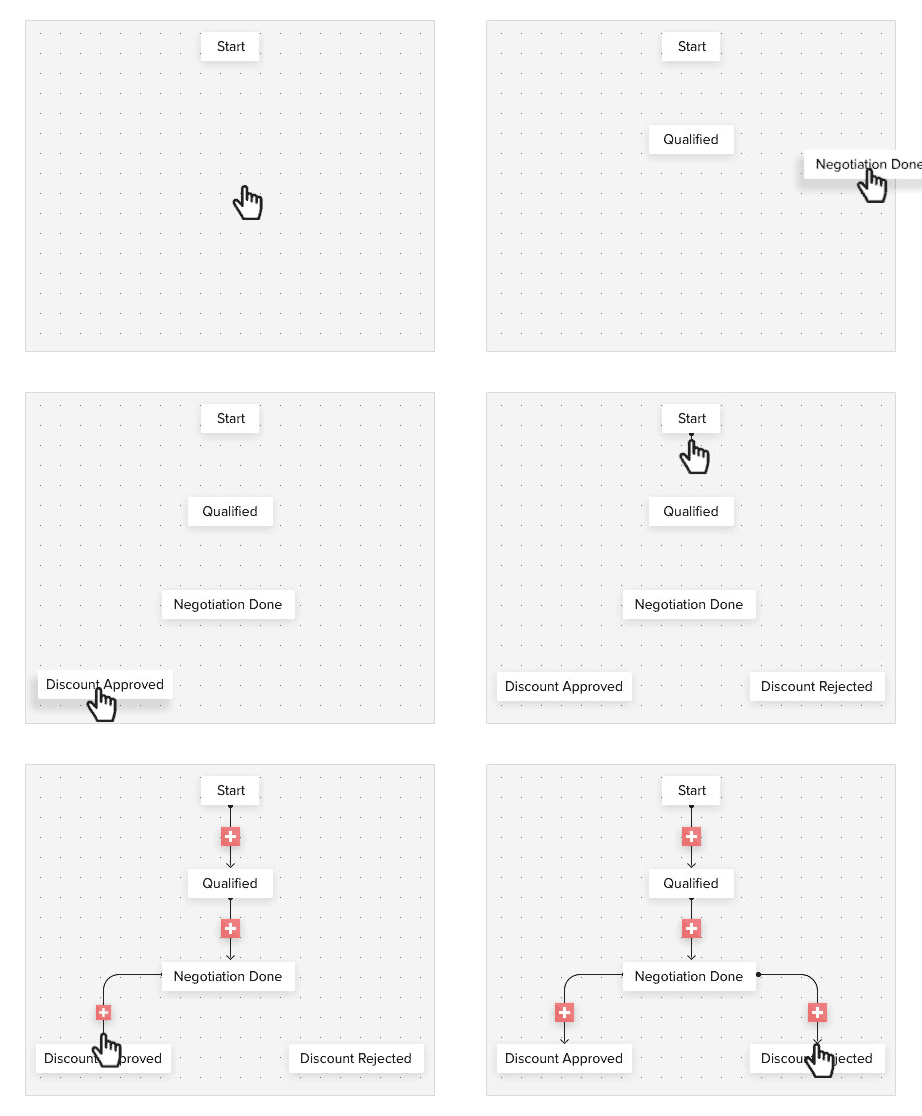

    Note that the Start State is the equivalent of "None" value of the chosen picklist field. 
  3. Create Transitions by clicking on the + button between two States.
    (To delete a transition, simply Right Click on the transition line, and click Delete transition)
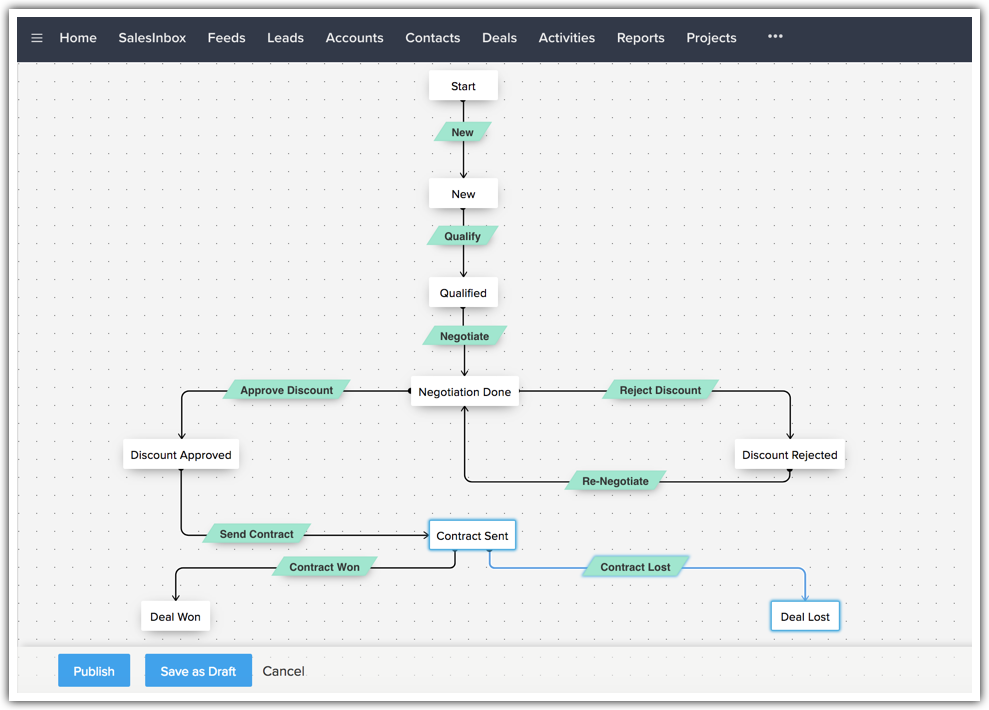
What does the above process flow mean?

This is a pictorial representation of the Deal Follow-up process followed in Zylker Inc. Deals entering this process will go through every stage in the order seen in the picture.

  1. The white buttons represent States in the Blueprint (Deal Stages).
  2. The green buttons represent Transitions (Conditions required to complete each stage).
  3. Each Transition you configure is displayed as a button on the record's details page.
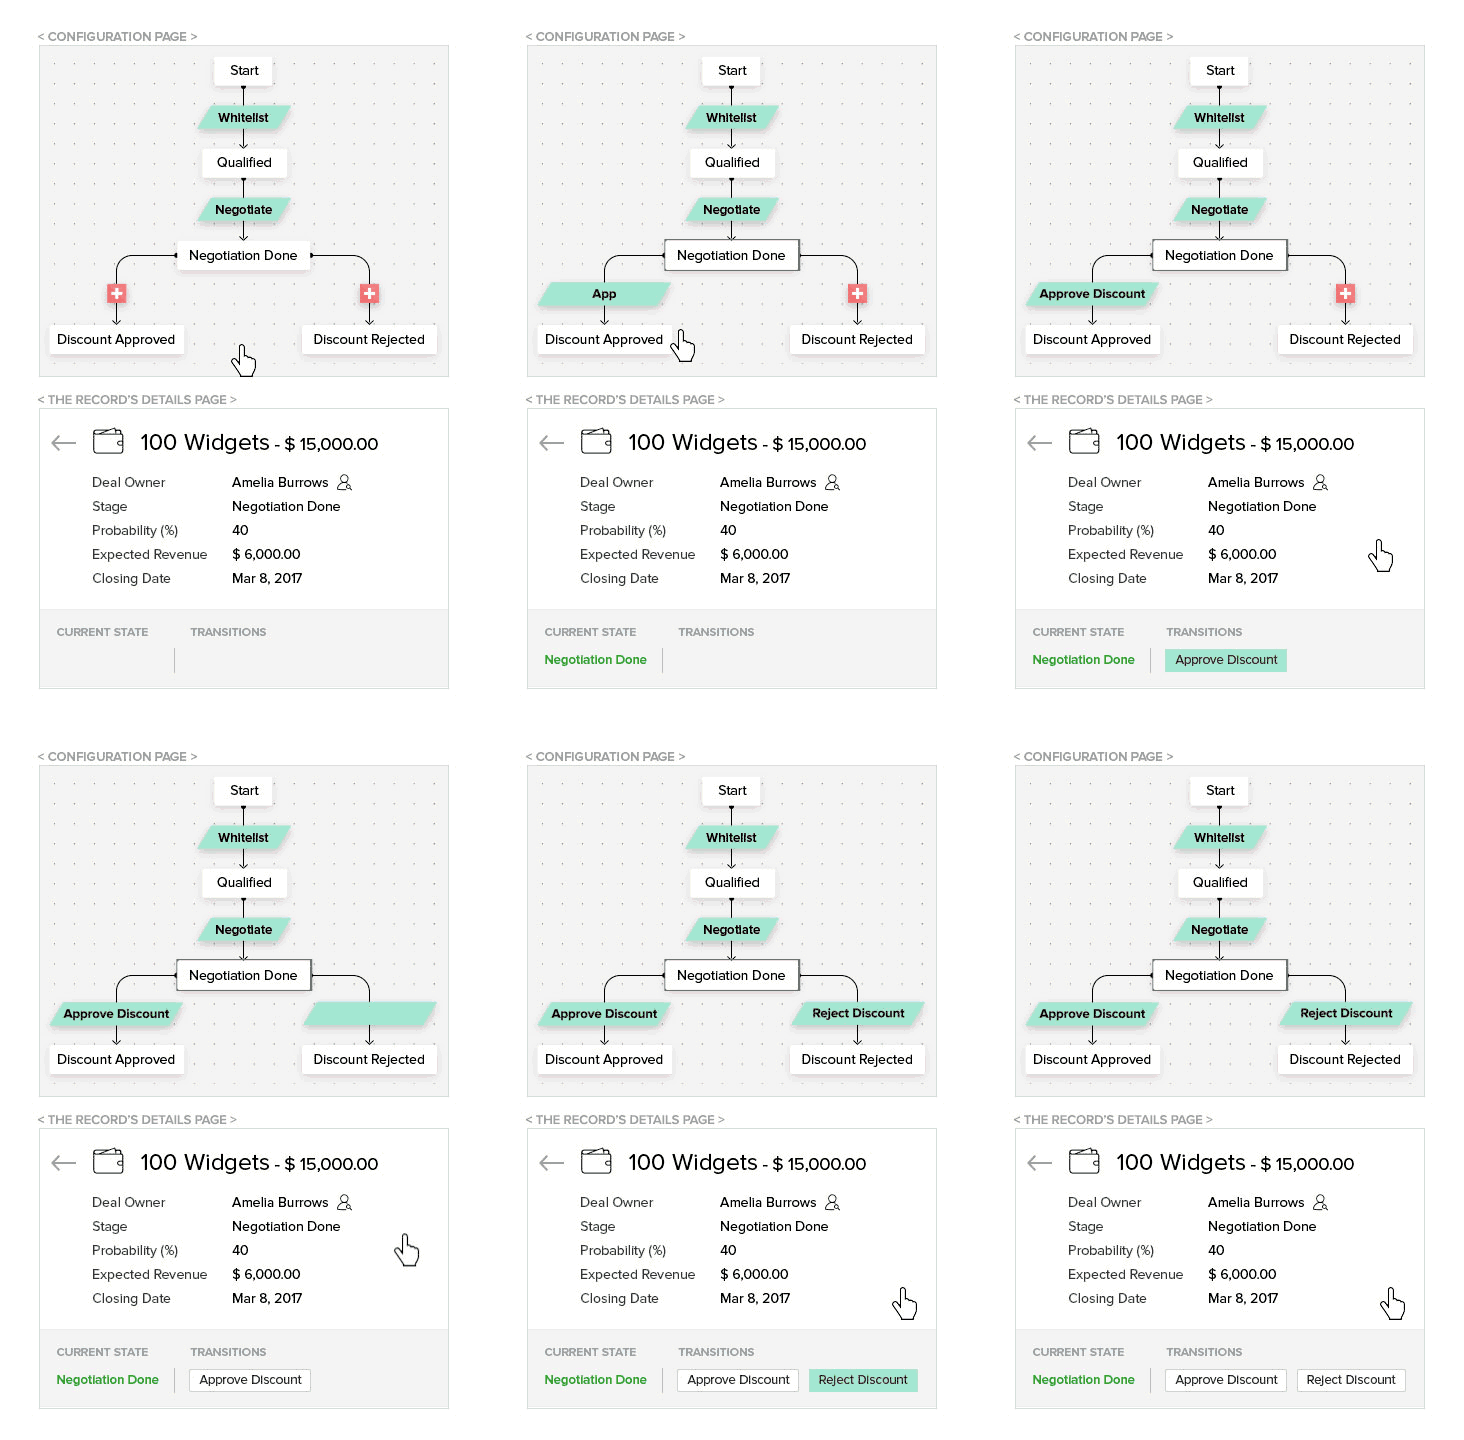
  4. To complete a Transition, click on the Transition button and execute the actions mentioned in the ensuing popup window.
  5. Example, clicking on Qualify will throw up a popup window, which will guide you in executing this Transition.
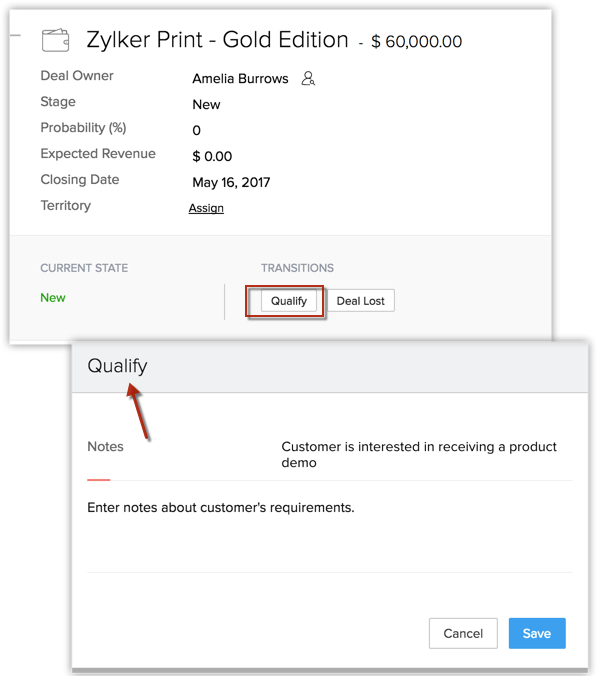
  6. On successful completion of the Transition, you will move to the next State in the Blueprint.
  7. The blue button Deal Lost is called a Common Transition and will appear at all States of the Blueprint.
  • Click here  to see more sample process flows from various sectors such as Education, Real Estate, Insurance.

Step 3 - Configure Transition Settings

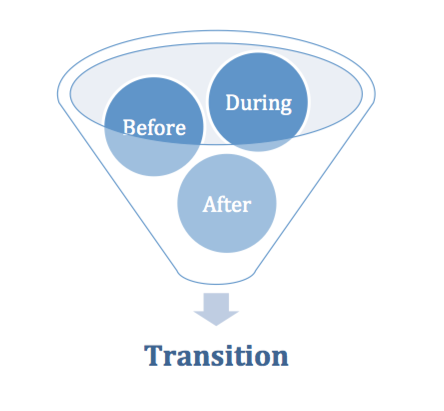
“Transition” refers to the change of state in a process. It is the connecting link between two States, where the conditions for the change are clearly defined. A Transition is made up of three parts -  Before, During, and After .
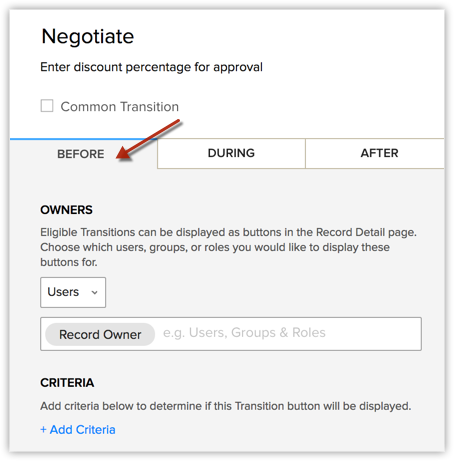
For example, let's look at the Transition between the States - Qualified and Negotiation Done. Let's name this "Negotiate". In Zylker's example, following are some guidelines to be observed while configuring the Transition settings in this scenario.
NotesNote : The length of the transition's name can be upto 50 characters. 

  • In order to complete the Negotiation Transition, a sales rep in Zylker must enter the Discount percentage and the Closing Date.
  • As per Zylker's policy, discount for a product cannot be greater than 25%.
  • As soon as the Negotiate transition is executed, an email notification must be automated to the sales rep's manager informing him/her about the deal submission.

Let's see how we can accommodate all of these points in the Blueprint.

Before Transition

  • Specify people responsible for executing a Transition. This can be CRM or portal users.
    For example, Record Owner. When you choose Record Owner, only the Record Owner (and those above the record owner in the role hierarchy) will be able to view the Transition.
  • Define criteria that dictates exactly when this Transition should be available for the records in a process. 
    Example criteria: "Product Demo is Completed".
    In this case, the Transition will be shown to records only when the  Product Demo  field is updated to  Completed
    If you have no such conditions, you can skip the criteria section. In such a case, the Transition will be visible on all records right away. 
During Transition

This section guides Transition owners in completing a particular stage in a process by prompting them to enter specific fields, notes, attachments, and other information contextually. For example, in the deal follow-up process, sales reps may be required to enter the discount percent, notes, and attach a few sales documents according to the organization's policy. In such a case, all these details can be mandated in the During Transition section of the Negotiation Transition.

You can ask your transition owners to perform the following actions:
  1. Add values for fields from the primary module and related modules, including multi-select lookup and multi-user fields. These can be validated.
  2. Complete checklists
  3. Add associated items like notes, attachments, tasks, meetings, calls, and so on.
  4. Add tags
  5. Perform actions in widgets
  6. Add Kiosks
Idea
By default, these actions are mandatory. You can choose to make them optional if you wish.

You can also add messages in the During Transition section. These will be displayed to your transition owners when they select a transition.
Notes
Notes:
  1. During transitions extended to portal users, modules like Activity and Solutions, as well as attachments, tags, owner, and user lookup fields, which are not compatible with portals, will not be visible to them, regardless of their presence in the blueprint transition process.
  2. Adding portal users as transition owners is not supported in sandboxes.
  3. You can reorder the items to be displayed in the transition form by using the UP and DOWN arrows. You can also make use of merge fields to display data from the CRM on the screen.
Let's look at the different options in the During tab.

Add fields and validate them

You can guide your sales reps to enter information required as part of your process by mandating fields at the appropriate stages. You can add optional fields to collect additional information that may be useful. These could be fields from the primary Blueprint module or related modules.

For example, in the Negotiation stage of the deal follow-up process, you can mandate the following fields:
  1. Deal Discount
  2. Related Account Name
  3. Annual Revenue of the Account
  4. Contact person's title and phone

You can add the following fields as optional:

  1. Additional terms
  2. Extended deadline
  3. Performance metrics
To add fields of the Blueprint module and related modules
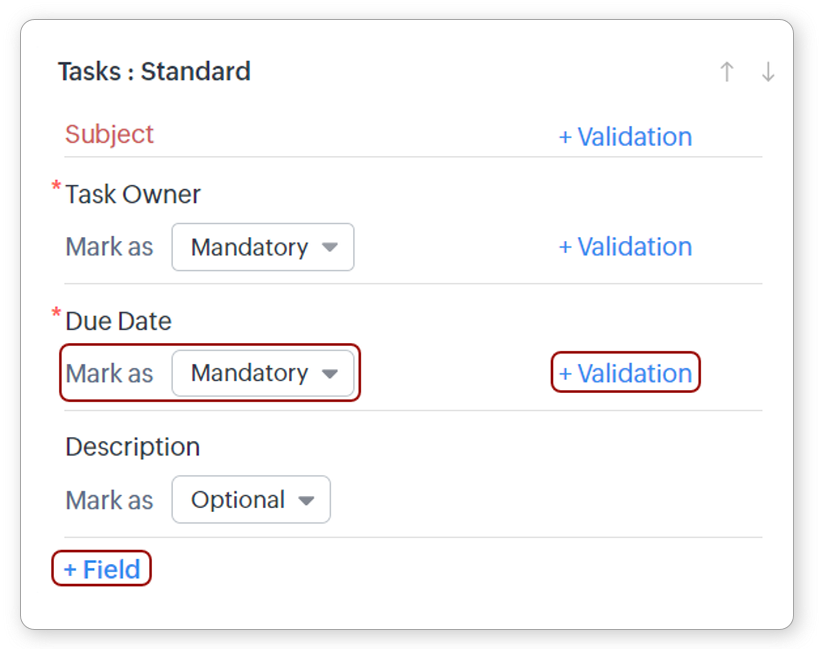
  1. In the During tab, click +Add.

  2. Choose Field in the popup that appears.
  3. Choose the required module from the drop-down list.
  4. Select the field to be added. Once selected, it will be added to the During tab.
  5. In the Mark as drop-down list, choose Mandatory or Optional.
  6. Click + Validation and set the criteria and alert message if you want to validate entries made for that field.
  7. Repeat this action for the number of fields required.
To mark fields as mandatory or optional
  1. Navigate to the During tab of a transition.
  2. Navigate to the required field.
  3. In the Mark as drop-down list, choose Mandatory or Optional.
    Repeat this action for the number of fields required.

Notes
Note: If a layout rule is triggered, the transition form will also show fields made mandatory as part of a layout rule.

Validate fields
Validate fields to ensure that your sales teams enter acceptable values.
Example: Discount cannot be greater than 20%.
Closing date cannot exceed 30 days.

To add validation to fields in the During Tab
  1. Navigate to the During tab of a transition.
  2. Navigate to the required field.
  3. Click + Validation if you want to validate entries made for that field.
  4. In the Field Validation criteria popup, enter the criteria and alert message.
  5. Click Done.
    Repeat this action for the number of fields required.
Notes
Note
  1. You can also add MxN and MxU fields as part of the Blueprint. This includes multi-select lookup fields and multi-user fields, along with single user lookup fields. However, these fields cannot be validated.
  2. Whether a transition field is marked as mandatory or optional depends on:
    1. Whether the module field is mandatory or not
    2. Whether a layout rule is marking a field as mandatory or not
    3. Whether its set as mandatory in the blueprint transition setting.
  3. If at least one of these is mandatory, then the field is marked as mandatory.

Include checklists

Checklists are a list of to-do items. They help your sales teams track the number of tasks and items they must complete in order to get through each stage of a process. This helps you ensure that you complete every tiny step that you must take towards executing a stage.

A checklist will be part of your During Transition tab, which, when configured by the manager or the process architect, will be shown to the eligible transition owners. You can also decide if each entry in the checklist is mandatory or optional.

For example, in our Deal follow-up process, the following items could be part of a  Negotiation Transition Checklist.

  • Finalize discount percent
  • Attach Negotiation documents as mandated
  • Check competitor's discounts
  • Make a note of contingencies

To add checklists

  1. In the During tab of a transition, click +Add.
  2. Select Checklist, then click the empty checklist that appears.
  3. Add a title for the checklist.
  4. Add the list of to-do items and decide if each one is mandatory or optional.


    This will be displayed to the selected Transition owners. The transition owner must check off the mandatory items in the list to proceed to the next state in the blueprint.

Add Associated Items

In addition to fields and checklists, you can ask your users to create items associated with the Blueprint module, as listed below:
  • Tasks
  • Notes
  • Attachments
  • Meetings 
  • Calls
  • Quotes
  • Sales Orders
  • Cases
For example:
  1. Once the discount has been approved and the deal is in the Contract stage, you may want the sales reps to associate a quote and schedule a call with the customer to proceed with the legal requirements. Here, you can mandate task creation and PO association.
  2. You may want to know additional details about various aspects of a process, such as why a sales rep entered a particular discount, why a particular task is pending, and so on. These additional details can be added as notes, which can also be mandated in the During Transition stage of a process.
  3. Any process, be it sales, insurance, manufacturing, or real estate, brings with it the need for several documents. Sales contracts, service level agreements, legal documents, and more are required at different stages of a process. You can mandate users to add these attachments during the required stage in a blueprint.

To add associated items

  1. In the During tab of a transition, click +Add.
  2. Select Associated Items in the popup that appears.
  3. Choose from the Associated Items dropdown list.
  4. The chosen item will be added to the During tab.
Note
  1. You can mark the following associated items as mandatory or optional:
    1. Notes
    2. Attachments

  2. Some associated items have system-defined mandatory fields. You can add other fields (along with validations) and mark them as mandatory or optional. This applies for the following associated items:
  1. Tasks
  2. Meetings 
  3. Calls
  4. Quotes
  5. Sales Orders
  6. Cases

Add a message to transition owners

Clear instructions are paramount to sales teams to ensure that they execute a process efficiently. Include messages to sales teams at each stage, so that every transition owner knows what's expected of them.

To add a message to the Transition owners

  1. In the During tab of a transition, click +Add.
  2. Select Message and click on the empty text box (with the placeholder text Info Message).
  3. Write a suitable message in the text box.

Add Tags

You can also prompt the user to add tags.

To make Transition owners add tags
  1. In the During tab of a transition, click +Add.
  2. Select Tags in the popup that appears, then click the empty Tag box.

  3. In the Mark as drop-down list, choose Mandatory or Optional.

Add Widgets

You can also mandate widgets as part of the During Transition settings in Blueprint.   
 
By mandating a widget, you can define your own parameters that need to be entered as part of the process. Not just fields and notes, but completely beyond the standard pieces of CRM data. For example, you can mandate location on a map or a calendar appointment.


To add a widget
  1. In the During tab of a transition, click +Add.
  2. Select Widgets in the popup that appears and click Proceed.
    Please note that adding a widget will remove all existing items in the During tab.
  3. Click Install to add an existing widget of your choice. Click + Create New Widget if you want to create a new one.
    Once a widget is added, you'll not be able to add any other item in the During tab of that transition.

Here's an example of widgets that are mandated as part of a Blueprint:

Add Kiosks

You can automate processes for users entering this stage of the blueprint using Kiosks. 

Set up your own processes that include data or functionalities across the CRM for users with kiosks. For example, set up a kiosk or process for your users in your account to renew their driving license or add deals to a pipeline and more.
Notes
Available in the Enterprise edition and above.

After Transition 

Define actions to be automated after the Transition. Actions that can be automated in the After Transition section are:
  • Send email notification
  • Assign tasks
  • Create a meeting
  • Schedule a call
  • Update fields
  • Create a record
  • Trigger webhooks
  • Trigger custom functions
  • Add tags
  • Convert Record (Applicable for the Leads and Quotes modules) 

In Zylker's example, an email notification must be automated to the Sales Manager regarding a deal submitted for discount approval. So, choose Email Alerts and associate the required email template.

In a similar manner, you can build conditions for each Transition until the end of the process.

Common transition

A Common Transition is a Transition that can be executed from all States in a process. 

For example, in a Deal follow-up process, you typically know if you have won or lost a deal after the record goes through several stages such as qualification, negotiation, discount approval and so on. So  Deal Lost is a Transition that is available only towards the end of the process. But assume that a customer shows no interest and you want to drop a deal at the Qualification stage itself. In such a case, you must be able to execute the  Deal Lost  Transition right then - rather than go through all the intermediary stages. 

To make this possible, you must make  Deal Lost a Common Transition by selecting the checkbox as seen in the following image. Once you do, you will see the  Deal Lost  Transition in all states. 


Automatic transition

Automatic transitions have been introduced in Blueprints, to help you combat process delays. Often, a record that traverses through a process tends to stagnate in a particular state and you may not even realise it. This causes unwarranted delays. One thing you can certainly do is set an SLA for the state and be notified whenever there's an escalation.

But ultimately, SLA is also a notification or a task/field update of sorts— the record at the end of the day, needs your manual intervention in order to progress further in the process. If you only want to be notified of escalations, you may configure SLAs. On the other hand, if you want the system to act and automatically move a record from one state to another at any point, you can now create automatic transitions.

So what are automatic transitions and how do they work?
An automatic transition is one in which a record in a Blueprint automatically moves from one state to another, after a specified "Wait" time has elapsed.
As per the process, in order for a record to go from State A to State B, you will have to perform a Transition A. If this Transition A has not been executed within a said time period, say, 5 days, then the Automatic Transition configured for that state will get executed and the record will be pushed forward automatically to another state in the Blueprint as per the configuration.

For instance, in the following screenshot, CRM will wait for one of the transitions to take place: Either "Confirm Interest" or "Drop deal". If no action is taken on this record until a said date, the record will be moved to the "Price Quote" stage automatically and the users can take it up from there.


To configure an automatic transition

Select the  Automatic Transition  checkbox as you create a regular transition.

Then, mention a  "Wait time"  and corresponding automated actions.

According to the following screenshot, the deal follow-up process flow has a handful of major steps to be performed before a price quote can be drafted — namely, Contact establishment, qualification, needs analysis and value proposition. If a particular deal has moved to the "Contacted" stage but the user has not taken the action required for Qualification, Blueprint will wait for 5 days and directly move it to the "Id.Decision Makers" state. From there the user concerned can take over drafting a price quote.


A price quote cannot be created without knowing requirements, contact details etc, so there the action items from previous states can also be done altogether at this point, without wasting any more time.      

Same-state looping

A process often contains steps which you have to attempt multiple times for it to be successful. A typical example would be an attempt to contact a customer. In order to gather their requirements you will have to call them. But often they may be unavailable or may ask you to call later. Unless you speak to them you cannot go to the next stage, so you have to stay in the same State until they answer. However your staying in the same state doesn't also mean you did not do your job — you just have to try multiple times until you are successful.

In such cases, you can now create a transition that "loops back" to the same stage. The From and To state is the same. For example, in the following deal follow-up process, you can use the "Retry contacting" transition infinite number of times, until you are successful in which case you will select Customer Available and progress further.


Organizing and color-coding transitions

Blueprints exist to improve the efficiency of your company's processes and ensure compliance — but only if your users follow them promptly. More often than not, your users may find it challenging to adopt your processes and follow through on them, especially when they are complex. You may find that many transitions are yet to be executed and records get stagnated at different stages. One of the many reasons could be that your users find it hard to navigate the UI and are sometimes unsure of which transitions to execute. So here, we bring to you a couple of improvements in that department. You can address this challenge by reordering and setting color codes for Transitions in Blueprint. This will be useful in organizing transition buttons on the record detail page based on your process needs.

Color code your transitions

Consider that there are several transitions emerging out from a specific state in a process. They are all currently displayed in a particular color and order. What if there's more than a handful of transitions, which may yield positive and negative outcomes. For example, a deal currently in the "Negotiation" stage could emerge out to be approved, rejected, on hold, reassigned and so on.

For a sales rep looking at these transition buttons, it could be overwhelming or confusing as to what possibilities there are for the record at that stage in the process.

So, instead of all the transitions being a default blue, if the "Approve" transition could be displayed in green, and "Reject" transition could be in red while "On hold", "Reassign" could be in orange — this color coding could give the sales rep a quick sense of possibilities and outcomes from the stage.


How it works

While configuring your Blueprint Transitions, you will now have an option to choose from a color palette, the specific colors you would like for that particular transition.


As you build your transitions, you could also define their color codes, so that it enhances your sales reps' user experience and improve the adoption of your processes.


Reorder your transition buttons

You can also reorder transitions to decide the order in which they appear on the detail page.
Simply head over to the specific State for which you want to order the transition buttons. Hover over that state and click the Reorder Transitions icon.


Notes
Note:
  1. The Reorder Transition icon appears only for States that have more than one transition.
  2. This color-coding and reordering has no interference whatsoever with Canvas, as the Blueprint widget is a single unit in an overall Canvas editor. While you can move around the Blueprint widget in Canvas, you cannot edit within the widget. For that, you can make use of the color and order preference of Transitions within Blueprint itself.

Configure SLAs for States 

When you put a process in place in your organization, you need to ensure that it also gets done on time. SLAs help you do exactly that. "SLA" stands for Service Level Agreement - and is usually understood in the context of a service provider and customer. This term in Blueprint stands for an agreement of sorts between teams within an organization to communicate the maximum time a sales rep/team can keep a particular record in a said state. For example, if a deal is the "Qualification" stage for too long, the sales manager or the record owner must be notified of this. But how long is too long? If it does stay in a State for too long, who should be notified and what should be done about it? These details can be configured as part of the Blueprint via SLAs. When you configure an SLA, CRM watches the records and how long each record is in a particular state. If it exceeds the time limit mentioned, the system will send alerts as configured to the users mentioned in the SLA settings. This helps you be transparent with the progress of a process across your organization and get things done on time. 

To configure SLA for a State 
  1. In your Blueprint Editor, click the State for which you wish to configure the SLA. Example,   Negotiation/Review.                       
  2. Set the maximum time limit for which the deal can be in the Negotiation State. Example, 5 Days. 
  3. When the deal exceeds the SLA time limit, specify who should be notified and when. 
    Example, escalate on the 5th day to the record owner. 
  4. In addition to this standard notification ON escalation, you can set an additional alert to be sent before or after the SLA time limit. 

For example, notify the record owner about the SLA time limit 2 hours before the limit expires.

This will help you take prompt action before it's too late.
You can also select further user-defined SLA actions to be automated apart from the standard alerts.
These user-defined SLA actions include custom email notifications, tasks, field updates, webhooks and custom actions. 

For example, let's say that as per your process, you want to be alerted whenever a record has stayed in the Negotiation State for more than 5 days. For this, apart from the default email alert you can choose to automate a field update where a field called "Urgency" gets updated from "Mild" to "Severe" whenever a record has stayed in the Negotiation state for more than 5 days. Later you can filter out records for which the urgency is severe and prioritise their transitions first.

Notes
Note:
User defined SLA Actions are available from the Enterprise Edition onwards.  

Mass include or exclude records from a blueprint

Alert
This option is being released in phases and may not be available in your account.
You can easily include and exclude multiple records to a blueprint using the Filters option. This is useful in cases like:
  1. You've created a new blueprint and want to include some existing records in it.
  2. You want to move a set of records from one blueprint to another.
  3. You want to disassociate some records from a blueprint altogether.
The process for inclusion and exclusion of records in a blueprint is similar. The steps are as follows:
  1. Navigate to Setup > Process Management > Blueprint.
  2. Click the Filters tab.
  3. Click Include or Exclude depending on your needs.
  4. Select the module, layout, and blueprint from the drop-down lists.
  5. Specify the criteria for records to be included/ excluded.
  6. Click Search.

  7. Select the records to be included/ excluded.
  8. Click Include/ Exclude.
You'll get a message saying that the records have been successfully associated or disassociated from the blueprint.

Reordering Blueprints


Create Blueprint in Sandbox

While formulating a blueprint for your sales process, there are chances that it has to be frequently modified to find the right one. Zoho CRM provides a testing environment called Sandbox for you to check how your blueprint works, without affecting the live data.
See also Sandbox

Sample Process Flows

In the following slide deck, you will find sample process flows for business from various sectors such as Education, Real Estate, Insurance, Banking and Finance. These are generic process flows meant to give you the perspective you need to start designing your own Blueprints. You can tweak the States, Tranistions and flow based on your unique needs. Start browsing the gallery now!


Troubleshooting Tips

SEE ALSO


    Access your files securely from anywhere

      Zoho CRM Training Programs

      Learn how to use the best tools for sales force automation and better customer engagement from Zoho's implementation specialists.

      Zoho CRM Training
        Redefine the way you work
        with Zoho Workplace

          Zoho DataPrep Personalized Demo

          If you'd like a personalized walk-through of our data preparation tool, please request a demo and we'll be happy to show you how to get the best out of Zoho DataPrep.

          Zoho CRM Training

            Create, share, and deliver

            beautiful slides from anywhere.

            Get Started Now


              Zoho Sign now offers specialized one-on-one training for both administrators and developers.

              BOOK A SESSION


                          Quick Links Workflow Automation Data Collection
                          Web Forms Enterprise Begin Data Collection
                          Interactive Forms Workplace Data Collection App
                          CRM Forms Customer Service Accessible Forms
                          Digital Forms Marketing Forms for Small Business
                          HTML Forms Education Forms for Enterprise
                          Contact Forms E-commerce Forms for any business
                          Lead Generation Forms Healthcare Forms for Startups
                          Wordpress Forms Customer onboarding Order Forms for Small Business
                          No Code Forms Construction RSVP tool for holidays
                          Free Forms Travel
                          Prefill Forms Non-Profit

                          Intake Forms Legal
                          Mobile App
                          Form Designer HR
                          Mobile Forms
                          Card Forms Food Offline Forms
                          Assign Forms Photography
                          Mobile Forms Features
                          Translate Forms Real Estate Kiosk in Mobile Forms
                          Electronic Forms

                          Notification Emails for Forms Alternatives Security & Compliance
                          Holiday Forms Google Forms alternative  GDPR
                          Form to PDF Jotform alternative HIPAA Forms
                          Email Forms
                          Encrypted Forms
                          Embeddable Forms
                          Secure Forms
                          Drag and Drop form builder
                          WCAG


                                            You are currently viewing the help pages of Qntrl’s earlier version. Click here to view our latest version—Qntrl 3.0's help articles.


                                                Manage your brands on social media

                                                  Zoho Desk Resources

                                                  • Desk Community Learning Series


                                                  • Digest


                                                  • Functions


                                                  • Meetups


                                                  • Kbase


                                                  • Resources


                                                  • Glossary


                                                  • Desk Marketplace


                                                  • MVP Corner


                                                  • Word of the Day


                                                    Zoho Marketing Automation

                                                      Zoho Sheet Resources


                                                          Zoho Forms Resources


                                                            Secure your business
                                                            communication with Zoho Mail


                                                            Mail on the move with
                                                            Zoho Mail mobile application

                                                              Stay on top of your schedule
                                                              at all times


                                                              Carry your calendar with you
                                                              Anytime, anywhere


                                                                    Zoho Sign Resources

                                                                      Sign, Paperless!

                                                                      Sign and send business documents on the go!

                                                                      Get Started Now


                                                                              Zoho TeamInbox Resources


                                                                                      Zoho DataPrep Resources


                                                                                        Zoho DataPrep Demo

                                                                                        Get a personalized demo or POC

                                                                                        REGISTER NOW


                                                                                          Design. Discuss. Deliver.

                                                                                          Create visually engaging stories with Zoho Show.

                                                                                          Get Started Now


                                                                                                              • Related Articles

                                                                                                              • Create a Continuous Blueprint

                                                                                                                Unlike a regular blueprint, which is suitable for an intermittent process, a continuous blueprint allows you to design a process that occurs without any pauses. For example, call scripting. Scenario A sales organization wishes to create a continuous ...
                                                                                                              • Blueprint: Sample Process Flow

                                                                                                                Sample Process Flows In the following slide deck, you will find sample process flows for business from various sectors such as Education, Real Estate, Insurance, Banking and Finance. These are generic process flows meant to give you the perspective ...
                                                                                                              • Blueprint - An Overview

                                                                                                                Right from the moment you capture a lead in your CRM system up until deal closure and beyond, your organization may have several sales processes in place. For instance, leads generation and follow-up, deals closure and order management. Each of these ...
                                                                                                              • FAQs: Blueprint

                                                                                                                What is a Blueprint and how it is useful for my business? Blueprint in Zoho CRM is a sophisticated tool designed to digitally replicate and streamline a business's offline processes within the CRM software. It's particularly beneficial for companies ...
                                                                                                              • Executing a Blueprint

                                                                                                                Access My Blueprint Records Once the Blueprint has been configured, records meeting the process criteria will enter the process and the Transition Owners mentioned in the Blueprint will be able to execute their respective Transitions. In order to ...
                                                                                                                Wherever you are is as good as
                                                                                                                your workplace

                                                                                                                  Resources

                                                                                                                  Videos

                                                                                                                  Watch comprehensive videos on features and other important topics that will help you master Zoho CRM.


                                                                                                                  eBooks

                                                                                                                  Download free eBooks and access a range of topics to get deeper insight on successfully using Zoho CRM.


                                                                                                                  Webinars

                                                                                                                  Sign up for our webinars and learn the Zoho CRM basics, from customization to sales force automation and more.


                                                                                                                  CRM Tips

                                                                                                                  Make the most of Zoho CRM with these useful tips.


                                                                                                                    Zoho Show Resources