Extract from date
DataPrep provides various options to extract part of date values into a new column. The portions which can be extracted are:
- Year
- Quarter and year
- Month and year
- Week and year
- Date
- Time
- Quarter
- Month
- Week
- Day of the week
- Day of the month
To extract part of a date
- Right-click a date column and select the Extract icon from the context menu.
- Enter the column name under New column name.
- Choose the portion to be extracted from the options provided.
4. You can apply this transform to multiple columns. Select the columns using the  option under Columns to apply.
To apply filters
If you want to apply some filters along with this transform, you can use the filters functionality.
1. Click the Filters tab.
2. Click the  icon and add the required columns in the Filters section. You can also reorder the filters using the drag and drop method.

3. For every column added, you can select one of the following options from the drop-down:
- Actual: This option lets you filter rows based on the actual values in the column. Click here to know more.
- Data quality: This option lets you filter rows based on the quality of data in the column. Click here to know more.
- Patterns: This option helps you filter rows based on the data patterns in the selected column. Click here to know more.
- Seasonal: This option helps you filter rows based on the seasonal parameters such as quarter, month, week, etc. Click here to know more.
- Outliers: This option allows you to filter rows based on the outliers present in the data of the selected column. Click here to know more.

Note: The filter options are displayed based on the datatype of the column added for the filter.
4. When you add more than one filter to the Filters section, the logical operators, AND or OR appear next to the filters. You can click to toggle the logical operator between AND and OR.
- Using the logical operators, you can combine the conditions and apply logic to determine the rule of precedence. The final expression is displayed in the Criteria expression box. You can click Edit to alter the default expression using logical operators and parenthesis to specify the precedence or the sequential order as to which condition should be evaluated first. Click Save after making the required changes.
- For example, In the expression, ((1 AND 2) OR (3 AND 4)) , at first the condition ( 1 AND 2 ) will be executed and the condition ( 3 AND 4 ) will be executed next. Thirdly, since, the OR operator is used, the filter will be applied when either or both the conditions is true.
5. You can further drill down to choose specific values based on the filter option selected for each filter, in the next section.
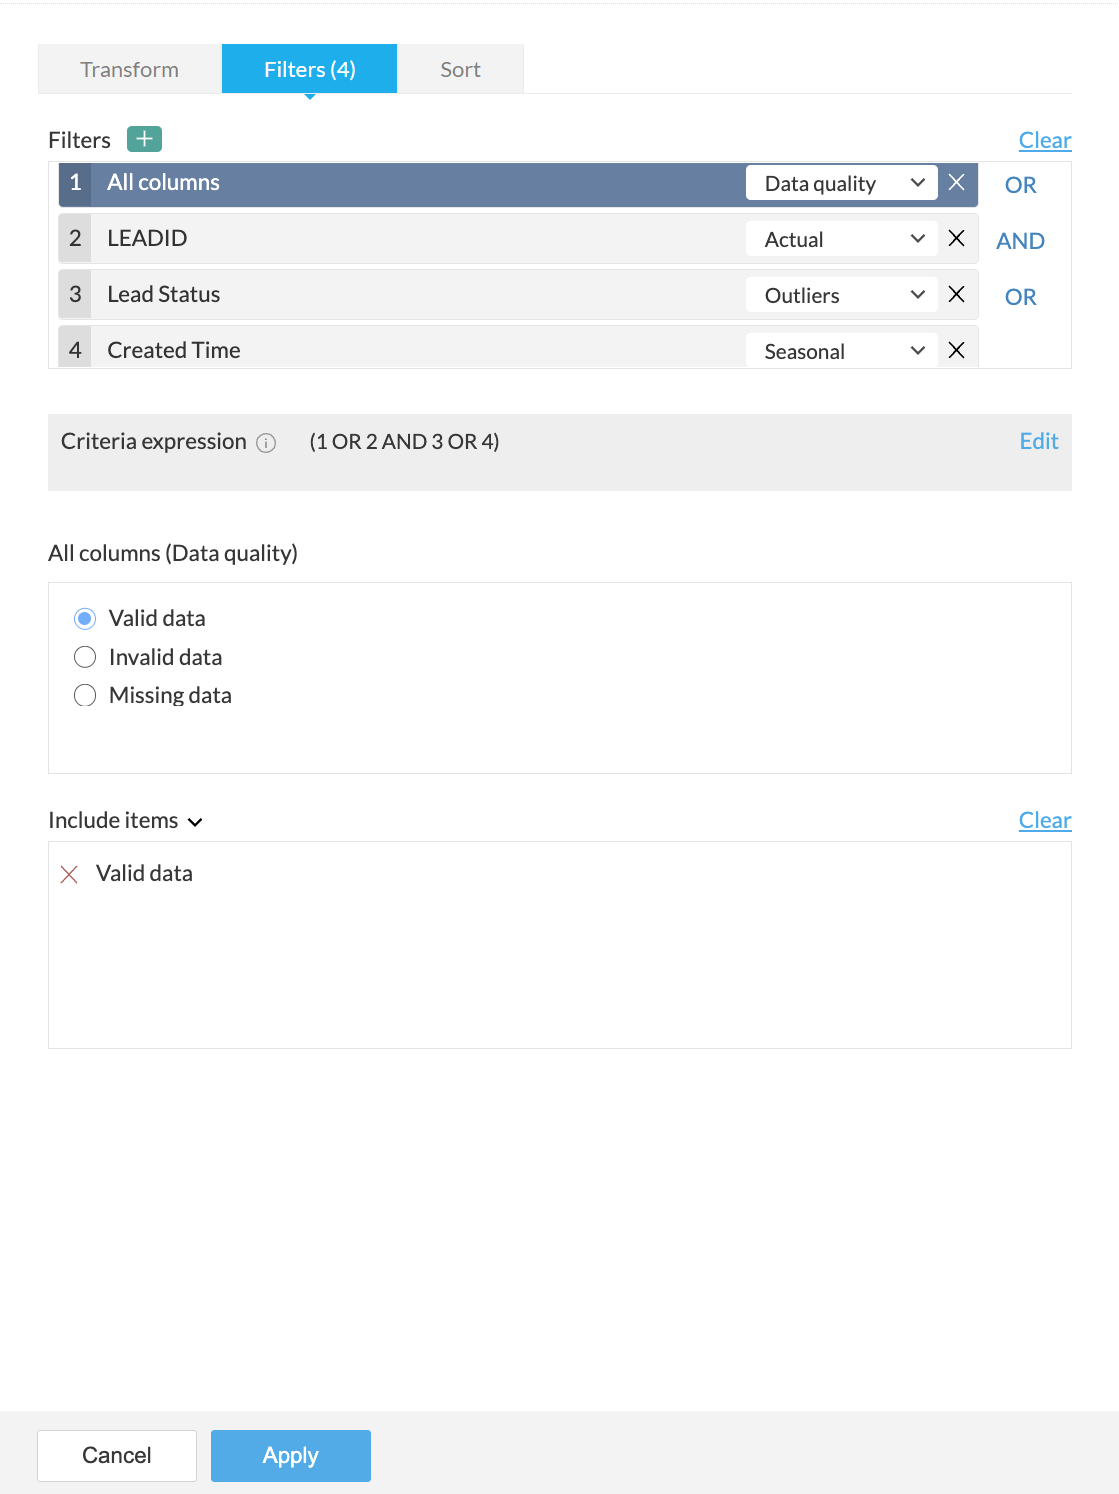
For example, in the above screenshot, the Data quality option is selected for the All columns filter in the Filters section. Based on the selection, further options to filter specific values are displayed in the All columns (Data quality) section.
6. You can choose to include or exclude the selected items in the last section.
7. If you want to remove all the filters for some reason, you can use the Clear button.
8. A live preview of the filter transform is shown as you make changes.
9. Click the Apply button to apply the transform along with the filters.
To sort data
Under the Sort tab, you can sort data in the ascending or descending order based on any column. You can choose the column in the Sort by column drop down and choose the order to be sorted.

You can use this functionality only with the transform and not as a standalone function. However, you can use the Sort transform if you want only to sort data.
SEE ALSO