Backfill run can process data that was missed in previous schedules due to a change in data models or data preparation workflow. This way, you can catch up with missed schedules or if you want to import specific data within a timeframe data, or to manually fetch incremental data without scheduling a job. Data interval needs to be defined while triggering a backfill run.
 Note: A backfill run will run on the latest version of the pipeline even if it is a draft version. If you want to do a backfill run on any old version, you can restore that version and perform a backfill run. Click here to know more about versions.
To execute a backfill run in a pipeline
1. Open your pipeline and go to the pipeline builder view. Click here if you want to know how to create a pipeline in the first place.
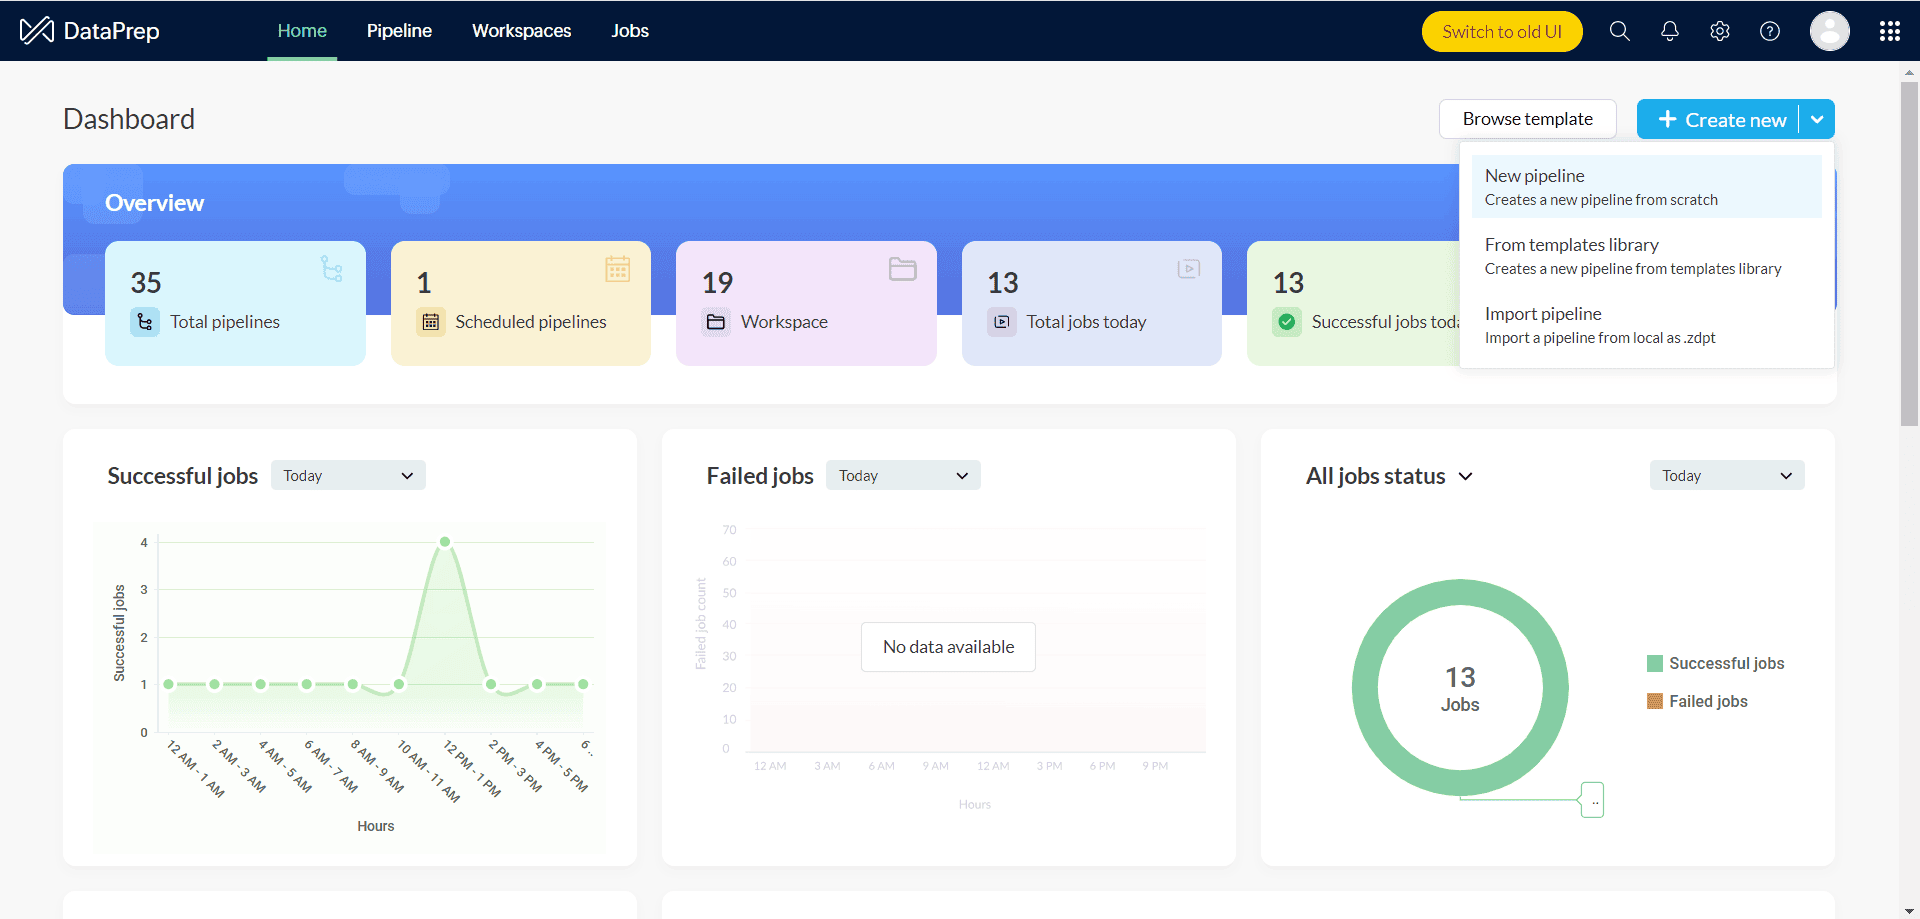
2. Click on the Add data option to bring your data from the required data source. Learn more on 50+ data sources. Click the Advanced selection option to import data incrementally.
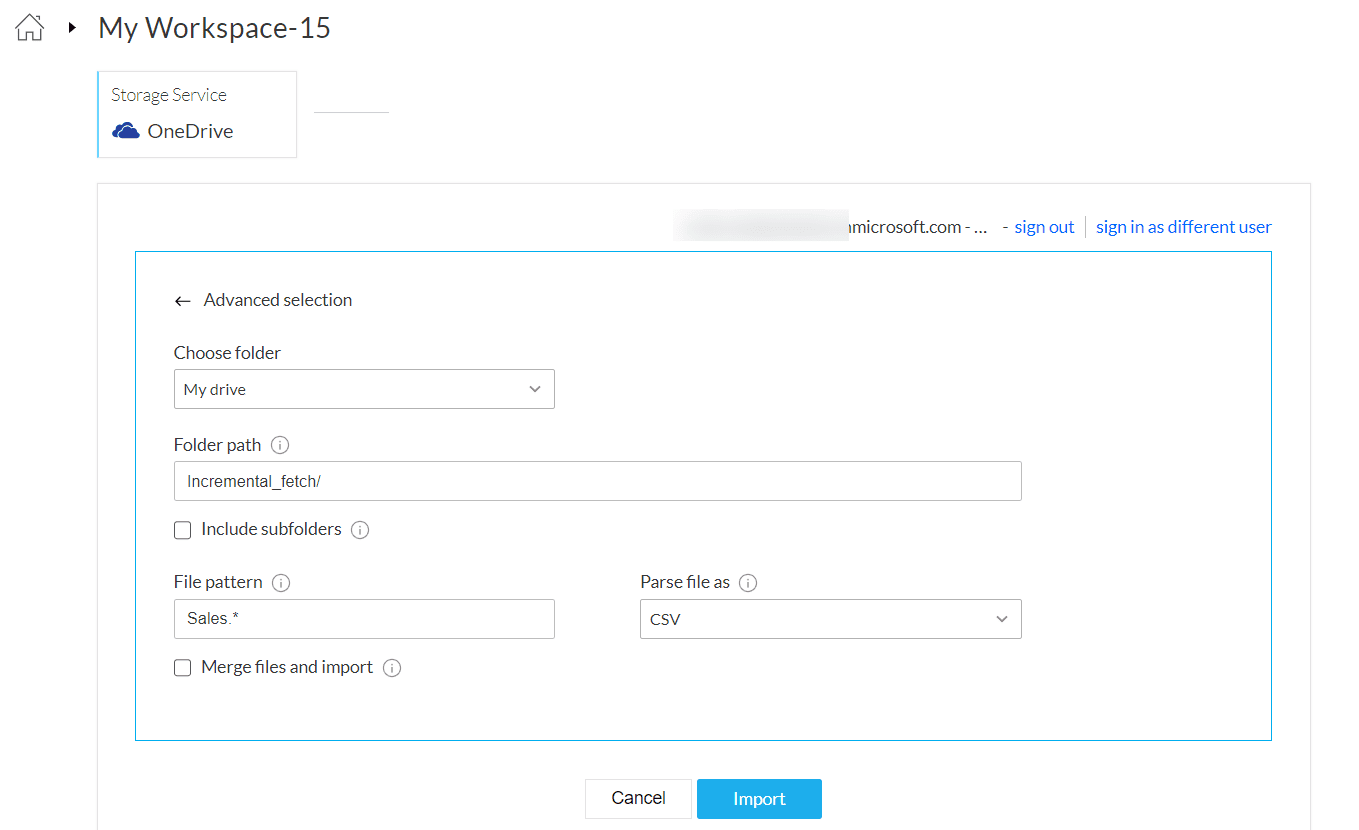
Incremental fetch
You can incrementally import data using the Advanced selection option. It helps you perform dynamic file selection based on regex. This can be used for getting new or incremental data from your data source. In the above snapshot, the newly added or modified file that matches the file pattern will be taken from your OneDrive folder.
The details required are:
Choose folder : Choose the folder you want to import data from.
Folder path : The folder path where you want to search for files. Eg. Incremental_fetch/
If the files are stored in the drive without any folder, you can leave this field empty.
 Info: Folder path is case-sensitive.
Include subfolders : You can also select the Include subfolders checkbox if you want to include subfolders while searching for a file.
File pattern : The pattern used to match the file names in the account. This supports regex type matching. You can also use the pattern, ".*" to match any file in the path specified.
Info: File pattern is case-sensitive.
Note: The file pattern match is a simple regex type match. For example, to fetch files with file names such as Sales_2022.csv , Sales_2023.csv , Sales_2024.csv , you can input the pattern Sales_.*
Similarly to fetch files such as PublicData1.csv , PublicData2.csv , PublicData3.csv , use Public.*
If you want to import a single file, then specify the pattern using the exact file name.
Eg: leads_jan_2022.*
Parse file as : Choose the required extension to parse the file. If your file format is not a commonly used one, you can use this option to parse the file into one of the following formats before importing the data into a readable format. The available formats are CSV, TSV, JSON, XML, and TXT.
Merge files and import - This will merge all the files that match the pattern specified and import them as a single dataset during the first import. You can merge a maximum of only 5 files using this option.
Note: If this checkbox is unchecked, then only 1 file will be fetched at a time.
Eg. If your OneDrive account has 5 files, all 5 files will be merged into one dataset and imported.
3. After data is imported, you will be redirected to the pipeline builder where you can see your data source, and a stage linked to it.
Stages are nodes created for processing data while applying data flow transforms. Every dataset imported from your data source will have a stage created by default.
4. You can right-click the stage and apply the data flow transforms.
6. Once you are done creating your data flow and apply necessary transforms in your stages, you can right-click a stage and add a destination to complete your data flow.
7. Data destination is a place where you want to export your data to. It can be your local database, business applications like Zoho CRM, Zoho Analytics, etc. You can choose your preferred destination out of 50+ data destinations in DataPrep to export your prepared data to.
6. After adding a destination for your pipeline, click the Run drop down and choose Backfill run.
Settings
Stop export data quality drops below 100%- You can use this toggle if you would like to stop export if data quality drops below 100 percent.
Order export- You can use this option when you have configured multiple destinations and would like to determine in what order the data has to be exported to destinations.
Note: This option will be visible only if you have added more than one destination in your pipeline.
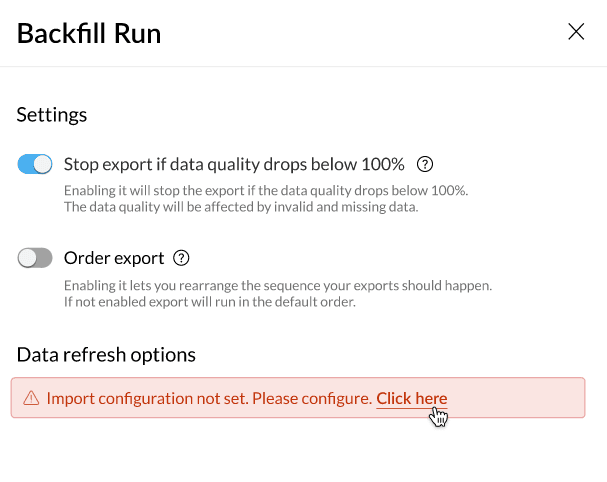
Data Refresh options
Under the Data refresh options, you can set the configuration for how you would like to fetch new data during the backfill run. For example, you can fetch data every month on a particular date and time.
Note: You can look into the tables in the import configuration tables to know when a data interval is applicable.
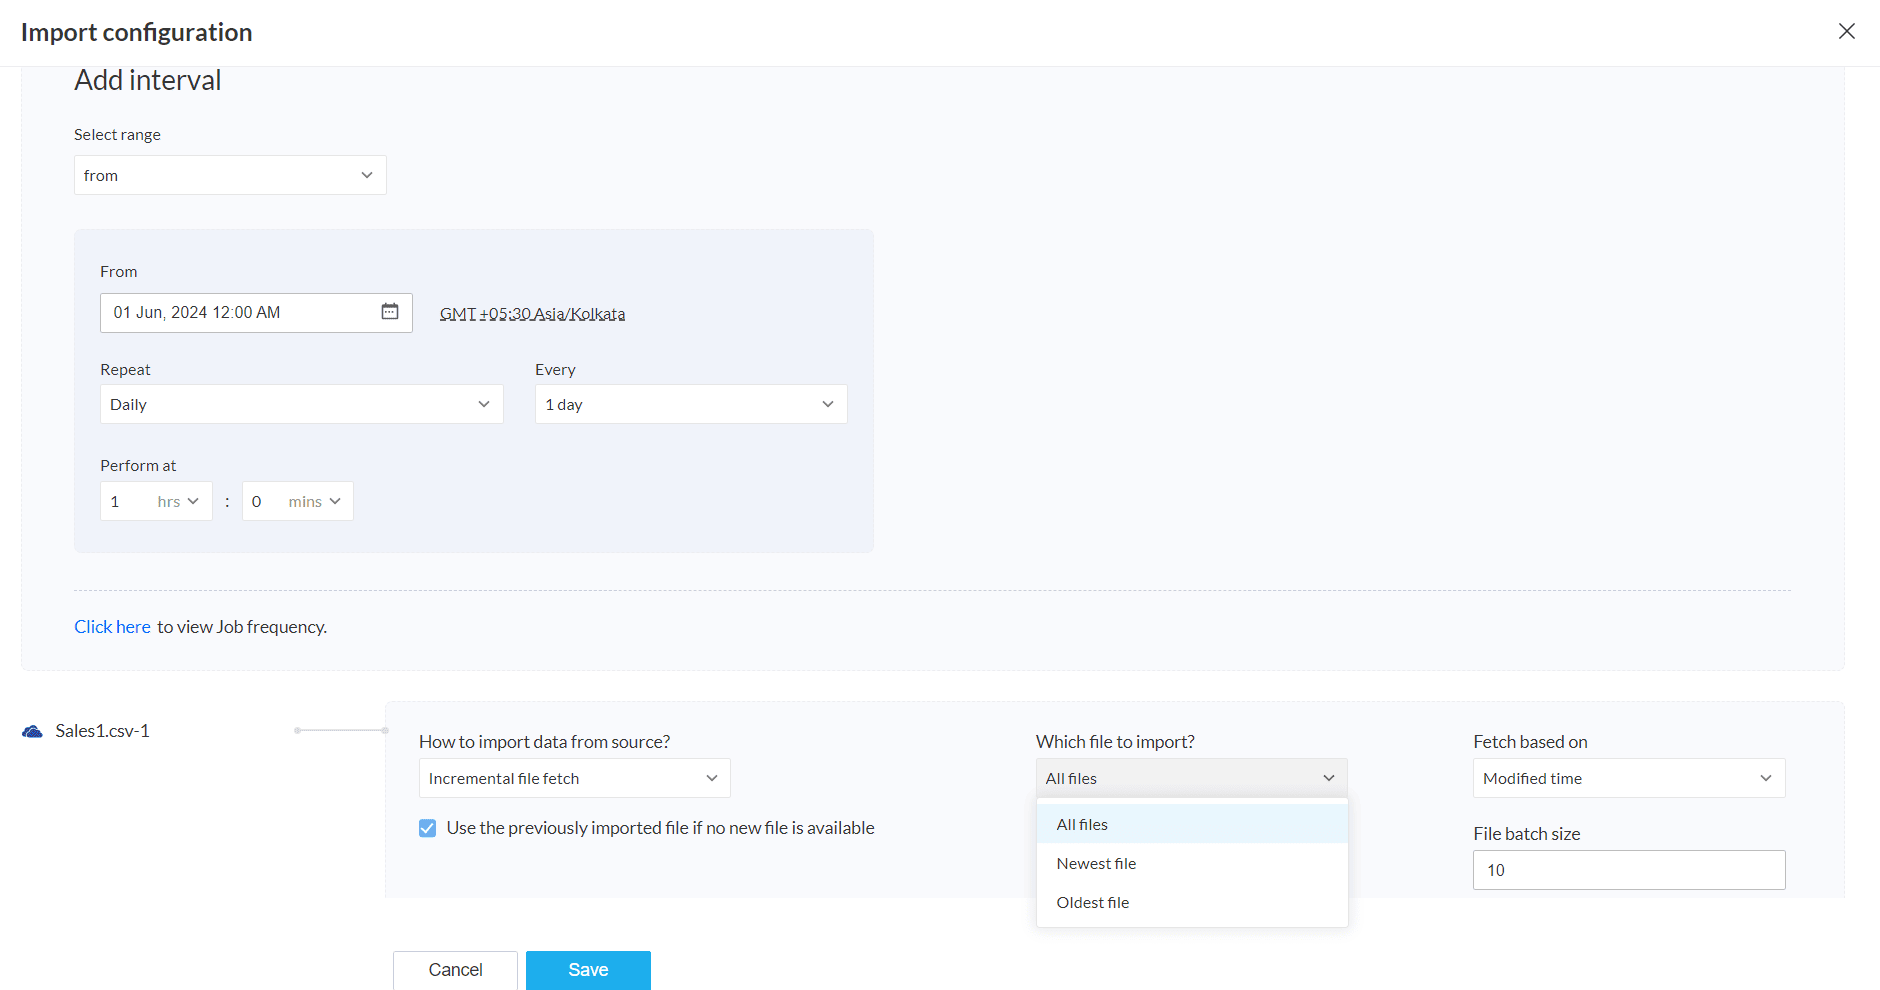
Add interval
Provide the following details to define the time interval:
Select range- Select the range option(from, between).
Repeat- Select one of the repeat methods(Hourly, Daily, Weekly, Monthly). You can further drill down with more options based on the option selected in this field.
Every- Set the job frequency using this option. For example, if you want to import data every 2 days from June 5, 2024 to June 10, 2024, you can select 2 days in this field.
Note: This option is visible only if you select Daily, Weekly or Monthly in the Repeat field.
Perform at: Set the time when you want the data to be imported. For example, if you set 1 hour, below will be the job frequency and data will be imported at 1:00 AM everyday.
You can also view the Job frequency. This shows the time interval in which the data will be imported. A job will run for each interval determined.
Import configuration
Info: The below options are applicable for cloud storage services. These import options may vary based on the data source you have selected. Refer to the import configuration tables below to know about other data sources How to import data from source? Choose how you would like to import data using this option.
Import all data
All data that matches the specified pattern will be imported.
File batch size: Data will be imported as a single file with the specified number of files in this field. For example, you have 10 files in your source and you provide 10 as the file batch size, all 10 files will be imported as 1 file.
Note: The maximum supported value for a File batch size is 10.
Incremental file fetch
Incremental file fetch- Using this option, you can incrementally fetch data that match the specified pattern. Incremental data fetch is a method used to import new files from a source after the previous sync.
Use the previously imported data if no new data is available:
During incremental import,
- If the checkbox is checked: When there is no new data in the source, the last fetched data will be imported again.
- If the checkbox is unchecked: When there is no new data in the source, the import will fail and no files will be imported. This will, in turn, cause the entire pipeline job to fail.
Which file to import?
Choose one of the below options
All files- All files will be imported based on the option selected in the Fetch based on field.
Newest file - The newest file will be imported based on the option selected in the Fetch based on field.
Oldest file- The oldest file will be imported based on the option selected in the Fetch based on field.
Fetch based on - Files will be fetch based on the Created or modified time. For example, if you want the first created file, choose Created Time and choose Oldest file option in the Which file to import? field.
File batch size: Data will be imported as a single file with the specified number of files in this field. For example, you have 10 files in your source and you provide 10 as the file batch size, all 10 files will be imported as 1 file.
Note: The maximum supported value for a File batch size is 10.
Example for incremental fetch
Let's say you want to import all data based on the created time from June 5, 2024 12:00 AM to June 10, 2024 12:00 AM. Below is the configuration snapshot. This will import all data created from June 5, 2024 12:00 AM to June 10, 2024 12:00 AM
Do not import data
This option will not import any new data. The source file will be used.
After providing the import configuration, click Save.
8. Review the Settings and Data refresh options and click Run to execute the backfill run. This will start the pipeline and the Jobs page opens. Each time interval will run as a job one by one. The Jobs page will show the list of jobs running along with their status. There are three different status for a job in DataPrep-Initiated, Success or Failure.
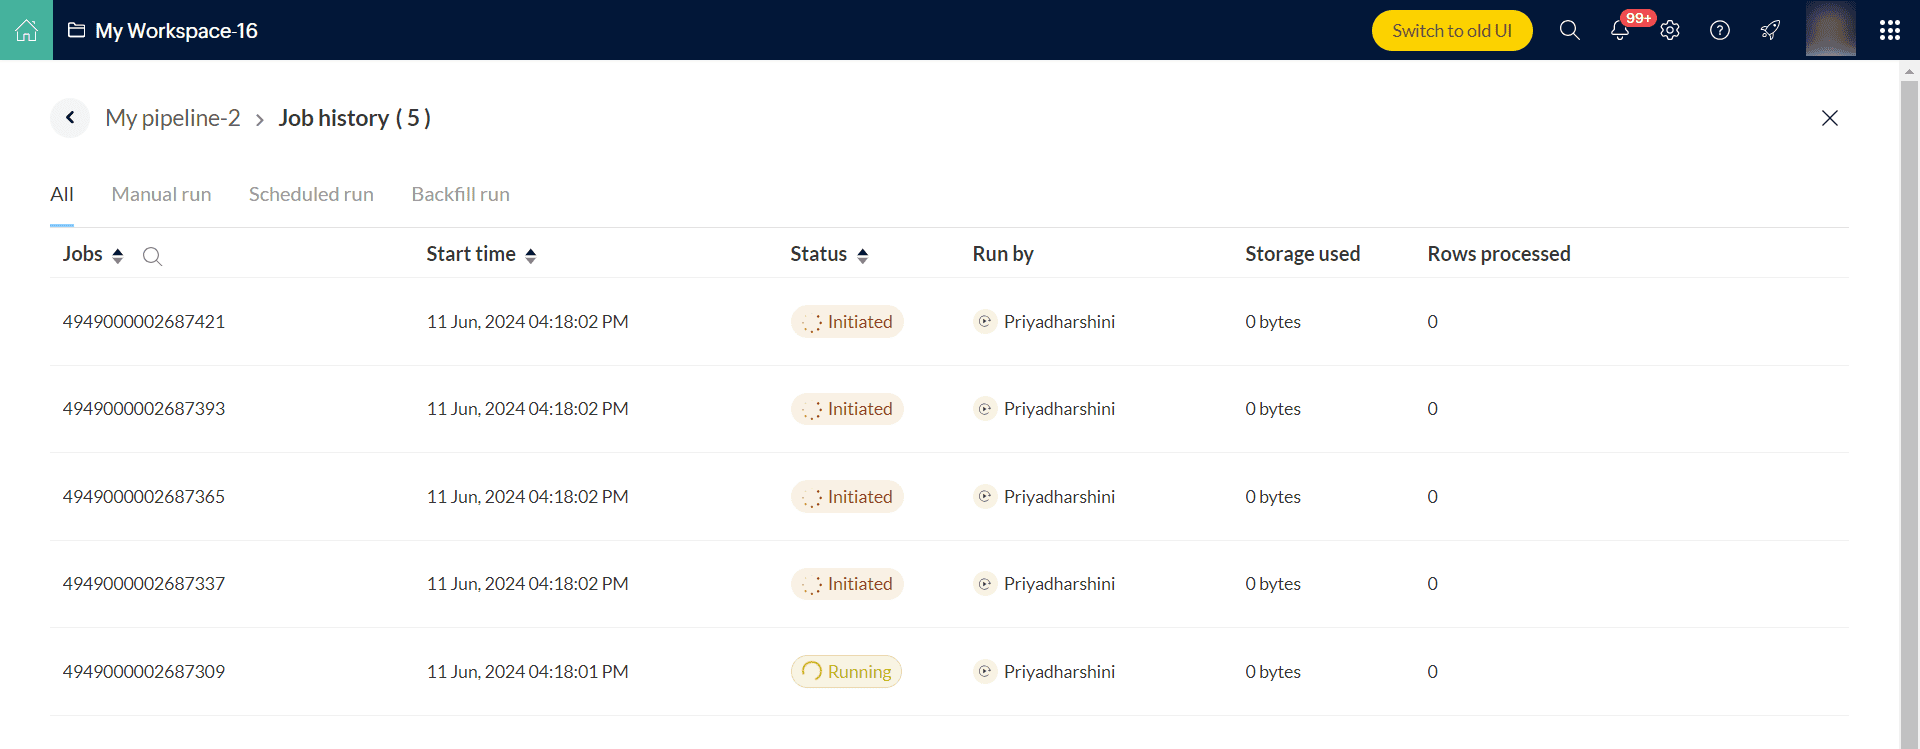
You can click open the jobs and view more details such as start and end time, duration of the job, etc. in the Jobs summary page. The Job summary shows the history of a job executed in a pipeline flow. Click here to know more.
In the Overview tab, you can view the status of the run along with the details such as user who ran the pipeline, storage used, total rows processed, start time, end time and duration of the run. Click here to know more
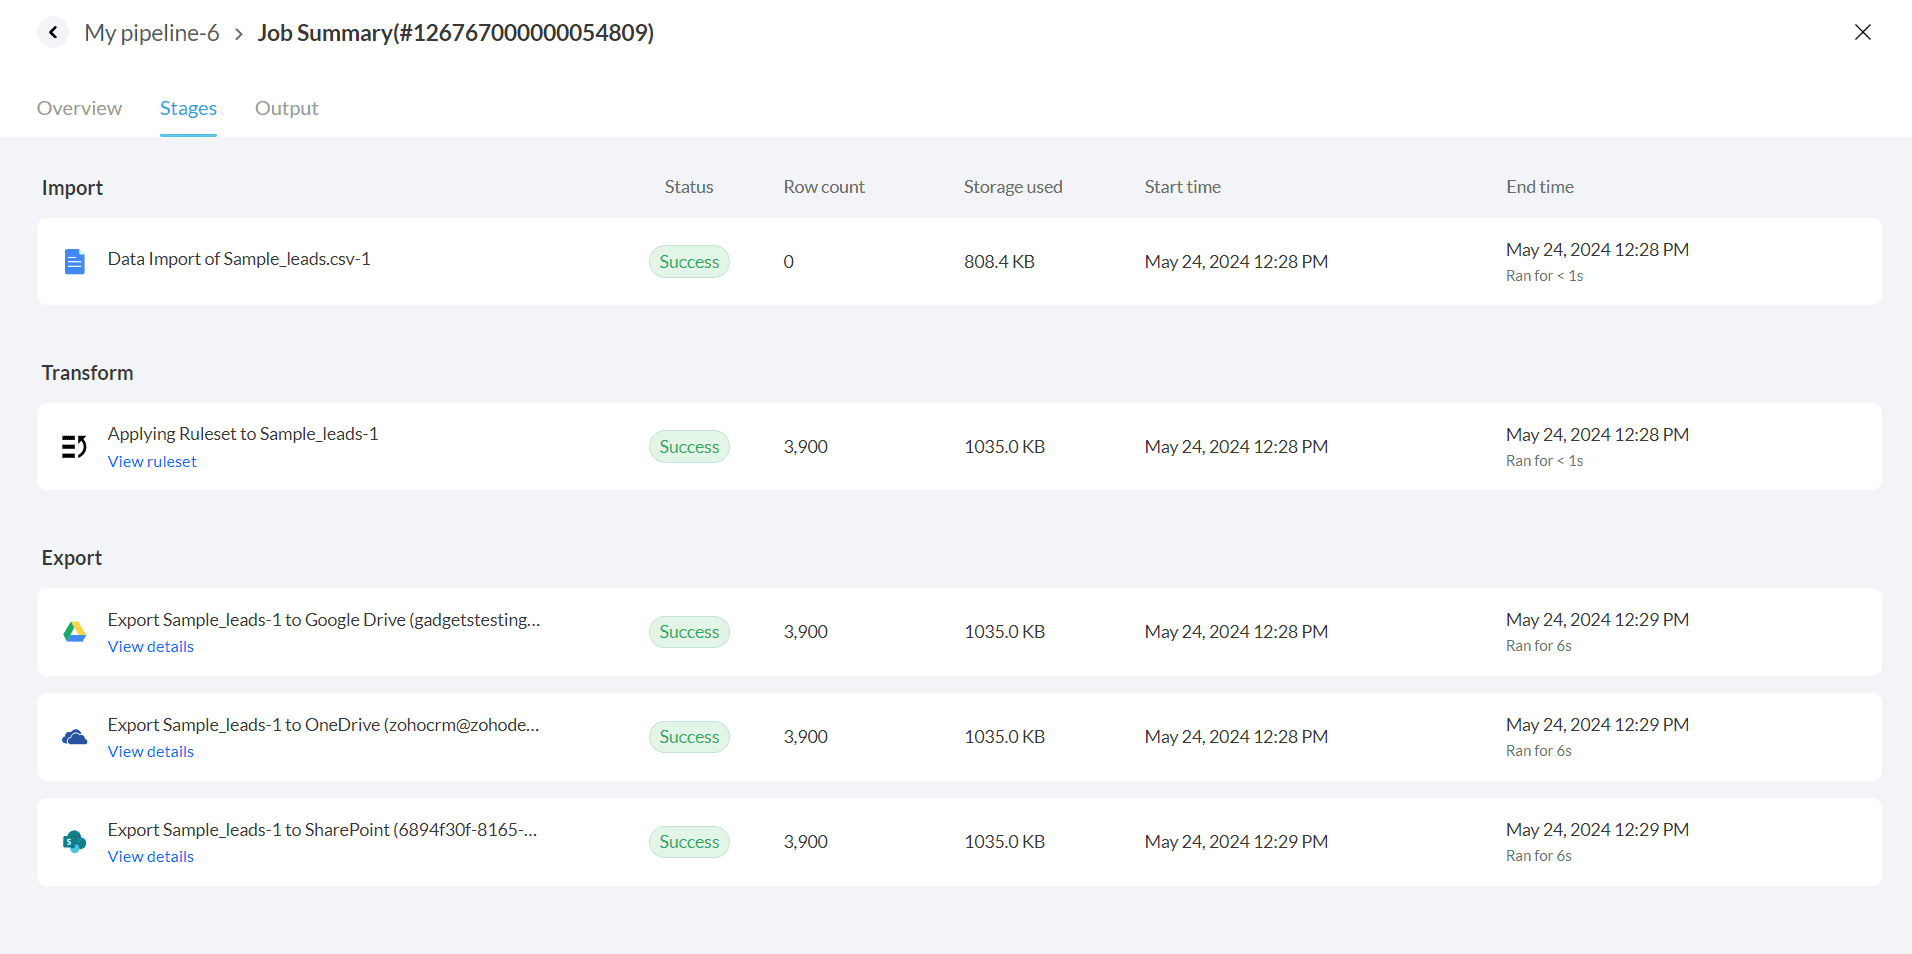
In the Stages tab, you can view the details of each pipeline stage such as Import, Transform and Export. Click here to know more.
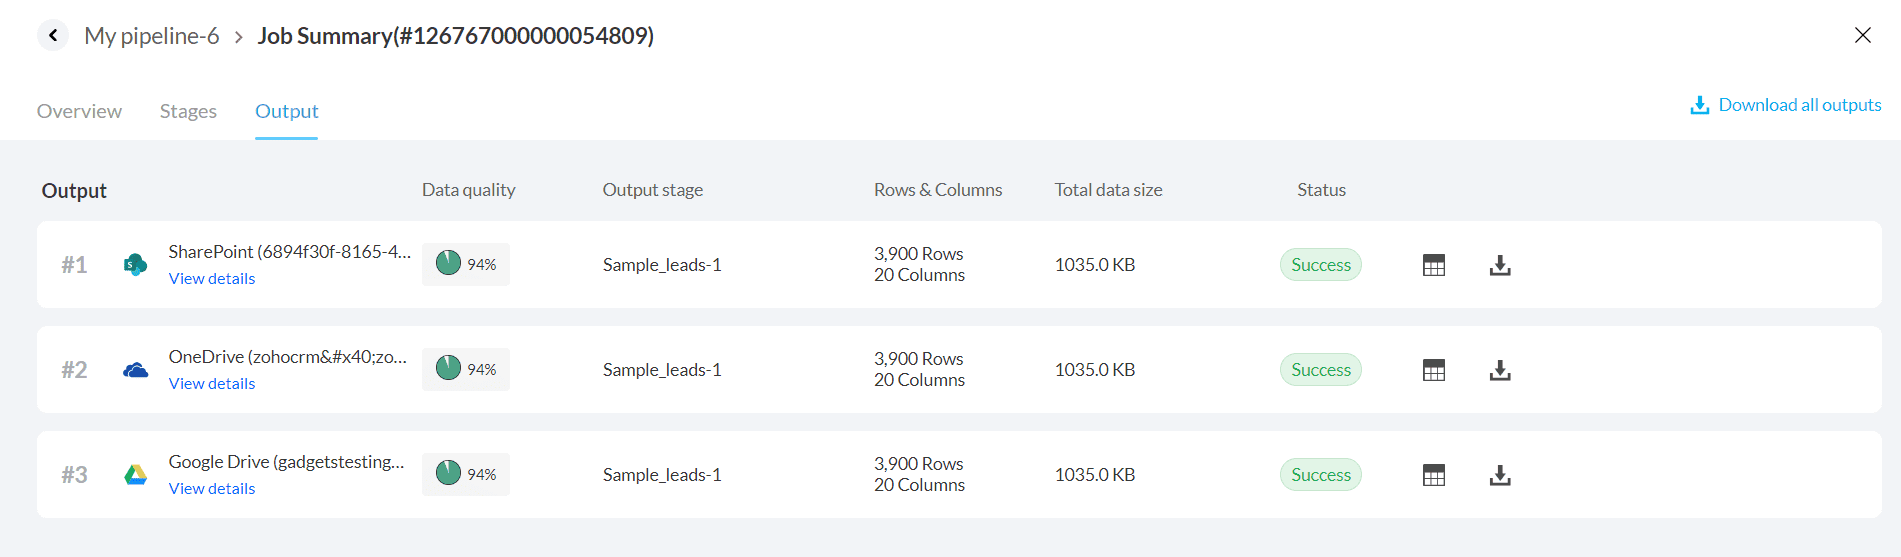
In the Output tab, you see the list of all exported data. You can also download the outputs if needed. Click here to know more.
8. When the backfill run is completed, the prepared data will be exported to the configured destination.
Import configuration for simple selection in cloud storage
Importing data without using a regex pattern, can be termed as a simple selection. If you import data from a cloud storage service using the simple selection method, refer to the below options:
| Data source | How to import data from source | Data interval applicable or not |
| Cloud storage | Import source file | Not applicable |
| Do not import data | Not applicable |
Import configuration for advanced selection in cloud storage
Zoho DataPrep allows you to import data using the Advanced selection option. Advanced selection helps you perform dynamic file selection based on a regex pattern. If you import data using the Advanced selection method, refer to the below options:
| Data source | How to import data from source | Data interval applicable or not |
| Cloud storage | Import all data | Not applicable |
Incremental file fetch
All files
Newest file
Oldest file | Applicable |
| Do not import data | Not applicable
|
Import configuration for data sources without using Databridge
If you import data from the below sources without using Zoho Databridge, refer to the below options:
| Data source | How to import data from source | Data interval applicable or not |
| Local files | Import source file
Note: You can upload a new source file that you would like to import using the Upload File option. You can use the Parse file as option to parse unknown file formats. | Not applicable |
| Do not import data | Not applicable |
| URL | Import source file | Not applicable |
| Do not import data | Not applicable |
| Local database | Import all data | Not applicable |
| Do not import data | Not applicable |
| FTP servers | Import source file | Not applicable |
| Do not import data | Not applicable |
Import configuration for data sources using Databridge
Zoho DataPrep allows you to import data from your local network using Zoho Databridge. If you import data from the below sources using Zoho Databridge, refer to the below options:
| Data source | How to import data from source? | Data interval applicable or not |
| Local files | Import all data | Not applicable |
Incremental file fetch
All files
Newest file
Oldest file | Applicable |
| Do not import data | Not applicable |
| Local database | Import all data | Not applicable |
| Only modified and new data | Applicable |
| Do not import data | Not applicable |
| FTP servers | Import all data | Not applicable |
Incremental file fetch
All files
Newest file
Oldest file | Applicable |
| Do not import data | Not applicable |
Import configuration for Apps and cloud database
If you import data from any of the below applications or cloud database, refer to the below options:
Data source | How to import data from source? | Data interval applicable or not |
| Cloud database | Import all data | Not applicable |
| Only modified and new data | Applicable |
| Do not import data | Not applicable |
| Cloud database query import | Only modified and new data | Applicable |
| Do not import data | Not applicable |
| Zoho Creator | Import all data | Not applicable |
| Only modified and new data | Applicable |
| Only new data | Applicable |
| Do not import data | Not applicable |
| Zoho Analytics | Import all data | Not applicable |
| Only modified and new data | Applicable |
| Do not import data | Not applicable |
| Zoho CRM | Import all data | Not applicable |
| Only modified and new data | Applicable |
| Only new data | Applicable |
| Do not import data | Not applicable |
| Zoho Bigin | Only new data | Applicable |
| Do not import data | Not applicable |
| Import all data | Not applicable |
| Only modified and new data | Applicable |
| Salesforce | Import all data | Not applicable |
| Only modified and new data | Applicable |
| Only new data | Applicable |
| Do not import data | Not applicable |
| Dataiku(Beta) | Import all data | Not applicable |
| Do not import data | Not applicable |
| Zoho Forms(Beta) | Only new data | Applicable |
| Only modified and new data | Applicable |
| Do not import data | Not applicable |
Usecase
How to import failed data using Backfill run?
Let's say you have configured an hourly schedule run on June 1,2024 to fetch data from Google Drive and a particular interval for example, 3:00 AM to 4:00 AM had failed and no data was imported. You can import that particular data using the below steps in Backfill run:
Perform steps from 1 to 6 as mentioned in the To execute a backfill run in a pipeline section. In the Data refresh options, provide values as mentioned below.
Choose the between option from the Select Range drop down.
Choose 01, June 2024 3:00 AM in the From field and 01, June 2024 4:00 AM in the To field.
Choose Hourly in the Repeat method.
Select 1 hour as the time interval in the Perform at field.
View the Job Frequency if you want to see the job intervals.
Choose to import all data from the How to import data from source field. You can
Enter a batch size as required but not more than 10.
Click Save and run the pipeline.
Now the data created during the interval 01, June 2024 3:00 AM to 01, June 2024 4:00 AM will be exported to your destination.
Note: You can also use the same method if you want to import data from multiple failed schedules. You will have to perform a backfill for each failed time interval with the same steps as above.
SEE ALSO
Pipeline-Manual run
Learn about Jobs in DataPrep
