Create buckets - Date
You can classify a group of date values or individual dates using the bucketing technique.
The bucketing options for a date column are:
-
Weekday or not
-
Month of the year
-
Week of the year
-
Week of the month
-
Day of the year
-
Day of the month
-
Minute of the hour
-
Time of day
-
Custom date range
Weekday or not
This option lets you create a new column next to the date column to classify weekdays and weekends.
To apply the
Weekday or Not
option to a date column:
-
Right-click the date column in the DataPrep Studio page.
-
Select Create Buckets from the context menu.
-
Select the Weekday or not option from the Select bucket options dropdown in the Transform panel.
-
You can set the days of the week under the sections Weekdays or Weekends.
-
Enter a name for your new column in the New column name field.
-
A preview of the new column will be shown in the data grid.
-
Click Apply.
Month of the year
This option lets you create a new column next to the date column to classify the months of a year.
To apply the
Month of the year option to a date column:
-
Right-click the date column in the DataPrep Studio page.
-
Select the Create Buckets option from the context menu.
-
In the Transform panel, select the Month of the year option from the Select bucket options dropdown.
-
Enter a name for your new column in New column name.
-
Choose one of the options from the Create Buckets Using section and fill in the required fields (see detailed descriptions below):
-
Custom range
-
Specific values
-
A preview of the new column will be shown in the data grid.
-
Click Apply .
Custom range
You can use a custom range to input the conditions to determine the bucket labels.
-
To do this, enter conditions using these comparative operators:
-
Equal to (=), more than (>), or more than or equal to (>=), as part of the Start condition .
-
Less than (<), or less than or equal to (<=), as part of the End condition .
-
For example, the start condition to classify the date if it falls in the first half of the year will be greater than or equal to 1 (1st month).
The end condition will be less than or equal to 6 (6th month). Enter the bucket label as H1, 2018.
-
The start condition to classify the date if it falls in the second half of the year will be greater than 6.
The end condition will be less than or equal to 12. Enter the bucket label as H2, 2018.
-
If the selected column has values that don't fit any condition, it will be marked as "N/A". You can edit this label in the Label for unmatched values field.
-
Use the + button to add another condition below the current one or the - button to delete the current condition.
-
The buckets will be in the new column, next to each value in the selected date column that fits the range.
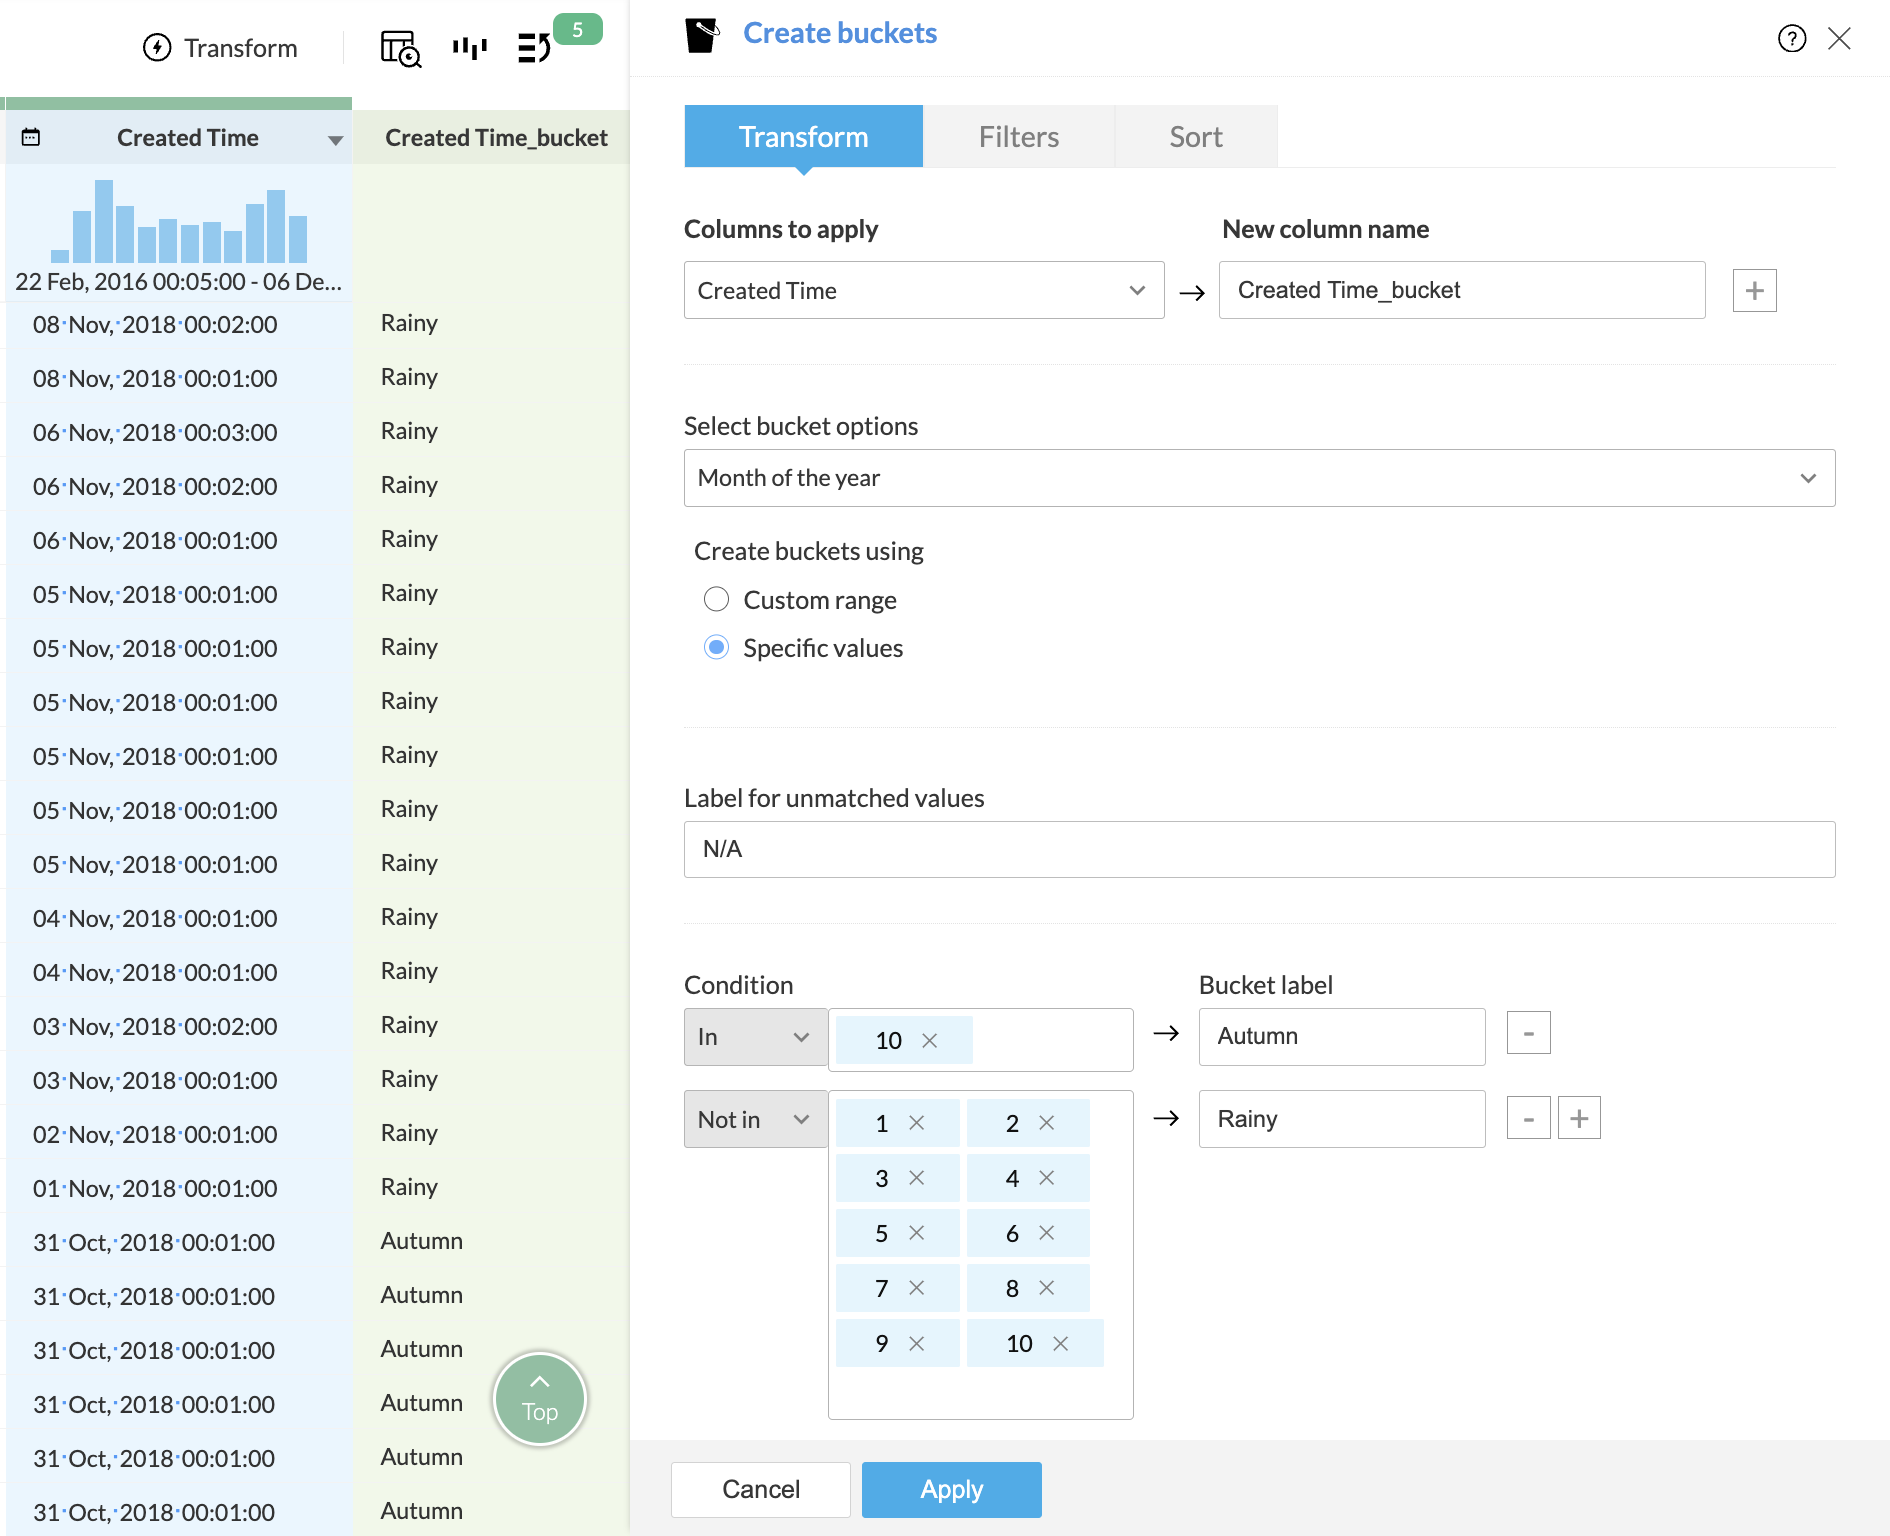
Specific values
You can use the
Specific Values
option to label specific values from the selected numerical column as a bucket.
To do this, enter conditions using these options:
-
In
-
Not in
For example, if you want to bucket the months based on a season like Autumn, enter the months with the condition "in" and enter the label name under Bucket label as "Autumn" and click Apply .
If you choose the "not in" condition, every other value which is not mentioned in this condition will get bucketed under one label.
Week of the year
This option lets you create a new column next to the date column to classify weeks of the year.
To apply the Week of the year option to a date column:
-
Right-click on the date column in the DataPrep Studio page.
-
Select the Create Buckets option from the context menu.
-
Select the Week Count option from the Select bucket options dropdown in the Transform panel.
-
Enter a name for your new column in New Column name .
-
Choose one of the options in the Create Buckets Using section and fill in the required fields (see detailed descriptions below):
-
Custom range
-
Specific values
-
A preview of the new column will be shown in the data grid.
-
Click Apply .
Custom range
You can use the Custom Range option to input the conditions to determine bucket labels.
-
To do this, provide conditions using these comparative operators:
-
Equal to (=), more than (>), or more than or equal to (>=), as part of the Start condition.
-
Less than (<), or less than or equal to (<=), as part of the End condition.
-
For example, the start condition to classify the date if it falls in the first half of the year will be greater than or equal to 1 (1st week).
The end condition will be less than or equal to 26 (26th week). Enter "H1, 2018" as the bucket label.
The start condition to classify the date if it falls in the second half of the year will be greater than 26.
The end condition will be less than or equal to 52. Enter "H2, 2018" as the bucket label.
-
If the selected column has values that don't fit any condition, they will appear as "N/A". You can edit this label in the Label for unmatched values option.
-
Use the + button to add another condition below the current one, or the - button to delete the current condition.
Specific values
You can use the Specific Values option to label specific values from the selected numerical column as a bucket.
To do this, provide the following conditions:
-
In
-
Not in
-
For example, if there is a high volume of sales in a grocery store during specific weeks of the year such as holidays, you can select the Specific Values option, select the "In" condition and enter the week numbers, e.g.- 45, 46, 47. Enter the Bucket label as "High sales week" and click apply.
-
You can enter the same weeks in the "Not in" condition. The ones that are not in the mentioned months can be named "Low sales week".
-
The ones that do not match the condition will have the default value "N/A".
Week of the month
This option lets you create a new column next to the date column to classify the weeks in a month.
To apply the Week of the Month option to a date column:
-
Right-click the date column in the DataPrep Studio page.
-
Select the Create Buckets option from the context menu.
-
In the Transform panel, select the Week of the month option from the Select bucket options dropdown.
-
Enter a name for your new column in the New column name field.
-
Choose one of the options in the Create buckets using section and fill in the required fields (see detailed descriptions below):
-
Custom range
-
Specific values
-
A preview of the new column will be shown in the data grid.
-
Click Apply .
Custom range
You can use the Custom Range option to enter the conditions to determine bucket labels.
-
To do this, enter conditions using these comparative operators:
-
Equal to (=), more than (>), or more than or equal to (>=), as part of the Start condition
-
Less than (<), or less than or equal to (<=), as part of the End condition
-
For example, if the first two weeks of every month have a high volume of sales of your product, you can classify the weeks using start and end conditions: >= 1 and <=2 as "high sales" and >2 and <=4 as "low sales".
-
If the selected column has values that don't fit any condition, it will be marked as "N/A". You can edit this label in the Label for unmatched values option.
-
Use the + button to add another condition below the current one, or the - button to delete the current condition.
Specific values
You can use the Specific Values option to label specific values from the selected numerical column as a bucket.
-
For example, if a certain week of each month has a high volume of sales in your company, you can select the Specific Values option, enter the week number, and label it as "Peak sales week".
-
The entries that do not match the condition will have the default value "N/A".
Day of the year
This option lets you create a new column next to the date column to classify the days in a year.
To apply the Day of the year option to a date column:
-
Right-click the date column in the DataPrep Studio page.
-
Select the
Create Buckets
option from the context menu.
-
Select
Day of the year
from the
Select bucket options
dropdown in the
Transform
panel.
-
Enter a name for your new column in the
New column name
field.
-
Choose one of the options in the
Create buckets using
section and fill in the required fields (see detailed descriptions below):
-
Custom range
-
Specific values
-
A preview of the new column will be shown in the data grid.
- Click Apply .
Custom range
You can use the Custom Range option to input the conditions to determine bucket labels.
You can use the Custom Range option to input the conditions to determine bucket labels.
-
To do this, enter conditions using these comparative operators:
-
Equal to (=), more than (>), or more than or equal to (>=), as part of the Start condition
- Less than (<), or less than or equal to (<=), as part of the End condition
-
For example, if there is a high volume of sales in your grocery store during the holiday season, you can select the
Custom Range
option and enter the Start and End conditions as >= 300 and <=356 to specify the range.
- If the selected column has values that don't fit any condition, it will be marked "N/A". You can edit this label in the Label for unmatched values option.
- Use the + button to add another condition below the current one, or the - button to delete the current condition.
Specific values
- You can use the Specific Values option to label specific values from the selected numerical column as a bucket.
-
For example, if your business sees a high volume of sales on the first 2 days of every month, you can select the
Specific values
option and enter the day numbers as: 1, 2, 32, 33, 60, 61, and so on through to 334 and 335. Assuming the rest of the month sees low sales, you can select the "Not in" condition to label the days which do not fall under high sales volume. The ones that do not match the condition will have the default value "N/A".
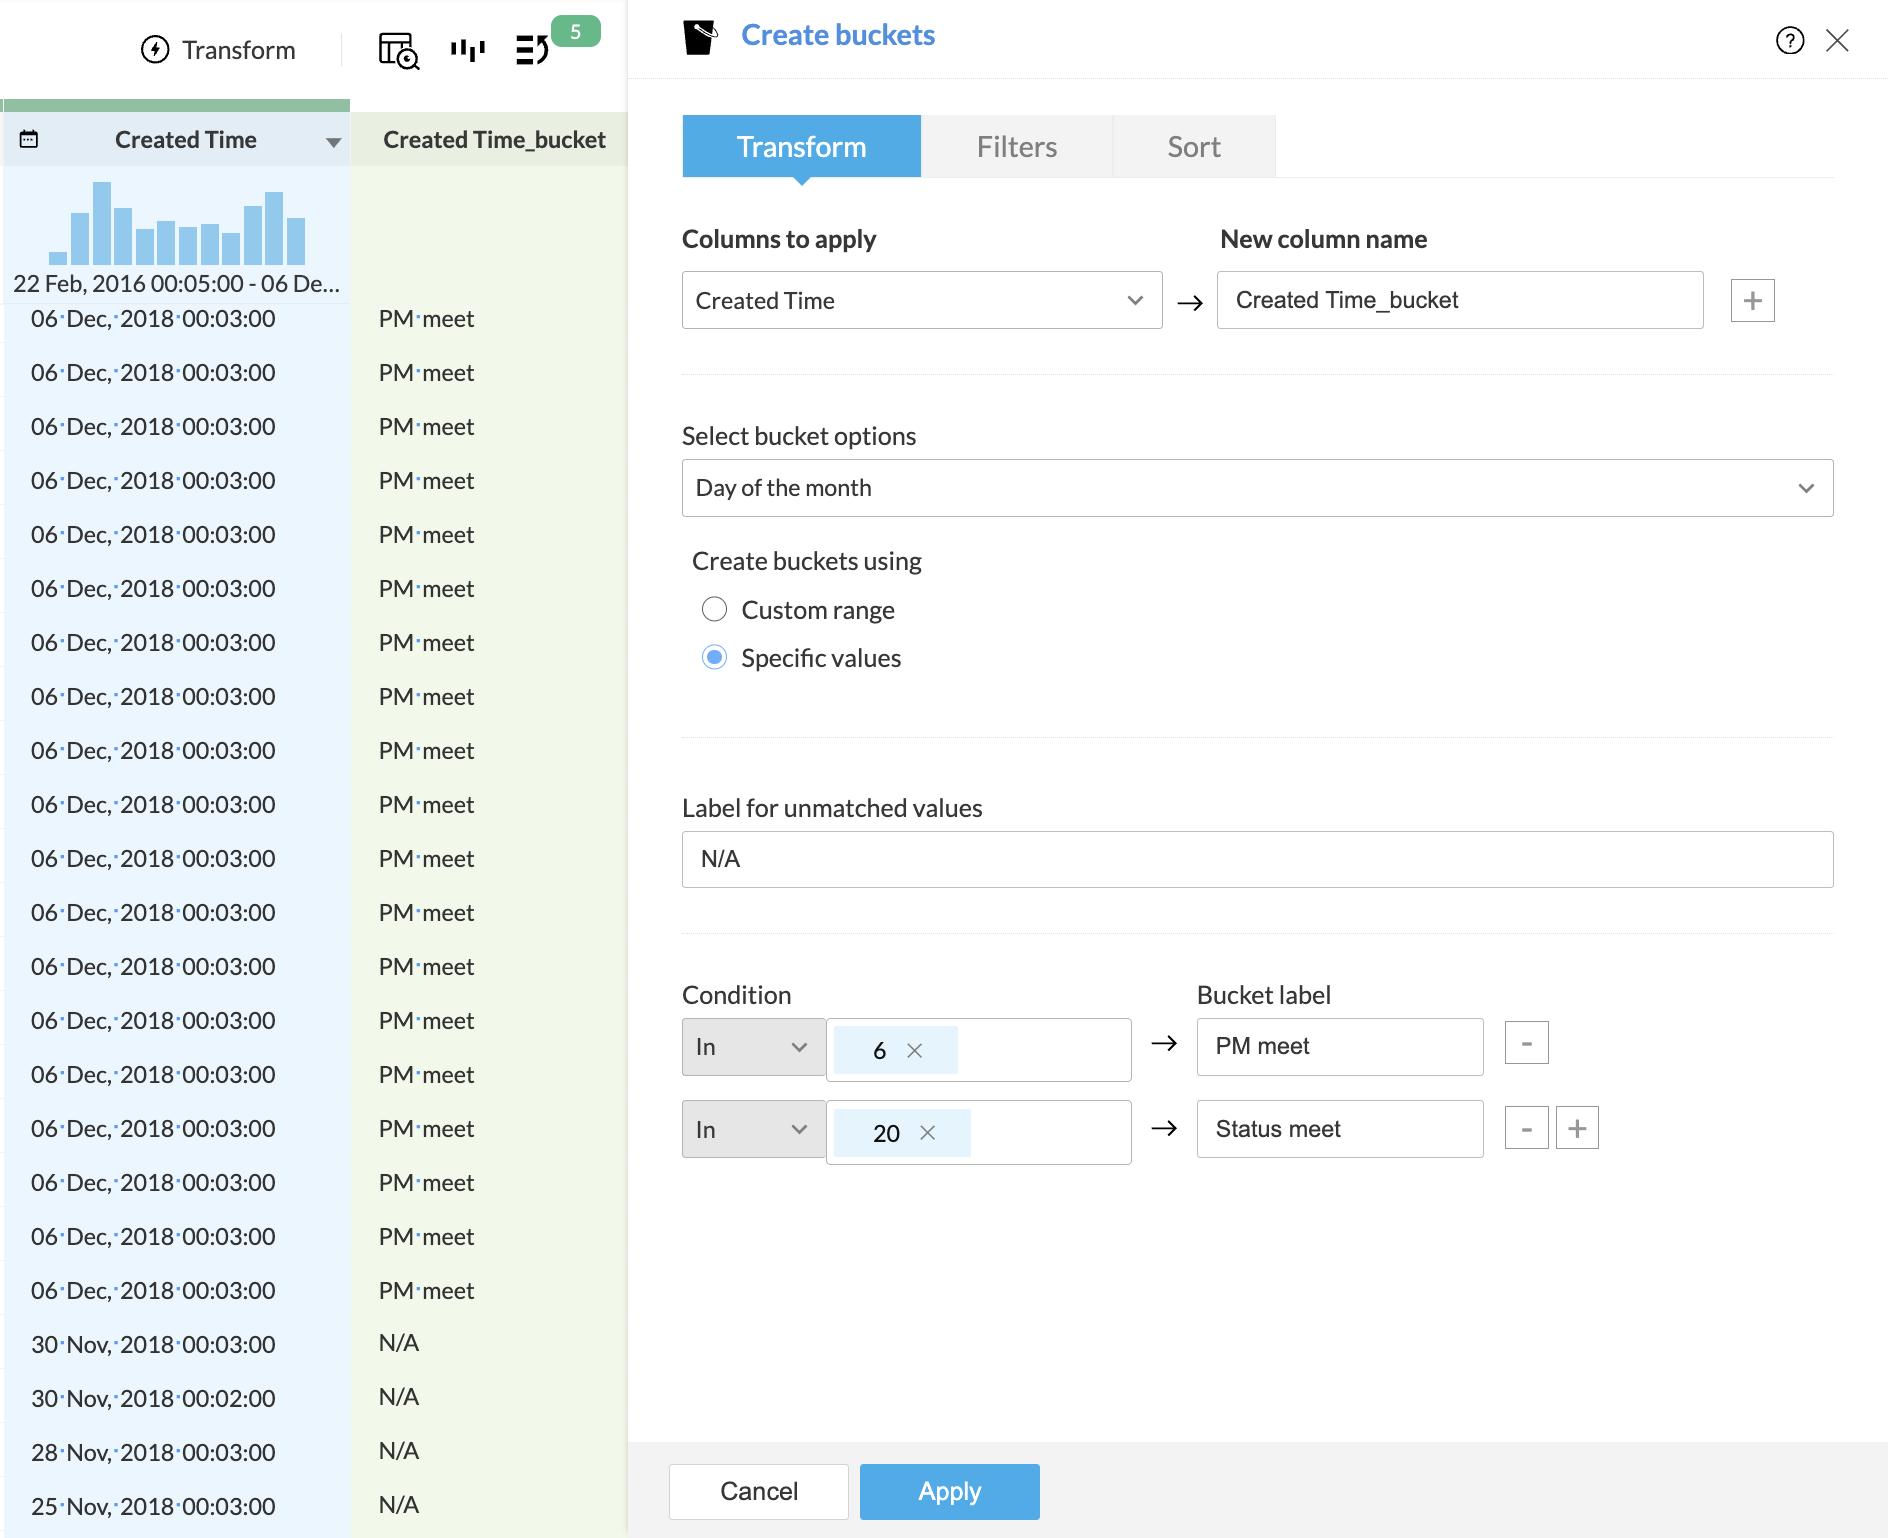
Day of the month
This option lets you create a new column next to the date column to classify the days in a month.
To apply the
Day of the month
option to a date column:
-
Right-click the date column in the DataPrep Studio page.
-
Select the
Create Buckets
option from the context menu.
-
Select the
Day of the month
option from the Select bucket option dropdown in the Transform panel.
-
Enter a name for your new column in the
New column name
field.
-
Choose one of the options in the Create buckets using section and fill in the required fields (see detailed descriptions below):
-
Custom range
-
Specific values
6. Click
Apply
.
Custom range
You can use the Custom Range option to input the conditions to determine bucket labels.
-
To do this, enter conditions using these comparative operators:
-
Equal to (=), more than (>), or more than or equal to (>=) as part of the
Start condition
- Less than (<), or less than or equal to (<=) as part of the End condition
-
For example, if you need to schedule different team meetings during the first half and the second half of the month, you can enter the start and end conditions using comparison operators:
-
If the day is between >= 1 and <=15, the label is "Technical discussion"
- If the day is between >15 and <=31, the label is "Status update"
- If the selected column has values that don't fit any condition, it will be marked "N/A". You can edit this label in the Label for unmatched values option.
-
Use the + button to add another condition below the current one, or the - button to delete the current condition.
Specific values
You can use the Specific Values option to label specific values from the selected numerical column as a bucket.
For example, if you want to schedule team meetings on the 6th and 20th of each month, you can enter 6 and 20 and label them as "Project management meet" and "Status meet".
The dates that do not match the condition will have the default value "N/A".
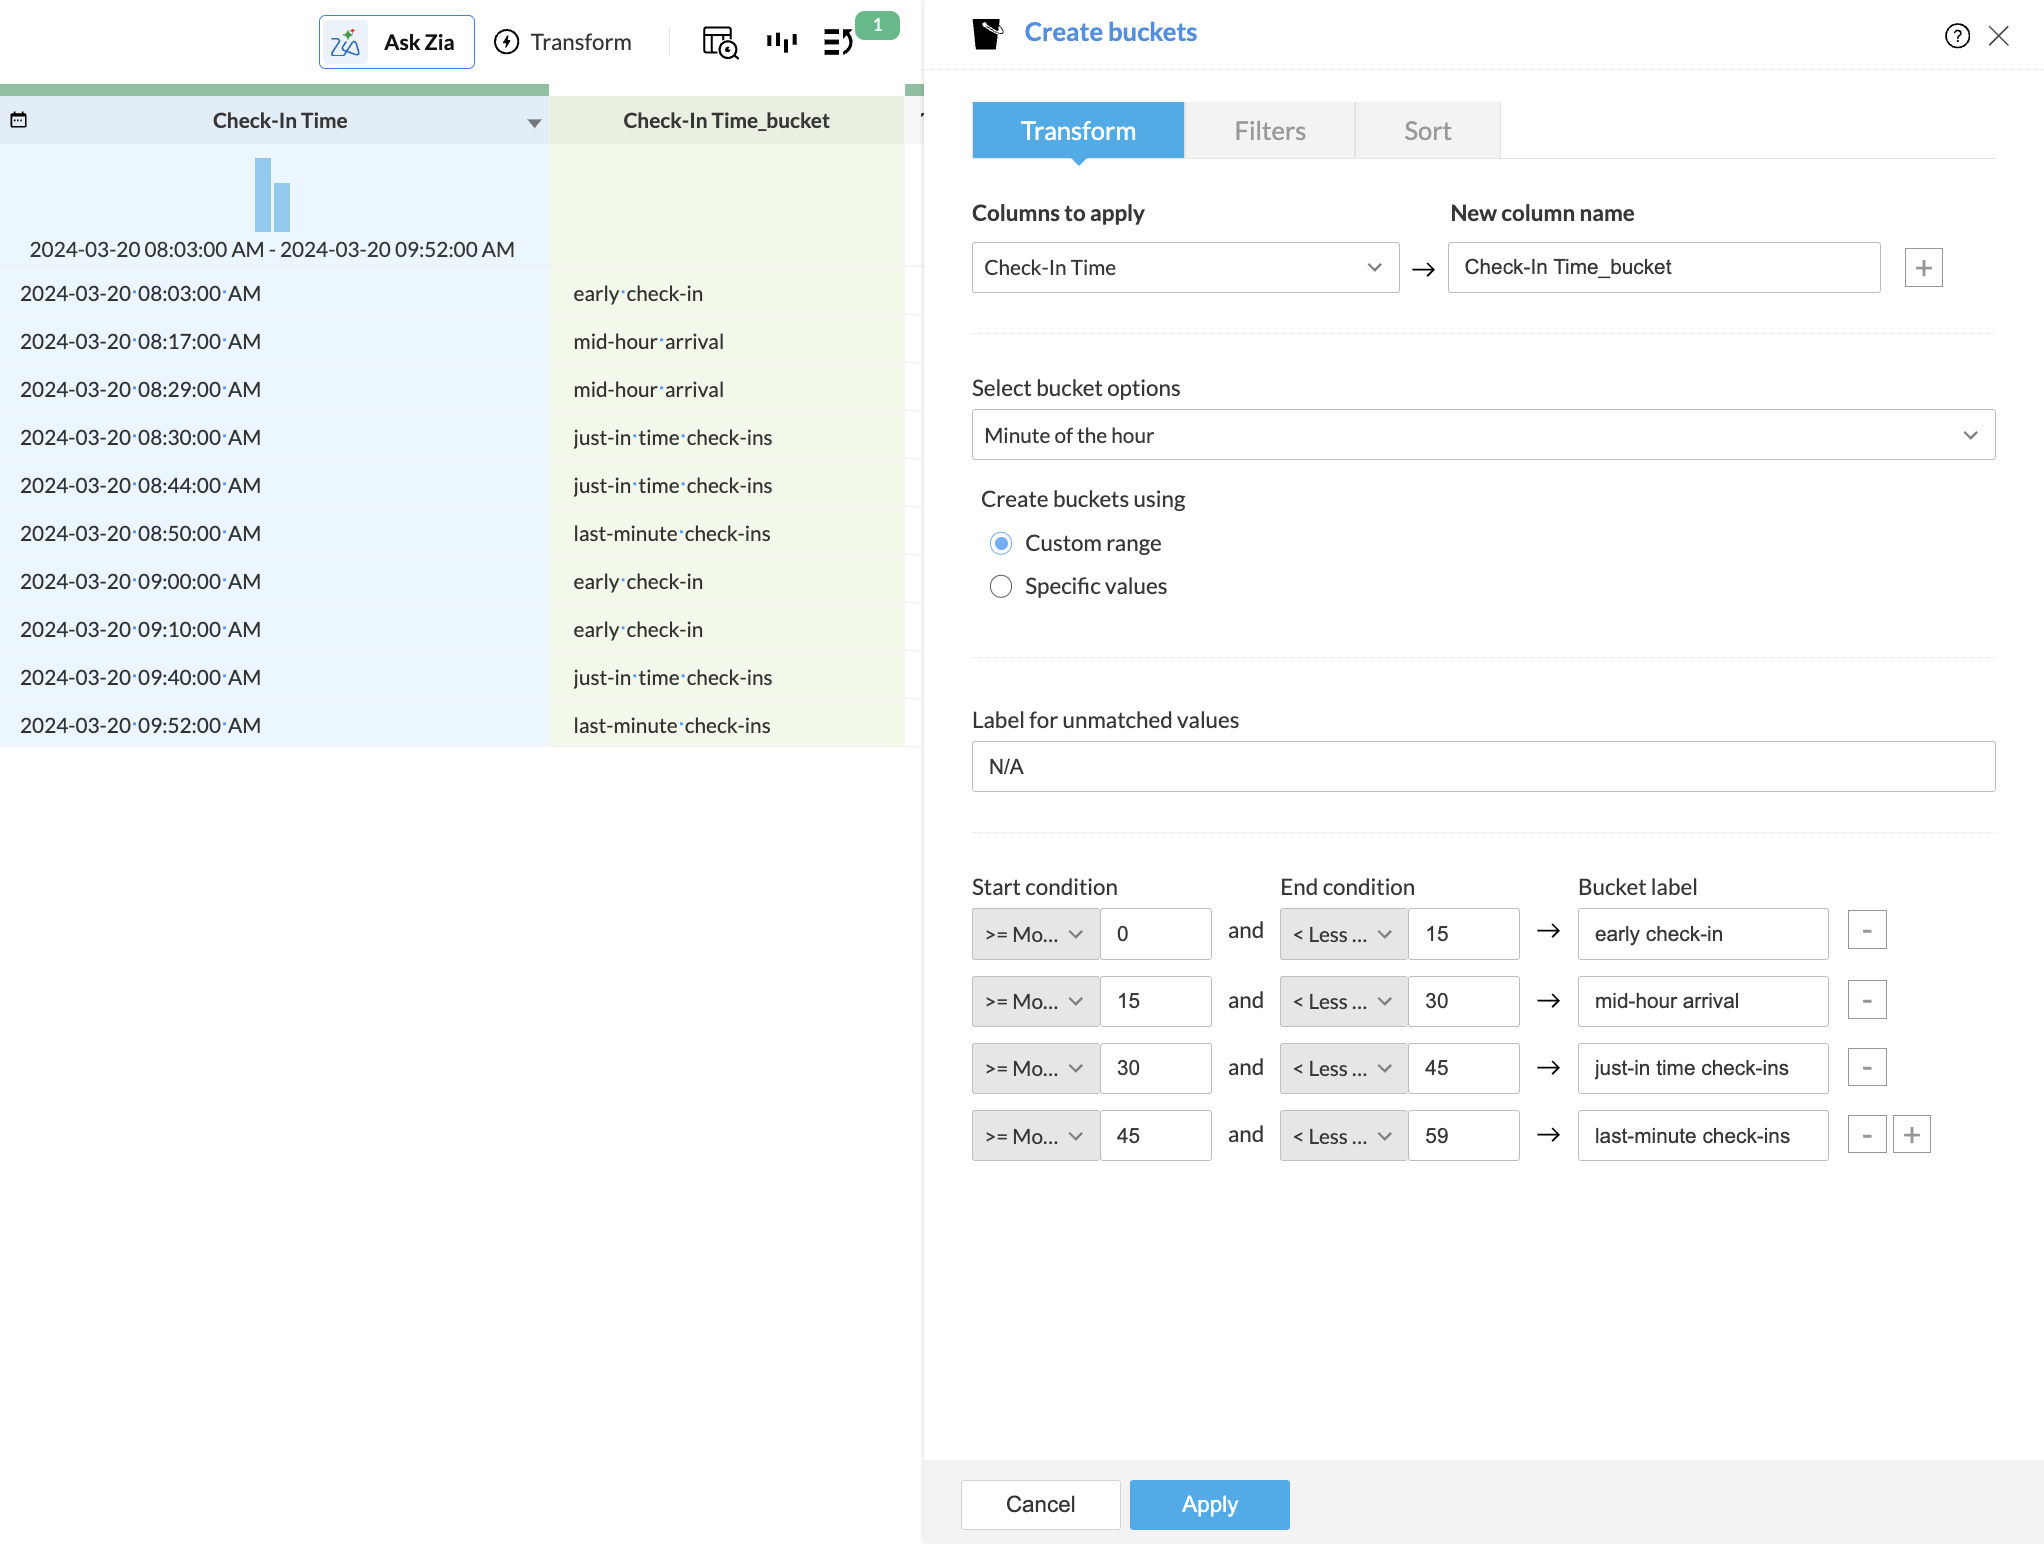
Minute of the hour
This option lets you create a new column against the date-time column classifying hours of time in a day.
To apply the
Time of Day
option to a date column:
-
Right-click the date-time column in the DataPrep Studio page.
-
Select the
Create Buckets
option from the context menu.
-
Select the
Minute of the hour
option from the Select bucketing method dropdown in the
Transform
panel.
-
Enter a name for your new column in the
New column name
field.
-
Choose one of the options in the Create buckets using section and fill in the required fields (see detailed descriptions below):
-
Custom range
-
Specific values
-
A preview of the new column will be shown in the data grid.
- Click Apply.
Custom range
You can use the
Custom Range
option to input the conditions to determine bucket labels.
To do this, enter conditions using these comparative operators.
-
Equal to (=), more than (>), or more than or equal to (>=) as part of the Start condition
-
Less than (<), or less than or equal to (<=) as part of the End condition
Example: Flight Check-In Behaviour
You have a "Check-In Time" column and want to group passengers by how early or late they check in within each hour.
| Start Condition | End Condition | Label |
|---|---|---|
>= 0 |
< 15 |
Early check-ins |
>= 15 |
< 30 |
Mid-hour arrivals |
>= 30 |
< 45 |
Just-in-time check-ins |
>= 45 |
< 59 |
Last-minute check-ins |
This classification helps airport operations anticipate passenger flow, manage queues, and adjust staffing levels effectively.
If the selected column has values that don't fit any condition, it will be marked "N/A". You can edit this label in the Label for unmatched values option.
Use the + button to add another condition below the current one, or the - button to delete the current condition.
Specific values
You can use the Specific Values option to label specific values from the selected numerical column as a bucket.
For example, at certain minutes of every hour, airlines may open dedicated counters for crew check-in. You can tag these specific minutes in your data for easy reporting.
The minutes that do not match the condition will have the default value "N/A".
You can edit this label in the Label for unmatched values option.

Time of day
This option lets you create a new column against the date-time column classifying hours of time in a day.
To apply the
Time of Day
option to a date column:
-
Right-click the
date-time
column in the DataPrep Studio page.
-
Select the
Create Buckets
option from the context menu.
-
Select the
Time of day
option from the
Select bucketing method
dropdown in the
Transform
panel.
-
Enter a name for your new column in the
New column name
field.
-
Choose one of the options in the
Create buckets using
section and fill in the required fields (see detailed descriptions below):
-
Custom range
-
Specific values
-
A preview of the new column will be shown in the data grid.
- Click Apply .
Custom range
You can use the Custom Range option to input the conditions to determine bucket labels.
-
To do this, enter conditions using these comparative operators.
- Equal to (=), more than (>), or more than or equal to (>=) as part of the Start condition
- Less than (<), or less than or equal to (<=) as part of the End condition
-
For example, if you need to specify shift timings in your team, you can enter the start and end conditions using the comparison operators: >= 7AM and < 3PM as "Morning shift", >=3PM and <11PM as "Noon shift", and >=12AM and <7AM as "Night shift".
-
If the selected column has values that don't fit any condition, it will be marked as "N/A". You can edit this label in the Label for unmatched values option.
-
Use the + button to add another condition below the current one, or the - button to delete the current condition.
Custom date range
This option lets you create a new column next to the date column to classify a range of dates and label them.
To apply the Custom Date Range option to a date column:
-
Right-click the date column in the DataPrep Studio page.
-
Select the Create Buckets option from the context menu.
-
Select the Custom date range option from the Select bucketing method dropdown in the Transform panel.
-
Enter a name for your new column in the New column name field.
-
Select the from date and to date using the date picker and enter the bucket label.
-
For example, to label a range of dates during the holiday season, you can select the Start condition as December 6th, and the End condition as December 10th and label it as "Holidays".
-
If the selected column has values that don't fit any condition, it will be marked as "N/A". You can edit this label in the Label for unmatched values option.
-
A preview of the new column will be shown in the data grid.
-
Click Apply .
To apply filters
If you want to apply some filters along with this transform, you can use the filters functionality.
1. Click the
Filters
tab.
2. Click the
 icon and add the required columns in the
Filters
section. You can also reorder the filters using the drag and drop method.
icon and add the required columns in the
Filters
section. You can also reorder the filters using the drag and drop method.

3. For every column added, you can select one of the following options from the drop-down:
- Actual: This option lets you filter rows based on the actual values in the column. Click here to know more.
- Data quality: This option lets you filter rows based on the quality of data in the column. Click here to know more.
- Patterns: This option helps you filter rows based on the data patterns in the selected column. Click here to know more.
- Seasonal: This option helps you filter rows based on the seasonal parameters such as quarter, month, week, etc. Click here to know more.
- Outliers: This option allows you to filter rows based on the outliers present in the data of the selected column. Click here to know more.

Note: The filter options are displayed based on the datatype of the column added for the filter.
4. When you add more than one filter to the
Filters
section, the logical operators, AND or OR appear next to the filters. You can click to toggle the logical operator between AND and OR.
-
Using the logical operators, you can combine the conditions and apply logic to determine the rule of precedence. The final expression is displayed in the
Criteria expression
box. You can click
Edit
to alter the default expression using logical operators and parenthesis to specify the precedence or the sequential order as to which condition should be evaluated first. Click
Save
after making the required changes.
- For example, In the expression, ((1 AND 2) OR (3 AND 4)) , at first the condition ( 1 AND 2 ) will be executed and the condition ( 3 AND 4 ) will be executed next. Thirdly, since, the OR operator is used, the filter will be applied when either or both the conditions is true.
5. You can further drill down to choose specific values based on the filter option selected for each filter, in the next section.
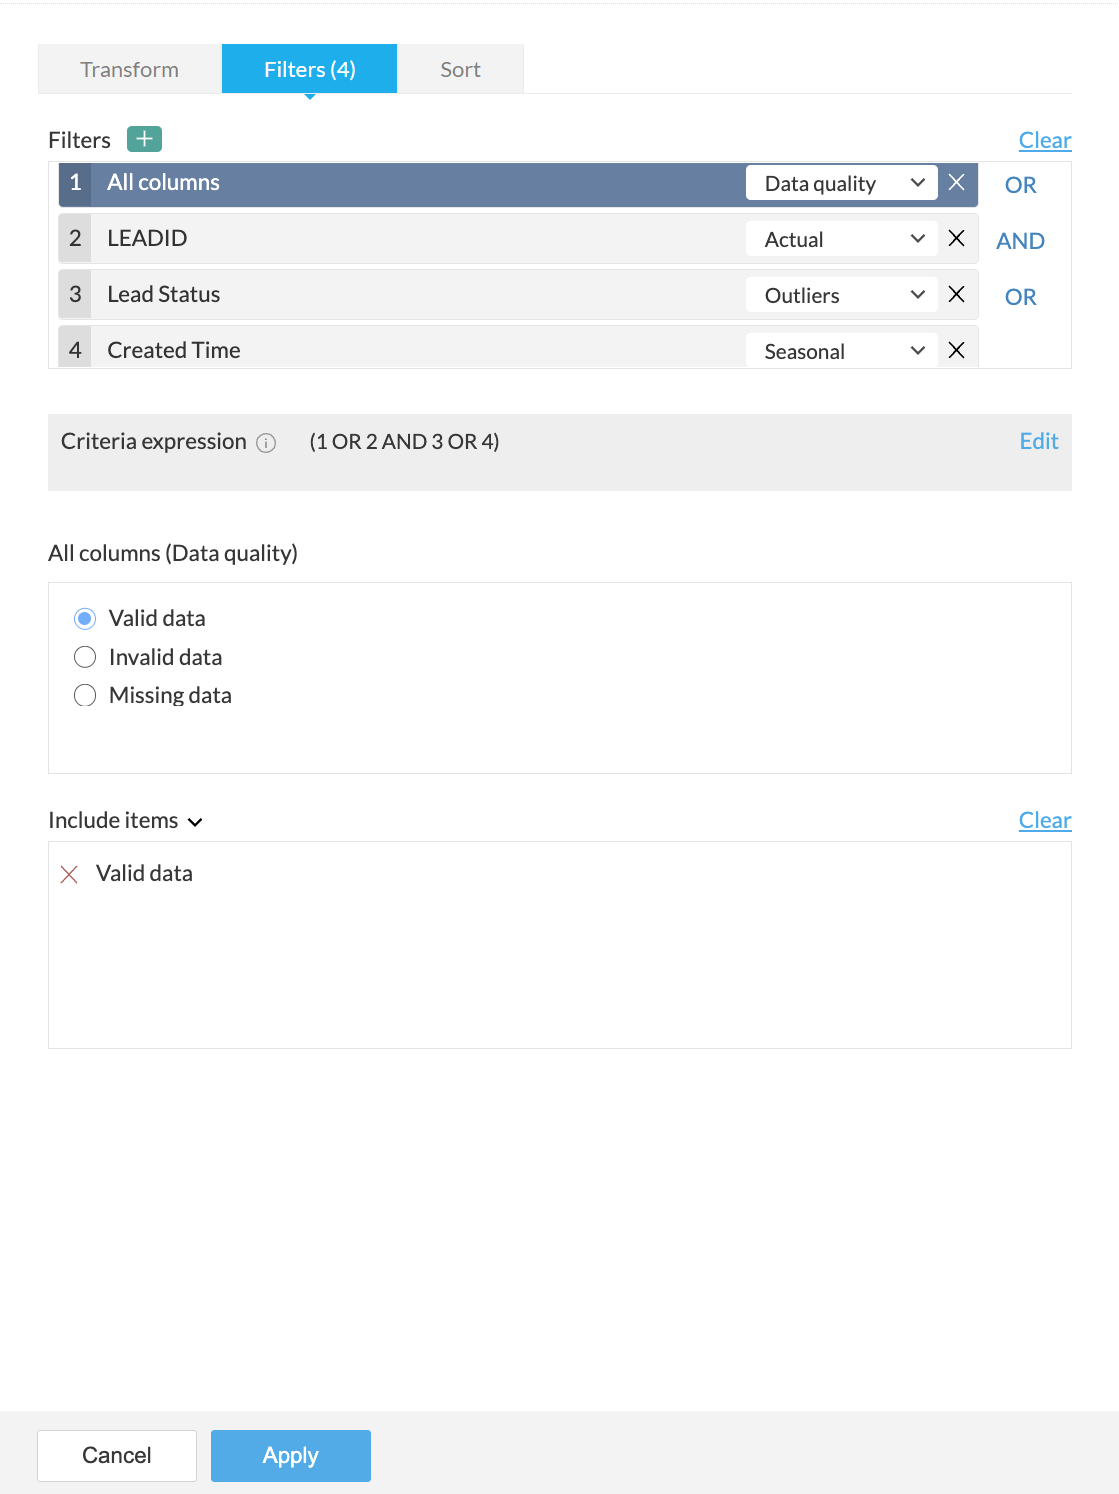
For example, in the above screenshot, the
Data quality
option is selected for the All columns filter in the
Filters
section. Based on the selection, further options to filter specific values are displayed in the
All columns (Data quality)
section.
6. You can choose to include or exclude the selected items in the last section.
7. If you want to remove all the filters for some reason, you can use the
Clear
button.
8. A live preview of the filter transform is shown as you make changes.
9. Click the
Apply
button to apply the transform along with the filters.
To sort data
Under the Sort tab, you can sort data in the ascending or descending order based on any column. You can choose the column in the Sort by column drop down and choose the order to be sorted.

You can use this functionality only with the transform and not as a standalone function. However, you can use the Sort transform if you want only to sort data.
SEE ALSO