Standard and Custom Contact Views
Contact List Views are used to group contacts based on a defined set of criteria. For example, you can view a list of contacts that were added today or of those that are mapped with Zoho CRM. You can also use the List Views to add contacts as end users, merge two or more contacts or export the contacts list to a CSV file.
Zoho Desk provides you a list of standard contact views that can be used by agents out of the box. They can also create custom contact views according to their requirements. Likewise, administrators can create shared contact views that can be accessed by all of the agents in your helpdesk.
Accessing Contact List View
Contact list views can be accessed from the home screen:
- Click the Customers module.
- On the Contacts Home page, select a standard list view from the left panel. The 'All Contacts' view is displayed during your first access. The system will remember your last seen View and lists the same during successive access.
Following are the standard contact list views that are available in Zoho Desk:
- All Contacts
- Anonymous Contacts
- Contacts Mapped with CRM
- Contacts Unmapped with CRM
- Last 30 Days
- My Contacts
- New Today
- Spam Contacts
You must click a contact to view its details. On the contact details page, click the Back icon (  ) to return to the List View.
Creating Custom Contact List Views
You can create custom list views by defining criteria as per your requirement. The custom views created by an agent will be listed on the left panel, following the standard views.
To create a custom list view:
- Click the Plus icon (
) located next to Contacts on the left panel.
- On the Create New View page, enter the Custom View Name.
- Specify the criteria to filter the contacts.
- Specify the visibility for this custom view. You can choose between Only me, All agents and Specific agents.
- Click Save.
What are the List View Criteria Available?
In the Filter Criteria section, you must specify the criteria based on which the contacts will be filtered under the view. The following table lists the criteria options for certain types of fields:
| Field Type | Criteria Options |
String Fields like:
|
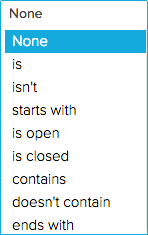 |
Numeric Fields like:
|
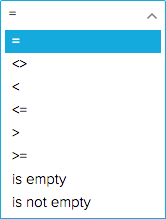 |
Date & Time Fields like:
|
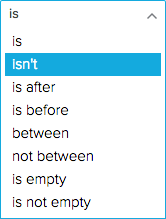 |
Other Fields like:
|
 |

Here are some tips to get you started:
- Age in Days option is very useful for the Date and DateTime fields. It can be used to filter contacts that were created within the last 7 days or those that were added for an agent in the past 30 days.
- You cannot edit the standard contact views that are by default provided in Zoho Desk. You may add a custom view to address any specific requirements.
Editing Custom Contact Views
You can edit the custom contact views that were added by your agents.
To edit a custom view:
- Right-click on a custom contact view.
- Click Edit from the menu.
- Make the necessary changes and click Save.
Deleting Custom Contact Views
You can delete a custom contact view that you think will no longer be required for your agents.
To delete a custom view:
- Right-click on a custom contact view.
- Click Delete from the menu.
- In the confirmation dialog box, click Ok.
Types of contact list views
Classic View
The Classic View displays customer records in a list format, with an intuitive user interface showing key details such as contact name, email, phone, account name, ratings, portal, and if they are paid contacts. Each row represents a single contact, with basic information visible. Agents can open a record to view more details.
Grid View
The Grid View presents customer records in a card format, with each contact or account displayed as an individual card. The cards showcase essential details like name, email, phone, account name, ratings, portal, and if they are paid contacts. This visual layout is ideal for agents who prefer a visual, tile-based format for quick scanning and identification.
Table View
The Table View for Contacts displays all the customer information that the user chooses in a spreadsheet format, with each row representing a contact and each column displaying details such as contact name, email, phone number, company name, etc. This layout enables agents to review efficiently and manage contact details without opening individual records.
Note: The Last Name is mandatory and cannot be removed.
Customizing the Table View
The Contacts Table View can be customized to display only the most relevant fields. Agents can add, remove, and reorder columns to get a clear and organized view of customer information. Both standard and custom fields can be added to the columns.
To customize the columns in table view
- Navigate to the Customer tab and select Contacts.
- Click the Select Columns icon located next to the column header (i.e., Last Name).
- In the Select Columns window, choose the fields you want to display, uncheck the unwanted columns, and drag and drop the columns to reorder them.
- Click Save to apply the changes.

Points to Remember
- Customizations made to the Table View apply to all users with access to the view.
- Fields with blank or null values are displayed as a dash ("-").
- Multi-line or text area fields cannot be added to the Table View.
Set Display Preferences
By default, Zoho Desk displays 10 records (contacts) per page. However, you can click the More Actions icon (  ) to choose the number of records to be displayed on a single page. A maximum of 50 contacts can be viewed per page. The system will remember your selection, the next time you access contact views.
Mass Actions in Contact Views
Views allow you to perform certain updates to many contacts at once. This way, you need not fiddle with each of your contacts and can save a lot of your time.
You can perform the following mass actions on contacts:
- Update Contacts
- Delete Contacts
- Add as End User
- Merge Contacts
- Mark Spam
Except for the merge function, which requires you to choose at least two contacts you can perform the above said actions even on a single contact.
- To update one or more contacts:
- Select the contacts.
- Click Update from the mass actions list.
- Select the field to be updated and specify the new values for it.
- Click Save.
- To delete one or more contacts:
- Select the contacts.
- Click Delete from the mass actions list.
- In the confirmation dialog box, click Delete.
- To add one or more contacts as end users:
- Select the contacts.
- Click Add as End User(s) from the mass actions list.
- In the confirmation dialog box, click Continue.
The contacts will receive an email invite to join your Help Center at https://desk.zoho.com/portal/<portal name>/home. Please keep in mind that you can invite contacts only when they have an email address. - To merge two or more contacts:
- Select the contacts.
- Click Merge from the mass actions list.
- Select the fields from the contacts, for its data to be retained in the Master Contact.
- Click Merge.
You can use the search bar at the top or the alphabet links on to your right to quickly find a contact by their name.
Here are some tips to help you Merge Contacts:
- You cannot merge more than three contacts at an instance.
- The contact that was first created in your help desk, will by default be considered as the master contact. You can also specify the master contact to be created.
- The master contact will keep the date of its creation besides other read-only or hidden field values.
- The values that were selected amongst the contacts will be merged into the master contact.
- All the records including attachments, products etc., from the other contacts, will be added to the master contact.
- Please exercise caution as you cannot undo or revert a contact merge.
Filter contacts and accounts
In the Customers module, agents can use values from the standard and custom fields to quickly filter and view the records that they want to check. For example: Customer Name, Email, Account Type etc. can be used to find the paid users. Agents can contact them by sending emails.