Understanding Fields and its Properties
Fields are are an essential part of modules which are used to capture information about Tickets, Customers, Organizations, Products etc. Depending on the type of data that are stored, fields are of different types such as Date, Date/Time, Picklist, Single line, Multiline. By default, Zoho Desk provides standard fields that are common across businesses such as Company name, Email address. It also allows to add custom fields as per the business requirement. A layout consists of both standard and custom fields.
Standard Fields
The standard fields in each module can be displayed or hidden as per the organization's requirement. Note that the mandatory fields (system-defined), such as Departments and Contact Name, cannot be edited or deleted. Additionally, changes made to the standard fields of a layout are applicable across the organization.
Custom Fields
In addition to the standard fields, Zoho Desk provides the flexibility to add more industry-specific custom fields, such as string, decimal, integer, currency, and checkbox type of fields. For example, you can add a custom field called Referred By to track who referred a customer to you. Note that these custom fields are specific to the department in which they are created. You can add fields in the following modules: Contracts, Time Entry, Agents, Tickets, Contacts, Accounts, Products, Calls, Tasks, and Events.
 Permission Required
 Users with the Support Administrator permission profile can access this feature.
Check Feature Availability and Limits
Viewing Fields List
While it is easy to add many custom fields that you may require for your business, it can quickly turn overwhelming if you are not able to keep track of them. Keeping that in mind, the Fields section under Setup provides a consolidated view of all the fields from the selected module, along with the relevant details and setting for the same. This includes the data type of the field (string, date, integer, etc.), API name, and the layout that uses the field.
To view the list of fields
- In your Zoho Desk portal, go to Setup (
).
- Under Customization, select Layout and Fields.
- Click Fields List under the Layouts and Fields sub-menu.
- Select the desired module from the Module drop-down list at the top of the page.
All the fields that belong to the selected module will be listed in alphabetical order. You will be able to see the following: - Field Name, Data Type, API Name columns with details.
- See layouts that use this field link. Note that the layouts that have the field in their Unused Fields section will not be displayed here.
- All the custom fields marked by this icon next to it.
- Enter characters in the Search text box to filter out a particular field or all fields of a certain data type from the long list.
Setting up Field Permissions
Data security is one of the most sought-after features in a help desk software. Given that you handle sensitive business information of your own company and that of your customers, you can choose to restrict access to specific fields within a module for agents. For example, when your Contact module includes sensitive information like your customers' bank account details you can hide these fields for specific profiles. Alternatively, when you do not want users to modify the information, you can simply give read-only access.
To manage field permissions
- In your Zoho Desk portal, go to Setup (
).
- Under Customization, select Layout and Fields.
- Click Fields Permissions under the Layouts and Fields sub-menu.
- In the Field Permissions page do the following:
- Select Module from the drop-down list.
- Select Profile from the drop-down list.
All the fields available in the selected module will be listed. - Edit the permission for the desired field to one of the following as required.
- Read and Write - Permission to view and edit the field.
- Read Only - Permission to view the field.
- Don't Show - Restrict user from both viewing and editing the field.
- Click Save.

Notes:
- Users with Light Agent profile cannot have Read and Write access for fields.
- Some system-mandated and time-based fields are restricted to read-only access.
- Field Permissions is available only in the Professional and Enterprise editions.
Preview layouts based on profiles
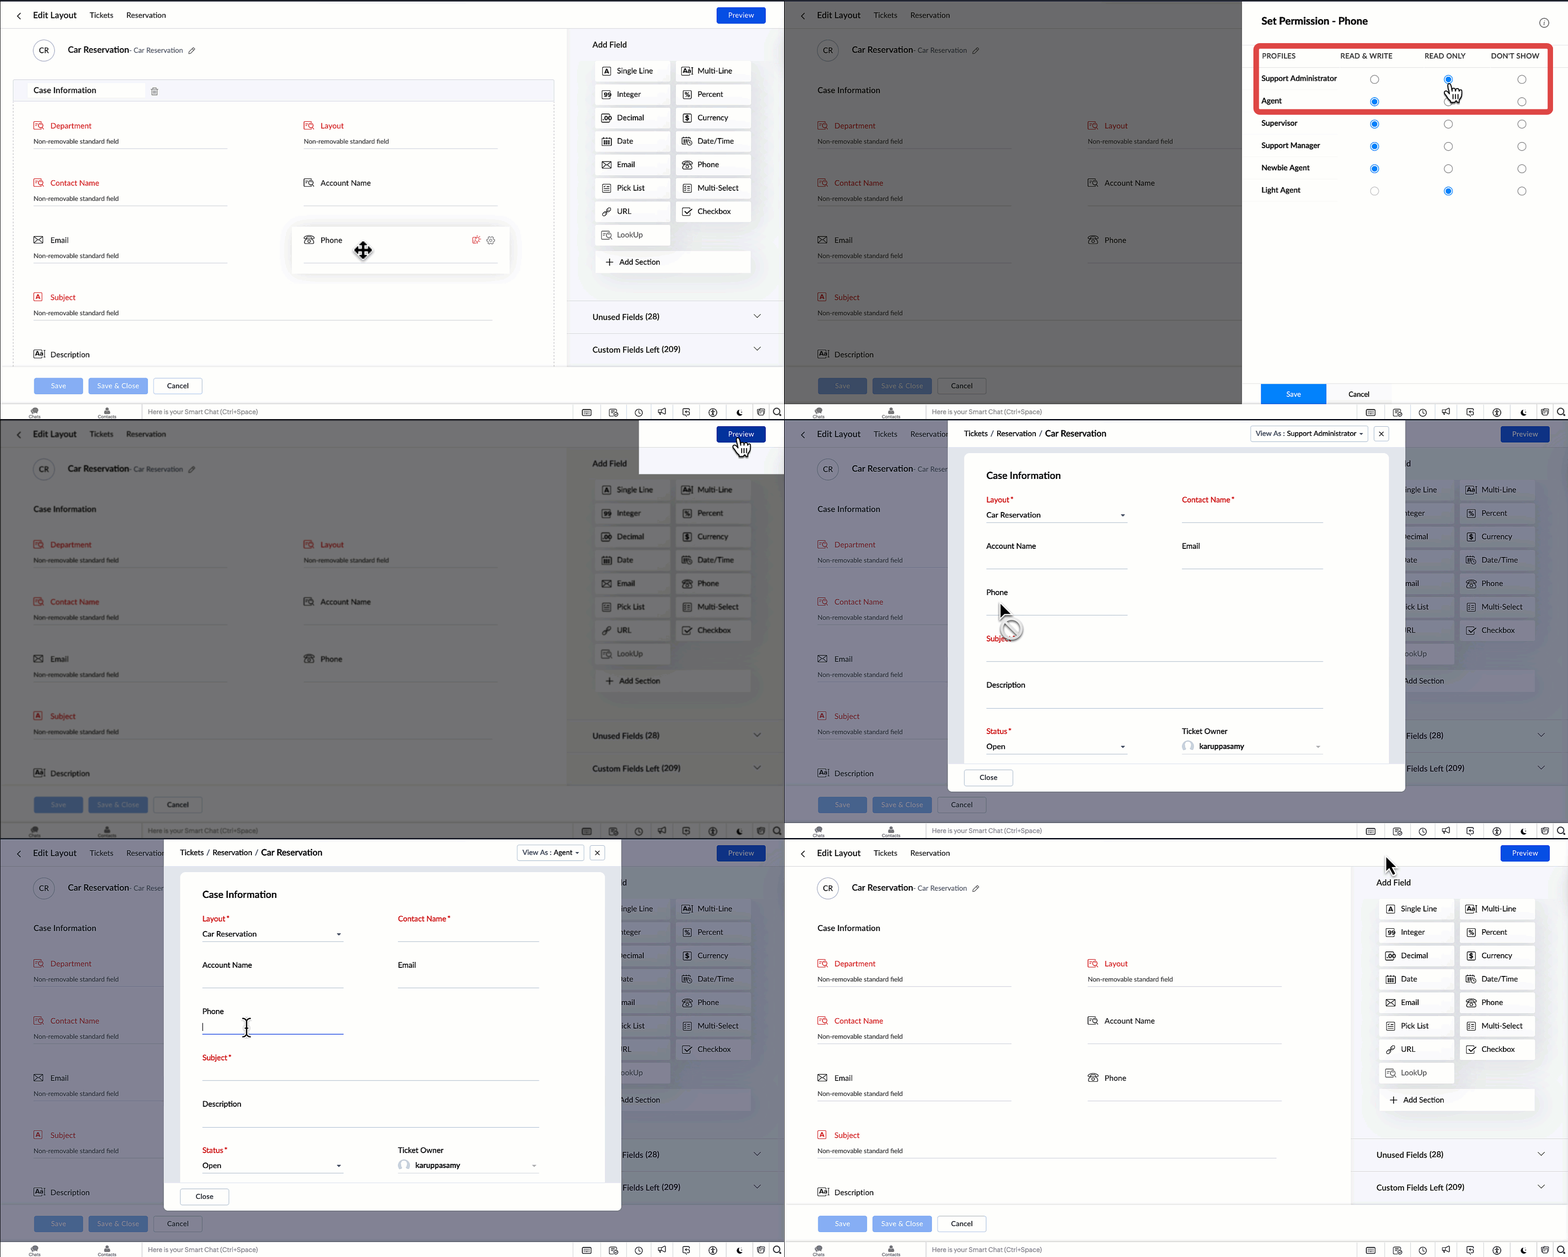
Once administrators set the field permission they can preview how these fields will appear for each profile within the layout.

For example, the Phone number field can be read only for agents and read/write for support leads. The admin can use the preview option to see how the field will appear for agents and support leads before saving the configuration.

Mapping Dependency Fields
Dependency fields are those that have a parent-child relationship, such as the Country and State field values. The relevant States will only be listed when the Country is also selected. Similarly, you may only need to list the sub departments when the main department is selected, or list the issues based on the Product type. Such dependency fields can be created using the Pick List data type fields.
To map field dependencies
- In your Zoho Desk portal, go to Setup (
).
- Under Customization, select Layout and Fields.
- Click Fields Dependencies under the Layouts and Fields sub-menu.
- Select the desired Module and Department where you want to create the dependency fields.
- In the Field Dependencies page, click Add New Dependency.
- In the Add New Dependency pop-up screen, do the following:
- Select the Parent Field from the drop-down list.
- Select the Child Field from the drop-down list.
- Click Next.
- Click each of your parent field values, then select their corresponding child values.
A tick mark indicates your selection of values for a parent field value. - Click Save Field Dependency.
When you create a new record in the module, the values on the child field will be populated based on the value chosen for the Parent field.
Customizing Search Fields
Customizing search fields can greatly enhance the user experience on a website or application. Allowing users to choose which fields to search increases the efficiency and accuracy of the search process. You may want to search records by name, email, or subject of the ticket request and the option to restrict your search to these fields will help you easily find the information, while minimizing irrelevant results.
By default, all the fields are selected and so the system will search all the fields' values in modules like Tickets, Contacts, Accounts, and Knowledge Base.
To customize the fields to be searched
- In your Zoho Desk portal, go to Setup (
).
- Under Customization, select Layout and Fields.
- Click Search Fields under the Layouts and Fields sub-menu.
- Select the desired Module from the list.
- In the [Module] Fields List page, click the Specific Fields option.
- Select the checkbox(es) of the fields whose values needs to be used for search.
- Click Save.

Note
Search Fields is an organization-level setting, and it applies to all departments in Zoho Desk.
When you choose to search for specific fields, you can select a maximum of 10 fields/module. For the Contracts, Products, Calls, Events, and Tasks module, you can select a maximum of six fields.
SEE ALSO
Zoho CRM Training Programs
Learn how to use the best tools for sales force automation and better customer engagement from Zoho's implementation specialists.
Zoho DataPrep Personalized Demo
If you'd like a personalized walk-through of our data preparation tool, please request a demo and we'll be happy to show you how to get the best out of Zoho DataPrep.
Centralize Knowledge. Transform Learning.
All-in-one knowledge management and training platform for your employees and customers.
New to Zoho Writer?
You are currently viewing the help pages of Qntrl’s earlier version. Click here to view our latest version—Qntrl 3.0's help articles.
Zoho Sheet Resources
Zoho Forms Resources
New to Zoho Sign?
Zoho Sign Resources
New to Zoho TeamInbox?
Zoho TeamInbox Resources
New to Zoho ZeptoMail?
New to Zoho Workerly?
New to Zoho Recruit?
New to Zoho CRM?
New to Zoho Projects?
New to Zoho Sprints?
New to Zoho Assist?
New to Bigin?
Related Articles
Understanding Layouts and Layout Rules
Creating Layouts Layouts control the organization of fields and related sections on the module page of a department. Each department can have its own layout that consists of both default and custom fields. They also determine which fields are ...Working with Custom Fields
In Zoho Desk, custom fields help you capture and organize information that may not be covered by default system fields. Because custom fields are user-defined, they can be tailored to meet the specific needs of your business and industry. For ...Viewing Ticket Properties in Android
The users can view certain ticket information within the ticket based on the ticket layout they configured. The basic information that the agents can view are: Properties Zia insights - analyses the tone of the ticket, gives a summary of it and also ...Creating Formula Fields
Managers and support agents often require quick access to key metrics, such as the time remaining before a ticket becomes overdue or the calculated costs associated with services. Manually extracting and calculating these metrics can be ...Regex in Layout and Validation Rules
Regular expressions (regex) are a sequence of characters that define a pattern. They are used to find and match similar patterns in a piece of text. In other words, regex is a set of strings that holds a particular pattern. It is commonly used to ...
New to Zoho LandingPage?
Zoho LandingPage Resources


