FAQs: Ticket Management
1. What is a ticket and where does it originate from?
Tickets are support requests that are submitted by customers. They contain the support conversations and other important details, such as priority, category, and status, that help agents categorize and prioritize the requests. Tickets can be problems, feature requests, questions, or general enquiry about the product.
Zoho Desk allows an omnichannel support system that allows customers to raise tickets or questions from different channels, which are converted to tickets and assigned to the agents or teams. A ticket can be created from:
- An email that is sent to the help desk-monitored support mailbox
- Submit a ticket from your customer-facing web interface
- Fill out a support contact form from your website
- Call you on your customer service telephone number
- Ping you through a live chat widget
- Post on your community forum
- Send you a tweet
- Post on your Facebook page
- Send in an SMS or text message
- Start a conversation on an instant messaging (IM) app
- Post your question in the Help Center.
These communication options are collectively called channels in Zoho Desk. You can add or remove a channel to meet your needs as per your business requirements. Requests submitted through these channels will quickly turn into tickets in Zoho Desk.
2. How can I hide tickets from help center users?
The Help Center consists of the Knowledge Base, Community, and Tickets. These modules are aimed at helping customers learn, find solutions, and raise support tickets whenever there is a need.
Users of the help center, also known as portal users, have the capability to perform the following actions within the portal:
- Create a ticket
- Add comments to the ticket
- Reply to a ticket
- Check the status of their tickets
Tickets submitted by help center users are public by default. Sometimes, organizations may have to hide certain tickets for reasons such as internal audits, internal reviews and reference, or organizational guidelines .
One such example is when dealing with a specific problem for an important client. If this client has a serious issue that needs to be kept secret for privacy reasons or to avoid bad publicity, the company might decide to make this ticket invisible to everyone except certain agents or managers. This way, the company can keep the client's information confidential, control who knows about the issue, and prevent other people, including other clients or employees who don't need to know, from seeing it.
To hide tickets from help center users, you need to do the following:
- Create a department that is not displayed in the Help Center.
- Move the tickets under this private department.
- Disable the display of tickets under this private department.
To do so:
- Go to Setup.
- Click Departments in General.
- On the Departments setup page, click on the Department you want to hide.
- Click the Edit button, then toggle Display in Help Center for department settings.
- Navigate to Setup > Channel > Help Center > Access Settings.
- Disable Display Tickets from private departments in the Help Center.
The tickets from the private department won't be visible to the customers or help center users anymore. You can also move tickets from any department to the hidden department in case you want to hide them.
3. Can I view the tickets I follow?
This feature is currently unavailable. This is because Zoho Desk doesn't provide the filter criteria that is required to sort tickets that you follow. Currently, you can only view updates of tickets that you follow in the Notification Center. You can access the same by clicking the Notifications icon (  ) in the top bar.
4. How do I star a ticket list view?
Views help to filter tickets based on your preference, so that you don't have to go through all the tickets in your Zoho Desk. You can go a step further and star certain views to find them easily under ticket views. When you star a view, it stays at the top of your left panel.

Notes:
- You can star a maximum of 15 list views per department.
- In the All Department view, you can star up to 15 views.
- The views that you star are marked only for you.
To star a view, follow the steps mentioned below:
- Go to the Tickets module.
- Click Views in the sidebar, then select a ticket view from the list.
- On the ticket listing page, click the Star icon next the view name.
- The view will be starred instantaneously.
- The view will also be listed under the Starred Views listing, on the left panel.
You can click the Star icon from the same location to unstar a view.
5. How can I filter tickets according to different criteria?
Alter the display preferences and see only those tickets that you would like to see by filtering them by age, sort them based on created time or due date and also define the maximum number of tickets that you think should be visible on a single page.
To set the display preferences:
- Click the More icon (
) in the top-right corner of the tickets List page.
- Use the Filter option to filter tickets by agent, status, priority, channel, and due date.
- Select the Show Oldest First to see the oldest tickets at the top of the list.
- Sort the tickets based on Created Time, Recent Thread, or Due Date.
- Filter tickets received during specific time periods. You can view those that were created during the last 15 days, 30 days, or 3 months.
- You have the option to view the total count of tickets, which can be clicked to see the number of tickets available in the selection ticket view.
6. How do I set up email alerts for the tickets I follow?
Agent may want to track certain tickets to stay informed, such as policy-related tickets or escalated case-sensitive tickets, without being assigned to them. Such updates can be viewed in the Notification Center that opens upon clicking the Notifications icon (  ) in the top-right corner of the top bar.
Email alerts cannot be set for tickets that you follow. The updates about a followed ticket can be viewed in the Notification Center by clicking the notification icon at the top band.
7. How can I respond to tickets?
Now that you've received an open ticket, you must reply to it.The person who has sent the ticket initiates the conversation. Just above the conversation is the Reply All button, which can be used when there are multiple recipients for the ticket and you want to respond to all of them. Click the Reply All icon to open the editor window.
If there are multiple recipients involved and you want to reply to just the person who has sent the ticket, hover the mouse on the Reply All dropdown and click Reply (from inside the editor).
Within the editor, compose your response for the ticket. When you're done composing, click the Send button at the top of your editor window. This will complete your action of responding to a ticket. You can also click Send & Close to send a reply and close the ticket simultaneously.
Your recent response will now be listed just below the title of the ticket. You can view the date and the time at which you sent the reply.
8. How to manually log a ticket in Zoho Desk?
Customer queries can be received from various channels. Often there are instances when agents have to create a ticket on behalf of the customer.
- Follow-up with a customer who they met at an event.
- Log the issue or solution provided over a phone call.
- Enquiry from a customer who visits the store.
In any of the above cases, the agent would have to create a ticket to follow-up and maintain a record.
Agents have the ability to generate tickets within a designated department and specify the ticket source (e.g. phone, store visit) in the tickets record page of the Tickets module based on the customized layouts and fields.
To add a ticket, follow the steps below:
- From the Tickets module, click the
sign located in the top toolbar.
- Specify the appropriate Department (if you have more than one) where the ticket should belong to.
- Enter the requestor's Contact Name. You can select from the suggested contacts if the requestor is an existing user.
- Enter the requestor's Account Name. The account name field is auto-filled when you've chosen a suggested contact that has an account associated with it.
- Enter the requestor's Email Address and Phone. The email and phone fields are auto-filled when you've chosen a suggested contact that has these details.
- Enter the Subject of your ticket besides, other ticket properties that add context to the customer's request.
- Click Submit.
The customer will receive an email acknowledgment with the ticket ID and other related information.
Note:
- The system will add a new contact (with the name, email and other relevant details) when a ticket is created, if a contact is not present already.
- You can add attachments up to 20 MB while you create a ticket.
- The agent who created the ticket will be the ticket owner by default.
9. Can I close a ticket permanently?
No, Zoho Desk does not allow you to close tickets permanently without allowing your customers to reopen them.
10. How do I move tickets between departments?
When customers send emails to specific support email addresses for different departments, support administrators can set rules to automatically generate tickets and route them to the right department. It's important to promptly transfer a ticket to the appropriate department if it ends up in the wrong department, in order to ensure customers receive the necessary assistance.
Let's look at an example. When a customer submits a ticket for a product replacement, it's imperative to route the ticket to the pertinent products department, then to logistics team. This ensures a seamless process for getting the replacement to the customer in a timely manner.
Any user with Move Tickets permission can move tickets across departments.
If the All Departments view is selected, and:
- The selected view is Classic View.
- Click the Department displayed in the ticket.
- Select the appropriate department to move the ticket.
- The selected view is Compact View.
- Click on the Department displayed in the ticket.
- Select the appropriate department to move the ticket.
Hover on the required ticket and click Ticket Peek.
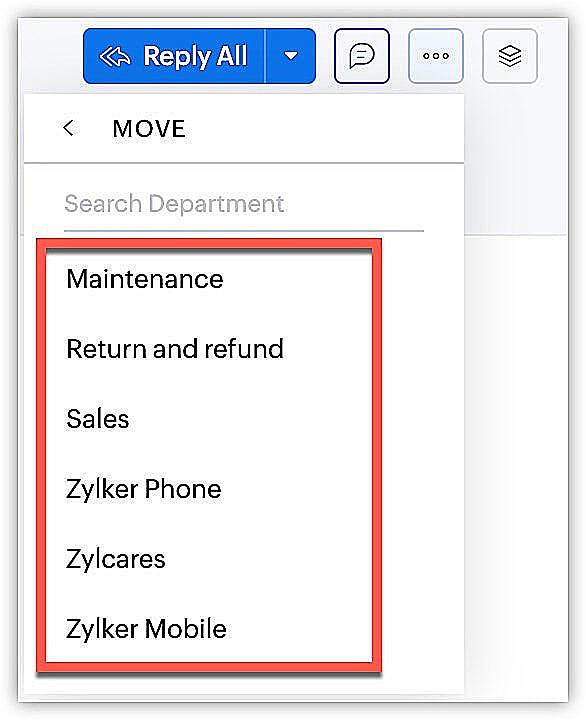
- In the Ticket View page, click More Actions.
- Click Move.
From the Department list, select the appropriate department to move the ticket.
Note:
- You can move tickets in bulk from Bulk Actions.
- Moved tickets will be considered new tickets in the receiving department and their status will be automatically set to Open in the receiving department. All the applied automations and SLA of the previous department will be erased and the ticket will adhere the process of receiving department after the moment of moving.
11. Can I associate more than one product with a ticket?
No, as products can be added as a lookup field in Tickets or other modules, only one product can be associated.
12. Can I change the starting number of the ticket IDs?
The system automatically assigns a distinct identification number to each ticket generated in Zoho Desk, starting with 101 for the first ticket and incrementing for each subsequent ticket. This unique ID can be utilized by both customers and agents as a reference for a specific ticket.
Notes:
- You cannot include character prefixes in ticket numbers.
- The ticket ID should contain at least three digits.
- You can only change to a number that is not already taken by a ticket.
- Changing ticket ID does not affect any current tickets existing in your account.
13. What is the difference between ticket comments and team feeds?
Comments and Team Feeds both allow collaboration within teams and between agents. However, they have different purposes. The table below highlights the major differences:
Comments | Team Feeds |
| Comments can be accessed within tickets, activities, articles, etc. | Feeds can be accessed under the Team Feeds section on the Tickets home page. |
| Comments are used to add extra information about a record. | Feeds is where you can share your views or discuss the question with co-workers . |
| Comments can be either private (viewable by you and your coworkers) or public (added by you or the customer). | Feeds is strictly for internal team collaboration that helps teams ideate, discuss, and work together. |
| You can mention other agents in a comment; they will be notified via email. | You can start a private conversation with other agents by sending a direct message within feeds. |
| Notifications can be triggered for comments if it is configured under Setup > Automation > Notify. | Notification can be sent to the users who follow or own a record. |
14. How do I prevent certain email addresses from creating tickets?
It is not uncommon for businesses to send newsletters, promotions, and greetings to your support mailbox. There are also situations where your support email address would be in cc of a conversation, or you receive notifications from third-party apps, firewalls, etc. These emails will spam your queues with unreal tickets, which can impact productivity.
By default, all the emails received in the support email address are created as tickets. In order to prevent tickets from specific email addresses, you can:
- Mark the unwanted tickets as spam a couple of times so that all future tickets from that contact will eventually be moved to the Spam folder without any need for manual intervention.
- Set up a server-side email inbox rule that filters the emails received from the specific addresses and then forwards them to Zoho Desk.
- Create a workflow rule under Setup > Workflows > Create Rule, and include a custom function (using this, API) that automatically deletes tickets received from specific email addresses.
15. How can I delete tags in tickets?
Tags are words or phrases that can be added to tickets to provide additional context, categorize, and help make it easy to find tickets. For example, you can tag tickets related to a service outage as "outage." Occasionally, multiple tags might be assigned to a ticket depending on the type of issue. Sometimes, we may not need specific tags, such as escalate or important to remain on a ticket once the relevant issue has been resolved. Maintaining your tags is essential for keeping your tickets easily searchable and reducing confusion.
To remove a tag from a particular ticket:
- Choose the desired ticket within the Tickets module.
- In the Tickets Detail page, navigate to the side bar and select the tags you wish to remove.
- Hover over the tag and click the (X) icon.
To delete a tag from the available list, follow the steps below:
- Select the Tickets module.
- On the Tickets List page, select Tags from the left panel.
- You will find tags listed under Recent and All Tags. Hover over a tag and click the (...) icon.
- Select Delete and confirm the message in the popup.
Click Save.
Note: Tags are department-specific and can be viewed in the Tickets module in the home page under the All Views section.
16. How do I merge tickets in Desk?
When users encounter issues or require assistance, they often feel the need to communicate urgency when reaching out to their support team. Consequently, they often create multiple tickets for the same problem across various communication channels. It's also common to receive tickets from multiple users addressing the same issue.
When responding to these tickets, agents may have already resolved or responded to one of the multiple tickets. To prevent confusion and streamline resolution, it's best to merge similar tickets.
Key facts to remember before merging tickets:
- Once the tickets are merged, they cannot be separated.
- Tickets that have been merged with the master ticket can be found in the Recycle Bin (Setup (
) > Data Administration > Recycle Bin).
- Email exchanges and other records, including comments, replies, and attachments, will be saved within the merged ticket. They'll be organized chronologically based on their creation time.
- Only tickets from the same department can be merged.
- You can merge up to five tickets at a time.
- Users who have Find and Merge permission can merge tickets.
To merge tickets, follow the steps below:
- Go to the Tickets module and select a Department in the top bar.
- Choose the tickets that need to be merged. You can search for tickets by user name, email, or creating a Custom View.
- Select the tickets, then click Merge from the mass actions list.
- The first ticket created will become the master ticket by default. You can also manually select a master ticket.
- Review the tickets and select the fields from which you want data to be retained in the master ticket.
- Click Merge in the top-right corner.
- Click Yes, Merge.
Note: The maximum number of tickets that can be selected for merge action is five.
17. Why can't I find the merge option for tickets?
To allow an agent to use the merge tickets option, follow these steps:
- Navigate to Setup (
) > Users and Control > Permissions.
- Under Permissions, click Profiles.
- In the Profiles Setup page, click the agent's profile to bring up the agent's permission page.
- Within Tickets Permission, toggle on the Find and Merge permission.
18. Why are the timestamps in the tickets showing an incorrect time?
The timestamp on tickets matches the time zone configured in the Zoho Desk account. By default, the time zone is determined based on the location provided during sign-up. If the UTC time is inaccurate, it can affect the timestamps, as it serves as the reference time in Zoho Desk. To correct this, an Administrator can adjust the time zone in your account settings under Setup > Customization > Personal Settings > Preferences.
To modify the time zone:
- Click the Setup icon (
) in the top bar.
- Click Personal Settings under Customization.
- Click the More link on the My Information page.
- From the Time Zone drop-down menu, select a default time zone.
- Click Save.
Check whether the timestamp on the ticket is reflecting the correct time.
19. Why am I unable to view closed tickets in the Work modes?
Closed tickets are not visible when viewing tickets in work modes like Countdown mode, Handshake mode, Status mode, and Priority mode. These modes are specifically set up to show only open tickets in order to reduce ticket traffic and focus on the tickets that agents work on daily. Closed tickets are intentionally not displayed in these modes.
To view closed tickets, you must switch to either Classic, Compact, or Table view under the Tickets tab.
20. Why does the account-contact relationship change when I update the ticket's account name?
Contact is the primary identifier of a ticket. You cannot create a ticket in Zoho Desk without associating it with a contact. Besides tickets, contacts are also associated with their respective accounts.
If the ticket's contact is not linked to any account and you update the account name on the ticket, agents will be prompted to update existing tickets. The contact will be linked to the new account automatically. However, if the contact is already linked to an account, agents will not be able to change the account from the ticket detail/edit view. If the agent removes/edits the account name, the contact will be automatically unlinked.
This is why you will notice that the account-contact relationship changes when you update the ticket's account name.
21. What's the difference between moving and sharing a ticket?
Move Ticket
What is it?
Sometimes, tickets are mistakenly sent to the wrong department by customers, such as a logistics-related ticket being sent to the product department. In these cases, the email should be transferred to the correct team to ensure the customer receives the necessary assistance.
When is it needed?
If a customer complains about receiving the wrong product and the email is mistakenly directed to the Order Inquiries team instead of the Product Returns team, the user with the Move Ticket permission must relocate it to the appropriate team to ensure a prompt and accurate resolution of the customer's issue.
If a customer complains about receiving the wrong product and the email is mistakenly directed to the Order Inquiries team instead of the Product Returns team, the user with the Move Ticket permission must relocate it to the appropriate team to ensure a prompt and accurate resolution of the customer's issue.
Share Ticket
What is it?
Good teamwork is essential for effective customer support. When there are multiple support teams in a company, sharing tickets plays a crucial role. This is similar to a relay race, where one team member starts the process and then hands over responsibility to the next team member at the appropriate time.
When is it needed?
Imagine a customer submits a ticket regarding a failed order and simultaneously notices an unprocessed charge on their credit card. In this scenario, resolving the customer's issue might require coordination with the department responsible for managing accounts receivable.
By sharing the ticket with this department and allowing their agents to provide necessary information, the company can efficiently reach a comprehensive resolution without complicating things from the customer's perspective.
The support administrator for your organization can set rules determining who can access tickets shared between departments, and what agents can do with shared tickets. This helps make sure the appropriate team handles the process and delivers effective support to the customer.
While both Ticket Sharing and Ticket Moving feature provide the ability for your agents to access tickets that are beyond their scope of viewing/editing, there are subtle differences between the two as described below:
Moving a Ticket | Sharing a Ticket |
| Ticket is transferred to another department. | Both departments can access and work on the ticket . |
| A ticket can be moved to only one department. | A ticket can be shared with upto 10 departments. |
| Agents get complete access to the ticket. | Access level can be decided while sharing the ticket. |
Once moved, agents lose control over the ticket in the source department. If the agent is added to the other department, they can access the ticket. Or else it will be inaccessible to them. | Once shared, agents get the access to the ticket in the parent department. |
22. Is it possible to update the notifications we receive in the desk?
When any change is made to a ticket or a task, a notification is sent to the agents to provide real-time updates. This keeps them informed about critical information and enhances effective communication, improving overall responsiveness and teamwork.
However, frequent and insignificant notifications can be distracting for an agent who may be occupied with a critical issue. Important notifications may also get lost amidst various other notifications or when they receive updates on low-priority tasks.
To avoid this, the feed preferences for a ticket and notifications for tasks can be customized for every department, allowing agents to receive only the updates that are most relevant to them.
Updating feed preferences
Go to Setup > Customization > Notification > Feed preference
23. Is there a way to customize the ticket view on the ticket home page?
The tickets module provides three default views: Classic, Compact, and Table view.
While classic and compact views don't offer customization, they only display the default fields such as ticket subject, status, owner, and no. of threads.
However, the Table view allows users to customize the ticket fields they want to view on the home page. Businesses can create a customized view for the ticket home page only for a particular department (user specific views table views cannot be created).
The Table View filter displays information like a spreadsheet with rows and columns, providing the flexibility to add or remove the properties of the ticket.
For example, if a user wants to view the ticket ID, assignee, due date, status, creation time, and subject without opening each ticket, they can select these columns from the filter. This conveniently displays all the relevant information in a single row, making it easier to manage tickets efficiently.
The following ticket fields are added to the table view by default:
- Ticket ID
- Subject
- Contact Name
- Account Name
- Customer Responded Time
- Email
- Due Date
- Status
- Ticket Owner
- Channel Phone
To customize the ticket list view
- Navigate to the Tickets module.
- Click the Classic View drop-down and select Table View from the drop-down.
- Click the Select Columns icon to add or remove the fields to be displayed as columns.
24. Can we prevent agents from replying to the tickets via email and require them to use comments?
Yes, organizations can prevent their support agents from sending email replies to the sender or requestor.
Some organizations prefer the customers to stay informed about the ticket progress and other details through comments; this can help them ensure complete transparency and also enable other customers to know the solution.
Admins can revoke the permission to send emails from the Tickets module, which will restrict all agents from replying to the tickets via email.
The agents can instead reply by posting a public comment to the ticket. The customers can view them in the help center.
25. Is it possible to quote a customer's response in a ticket?
When a customer raises a request or a query via email or other channels, it is always important to highlight that in the reply sent to a ticket.
Zoho Desk allows users to add the response in the format of a quote to help the agents not lose track and to stay updated on the requirements.
26. How to change the font style when replying to a ticket?
To change the font style within the reply editor, type the message in the reply area and click the "F" icon in the toolbar above. Then, select the desired font style to apply it to the text.

Alternatively, change the font of the ticket reply by following the steps below:
- Click the profile image in the top-left corner and select My Information.
- Go to Preferences.
- Click Ticket Default Preferences.
- Under Default Editor Font, choose the desired font style and font size for the email description and reply editors.

We hope that this list of frequently asked questions about Ticket Management is informative. If you still have questions that haven't been addressed, please drop a comment below or let us know here . We will be happy to discuss them with our subject matter experts and add them in the future. And please don't forget to share your rating below!