Qualtrics for Zoho Desk
Qualtrics is an experience management software that provides resources you need to manage, strategize, measure, and impact all aspects of the customer experience for your business.
With the Qualtrics for Zoho Desk extension, you can equip your agents with the ability to provide better customer support by adding templates and sending feedback survey emails automatically. By sending those surveys, you can get feedback from customers which is made available to your agents in Zoho Desk. Additionally, you can create contacts and multiple email templates in your Qualtrics account from Zoho Desk, and define conditions for emails to be triggered automatically based on users' responses.
Installing the extension
The Qualtrics extension can be installed either from the Zoho Marketplace or from your Zoho Desk account.
To install from Zoho Desk:
- Log in to your Zoho Desk account with Administrator privileges.
- Click the Setup icon (
) > Integration > Marketplace.
- Search for Qualtrics in the search bar on the right.
- Select the Qualtrics for Zoho Desk extension, then click Install.
- Under General Settings, select the Departments and Profiles whose agents can access the extension in Zoho Desk.
- Agree to the Terms of Use, then click Install.
- Click Authorize in the pop-up window to authorize your account for ZApps External Client service to activate this extension.
Click Create to create an OAuth Client ID for the integration; click Accept to allow Sigma to access data in your Zoho account. - Click Authorize in the pop-up to authorize your account for Zoho OAuth service to activate this extension.
Click Accept to allow DRE to access data in your Zoho account. - Click Authorize in the pop-up to authorize your account for Qualtrics for Desk-Qualtrics service to activate this extension.
Sign in with your Qualtrics account credentials.
Upon successful installation, you will be taken to the Preference tab where you can define the extension settings as per your preference.
Configuring extension settings
With this extension, agents can send surveys to their customers in two ways: manually or automatically. By default, every agent can send the surveys manually once the basic configuration is done. For automated survey emails, you should configure the additional settings as given below.
Basic configuration
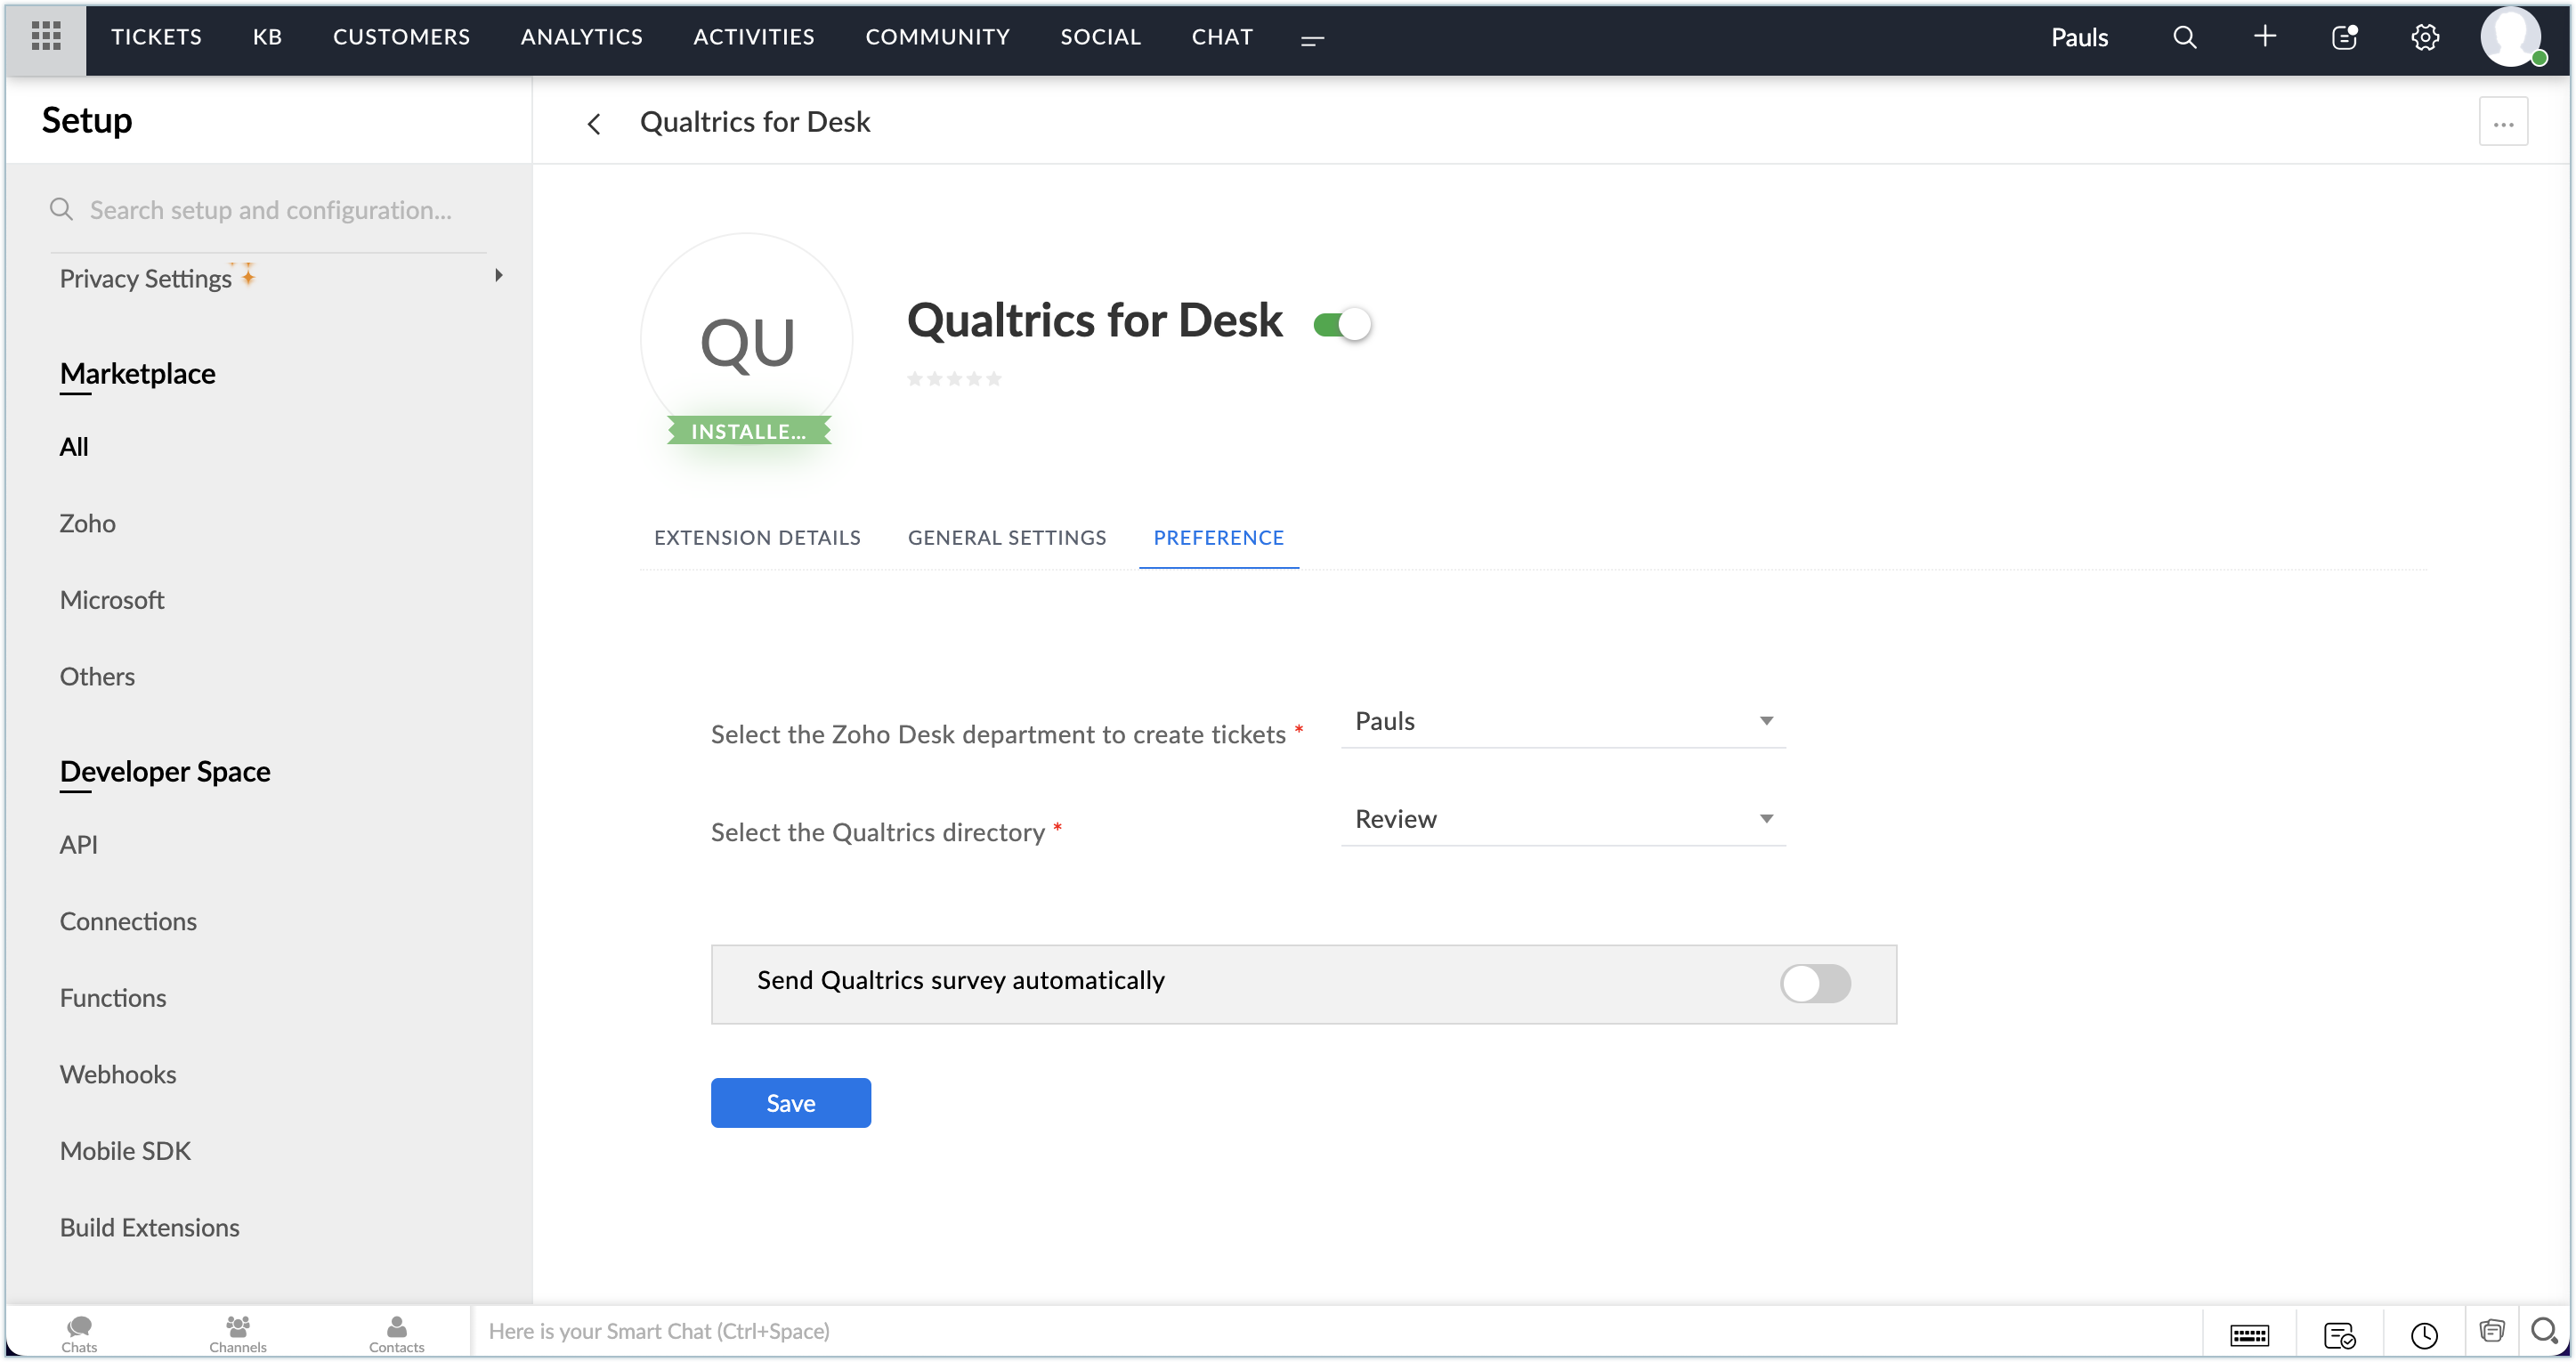
Once installed, you need to configure the required Zoho Desk department and the Qualtrics directory. Based on this configuration, the support tickets from customers will be housed within the respective department automatically.

Automated survey configuration
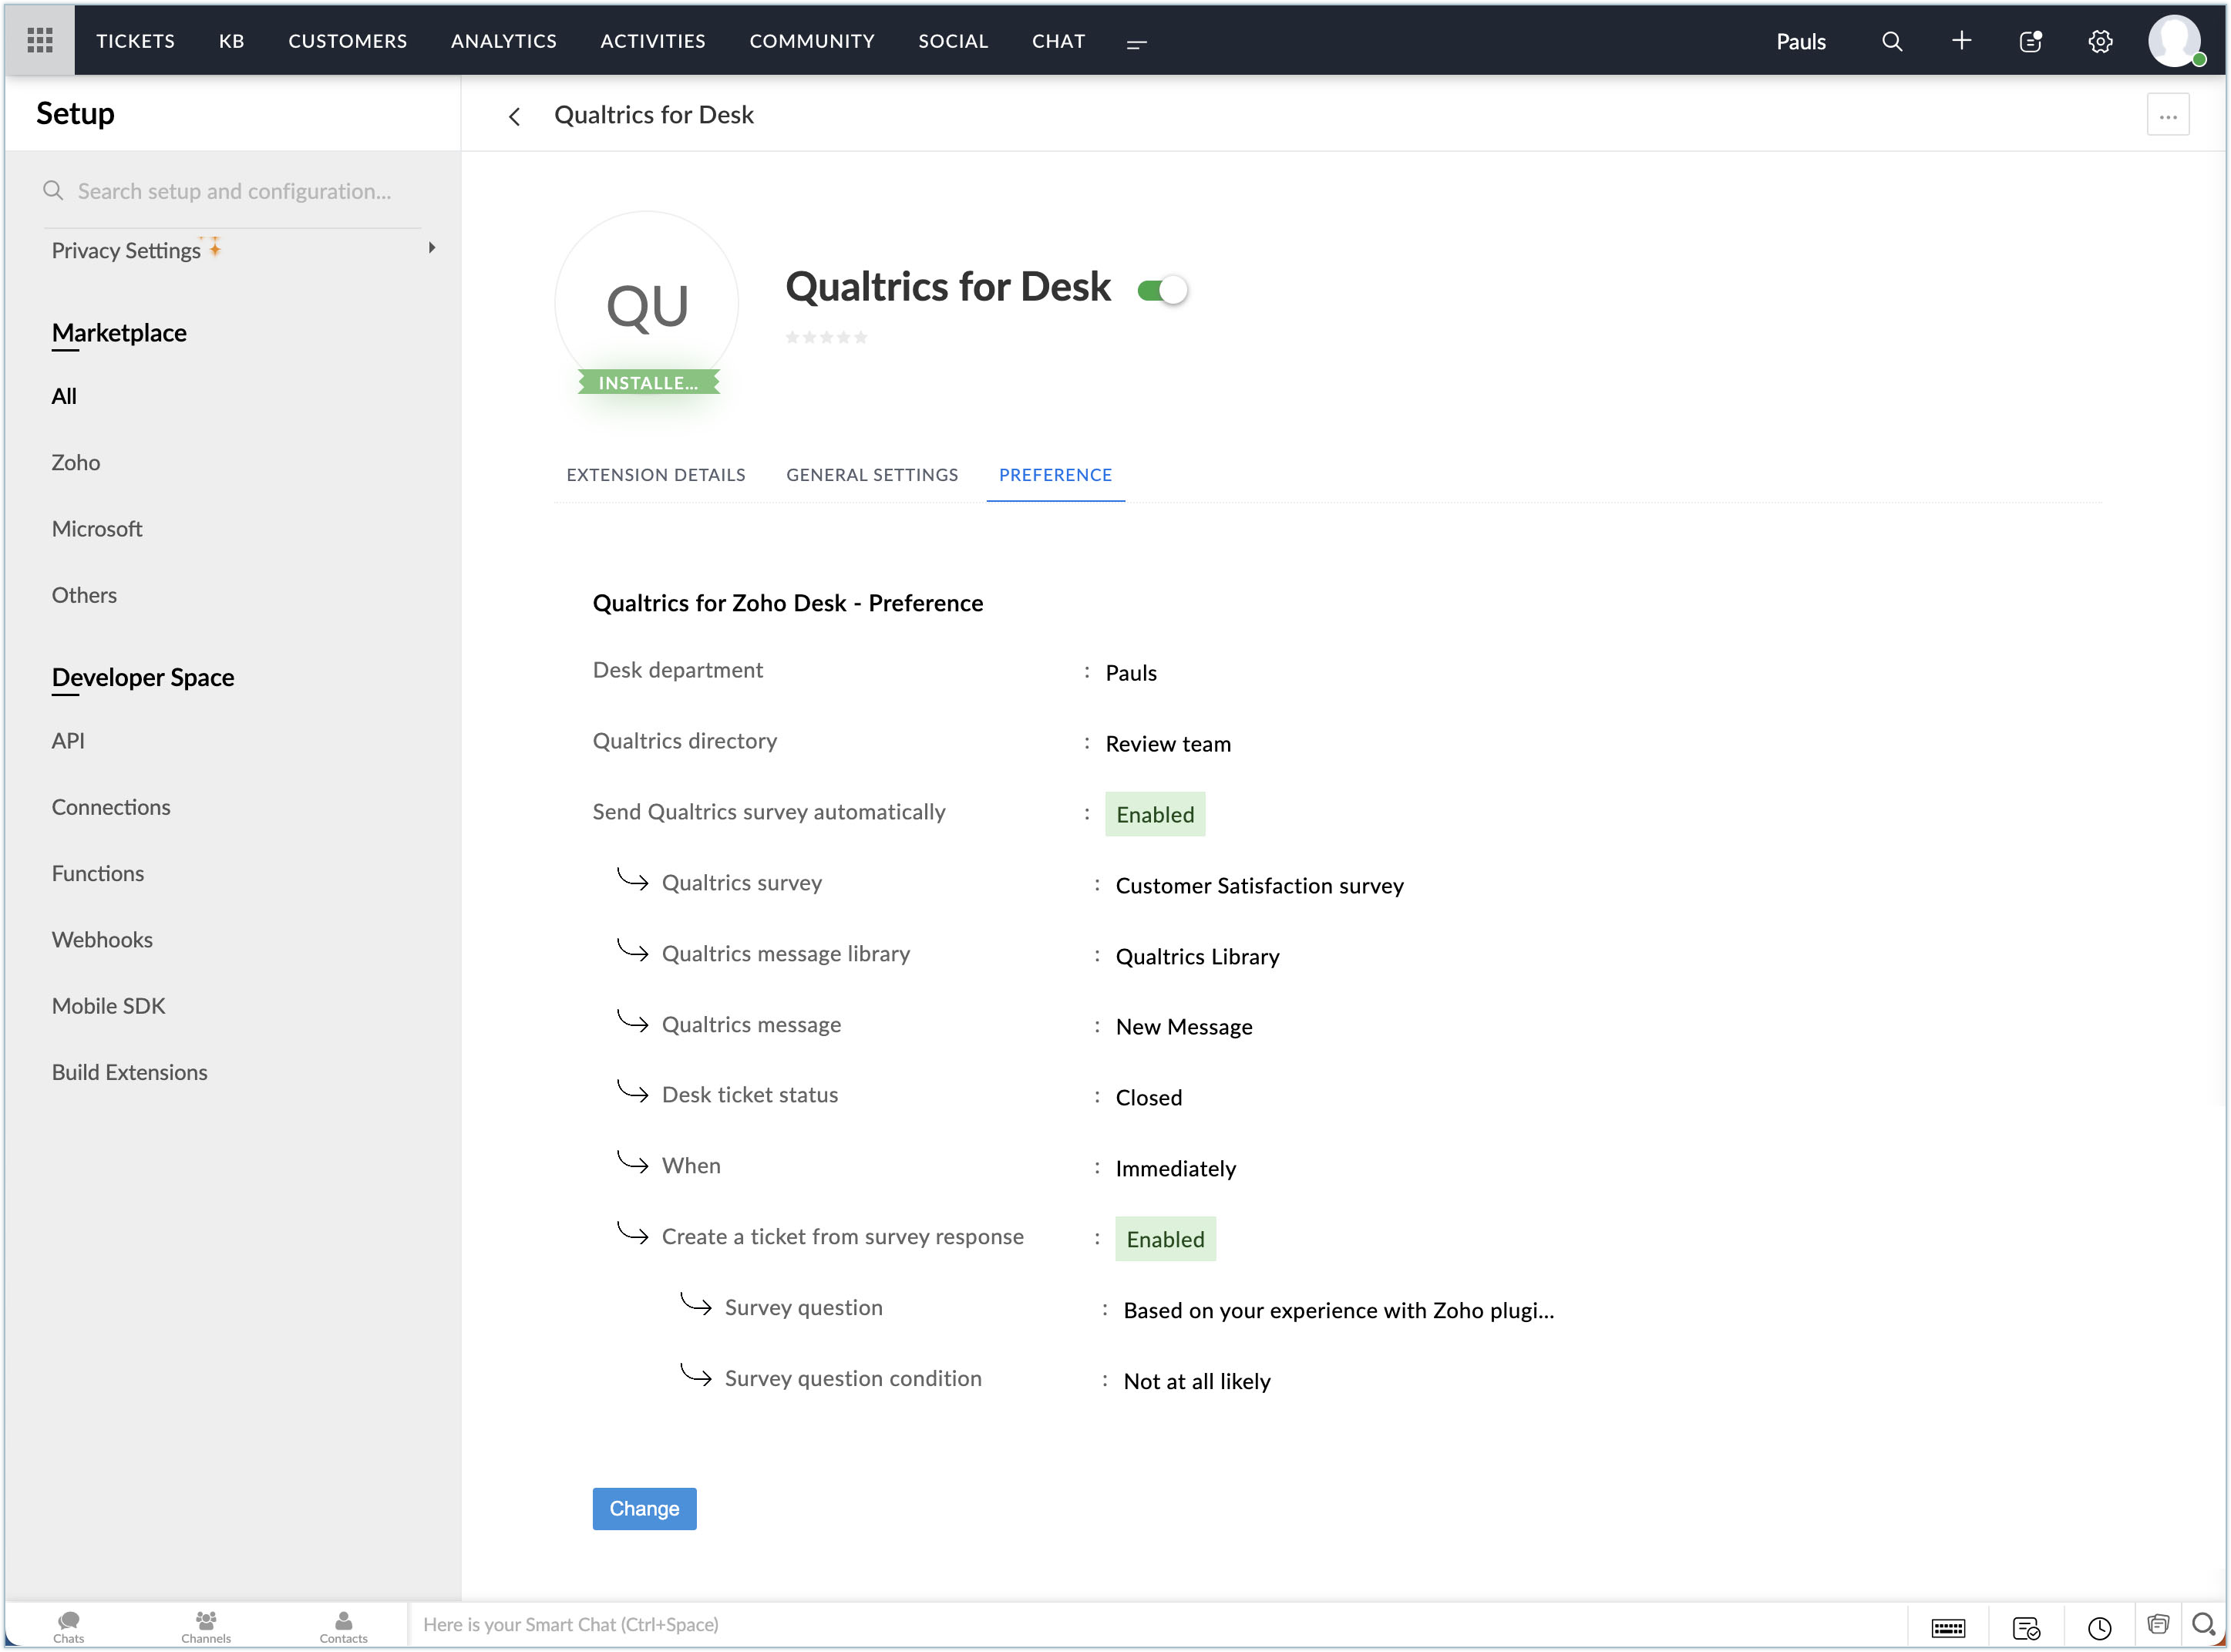
You can opt to send Qualtrics surveys to your customers automatically with conditions defined. Whenever the defined conditions are met, an appropriate Qualtrics survey will be sent to the customer from the Zoho Desk.
To configure Qualtrics survey settings:
- In the Preference tab, toggle the option to enable Send Qualtrics survey automatically.
- Choose the survey to be sent to the customer.
The list of surveys available in your Qualtrics account will be displayed. - Under Qualtrics survey automatically trigger conditions:
- Choose a Message Library from the drop-down.
- Select the Message to be sent from the drop-down.
- In the Ticket status field, choose what action triggers the survey to be sent.
- In the When field, define the timeline in which the survey is to be sent.
- Check the Create a ticket for survey response option if you want further automated actions once the customer responds to the survey.
- Select a Question from the drop-down.
This question is one of the questions present in the survey sent. - Select a Condition from the survey.
If the given condition for the question satisfies, a new ticket will be created. - Click Save.
All the settings defined can be altered anytime by the administrator.

Adding customers to Qualtrics
Whenever the agent receives a ticket from a new customer who is not in the Qualtrics records, the extension will identify the customer based on email and notify you on the widget to add the customer to Qualtrics.
To add the customer:
- Click on Click here in the extension widget.
- The email ID will be auto-filled from the ticket.
- Enter the first name and last name.
- The Directory will be auto-filled based on your extension settings.
- Click Add Directory Contacts.
The contact will be added in Qualtrics. You will be asked to add the contact to any contact list in Qualtrics, if any. - Select the contact list from the drop-down.
- Click Add.
You can also add customers to Qualtrics from the Customers module of Zoho Desk by following the same steps in the module.
Sending surveys to customers
Support agents can send surveys to customers manually from the extension if the automatic survey option is not enabled in the extension settings. Even if the automatic survey option is enabled, agents can send surveys manually whenever required.
To send surveys manually:
- Open the ticket to which the survey is to be sent.
The list of surveys sent, if any, will be displayed. - Click Distribute Survey.
- In the pop-up window, select the survey and click Next.
- In the To field, the email ID will be auto-filled from the ticket.
- In the When field, define the timeline in which the survey is to be sent.
- Enter a subject for the message.
- Select the message to be sent from the drop-down.
The message will be populated in the description. - Click Send.
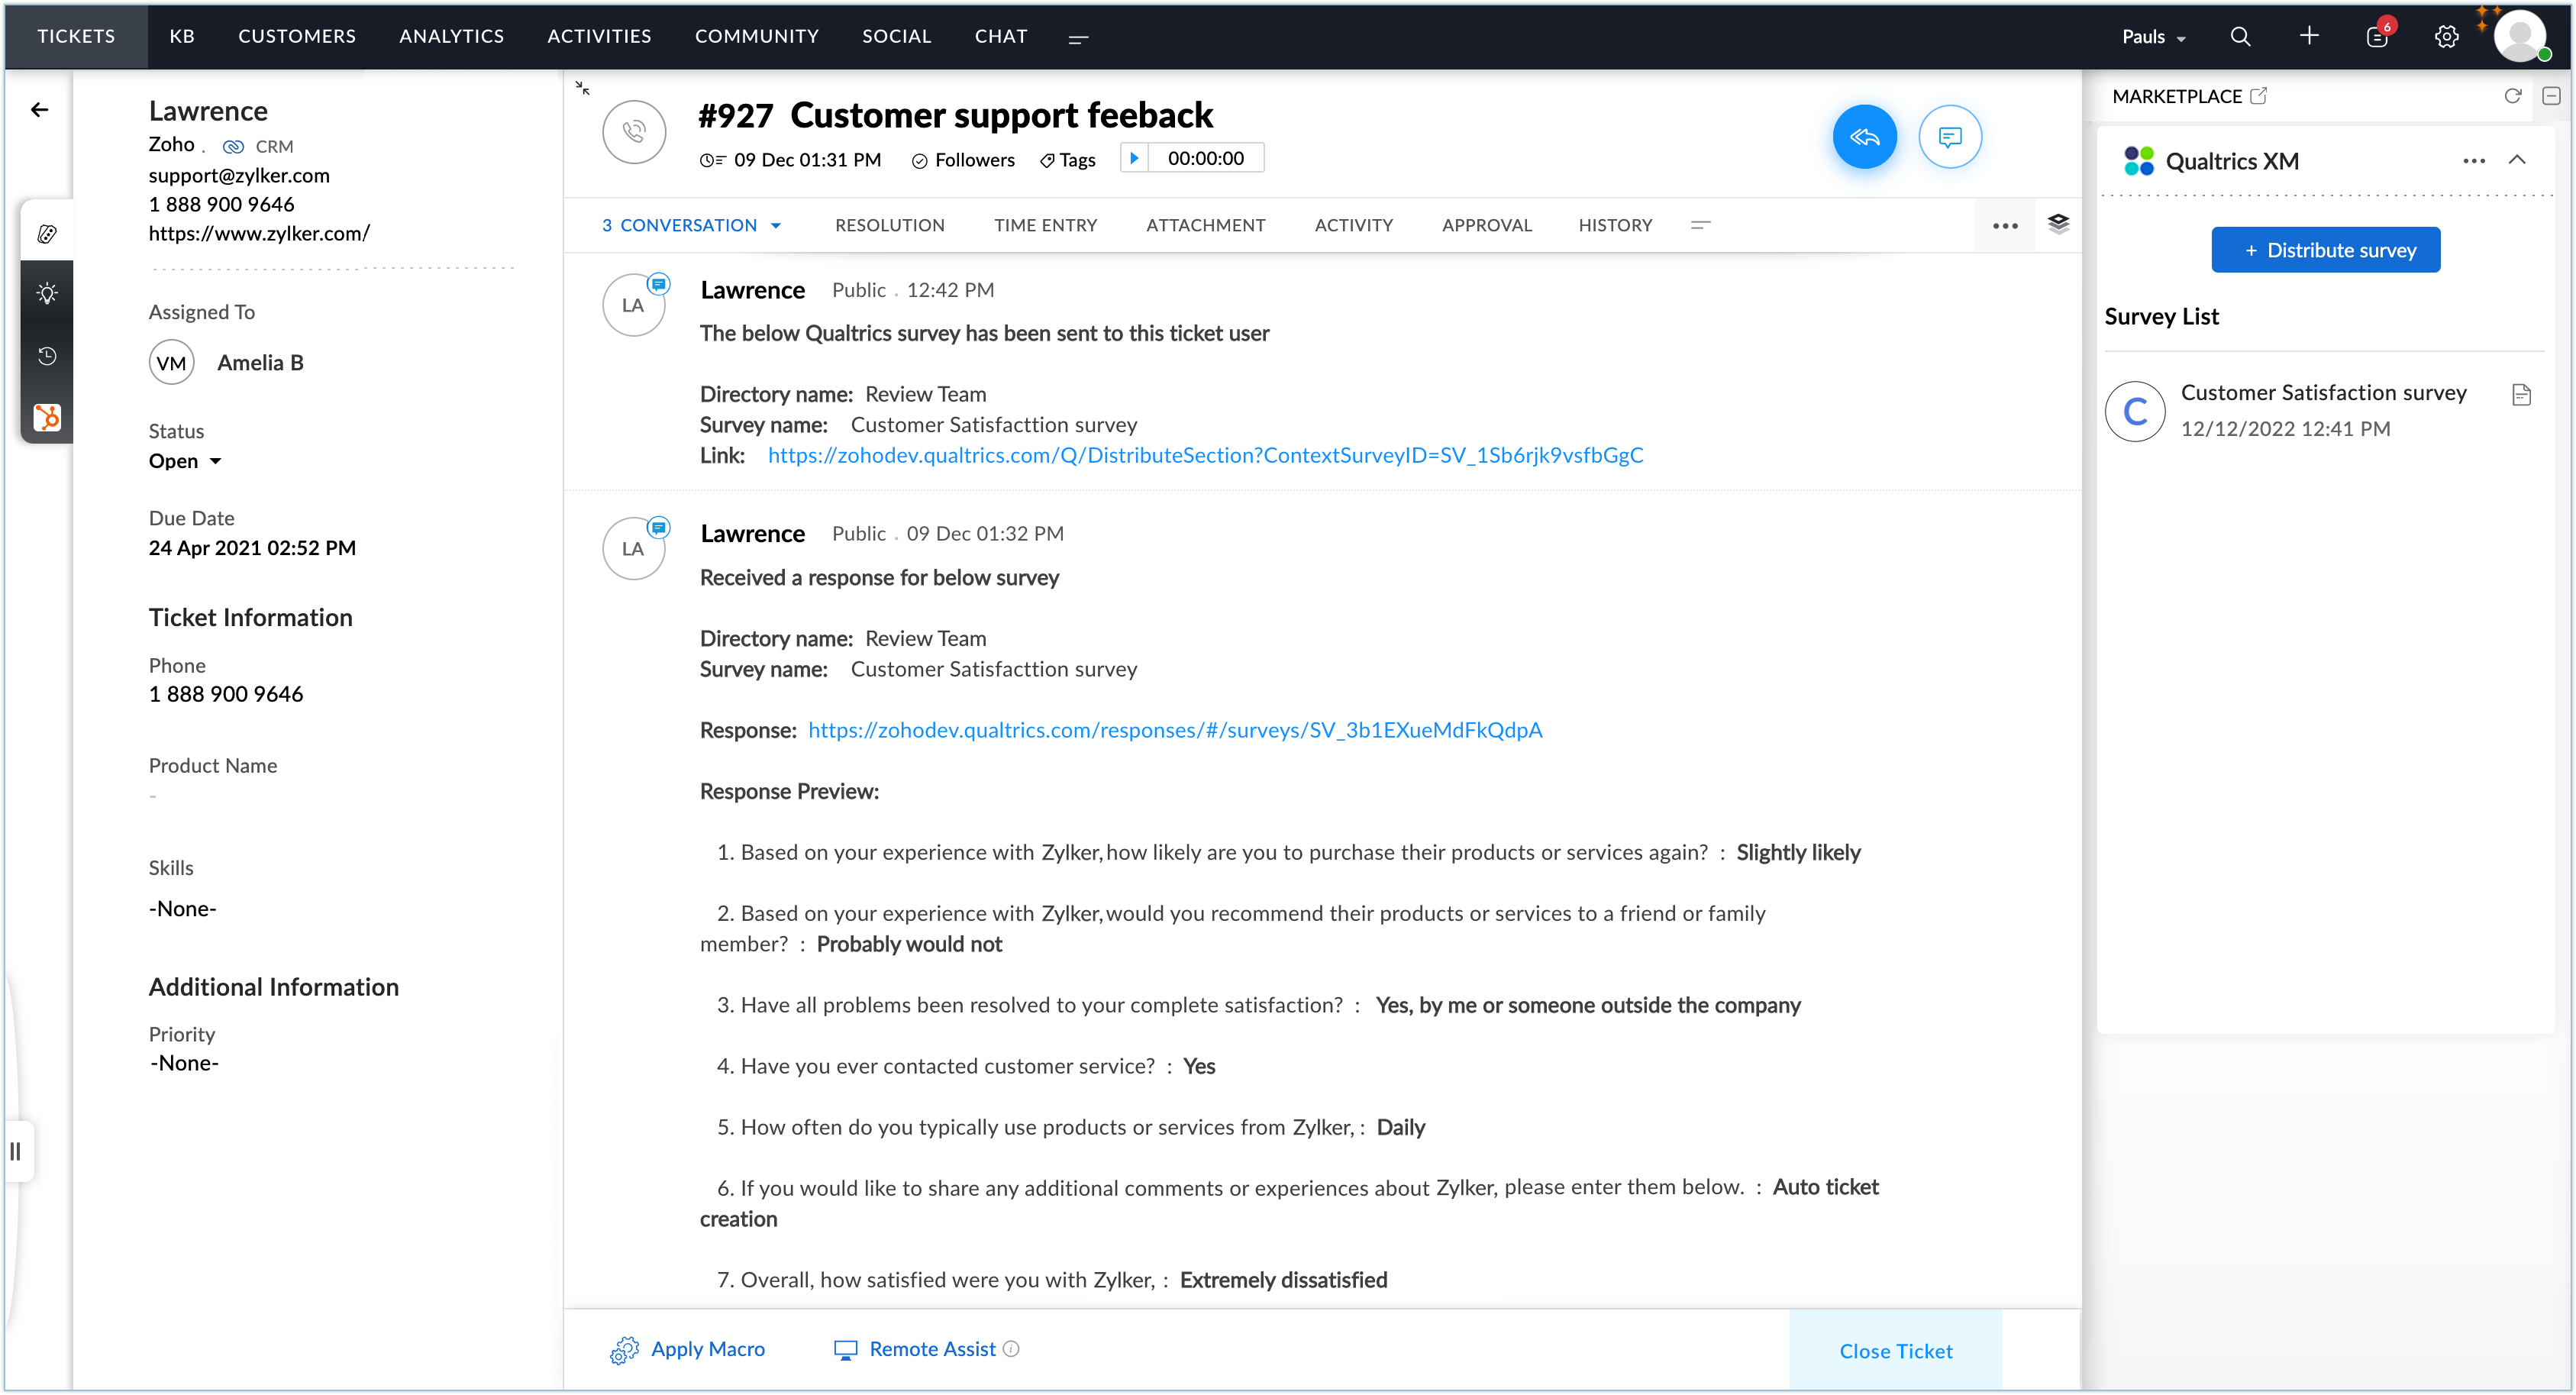
The details of the survey sent will be shown in the ticket thread. Based on your extension settings, a new ticket will be created once the customer responds to the survey.

Before you send the survey, you can preview the survey by clicking on the Preview button, where you will be redirected to the Qualtrics webpage.
To preview the survey:
- In the Distribute Survey pop-up, click Preview.
You will be redirected to the Qualtrics webpage in a new tab. - Under Preview, click on Preview Survey.
You can also edit the survey from here, if required. - The survey preview, both on web UI and mobile UI, will be displayed.
Uninstalling the extension
- Go to Setup > Integration > Marketplace.
- On the Setup Landing page, click All under Marketplace.
- On the Marketplace page, click Installed Extensions.
- Choose Qualtrics from the list of extensions.
- Click the More icon (
) in the upper-right corner of the Qualtrics extension setup page.
- Select Uninstall Extension.
- Click Confirm.
Zoho CRM Training Programs
Learn how to use the best tools for sales force automation and better customer engagement from Zoho's implementation specialists.
Zoho DataPrep Personalized Demo
If you'd like a personalized walk-through of our data preparation tool, please request a demo and we'll be happy to show you how to get the best out of Zoho DataPrep.
Centralize Knowledge. Transform Learning.
All-in-one knowledge management and training platform for your employees and customers.
New to Zoho Writer?
You are currently viewing the help pages of Qntrl’s earlier version. Click here to view our latest version—Qntrl 3.0's help articles.
Zoho Sheet Resources
Zoho Forms Resources
New to Zoho Sign?
Zoho Sign Resources
New to Zoho TeamInbox?
Zoho TeamInbox Resources
New to Zoho ZeptoMail?
New to Zoho Workerly?
New to Zoho Recruit?
New to Zoho CRM?
New to Zoho Projects?
New to Zoho Sprints?
New to Zoho Assist?
New to Bigin?
Related Articles
SurveyGizmo for Zoho Desk
Quickly respond to customer feedback by viewing survey responses right from Zoho Desk. The SurveyGizmo extension allows you to send surveys to your customers directly from a ticket's detail page. You can also view customer responses right from Zoho ...Admins Guide to Get Started With Zoho Desk
Help Desk is a department in an organization that is in charge of providing the support needed by customers while using the company's product or a service. Customers contact the help desk when they have a question or a problem and a product expert ...Zoho Survey Extension for Zoho Desk
The support desk is an indispensable part of any organization. Not only do they attend and resolve customer issues, but they help better the relationship between the company and its customers. But how do you ensure that you are carefully monitoring ...Measuring Customer Happiness in Instant Messaging
Getting genuine, useful feedback after a chat support interaction shouldn’t feel forced for you or your customers. With Zoho Desk, you can gather honest feedback without interrupting the conversation flow. This guide covers how Customer Satisfaction ...Business Messaging in Zoho Desk vs. Live Chat in Zoho SalesIQ: A Comprehensive Business Decision Guide
Introduction As businesses strive to deliver exceptional customer experiences, real-time communication has become a necessity. However, not all customer interactions require the same approach. Some interactions require structured workflows and ...
New to Zoho LandingPage?
Zoho LandingPage Resources


