Users who have the create permission can build the guided conversations flows. Similarly, users who have view and edit permission can perform relevant actions.
What are GC flows?
Flows are a series of constructed blocks that define the GC bot's conversational journey. Each block represents a step in the conversational flow, and the entire flow guides how the bot responds to end-user inputs, automates tasks, and provides information.
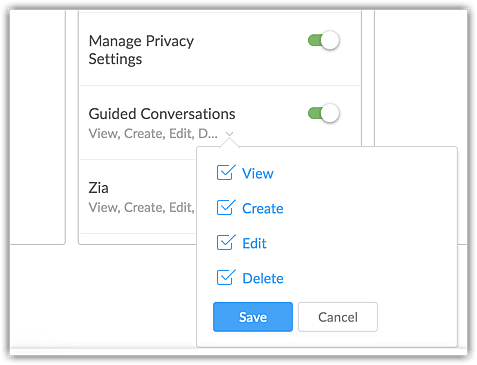
Steps to set profile permissions:
1. Navigate to Setup > User and Control > Permissions > Profile.
2. Select a profile.
3. Under Administrative profile, toggle Guided Conversations.
4. Select Create, View, Edit, or Delete as required.
Steps to create a flow:
- Navigate to Setup > Self Service > Guided Conversations.
- Select the department in which you want to build the conversation flow.
- Click Create Flow.
- Choose how you want to create the flow:
- Start from Scratch to build a Custom Flow.
- Use a Template to begin with a pre-built structure
4. If you choose custom flow option, Create Flow form opens.
5. In the Create Flow form:
- Select the Target Audience (All users, Agents only, or Specific agents).
- Enter the Flow Name.
- Choose the Channels where the flow will be deployed.
- Select the Default Language (or add more languages)
- Enter an optional Description.
- Click Create Flow.
The centralized dashboard will be displayed to manage the languages, customization and share options.
6. Click on the Language to open the builder.
7. Click the Add icon (

) in the builder to start adding the block of your choice.
Steps to add a Display block to the flow
1. In the Display block, select Text message or Info card.
Text Message - Enter the Message and Block Name and click Save.
Info card - Select Card Type: Static or Dynamic.
If you choose Dynamic, choose Rendering Style: Single or Multiple.
In Card Info List, upload an image, enter title, subtitle, and description.
If there are Multiple Cards, then enter the above information for all cards.
Click Add Card Field to include more fields like Text or Button.
If you choose Static Card, click Add Card to include more than one card.
c. Enter the Block Name.
2. Click Preview Block or Save.
Steps to add a question block to the flow
1. Select the type of question block.
2. Enter Block name and Input variable.
The options will vary based on the type of block. For example, for number block you must select the number type.
3. In Advanced Settings, toggle the Skip Block or End Block, if needed.
4. Click Preview Block or Save.
Steps to add a choice block to your flow
1. Select any of the Button types, Dynamic Button, or Choice Card.
2. Select the Button Type: Single or Multiple.
3. In the Button list, enter the Button Name and click Add Button.
4. Toggle Create Path.
5. Enter the Block Name and Input variable.
For Dynamic Button, enter an Error Message (eg., "Something went wrong, please restart the chat to try again").
6. Select the Card Type: Static or Dynamic.
7. Enter text in the Question field.
8. Select the Button Type: Single or Multiple.
9. In Card List, enter the necessary details.
10. In Advanced Settings, toggle the Skip block or End Block, if needed.
11. Click Preview Block or Save.
12. Add more blocks in the same fashion to complete the flow.
Adding variables to the GC flow
1. On the far left side of the Guided conversations builder, click(  ). The Variables panel will appear.
2. Select a variable type from the drop-down (Global, Local, or Session).
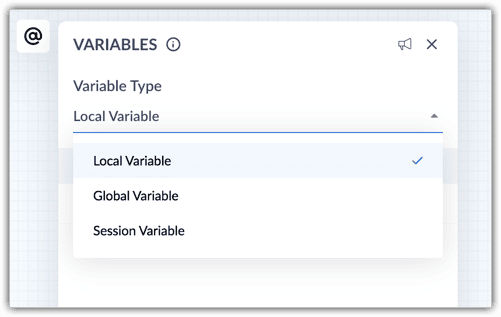
3. Select the variables from the available list. The variables created before will be listed here; you can choose from those.
From within the flow, you can only create Block and Local variables.
4. Click Save.
Create a local variable from the flow
1. On the far left side of the Guided conversations builder, click the Variables icon (  ).
).
2. The Variables panel will appear.
3. Under Variable Type, select Global variable from the drop-down.
4. Click Add Local Variable.
5. Enter the following details in the form:
6. Variable Name - Name of the variable
7. Variable Type - Data type of the variable: String or Number
8. Variable Value - Value to be assigned to the variable
9. Description - A brief description of the variable
10. Click the Save button.
How to create flows for specific IM channels
A chat-based, guided approach can help users navigate their way through the process with ease. To facilitate this, organizations can build exclusive flows for different channels, such as the web, mobile (iOS and Android), Telegram, Messenger, LINE, Facebook Messenger, and BM.
Some blocks are not supported in every channel. For example, the Info card is supported in the web version, but not in WhastApp. So while the admins can create a single flow for all channels, they need to carefully chalk the process to ensure the flow is built using a common set of blocks that are supported across channels. Depending on the requirement, it would be best practice to create flows for individual channels.
To create flows for specific channels
1. Navigate to Setup > Self Service > Guided Conversations.
2. Select the department in which you want to build the conversation flow and click Create Flow.
3. On the Create Flow page, choose the messaging Channel for which you want to create the flow.
You can choose all the channels: Web, WhatsApp, LINE, Instagram, Messenger or iOS, Android.
4. Enter Name and Description for the conversation flow and click Next.
Publishing a Conversation Flow
After building the conversation flow, it's time to publish.Once you have built the conversational flow, in order to share it with the end-user, you have to publish the flow first.
Publishing the flow doesn't mean it will be available on your website for end users; it only means that the flow is available for the GC Widget to access.
Steps to publish the flow
1. Navigate to Setup > Self Service > Guided Conversations.
The conversation flows are listed under Flows, Deleted Flows.
2. Click the the that need to be published.
3. Open the default language builder to preview the flow.
4. Click Preview to review the flow before publishing.
5. Preview opens a chat window, enabling you to examine whether the conversation flows as intended.
6. Verify the flow, make any changes if needed, then click Publish when you are ready.
If you want to publish the flow in multiple language, you can use the option Publish All Languages in the builder.
You can see details about who created the flow and by what time it was created.
Points to note when creating a flow:
The Save Draft option lets you save the flow midway so that you can resume working on it later.
A maximum of 25 unique flows can be created in one department. Inclusive of the published, deleted flows and drafts.
Only users with the appropriate permissions can create, edit, and delete GC flows.
You can add up to 500 blocks in a single flow. If you reach this limit, use the jump block to link another flow or delete unnecessary blocks.
If you close the block listing without saving, unsaved changes will be lost.
Use the preview option to review the conversation flow before publishing to ensure it meets your expectations.
To evaluate the performance of the flow you have built, published, and pushed live, you can review its flow metrics.


