Global Choice List
you'll see options to The Global Choice List feature in Zoho Forms allows you to create a list of predefined choices that can be used across choice-based fields in multiple forms within your Zoho Forms account. This means that instead of manually typing out the same choices for different forms, you can simply select the global list with the predefined choices. This helps in reducing the likelihood of errors due to inconsistent choices across multiple forms.
Lets say you have multiple forms across your organization that require employees to select their department when they submit a form. Instead of manually typing out department names every time you create a form for your employees, you can create a global choice list with options like Sales, Marketing, Finance, Operations, etc., and associate this choice list with a choice field in all relevant forms. Additionally, if you ever need to update or add new departments, you can do so in the Global Choice List, and the changes will automatically apply to all associated forms.
Creating a Global Choice List
The first step before you can start showing up the predefined choices of a global choice list in the choice fields of a form is to create a Global Choice List.
To create a Global Choice List,
- On the forms listing page, in the left pane under Setup, click Control Panel.
- Click Global Choice List under Developer Space.
- Click Create New List. You can create lists under the Choices or Grouped Choices tabs as required.
A Global Choice List created under the Choices tab can be associated with Dropdown, Radio, Multiple Choice, and Checkbox fields in your form.
A Global Choice List created under the Grouped Choices tab can be associated only with the Dropdown field. - Enter a name for the List and provide the names of the choices (and group names if you are creating a list under the Grouped Choices tab).
- You can sort the choices alphabetically in ascending or descending order, with the option to enable or disable Case Sensitive sorting. Learn More
- You can import choices to add a list of choices in bulk, copy the added choices to create a similar choice list and assign or import values to the choices to perform calculations using the Advanced option as shown.
- Click Create. Once a Global Choice List is created, you can:
- Edit the list
- Translate the choices in the list so that they appear in the corresponding languages in translated forms.
- View the forms that a choice list is associated with.
Know more about managing a Global Choice List.

Note:
- You can create a maximum of 100 lists under Choices and Grouped Choices tabs each.
- The maximum number of choices you can add under the Choices tab is 1000.
- The maximum number of group names you can create under the Grouped Choices tab is 50 and the maximum number of choices you can add under each group is 300. The maximum number of choices you can add under the Grouped Choices tab altogether is 2500.
Publishing a Global Choice List to your organization
You can share a choice list that you have created with the users in your Zoho Forms organization, so that it can be associated with their own forms. This avoids the need to re-create the same set of choice lists by members of your organization.
To publish a choice list to your organization,
- Hover over the choice list that you wish to publish to the organization.
- Click the Publish to Org icon.
3. Click Yes to continue.
4. Once published, the list will be represented by  icon to indicate that it's shared with the organization.
Org Lists
Org Lists are the list created and published by a user that can be used by other users within the organization. To view the list published by other users in the organization, click the Org Lists section.
Viewing Org Lists Translated Languages
If a user wishes to view the languages in which a Org Lists Choices are translated into, then
- Hover over the choice list that you wish to view.
- Click the Translated Languages icon to view the languages in which the choice list are translated.
Viewing Org Lists Choices
If a user wishes to view the choices in the Org Lists, then
- Hover over the choice list that you wish to view.
- Click the View icon corresponding to the list.
Unpublishing an Org List
If you wish to unpublish the choice list to your organization, click the Unpublish to Org icon under My List.
Note: You cannot unpublish a choice list, if any forms in your organization use it. You need to remove that connection first to unpublish the choice list.
Sharing a Global Choice List privately within organization
If you prefer to share a global choice list with only specific users rather than making it accessible to the entire organization, this option can come handy.
How to Share a Global Choice List
- Go to My Lists and hover over the Share icon.
2. In the pop-up, enter the email address of the user(s) you want to share the list with. The email address must be an active, existing part of the organization to be able to share the list.
3. You can also opt to enable the Notify Users checkbox to send a notification.
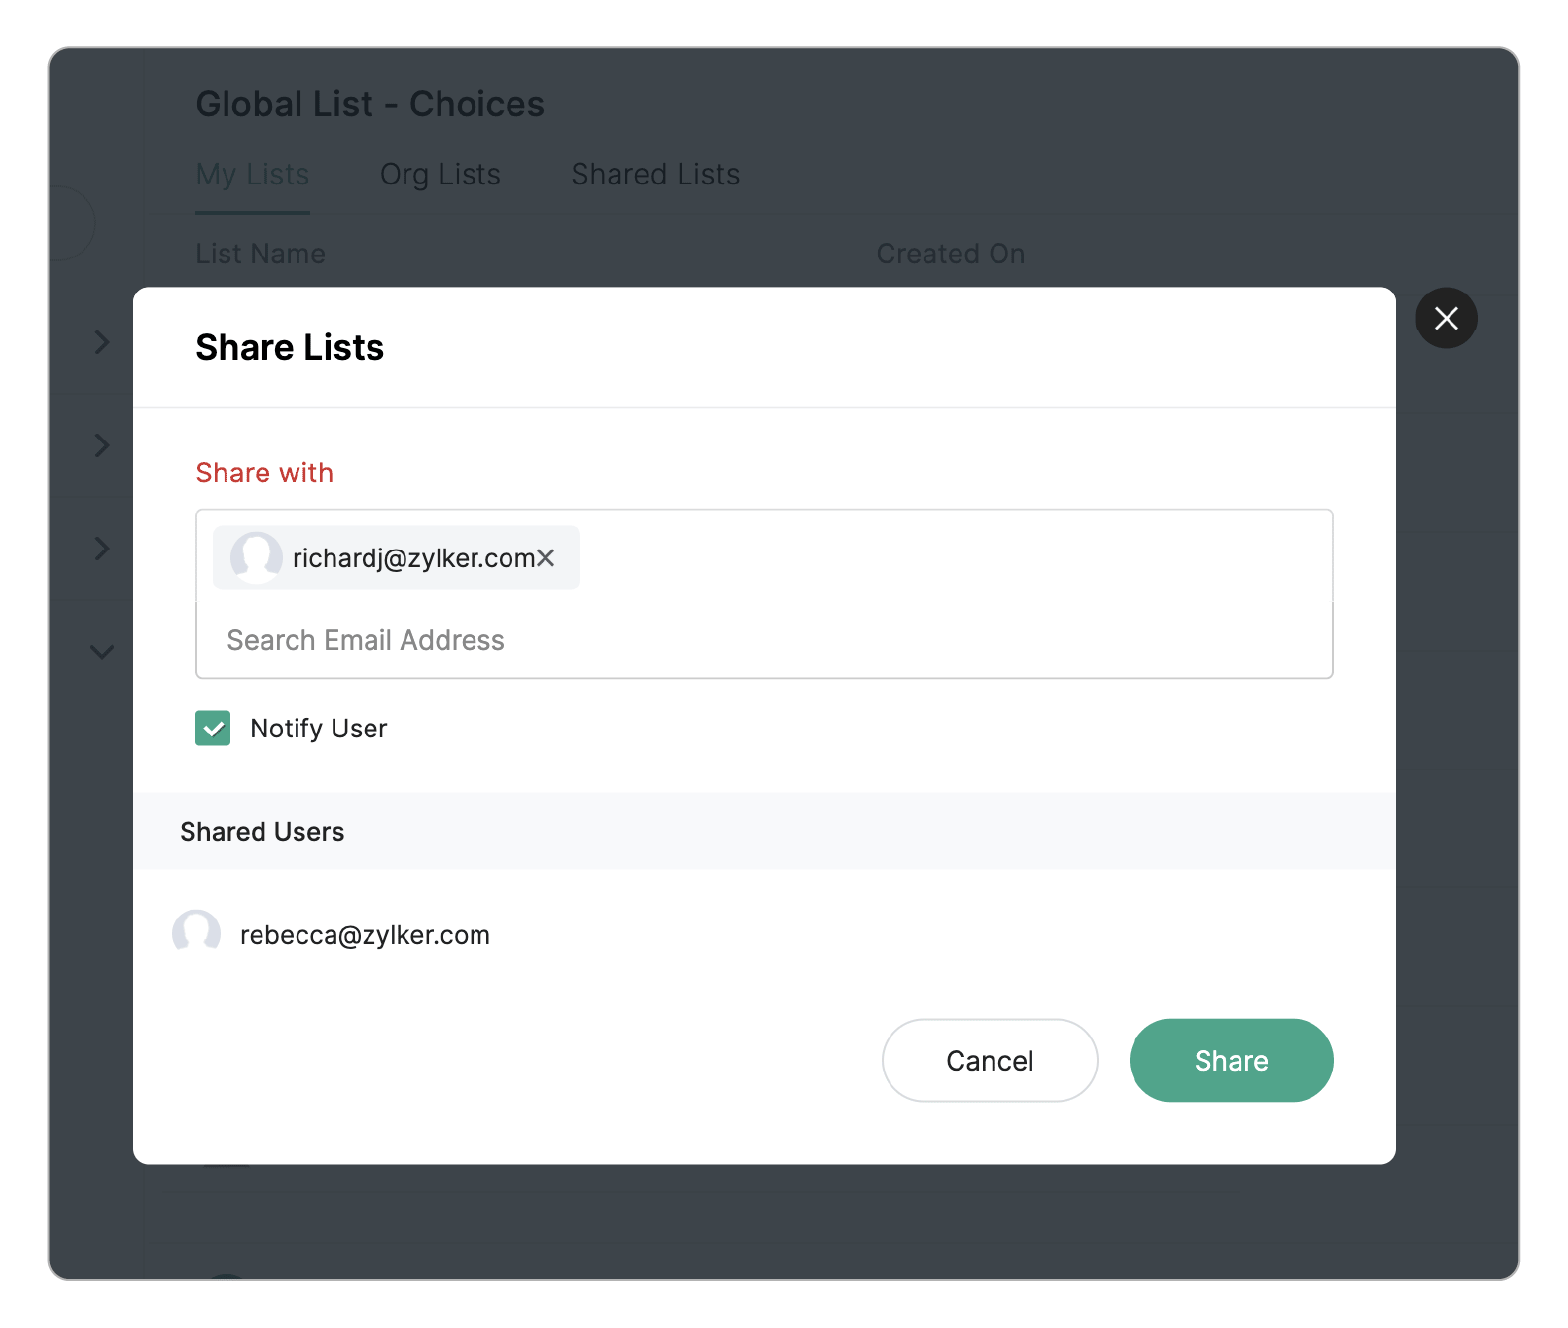
4. Under Shared Users, you can view the list of users you have shared the global choice list with.
4. Under Shared Users, you can view the list of users you have shared the global choice list with.
Shared Lists
In the Shared Lists tab, you can view all global choice lists shared with you along with the users who shared them.
Upon hovering over the choice list, you will be able to see options to Edit the list, Translate the choices and view the Usage of the Shared List.

Note:
1. You can share a Global Choice List with upto 25 users at a time.
2. If a form is shared as a co-owner, all global choice lists associated with that form owner will automatically appear under the respective lists.
1. You can share a Global Choice List with upto 25 users at a time.
2. If a form is shared as a co-owner, all global choice lists associated with that form owner will automatically appear under the respective lists.
3. Sharing a List and accessing Shared Lists are only available from the Standard plan.
Associating a Global Choice List with a choice field in a form
Once you have created the required choice lists in the Control Panel, you can now associate them with the choice fields in different forms.
When you associate a Global Choice List with a choice field, the choices will be added only to that particular choice field and will not affect any other choice fields of the form.
For example, you have a Leave Application Form with 2 choice fields: Department and Reporting Manager Email. You must individually associate the appropriate Global Choice List to each of these choice fields and any configuration made in one field will not impact the other.
For example, you have a Leave Application Form with 2 choice fields: Department and Reporting Manager Email. You must individually associate the appropriate Global Choice List to each of these choice fields and any configuration made in one field will not impact the other.
To associate a choice field in your form with a Global Choice List,
- In your form builder, open the field properties of the choice field that you wish to associate.
- Under Choice List, select Use Global List option.
- Select the desired list name from the Choose From dropdown to associate it with the choice field.
-
The lists created by you will be listed under My Lists.
-
Any list published to the organization by other users will be listed under Org Lists.
Any list that has been shared with you by other users will be listed under Shared lists.
-
If the form has been shared to you with the Modify Form or Modify Form, Entries, Reports permission, you will be able to see the choice lists created by the form owner and can associate those lists to the choice fields in the form.
-
You can view the languages to which the choice list is translated by clicking the Translated Languages icon and to view the choices in the list click the View Choices icon.
-
- You can set the initial value that will be pre-filled when the live form is loads. The initial value set for one choice field will not automatically carry over to any other choice field in the form that is linked to the same Global Choice List. Each choice field retains its own independent initial value set.
Managing a Global Choice List
To update the choice lists, view the usage of the lists, create translations of the choices, or delete the holiday lists:
- In your Zoho Forms account, click the
icon in the top-right corner to access the Control Panel.
- Click Global Choice List under Developer Space.
Updating a Global Choice List
At any point of time, if you wish to add any choices or remove any added choices or assign values to the choice in a choice list,
- Hover over the choice list that you wish to update.
- Click the Edit icon corresponding to the list as shown.
- Make the required changes and click Update.
Translating choices to another language
You can show up the choices in a language that corresponds to a translated form. This is useful when you have created multilingual forms using the Language Translation feature. You can translate the choices to a language that your form is translated into and when you share the translated form, the choices will be displayed in the same translated language.
To translate the choices,
- Hover over the choice list that you wish to translate and click on the
icon.
- Click the Translate icon as shown.
- Select the language that you wish to translate the choices into from the dropdown and click Translate. You will see the translated version of the choices. You can edit the translations manually if you wish to and click Save. The languages that the choices have been translated into and saved will be listed.
- If you have modified a choice list after saving the translated choices, you will have to re-translate the modified choices for the changes to reflect in the corresponding live translated form. To re-translate choices, click the edit icon corresponding to the language that you wish to re-translate into, click Edit manually, make the changes and click Re-translate.
Note:
- You can translate the choices to a maximum of 10 languages.
- Ensure that the choice list is translated into the same language as the translated form. This ensures that the translated form loads with the holiday names displayed in the same translated language.
- If a form is shared in a language that doesn't correspond to the languages that the choice list has been translated into, the choices in corresponding choice field of the form will be displayed in the default language.
Viewing the usage of a Global choice List
To know the forms that are associated with a Global Choice List,
- Hover over the choice list for which you wish to view the associated forms and click on the
- Click the Usage icon as shown.
- In the pop-up, you will see the list of forms that are associated with that choice list.
Delete a Global Choice List
To delete a global choice list that you have created,
- Hover over the choice list that you wish to delete and click on the
- Click the delete icon as shown.
Note: If the choice list that you wish to delete is associated with any forms, you will have to first remove their association with the list before you can delete it.