Thank You Page & Redirection
Overview

You can also choose to display a Splash Message for a few seconds to your respondents while they are redirected.

Importance of Acknowledgement & Redirects for your forms
- Acknowledgment message prevents users from wondering whether their form submission went through.
- After submitting a form entry, being redirected to another form, such as a Feedback form allows respondents to provide instant feedback that reassures them their submission was successful.
- Offering acknowledgments reflects professionalism, showing that your business values users' time and input.
- Acknowledgment messages can include details about the next steps, expected timelines, or links to related links, enabling you to further engage users.
- Customize acknowledgment messages to align with your brand identity.
Thank You Page
Setting up Thank You Page
-
In your form builder, navigate to Settings > General > Thank You Page & Redirection.
- You can either choose a plain text or a rich text format to customize your thank you page.To display a simple text message in the Thank You page, select Plain Text option, and enter the message to be displayed. You can also generate content using Zoho's AI assistant, Zia by clicking the
icon.
To provide useful links, include bullet points, create tables, format text messages, include form responses and personalize the Thank You page, select the Rich Text option.You can change the font style of the text message from the Font Family dropdown. Note: If you wish to choose any web font other than the Default Fonts available, click Manage Fonts. Learn more about changing the font style.
 - To provide your respondents with a link to submit another entry in the Thank You Page, select Include a link to allow respondents to add another response.
-
To provide your respondents a link to download the PDF of form submission in the Thank You Page, select the Include a link to download PDF of submitted response in the Thank You Page option.
To add Google Analytics and Facebook Pixel tracking codes and measure each form submission as a goal, select Add Google Analytics or Facebook Pixel tracking code.
Tracking using Google Analytics
Universal Analytics
-
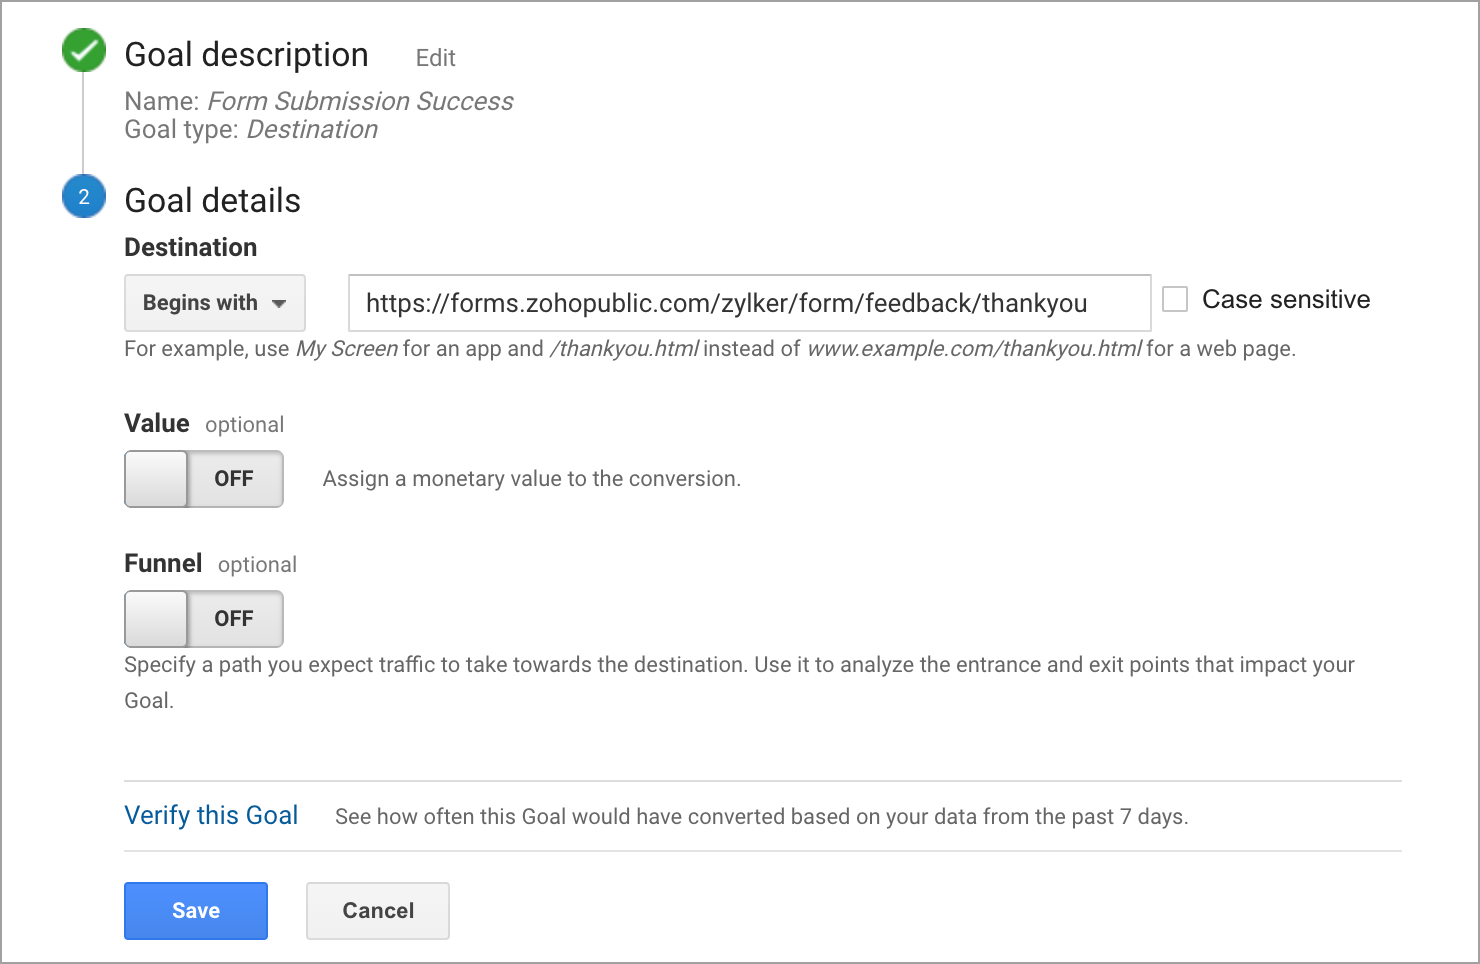
Set up a Destination goal in Google Analytics.
-
Under Goal details, choose Begins with and enter the Thank You Page URL of your form .
-
You can also enter a value and a path if you wish to assign a monetary value and track your website traffic path.
Click Save.
After completing the above pre-requisites in Google Analytics,
-
Select Add Google Analytics or Facebook Pixel tracking code under Thank You page settings in Zoho Forms.
-
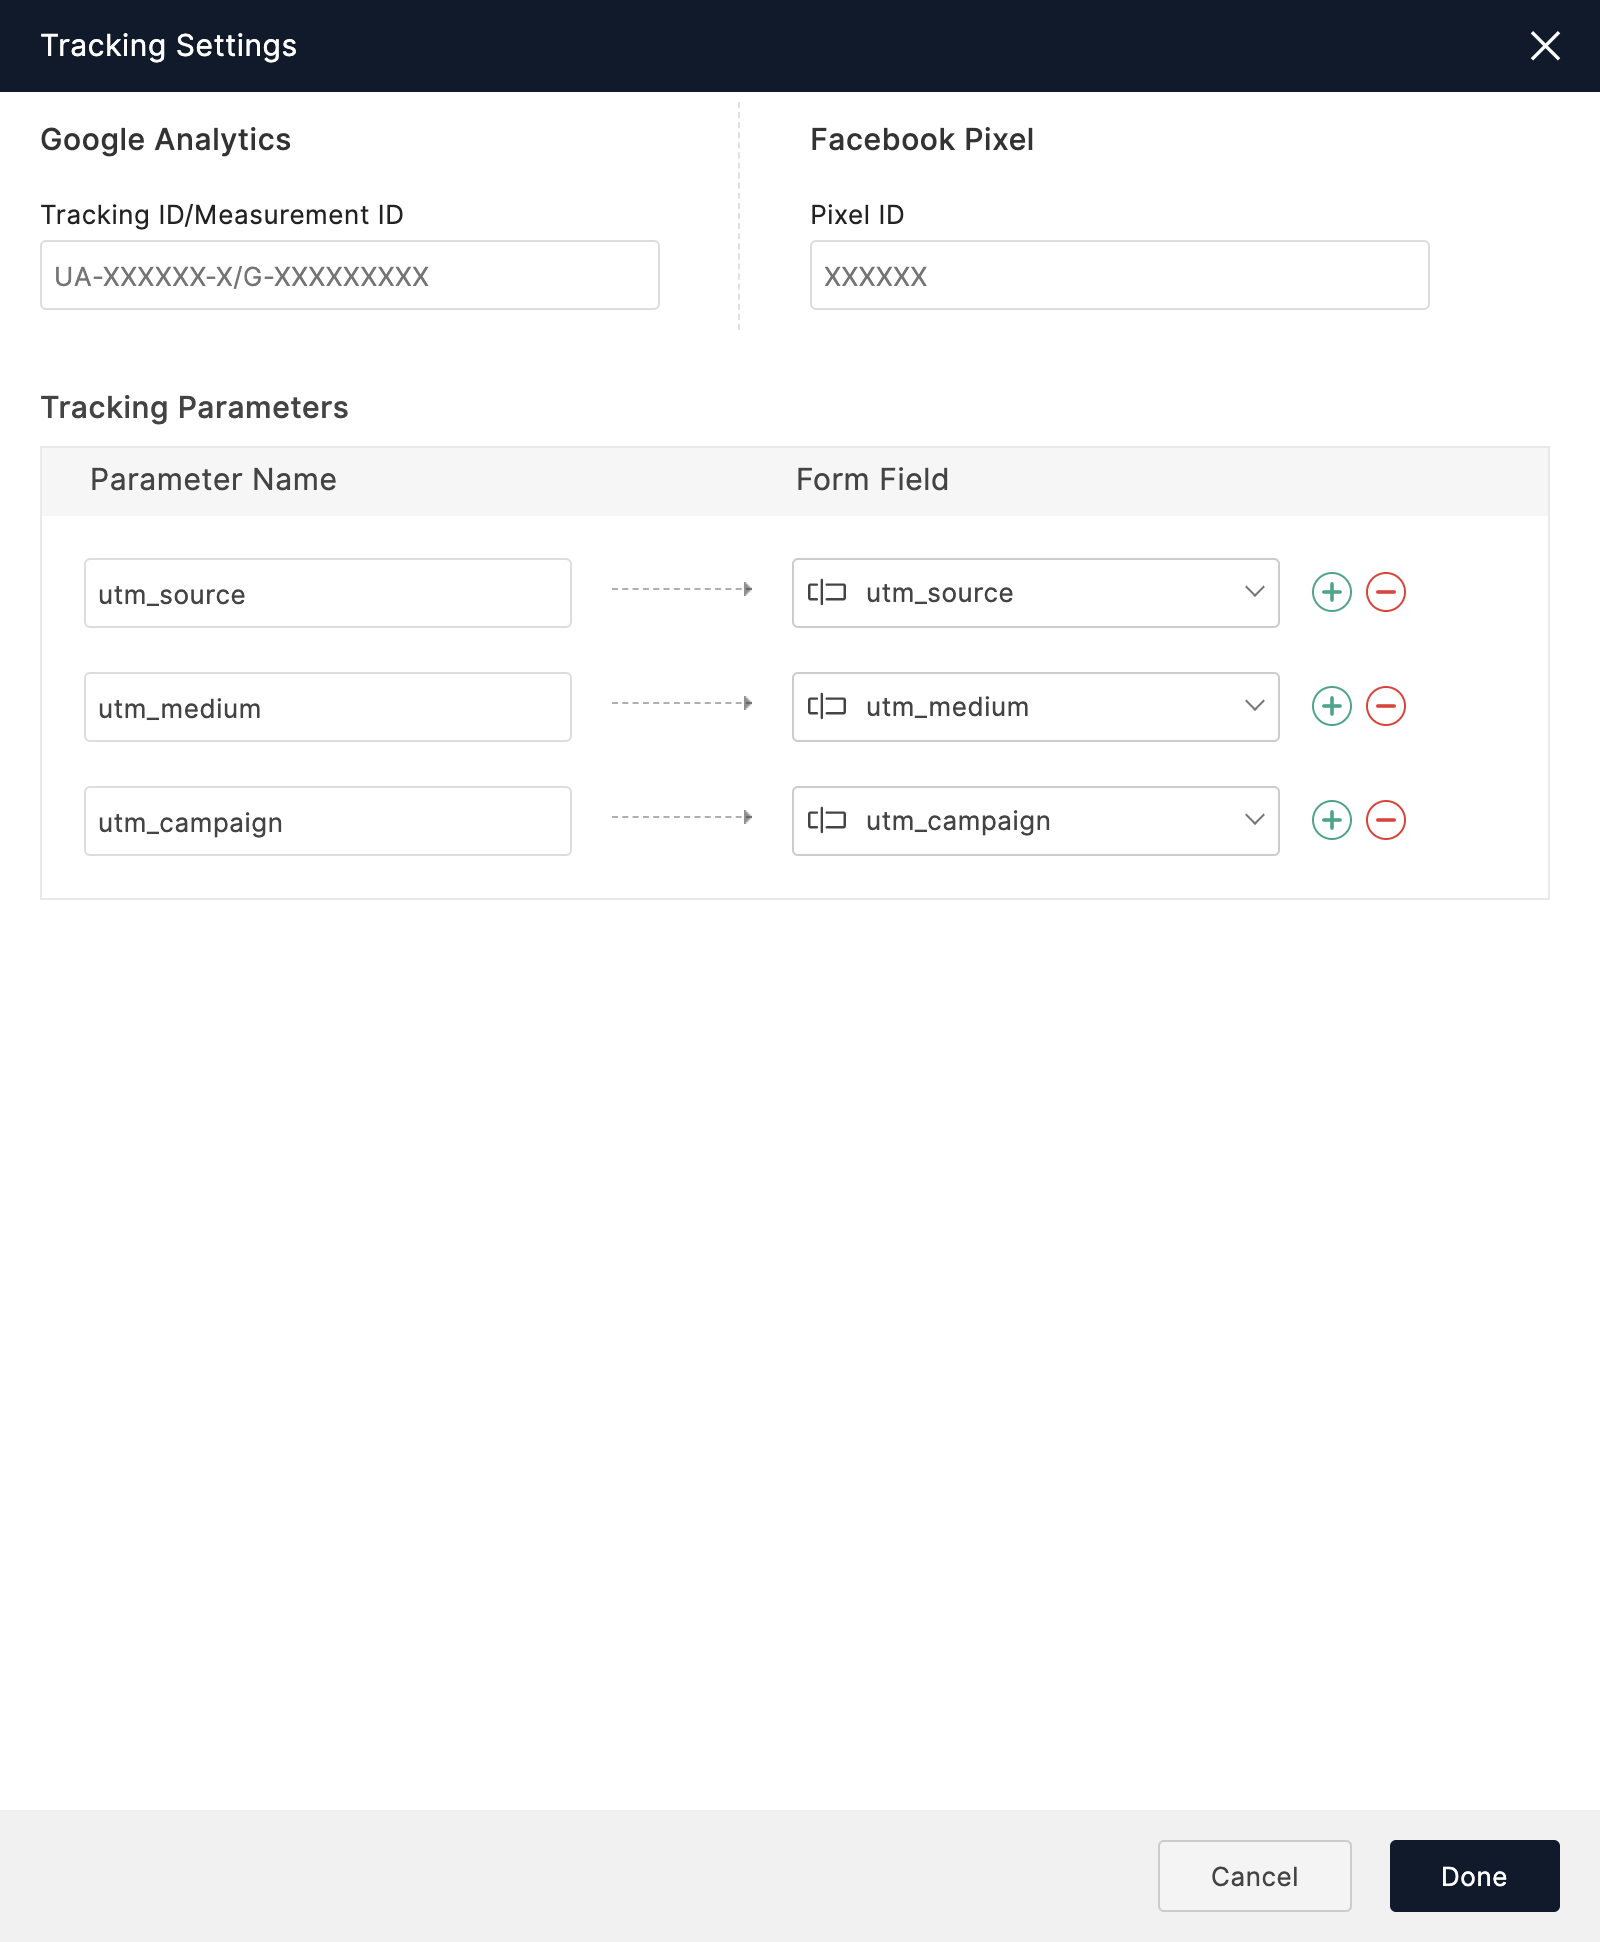
In the Tracking Settings popup, enter the Google Analytics ID (Eg.: UA-000000-2) in the Tracking ID field.
Google Analytics 4
-
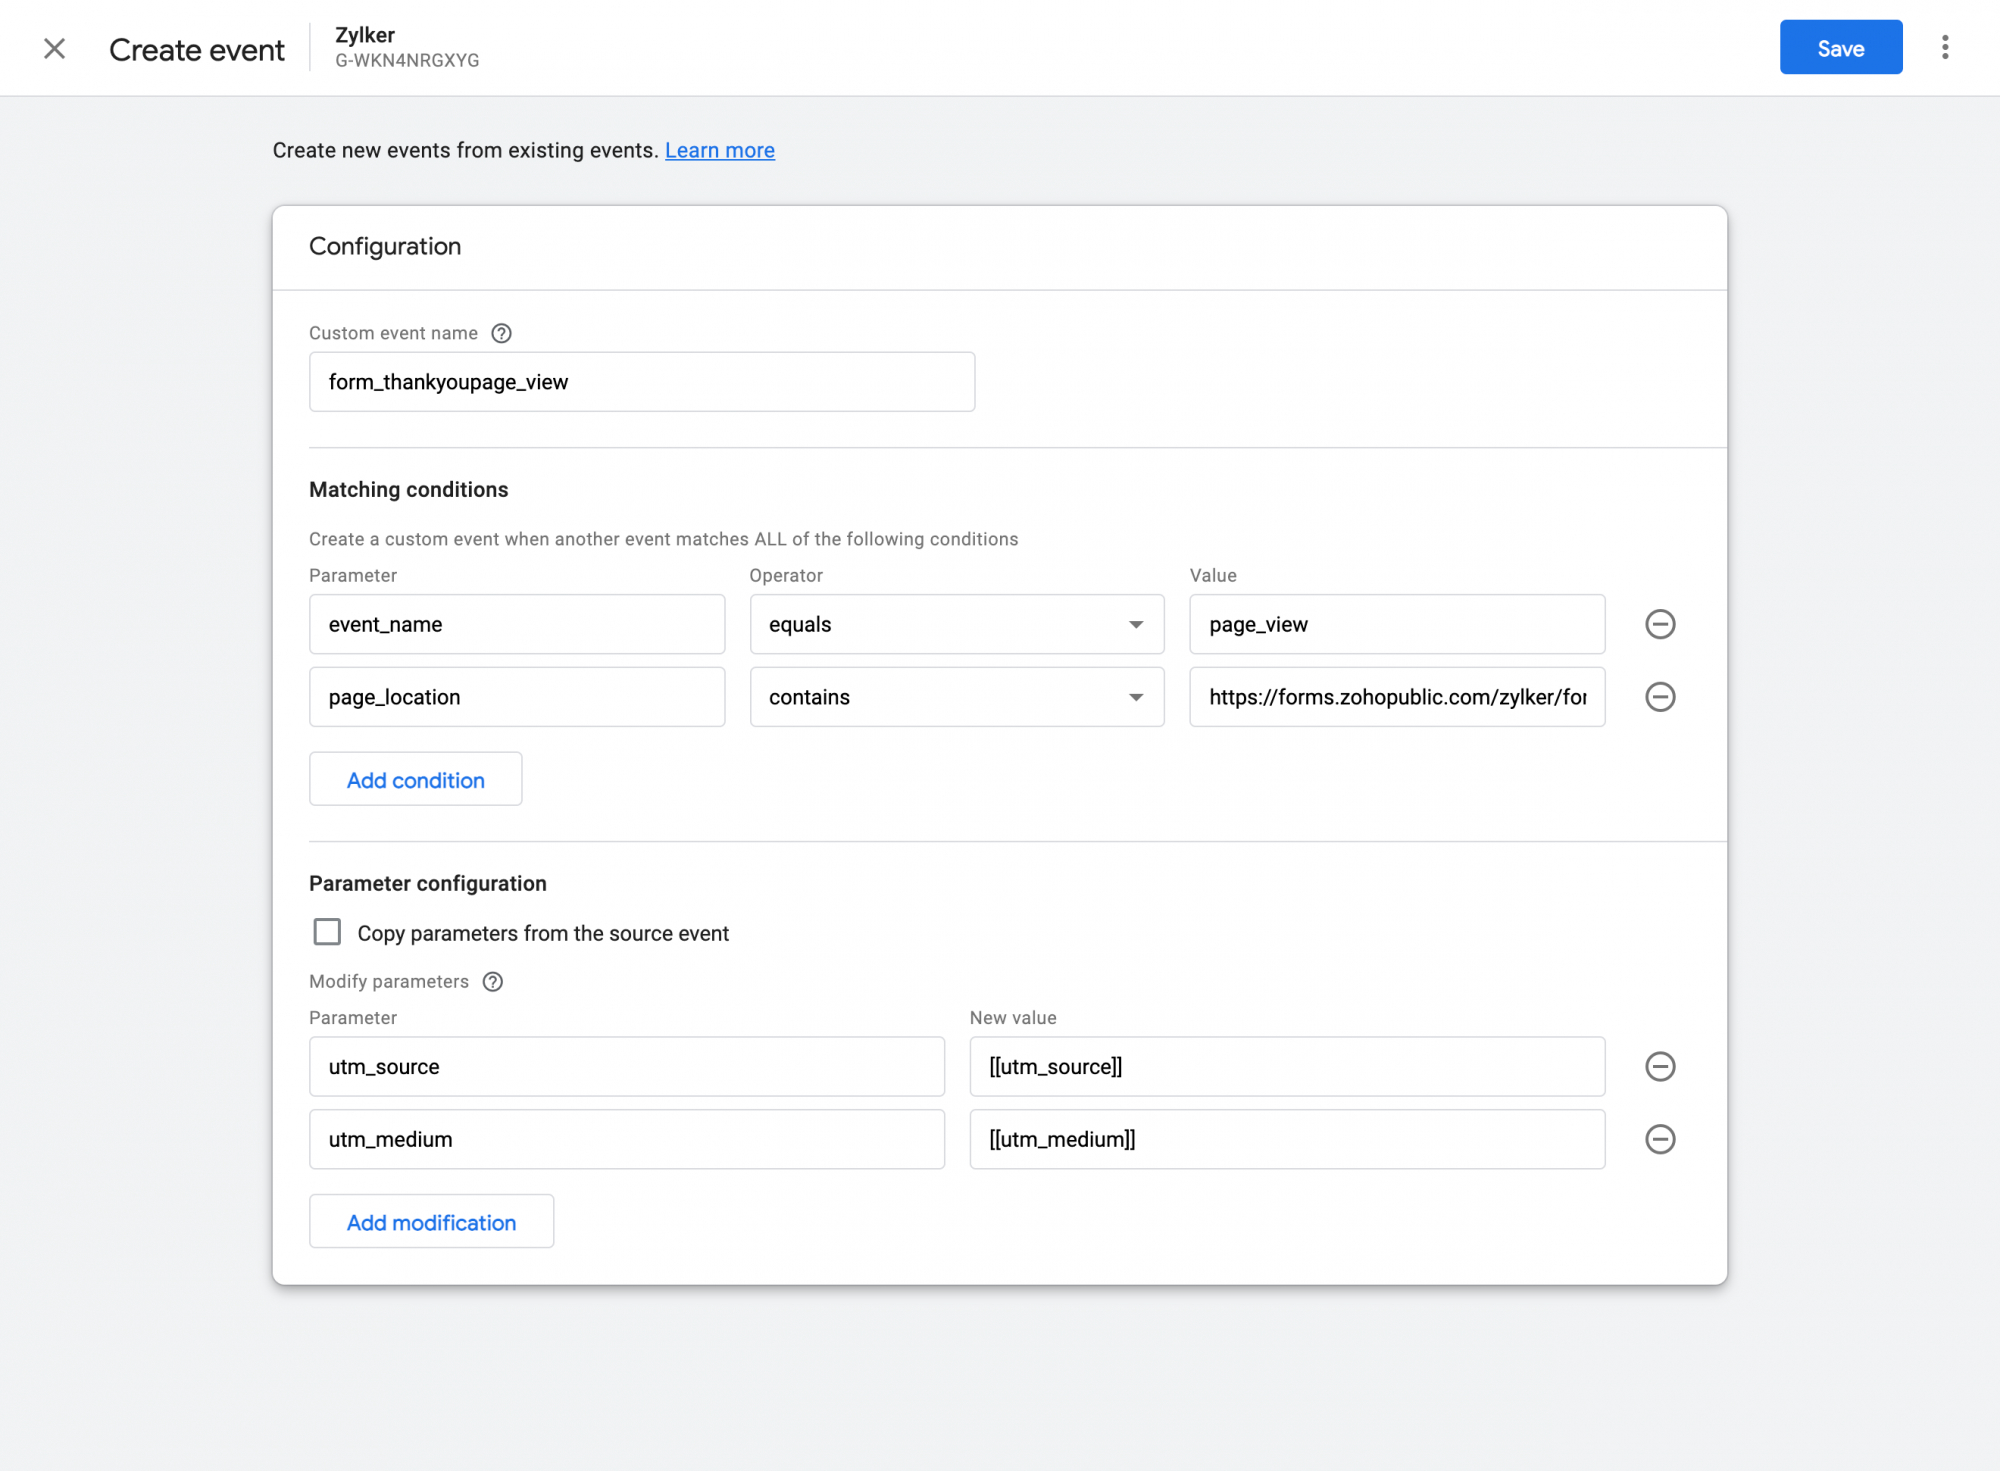
Click Events under All events in the left menu and click Create Event.
-
Click Create and enter a valid Event Name. Copy this Event Name to your clipboard to create a conversion event.
-
Under Matching conditions, define the parameters as
-
event_name equals page_view
-
page_location contains < ThankYou Page URL >
-
Under Parameter configuration, configure the UTM parameters and map them to the parameters defined by you in Zoho Forms.
Save the Event.
-
Click Conversions under All events in the left menu. Click New conversion event and in the event name, paste the Event Name you created under All Events.

-
Go to your Admin page in Google Analytics, click Data Streams in the Property column and copy the "G-" Measurement ID for web data stream.
After completing the above pre-requisites in Google Analytics,
- Select Add Google Analytics or Facebook Pixel tracking code under Thank You page settings in Zoho Forms.
- In the Tracking Settings popup, paste the copied ID under Tracking ID/Measurement ID.
Using tracking parameters in Goal Conversion
-
In your form builder, go to Track Entries under the Share tab.
-
Enable tracking and copy the Advanced Tracking Code.
-
Paste the code on all the pages of your website.
In the Tracking Settings popup (Thank You Page configuration), click +Tracking Parameters, enter your Parameter Name, and map it with the tracking parameters defined in Zoho Forms.
Tracking using Facebook Pixel
Pre-requisites
-
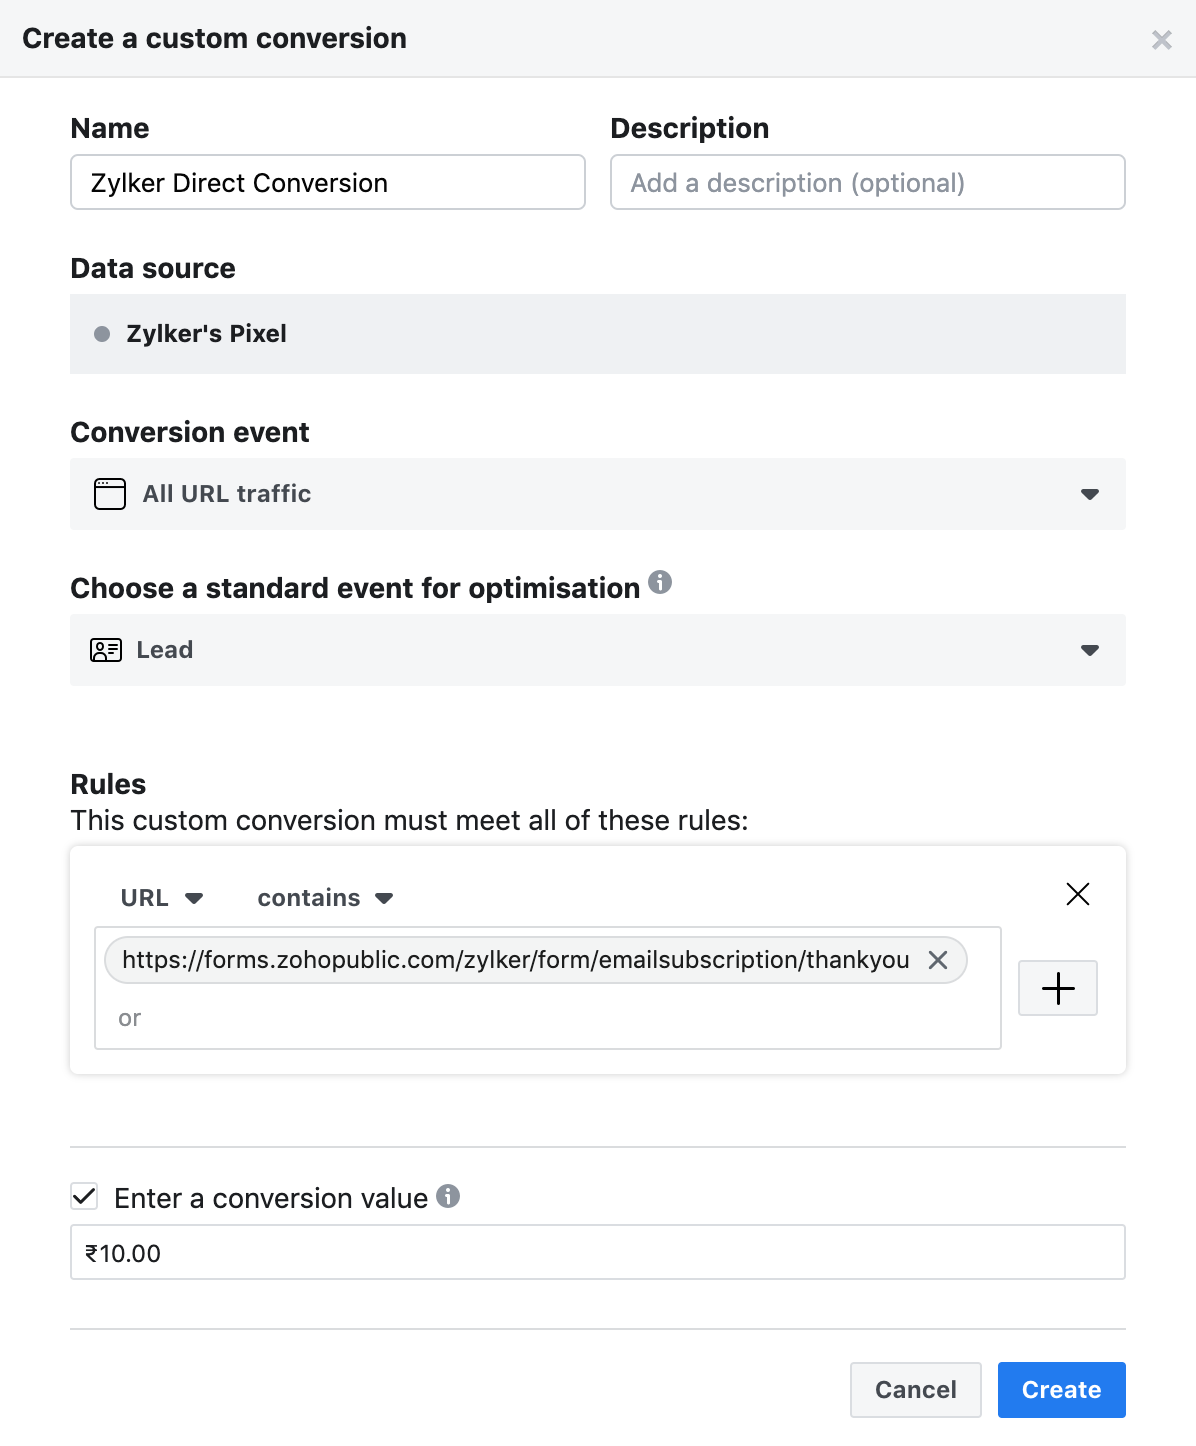
Create a custom conversion in Facebook Pixel under Events Manager.
-
Enter the event name and description (optional).
-
Choose the Conversion event and the standard event for optimization.
-
Under Rules, define a rule for your conversion.
-
Enter a conversion value for this goal.
Setting Rules for custom conversion
-
When you share the form as a clickable link, define the rule as URL contains < ThankYou Page URL > of the form.
-
When you embed the form on webpages, define the rule as URL contains <Permalink URL> of the form.
After completing the pre-requisites,
-
Select Add Google Analytics or Facebook Pixel tracking code under Thank You page settings in Zoho Forms.
-
In the Tracking Settings popup, enter the Pixel ID (Eg.: 1234567890).
Once this setup is saved, you can track successful form submissions as events in Facebook Pixel.
Thank You Page URL of a form
- To get the ThankYou page URL of a form, make a test submission by accessing the form's Permalink URL.
- Once you make a test submission, you will be redirected to the Thank You Page. The ThankYou page URL will be in the below format:
- From this URL, copy https://forms.zohopublic.com/<your portal>/form/<form name>/thankyou/ and paste in the Rules section in Facebook Pixel or in Destination under Goal details in Google Analytics while creating a custom conversion.
Redirect Options
Redirect to a form
You can choose to redirect your respondents to fill out the same form or another form as the next step after submitting a form entry.
Redirect to the same form
-
In your form builder, navigate to Settings > General > Thank You Page & Redirection. -
Select Redirect To. -
Select the Same Form option and click Save.

Redirect to another form
-
In your form builder, navigate to Settings > General > Thank You Page & Redirection.
-
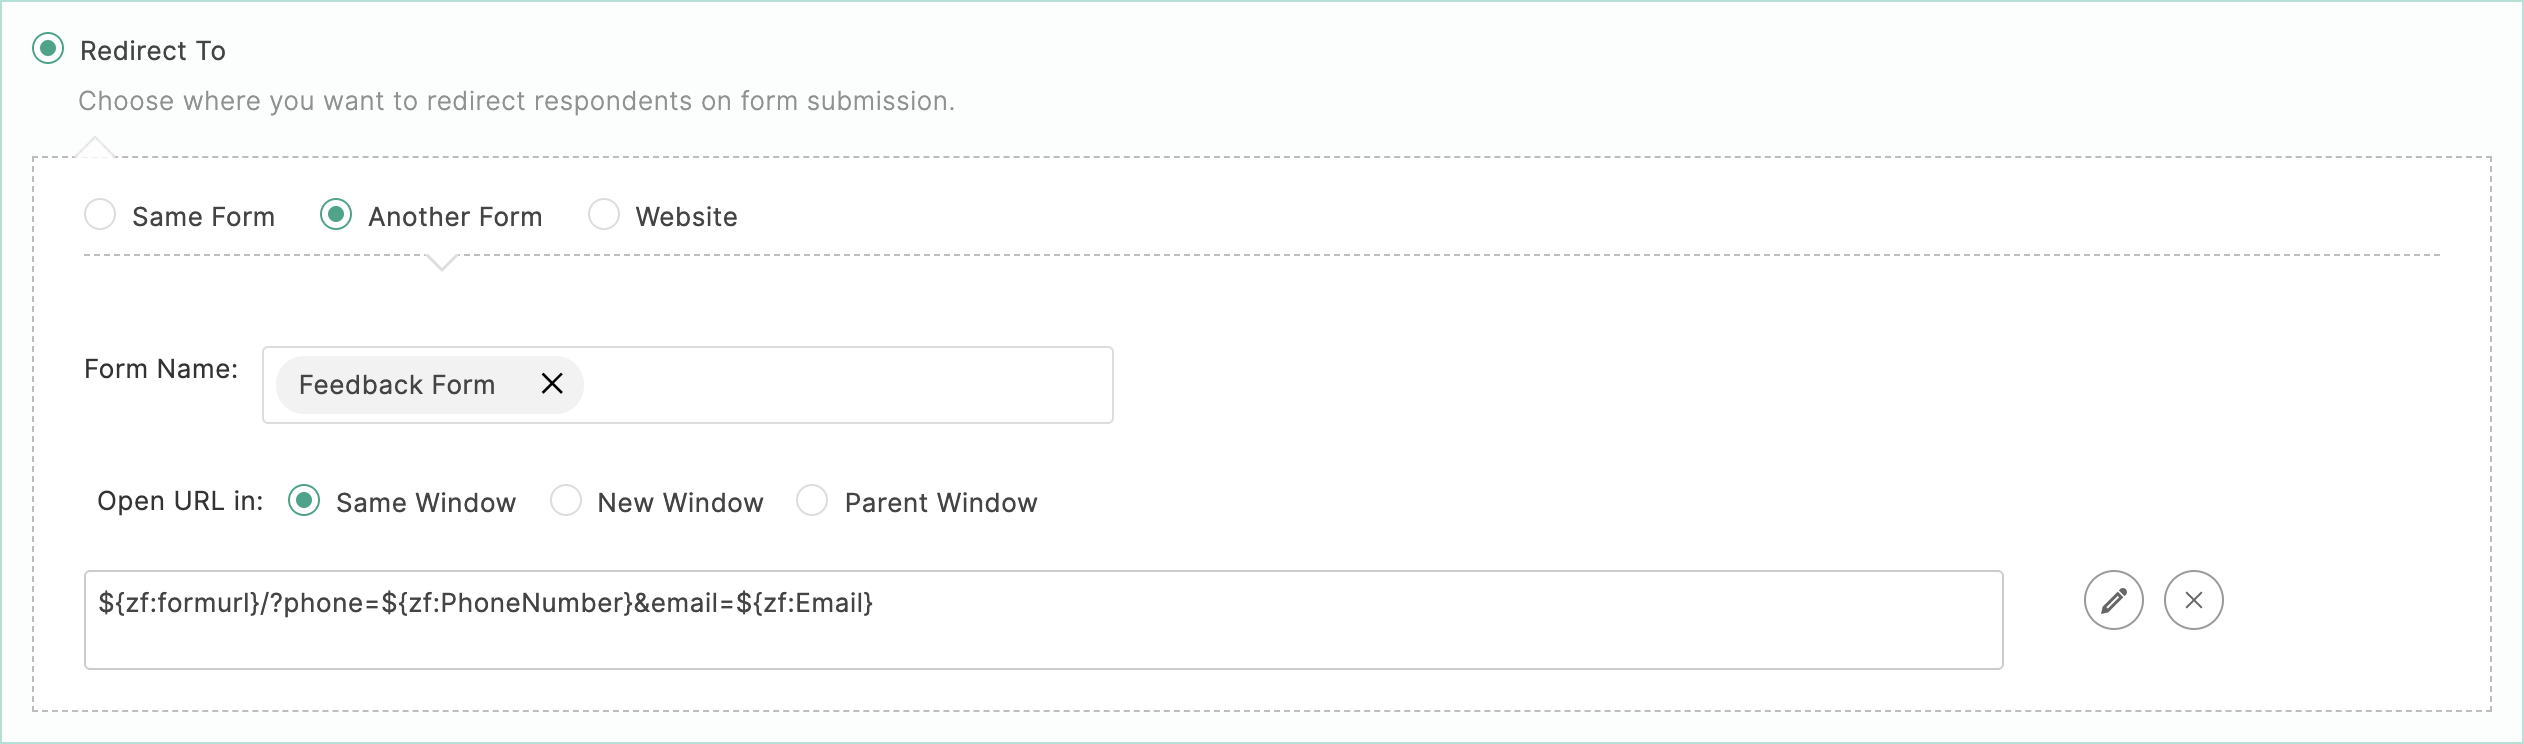
Select Redirect To and choose the Another Form option.
-
Search for the form you want to redirect your respondents to in the Form Name.
Choose where the new form should open from the following options:
-
Same Window: To load the new form in the same window or in the same frame where your current form is embedded, select this option.
-
New Window: To open the form in a new tab, select this option. This might not work as intended if your respondents have a popup blocker enabled on their web browser.
Parent Window: If you want the parent window where your form is embedded to redirect to the new form's URL on submitting the form entry, select this option.
-
-
To prefill the redirected form with responses from the current form and make the form filling experience simpler for your respondents, select the Prefill values in redirected form option.
-
Click Save.
Prefill fields in the redirected form
When you need your respondents to fill out another form as the next step after submitting your form and both the forms contain generic repetitive fields such as Name, Email, Phone, etc., your respondents might find it tedious to enter the same data again in the second form. To make the form filling process easier for your respondents, you can pass the form responses from the current form to the redirected form and prefill the form with those values.
For example, if you are planning an event, after invitees submit an RSVP form, you can redirect them to a Guest List form where their name and email address are pre-filled.
To prefill the redirected form,
-
In your form builder, configure Field Alias for the fields in the form that you wish your respondents to be redirected to.
-
Navigate to Settings > General > Thank You Page & Redirection.
-
Select Redirect To and choose the Another Form option.
-
Select Prefill values in redirected form.
-
In the pop-up, map the Parameter Name (denoted by the configured field alias) that you wish to prefill in the redirected form to the Parameter Value as shown.
-
To redirect a translated form to another form in the same language, map the zf_lang parameter name to the Submitted Language as shown.
Once the fields are mapped, the mapping summary will be shown. If you wish to edit the mapping, click the icon. To delete all the field mappings, click the
icon.
- Only the forms created by the user can be used as redirection forms.
- Shared forms or disabled forms cannot be used as redirection forms. If the redirected form is deleted, then the Thank You page will be displayed after a form entry by default.
Redirect to a Website
You can choose to redirect your respondents to a website after they submit the form to provide more information about your business or product. You can also pass the submitted form responses to the redirected website.

-
In your form builder, navigate to Settings > General > Thank You Page & Redirection.
-
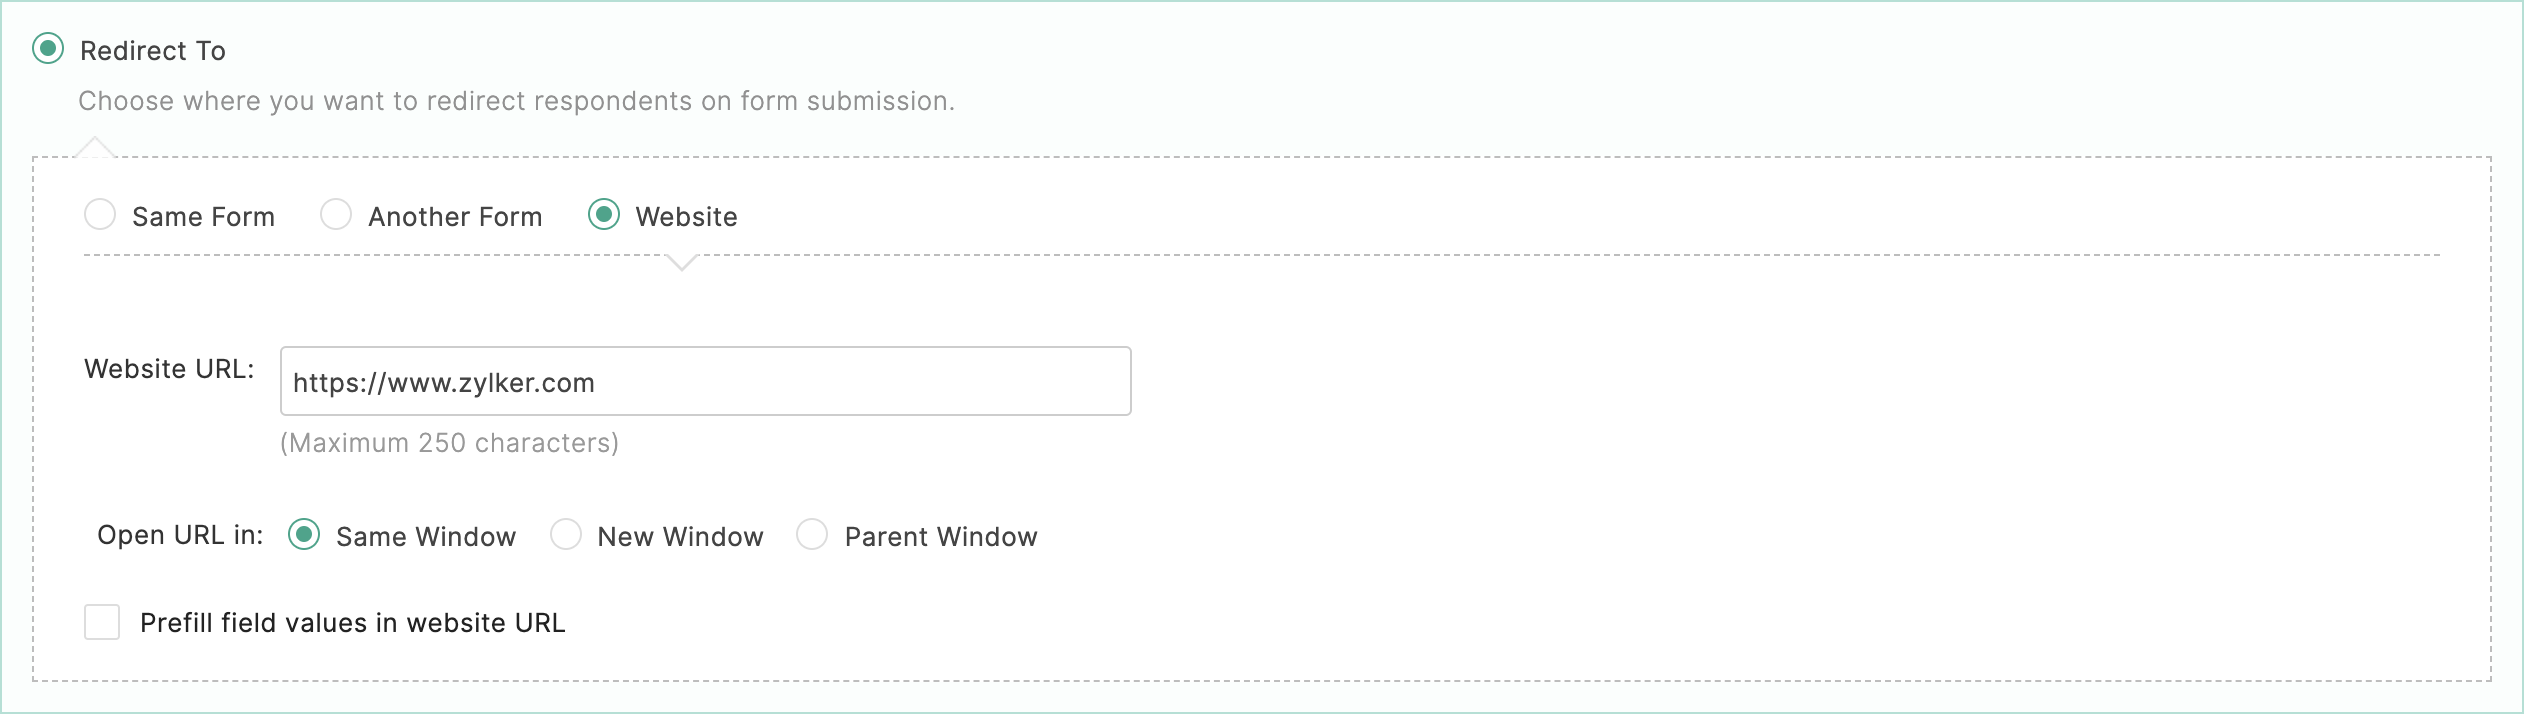
SelectRedirect To and select the Website option.
Enter theWebsite URL and choose where you want the website to open from the following options:
-
Same Window: Select this option to load the website in the same window where your current form is embedded.
-
New Window: Select this option to open the website in a new tab.
-
Parent Window: Select this option if you want the parent window where your form is embedded to redirect to the website when a form entry is received.
-
-
To prefill the website URL parameters with the submitted form responses when redirected, select the Prefill values in website URL option.
Pass the form responses to the redirected website
If you wish to redirect your respondents to your website after they submit the form, you can also choose to pass the form responses submitted by your respondents to the website. These passed values can be used to personalize messages for the respondents on your website.
To do so,
- Navigate to Settings > General > Thank You Page & Redirection, select Redirect To and choose the Website option.
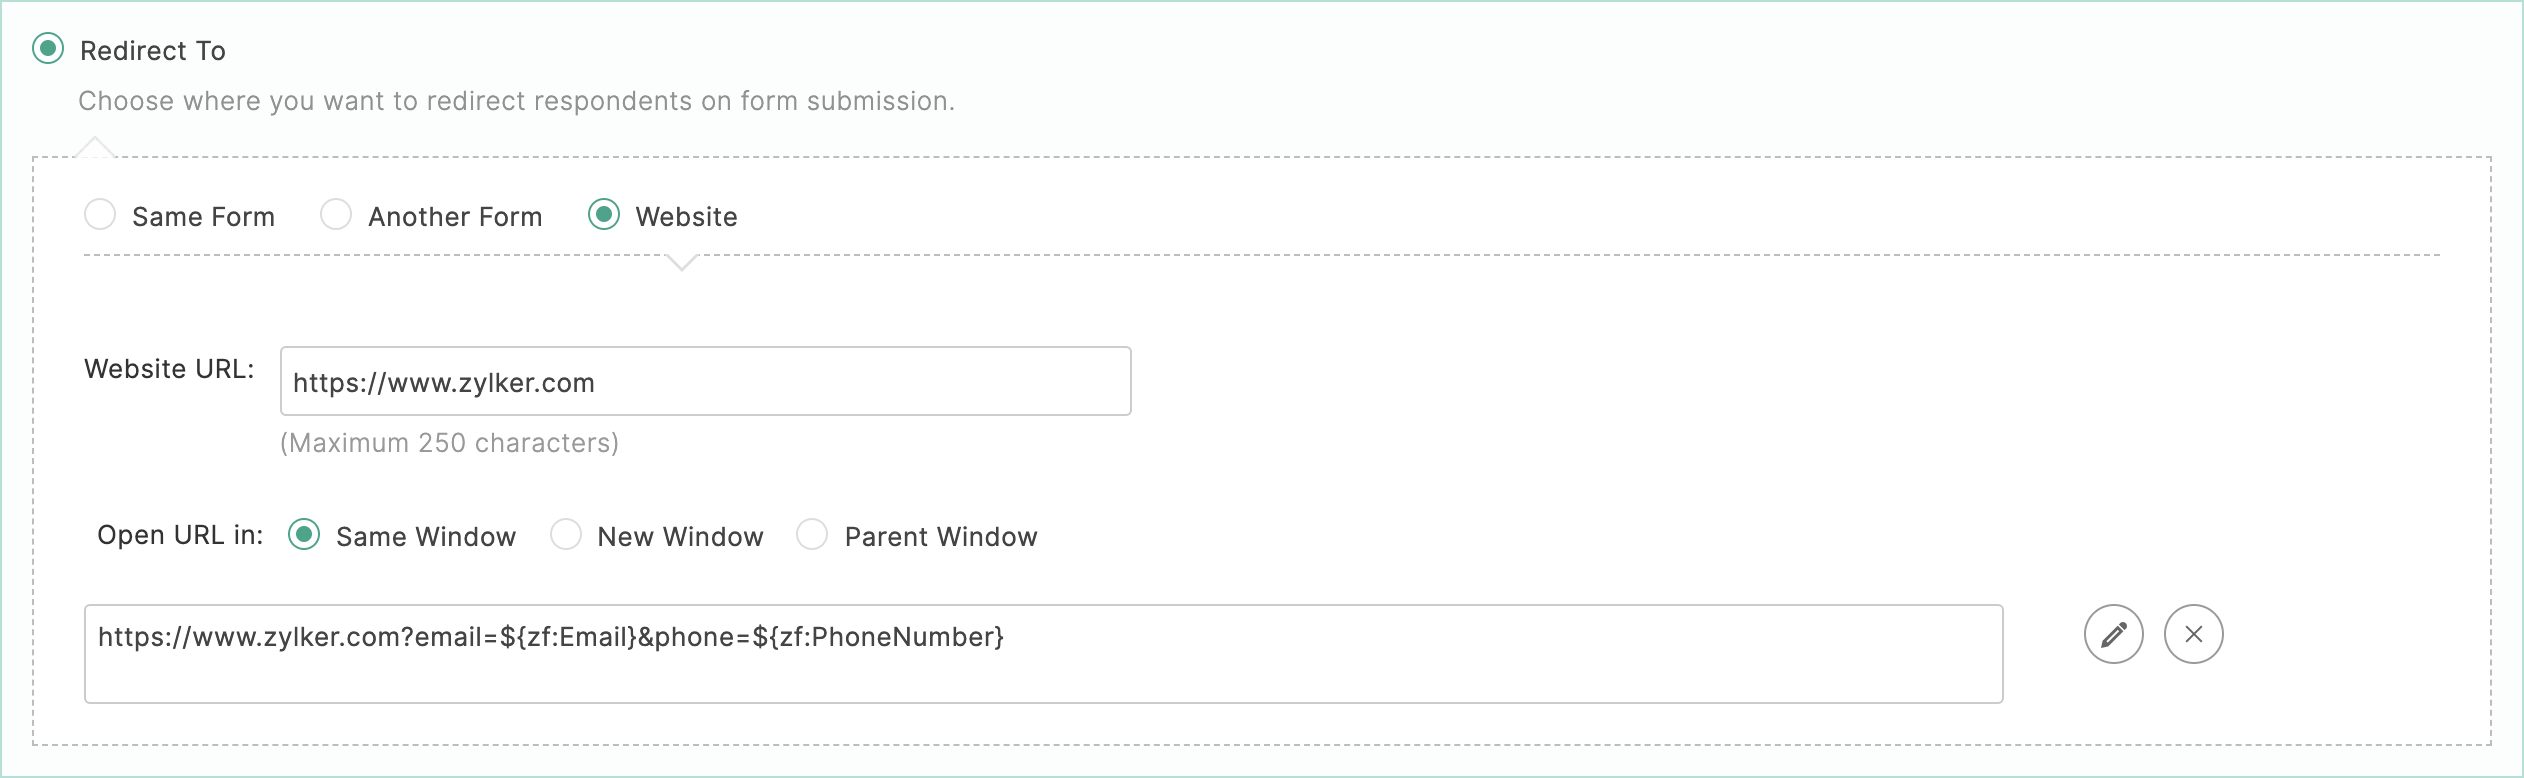
- Enter the Website URL and select the Prefill values in website URL option.
- In the pop-up, enter the parameter names to be the Prefill Key in the Website URL and map them to the form fields as shown.
Once mapped, the mapping summary will be as shown:website URL?Prefill Key=${zf:Form Field}.
When redirected the prefill key (parameter name entered while mapping) and the mapped form field value will be appended to the website URL.
If you wish to edit the mapping, click ![]() icon. To delete all the field mappings, click the
icon. To delete all the field mappings, click the ![]() icon.
icon.
For example, say you have an inquiry form on your website, and you wish to know which product has been enquired about the most. When the respondents submit the form, you can pass the product name from the inquiry form to the website by mapping the appropriate field.
Tracking goal conversions from a redirected website
By default, the source/medium will be captured as forms.zohopublic.com. You can also include custom UTM parameters to identify the source and medium from which the form entries came in.
To use tracking parameters,
- In your form builder, go to Track Entries under Share tab.
- Enable tracking and copy the Advanced Tracking Code.
- Paste the code on all the pages of your website.
- Now, navigate to Settings > General > Thank You Page & Redirection, select the option to redirect the form to Website, and select Prefill values in the website URL.
- In the popup, enter your Parameter Name, and map it with a tracking parameter defined in Zoho Forms as shown.
Note: Form Redirection is available only in our paid plans.