Overview
Using business messaging tools can indeed be a very effective way to improve customer engagement and meet their expectations, and messaging tools such as text messaging services can be particularly useful for businesses of all types and sizes. They allow businesses to reach out to customers in a more personal and direct way, providing updates, promotions, and other important information. With a personalized way to communicate with customers, businesses can build stronger relationships and increase customer loyalty, ultimately leading to greater success and growth.
Today, WhatsApp is the most popular instant messaging (IM) service app globally which is why it is time for you to use WhatsApp Business Notifications when respondents submit your form. WhatsApp is one of the most dependable channels for sending notifications, with a near-perfect deliverability rate. Customers will receive your WhatsApp Notifications as long as they have an active internet connection. They are also more likely to be read as your business is directly engaging with your customer, bringing more reliability. Furthermore, it allows businesses to send targeted and personalized messages to individual customers, based on their specific interests and preferences.
Configuring WhatsApp Notifications for your form will trigger notifications on the respondent's WhatsApp after submitting the form.
Things to know
Before you configure WhatsApp Notifications for your form, make note of the following:
- Explore the WhatsApp Commerce Policy and the WhatsApps Business Policy, that define which businesses can use the WhatsApp Business Platform.
- Business-initiated messages can only be sent to users who have opted-in to receive messages from your business and must be transactional.
- When sending notifications, you must use an approved WhatsApp template.
- Business-initiated messages cannot be promotional messages. These can be customer care messages, payment or shipping updates, alerts, and more.
- Only the Super Admin can configure WhatsApp Notifications
Pre-requisites
There are certain Pre-requisites that you need to set up before you can send WhatsApp Notifications for the form entries received.
- You must create your Meta and WhatsApp Business accounts.
- Create or select your WhatsApp Business profile.
- Verify your WhatsApp business number.
Watch this video to learn how to configure Whatsapp notification in Zoho Forms
To fulfill these pre-requisites,
- On the forms listing page, under Setup, click Control Panel.
- Click WhatsApp Configuration.
- Once it is ready for configuration, click Link with WhatsApp.
- You will be redirected to log in through your Facebook account in a widget to connect to your Meta Business account.
 Note: Ensure that your browser's pop-blocker is disabled for the widget to load.
 - Login to your existing personal Facebook account. New personal accounts may not be approved.
- Once you log in, you will be prompted to get started with the setup to register and connect your WhatsApp business account to Zoho Social to send notifications to WhatsApp users via the WhatsApp business API. Click Get Started.
- To allow Zoho Social to manage your WhatsApp Business account, you'll need to share account and billing permissions. Click Continue.
- Then, you will be asked to fill in your business information. To connect your WhatsApp Business Account, you must first select a Meta Business Account from the dropdown. If you do not already have a Meta Business Account, you will be given the option to create one.Your business must have a Meta Business account (formerly known as Facebook Business Account) in order to have a WhatsApp Business Account (WABA). The Meta Business Account is specific to a Company. If the Company has multiple Sub-brands with different names, each Sub-brand should have its own WhatsApp Business Account with their name.
- Your Business name, Business email address, Business website, and Country will be autofilled. Click Next.
- The next step is to create or select a WhatsApp Business account which will belong to your Meta business account.
- Choose Create a new WhatsApp Business profile and click Next.
- Give your WhatsApp business account name, WhatsApp Business profile display name and select the Category of your business.
The WhatsApp Business display name is the name that customers see when they visit your WhatsApp Business profile. Read the guidelines in choosing a display name for your WhatsApp profile. - You can optionally provide a description for your business and include any website you have for your business. The category and business description will both be visible to your customers. Click Next.
- The next step is to add a WhatsApp business phone number. This is the number that people will see when they chat with you for your business. Enter the Phone number along with your country code.
Pre-Requisites for Phone Number - The number must be owned by you
- The number must have a country and area code
- It should be able to receive voice calls and SMS
- It should not be a short code
- Any other BSP should not have previously used the number
- The number should not be connected to any WhatsApp Messenger or WhatsApp Business App at the instant.
- Choose if you would like to verify your phone number via Text message or a Phone call . You will receive a code to verify this phone number on your preferred verification method. You can change your preferred verification method if it isn't working.
Note : The phone number will be verified with a PIN, so make sure you have access to it.
Enter the 6-digit verification code received on your WhatsApp Business Phone Number and click Verify.
Click Finish.
Creating a Channel
Once you verify the phone number, your pre-requisite setup will be complete and you will find the option to create a new channel in the Control Panel. A Channel identifies which of your business profiles the message must be sent from. Each Channel you create can be associated with only one of the verified phone numbers.
To create a new channel,
- In your Control Panel > Notification Settings > WhatsApp Configuration, click + New Channel.
- In the pop-up, enter a name for your channel and choose a WhatsApp Business Account. Select the WhatsApp business phone number that you have verified from the dropdown.
- Click Create.
Note:
1. Multiple WhatsApp Business accounts are supported only for Zoho One users currently.
2. If you delete a channel, you will not be able to send messages via that channel and the configured business number will get dissociated and listed for use to configure another channel.
1. Multiple WhatsApp Business accounts are supported only for Zoho One users currently.
2. If you delete a channel, you will not be able to send messages via that channel and the configured business number will get dissociated and listed for use to configure another channel.
Creating a Template
Once you have created a channel, the next step is to create a WhatsApp message template for your WhatsApp notification.
A WhatsApp message template is a message format that you can reuse to send messages to users after they have submitted your form. You must first submit a message template to WhatsApp before you can use it. WhatsApp reviews and approves each message template within 48 hours or less. After WhatsApp has approved your template, you can use it to send notifications.
To create a WhatsApp message template:
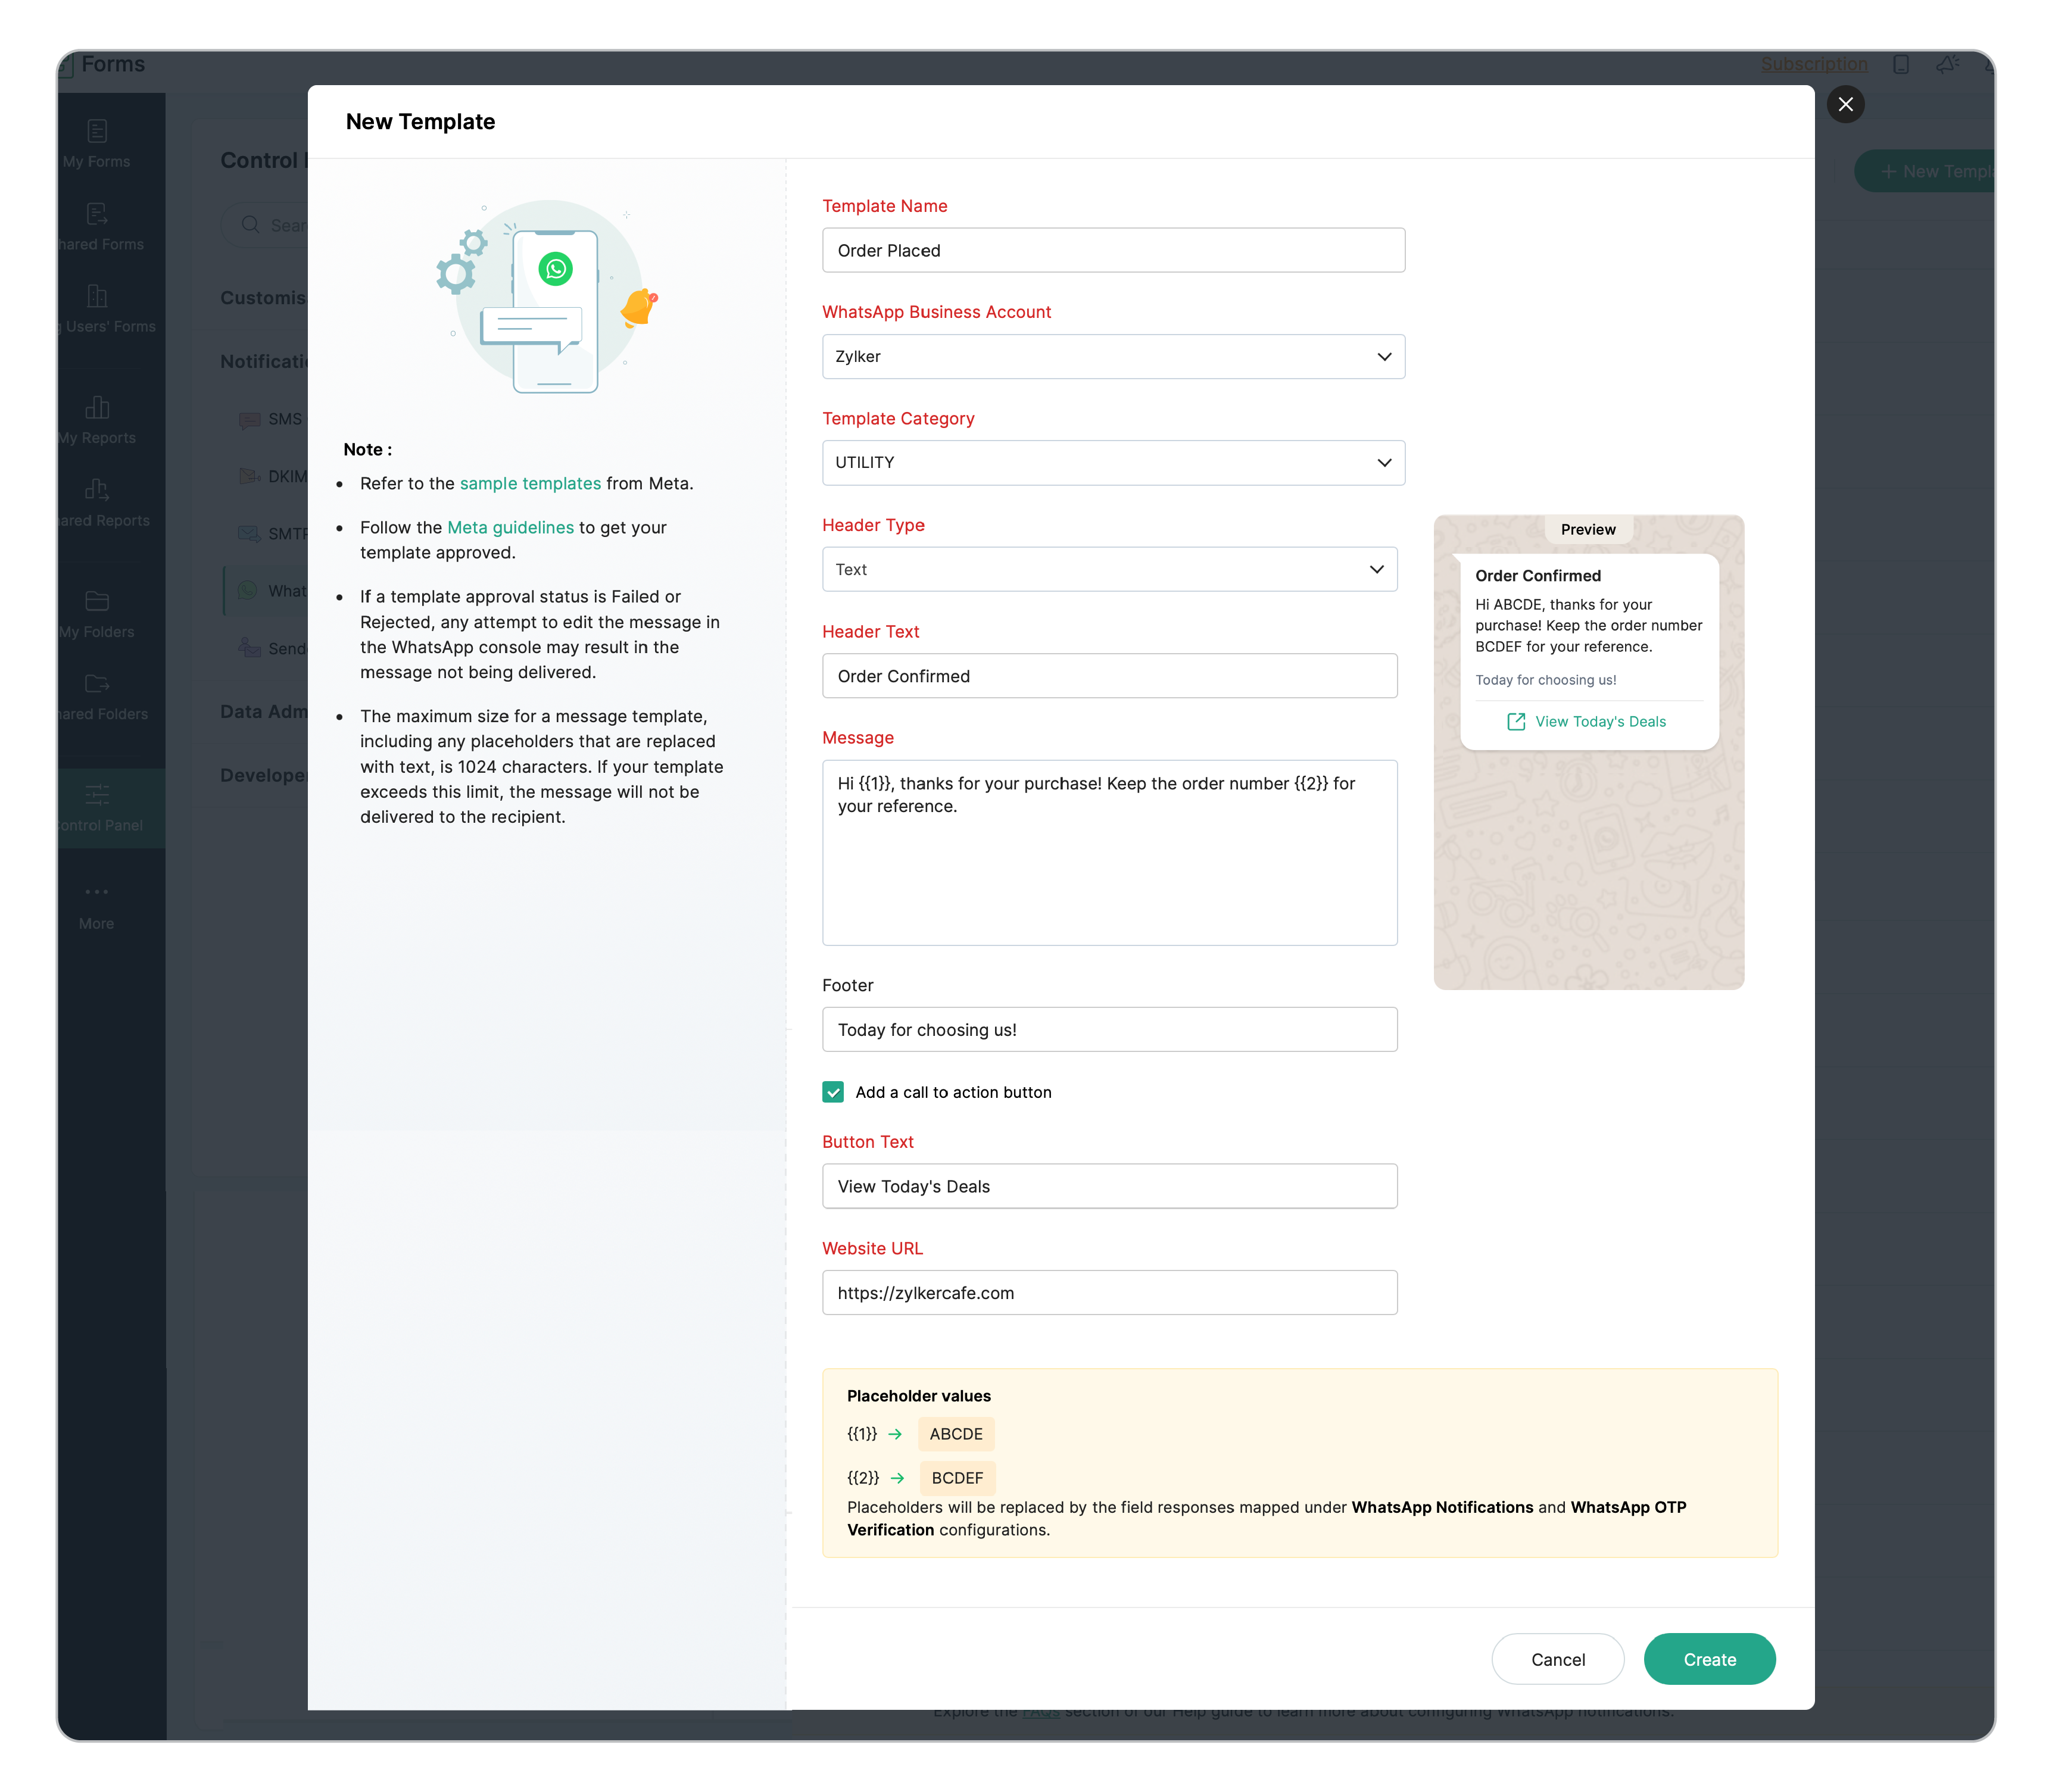
- Once you have created a channel, you will have a Templates tab. Navigate to the Templates tab and click + New Template.
- Select the WhatsApp Business Account in which you want to create this template.
The template will be created under this account. - Enter a Template Name.
The name you give must be unique and contain only lowercase alphanumeric characters and underscores. Use a name that helps the WhatsApp's reviewer comprehend the intent of your message. - Select
a Template Category from the dropdown list. Your WhatsApp message templates must fall into one of the categories listed:
- MARKETING
- UTILITY
- AUTHENTICATION
Make sure that you choose a suitable category for your template that best fits your use-case. WhatsApp is more likely to reject templates that do not clearly align with these template types.
The AUTHENTICATION message template is exclusively for sending OTP verification messages through WhatsApp under Settings > Spam Control > OTP Verification.
Learn more about message templates -
Choose a Header Type from the dropdown list.
To configure the template using message text only, proceed by selecting None.
If you wish to include a header in your WhatsApp template, choose one of the two available formats: Text or Image. Depending on your use case, you can opt for a static or dynamic header. Learn More - Type in your message for the WhatsApp notification and click Create. If you wish to include the field responses from the submitted form in this message, use the placeholder values inside double curly braces {{...}}.For example:Hi {{1}}, your order number {{2}} will be delivered by {{3}}.
When a message is sent, the placeholder values inside double curly braces {{...}} are replaced with dynamic content from your form fields. The later stages of these steps will determine which placeholder will be replaced by which form field response.
Note:
- Multiple WhatsApp Business accounts are supported only for Zoho One users currently.
- The maximum size for a message template, including any placeholders that are replaced with text, is 1024 characters. If your template exceeds this limit, the message will not be delivered to the recipient.
- If the template category is set to AUTHENTICATION, headers are not supported, and only message text is allowed.

You should set up a template for each type of notification you need to send and wait for WhatsApp to review and approve your template before you can use it to send notifications on receiving form entries.
Header Type
If you wish to configure the WhatsApp template using message text only, choose the Header Type as None. To include a header in your WhatsApp template, choose one of the two available formats:
- Header Text
- Header Image
Additionally, based on the input source of the header, there are two types of headers: Static Header and Dynamic Header.
Static Header
Static Header (text or image) is configured directly during template creation and remains the same for every message, regardless of user responses.
Static Header
Static Header (text or image) is configured directly during template creation and remains the same for every message, regardless of user responses.
- For Text, enter the desired text in the field Header Text.
- For Image, choose Add Manually after selecting the header type.
For example, Zylker Cafe wants to send a WhatsApp notification with it's logo included in every order confirmation. To configure this:
- Choose Header Type as Image from the dropdown list.
- Select Add Manually and then click Upload Image to upload the logo.
- Preview the WhatsApp notification message with the uploaded logo as the header, along with the message text.
Since the logo remains the same for every order, it’s ideal to use a static header.
Dynamic Header
Dynamic Headers (text or image) can be preferred when you need to customize the WhatsApp notification message based on respondent's input.
- For Text, add placeholder values ( e.g., {{1}} ) in Header Text field, similar to how placeholders are configured in the message body.
- For Image, choose Map a Form Field to dynamically pull the file from the user's response.
For example: Suppose you're running a cake shop that accepts custom cake orders. Customers can upload a sample image of the design they want while placing the order. You want to include this uploaded image as a header in the WhatsApp notification. To configure this:
- Choose Header Type as Image from the dropdown list.
- Select Map a Form Field.
- Preview the WhatsApp notification message with a placeholder image as the header and the message text.
- To map the field, navigate to Form Settings > WhatsApp Notifications.
Having seen the usage of image in the WhatsApp template, let's check how Text can be used as the Header Type.
For example: You're running an online store, and after a customer places an order, you want to send a WhatsApp notification with a clear title like `Order Confirmed`. This header gives users a quick idea of the message's content. To configure the same,
- Choose Header Type as Text from the dropdown list.
- Enter the desired text in the Header Text field.
- Preview the WhatsApp notification message with Text as the header along with the message text.
To use dynamic header text, insert placeholder values (e.g.,
{{1}}) similar to how you configure them in the message body. Only one placeholder is allowed in a text header.You can customize your whatsapp template by choosing any one of the header type - Text or Image & the input source - Static or Dynamic, based on your use case.
Note:
- If more than one attachment is uploaded in image upload fields, only the first uploaded image will be used for sending WhatsApp notifications.
- The maximum file size allowed for Header Images is 5MB.
- The maximum length allowed for Header Text is 60 characters.
Footer
Footer is an optional text component that appears at the bottom of the message.
Below the Footer, you have an option to include an interactive button which allows the user to visit a website directly from the message. To include this button, check the Add a call to action button option. This will allow you to configure:
Button Text: This is the clickable text that will appear on the button. For example, Visit Website, Learn More
Website URL: This is the website address where the button will direct users. Ensure it starts with http:// or https://.
Template Status
You will find the list of the templates you have created and the status of approval by WhatsApp under Control Panel > Notification Settings > WhatsApp Configuration > Templates tab.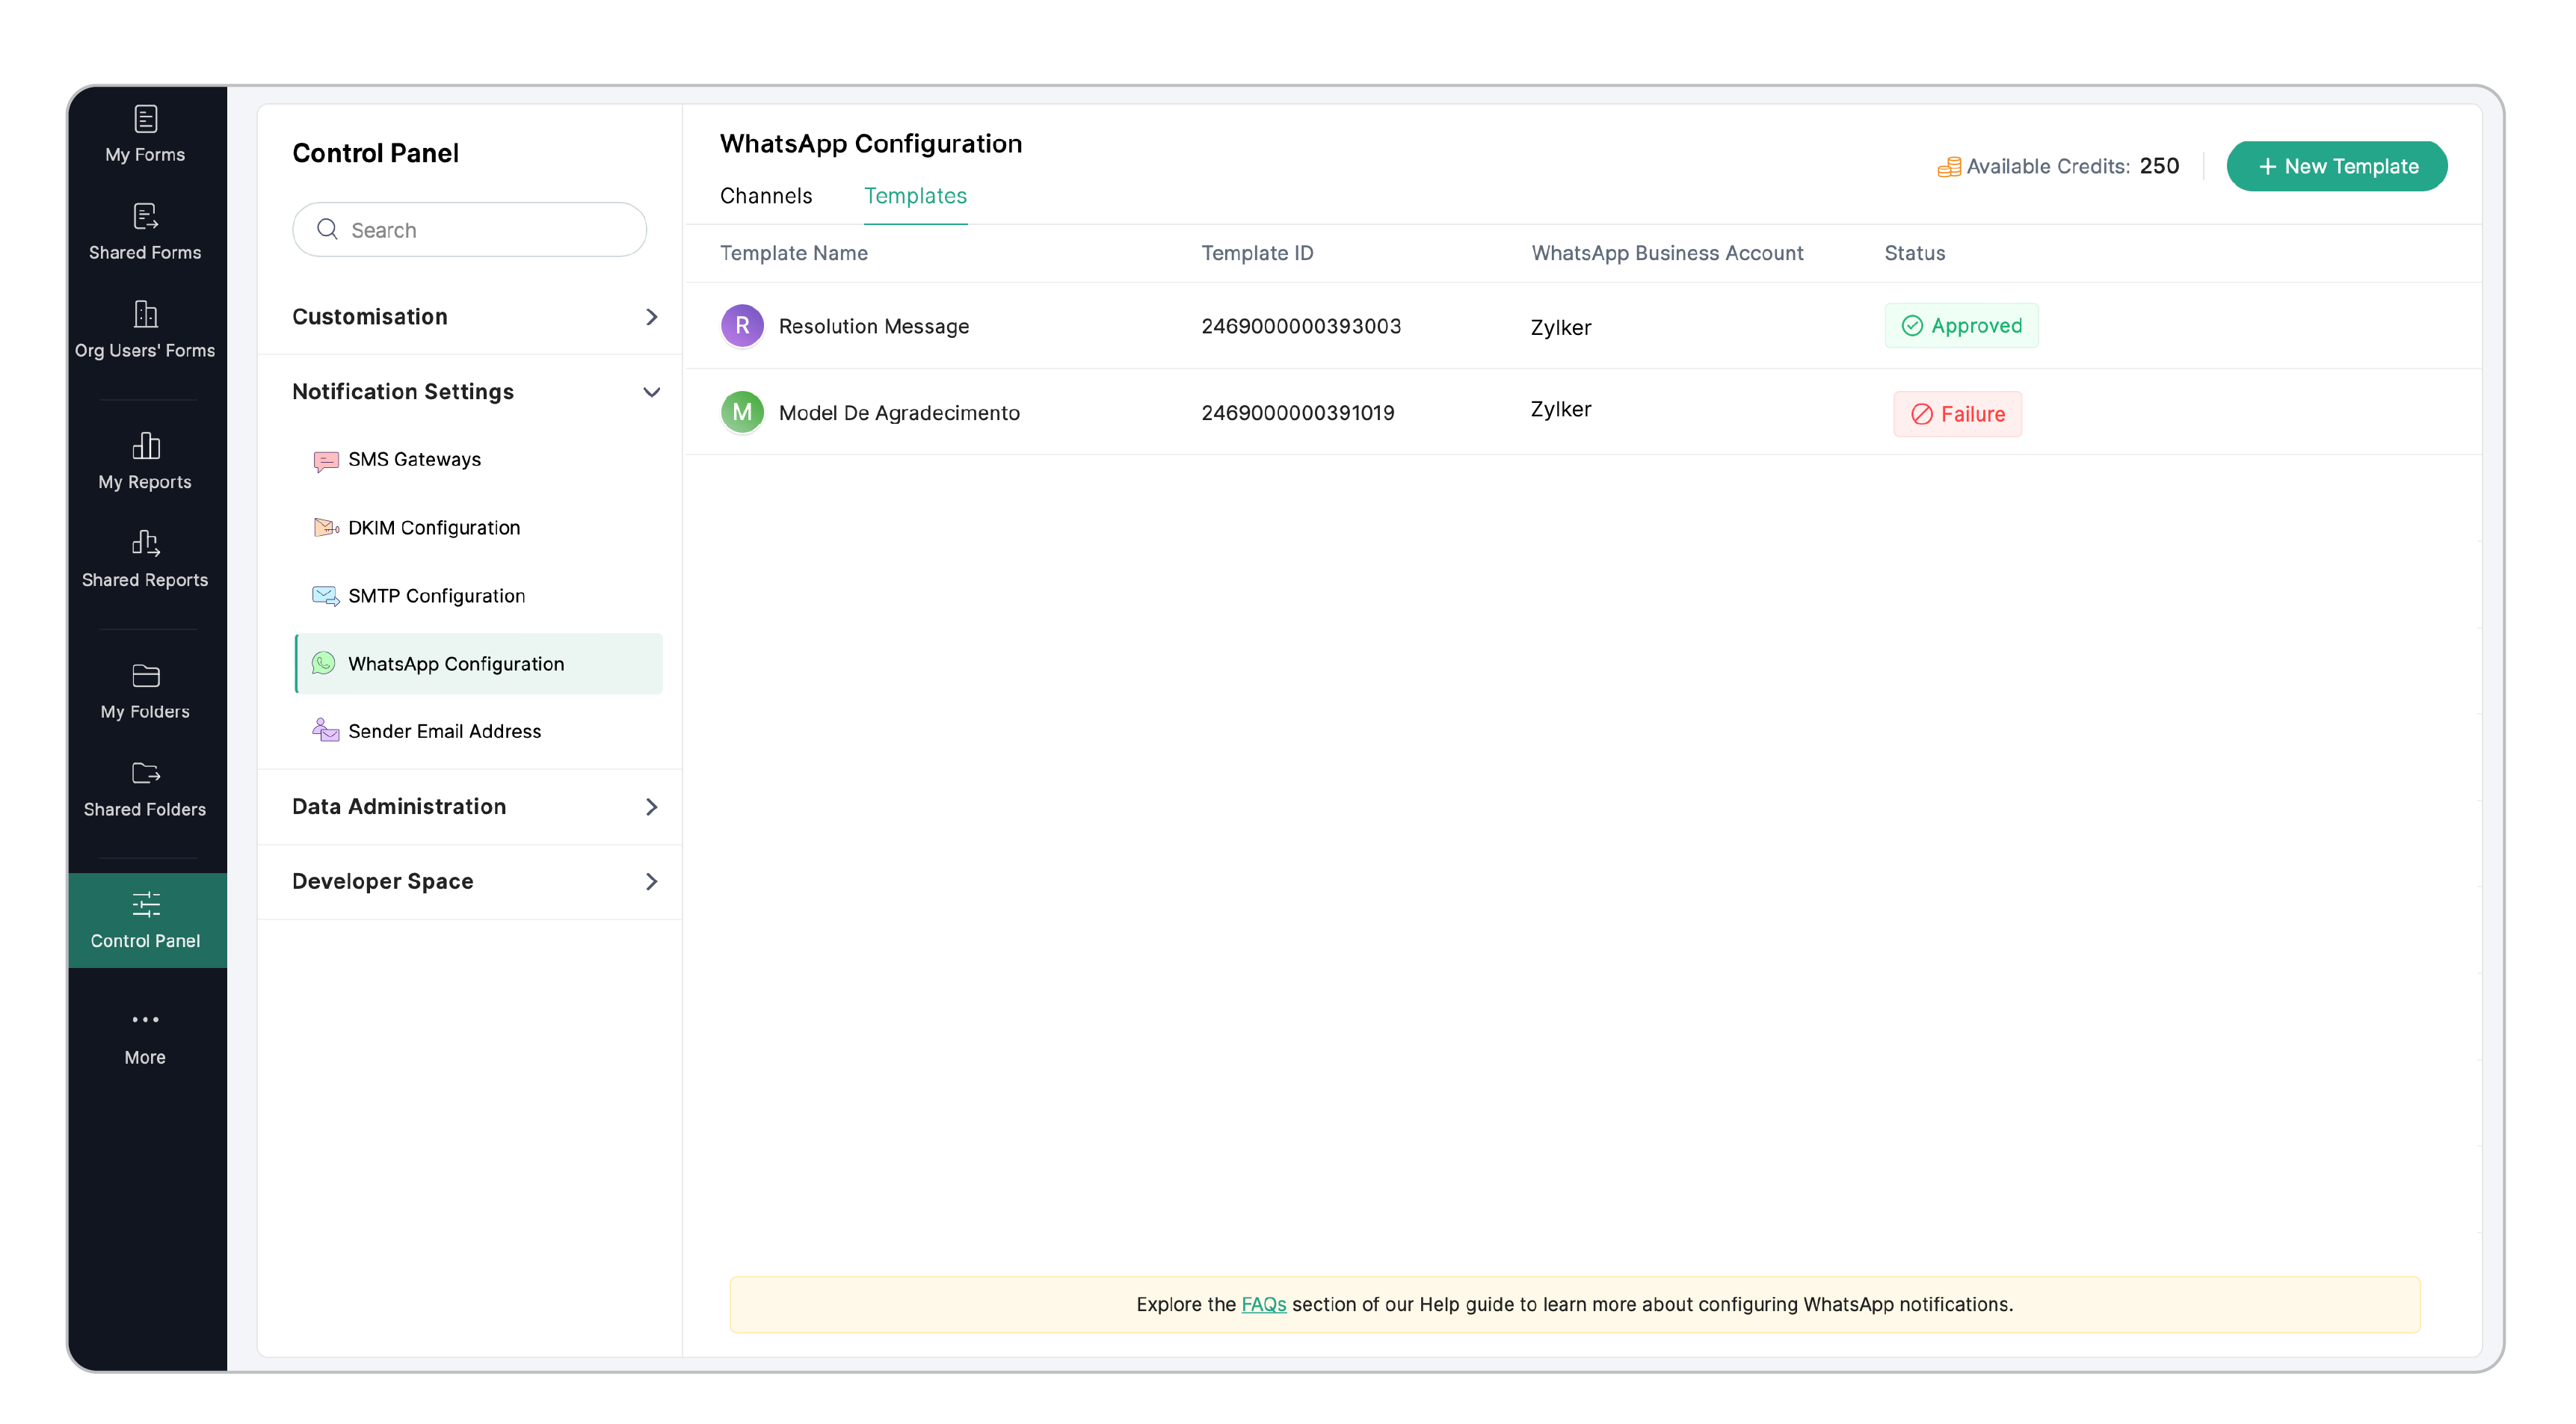
There are 4 approval statuses:
There are 4 approval statuses:
- Pending: The template is still under review by WhatsApp.
- Approved: The template is approved by WhatsApp and can be used to notify customers.
- Rejected: The template is rejected by WhatsApp in the review process.
- Failed: The template did not go for the review process.
If a template approval status is Failed or Rejected, it means that the template does not comply with WhatsApp's policies, and any attempt to modify the message in the WhatsApp console may result in the message not being delivered.
It is advisable to review the template and make the necessary changes to comply with WhatsApp's policies before resubmitting it for approval. In the meantime, it is recommended to refrain from sending any messages using the failed or rejected template.
Things to remember for your message template to be approved
- Your template name and message should clearly convey to the recipients why they have received the message.
- You cannot use template placeholders in the beginning or in the end of the message. This will lead to automatic rejection of your template.
- The maximum size for a message template, including any placeholders that are replaced with text, is 1024 characters. If your template exceeds this limit, the message will not be delivered to the recipient.
- Do not keep the placeholder variables next to each other like {{1}} {{2}}.
- Do not use words instead of numbers within the curly braces.
- Keep the placeholder variables sequential throughout your message and do not miss out even a single number in the sequence.
- A Maximum of 10 placeholders are allowed.
- Ensure that you do not use multiple sequential line breaks in your message as they are not allowed by WhatsApp.
- Do not create a duplicate template message with a different template name.
- Do not make any spelling or grammatical mistakes.
- Use no more than 4 consecutive spaces.
By sticking to these guidelines, you can increase the likelihood that your message template will be approved.
Setting up a form to send WhatApp Notifications
Once you have finished configuring the above steps in your Control Panel, you can configure WhatsApp Notification settings for individual forms. You can configure the same without or with headers, based on the template selected.
Send Notifications Without Headers
To send WhatsApp Notifications using message text (without any headers),
- Go to the form builder of the form that you wish to send WhatsApp Notifications for.
- Navigate to the Settings tab > Email & Notifications > WhatsApp Notifications.
- Click Configure Now.
- Select the Channel and Template that you wish to use for sending WhatsApp notifications for this form.
- Enter the Recipient's phone number. You can either enter a number or select a Phone field from your form by clicking the phone icon. If you select a Phone field from your form, the message will be delivered to the phone number entered by the respondent in the selected Phone field.
You can either use US format or use International format with Country Code. - Under Placeholder Mapping, you can select the form fields whose responses you want to replace for the placeholders in the double curly braces you specified when configuring the WhatsApp message template.
- Click Save.
The mapped template above has no headers as you can see in the preview.
Send Notifications With Headers
If your template includes a header (Text or Image), you can configure the notification based on whether the header is static or dynamic.
For a template with a static header:
- Select the template for the WhatsApp Notification.
- Map the placeholders in the message text, if any.
Header will be used from the selected template directly, as you can see in the preview.
For example: In the above order update form, the customer's name, product name, and order number are sent as a WhatsApp notification along with the order status shown as the Header Text.
For a template with a dynamic header:
- Select the template for the WhatsApp notification.
- Click Choose Field under Header Mapping to display the available image upload fields in the form.
- Select the Image Upload Field that need to be mapped as the dynamic header. Add placeholders for message text if needed.
Preview the WhatsApp notification message with a placeholder image as the header and the message text.
For example: In the above order form, the customer's name and order number are sent along with the image uploaded by the customer (e.g., a sample cake design), which appears as the Header Image in the notification.
You can view the status of the WhatsApp notifications sent for each form entry in the All Entries section of your form under the WhatsApp Status column.
Pricing
WhatsApp has adopted a per-message pricing model, effective July 1, 2025, replacing the earlier 24-hour conversation-based billing system. Under this model, businesses are billed for each delivered template message, offering more transparency and control over messaging costs.
Charges are determined based on:
- The message category — Marketing, Utility, or Authentication.
- The country code of the customer your business is communicating with. Rates vary by country or region.
Note:
- Currently, there are no free credits available for using WhatsApp Notifications for any number of conversations.
- To ensure that your WhatsApp Notifications are successfully delivered, it is necessary to purchase the IM credits Add-On from the store in addition to your existing Zoho Forms subscription.
How to purchase credits
Zoho Forms manages the billing and credit line for your WABAs. To purchase credits,
- In your Zoho Forms account, click the Subscription link in the top-right corner.
- Under Nonrecurring Add-Ons, click Buy More.
- Specify the number of credits you want to purchase. You will be charged per credit, along with a value-added fee of 3% of the cost.
- Click Proceed and make the payment.
- Once paid, your credits will be topped up and will be reflected in the Available Balance section, and you can start sending your WhatsApp business messages.
The phone number tier of your WhatsApp Business account will determine your messaging limits - the number of unique contacts (customers) an account can message in a 24-hour period.
There are four tiers for a WhatsApp Business Account's phone number:
Tier 1 : Send 1000 business-initiated conversations to individual customers over a rolling 24-hour period.
Tier 2 : Send 10000 business-initiated conversations to individual customers over a rolling 24-hour period.
Tier 3 : Send 100000 business-initiated conversations to individual customers over a rolling 24-hour period.
Tier 4 : Send unlimited business-initiated conversations over a rolling 24-hour period.
If your business use-case requires switching between these tiers, you will have to raise your requests with Meta.