Document Merge using Zoho Writer
Overview
The merged documents can be attached in an email and sent to all respondents, either through an automated email or to selected respondents manually. You can further get these documents signed digitally using Zoho Sign.
Setting up Document Merge using Zoho Writer
To set up a document in Zoho Writer,
-
Navigate to Settings > PDF & Document Merge > Document Merge.
- Click Configure next to Zoho Writer.
- If you have both Zoho Docs and Zoho WorkDrive accounts, you will be prompted to select a document service to view/create/save the merge templates.
If you have not accessed Zoho Docs/ Zoho WorkDrive/ Zoho Writer yet, you must access Zoho WorkDrive and complete the onboarding before you can create a Zoho Writer template.
If your Zoho WorkDrive subscription has expired, you must access Zoho WorkDrive and upgrade your plan.
-The templates that you have created in Zoho Writer will be listed under My Templates.
-Documents that you create using the Document Merge option as well the documents from Zoho Writer will be listed under My Documents.-The templates that are shared by your organization users will be listed under Org Templates (if you have selected Zoho WorkDrive service) You can sort the templates under My Templates, My Documents, and Org Templates by Template Name, Created Time, or Modified Time using the sort option in the top-right corner.-All the public templates from Zoho Writer will be listed under Public Templates.
-
Click
+
under
My Documents
to create a new template.
-
In the pop-up, specify the
Template Name.
-
If you are looking to send this document as an email attachment, specify the
Attachment Name
and the
Attachment Type. To include a field's response in the attachment name, click the merge icon and choose the required field.
-
If you have configured
Language Translation
for your form, you can choose to use the translated form responses for the following fields while creating merged documents with this template by enabling the
Send picklist values in form's translated language
option:
-Choice-based fields
-Dropdown in Matrix Choice field
-Title in Name field
-Country list in Address field -
Click
Create. You will be redirected to the new Zoho Writer template created.
-
You can personalize your template by including your respondent's answers in it. Go to
Fields
>
Merge Fields. From the list of fields, click the required fields. The form fields will be replaced by your respondents' answers.
-
File Upload, Image Upload field attachment formats supported for Document Merge:
jpg, png, gif, jpeg
-
The images in the Image Choice Field cannot be merged. Only the choice labels can be merged.
- Matrix Choice Field: You can merge specific responses of the Matrix Choice field and also choose to merge all the questions and answers of the field in a table format as shown.
- You can display different things in your merged documents based on the respondents' answer for certain form fields. To do this, go to Fields > Merge Fields and click Condition under Advanced Merge Fields. Learn more about the conditional merge setup.
-
You can include signatures, images, and other form attachments in your merged document template. To do this, go to
Fields
> Signer Fields
>
Signature/ Attachment
under
Insert Fields
in Zoho Writer.
-
To generate two or more document templates using the same form, click + New Template in the top-right corner of the page.
Sharing merged document templates with form collaborators
-
Access your
Zoho Writer
account.
-
Under
My Documents, click the ellipsis icon below the template that you wish to share and click
Share.
- Enter the email address of the users and share the template. Once done, the users can access the shared document templates under Shared with me. They can refresh and add the fields, edit the template as required.
Note
:
-
Zoho Writer has limits on the number of merges you can generate with your account. All users in Zoho Forms' Free plan and paid plans can perform up to 10 merges per day, and up to 200 merges a month.
If you're looking for bulk merge-limits, or to increase your monthly limits, please subscribe to the new Document Automation add-on from Writer. Learn more - The attachments that are stored in a third party service using the Manage Form Attachments option cannot be used in Document merge as the attachments successfully pushed to a third party service, will not be stored in Zoho Forms.
Sending merged documents with email notifications
Watch a simple, quick video on setting up Document Merge and including the merged document in email notifications.
-
In your form builder, navigate to
Settings >
Email Notifications
under
Notifications.
-
Configure your email. You can choose to send the email to your respondents or your organization's users.
-
Select
Attach merged document.
-
Save
the changes.
Once this has been set up, form responses will be automatically populated in your Zoho Writer template, and the merged document will be sent along with the email notification triggered each time a form entry is received. You can create as many templates as you wish using Zoho Writer.
Manually merge a form response with a document
To manually merge form responses with a Zoho Writer template,
-
Navigate to the
All Entries
section of your form to view entries received.
-
Select the form entry that needs to be merged from the list.
-
Select
Merge
>
Zoho Writer
>
Document Merge.
-
Select a document from the drop-down and click
Merge.

-
To view the status of the merge, check the
Mail Merge Status
column provided in the All Entries section.
-
The shared users of a report will be able to merge documents only if you have given them the Read/Write/Merge permission.
Merge and get form responses signed using Zoho Sign
-
Configure the
document merge setup
using Zoho Writer.
-
Navigate to the
All Entries
section of your form to view form entries received.
-
Select the form entry that needs to be signed and verified from the list.
-
Choose Merge
> Zoho Writer
from the dropdown menu.
-
Select Merge and Sign
from the subsequent drop-down menu.
-
In the pop-up, you can do the following under
Zoho Sign Settings
:
Needs to sign : If you need someone to sign a particular merged document, enter their email address and select Needs to sign in the dropdown menu next to the email address field.
Receives a copy : If you wish to send a signed copy of the merged document to someone, enter their email address and select Receives a copy in the dropdown menu next to the email address field. -
To send the merged document in consecutive order, check the Send in order box.

- Once the intended signers are added, click Continue.
- A new window will open. This will take you to the Edit Document Details window of your Zoho Sign account. Here, all details regarding the current merged document will be displayed. You can add or import more signers to the list, add yourself as a signer, set reminders, and give a brief description of the document being sent for signing.
- Click Continue to proceed.
- The merged document template will open, where you can drag and drop fields such as Signature, Job Title, Email, and Sign Date for the intended signers. When you're done, click Send.
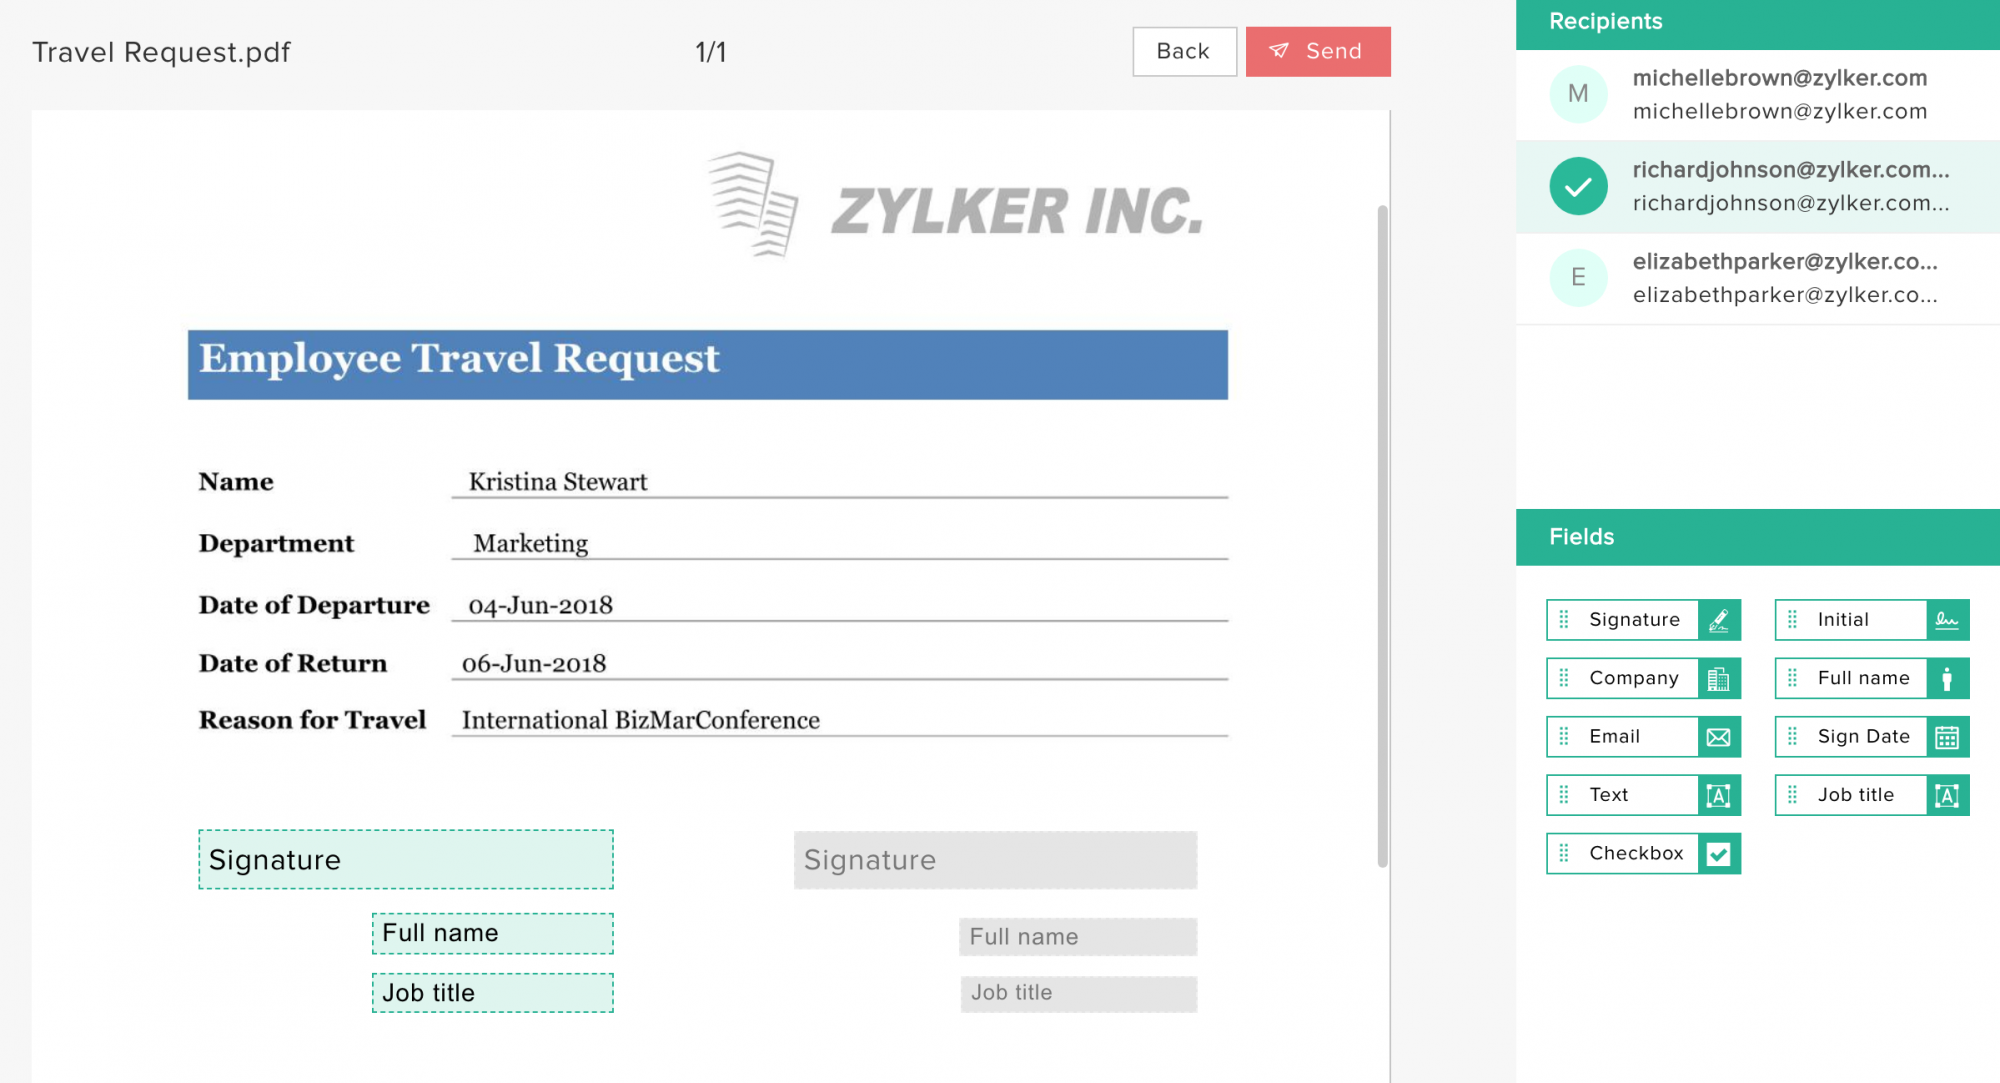
-
A dialog box will open to confirm the intended signers and the number of fields added for the signing process. Click Confirm to send the document.
Once this is done, the document will be mailed to the list of intended signers and recipients who will receive a copy of the document.