Creating custom PDF Template
Table of contents
Watch a quick video that will walk you through the various features and functionalities of the PDF editor, enabling you to create polished and professional-looking documents for your business needs.
To create your own custom PDF template that you wish to use in the Thank You page or include in the email notifications,
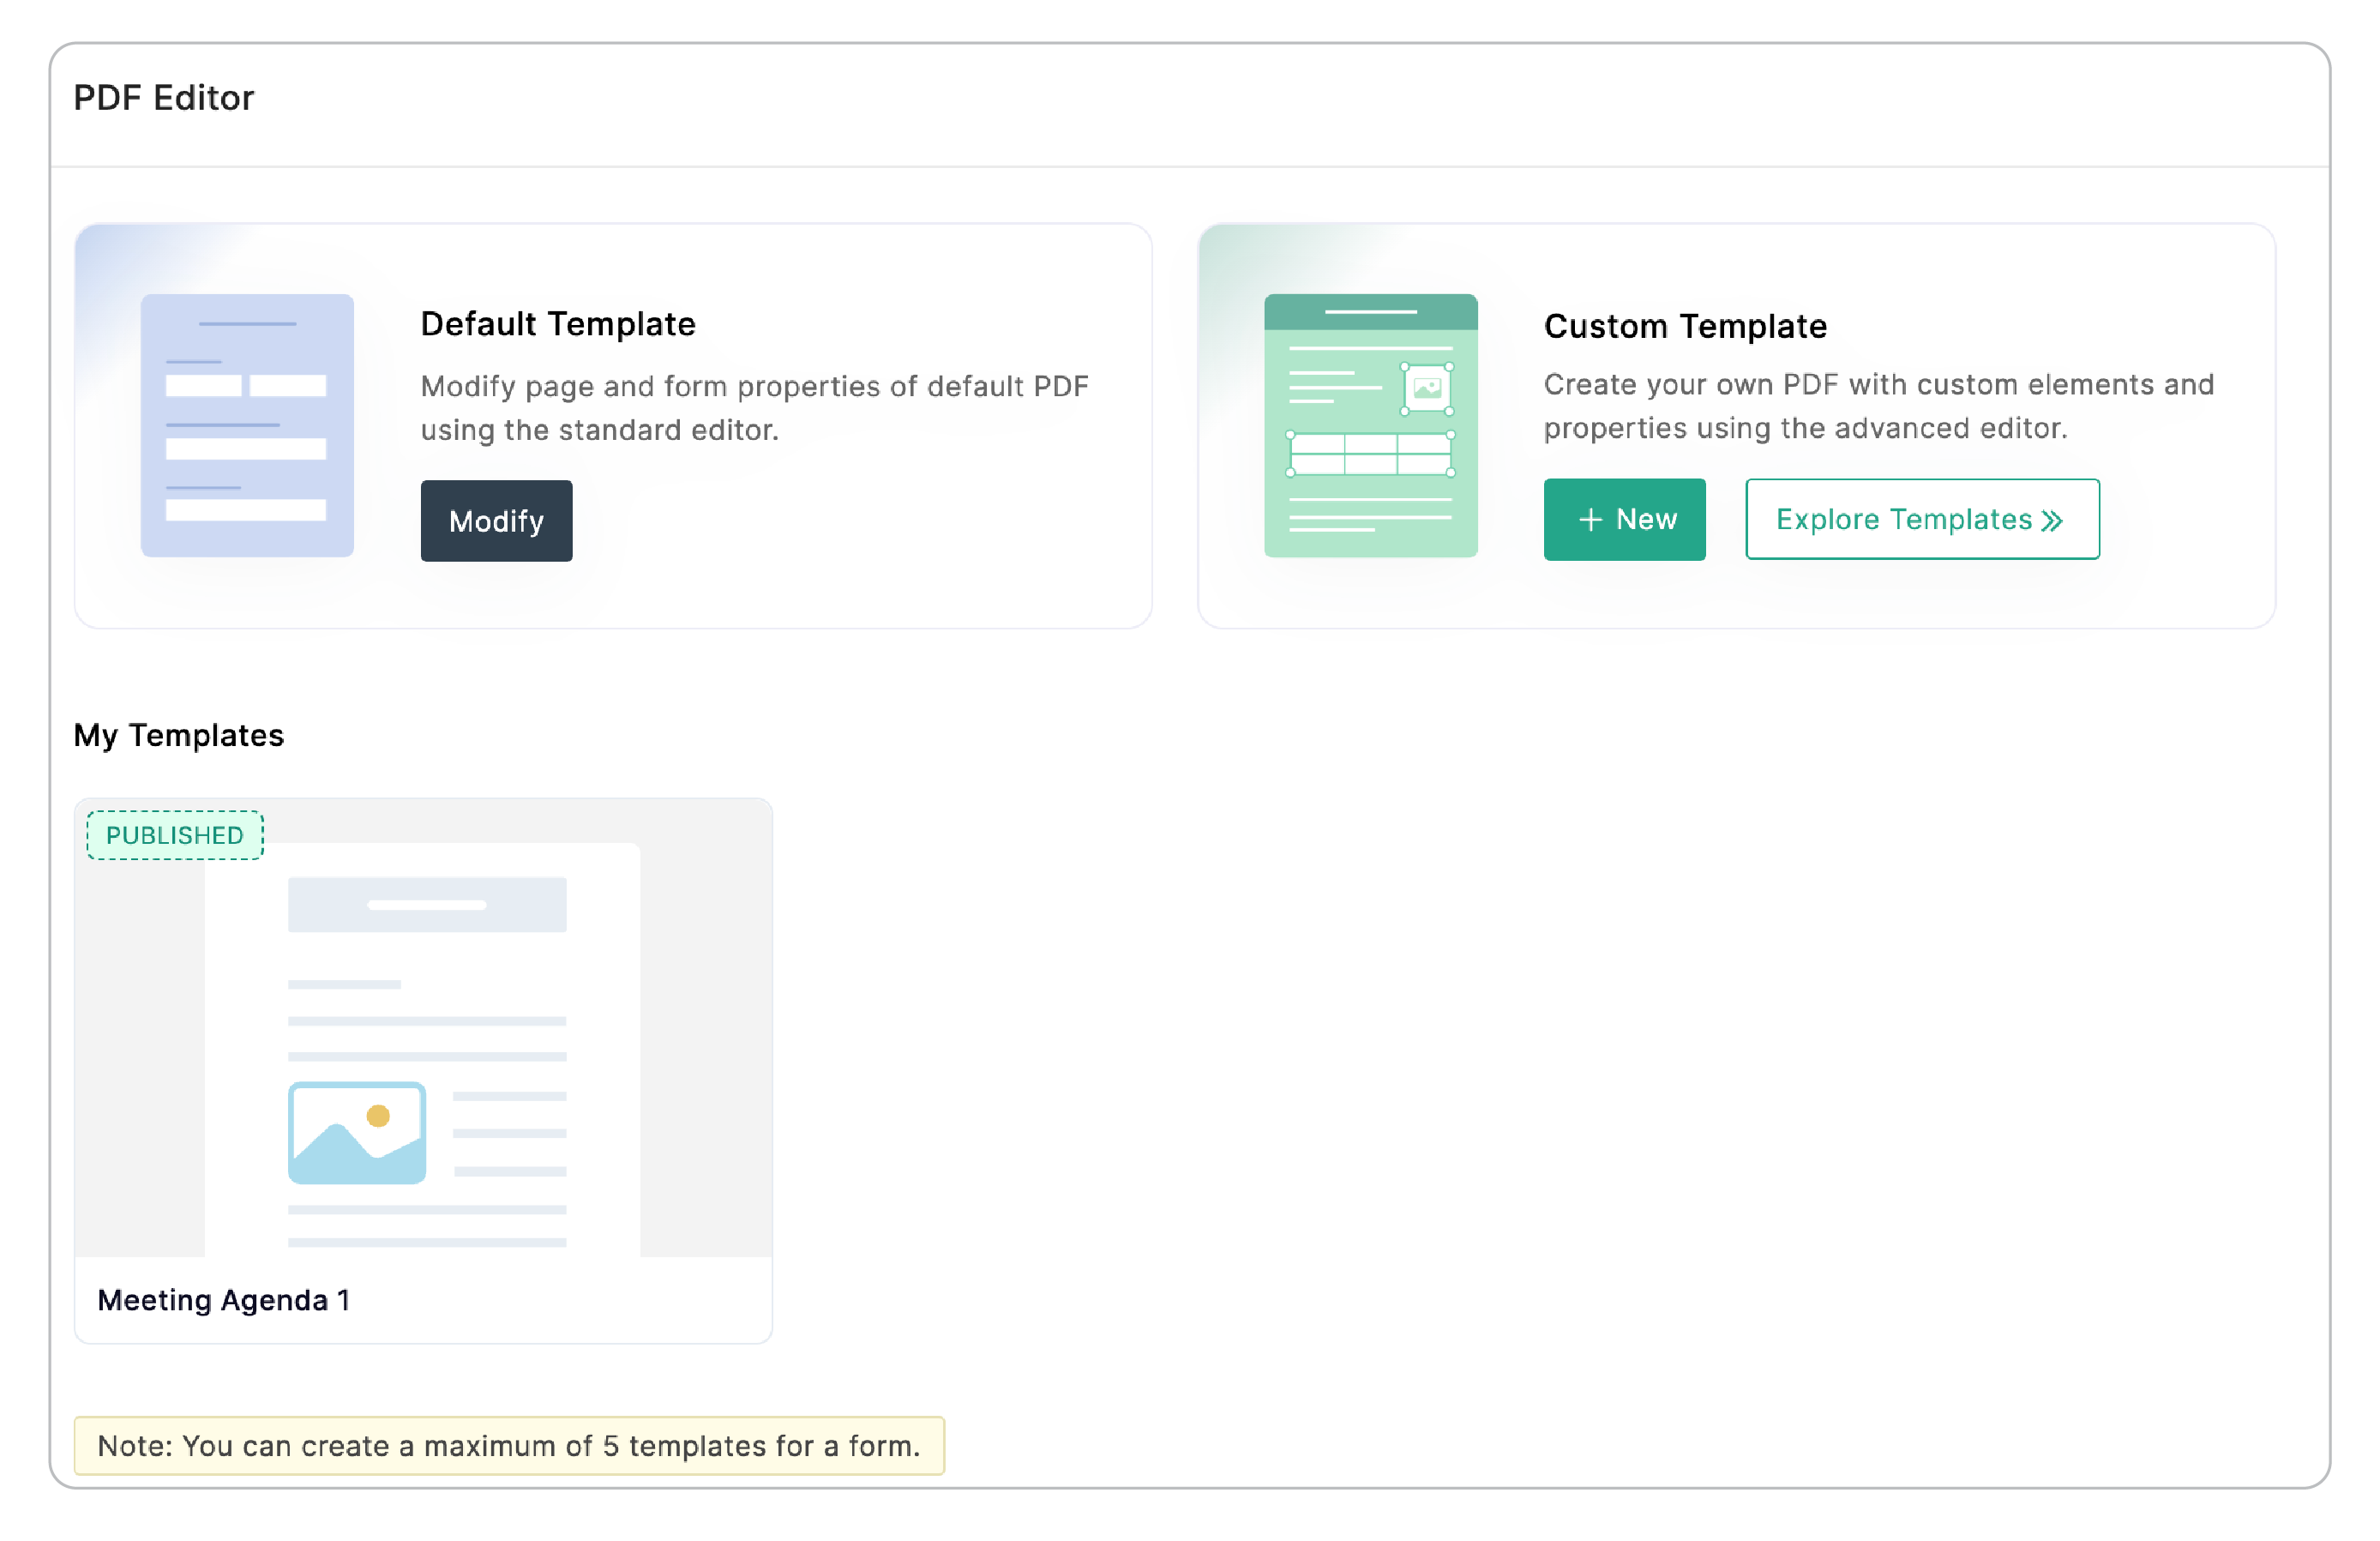
Navigate to Settings > PDF & Document Merge > PDF Editor .
You can either choose the default template for PDF and modify it or create your own PDF using the Custom Template option with custom elements and properties using the advanced editor.
To create your own custom template, click + New under Custom Template. You can also choose from our pre-built PDF templates using the Explore Templates option under Custom Templates.
In the pop-up, you can either choose to create your template from scratch using the Blank option, or customize the Pre-populated template.
Creating your template from the scratch
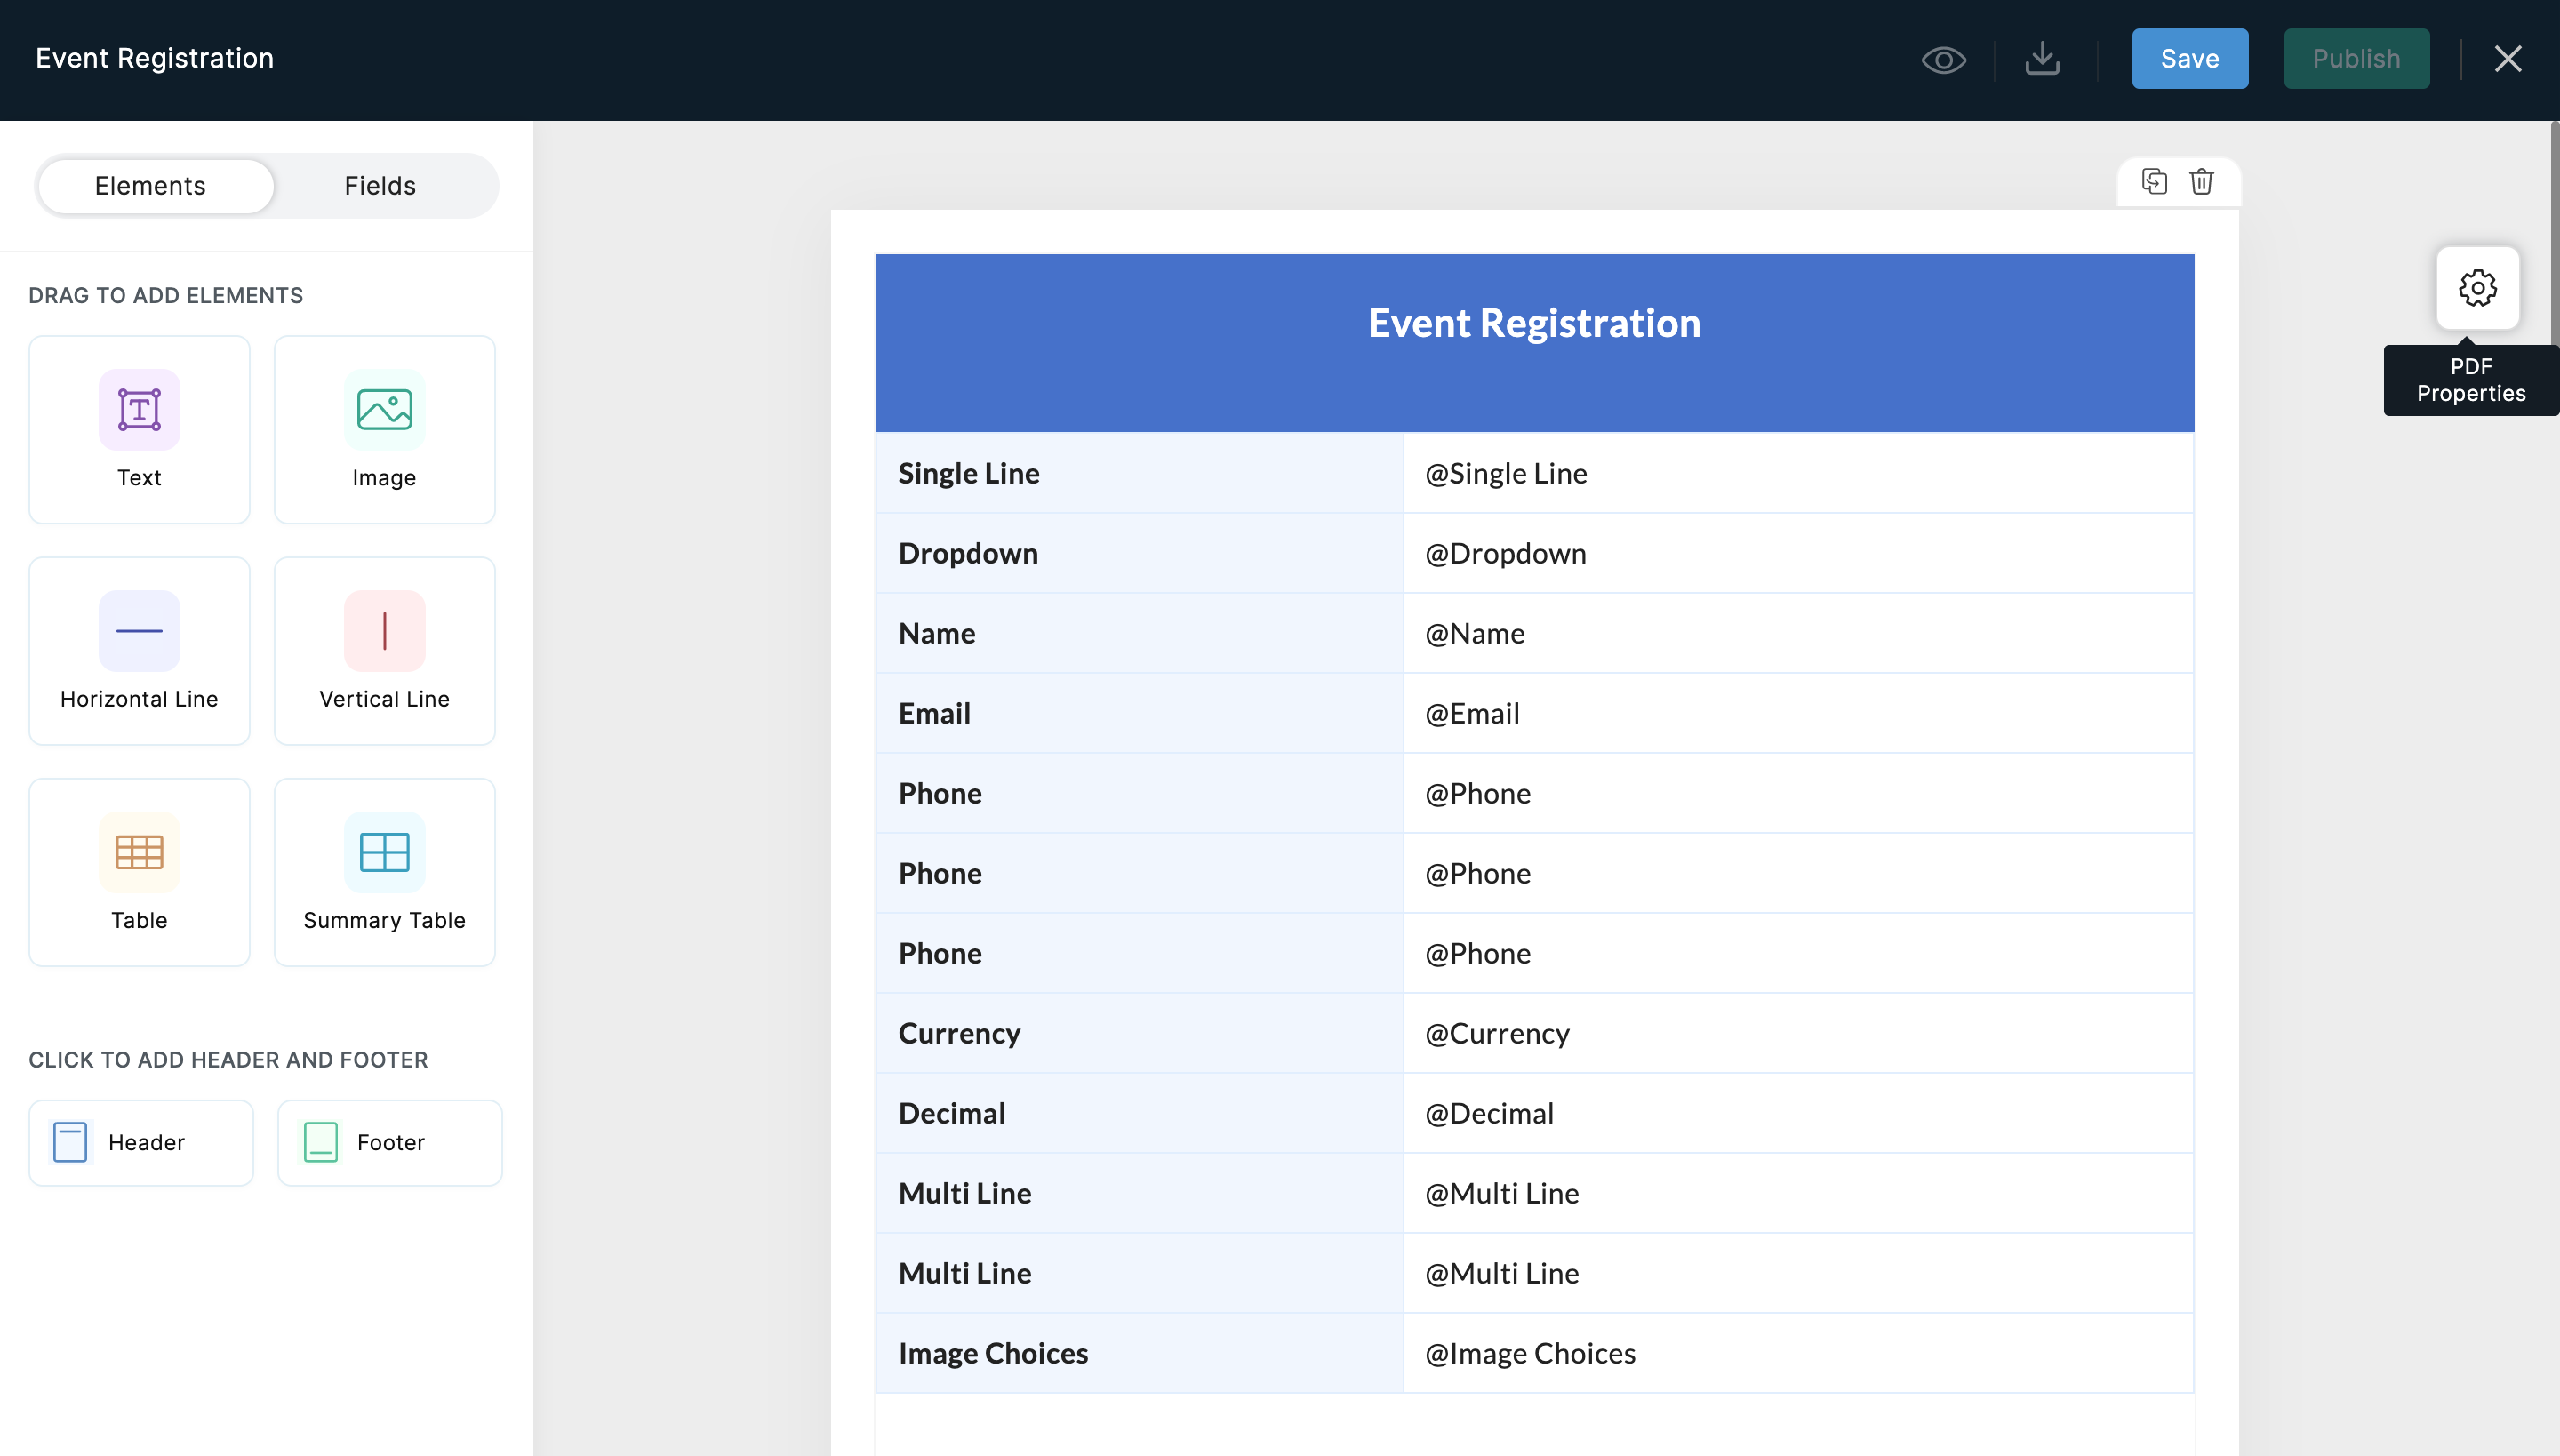
If you choose to create your PDF template from scratch using the Blank custom template option, you will land on our Advanced PDF Editor. From the left pane, you can drag and drop Elements and Fields on to your template.
You can duplicate any page you create in your PDF template by clicking the  icon on the top-right corner of the page.
PDF Layout
You can choose the layout of your PDF document generated to be in a Fixed Layout or Free-flow Layout.
Fixed Layout | Free-flow Layout |
In a Fixed Layout, the text and elements within the PDF will adhere strictly to the defined boundaries or containers. If the content exceeds the container's size, it will be truncated or cut off. | In a Free-flow Layout, the collected data within the PDF is allowed to flow naturally without strict boundaries or containers. Content can expand or contract dynamically based on the length of the text. If content exceeds the space on one page, it will naturally continue onto the next page. |
Pros
Cons
| Pros
Cons
|
When to use Fixed Layout and Free-flow Layout?
Use Fixed Layout When:
- The document is intended for print, such as brochures, posters, or forms that require exact positioning of elements.
- The documents consists of intricate grid systems, multi-column layouts, or where visual alignment is critical.
Use Free-flow Layout When:
- The primary emphasis is on the content, like articles, reports, or ebooks. This allows for optimal readability and user experience.
- The length of the content is variable and unpredictable, a free-flowing layout allows for natural expansion or contraction.
How to switch between the layouts?
Click the  icon (Change Layout) in the top-right corner and click Switch .
Elements
The elements you can add include:
- Text
- Image
- Horizontal Line
- Vertical Line
- Table
- Summary Table
- Header
- Footer
Text
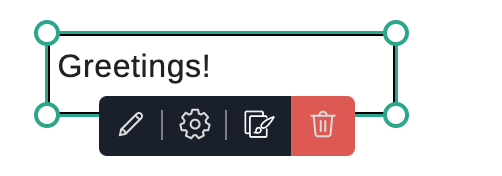
When you add a Text element, you can type in any content that you want inline.
To edit this text, access the settings of the text, copy/paste its properties, or to delete it, hover over the text on your template and you will find the icons for each.
Editing the text
To edit this text, access the settings of the text, copy/paste its properties, or to delete it, hover over the text on your template and you will find the icons for each.
Editing the text
- To edit the text, hover over the added text element on your template and click the edit (
) icon.
- In the Edit Content pop-up, you can apply basic text formatting to the text.
- If you prefer a light colored font for this text, you can type it in using the option to switch to dark mode at the bottom-right corner of the pop-up for better visibility while you type in.
- To include any fields within this text, enter @ and you will see the list of fields on your form from which you can select the required fields. The form responses for these fields will get added in the place of these field labels in the live PDF.
Text Settings
- To access the Settings of the Text element, hover over the added text element on your template and click the Settings (
) icon. The Text Element Properties pane will open on the right.
- Here, you can choose a background color for your text element container and adjust the spacing of the text from the edges of the text border.
- If you wish to have a border for this text, you can choose the border style, the color, thickness and the radius of the border under BORDER .

Note :
- When you copy the properties of the Text element, only the Text element Properties configured will be copied. The copied properties can be pasted to other Text elements of a form field of similar type.
- The maximum number of characters that you can include in a Text element is 30,000.
Image
When you add an Image element, you can include any image that you want. To access the properties of the image, copy/paste its properties, or to delete it, hover over the image on your template and you will find the icons for each.
Image Properties
- To access the properties of the Image element, hover over the added image element on your template and click the Settings icon. The Properties pane will open on the right.
- Here, you can upload an image from your desktop.
- You can choose to use a stretched image by selecting the option and align the image to the left, center, or to the right of the template.
- You can choose a background color for your image element container and adjust the spacing of the image from the edges of the image border.
- If you wish to have a border for this image, you can choose the border style, the color, thickness and the radius of the border under BORDER .
Note : When you copy the properties of the Image element, only the Image element Properties configured will be copied.Horizontal Line
When you add a Horizontal Line element, you add a rule to create a horizontal section on your template. To access the properties of the horizontal line, copy/paste its properties, or to delete it, hover over the horizontal line on your template and you will find the icons for each.
Settings
- To access the properties of the Horizontal Line element, hover over the added horizontal line on your template and click the Settings icon. The Horizontal Line Properties pane will open on the right.
- Under LINE DESIGN , you can select the Style and Color of the line.
- You can also set the position of the to be at the top, center, or at the bottom of the element space.
- You can also choose the thickness of the line using a simple slider.
Note: When you copy the properties of the Horizontal Line element, only the Horizontal Line element Properties configured will be copied.
Vertical Line
When you add a Vertical Line element, you add a rule to create a vertical section on your template. To access the properties of the vertical line, copy/paste its properties, or to delete it, hover over the vertical line on your template and you will find the icons for each.
Settings
- To access the properties of the Vertical Line element, hover over the added vertical line on your template and click the Settings icon. The Vertical Line Properties pane will open on the right.
- Under LINE DESIGN , you can select the Style and Color of the line.
- You can also set the position of the line to be at the top, center, or at the bottom of the element space.
- You can choose the thickness of the line using a simple slider.
Note : When you copy the properties of the Vertical Line element, only the V ertical Line element Properties configured will be copied.
Table
When you add a Table element, you add a table with 3 rows and 3 columns on your template.
To add and delete rows and columns to the table, click the table on the template and click the ellipsis icon.
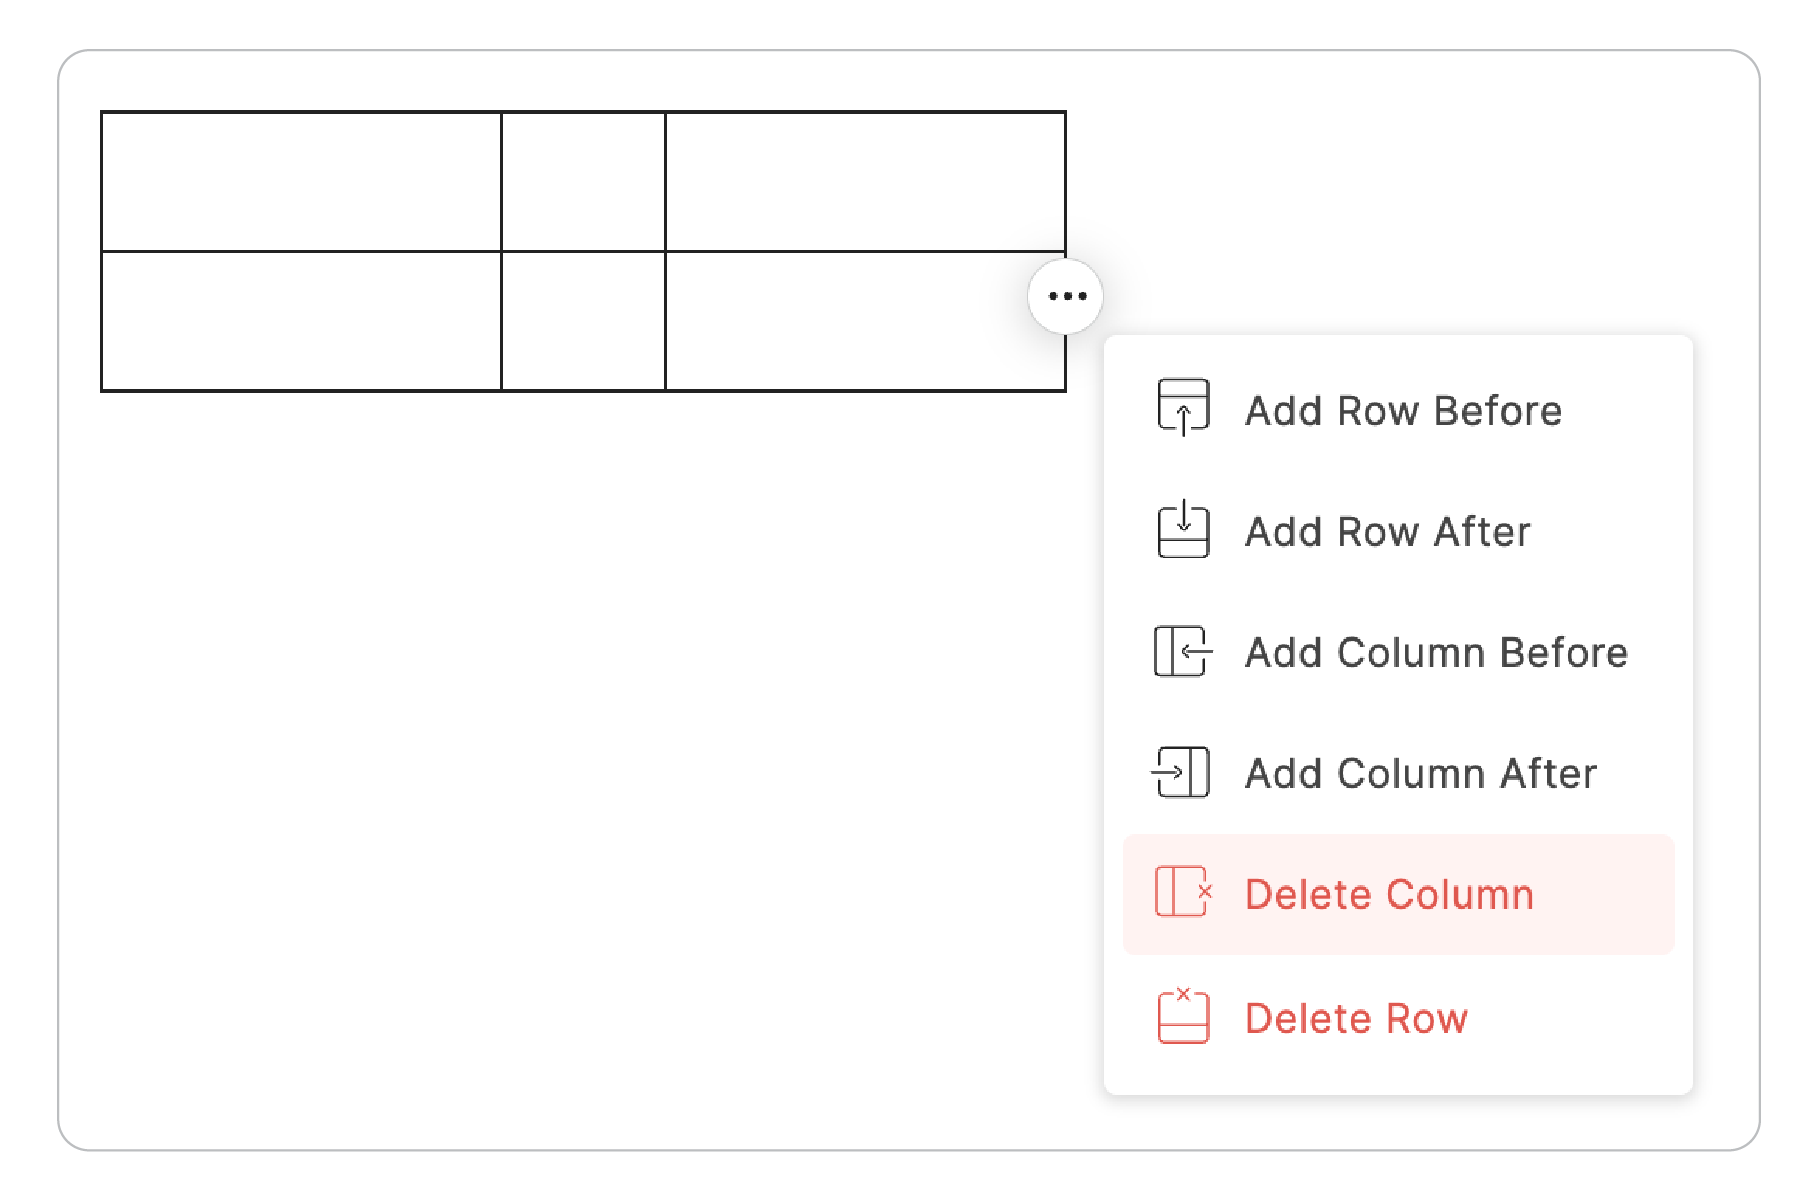
To adjust the size of the table, hover over the added table and drag the corner or the sides of the table adjustment tool.
You can also change the width of a column by hovering over the column divider line and dragging the arrow.
To access the properties of the table, copy/paste its properties, or to delete it, hover over the table on your template and you will find the icons for each.
Table Properties
- To access the properties of the Table element, hover over the added table on your template and click the Settings icon. The Table Properties pane will open on the right.
- Under THEME , you can select the table style and color of the cells.
- Under BORDER , you can select the style of the table border (Solid Line, Dotted Line, Dashed Line) and its color.
- Under TABLE SETTINGS > Cell Padding, you can adjust the space between the content of the cell and the cell's border for all the table cells.
- Under HEADER SETTINGS , you can select the font family, font size, font color, and the font style (Bold, Italics, Underline) for the Table Header. You can also align the Table Header text to the left, center, right, or justify.
- Under CELL SETTINGS , you can select the font family, font size, font color, and the font style (Bold, Italics, Underline) for the table cell text. You can also align the cell text to the left, center, right, or justify.
 Note:
Note: When you copy the properties of the Table element, only the Table element Properties configured will be copied.
Each cell within a table can contain up to 12,000 characters.
Summary Table
- A summary table will have 2 columns by default, one for field and another for response. This can be used to create a table with the summary of fields and their responses.
- To insert fields within the table click the ellipsis icon as shown and click Insert Fields . You can also choose any assigned values of choice fields into the rows of the table with this option.Select the fields to be added to the columns of the summary table and the fields and their responses will be added to the respective columns.
- To access the properties of the Summary Table element, hover over the added table on your template and click the Settings icon. The Summary Table Properties pane will open on the right.
- Under BORDER , you can select the style of the table border (Solid Line, Dotted Line, Dashed Line) and its color.
- Under TABLE SETTINGS > Cell Padding, you can adjust the space between the content of the cell and the cell's border for all the table cells.
- You can choose a column background color, font family, font size, font color, and the font style (Bold, Italics, Underline), and text alignment for the FIELD COLUMN and RESPONSE COLUMN separately.
- You can choose to exclude the rows of the table that do not have any form field responses added in the PDF by selecting the Exclude rows containing no field values checkbox under OTHER OPTIONS.
- You can choose to include a column for serial number by selecting the Show Serial Number checkbox under OTHER OPTIONS. A new column to include the serial number will be added which will have auto incremented values.
Note : When you copy the properties of the Summary Table element, only the Summary Table element Properties configured will be copied.
Note : If the size of the content in an element exceeds the element size, the overflowing content will be hidden.
Header and Footer
You can choose to have a header and footer for your PDF template. When you add a Header/Footer element, you can type in any content that you want for the PDF header/footer.
To edit this text, access the settings of the text, copy/paste its properties, or to delete it, hover over the header/footer text on your template and you will find the icons for each.
Editing the header/footer text
- To edit the header/footer text, hover over the added header/footer element on your template and click the edit icon.
- In the Edit Content pop-up, you can apply basic text formatting to the text.
- If you prefer a light colored font for this text, you can type it in using the option to switch to dark mode at the bottom-right corner.
- To include any fields within the header/footer text, enter @ and you will see the list of fields on your form from which you can select the required fields. The form responses for these fields will get added in the place of these field labels in the live PDF.
Header/Footer Settings
- To access the Settings of the Header/Footer element, hover over the added header/footer element on your template and click the Settings icon. The Settings pane will open on the right.
- Here, you can choose if you want to include the header/footer on all the pages of your PDF.
- You can choose a background color for your header/footer element container and adjust the spacing of the text from the edges of the text border.
- If you want to have a border for the header/footer, you can choose the border style, the color, thickness and the radius of the border under Border .
Fields
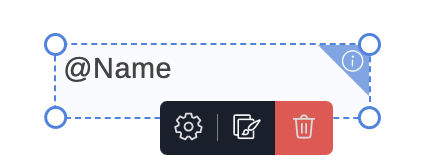
Under this section on your left pane, you will see the list of fields that are added on your form. You can also search for the required fields and drag and drop them onto your PDF builder.
The form responses for these fields will get added in the place of these field labels in the live PDF.
To access the PDF settings of the field, copy/paste its properties, or to delete it, hover over the field on your template and you will find the icons for each.
Field Settings
- To access the Settings of the Field element, hover over the added field element on your template and click the Settings icon. The Field Settings pane will open on the right.
- Here, you can choose a background color for your field and adjust the spacing of the field from the edges of the field border.
- If you want to have a border for this field, you can choose the border style, the color, thickness and the radius of the border under BORDER .
- You can select the font family, font size, font color, and the font style (Bold, Italics, Underline) for the Field responses. You can also align the field responses to the left, center, right, or justify.
- Fields like Image Upload, Subform, Matrix Choice, Image Choices have certain additional properties.
Matrix Choice
- You can select the MATRIX LAYOUT to be either Default or Summary .
- Under THEME , you can select the matrix style and color of the cells.
- Under TABLE SETTINGS > Cell Padding, you can adjust the space between the content of the cell and the cell's border for all the table cells.
- Under QUESTION STYLE and CONTENT STYLE, you can select the font family, font size, font color, and the font style (Bold, Italics, Underline) for the matrix questions and content respectively. You can also align the text to the left, center, right, or justify.
Image Upload
- Under THUMBNAIL, you can choose the arrangement style of the uploaded images and choose if you wish to display the image labels.
- Under IMAGE CONTAINER, you can choose the type and color of the container.
Image Choices
You can choose if you want only the image labels to be displayed or only images to be displayed in the PDF.
Subform
- Under THEME, you can select the subform style and color of the cells.
- Under TABLE SETTINGS > Cell Padding, you can adjust the space between the content of the cell and the cell's border for all the table cells.
- You can choose the font family, font size, font color, font style (Bold, Italics, Underline) for the header and cells separately under HEADER SETTINGS and CELL SETTINGS respectively.
- To delete a page, click the delete icon on the top-right corner of the page.
- If the content exceeds the container's volume, it will not be visible in the PDF. You are required to adjust the size of the container so that the content is fully visible.
My Templates
Once you are finished with creating the template, you can save the template as a draft using the Save option or publish the template using the Publish option in the top right corner. You can preview the template or download it your desktop using the respective options in the top-right corner as shown below.
Once you have saved or published your template, you can view them under the My Templates tab as shown.
Note :
- Only if a PDF template is published will it be listed under PDF Editor, Acknowledgement & Redirects, and other places.
- If a template has a draft and a published version, only the published version will be sent to all end points.
You can edit or preview the templates under the My Templates tab using the respective options as shown.
By clicking the ellipsis icon in the top- right corner of a saved or published template, you can access the settings of the template, duplicate, or delete the template.
Under the Settings, you can change the Template Name, PDF Attachment Name and also set a PDF Password under Password Protection to restrict access to the PDF.
Password Protection
You can restrict access to the generated PDF by requiring recipients to enter a password to open it. The password can be configured as a static value that you enter manually, a dynamic value generated from up to three form field responses at the time of submission, or a combination of both.
To enable password protection:
- In the PDF Editor > My Templates, hover over the desired template.
- Hover over the horizontal ellipsis and click Settings.
- In the Template Settings popup, enable the Password Protection checkbox.
- In the PDF Password field, enter a password. To include form field values, click
icon and select the fields you want to add. Fields are combined in the order they are selected.
- Click Update.
Supported Form Fields for Dynamic PDF Password
The following form fields are supported for generating the PDF password dynamically:
- Name (First Name, Middle Name, and Last Name)
- Email
- Single Line
- Number
A maximum of 3 fields can be selected for generating PDF Password. Selecting more than 3 fields is not permitted.
Note:
- PDF Password must be between 8 and 50 characters.
- If the combined output of all selected fields exceeds 50 characters, only the first 50 characters will be used as the password in the live form.
- If all the form fields selected for PDF Password are left blank by the respondent and no static text is included, the PDF can be accessed without requiring a password in the live form.
- The PDF Password accepts all character types: uppercase and lowercase letters, numbers, special characters, spaces, and characters from all supported languages (Unicode). No character restrictions apply.
- Password Protection option is not available when downloading a PDF from All Entries using the Record Summary Layout.
Using the Pre-populated Template
If you choose to use the Pre-populated template, all the fields will be populated in a summary format. You can customize the template to your liking on the Advanced PDF Builder.
Using Pre-built PDF Templates
If you choose to use any of the pre-built PDF templates, click Explore Templates under Custom Template.
You will be taken to the pre-built templates gallery.
Hover over a template to Preview or Use the template.
Once you choose to use a template, you can will land on the Advanced PDF builder where you can customize the template to your liking by dragging and dropping elements and fields to the template.
Note :
- A maximum of 5 PDF Templates can be created for a form.
- A template can consist of a maximum of:
Pages : 20
Elements/Fields : 2000
Content Limit : 10,00,000 (10 lakhs)
Image Elements : 15
Images : 20
Image Upload Fields : 5
Table columns : 10
You can view the PDF generation status for the custom templates in the All Entries/ Custom Report section under the PDF Status column. This column will not be updated if you are using the default PDF template.
PDF Properties
Whether you create a template from scratch, customize the pre-populated template or use any of the pre-built templates, you can edit your PDF using the PDF Properties icon on the right as shown in the below image.
Under PDF Properties, you can modify the following:
FORMAT
- Size : You can select the page size of your PDF from the listed options (A4, Letter, A3).
- Orientation : You can set your page orientation to Portrait or Landscape.
FONTS
Under FONTS, you can choose the font style and size for the PDF text.
MARGIN
You can set margins for your document here from the dropdown. If you wish to have a custom margin, choose CUSTOM SIZE from the dropdown and provide the values.
SHOW PAGE NUMBER
- You can choose to display page numbers on each page of your PDF.
- If you choose to display the page number, you can choose the position of the page number from the dropdown and select a font color.
- The page number will be displayed in the PDF only if the bottom margin chosen is above 0.25.
BORDER
If you want to have a border for the PDF document, you can choose the border Style , the Color , Thickness and the Radius of the border.
BACKGROUND
Here, you can choose the Background colour for the PDF document and upload an image to be the document background.
You can align this image to the left, center, or right in the background and fit the image as needed (Tile or Stretch).
You can also adjust the opacity of the background using a slider.
CONTENT AREA BACKGROUND
Here, you can choose the Background colour for the content of PDF upload an image to be the content background.
You can adjust the opacity of this background using a slider and the spacing of the content from the edges of the PDF border.
OTHER OPTIONS ( Only for Free-flow Layout)
If you select the Free-flow Layout for generating PDFs from your form submissions, there's an additional option available in the PDF properties which allows you to automatically remove any empty pages and fields that don't contain any values.
This means that if there are fields in your form that haven't been filled out by the respondent, those empty field values won't appear in the generated PDF . This can help streamline the PDF document and make it more concise by excluding any unnecessary blank fields.
Using the PDF Template
The custom PDF template created and published will be used in the following places:
- Thank You page
- Email Notifications
- Thank You page configured in Form Rules
- Email Notification configured in Form Rules
- Response Settings
- Approval completion Email Notification
Pricing
Maximum limit for the number of PDFs that can be generated:
Free plan and Trial: 50
Paid plans: 2000

Note: This limit is applicable for a single use and does not renew automatically.
 If you want to increase this limit, you must purchase the PDF Credits Add-on from the Subscription page. This is a one-time use add-on and will not get affected by your subscription cycle. Zoho One customers must contact the Zoho One support team ( support@zohoone.com ) to purchase PDF Credits add-ons. EU customers write to support@eu.zohoone.com.
Note :
- This is the total limit for your organization's account, including all users and forms.
- You can view your PDF Usage details under Account Usage .
- If the usage reaches 90% of the limit, we will notify the Super admin via email.
- PDFs will not be generated once this limit is reached. The failure status will be updated in the All Entires / Reports section. In this case, the default PDF will not be sent.
- If the PDF Credits have been exhausted, the Download your response as PDF link will be removed from the Thank You page.
- Custom PDF template cannot be used in the Thank You page in the Free plan.