Import Form and Entries
Overview
You can bring your existing data into Zoho Forms without starting from scratch using the Import Form and Entries feature.
Zoho Forms support two import flows:
Import Form and Entries: Upload a CSV file to create a new form. The file's columns become form fields, and the rows are imported as entries.
Import Entries: Upload a CSV file to add entries to a form you have already built in Zoho Forms.
Import Form and Entries
Use this option to create a form and import entries from a CSV file.
To do this:
- On your Zoho Forms listing page, click New Form in the top right corner.
- ChooseImport Form and Entries.
Step 1: File Upload
- Drag and drop the CSV file into the upload area or click Browse to upload a file.
- Once uploaded, you will see the file details (file size, row count, column count) and preview of few rows from the uploaded file.
- Click Next to proceed.

Note:
- If the row count exceeds the allowed limit, only the form will be created. You can reduce your file size and import entries later via All Entries > Import Entries.
- If the import exceeds your plan's submission limit, only the form will be created. You can upgrade your plan to import entries.
Step 2 : Field Mapping
The File Column displays all column headers from your file. Map each column to a Zoho Forms field (Form Field) that best represents the data.
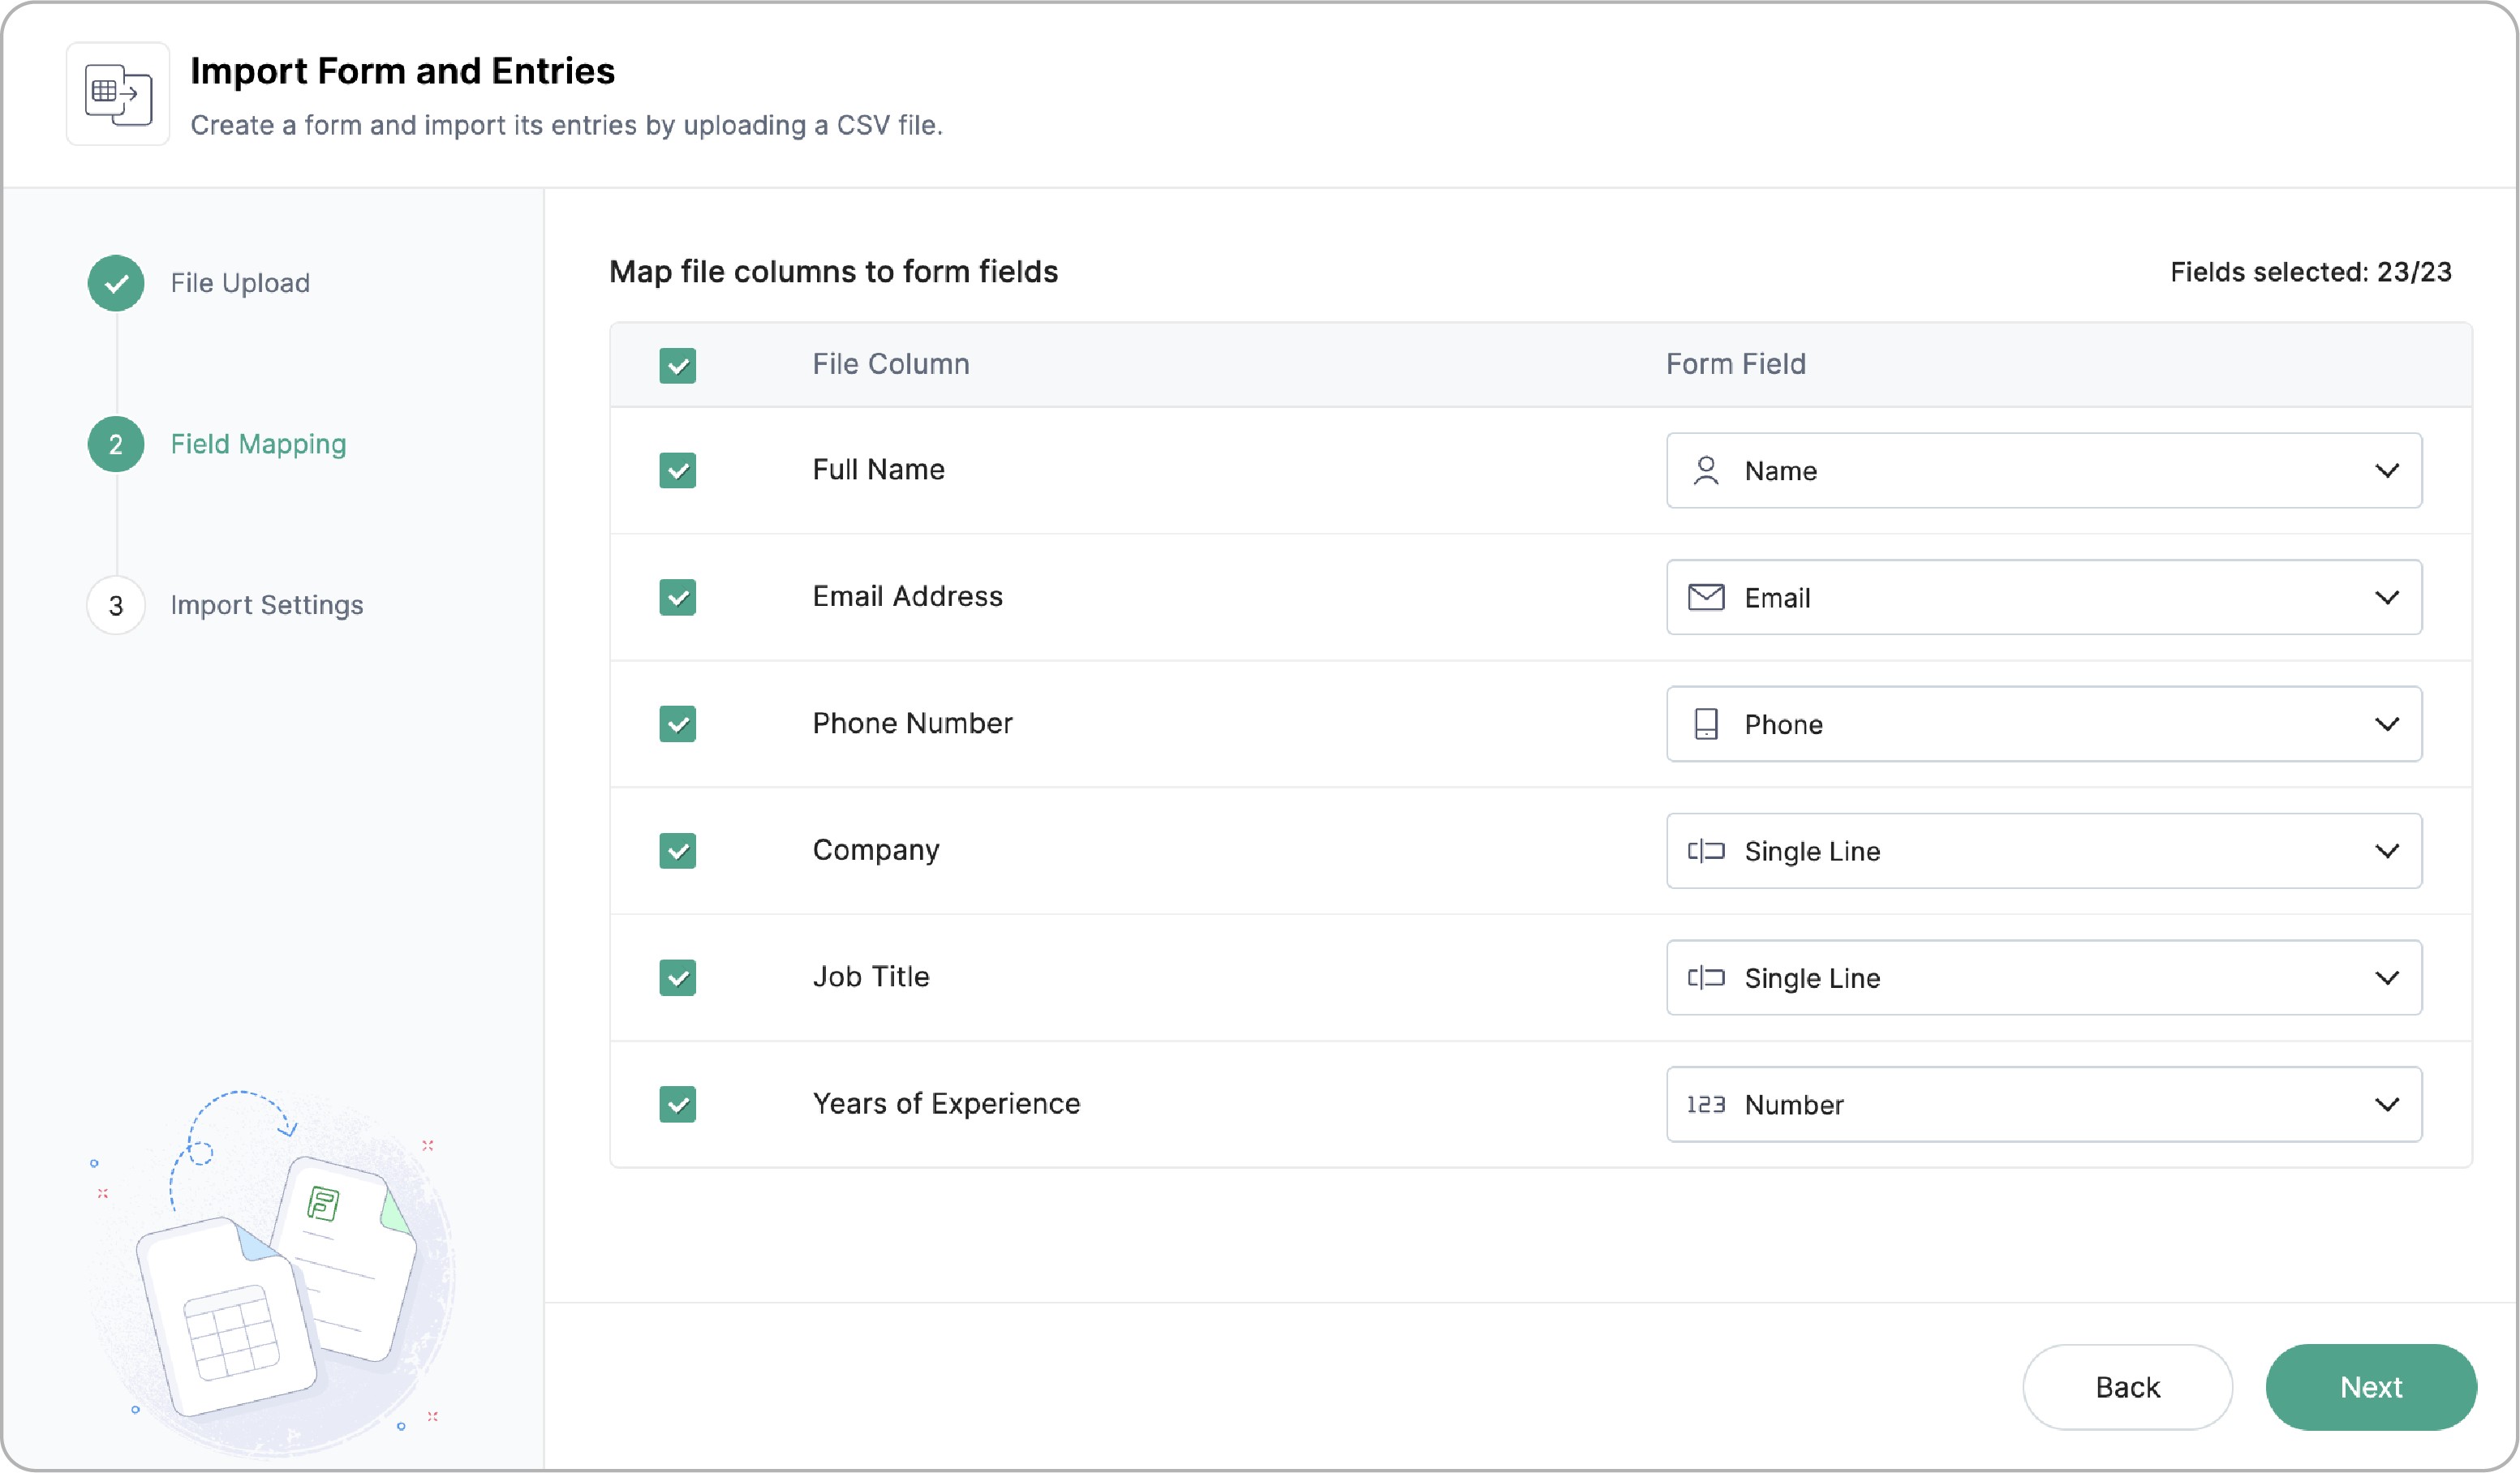
- Check or uncheck columns to include or exclude them as the form. Unchecked columns will not be imported and will not appear as form fields.
- For each selected column, choose a form field type from the dropdown.
Step 3: Import Settings
Here you can configure the form details and define how your CSV data should be formatted for import.
Form Setup
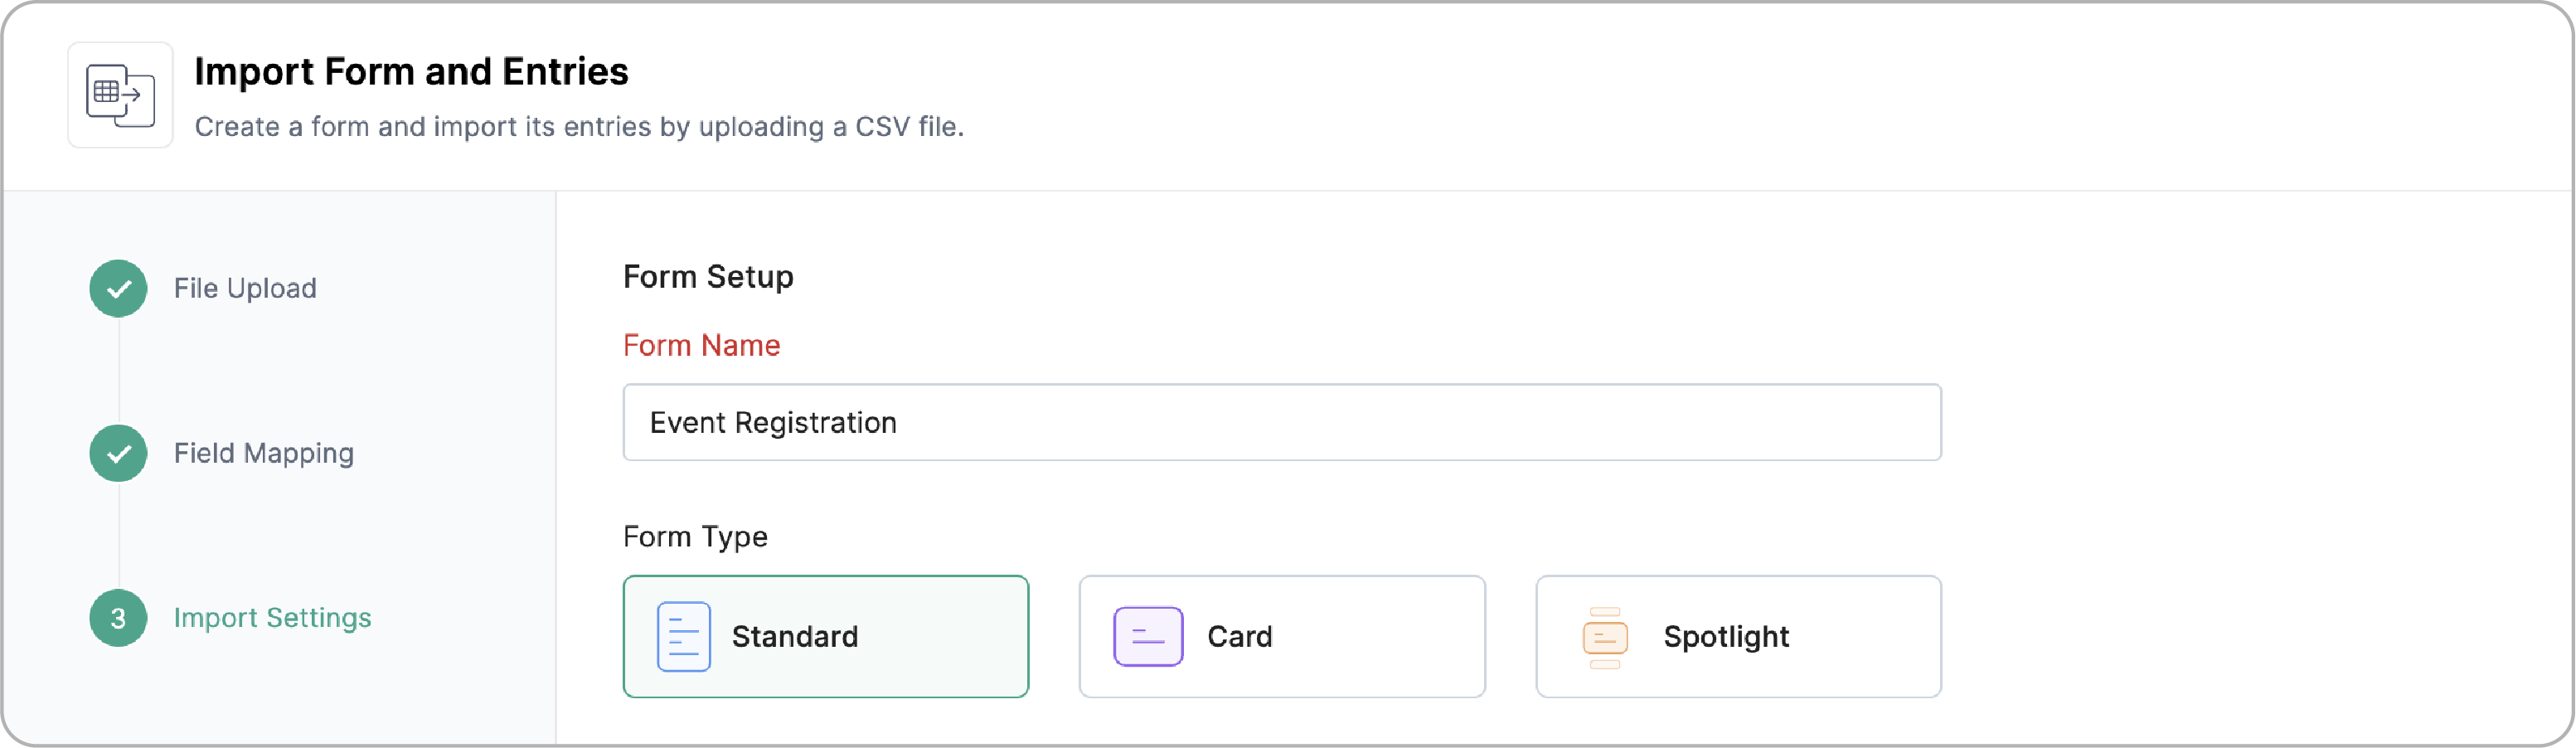
- Form Name: Enter the title of the form.
- Form Type: Choose the type of form you want to create.
Import Data Format
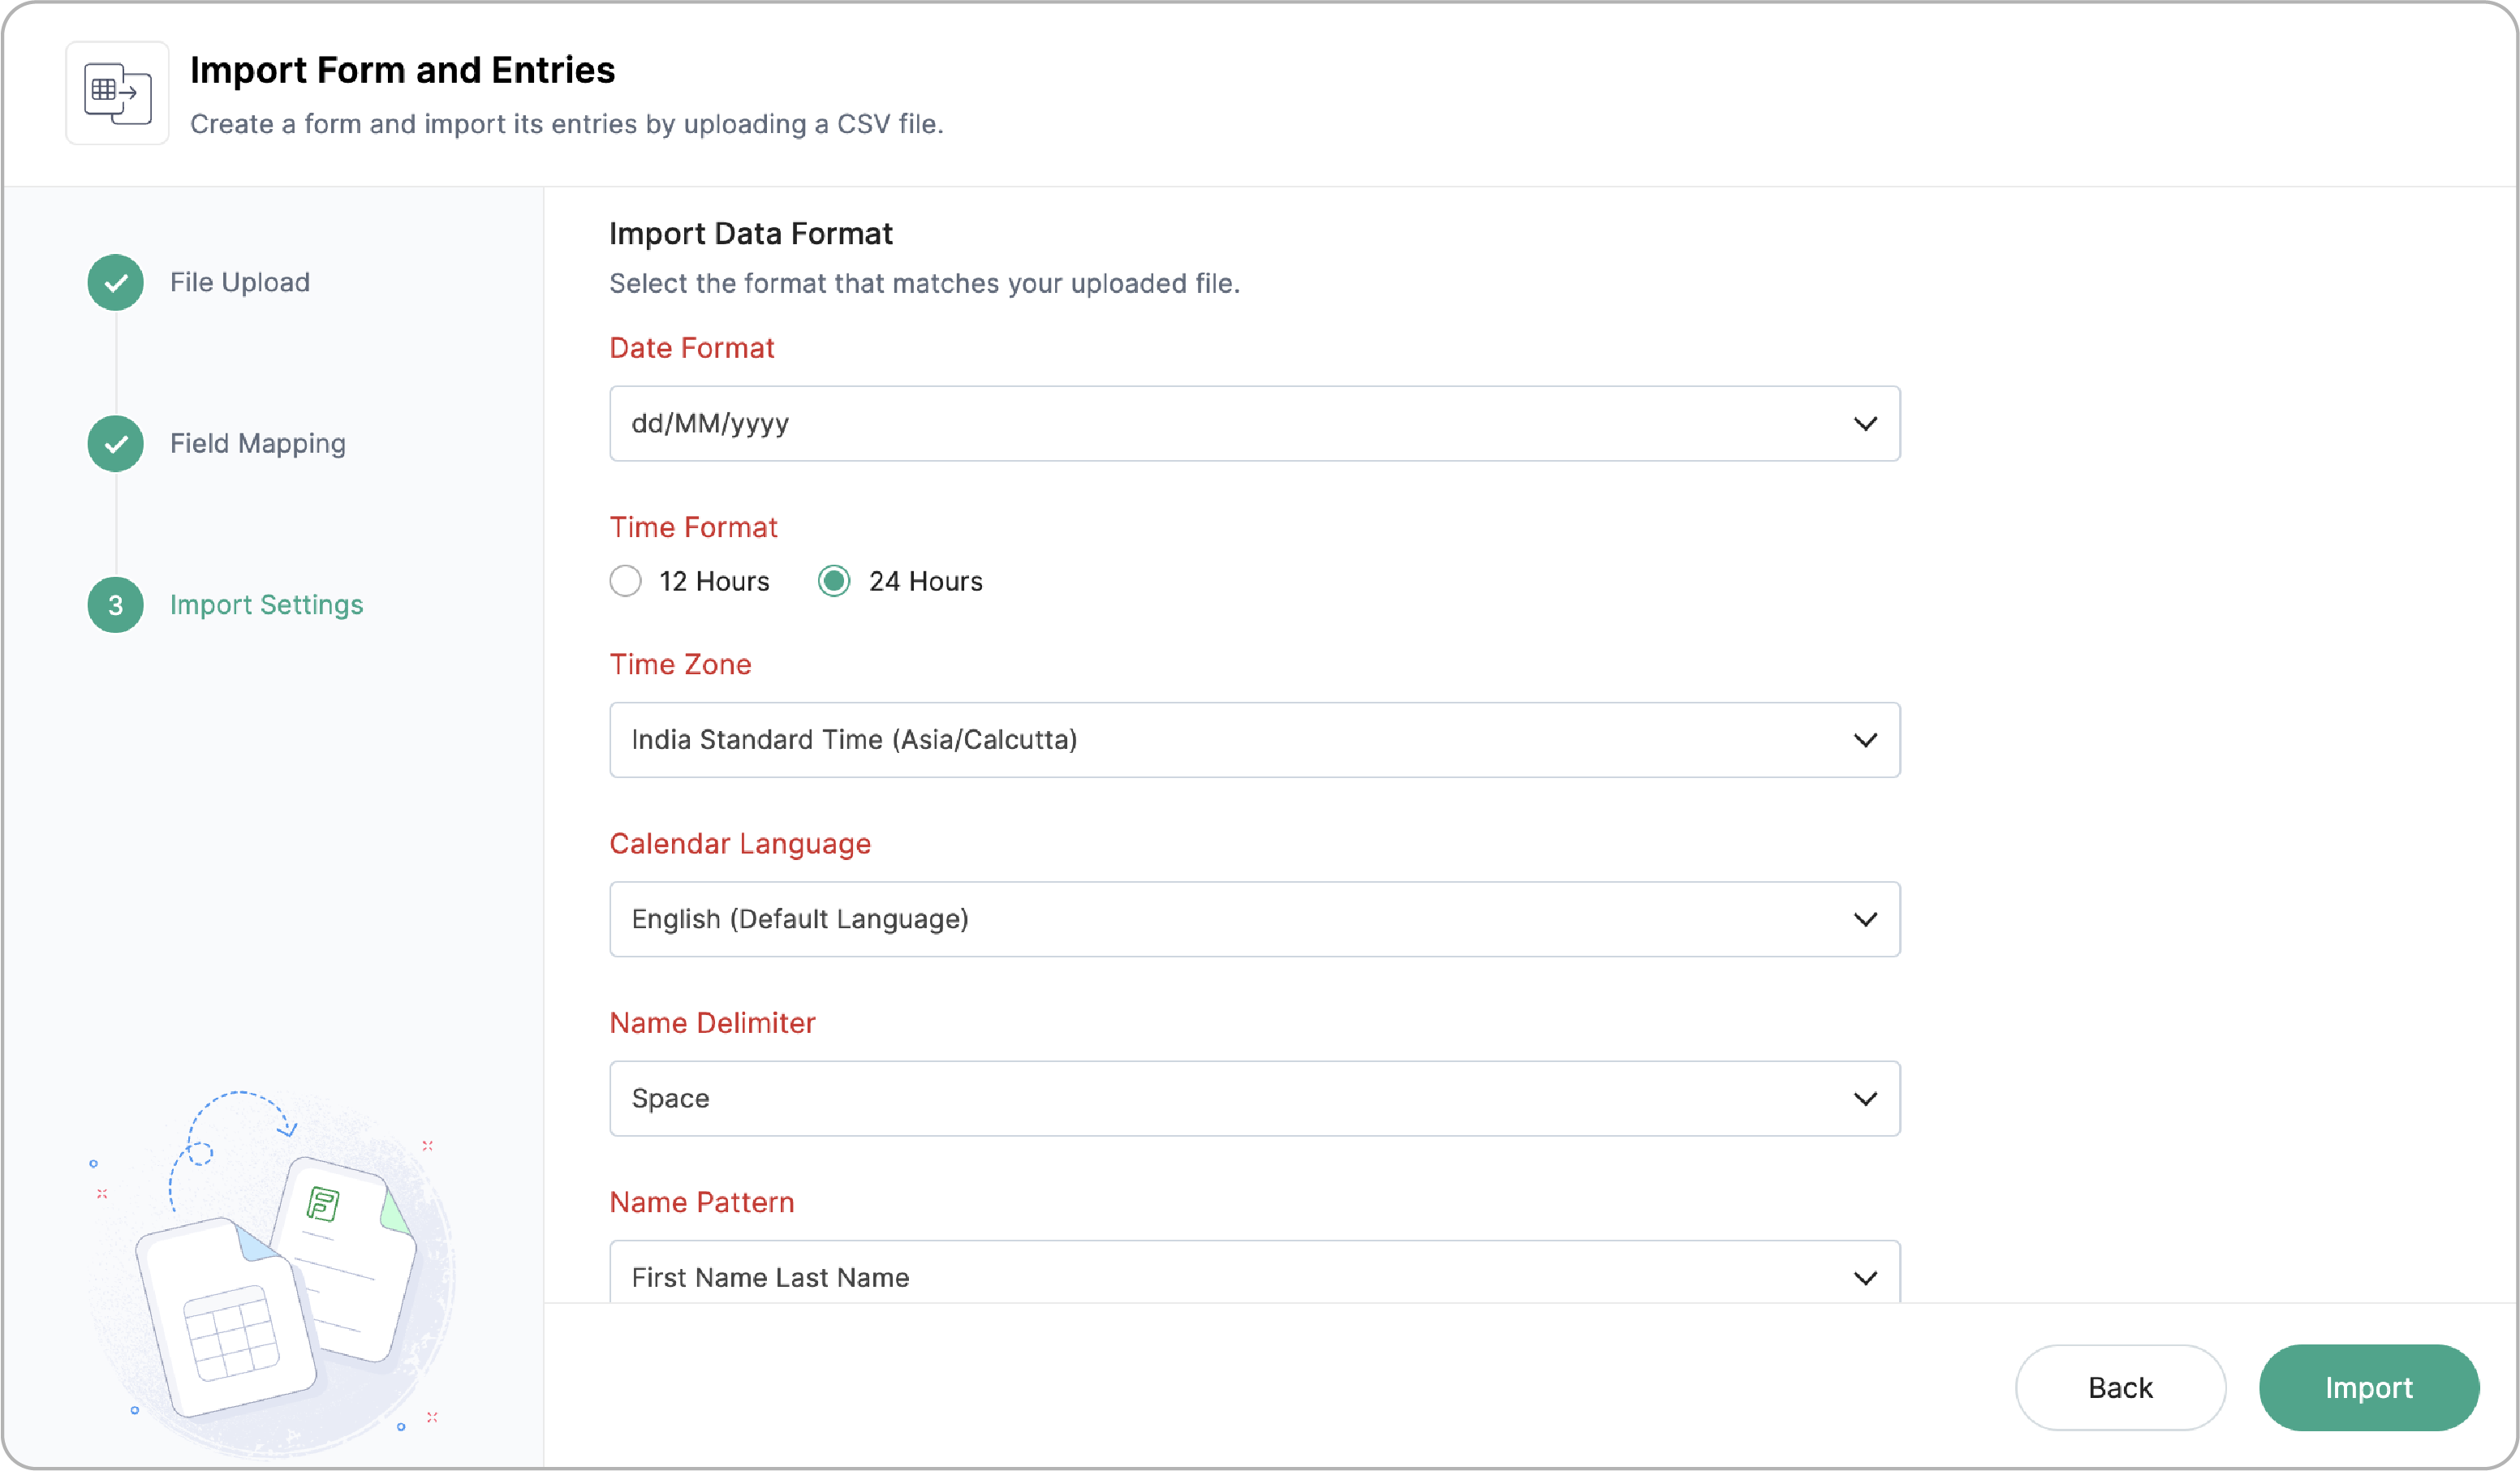
This section appears only if your mapped file includes Multiple Choice, Name, Date and Time, or Decimal/Currency fields. Based on the field type selected, the required options will be displayed. Select the format that matches your uploaded file.
- Date Format: Select the appropriate date syntax (e.g., DD-MM-YYYY or MM/DD/YYYY) used in your uploaded file.
- Time Format: Select the time format used in your file (e.g., 12-hour or 24-hour).
- Time Zone: Select the time zone that applies to the time values in your file.
- Calendar Language: Select the language used for calendar or date values in your file.
- Multiple Choice Delimiter: Select the character used to separate multiple selected values in your CSV.
- Name Pattern: Select the order in which name components appear in your file (e.g., First Name Last Name, or Last Name First Name).
- Name Delimiter: Select the character used to separate name components (e.g., salutation, first name, last name).
- Decimal/Currency Separator: Select the format used for numeric values in your file.

If none of your mapped fields require these settings, this section will not be displayed.
Click Import to create the form.
What happens after you click Import
Your form will be created and entries are scheduled for import in the background. You will receive an email notification with summary once the import is complete.
Import Entries
Use this option to add entries to a form you have already created.
To do this:
- Open the form's All Entries view, click the More Option icon (···), and select Import Entries.
Note: Import Entries is not supported for encrypted forms.
Step 1: File Upload
- Drag and drop the CSV file into the upload area or click Browse to upload a file.
- Once uploaded, you will see the file details (file size, row count, column count) and preview of few rows from the uploaded file.
- Click Next to proceed.
Note:
- If the row count exceeds the allowed limit, the upload will fail. Reduce your file size and try again.
- If the import exceeds your plan's submission limit, the upload will fail. Upgrade your plan to import more entries.
Step 2: Field Mapping
Map each column in your file to an existing field in the form.
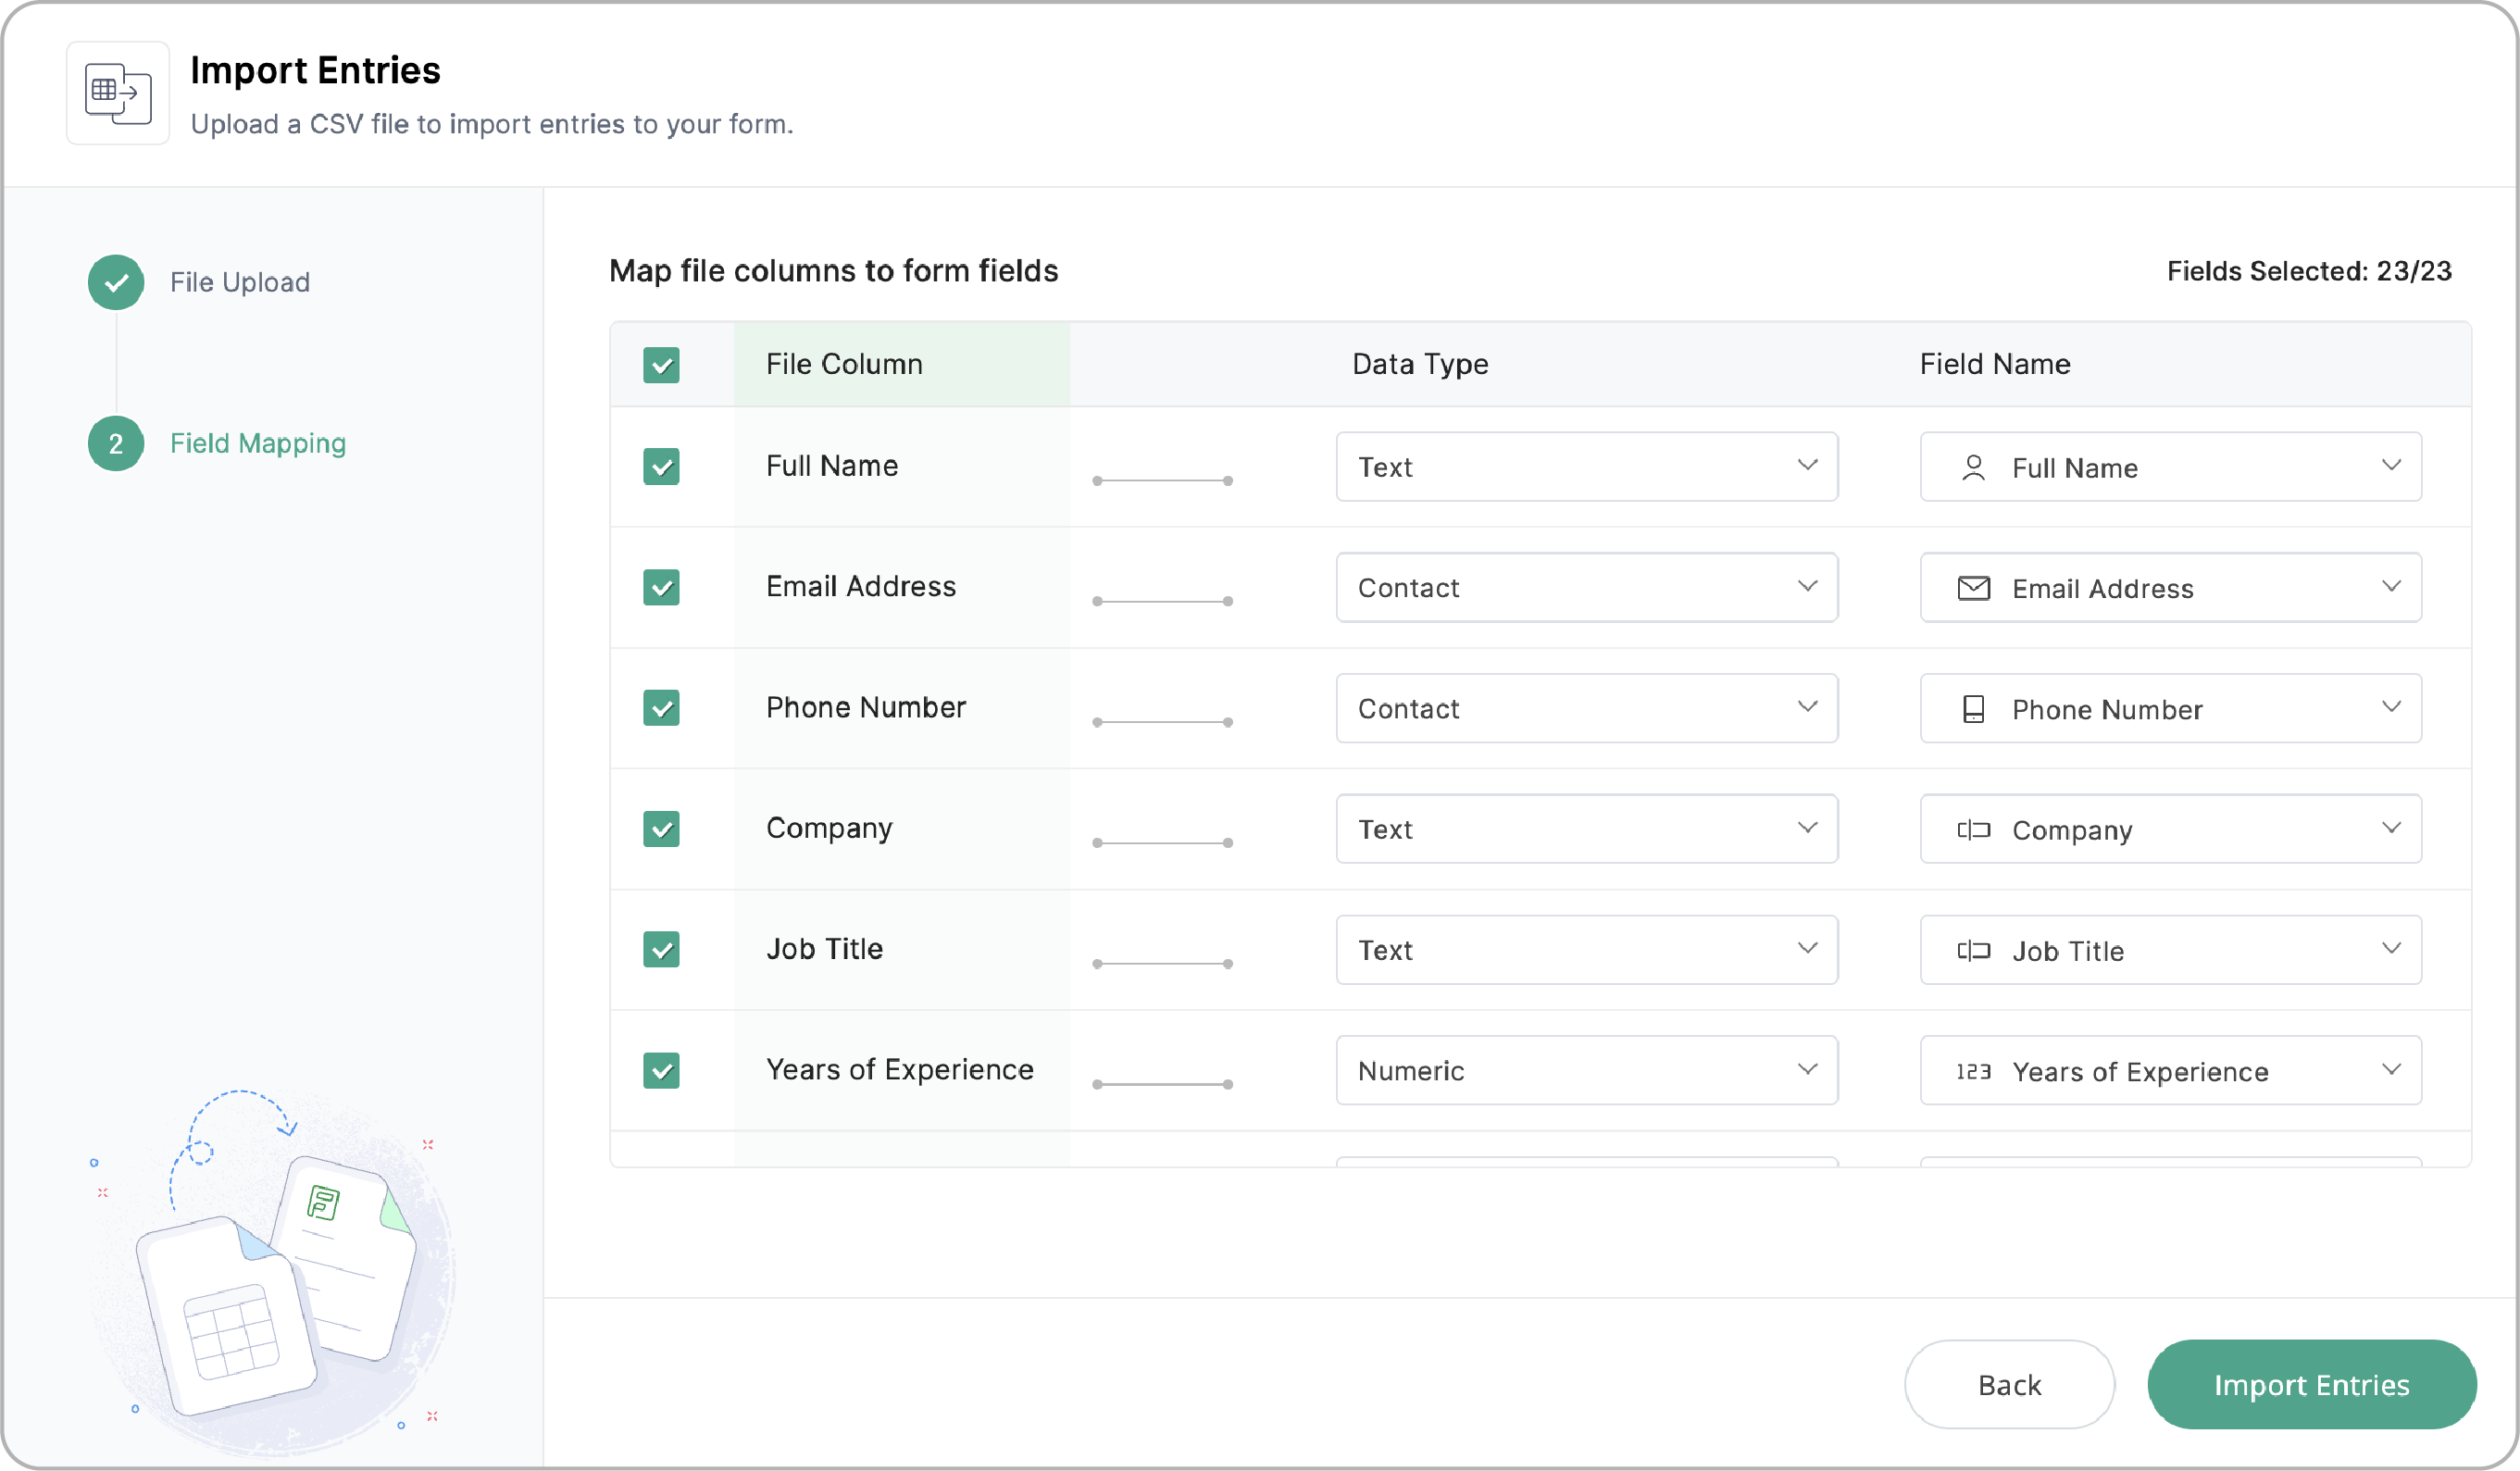
- The Data Type column groups similar field types. Based on your selected data type, the Field Name column lets you select the matching form field.
- Check or uncheck columns to include or exclude specific column values.
The Import Data Format section appears based on your field selection. Most settings here should uses the format used in your form. For Multiple Choice fields, select the delimiter used in your CSV file.
Click Import Entries.
Note:
- If the form contains a Name field configured with a Newline delimiter, you will not be allowed to map it. Update the delimiter in Form Settings > General > Others before proceeding.
- Ensure the values in your uploaded file match the field formats in the form for a successful import.
- Subform fields are not supported for import and will not appear in the field mapping list.
Scheduled Imports
All entry imports are scheduled regardless of the number of records. Zoho Forms processes the import in the background and sends an email notification when it completes.
The email notification includes:
Form details: Form name and the date and time of import.
Import Details: Total rows in the file and entries successfully imported.
Accessing the Import Summary Report
If your import completed with errors, you can download the Import Summary report to review and correct them. To access it, go to the Zoho Forms home page, hover over the form, and click Audit or open the form builder and select Audit from the right pane. In the audit log, find the relevant import entry and click Download Import Summary.
Import Summary Report
An Import Summary report contains two files,
- import_errors: It contains cell-level error detail, which specific value in which row and column failed, and why.
Note: If a value in the first column of a row fails, the remaining columns in that row will not be scanned for errors.
- failed_rows: Full row data for every record that could not be imported. Designed to be corrected and re-uploaded directly from All Entries -> Import Entries.
Know when an import stops early
In some cases, an import may stop before all rows are processed. When this happens, entries imported up to that point are saved and will be available in All Entries section of the form.
- Invalid row limit reached
If 1,000 rows contain invalid data, the import stops regardless of how many rows remain in the file. Download the failed_rows files from the Import Summary report in your form's Audit section to review and correct the invalid rows, then re-import from All Entries -> Import Entries. - Submission limit reached
When you schedule multiple imports, they are processed concurrently. If the combined entries across all imports exceed your plan's submission limit, some imports may stop mid-way. The import stops at the row where the limit was hit, and entries imported before this point are saved. Your mail will contain the row at which the import was stopped. You can re-import the remaining rows after upgrading your plan. - No entries imported — submission limit already reached
If your form has already reached its submission limit before the import begins, no entries will be imported. You have to upgrade your plan to import entries.