Themes | Customize your forms - Zoho Forms

Customizing Themes (Old Theme Builder)


Experiment with shadows, transparency, colors, and patterns to create the best form theme for your business. Design flawless forms that look great on all devices, including mobile with complete control over all the elements of your form, and make your brand stand out in the crowd.


To customize the appearance of your form to your liking,

Customize themes

  1. After building your form, navigate to the Themes tab.

  2. Click Create from Scratch / Customize Form.

    Create from Scratch

  3. Under Form Customization, you can customize the appearance of your:

    1. Form

    2. Subform

    3. Pages in a multi-page form

    4. Thank You Page

      Form Customization

Form tab

Under the Form tab, you can customize the following in your form.


Let's look at each one of these in detail.

Customizing Form Background

Adding a Wallpaper

You can customize the background of your form and choose to apply different backgrounds to different sections of your form. You can either set a pattern or use an image as the background to suit your requirement.

To set a pattern as the background,
  1. Under the Form tab, select Wallpaper under the Background section in the dropdown.
  2. Select Pattern under Background Type and choose your preferred pattern.
  3. Select a color and adjust the opacity as required.
Form Wallpaper

To set an image as the background,
  1. Under the Form tab, select Wallpaper under the Background section in the dropdown.
  2. Select Image under Background Type. You can either Upload an image from your desktop, or click Search from Pixabay to use a high resolution image from Pixabay.

    Choose background from Pixabay
  3. Select a color and adjust the Opacity as required.

    Image Wallpaper

Adding a Banner

Banners can help you advertise your product and familiarise your respondents with your brand or service. You can add a banner that suits your business at the space on the top of your form. 

Banner

  1. Upload an image from your desktop in the recommended image formats: JPG, JPEG, PNG, BMP or GIF. 
  2. You can also set the alignment of the image post the upload.

Customizing Form Elements

Container

Your form container is the part of the form that contains all your fields and the buttons. 


To customize your form container,
  1. Under Form Customization Form tab > Container in the dropdown, you will find options to alter various features of the form container like Background, Border, Edges, Alignment, Form width, Spacing and Shadow.
  2. You can alter the color, opacity and pattern of the container background, alter the width, style, opacity, and color of the Border and the Edges of the container, and control the alignment at which the containers are present in the form under the Alignment option.


    The width of the form, the spacing present in between the containers and Shadow effects can also be customized as required.

    Form Customization
  1. Under Form Customization > Form tab > Header  in the dropdown, you will find options to customize various features like Background, Border, Edges, Alignment, Form width, Spacing, and Shadow of the Header.
  1. Inserting LogoAdditionally, you can upload your business logo as a header to the form in recommended formats for better brand recognition. Once inserted, you can adjust the alignment and size of the image.
Insert Logo

Body               

Your form body is the part of the form which consists of the form fields excluding the buttons.


To customize the form body, under Form Customization Form tab > Body in the dropdown, you can alter the features of your form body as per your choice to fit your requirements.
  1. You will find options to alter various features of the form container like Background, Border, Edges, Alignment, Form width, Spacing and Shadow.
  2. You can alter the color, opacity, and pattern of the body background, alter the width, style, opacity, and color of the Border and the Edges of the form body.

Fields

Field Container
It is the part of the form around each field in your form.


To customize the fields in your form, go to Form Customization Form tab > Fields in the dropdown.
Under Field Container, you can customize the Background, Border, Edges and Spacing of a field container. You can change the font of the content in the field container too.

Field Customization


All Fields
You can customize the field input box background, border, edges, font, input spacing, and shadow under the All Fields option.


Section 
If you have separate sections in your form, you can customize the section features such as, Background, Border, Edges, Font and Spacing of the sections.

Matrix Choice
If you have a Matrix Choice field in your form, you can choose the color, font, style, and font size of the questions and answers of the field.

Choices
Likewise if you have a Choice based field, you can alter the color, font, style and font size of the choices in the field.

Choice Style
You can choose the style of your template for Radio and Checkbox fields in a choice field under the Choice Style option.


Rating, Slider
If you have a Rating / Slider field in your form, you can edit the style and size of the Rating field, customize the border and choose the color for selected and unselected parts of the fields.

Multiple Choice
If you have a Multiple Choice question in your form, you can edit the color, font, style and font size of the choices in the field.
If you have a Dropdown field in your form, you can choose the style of the dropdown. You can change the Dropdown style to include a search option for quickly finding the required option in the list using the Type 2 style. 
Footer is the part of the form where all your for buttons exist. Under Form Customization Form  tab > Footer, you can customize various features of the footer like Background, Border, Edges, Alignment, Form width, Spacing and Shadow.

Customizing Form Buttons

There are 3 types of buttons i.e., SubmitSave and ReviewUnder  Form Customization Button Width, you can customize the width of your button label.
You can head into the Submit  button section to alter the Background, Border, Edges, Font, Alignment, Spacing and Shadow of the Submit button label.

  Submit Button customizatio


If you also have Save and Review buttons in your form, you can alter the above mentioned features under their respective dropdowns. 
Learn more about changing and customizing form buttons.

Subform tab

If you have a subform in your form, you can totally customize it to your liking as well!

Subform Container  

Head to the Subform tab, choose Subform Container from the dropdown to customize the subform.

Subform Container

Subform Fields  

  1. To customize the fields in your Subform, go to Subform tab > Fields in the dropdown. Under Field Container, you can customize the Background, Border, Edges,Spacing, and font of your field container.
  2. If you have a choice-based field field in your subform, you can alter the color, font, style and font size of the content in the field.
  3. You can choose the style of your template in a choice field under the Choice style option.
  4. If you have a Rating field in your Subform, you can edit the style and size of the Rating field and choose color for both selected and unselected parts of the field.
  5. If you have a Multiple Choice question in your form, you can edit the color, font, style and font size of the choices in the field.

Pop-up Subform  

If you have opted to have a Pop-up Subform, then you can edit the features of your pop-up like Background, Borders, Edges and also the font of the content under Pop-up Card section.

Page tab

Having a multi-page form?
Long multi-page forms can get boring for your customer to fill out. Customize the look of the pages in your form and make your long multi-page form interesting!
Under Form Customization > Page tab, you can not only customize the pages but also the finer details like the navigation buttons on a page!

Page Customization

  1. Customizing the features of the page header like Background, Border, Edges, Alignment and spacing can be done under the Page Header option in the dropdown.
  2. If you want to change the font, color, style and size of the content in the Title, you can do so under Page >Title
  3. The number and color of the footer for the visited and unvisited pages of the form can be customized under Page Number section.

    Page Customization
  1. You can customize the features of the Navigation buttons ( NextBack ) like Background, Border, Edges, Font, Alignment, Spacing and Shadow under the  Navigation Button section.
  2. The change in color of the navigation bar indicating the status of page visit and the spacing of the bar in the page can be customized under the option Navigation Bar in the dropdown.

    Page Navigation Buttons Customization
    You can even display the visited and the unvisited pages of a form in different colors under Navigation Bar.

    Navigation Status

Thank You Page tab

Thank You page is where you can redirect your respondents to acknowledge them after they submit your form. You can configure your Thank You page under Acknowledgements & Redirects or configure Form Rules to redirect respondents to different Thank You pages based on their form responses.
You can customize the look of the Thank You page to suit your needs. To do this,
  1. After building your form, navigate to the Themes tab.

  2. Click Customize Form.

  3. Under Form Customization Thank You page tab, change the Default style of the Thank You page to Custom.

  4. If you wish to match the theme of the Thank you page with your form customization, select the Use form design  option. The form Container and Wallpaper customization will be applied to the Thank You page upon choosing this option.

  5. You can customize the Wallpaper, Container, Buttons & Icon on your Thank You page.

Wallpaper: You can set a pattern or an image as the background. Select a color and adjust the opacity as required.
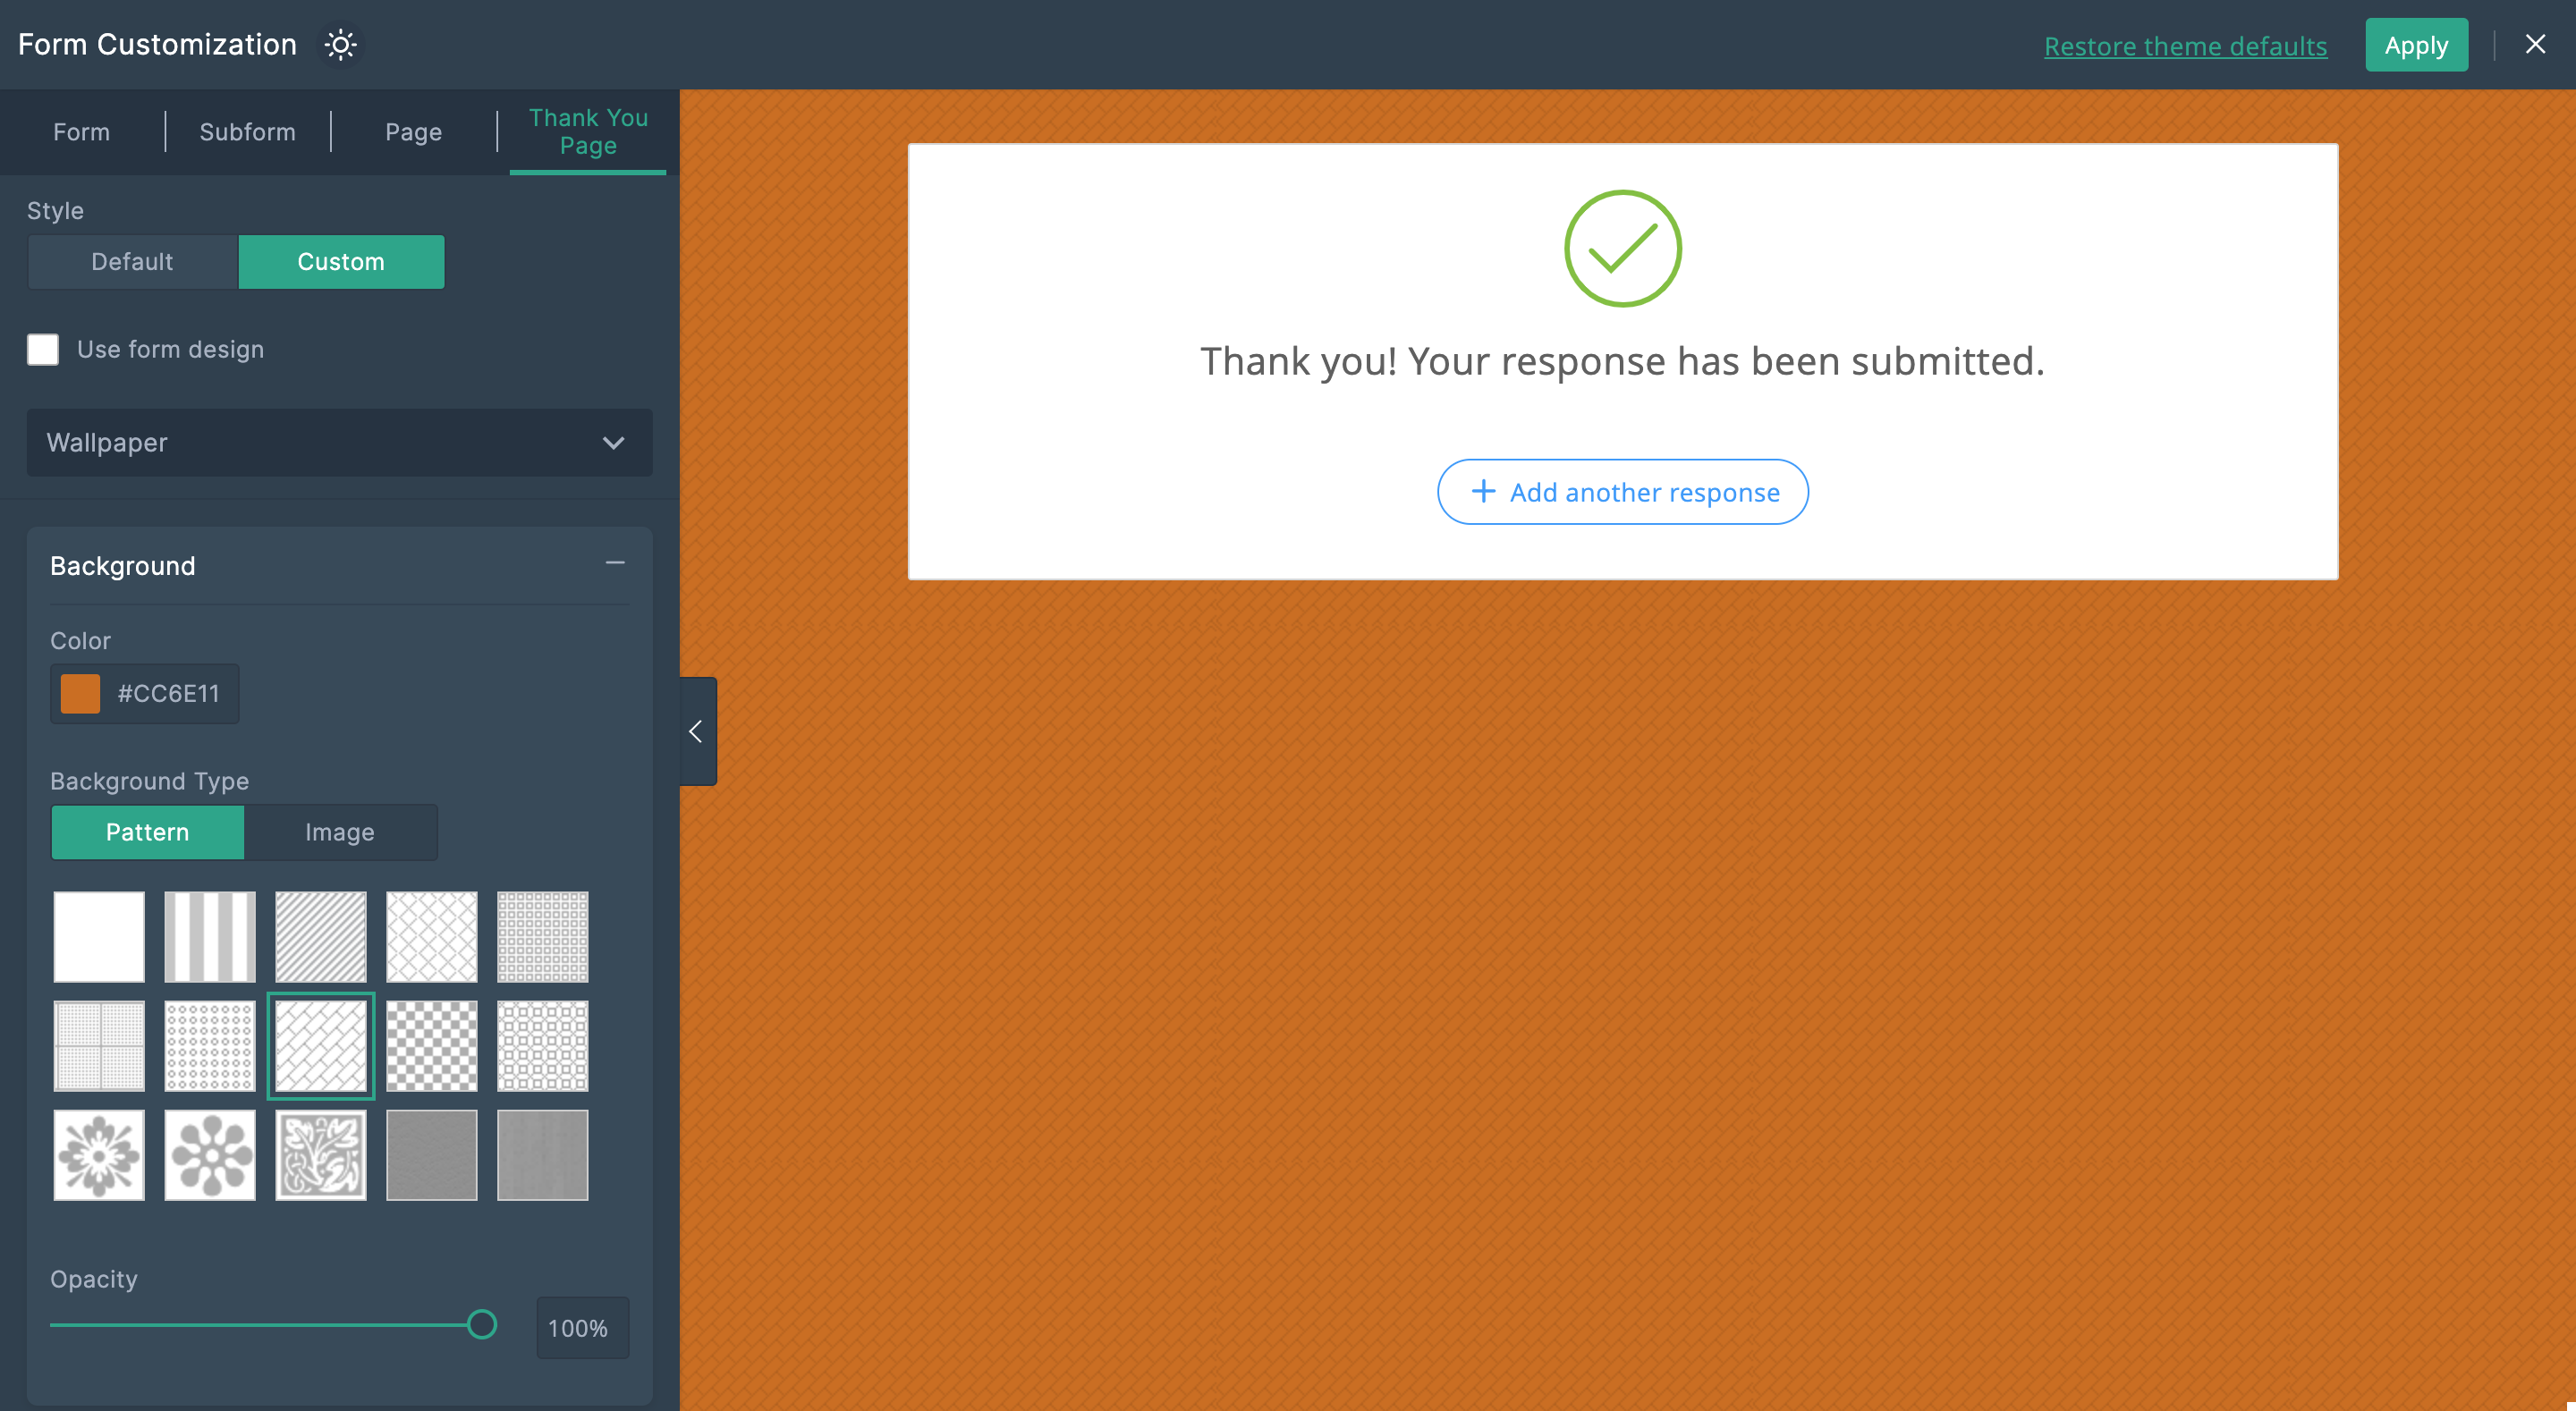
Thank You Page customization

Container: You will find options to alter various features of the container like Background, Border, Edges, Alignment, Spacing, color,opacity and pattern of the container background, alter the width, style, opacity, and color of the Border and the Edges of the container.
Buttons & Icon: You can customize the Background, Border, Edges, Font, Spacing, Shadow of buttons and the border of icon on your Thank You page. You can even change the colour of the Tick icon and the text message under Icon & Text.
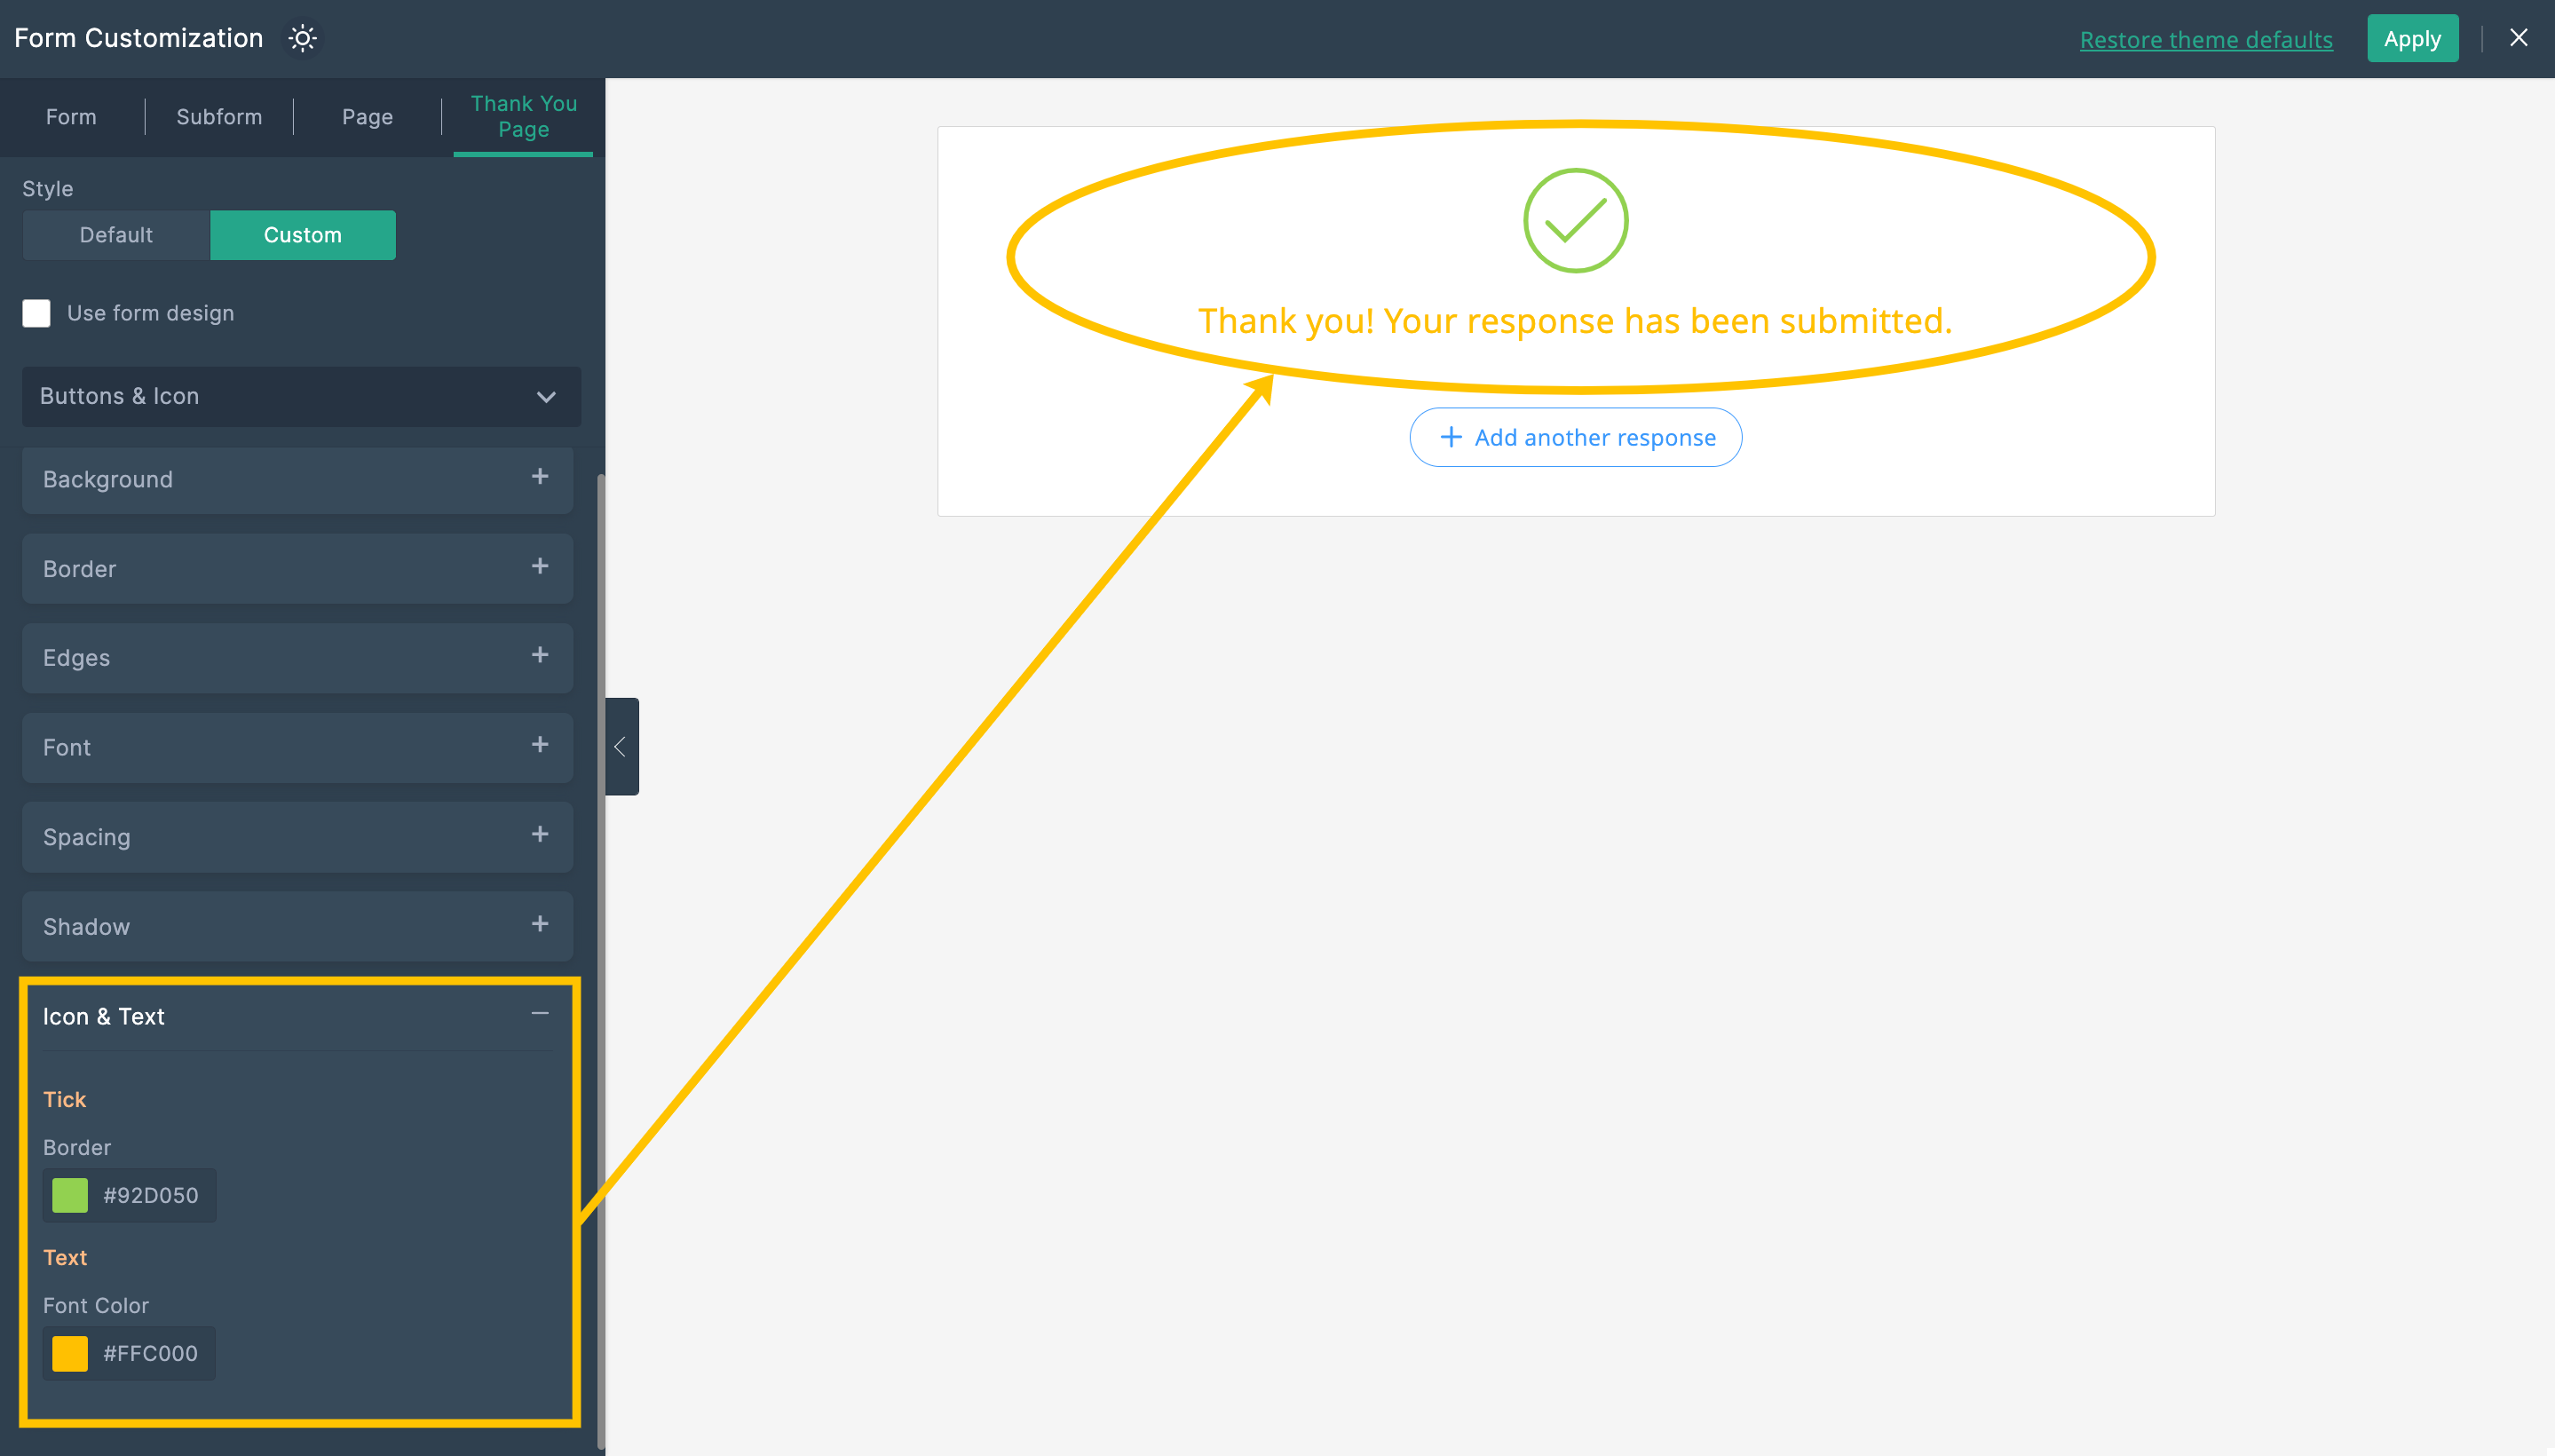
Change color of the Tick and Text

Quick help on customizing your form

Changing Font Settings                                  

You can choose to change the font style, size and color of text elements in different sections of your form. Learn about the importance of font in a form and which font to choose for your form.

To modify the font settings,
  1. Select the form element you wish to change the font settings for under the FormSubform or Page tab.
  2. Click Font.
  3. Customize the text element by selecting the color, font family, style/weight, and the size of the font.

Adding Shadow   

You can add shadow effect to your form for extra visual appeal.
To add shadow,
  1. Select a form element for which you wish to add the shadow effect under the FormSubform or, Page  tab.
  2. Click Shadow, and specify the shadow range and color. 

Inserting Border    

You can add a border to your form or specific sections of the form, Submit button, form footer, form header, section breaks, and more.
To add a border,
  1. Select a form element you wish to add border for under the FormSubform, or Page tab.
  2. Click Border and change the width, style, color of the border and adjust the opacity. 

Changing Alignment   

You can change the alignment of your form, form header, Submit button, and more.
To change the alignment,
  1. Select a form element you wish to change the alignment for under the FormSubform, or Page tab.
  2. Click Alignment and set the required alignment.

Modify Form Width    

You can adjust the width of your form as per your requirement.
To modify the form width, under the Form tab, select Container under the Form section and choose Form Width.
  1. To set a fixed form width, select Standard and specify the width of the form in pixels. The permitted range is from 320 px to 1200 px.
  2. To let the form width automatically adjust to the screen size, select Fit to screen .
Check out how you can customize the Thank You Page.


    Access your files securely from anywhere

      Zoho CRM Training Programs

      Learn how to use the best tools for sales force automation and better customer engagement from Zoho's implementation specialists.

      Zoho CRM Training
        Redefine the way you work
        with Zoho Workplace

          Zoho DataPrep Personalized Demo

          If you'd like a personalized walk-through of our data preparation tool, please request a demo and we'll be happy to show you how to get the best out of Zoho DataPrep.

          Zoho CRM Training

            Create, share, and deliver

            beautiful slides from anywhere.

            Get Started Now


              Zoho Sign now offers specialized one-on-one training for both administrators and developers.

              BOOK A SESSION


                                            You are currently viewing the help pages of Qntrl’s earlier version. Click here to view our latest version—Qntrl 3.0's help articles.


                                                Manage your brands on social media

                                                  Zoho Desk Resources

                                                  • Desk Community Learning Series


                                                  • Digest


                                                  • Functions


                                                  • Meetups


                                                  • Kbase


                                                  • Resources


                                                  • Glossary


                                                  • Desk Marketplace


                                                  • MVP Corner


                                                  • Word of the Day


                                                    Zoho Marketing Automation

                                                      Zoho Sheet Resources


                                                          Zoho Forms Resources


                                                            Secure your business
                                                            communication with Zoho Mail


                                                            Mail on the move with
                                                            Zoho Mail mobile application

                                                              Stay on top of your schedule
                                                              at all times


                                                              Carry your calendar with you
                                                              Anytime, anywhere


                                                                    Zoho Sign Resources

                                                                      Sign, Paperless!

                                                                      Sign and send business documents on the go!

                                                                      Get Started Now


                                                                              Zoho TeamInbox Resources


                                                                                      Zoho DataPrep Resources


                                                                                        Zoho DataPrep Demo

                                                                                        Get a personalized demo or POC

                                                                                        REGISTER NOW


                                                                                          Design. Discuss. Deliver.

                                                                                          Create visually engaging stories with Zoho Show.

                                                                                          Get Started Now


                                                                                                              • Related Articles

                                                                                                              • Customizing Themes (New Theme Builder)

                                                                                                                The Themes Builder allows you to create visually appealing forms that reflect your business and resonate with your audience to create a more engaging experience. Design layouts that seamlessly integrate with your brand identity, select fonts that ...
                                                                                                              • Theme Gallery

                                                                                                                Table of contents Applying a Theme From Theme Gallery Creating New Theme Publishing Themes to your Org Users Using the Org Themes Applying a theme from the theme gallery The Theme Gallery consists of certain pre-designed themes that you can instantly ...
                                                                                                              • Overview

                                                                                                                Beautiful forms can make a great difference in the number of entries you receive. The Theme Editor in Zoho Forms allows you to polish your forms with minimal effort. You can customize your form and play around with custom backgrounds, fonts, effects, ...
                                                                                                              • Tips for creating visually appealing forms

                                                                                                                Table of Contents Overview What details matter the most in a form? Form Title and Description Fields Choice fields Image Choices to market your products Talk to your respondent with dynamic fields Submit button Structuring a long form Section and ...
                                                                                                              • Custom Domain

                                                                                                                Custom Domains are used to promote your organization's brand in the form URLs to all your form respondents. If you do not want any reference to Zoho Forms in your form URL, you can use your own custom domain. By default, your form URL will be in the ...
                                                                                                                Wherever you are is as good as
                                                                                                                your workplace

                                                                                                                  Resources

                                                                                                                  Videos

                                                                                                                  Watch comprehensive videos on features and other important topics that will help you master Zoho CRM.


                                                                                                                  eBooks

                                                                                                                  Download free eBooks and access a range of topics to get deeper insight on successfully using Zoho CRM.


                                                                                                                  Webinars

                                                                                                                  Sign up for our webinars and learn the Zoho CRM basics, from customization to sales force automation and more.


                                                                                                                  CRM Tips

                                                                                                                  Make the most of Zoho CRM with these useful tips.


                                                                                                                    Zoho Show Resources