Job Sheets
Job Sheets are customizable, reusable forms that serve as a checklist for the services that technicians need to carry out and as a tool for data collection. While on location, the checklists and instructions within the job sheet guarantee that the services are performed accurately and efficiently. Technicians can update job sheets in real-time using the mobile app. Once all the activities are carried out, they can attach photos of the work done and also include their observations. This documentation serves as a reliable record that can be referenced later.
A typical job sheet will have one or more of the following sections:
- Pre-Job Checklist: Ensures all preparations are made before starting the job. Items may include verifying equipment, materials, and safety gear.
- Instruction checklist: A step-by-step breakdown of the job, allowing teams to track progress and ensure no step is missed.
- Post-Job Checklist: It is used to ensure that all necessary activities are completed after finishing a job. Items may include cleaning up the site, returning equipment, and obtaining a client sign-off.
- Instructions/Safety guidelines: Specific instructions related to the job, including safety protocols and best practices to follow.
- Observations: Areas for technicians to document their observations, record any insights, issues, and general comments related to the work performed.
Following are the benefits of using job sheets:
- Consistent Service Delivery: Job sheets help standardize processes and workflows, ensuring that all technicians follow the same procedures and protocols, resulting in consistent service delivery. Predefined checklists in job sheets allow for built-in quality control measures for all kinds of service, be it inspection, installation, or repair.
- Superior Data Collection: By providing a structured format for documenting job details, job sheets help minimize errors and omissions, leading to standardized data collection, ensuring that all technicians capture all the required information uniformly. It supports a variety of fields enabling users to capture different types of data.
- Accountability, Compliance, and Safety: Job sheets can include safety instructions and compliance requirements, ensuring that technicians are aware of necessary precautions and regulations while performing their job. Thus, organizations can ensure compliance with industry regulations and internal policies, thereby reducing liabilities. The uniformity of data collected also makes it easier to conduct audits and reviews.
- Mobile Accessibility: Using the mobile app, technicians can update job sheets in real-time while on-site, capturing vital information such as photos and diagnostic results. This immediacy enhances the accuracy of the information collected and reduces the risk of errors associated with post-job data entry, also ensuring that all relevant data is immediately available in the system for office staff.
- Training and Development: By outlining standardized procedures, job sheets help new technicians learn the correct methods for completing their job. While on-site, they can quickly access important information, such as troubleshooting steps, safety protocols, and equipment specifications. This clarity helps reduce confusion and increases confidence.
Create Job Sheets

- Permission Required: Modules Customization
To create a job sheet:
- Navigate to Setup > Customization > Job Sheets and click Create Job Sheet.
- Enter the following details, then click Create:
- A Name for the job sheet
- A Description of the job sheet
- The Services you want to create the job sheet with.
All the job sheets associated with the services that are added to a service appointment will be available for use under the job sheets tab of that service appointment. - In the Job Sheet Builder page, drag and drop the fields you want from the New Fields tray.
- Enter the properties for the field and click Save.
- You can also drag and drop a new Section, provide a name for the section, add fields to the section, and click Save.
The table below lists the different types of fields that are supported.
Field Type | Description |
Single Line | Text field. Maximum of 255 characters are allowed. |
Multi Line | Textarea. Small is 2000 characters, Large is 32000 characters. |
Number | The maximum allowable length is 9 |
Long Integer | The maximum allowable length is 18 |
Decimal | The maximum allowable length is 16 including a maximum of 2 decimal places |
Phone | Field for entering a Phone number |
Email | Field for entering an Email address |
Date | Date Field. Default format is MMM D, Y. Date format will be changed according to user's time zone settings. |
Date Time | Date Time Field. Default format is MMM D, Y hh:mm. A Date format will be changed according to user's time zone settings. |
Checkbox | Field to make a binary choice, typically between two options: checked (selected) or unchecked (deselected). |
Pick list | Dropdown field. You can add a maximum of hundred choices. |
Radio Choice | Field to select one option from a predefined set of choices. You can add a maximum of five choices. |
URL | Field for entering web address of a specific webpage or website |
Currency | Field for entering monetary values |
Multi-Select | Drop-down field that allows users to select multiple options. You can add a maximum of ten choices. |
Check List | Comprises a list of items or tasks, each accompanied by a checkbox that can be marked as completed. You can add a maximum of ten items or tasks. |
Image Upload | Field to upload images. In the Maximum images allowed property of this field, choose the number of images you wish to permit the user to upload. Up to five images can be permitted. The total size of the image files should not exceed 10 MB. The file types supported for images are .jpeg, .jpg, and .png. |
Rating | Field that will allow users to record machine readings or calibrations. |
T&Cs | Field for Terms and Conditions. Maximum of 10,000 characters are allowed. You can also set a default value if required. |

Note:
- Refer to the section Limits for each field type in Job Sheets in the pricing Help to know about the field limits.
Edit Services in a Job sheet
At any time, you can edit the services added to a job sheet. To do so:
- Navigate to Setup > Customization > Job Sheets and hover over the job sheet whose services you want to edit.
- From the More Options [
] icon, click Edit Services.
- Add or remove the services and click Save.
Mark Job Sheet As Inactive
If you no longer want a job sheet to be in use, you can mark it as inactive. To do so:
- Navigate to Setup > Customization > Job Sheets and hover over the job sheet you want to mark as inactive.
- Toggle the Status button to disable it.
If a job sheet that you mark as inactive is already being used in a service appointment, then you can continue using it if it has already been filled, i.e., the ones with the Draft and Completed statuses. The ones in the Yet To Start status will be removed. Refer to this section to know more about these statuses.
If there are five active job sheets, then any new ones created will be in the inactive status.
Subforms in Job Sheets
Subforms allow you to capture repeatable information related to the job performed in an organized and tabular format. They are useful when you need to record multiple entries of similar data within a single jobsheet. With subforms, you can:
- Log multiple readings or measurements (e.g., voltage readings, temperature checks, pressure levels).
- Record repeated activities or inspection checkpoints without cluttering the main form (e.g., Check thermostat, Test circuit breaker, Verify refrigerant levels).
- Capture multiple materials or consumables used on-site, along with quantities and remarks (e.g. HVAC Filters, Electrical parts, Plumbing parts).
- Document multiple observations or issues identified during the job.
Following are two examples of subforms in a job sheet for routine maintenance:
Component Inspection Subform
Component Name | Condition (Good/Fair/Poor) | Issue Observed | Action Taken | Requires Follow-Up (Y/N) |
Consumables Used Subform
Consumable Type | Model/Size | Quantity Used | Status | Task Description |
Add Subform to a Jobsheet
- Drag and drop the New Subform tile from the New Fields tray.
- Enter a name for the subform.
- Click Add Field and select the field you want to add to the subform. Add the required details to the field added. Repeat this for all the fields you want to add to the subform.
- Click Save.

Points to remember
- The maximum number of subforms allowed per jobsheet is two.
- The maximum number of rows allowed in a subform is 200.
- You can add a maximum of five asset lookups within a subform.
Managing Subforms
The following are the actions that can be performed within a subform:
- Remove Fields: Hover over a field and click the More Options [
] icon, then select Remove. In the confirmation prompt, click Yes, Move to Unused Fields. The field will be moved to the subform’s Unused Fields list. Note that unused subform fields will not appear in the Jobsheet’s general Unused Fields section.
To view the unused fields of a subform, hover over the subform and click the More Options [] icon, then select Unused Fields. Click a field to add it back to the subform. To delete a field permanently, click the Delete [
] icon next to it and confirm the deletion.
- Reorder Fields: You can rearrange the fields within a subform. Hover over the subform and click the more options [
] icon. Select Reorder Fields. Within the Rearrange popup, reorder the fields by dragging and dropping the fields to its desired position. Click Save.
- Delete Subform: To delete a subform, hover over the subform and click the More Options [
] icon, then select Delete Section. Click Delete in the confirmation message.
Using the Subforms
Click + New Line to add a new entry to the subform. To remove an existing entry, click the Delete [ ] icon.
Associate Job Sheets to Services
While creating a job sheet, you associate services to it. You can perform the same action from a service record. You can link the service to one or more job sheets. To do so:
- Select the Services And Parts module.
- Click on the service you want to associate with a job sheet.
- Under the Job sheets tab, click Associate Job Sheet.
- Select a job sheet and click Link Job Sheet.
You can remove the job sheet to which you have associated the service by hovering over an entry and clicking on the Delete [ ] icon.
Using Job Sheets in Appointments
- Permission Required: Job Sheets
All the job sheets associated with the services added to a service appointment will be listed as job sheet line items under the Job sheets tab. Starting from the first service in the service appointment, all the job sheets associated with each service will be added until the limit of 20 is reached. Consider this example for better understanding.
Two services, Substation Equipment - Routine Maintenance, and Substation Equipment - Testing are added to a service appointment.
These services have been added to some job sheets as depicted in the screenshots below.
Under the Job sheets tab of the service appointment, a total of seven job sheet line items will be added, two for the service Substation Equipment - Routine Maintenance, and five for Substation Equipment - Testing and in that order.
You can perform the following activities on the job sheet line items of a service appointment:
- Fill out the details
- Save it as draft
- Save it as completed
Fill out the details
Initially, the status of the job sheet will be Yet To Start. Click on Start Filling to fill out the necessary details.
Save it as draft
After filling out the details, you can either Save as Draft or Save as Completed. If you save it as draft, the status will change to Draft. You can also perform this action by hovering over an entry and clicking Mark as Draft from More Options [  ].
].
Note: When saving a job sheet as a draft, you are not required to fill in mandatory fields.
Save it as completed
You can later change its status to Completed by clicking on Save as Completed. You can also perform this action by hovering over an entry and clicking Mark as Completed from More Options [  ].
].
Even after marking it as complete, you can revert the status to Draft.
After you have filled a job sheet line item and saved it, then an ID will be generated for it. The entries will be sorted in the order Yet to Start, Draft, and Completed.
The following table details how the job sheet line items in a service appointment will be handled in different scenarios.
Scenario | Status is Yet to Start | Status is Draft/Completed |
Service is removed or disassociated from a job sheet | Removed from service appointment | Retained in service appointment |
Service line item is delinked from the appointment or deleted from work order | Removed from service appointment | Removed from service appointment |
The Service record is deleted | Removed from service appointment | Retained in service appointment |
Using Job Sheets in the Mobile App
To use job sheets in the mobile app:
- Log in to Zoho FSM mobile app.
- Select the Job Sheets tab within the service appointment you want to use.
- Click Start Filling from the More Options [
] for a job sheet entry.
- You can either Save as Draft or Save as Completed.
- You can later change its status to Completed by clicking on Mark as Completed.
Download/Print Job Sheets
- Permission Required: Download/Print of Job Sheets
The option to download a job sheet as a PDF or print it will be available once it is in the Draft status.
 Note: The Image Upload and Signature fields will not be shown in the PDF.
How can you include the data from job sheets in Service Reports?
You can include the data from job sheets with a status of Completed in service reports. To do so:
- Select Service Appointments from the Work Order Management menu. Select the desired service appointment. Select the Service reports tab and click Create Service Report.
Or
Select Service Reports from the Work Order Management menu and click Create. From the Create Service Report popup, select the desired service appointment and click Proceed. - Click + Add Job Sheet.
Note: The + Add Job Sheet option will not be available if the template selected is Standard Old. - Select the job sheets whose data you want to include in the service report.
Note: You can only add up to five job sheets per service report.
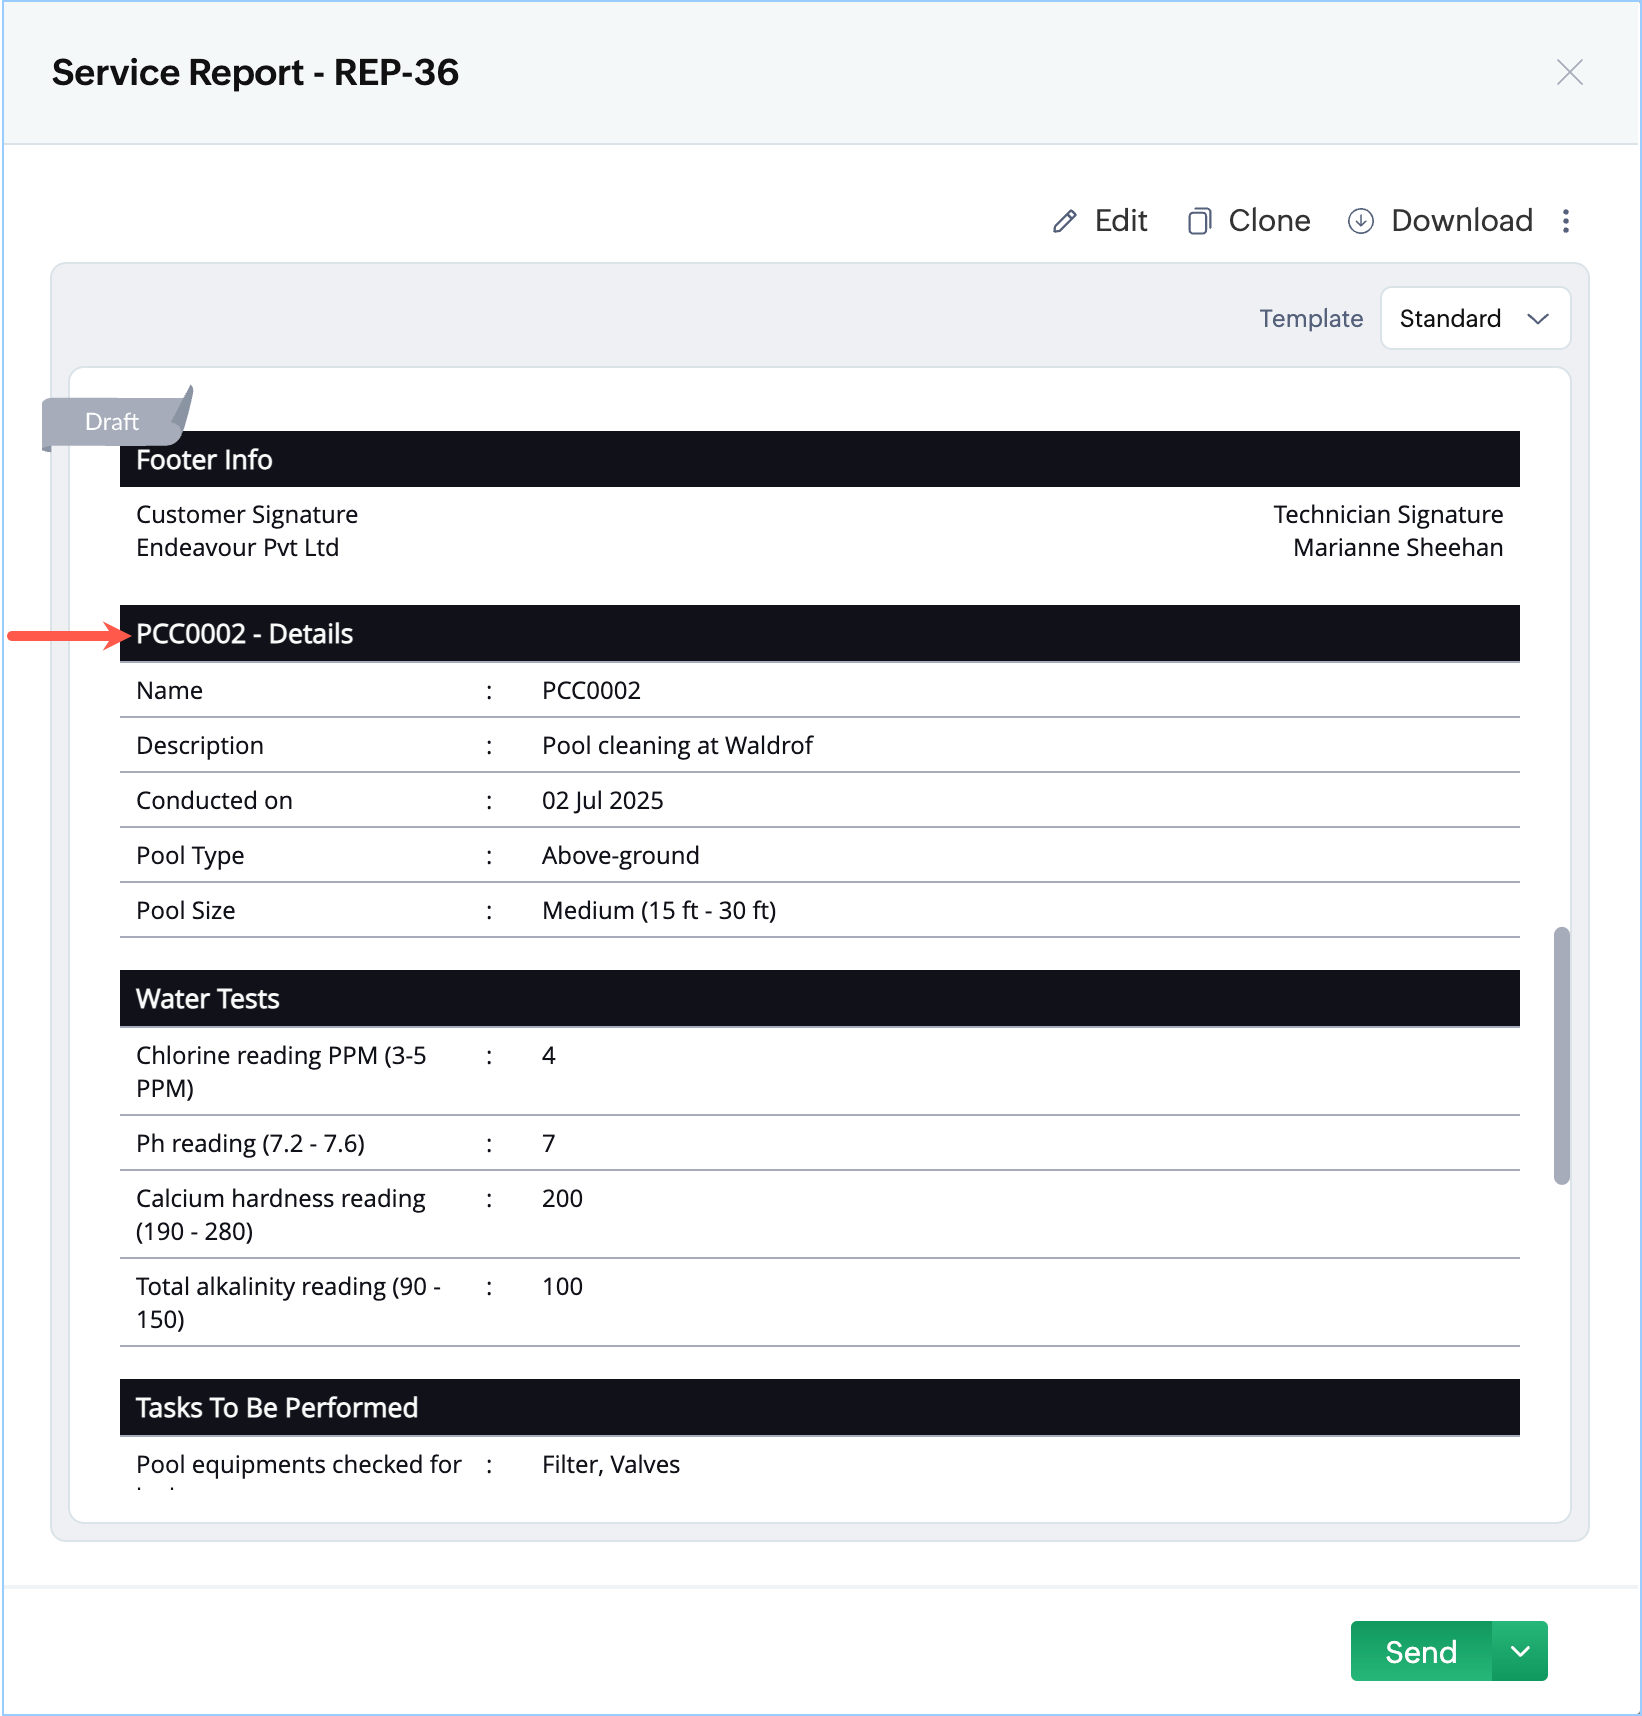
The job sheet data will be displayed after the footer of the service report.
Sample Job Sheets
Job sheets in Zoho FSM can be customized to suit any industry. Below are some sample job sheets.