Estimates
An Estimate provides a ballpark figure for how much it would cost to provide the services asked for in a Request. Once a request is approved, the estimate can be created for the request. Based on the estimate, the contact can decide whether to proceed with the service request or not. The estimate can either be accepted or rejected.
Add Estimates
 Permission Required: Estimates
To create an estimate:
- An estimate can be created in one of two ways:
- Select the Requests module from the Work Order Management menu and click the request you want to create the estimate for. In the Request Details page, click Convert to Estimate.
- Select the Estimates module from the Work Order Management menu and click Create.Perform this step if you are creating an estimate from scratch (without a request).
- Enter the following details and click Save:
- A Summary of the estimate
- An Expiry Date until which the estimate will be valid
- Currency
The Currency and Exchange Rate will be displayed only if multiple currencies are enabled. The currency field will be populated based on the Contact/Company. - The Contact whom the estimate is being created
- The Company the contact belongs to
- The Email address of the contact.
If there is no email address associated with the contact, the email address of the company (if present) will be used. - The Phone number of the contact
- The Mobile number of the customer
- An AssetAn Asset is added when the service is for a product that you have sold. This field will be shown only in the Professional edition.
- The Territory in which the contact is located
This field will be displayed only if there are multiple territories in the organization. - A Service AddressThis is the address where the service needs to be carried out. The service address present for the Asset, Company, or Contact will be used, in this order of preference. You can choose any other available address or click Create New.Upon clicking Create New, the Add Address overlay will be displayed. To add a new address, enter the details and click Save. You can either choose to add an address to the Company/Contact or create a Single Use Address. The Single Use Address can be used only in the current Estimate record.
- A Billing Address
- Entries for Services
These denote the services that have to be delivered for the request for which the estimate is being created. The Services added in Services And Parts module will be listed here.
Select a Tax Rate or choose non-taxable by providing a reason. Click here to find details about setting the tax rates. Enter a percentage for the discount you wish to offer or a discount amount.
You can also add Optional Line Items. - Add the Parts necessary for the service tasks.
For Service, select the Service task for which the Product has been added. Select a Tax Rate or choose non-taxable by providing a reason.
The estimate amount can be viewed in the Estimate Details page under the Service and Parts tab.
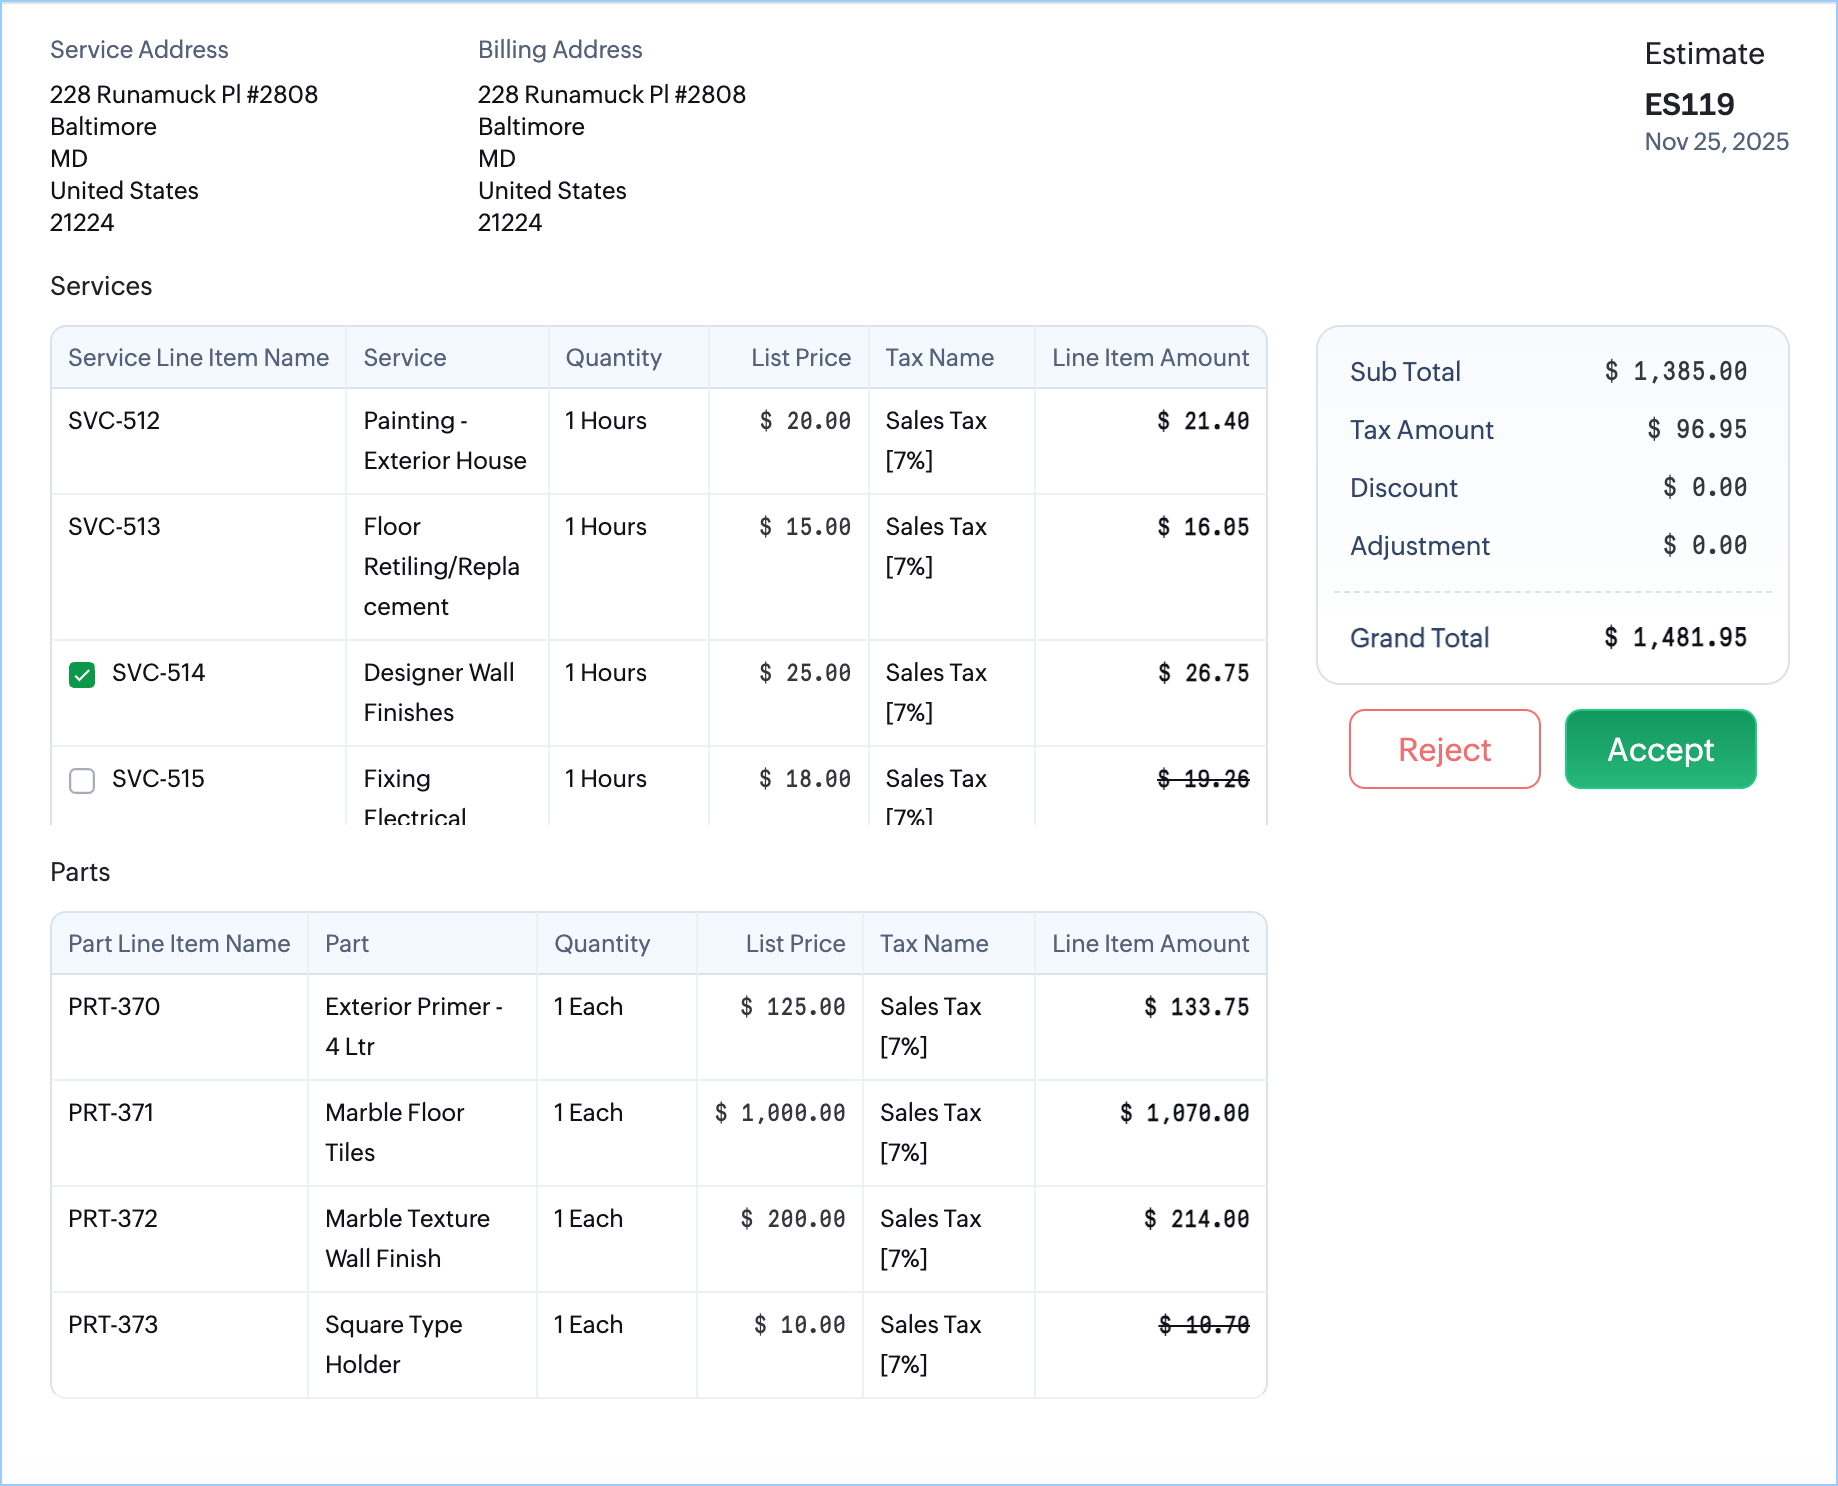
Optional Line Items
Optional Line Items allow you to include additional services in your estimates—services that customers may choose to add based on their preferences. This gives customers the flexibility to opt in or out of specific services (and parts) while giving you the opportunity to offer auxiliary or premium add-ons. For instance, a home refurbishment company can clearly distinguish between standard (core) services and optional (value-add) services that enhance the overall project. By using Optional Line Items, you can present these differentiated offerings clearly and effectively, enabling better customization for the customer and potential upsell opportunities for your business.
Adding an Optional Line Item
In the Create Estimate overlay, click + New Optional Line to add an optional line item. By default, the checkbox for the optional line item is selected. When selected, the optional line item will appear as Recommended on the Estimate Details page. If you clear the checkbox, the line item’s price is excluded from the Grand Total, and the price will appear struck through to indicate that it is not being counted.
Similarly, if an Optional Line Item is unchecked, the price of its associated part line item will also be excluded from the Grand Total. This will be shown by striking off the price. If you select the Optional Line Item again, the prices of both the service line item and the associated part line item will be included in the Grand Total.
In the Estimate Details page, the checked optional line item will be indicated as Recommended and the unchecked optional line item will be grayed out.
In the PDF Template of the estimate, the unchecked optional line item will be struck out.
Refer to this section to know how the optional line items will be used in the work order after the estimate is approved.
Add Estimates from Mobile App
To create an estimate from the mobile app:
- Select Estimates, in the left menu.
You can also create an estimate by using the Convert to Estimate in a request. - In the Estimates screen, tap the add [+] icon.
- In the Create Estimate page, enter the necessary details and click Save.
- In the lookup fields, you can do an advanced search.
- In the address fields, you can add addresses.
- The Currency and Exchange Rate will be displayed only if multiple currencies are enabled.
The created estimate can be edited. To edit an estimate:
- Click the Edit [
] icon on the top right side.
- Make the necessary changes and click Save.
You can also add notes, and view the related records.
Edit Estimate
To edit estimates:
- Select Estimates from the Work Order Management menu.
- Click the estimate you want to edit. In the Estimate details page, click Edit.
- Click Save after making the changes.

NOTE: If an estimate is in Rejected, Cancelled, or Expired status, while editing you will have options to retain the estimate status, and include the approval link. Refer to the Edit & Resend section for details.
Send Estimate
Once the estimate is created, it can be emailed to the contact. To do so, follow the steps below:
- In the Estimate Details page, click Send Estimate.
- In the Send Estimate overlay, click Send.
By default, the checkbox for Add Estimate PDF will be selected. If you do not wish to include the estimate PDF in the estimate email, deselect it. To rename the estimate PDF, click on its name and enter a new value. The system will automatically select the PDF template that you have designated as the default. To change the template, click on the button next to the Add Estimate PDF checkbox. In the Preview Estimate overlay, select the desired template from the Template dropdown at the top right corner and click Save.
The email templates that you have created for the service report module will be listed in the Template dropdown.
In the From field, choose a sender email address.
In the Send To field, you can use one of the following email addresses:
- Contact email address (if only a contact is present for the estimate)
- Company email address (if a company is present for the estimate)
- Email addresses of the Company's Contacts (if a company is present for the estimate)
- An email address entered by the user in the Email field of the estimate
In the Cc and Bcc fields, along with the email addresses available in the Send To field, all active confirmed users will also be listed. To include any other email address, just type in the value and press Enter. In each of these fields, you can include a maximum of five email addresses.
If there are no sender email addresses, then the estimate will be sent from noreply@sender.zohofsm.com.
You can use Mark as Sent, or Mark as Approved to change the status of the estimate manually. When an estimate is shared with the customer through any means other than via the FSM application, then Mark as Sent can be used to change the status of the estimate to Waiting for Approval. Similarly, if you want to manually change the status of the estimate to Approved, then use Mark as Approved.
Accepting/Rejecting the Estimate
The customer will receive an email with the estimate details and the options to accept or reject it. The options to accept or reject will be available only on enabling Estimate - Email Approval.
When the customer clicks Accept in the estimate email, the estimate opens in a new window. The customer can deselect any pre-selected optional line items or select additional optional line items as needed. When an optional line item is selected, its price — along with the price of any associated part line items — will be included in the Grand Total.
After making their selections, the customer must click Accept again in the confirmation message to proceed.
Once the estimate is accepted by the customer, then a work order can be created with the information in the estimate (refer to this section for mapping details). Among the optional line items, only the ones selected by the customer and associated part line items will be included in the work order. Any requests and work orders created for this estimate will be displayed in the Estimate Details page.
Send Estimate from Mobile App
To send an estimate:
- Tap Send Estimate.
- Select a recipient and tap Send [
].
Tap More options for the actions you can perform on the estimate.
Invalidated Status
After the estimate is emailed, if an FSM user performs any of the following actions, then the Accept/Reject link in the email will expire and the status of the email will change to Invalidated:
- Edit the estimate
- Resend the estimate
- Mark the estimate as expired
- Cancel the estimate
- Approve the estimate
- Reject the estimate
You can also manually invalidate an email when the status of the email is in Pending status. To do so:
- Hover over the email entry you want to invalidate. Click the more options [
] icon and select Invalidate.
Resend Estimate
If an estimate has been rejected, cancelled, or has expired, then you can resend the estimate. You can resend the estimate in three different ways:
Resend
You can resend the estimate (without changes) with or without the approval link. The option Add approval link will only be available if the Estimate - Email Approval is enabled at Setup > Field Service Settings > Other Settings.
- Click Resend and click Proceed.
- Click Send.
If you select the Add approval link checkbox, then it will be checked in the Send Estimate overlay. If this checkbox is selected, then the estimate email will contain the Accept/Reject link.
If you try to send the estimate without the approval link, then you will encounter the below confirmation message.
Edit & Resend
You can resend the estimate after making changes.
- Click Edit & Resend and click Proceed.
- In the Edit Estimate overlay, click Save or Save and Send.
- If you select the checkbox Keep the status as [Status_Name], you can retain the status (rejected, cancelled, expired) of the estimate. Click Yes, Proceed in the confirmation message. The changes made to the estimate will be saved.
- If you do not select the checkbox Keep the status as [Status_Name], the status of the estimate will change to New. - In Send Estimate overlay, click Send.
- If you select the checkbox Add approval link, then the estimate email will be sent with the approval link. The estimate status will change to Waiting For Approval. The status of the email will be Pending. The Add approval link checkbox will be shown only if had selected the checked Keep the status as [Status_Name] in the previous step.
- If you do not select the checkbox Add approval link, then the estimate email will be sent without the approval link. The status of the estimate will remain unchanged. The status of the email will be None.
- If the checkbox Keep the status as [Status_Name] was not selected in the previous step, then the estimate status will change to Waiting For Approval (since it was in New in the previous step). The status of the email will be Pending.
Clone & Resend
You can create a copy of the estimate and send it.
- Click Clone & Resend and click Proceed.
- In Clone Estimate overlay, click Save.
A copy of the estimate will be created with status New.
Print Estimate
Once you have sent an estimate, you can print the estimate. To print an estimate:
- From the dropdown button, click Print.
- Click Print.
Cancel Approval
You can roll back the Approved status of an estimate. In the Estimate Details page, select Cancel Approval.
Once you cancel the approval of an estimate, the status of the estimate will change to New. Refer to this table to know about the permission required to perform this action.
Customize Estimate Email Template
You can customize the template you use to email the estimate. To do so, follow the steps below:
- In the Estimate Details page, click Send Estimate.
- In the Send Estimate overlay, click the Template dropdown and choose one of the following options:
- Standard Old: This is the older version of the standard template. Gradually, support for this template will be withdrawn.
- Standard Template: The default template will be used.
- Custom Template: The email templates that you have created for the Estimates module will be listed here. The placeholders in the email template will be replaced with actual values.
- Compose your own: Using the text editor you can create a template for this estimate. This template, however, will not be saved for future use.
In the mobile app, click on the More Options [  ] icon in the Send Estimate screen to view the templates available. The user can either choose the Standard template or any email template created for the Estimates module. Old Standard Template is the older version of the standard template.
Adding Accept/Reject Links
You can add links for Accept/Reject in a custom template (created using an email template or by using the text editor in the Send Estimate overlay).
In an email template, click Add Placeholders or type # and select Estimates Actions. Add the necessary placeholders.
While composing your email template from the Send Estimate overlay, click on +Add Placeholders and select the required options.
Since the approved status of an estimate shouldn't be tampered with, the placeholders for the Accept/Reject links that you add in an approved estimate will generate invalid links in the estimate email. The below message will be shown, indicating the same.
Adding Customer Notes, and Terms & Conditions
You can set the values for Customer Notes, and Terms & Conditions. You can add these from Setup > Field Service Settings > Transaction Settings. These values will be used in the PDF templates of estimates. You can overwrite the set value of Terms & Conditions for an individual estimate while creating or editing it.
These two sections will be added at the bottom of the Estimate Email if you use the Standard Old template while emailing the estimate.
Preview tab
Under this tab, you will find all the actions for the Estimate's PDF template present at the same place. From this tab, you can perform the following actions on the estimate PDF template you select from the dropdown:
- Download
- Print
- Terms & Conditions: In the Update Terms And Conditions popup, the Terms & Conditions present at Setup > Field Service Settings > Other Settings > Estimates will be shown. Make any changes, if necessary, and click Save. If you select the checkbox Use this for every customer's future estimates, the updated terms and conditions will be used for the estimate in question and all estimates created after that. The changes to the terms and conditions will also be updated in the Terms & Conditions at Setup > Field Service Settings > Other Settings > Estimates. However, if you don't select the checkbox, the updated terms and conditions will only reflect in the estimate in question. At any point, if the Terms & Conditions present at Setup > Field Service Settings > Other Settings > Estimates is modified, then this updated terms and conditions will be used in the estimates created thereafter.
- Update Logo: If you need to use a different organization logo, in the Upload Image popup, click Choose File to Upload, choose an image, and click Upload. This updated logo will also reflect in the Organization Profile (Setup > General > Organization Details).
- Edit Template: Use this option to edit the chosen custom PDF template.
Emails tab
Under this tab, the details of the emails sent will be listed.
Statuses
List of Estimate statuses
Status | Description |
New | - When an estimate is created - When the estimate's Approved status is cancelled. |
Approved | - When the estimate is approved by the contact from the estimate email - When the estimate is approved by a FSM user from the Estimate Details page. - When a FSM user chooses Mark as Approved from the Estimate Details page. |
Rejected | - When the estimate is rejected by the contact from the estimate email - When the estimate is rejected by a FSM user from the Estimate Details page. |
Cancelled | When the estimate is cancelled by a FSM user from the Estimate Details page. |
Waiting For Approval | - When the estimate email is emailed to the contact - When a FSM user chooses Mark as Sent from the Estimate Details page. |
Converted to Work Order | When a FSM user chooses Convert To Work Order from the Estimate Details page. |
Expired | - When the FSM user chooses Mark As Expired from the Estimate Details page. - If an Expiry Date is set by the Zoho FSM user, the estimate will move to Expired on that date — provided it is in the Waiting for Approval status. If the estimate is in the New status, it will remain unchanged. - If no Expiry Date is set, the estimate will automatically move to Expired seven days after creation, but only if it is in the Waiting for Approval status. Estimates in the New status will not change. |
List of Email statuses
Status | Description |
None | - When you resend the estimate when it is in Approved or Converted to Work Order status - If Estimate - Email Approval setting is disabled at Setup > Field Service Settings > Other Settings. - If approval link is not included in the estimate email |
Pending | When the estimate email is sent |
Invalidated | When the approval link is no longer valid or has expired. If an FSM user does any of the following actions, the accept/reject link in the email will expire:
|
Approved | When the estimate is accepted by the user by clicking Accept in the estimate email. |
Rejected | When the estimate is rejected by the user by clicking Reject in the estimate email. |
Permissions
Following are specific permissions under Estimates that are required to perform certain actions:
Action | Permission Required |
Estimate Edit | |
Estimate Edit, Send Estimate | |
Send Estimate | |
Estimate Create, Send Estimate | |
Cancel Approval | Cancel Approval |