Signup Pop-Ups
Pop-Up forms are similar to signup forms, except they are usually smaller and they pop over a webpage. They help you to capture users' attention at the most favorable time, as they can be added to your pages and will be displayed to the visitors on certain conditions, such as at a specific time or at a specific point in the page.
They can be used to maximize the conversions amongst your webpage visitors. Design the content and template of the form based on the information that you want to collect from your contacts. Once you're done with the form template and design, you can set conditions. When the conditions are met, the pop-up form appears on the visitor's screen.
Types of pop-ups
We provide four types of pop-up forms in Zoho Marketing Automation. They differ based on how they are positioned in the users' screen on their device.
Types
- Pop-Up appears as a dialog-box in the middle of the webpage. When it appears, the visitors can decide to either subscribe to the special offer or skip it.
- Fullscreen pop-up appears as a full screen popup in the middle of the webpage. It is similar to the popup except it takes up the entire page covering the content of the webpage beneath it completely.
- Slide-In appears from the side or corner of your webpage. This is useful when you have blank space in the corner of your webpage and also when you want to attract users' attention without disrupting their reading flow of your webpage.
- Banner appears as a thin banner at the top or bottom of your webpage. This is usually used to remind users about some action that they need to perform, such as reading privacy policies or accepting necessary cookies to render images on the page.

General use cases for pop-up: Signing up for newsletter subscriptions or promoting ebooks, or special product offers.
General use cases for slide-ins: Collecting customer feedback, promoting discount coupons, or building up email lists.
General use cases for banner: Announcing new features, providing service updates, or advertising product videos.
General use cases for banner: Announcing new features, providing service updates, or advertising product videos.
To create a pop-up
- From the Navigation Toolbar to the left, choose Signup Pop-Ups under Lead Generation module.
- Click Create in the screen that appears if this is the first pop-up you are going to create.
- If you have already created pop-ups, click on Create button at top right.
- Enter a Name and the Preview URL for where you want to display the pop-up and click Next.
- Choose the type of pop-up from the four types available, and choose a template from the list of Categories available.
- In the next screen, customize your pop-up in the Elements tab of the pop-up builder.
- From the list of elements available, you can drag and drop the desired element on to the pop-up preview and customize it to suit your needs. Each element will have further customization options present to the left as soon as you drag and drop them.
- Make design and color related changes in the Settings tab of the builder.
- Once you are done customizing the pop-up, click on Save & Next button at top right. You will be taken to the Configuration tab of the pop-up.
- Before you click on Save & Next, in case you want to redo or undo any customizations you made, you can do that. At far right of the builder screen, you have different options. You can view a desktop preview or mobile preview of your pop up. Clicking on the eye icon shows you a full window preview without the customization options. The two arrows are undo and redo buttons respectively.
- Click Launch at the top-right after you are done customizing the pop-up.
- In case you want to make some changes to the pop-up template at this stage, you can click on the pencil icon as shown in above image.
 Note: A maximum of nine elements (of any combination) can be added to a pop-up form. For example, you can add five Input Box, three Text Area, one Video. This can be of any combination as long as the total is nine.
Configuration Actions in Pop-Up
After customizing the pop-up, you would have clicked on Save & Next button which will lead you to the Configuration tab of the pop-up.
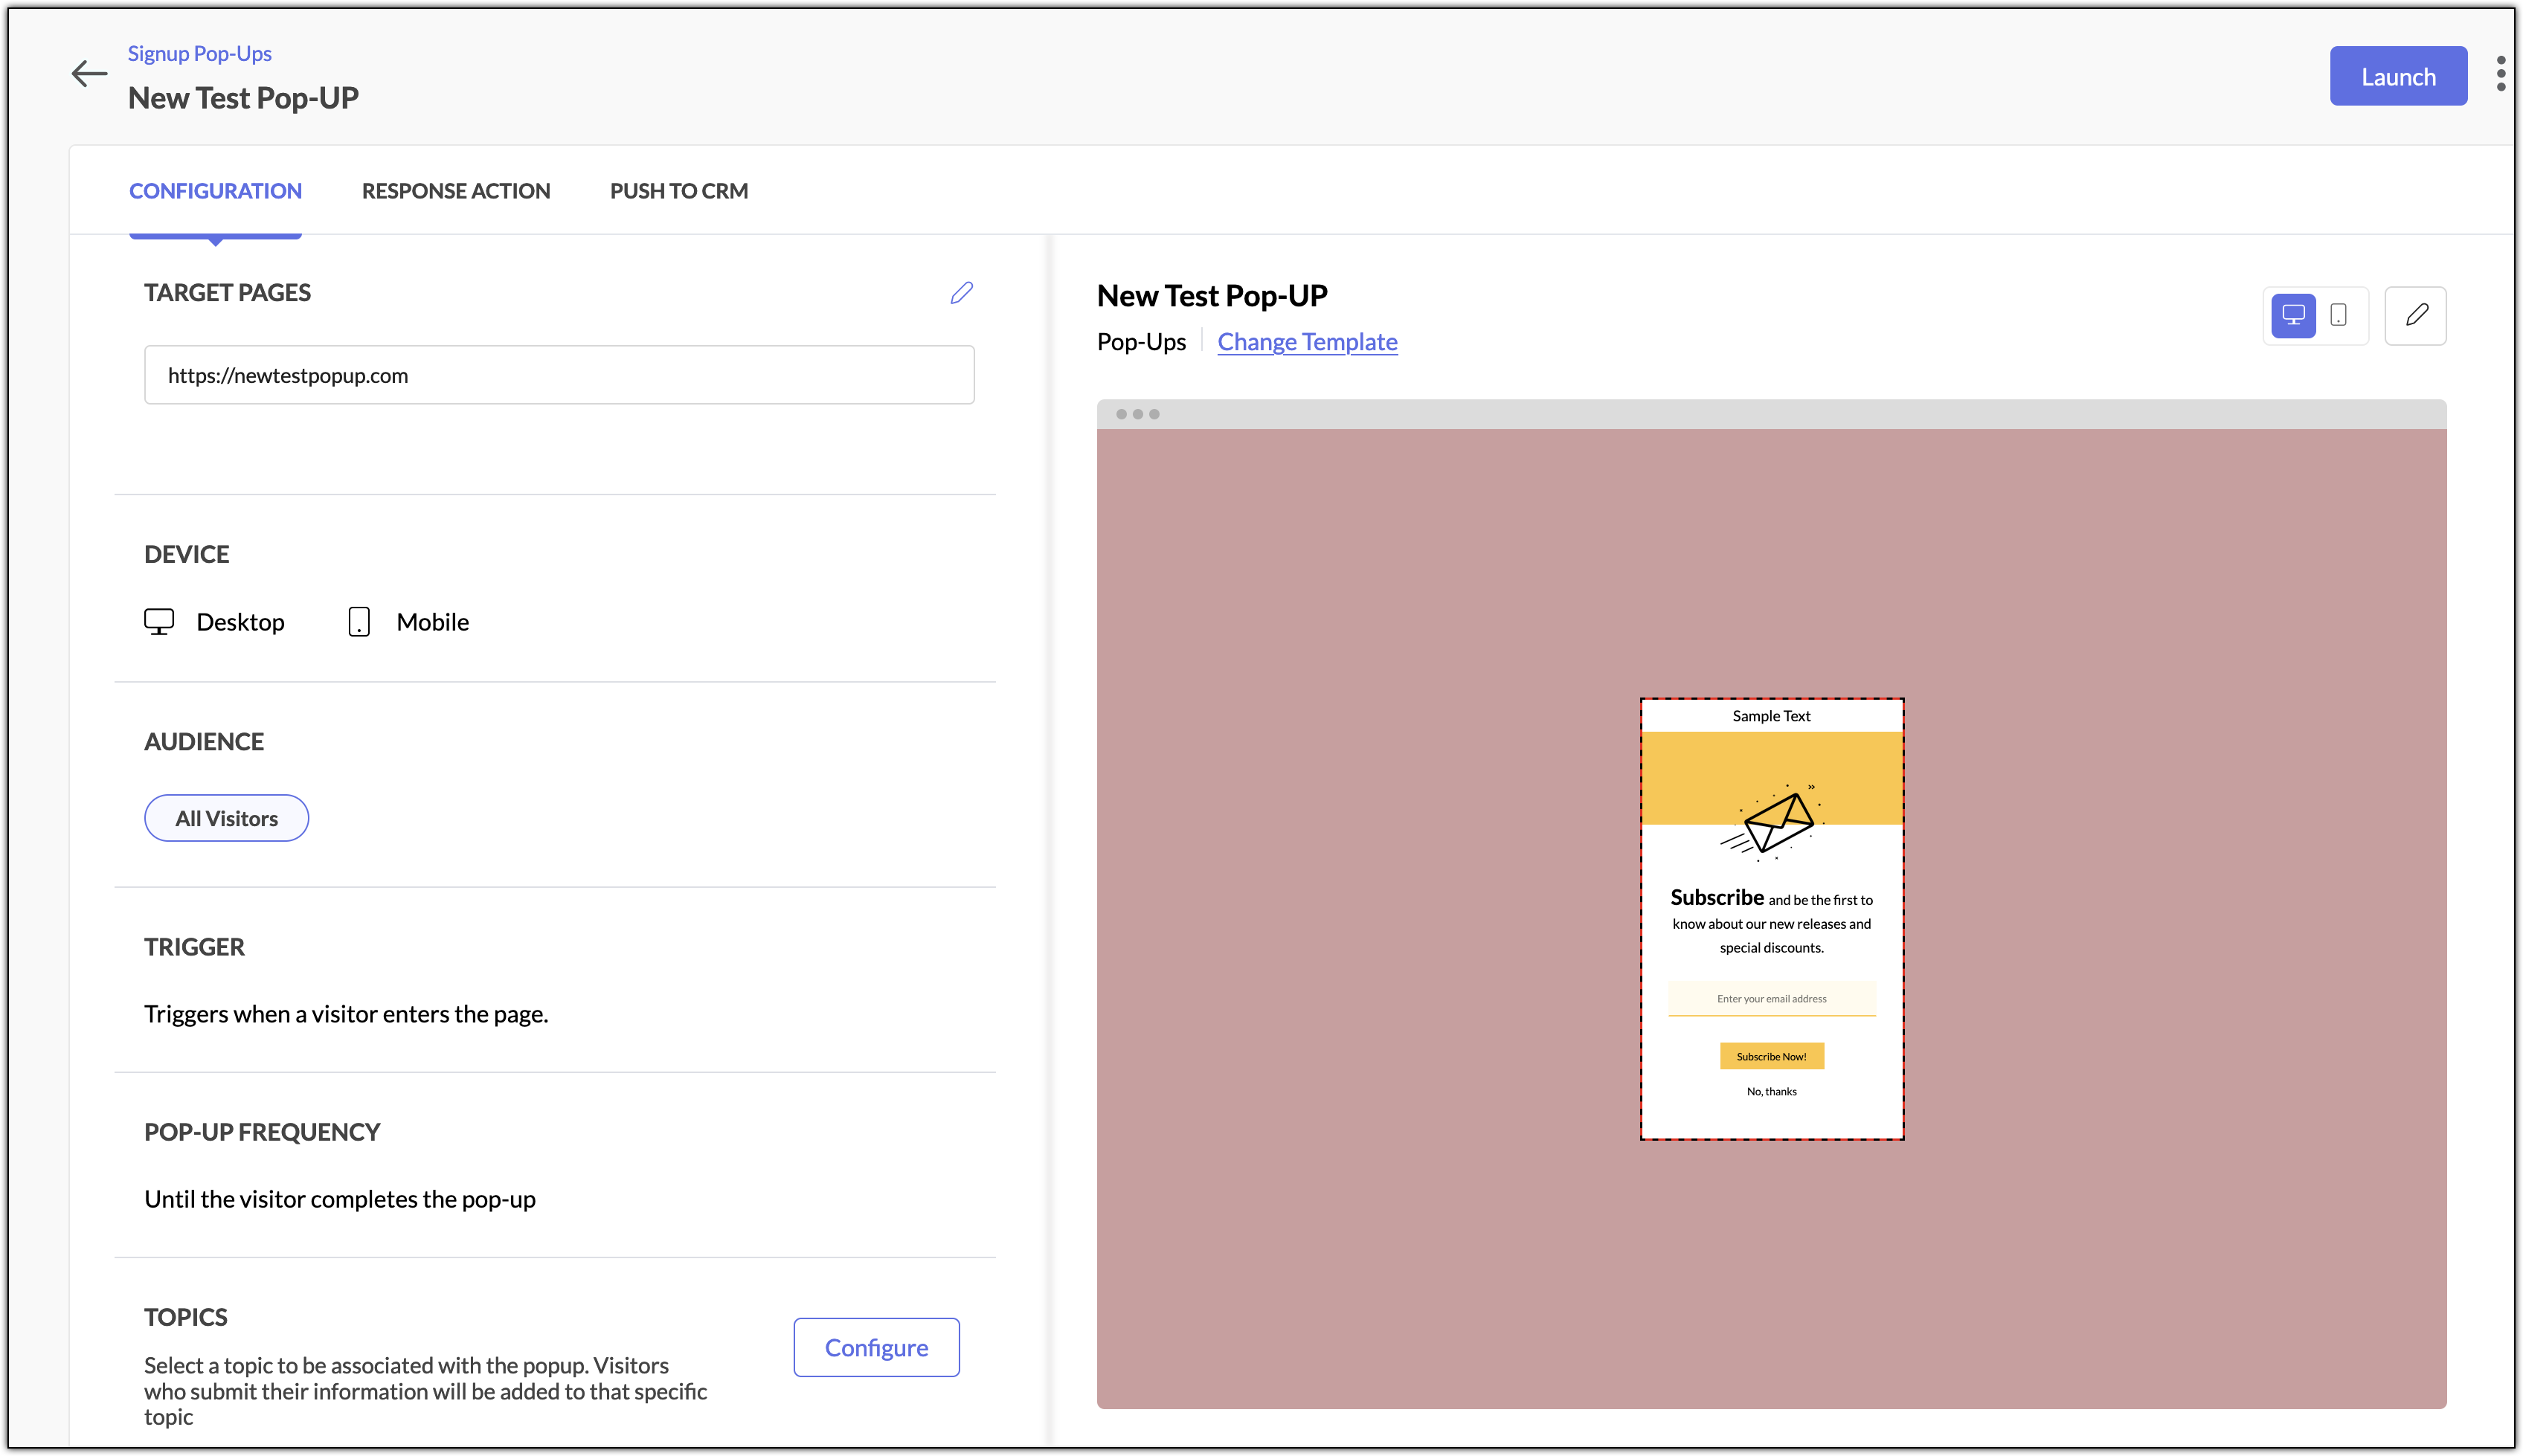
You will need to configure the pop-up for compatible devices, target audience, pop-up trigger, response follow-up action, and also associate with a topic.
You will need to configure the pop-up for compatible devices, target audience, pop-up trigger, response follow-up action, and also associate with a topic.
Set Target Pages
To set target pages:
- Click the pencil icon beside Target Pages option on the Configuration tab to specify the web pages you want to show your pop-up on.
- You can select the desired Criteria and then enter the URL in Value field. You can also toggle the Advanced options.
- In the Advanced options, you can set multiple criteria.
- You can also specify the target pages not to track.
- Once done, you can Save changes.
Set Triggers
To set triggers:
Choose when you want the pop-up to appear to visitors from the options in the Trigger section. You can trigger the pop-up using two types of trigger conditions: Preset Trigger and Custom Trigger. Once you are done setting up the trigger, click Save.
- Preset Trigger: These are some of the default conditions which you can set to trigger the pop-up when a condition is met. The available options under preset triggers are shown in
the image below. - Custom Triggers: Click Build Custom Trigger to set one or more set of custom conditions according to your requirements. You can set AND, OR conditions when you want to set more than one condition. The pop-up will be triggered when the condition is or set of conditions are met. You can also create new groups when setting the conditions using the Add New Group option. To understand how these filters and groups work, please check here. To edit a custom trigger, click on the Custom Trigger tab and click on pencil icon at far right of the trigger when you hover over it.
Pop-Up frequency
- Choose how frequently the pop-up will be displayed to your visitors from the Pop-Up Frequency section. Click on the pencil icon beside this section to set up the frequency.
- Once you are done setting up, click Save.
Choose your target audience
You can choose from a variety of audience segments depending on your visitors' geological location, device used, new or returning visitors, and much more. To choose your target audience:
- Click the edit icon in the Audience section and choose a specific group of visitors you want to show this pop-up to.
- There are two types of audience you can choose from:
- Preset Audience: This allows you to target audience based on device type, social media traffic, returning visitors, paid campaigns, and more.
- Custom Audience: These are personalized audience that can be created using any combination of user profile or behaviour filters by clicking the Build Custom Audience button at the top-right. You can set AND, OR conditions when you want to set more
than one condition. The pop-up will be triggered when the condition is
or set of conditions are met. You can also create new groups when
setting the conditions using the Add New Group option. To understand how
these filters and groups work, please check here.
To edit a custom trigger, click on the Custom Trigger tab and click on
pencil icon at far right of the trigger when you hover over it.
- Click Save to move on to the next configuration.
Choose Device
You can choose from three devices: Desktop, Mobile, and Tab. To choose a target device:
- Click the edit icon in the Device section and choose a specific group of visitors you want to show this pop-up to.
- There are three types of devices to choose from: Desktop, Mobile, and Tab. You can choose all three, if needed.
- Click Save.
Configure Response Action
You can set up follow up actions for visitors when they submit their
details on the form. Response action allows you to not only save time
but also provides a way to automate a certain action thereby eliminating
manual intervention. After customizing the pop-up, you would have clicked on Save & Next
button which will lead you to the Configuration tab of the pop-up; beside this tab you can find the Response Action tab.
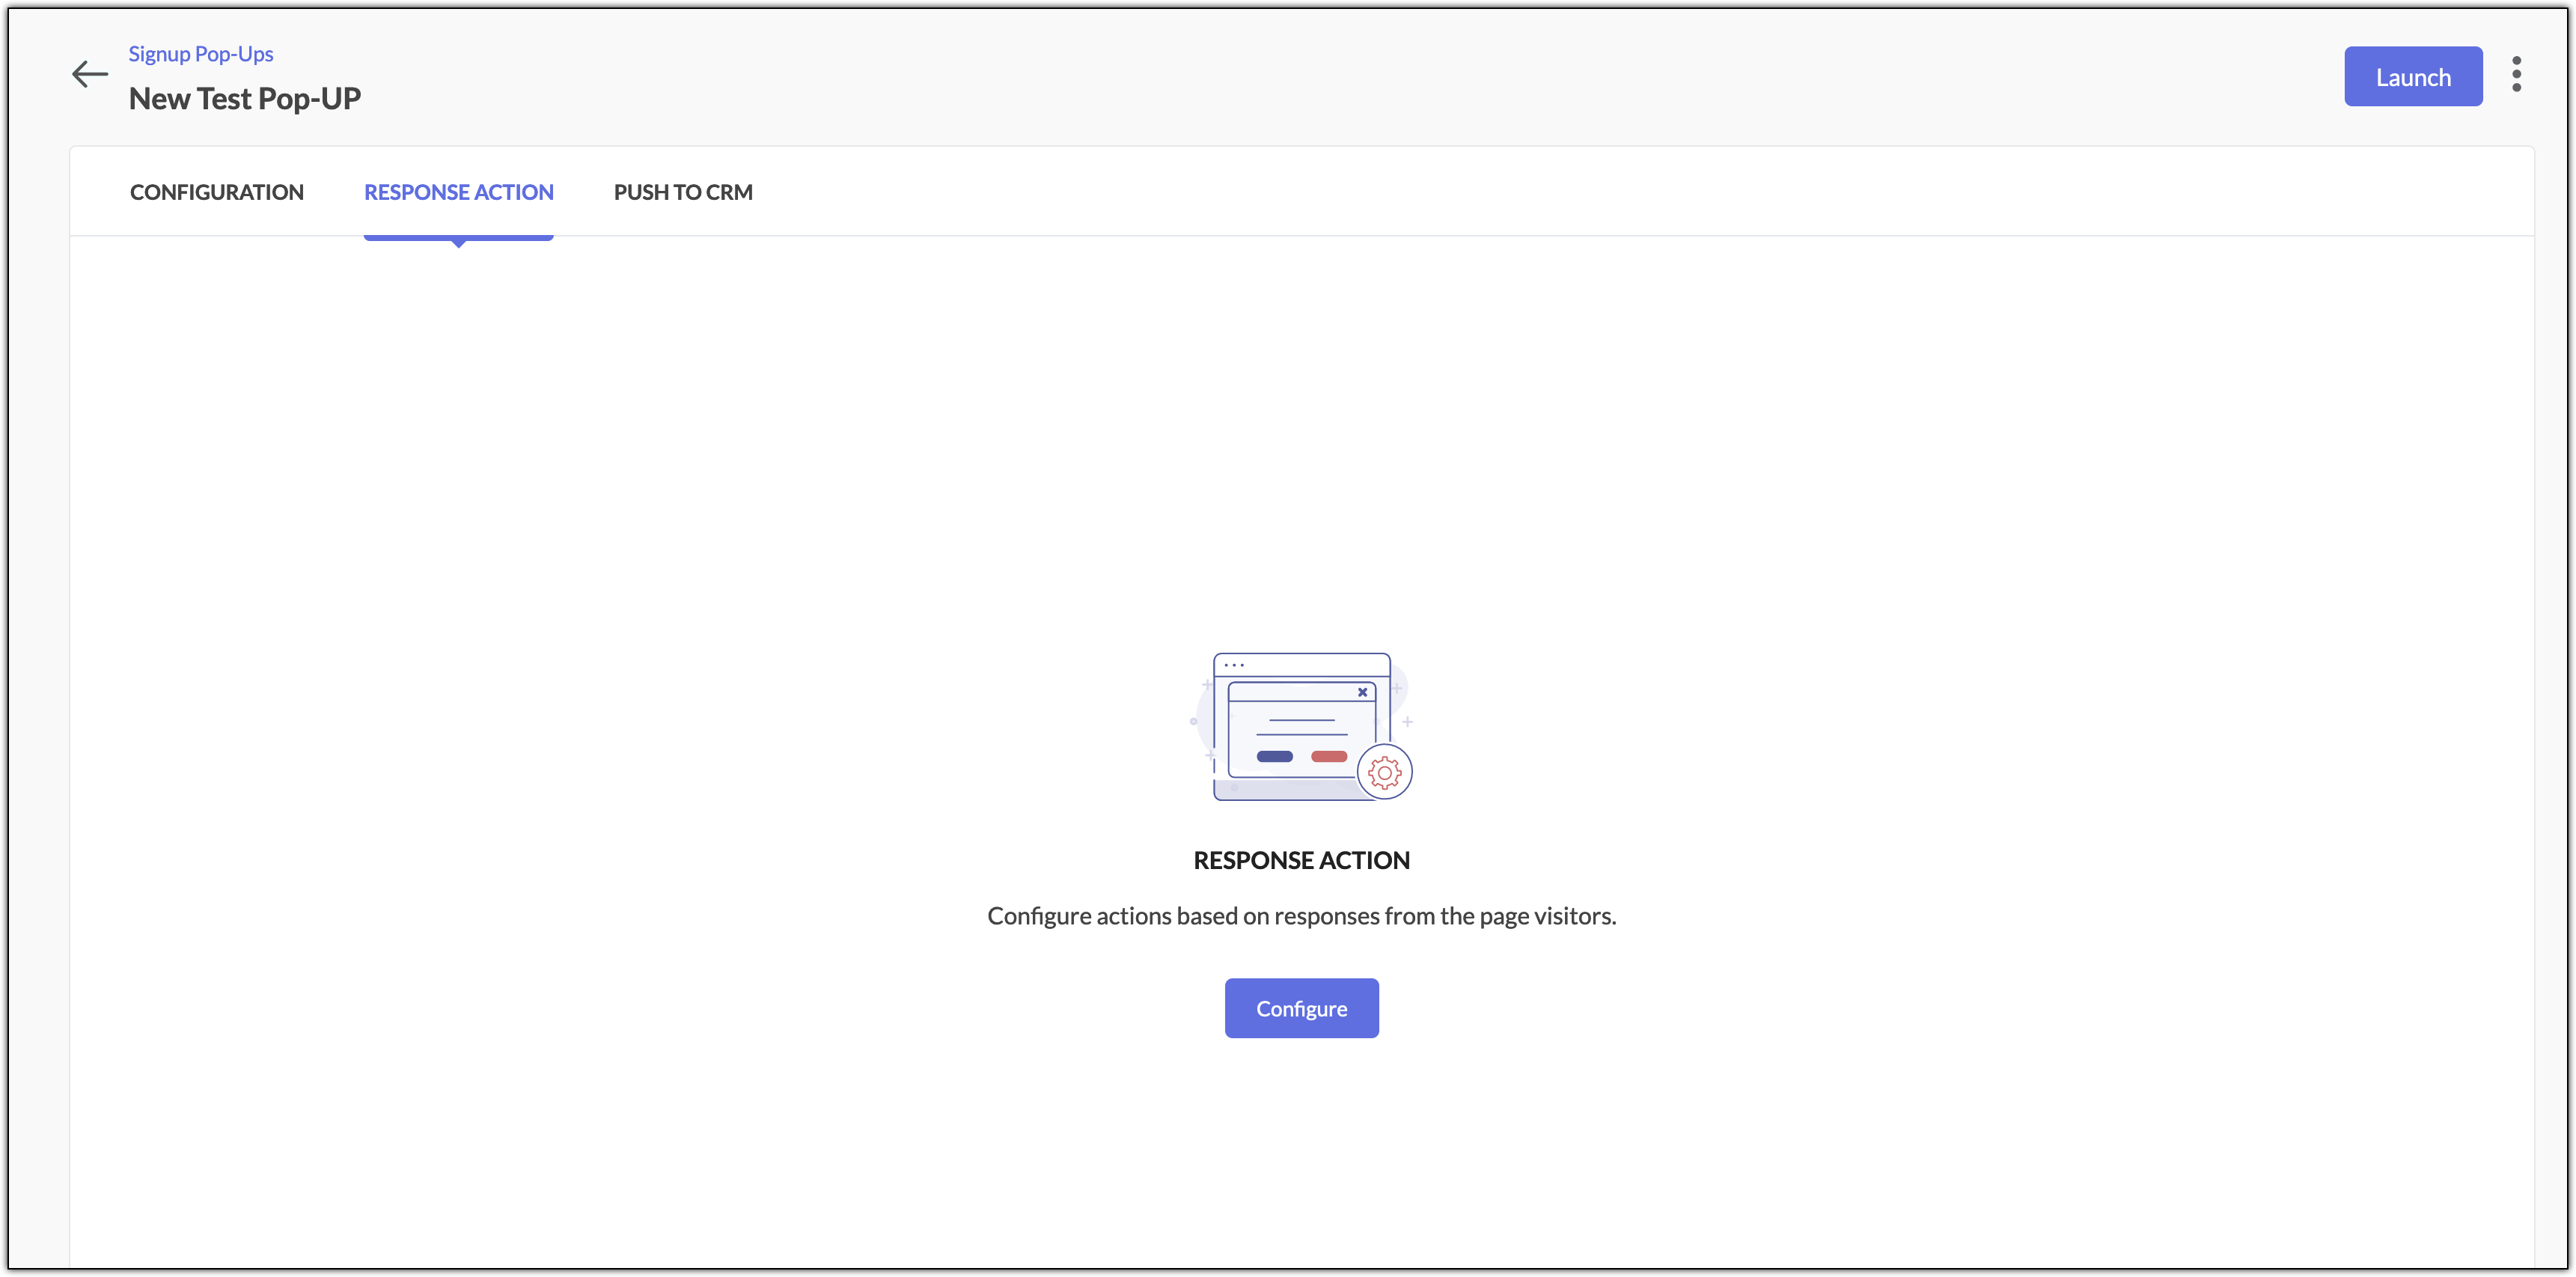
- Click on the Response Action tab section and click Configure.
- Select the desired Activity for different responses. You can set multiple response actions based on your requirements by clicking on the + icon at far right.
- Click Save.
Push records to Zoho CRM
After customizing the pop-up, you would have clicked on Save & Next
button which will lead you to the Configuration tab of the pop-up; the last tab would be the Push to CRM tab.
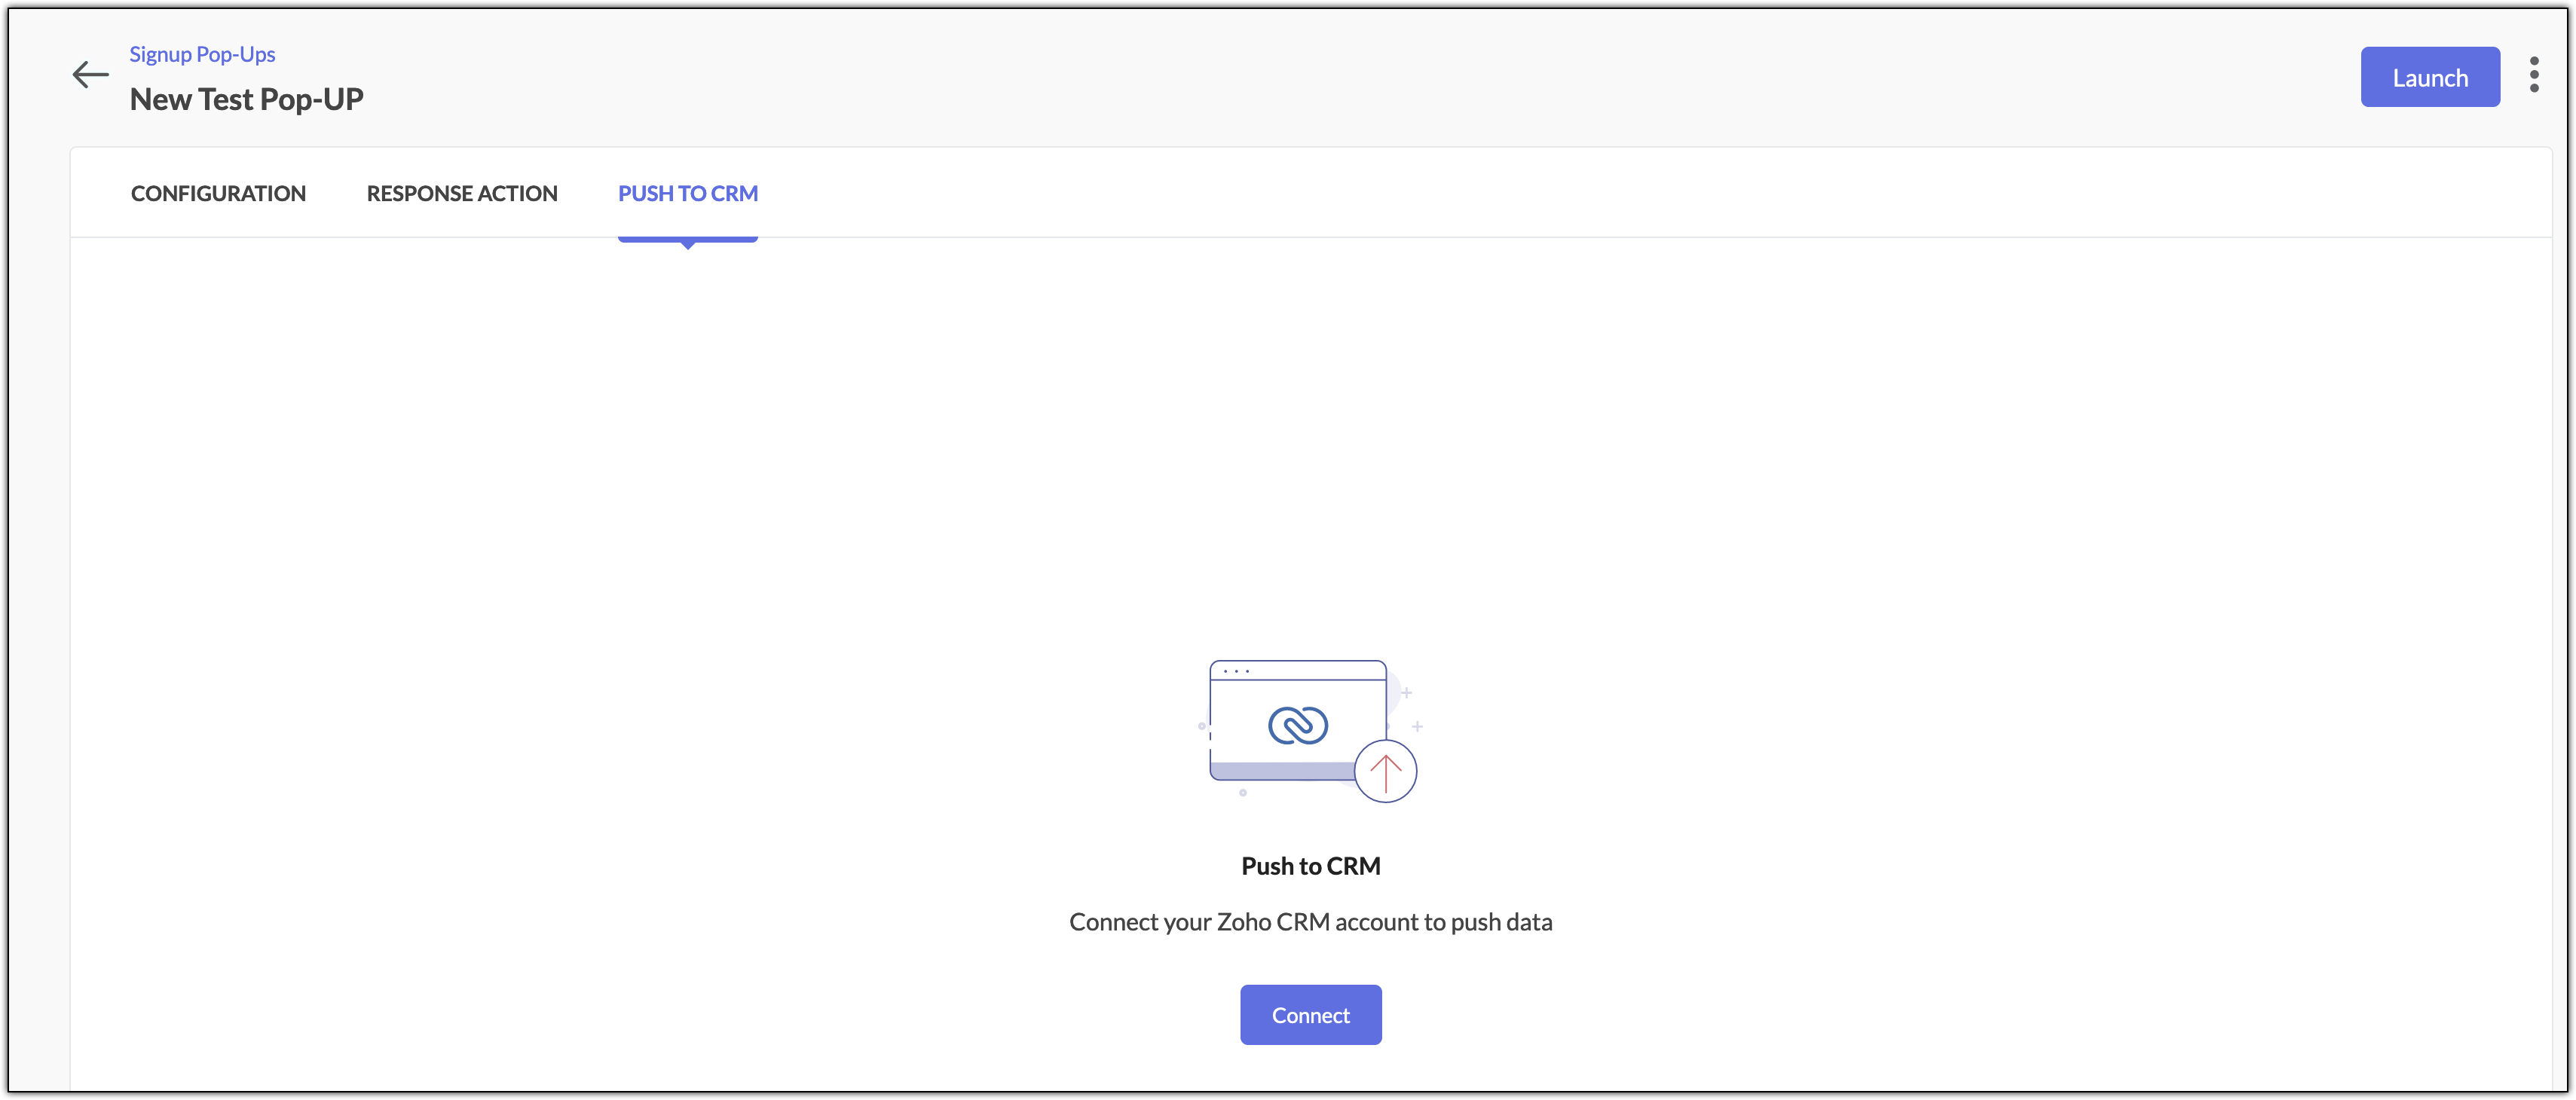
To push data submitted by form visitors (form in the landing page) to your Zoho CRM:
To push data submitted by form visitors (form in the landing page) to your Zoho CRM:
- Click Connect in the Push to CRM tab.
- Select which contacts you want to update in Zoho CRM.
- Update existing and push new contacts: Choose this if you want to update the field values of pre-existing contacts (if there is a change) as well as push new records incoming from the form.
- Update existing contacts only: Choose this if you want to update field values of only pre-existing contacts.
- Select the CRM module into which you want to push the records.
- Map the fields between Zoho Marketing Automation and Zoho CRM. Mapped fields will be updated in Zoho CRM when the records are pushed.
- Click Save.
Note: Data can be pushed from Zoho Marketing Automation to Zoho CRM but the reverse is not possible.
Use cases
In this section, we can refer to some use cases to help you choose the most appropriate pop-up for different scenarios.
Slide-in
Ella has added a new blog to her company's website. The blog is about a mandatory and lengthy process that users are supposed to follow for the uninterrupted use of their product. She wants to collect user feedback regarding their understanding of the process and make necessary changes to make it easier for the users.
She creates a slide-in pop-up to achieve this. She chooses a template from the Feedback category, sets her blog URL as the target page, and sets the preset trigger as Triggers when a visitor scrolls halfway down the page. She sets the pop-up frequency as Show the pop-up once.
Full screen pop-up
Abdul published a few ebooks for his company's products. Now, he wants to see the number of users referring these ebooks and wanted to collect their information. He then plans to send newsletters on the latest trends about the topics that are discussed in each ebook to make it more useful and engaging for the users.
He creates a full screen pop-up and chooses from one of the signup templates. He sets the white paper download URL as the target page and sets the preset trigger as Triggers when a visitor enters the page. He sets the pop-up frequency as Until the visitor completes the popup.
Banner
Software Bay wanted to give all its customers a five percent discount on their products as a promotion for its fifth anniversary. They wanted to announce it in the banner and collect interested customer's "Customer ID" to proceed. They will collect more details after collecting the Customer ID.
They add another screen following the banner to collect other basic information and set the On Click Action for the button as Jump to screen, which will take them from the announcement banner to the next screen.
They create a banner pop-up and choose the Image and subtitle with input template. They set a domain criteria (webpages with their domain) as the target page and sets the preset trigger as Triggers when a visitor enters the page. They set the pop-up frequency as Until the visitor completes the popup.
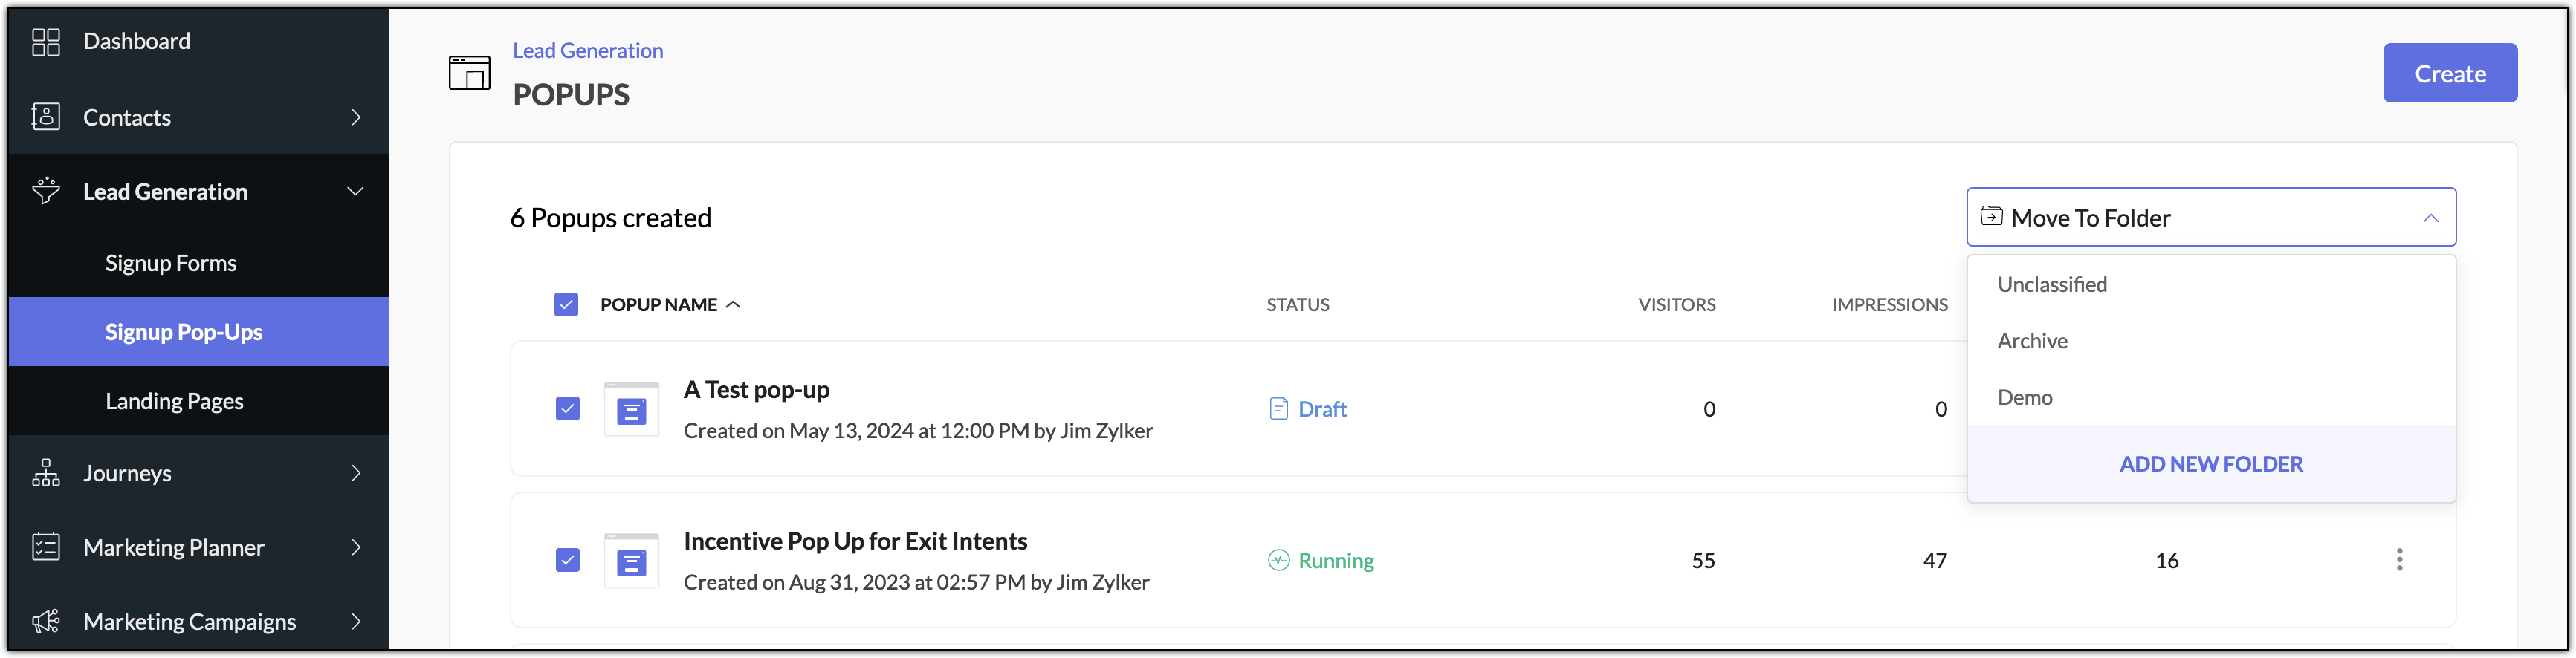
Other Actions
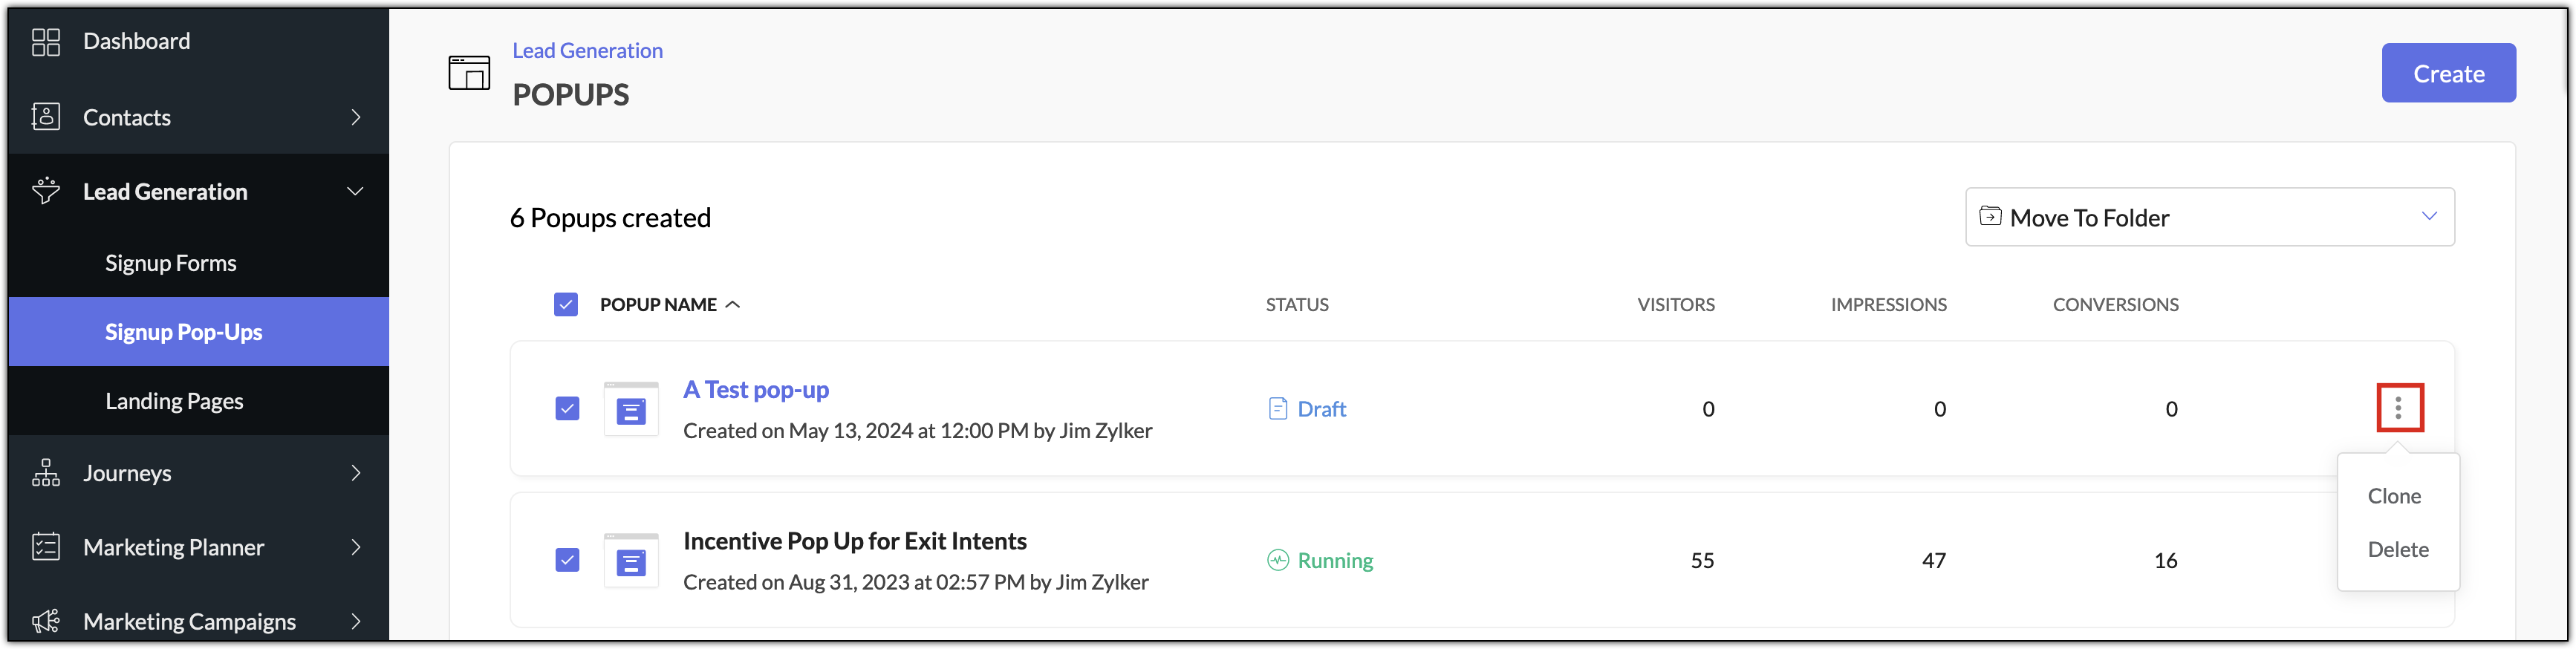
In the Signup Pop-Ups list view, you can select some pop-ups and move them to a different folder using Move to Folder
option. You can also use the Add New Folder option to create a new
folder. If you want to categorize signup pop-ups catering to different
purposes, having them in different folders would be a good option.
By clicking on the More Actions icon at far right of a signup form, you can make use of Clone and Delete options. Clone allows you to create a copy of the pop-up you have created and
Delete option will delete the pop-up. Once a pop- is deleted, it cannot be
retrieved.
The Clone and Delete options can also be used in a pop-up's detail view. Click on the More Actions icon at top right of the pop-up next to the Pause or Relaunch button to access these two options.
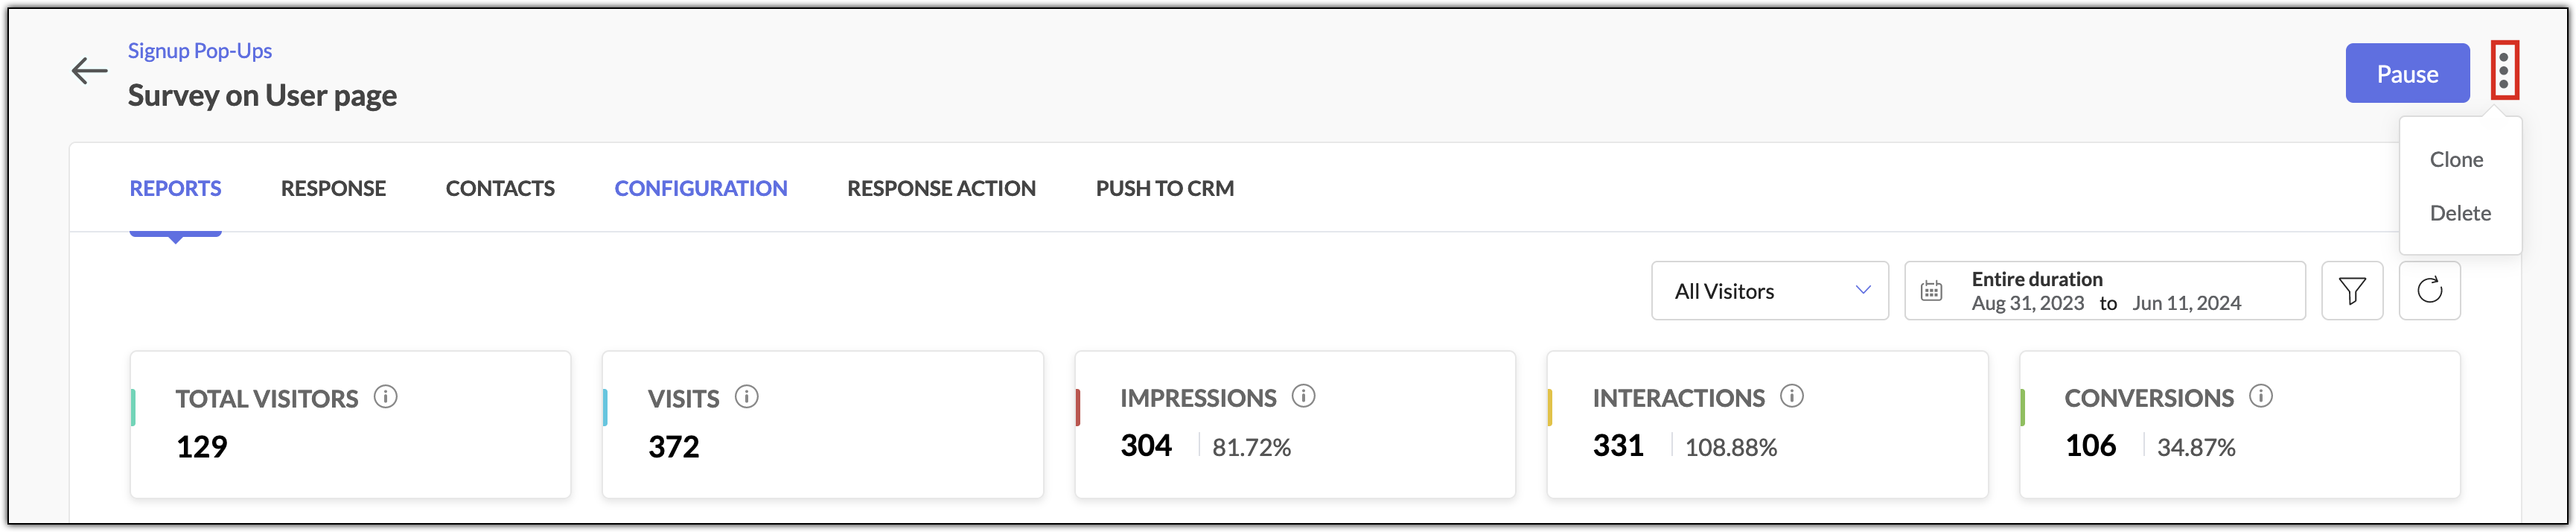
A pop-up that is in Running status can be paused using the Pause button present at top right of that pop-up's detail view. Similarly, a pop-up that has been paused can be launched again using the Relaunch button present at top right.

The Clone and Delete options can also be used in a pop-up's detail view. Click on the More Actions icon at top right of the pop-up next to the Pause or Relaunch button to access these two options.
A pop-up that is in Running status can be paused using the Pause button present at top right of that pop-up's detail view. Similarly, a pop-up that has been paused can be launched again using the Relaunch button present at top right.