Maximize conversions using LandingPage
Today's business world is highly dependent on digital marketing strategies, no matter the size of the business. Marketers work on various ideas for different marketing channels and curate their websites by putting a lot of thought and effort into content and design, but they sometimes still struggle to see good conversion rates.
One of the main reasons this is happening is because they've been trying to promote and divert traffic to webpages that don't work towards specific marketing goals, but rather provide visitors with a lot of general information. Visitors therefore often feel very overwhelmed with the amount of information they're exposed to, and aren't pulled towards any specific desired action. This leads to decreased conversion rates and creates a mismatch between the marketing efforts you've been making and the actual end-user experience.
To address this issue, LandingPage—part of Zoho Marketing Plus—enables you to create and implement dedicated landing pages that are focused on specific concepts and targeted towards specific audience segments. These landing pages are standalone webpages that can help achieve one clear marketing goal and guide your visitors directly towards your call-to-action. Users land here after clicking on a link either from their search engine, social media channels, or an email, and these pages are specifically designed to convert incoming visitors into leads and provide more control over conversions.
What to add to a landing page
Compelling content
Curate content that's clear and concise, gradually guiding users through a journey where they understand the need for your product or service and navigate toward the ultimate target: the call to action.
Engaging visuals
It's always easier to encourage visitors to engage when you add visuals that support your content. High-quality images, graphics, and statistics in the form of graphs/charts can help them visualize the message you're trying to convey quickly. Choose a design that's responsive and compatible across devices. A sleek and simple design that has a logical flow towards the call to action is the key to conversion.
Lead information capture
Attach a form to your landing page through which you can capture information from visitors. Basic details like name, contact number, email, and business name can be obtained in exchange for something you have to offer. You can either provide them with an option to schedule a demo or a free guide to your product or service.
Contact information
Provide users with the means to contact you by attaching your team's email address, linking your social channels, or providing your business contact number and address if relevant. You can also link or deploy a live bot that can help users navigate around and reach out to you quickly. You can link any of your social profiles, choose how you want your logo to look, and reorder the section however you see fit.
Customer testimonials
Add reviews, feedback, and testimonial videos from customers to your page to help your brand build trust and credibility with visitors. Reading the experience of other users from the same or different industries will give them an idea of how your offering will benefit them better in a more relatable manner. You can either embed a video or attach the video directly from YouTube.
Where to create a landing page in Marketing Plus
You can access and create a landing page from three different places inside Marketing Plus:
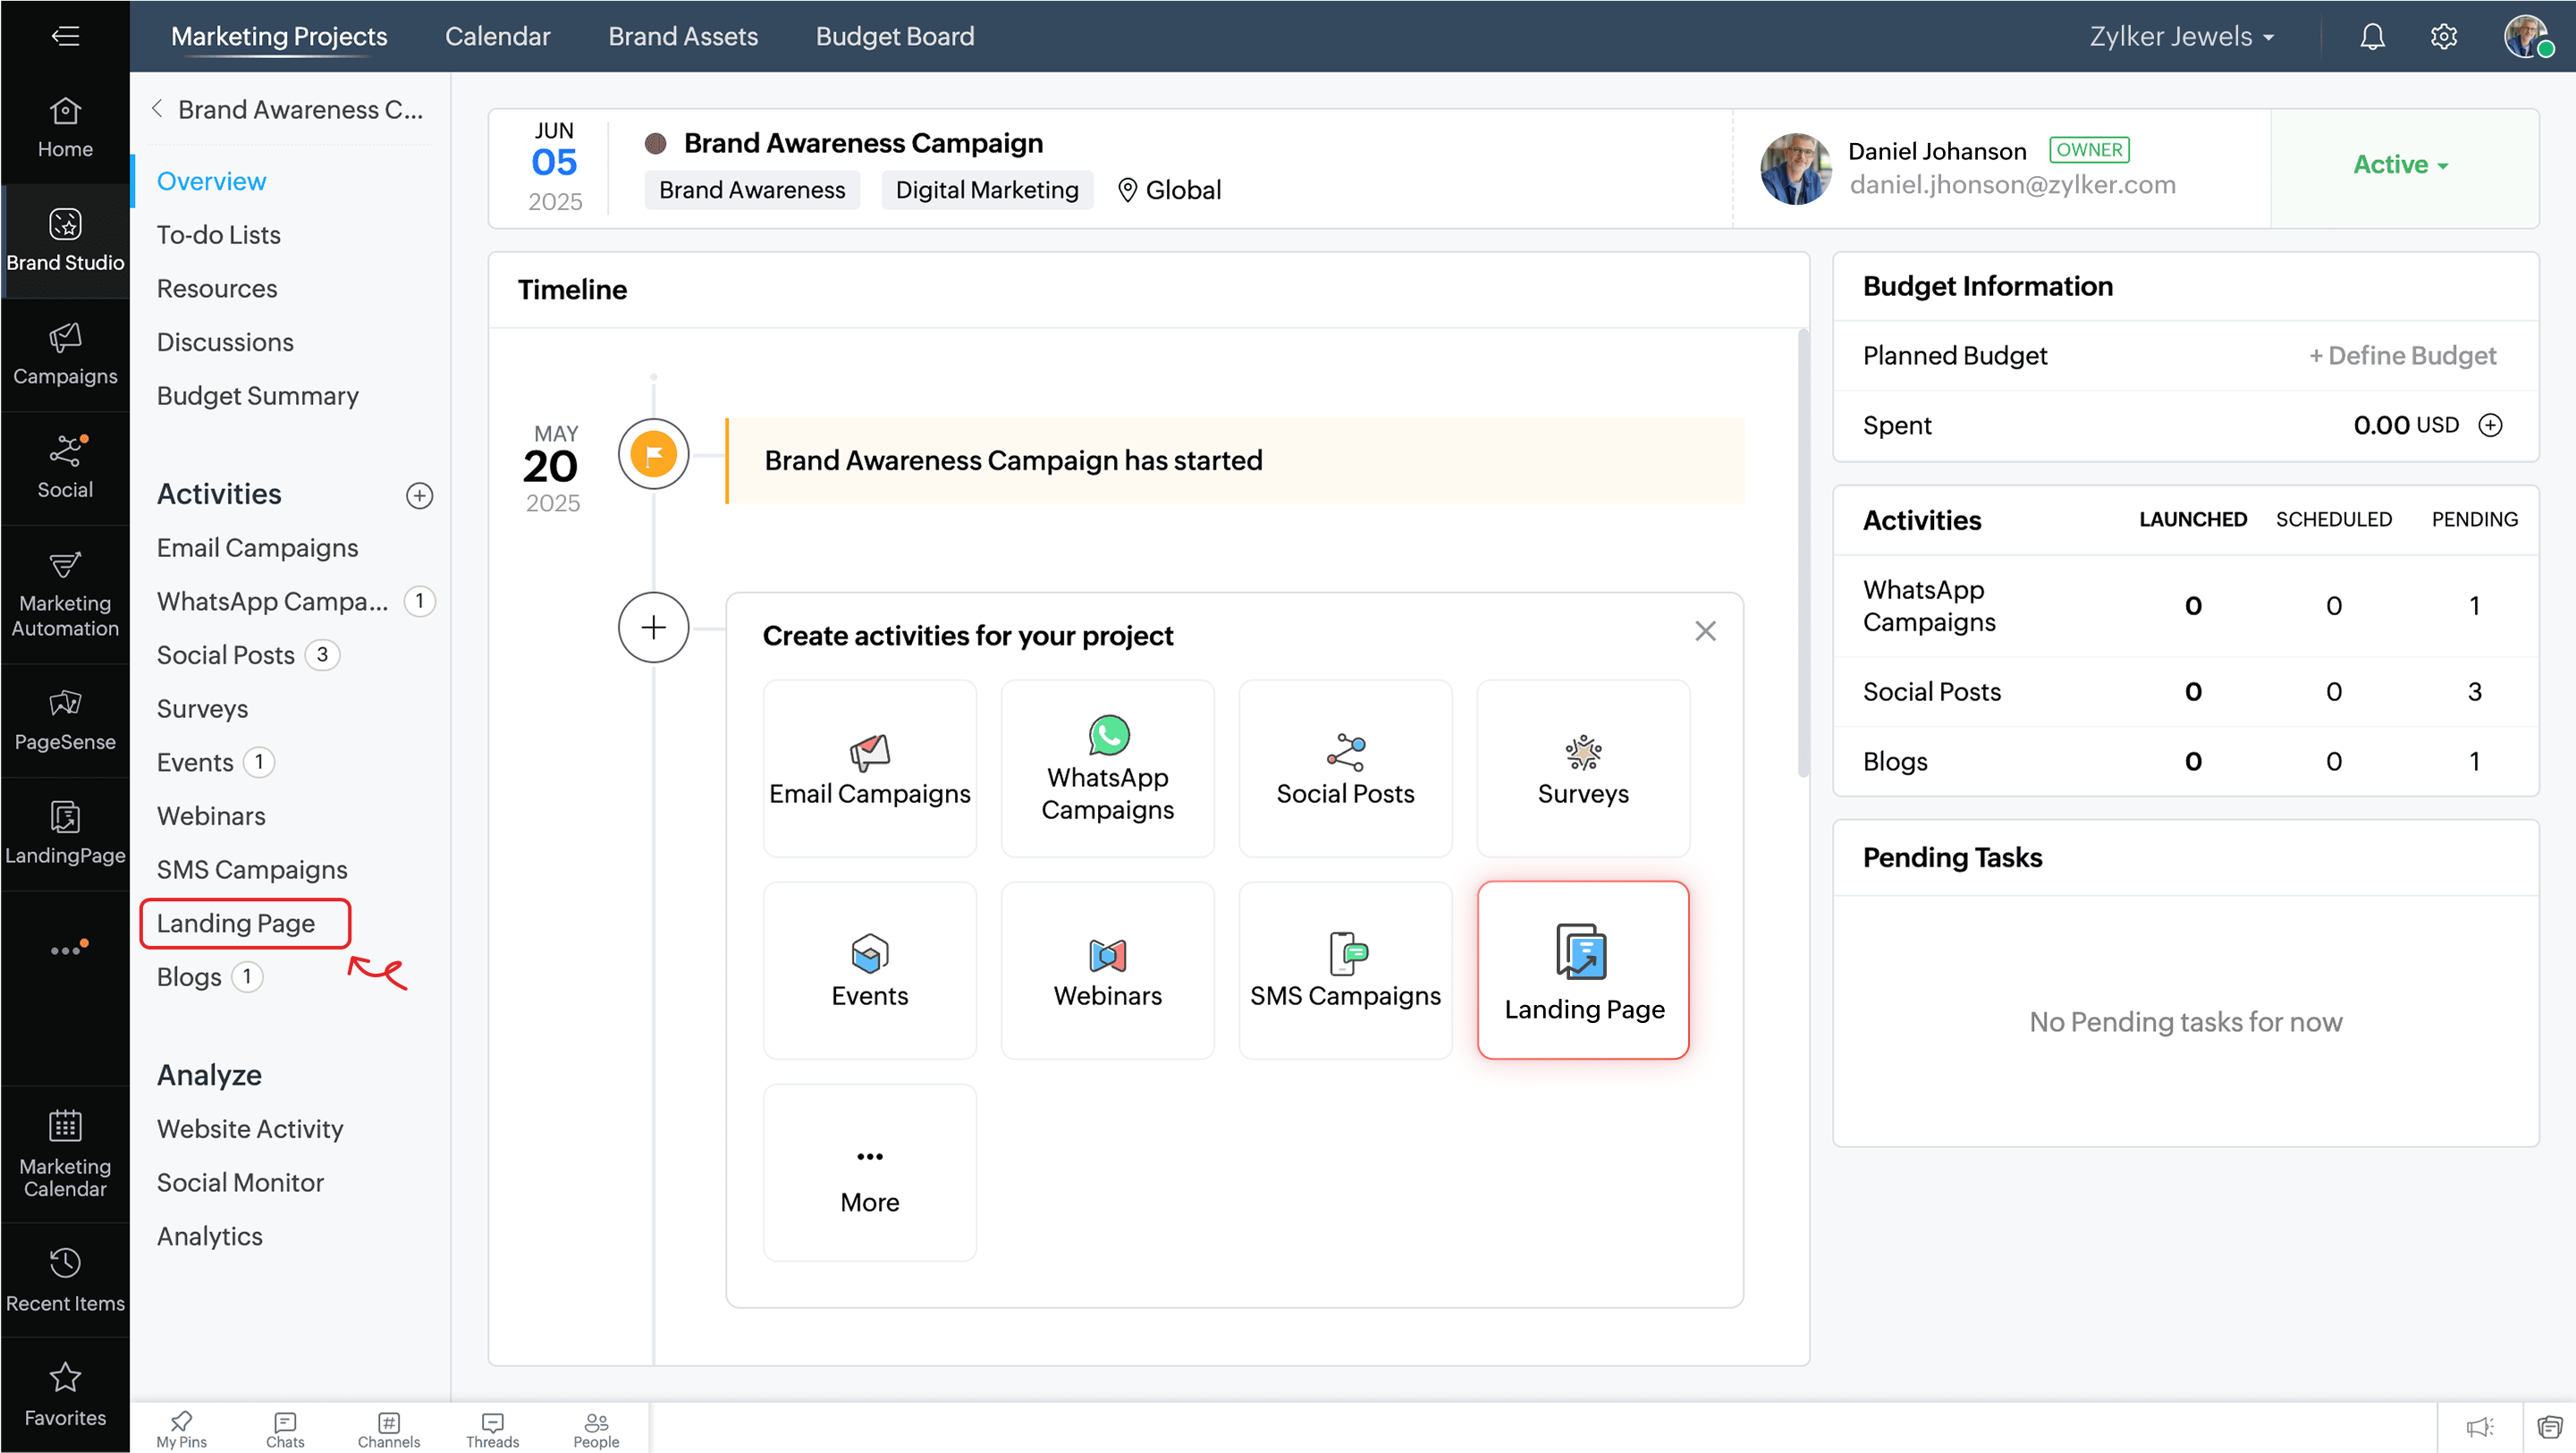
Marketing Projects: Under Brand Studio > Marketing Projects, go to the marketing project for which you want to create the landing page or create a new project per your requirements. Once inside the project, add a landing page as an activity, provide a relevant name and expected launch date, choose the owner of the activity, and then start drafting it right away. Alternatively, you can also create a landing page as an activity directly from the left-hand menu.

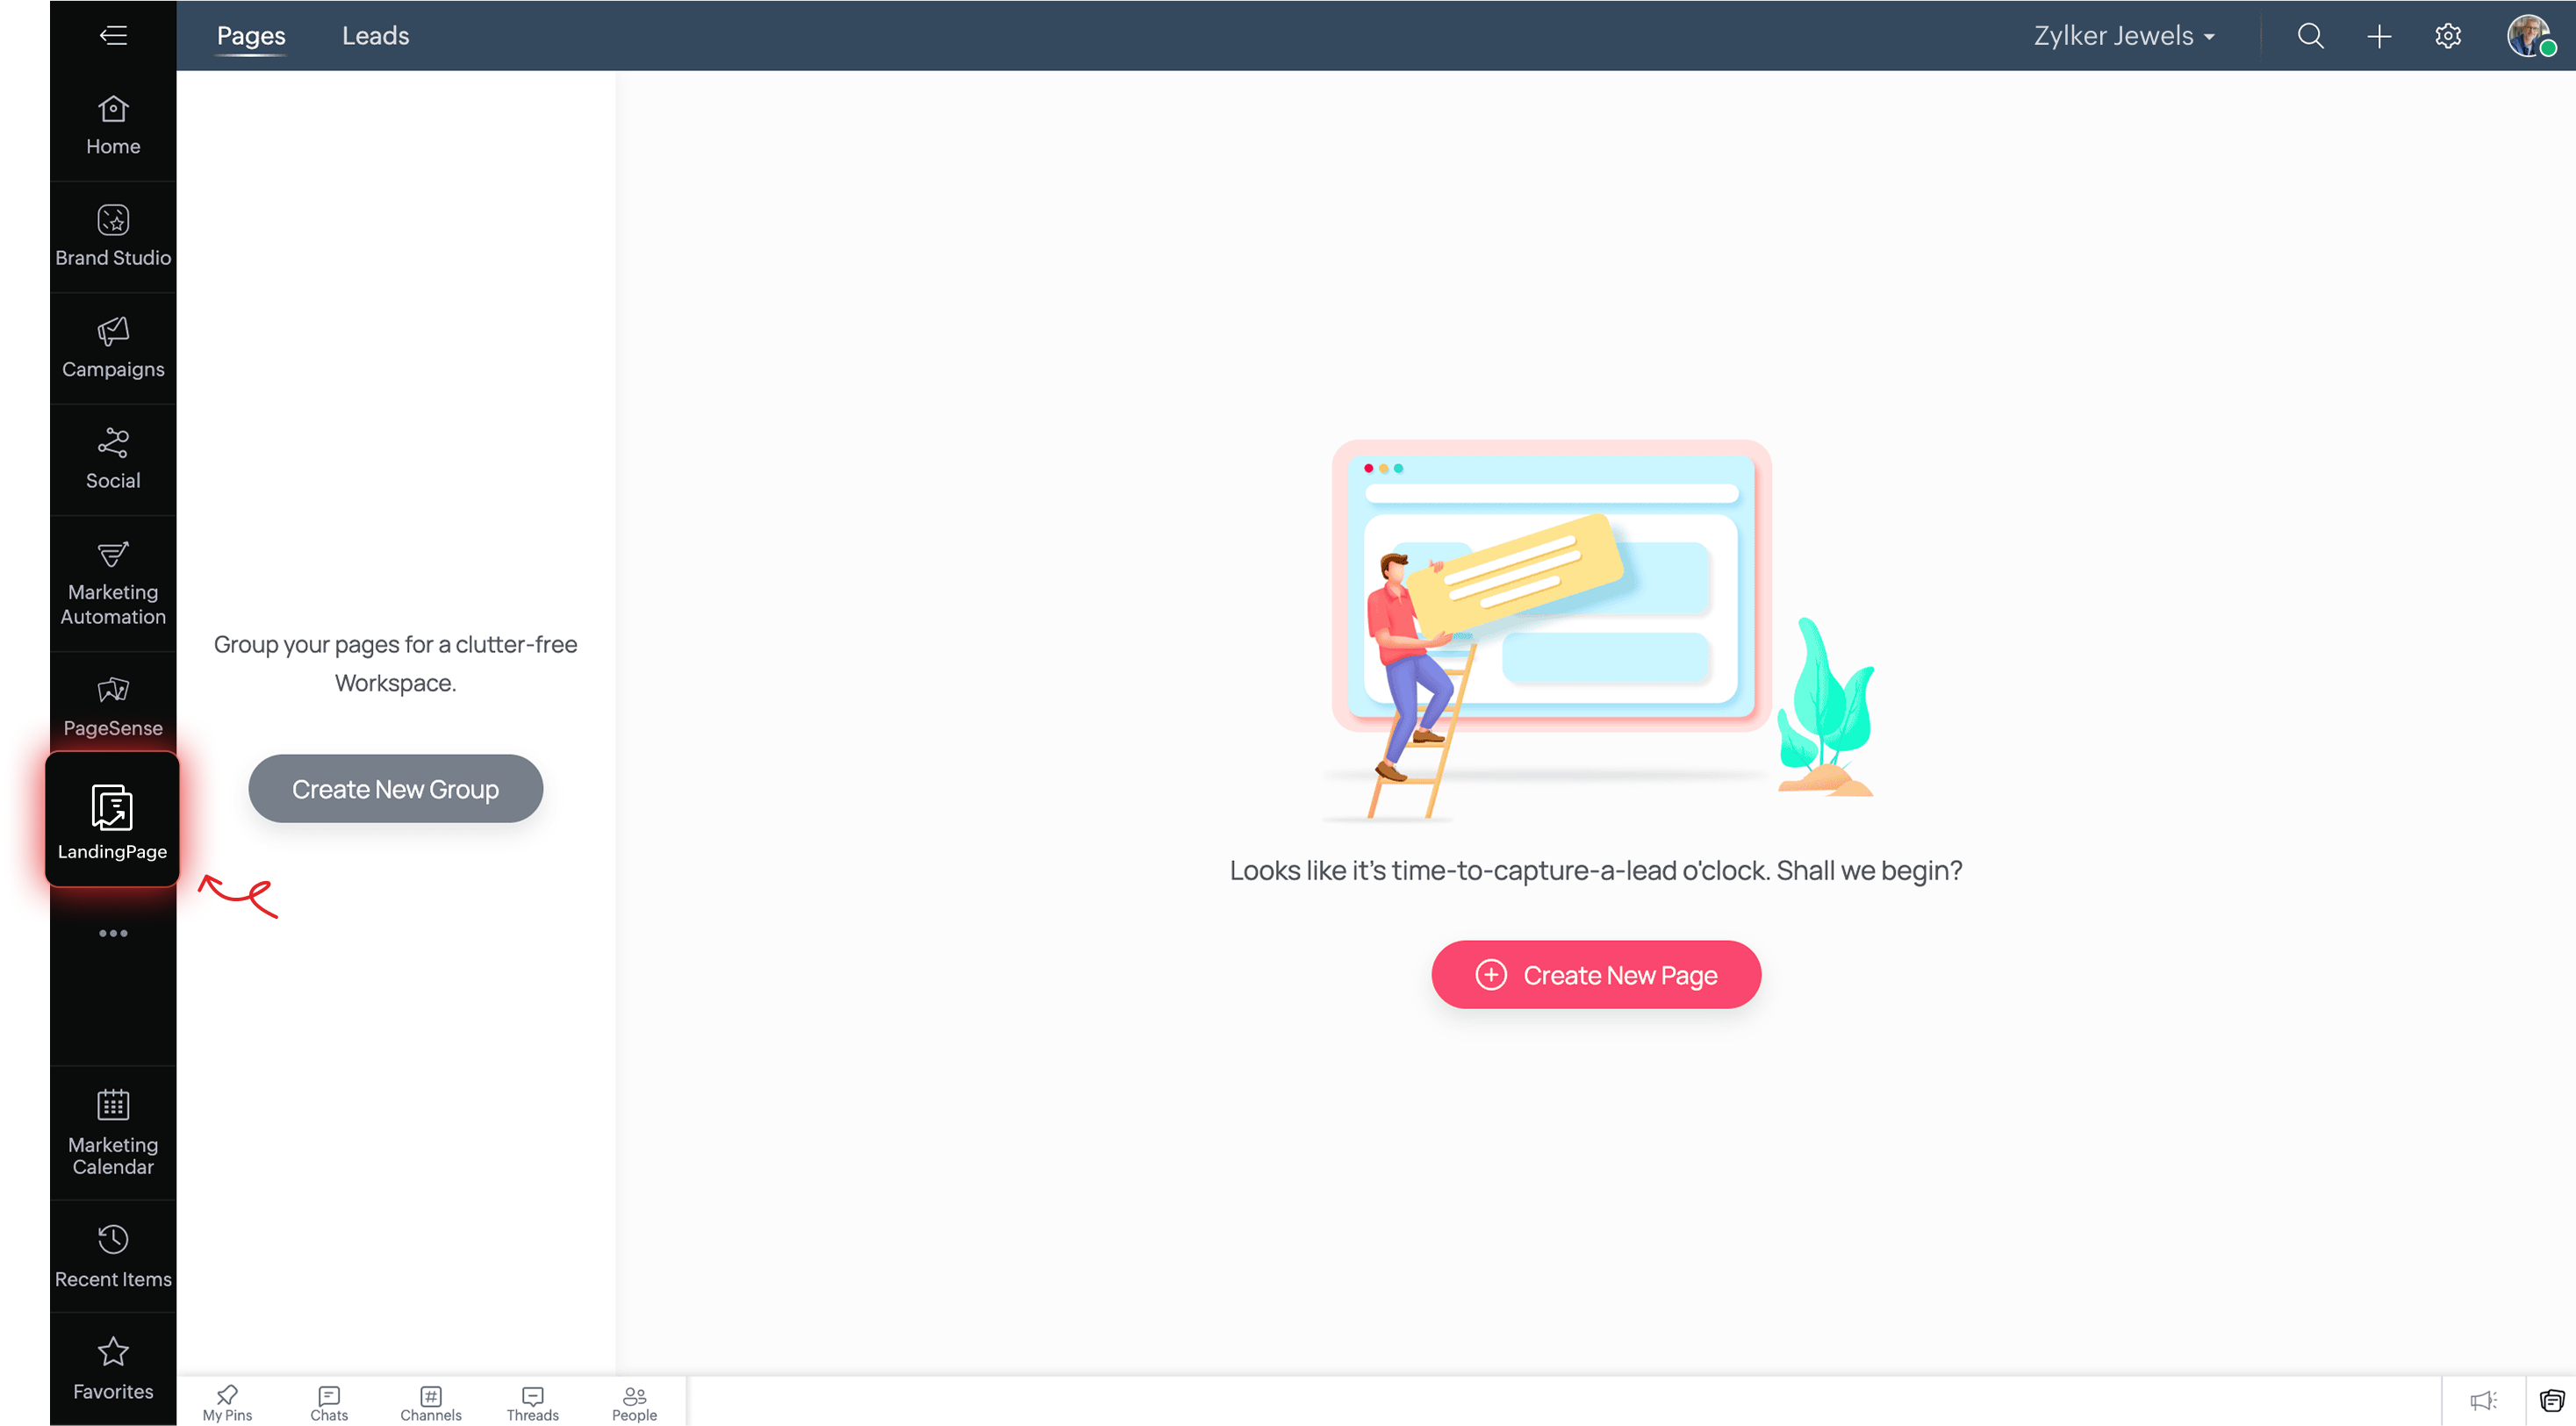
Directly from inside the module: Access the LandingPage module from your dashboard's left-hand menu and click Create New Page to get started.

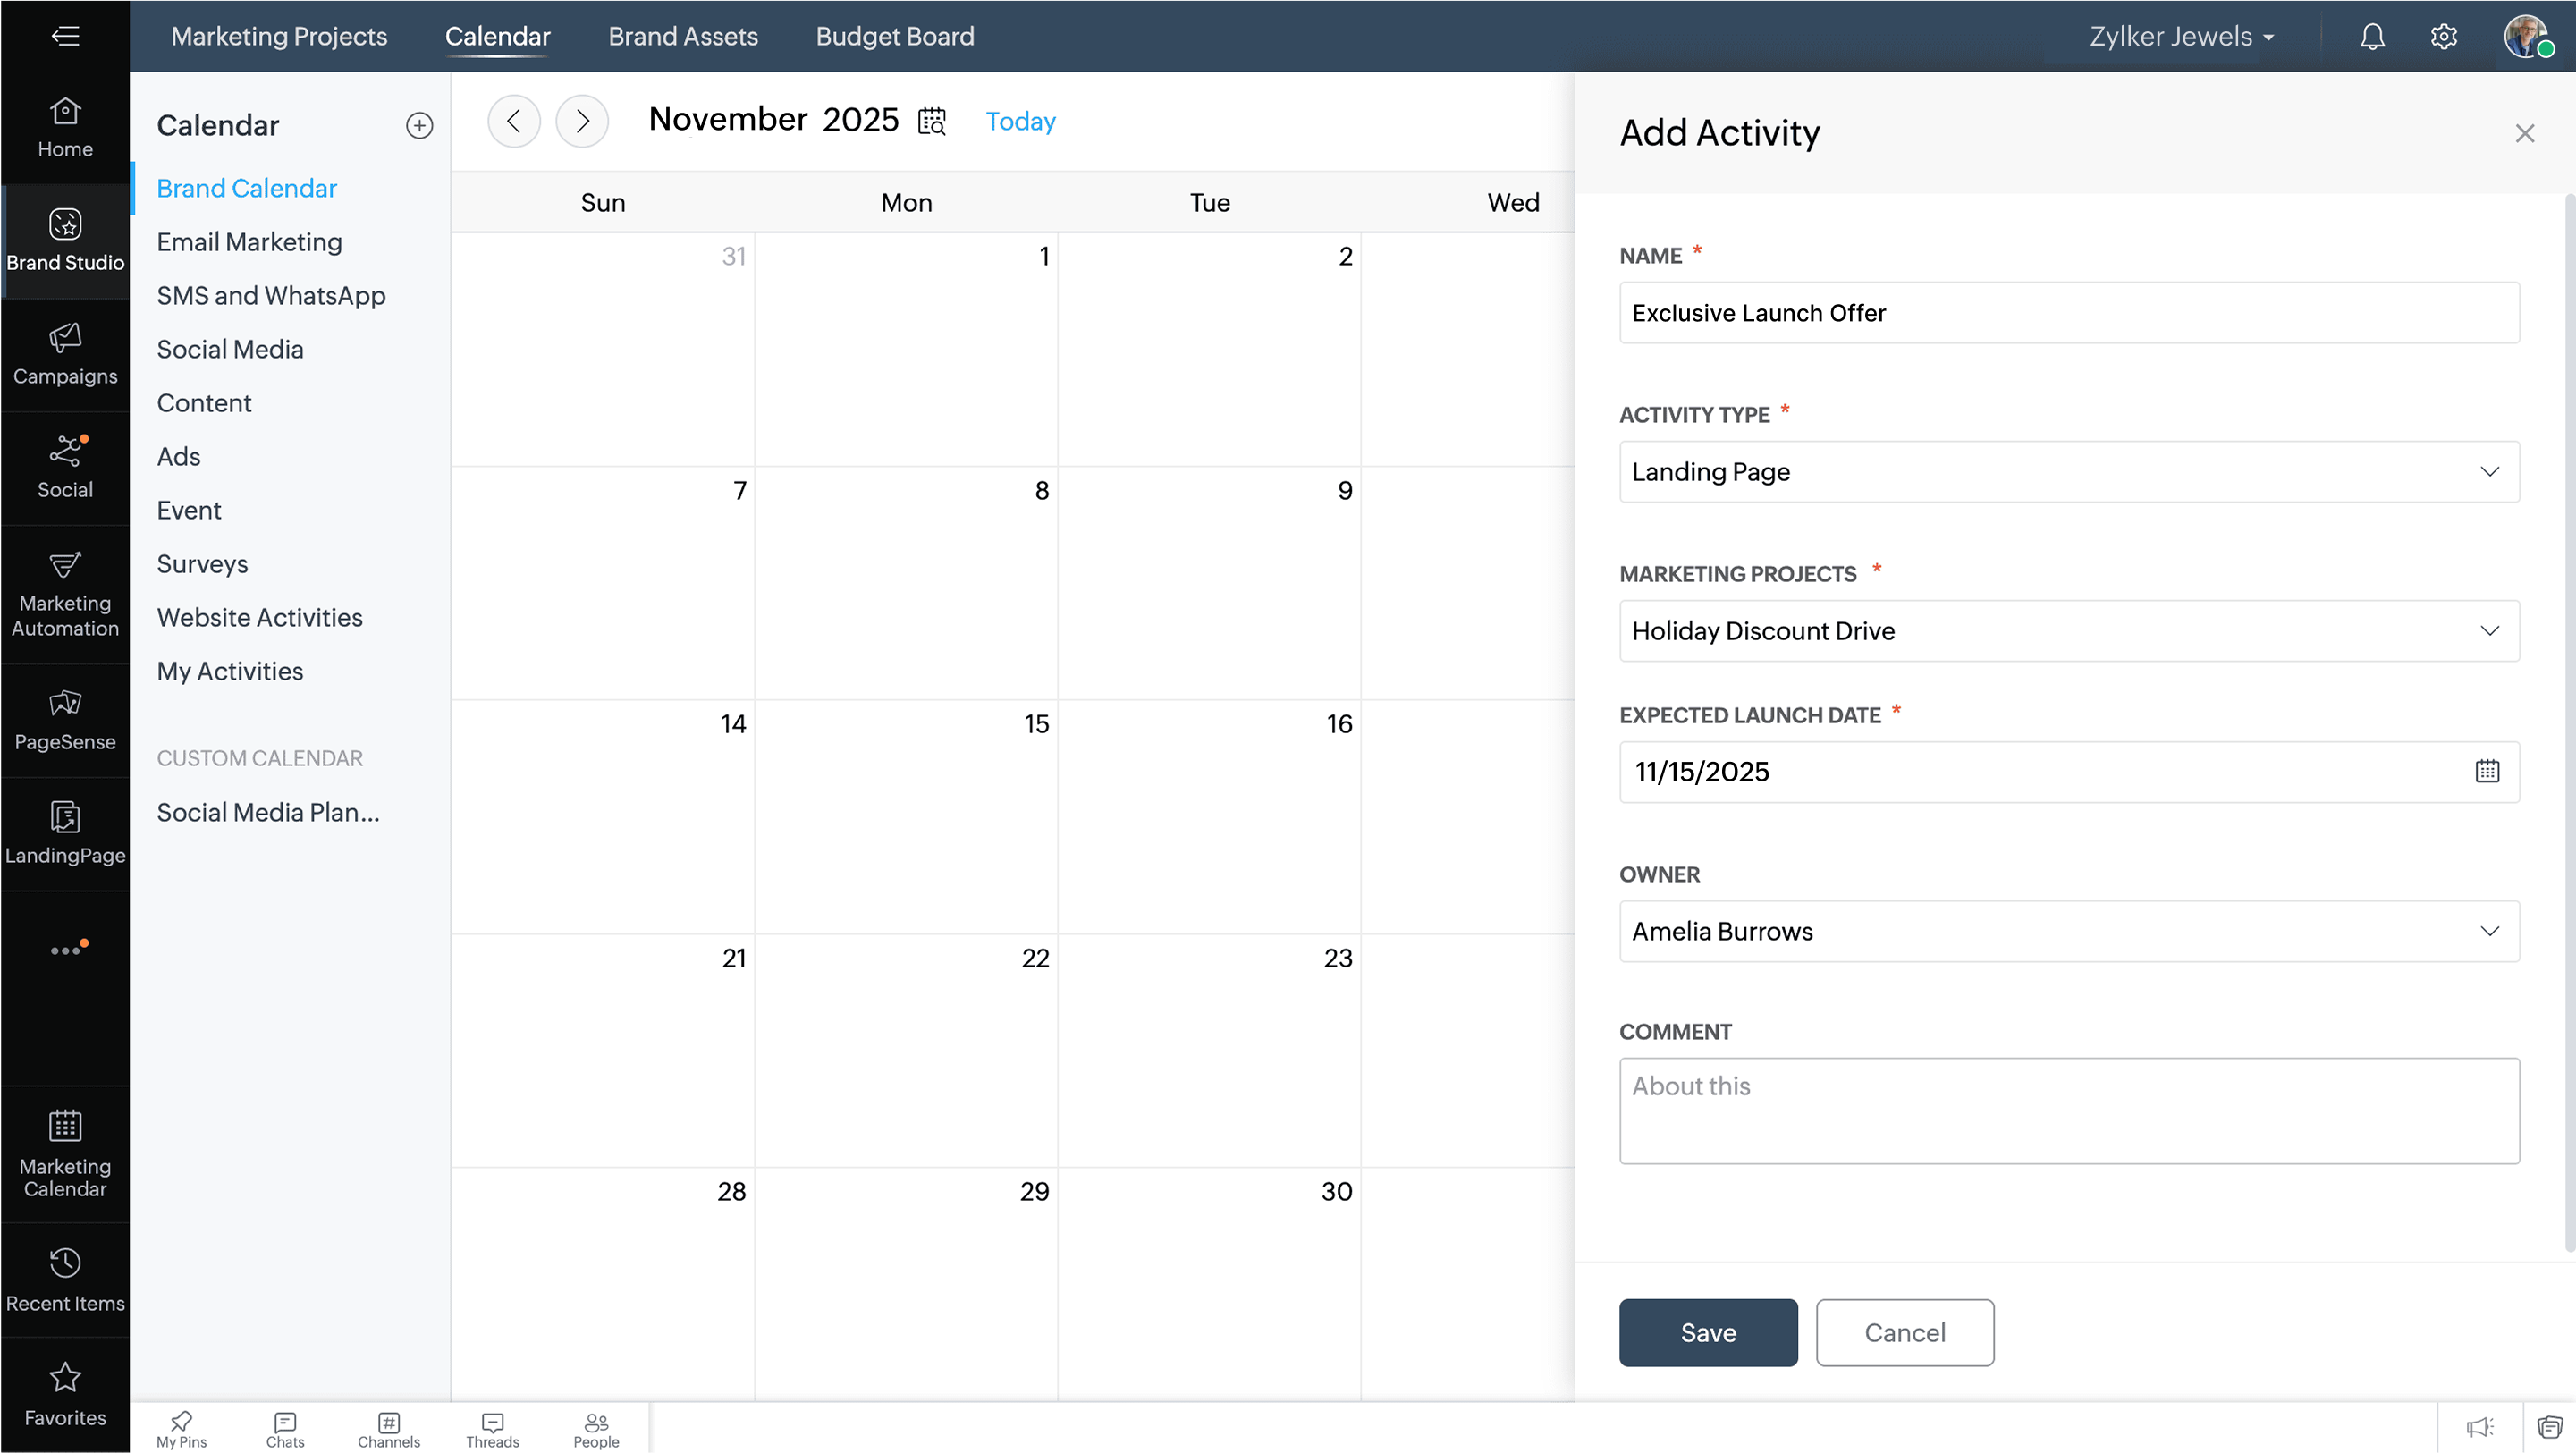
Calendars: Under Brand Studio > Calendar, go either to Brand Calendar or Content Calendar and add the activity directly to the specific date you want to start drafting the landing page on.
Brand Calendar:

Brand Calendar:
Content Calendar:
How to use a landing page for my business
Automobile industry
Let's say you run an automotive company. You're trying to revamp your current digital marketing strategy to increase conversions, and your plan is to add more landing pages to your website. Let's also say you've recently announced the launch of an EV product and are starting to promote it. You can build a landing page with the specific purpose of letting your customers and potentials know all about the new product and scheduling their test-drive appointments at the nearest showroom. When visitors are on the page, they can view the full range of information about the product. The call-to-action would be to make the visitors schedule a test drive.
Jewelry industry
Or let's say you run a jewelry company and have some ongoing offers on a specific collection. You're promoting this offer to two different subsets of your audience using an A/B testing experiment. You create the first version of the landing page and then make a clone of it. Elements like the CTA, heading, form fields, and images receive tweaks and both variants are published for a specific time period—say, two weeks. The first one has a "Buy now" CTA, whereas the second variant has a "Browse our collection" CTA. Once published, the traffic and conversion rates between both the pages are compared to understand which variant has pushed visitors towards conversion more effectively. After the results are finalized, one variant replaces the other.
First variant:
Second variant:
How to build a landing page in Marketing Plus
Create a template from scratch or choose from pre-defined categories
With Landing Page in Marketing Plus, your job is as easy as choosing a ready-made template from the available categories, like ecommerce, events, tourism, and more, and just making the necessary changes from there.
Build pages easily using the intuitive drag-and-drop landing page builder
Once you've chosen a category or designed one, you can then add everything you want to add from the menu options: sections, elements, pop-ups, forms, apps, and ecommerce elements. You can choose the style of heading, icons, images, and videos, add a call-to-action button, link a form, add pop-ups to promote specific offers, add your social profiles, and much more. When built with a focused end-goal, lead generation is easier because visitors understand why they need your product or service. Visualize and plan your page accordingly.
Organize your workspace
Save all your files, images, videos, and folders in your workspace and upload them to your page whenever needed. Keep track of all the activities happening on your page by accessing event logs next to each page. Organize your landing pages into groups to create a clutter-free workspace.
Integrate your landing page with various services
By integrating your landing page with CRM software like Zoho CRM, Bigin, and HubSpot, and with other marketing applications like Mailchimp, Zoho Campaigns, Zoho Backstage, and others, you can make optimal use of the lead information you've captured through forms, monitor your conversions, track registrations for your webinars and workshops, and much more.
Optimize your landing page to fit your target audience
You can run optimization experiments on your landing page for specific periods of time to see how it resonates with your audience. The analyses obtained from these experiments will help you to make data-driven decisions on what works and what doesn't, and gives you a greater chance at improving your website and increasing conversion rates.
- A/B testing: Through this experiment, you can create different variants of the same page. You can vary any element—like a heading, the color, placement, or wording of your CTA button, or even rearrange elements or fields in a form to see how your conversion rates change between the different variants of the page. You can also choose the percentage split of traffic between your variants and publish it.
First Variant:
Second variant: - Personalization: You can personalize your landing page for different subsets of your audience to create an experience specific to each one. For instance, you can create a page to market your jewel collection to working women, as well as to mothers' for mothers' day.
You can target your audience based on the Google Ads campaign they signed up from, define default audience segments, set UTM parameters, or narrow them down even further by creating custom audience segments. With this, you can choose from various parameters like source, device type, name of campaign, and more options.
Preview and publish the landing page
Once you've added everything you need to your page and set up your experiments, you can preview how it looks on different device types and then publish the page instantly either using the default domain or by adding a custom domain. Once you've added the details of your custom domain under Settings > Domains, DNS verification occurs and the status is updated on your dashboard. You can secure your domain by getting the SSL certificate, and then you're done!
Create a landing page
A landing page is a webpage that's created with a specific goal or objective, is targeted at a particular audience, has a clear call-to-action, and aims to increase conversions. You can create a landing page in Marketing Plus by choosing a pre-defined template or creating one from scratch and customizing it by adding elements, varying the look and feel of the page, and finally optimizing and personalizing it to publish for different audience segments.
Read more: Creating a landing page
To create a landing page in Marketing Plus
- Go to the LandingPage module via the left-hand menu of your Zoho Marketing Plus dashboard.
- Click Create new page to start drafting a new landing page.
- Choose a template from the categories listed or click Start from scratch if you want to build an entirely new page.
- Design the page by adding the different elements, pop-ups, images, and other elements.
- Optimize it further through A/B testing or personalization to refine your target audience.
- Integrate with various marketing applications to use the information you've obtained.
- Save and publish the page to take it live.

Note:
- You can also clone an existing page from the LandingPage dashboard by clicking (3 dots icon image) next to the page you want to replicate and clicking Clone Page.
Zoho CRM Training Programs
Learn how to use the best tools for sales force automation and better customer engagement from Zoho's implementation specialists.
Zoho DataPrep Personalized Demo
If you'd like a personalized walk-through of our data preparation tool, please request a demo and we'll be happy to show you how to get the best out of Zoho DataPrep.
Centralize Knowledge. Transform Learning.
All-in-one knowledge management and training platform for your employees and customers.
New to Zoho Writer?
You are currently viewing the help pages of Qntrl’s earlier version. Click here to view our latest version—Qntrl 3.0's help articles.
Zoho Sheet Resources
Zoho Forms Resources
New to Zoho Sign?
Zoho Sign Resources
New to Zoho TeamInbox?
Zoho TeamInbox Resources
New to Zoho ZeptoMail?
New to Zoho Workerly?
New to Zoho Recruit?
New to Zoho CRM?
New to Zoho Projects?
New to Zoho Sprints?
New to Zoho Assist?
New to Bigin?
Related Articles
Track and engage with website visitors using SalesIQ
What is SalesIQ? SalesIQ in Marketing Plus helps you track and communicate with visitors on your website in real time. You can also create a chat bot (powered by AI), connect your instant messaging channels such as Facebook Messenger, Telegram, ...Communicate and collaborate with your team using Cliq
As marketers, you work towards various goals for your brand, such as increasing awareness, generating leads, working on content marketing strategies, creating a strong social media plan to widen your audience, and much more. All of these activities ...Personalize websites and optimize conversion
Establishing an online presence is extremely important. It helps you build a reputation and makes it easy for prospects to find your brand online and the products or services that you offer. Ideally, prospects will find your site when they search for ...View detailed Analytics
Website Activity Various analytics for the website related to a marketing project can be tracked to get an overview of the visitor's behavior on your webpage. You can configure the following types of analytics: Goals: Analyze various key business ...Manage Email Campaigns
Email marketing is one of the easiest ways to connect with your prospects and customers to promote your business. You can contact customers about launch of a new product, discounts, and sales using email campaigns. This keeps your customers informed ...
New to Zoho LandingPage?
Zoho LandingPage Resources


