Identifying the visitors in your session recordings
Session
recordings in PageSense use cookies to identify individual visitors'
sessions, and track their behavior on your website. This cookie
generates a random name for each of the visitor session, which is a
combination of an adjective and an animal name, for example, Magnificent Giraffe.
However, if you want to identify a specific user or event from the list
of recordings in your report page, you can add our custom Identifier
API inside the PageSense tracking snippet code on your website as
explained in the steps below.

For example, say you want to identify visitors coming to your site using their
email address and later target them with relevant shopping
offers/discount coupons to boost conversions on your business. In this
case, you can pass the corresponding user ID or variable used to store
the particular visitor information on your site into the Identifier API code (as explained below), to quickly show visitor sessions based on their email address.
In
PageSense, the cookie length for a session is set up for two hours. If a
visitor interacts with your website multiple times within the two hours
of their first interaction, then we combine all the interactions
together, and show them as a single recording under a random username.
However, if the same visitor comes to your website after two hours, then
a new recording will be created under a different name.
To setup Identifier API in session recordings:
1. Decide what type of
visitors' data you want to identify in your session recordings and later
send this list of data to your web developer to see if the values are
available on your site.
For example, it could be anything that's relevant to your business
need such as identifying customers based on their phone number in your
recordings, or identifying and filtering visitor sessions based on their
email address or first name which could help you directly contact or
write to them about new product releases and attractive offers in the
future.
2. Now, copy and paste the following Javascript Identifier API code inside your website's JS code:
|

Please make sure you call this API code after including PageSense tracking code snippet on your site.
3. Replace
the <name> tag in the above script with the corresponding
variable that you want to associate with the session. This can be any
unique value that is used to identify a visitor based on their personal
identification details on your site, such as email address, first name,
phone number, etc. This
user ID or variable will now be mapped with the respective user
sessions on your website and be displayed in your recordings. The Identifier API can be implemented with the help of your
developer. No data will be passed to PageSense until you've added the
required Identifier API code to your site.
4. PageSense expects a string as a parameter for the <name> tag, and it can only contain a single value at a time
Let's reconsider the example, where you want to identify visitors coming to your site with their email address and later target them with relevant shopping offers/discount coupons to boost revenue. In
this case, you can enter the corresponding <name> tag as 'email
address' (just for example) in your Identifier API snippet above to
quickly identify and view recordings with their email address instead of
random names.
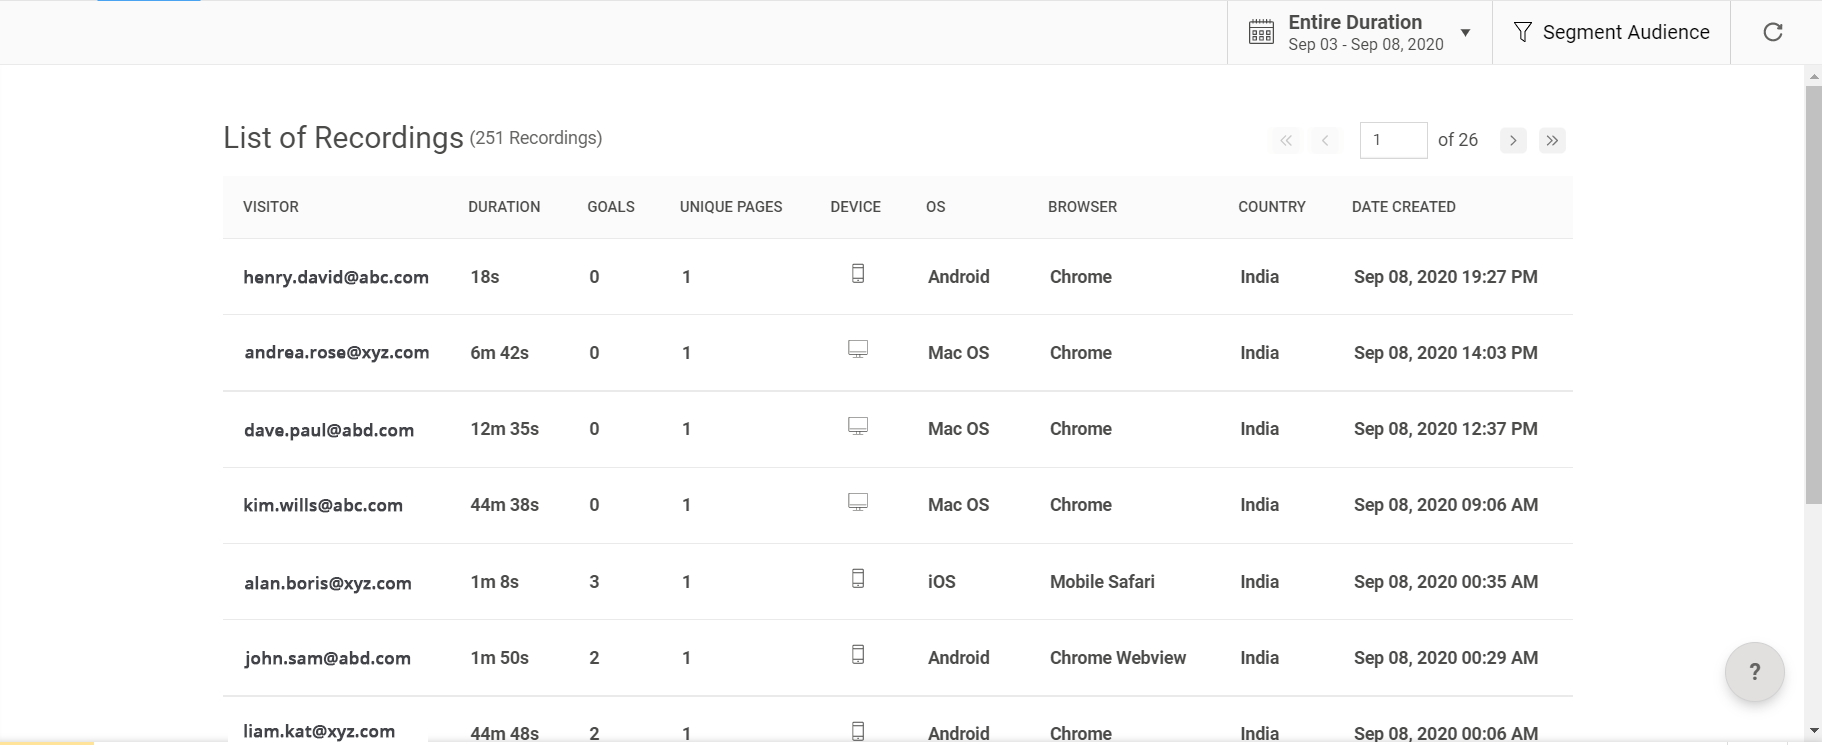
5. Once
your developer has implemented the code necessary to send data to
PageSense, you will start seeing the session appear along with the email
address in your recordings list as shown in the figure below.

Implementing the Identifier API code on your site will also
replace the random visitor names displayed in your Pop-up experiment
report.
Zoho Commerce site builder
If you want to add the Identifier API to the Zoho Commerce site builder, follow the below-mentioned steps:
1. Open your store where the Identifier API needs to be inserted. Navigate to Site Settings.
2. Under General, select Header & Footer code and add the below code:
|
3. Click on Save and Publish the site.
Zoho Sites builder
If you want to add the Identifier API to the Zoho Sites builder, follow the below-mentioned steps:
1. Login to your Zoho Sites account.
2. Open your Website > Site settings.
3. Under General, click on Header and Footer code to insert the code.
4. Paste the below Identifier API code in the Header region:
|
5. Click Save and Publish.
Zoho SalesIQ
If you want to add the Identifier API to the Zoho SalesIQ, follow the below-mentioned steps:
Copy and paste the following Javascript Identifier API code inside your website's JS code:\
- $zoho.salesiq.ready=function()
- {
- $zoho.salesiq.visitor.chat(function(visitid,data)
- {
- window.pagesense = window.pagesense || [];
- window.pagesense.push(['identifyUser', data.email]);
- });
- }
- $zoho.salesiq.visitor.offlineMessage(function(visitid,data)
- {
- window.pagesense = window.pagesense || [];
- window.pagesense.push(['identifyUser', data.email]);
- });
We’ve designed this documentation to
guide you every step of the way. If you need further assistance or have
any questions, don’t hesitate to contact us at support@zohopagesense.com - we’re always here to help!