Actions in Employee Files
You can perform following operations in Employee Files:
- Send for signature
- Import Files
- Export Files
- Edit / Delete File
Send for Signature
You can send files specific to employees and get them signed from them.
- Go to Operations > View all > Files > Employee Files, hover over the file, click on the ellipsis icon and select Send for Signature.
- Select a folder name in which the signed documents should be placed.
- In document details, enter the document name and a descriptive message which will be displayed to all the specified recipients.
- Click Add Recipients and do the following action:

Select Send in order check box to send the document signed in order. For example, if the manager and employee are recipients in the order, the manager needs to sign the document first to move the document to employee for signature.
- Use the drop-down and select Specific email and provide the recipient email ID.
- Use the dropdown and select the Specific User, search and add the specific user to be included in the recipient list.
- Use the drop-down to choose any of the acknowledgement types for the e-sign document:
- Sign: The user can e-sign the document.
- View: The user can only view the document once.
- Approve: The user can approve the document. - Use the drop-down to choose a language for the email and e-sign interface.
- Click on the Private Message icon to enter a private message for the recipient.
- Click on the Authentication icon, enable Email OTP Verification, and click Save to open the document after Email OTP verification.Steps d, e, and f are only available for Zoho Sign integration. DocuSign and Adobe Sign do not support these options.
- In the Additional options section, set deadlines and reminders for e-signing the document if required. (optional)
- In the Automatic Website Redirection section, enter the webpage URL that you want to redirect your recipients based on the given scenarios. (optional)
- Click Send.
- Based on the e-sign platform that you have integrated with Zoho People, the e-sign panel of Zoho Sign or Adobe Sign or DocuSign panel will open where you can drag and drop the corresponding signature fields into the documents.
- Add additional fields as required and click Send.
You have successfully sent the document for e-signature from employee files. The document will be sent to the recipients via email.
Import Files
Importing employee files lets you add multiple files for a specific or multiple employees at once. While importing, it is important to select an appropriate reference field, such as a first name or employee ID, and ensure there is no duplication. You can also choose whether to import the folder structure or only the files within the folder.
Only zip files can be imported with a maximum file size of 50 MB.
To import an Employee file,
- From your homepage, go to Operations > View all > Files, and click the Employee Files tab.
- Click on the ellipsis icon on the top-right corner of the page and select Import.
- Select Import for options for importing files for multiple employees or for a single employee.
- If you are importing files for a single employee, select the employee's name from the dropdown that appears.
- If you are importing files for multiple employees, choose a file name format. The names of the files being imported must match the chosen file name format.
- Provide a description if needed.
- Select Import with folders if you want to retain the folder structure of the files you are importing. Select Import without folders if you only want the files to be imported and placed under the folder that you select from the drop-down.
- Select the folder for the file to be placed in.
- Enable document acknowledgement if required.
- Under File Permissions, select the relevant permissions.
- Under Notifications, Check Feeds or Email to notify employee.
- Click Save.
The files from your zip folder will be imported to your Employee Files tab.
Export Files
To export all your Employee files, click on the ellipsis icon on the top right corner, click Export and Confirm the export.
Access URL to the exported file will be mailed to your email address, click on the URL to download the exported files.
Edit File
To edit file, hover over the file, click ellipsis icon > Edit. Through edit option, you can change the existing file configuration:
- Deleted and add new file
- Change file name and description
- Change applicability
- Enable or disable document acknowledgement
- Change file view and download access permission
- Change folder
- Change notification settings
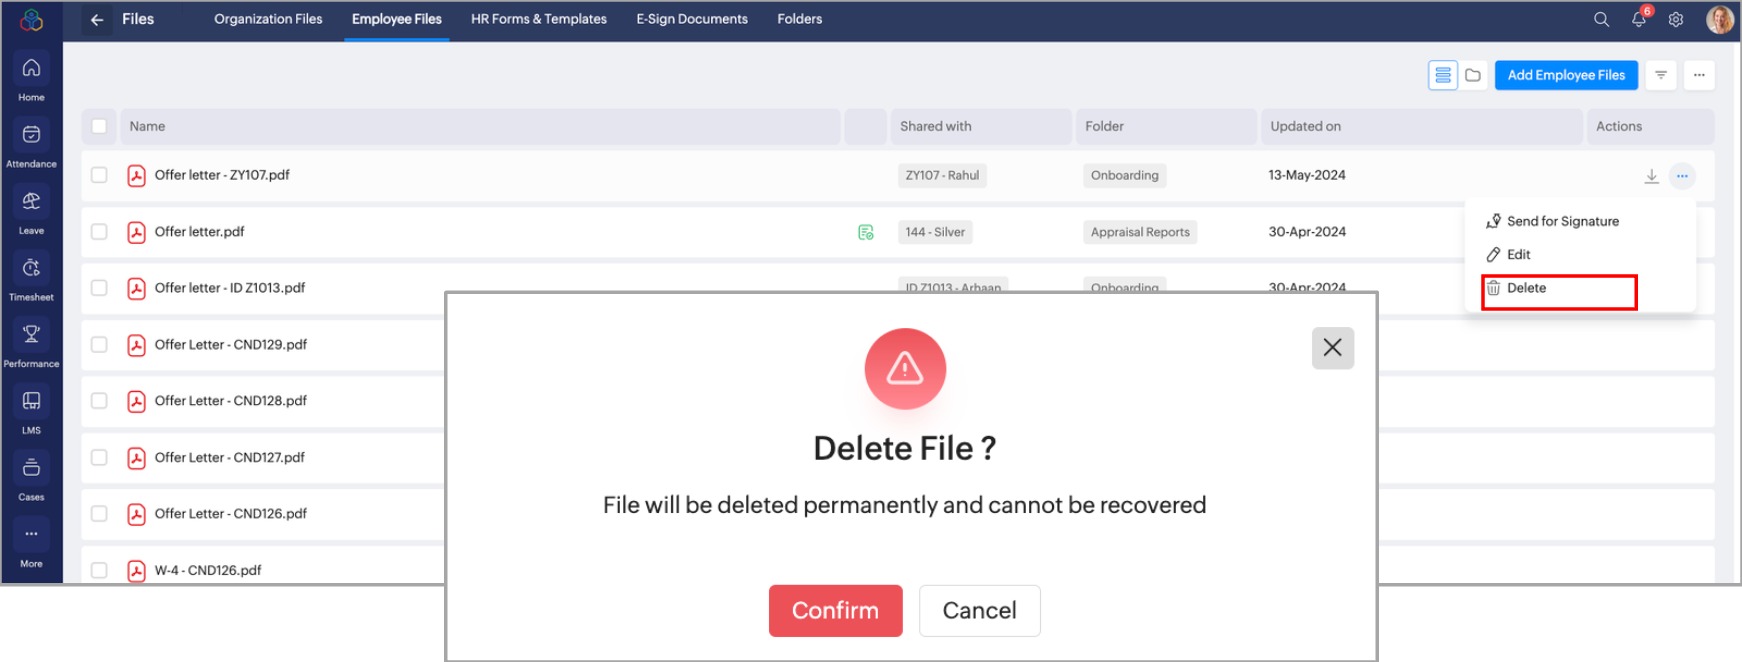
Delete File
To delete the file, hover over or select the file and click Delete and Confirm deletion. The file will be removed from your employee files and cannot be retrieved.
Learn more: