Courses in LMS - Overview
Overview
LMS offers various types of courses, which include self-paced, blended, e-material, and learning plans. All actions related to courses, such as enabling methods, enrolling users, etc., are added. They are covered in detail below.
- Enable learning methods
- Self paced learning
- Blended learning
- E-materials - Creating a learning plan
- Setup learner management
- Manage course entities
- File
- Link
- Assignment
- Offline test
- Online test
- Content
- Session (Applicable only for blended learning courses)
- SCORM - Add modules and import modules from another course
- Cloning a course
- Disabling / Enabling a course
- Configure grading in LMS
- Setup manager evaluation
- Notes
- Feedback
- Discussions
- LMS calendar
- Creating and Managing Course Requests
Watch our help video on Courses in LMS:
Enable Learning Methods
Learning methods refer to the different ways learners can engage with a course, such as self-training, online classes with instructors, or through study materials. In a Learning Management System (LMS), there are three main types of learning methods: Self-Paced Learning, Blended Learning, E-Materials, and Learning Plan.
Self Paced Learning
A learning method where the learner can move from one subject/course to other based on how much they have understood the previous ones. This can include reading content or tutorials that do not involve an instructor and the learning can go in their own pace.
To add and manage a self paced learning course:
- Go to LMS (from left bar) > My Data > My Courses.
- Click Add Course.
- Enter a name for the course.
- Select the type of course: Self Paced Learning.
- Click Create.
Course entities in a Self Paced Learning includes File, Link, Assignment, Offline Test, Online Test, and Content.
Blended Learning
A hybrid learning method that combines classroom instruction with self paced online training, guided by an instructor. It generally concludes with an assessment.
To add and manage a blended learning course:
- Go to LMS (from left bar) > My Data > My Courses.
- Click Add Course.
- Enter a name of the course.
- Select the type of course: Blended Learning.
- Enter the batch name.
- Select the start and end date of the batch.
- Enter the minimum and maximum capacity of the batch.
- Click Create.
Once the batch is created, sessions can be defined. To learn more about sessions click here.
Once the batch and sessions are created, you can start adding Modules and Course Entities. Course entities in a blended learning course includes File, Link, Assignment, Offline Test, Online Test, Content, and Session.
Track Learner Course Completion Progress for a Batch
Course administrators can track learners progress by checking the completion status of each module. They can also mark module elements as completed for learners if needed.
To track learners progress by administrator:
- Go to LMS (from left bar) > My Data > My Courses.
- Click on the course you want to track learners progress.
- Go to the Module tab.
- Click on the completion status of any module.
- Check the completion status for the enrolled learners. As a administrator, you can also mark module elements as completed.
Administrators can manually mark course elements as completed for learners, ensuring a smooth course completion process.
E-Materials
Online manuals reference materials to guide the employees. This learning method does not involve course completion or an instructor.
To add and manage a E-material:
- Go to LMS (from left bar) > My Data > My Courses.
- Click Add Course.
- Enter a name for the e-material.
-
Click Create.
Creating a Learning Plan
Learner Management
Course Entities
File
Files comes in handy when you want learners who are part of a course to go through and learn a specific file such as a book/pdf etc. To add a file, within a module, click + (add Icon) and select File.
The Basic Info tab holds the basic information about the file, such as the name, description, and suggested duration. Use the Upload option to upload the required file. You can also mark the file as mandatory (learner must download the file to be able to complete the course). The file can also be marked as an introductory file, suggesting to the learner to start here as he begins the course.
Link
Link is useful when you want learners to access a video/webpage form an external source, such as a youtube page or a Wikipedia page, etc.
To add a link, within a module click + (add icon) > Link.
In the Basic Info tab enter the name, insert the Embed URL and provide a description about the link. Enable Mark link as mandatory, if you require the learner to view this link to complete the course.
Additionally, you can lock the link until a specific date using the Link Lock tab and also add any additional resources in the Resources tab.
Assignment
Assignments can be used to help learners practice what they have learned. An assignment topic/material is uploaded as a Resource file, which the learners can download and write offline. Assignments can also carry marks and can be included as part of a graded course.
To add an assignment, within a module click + (add icon) > Assignment.
Enter the name, description, date, and maximum marks in the Basic Info tab, you can also lock the assignment until a specific date using the Assignment Lock tab, and add any assignment-related resource from the Resources tab.
Offline Test
An offline test, in essence, involves taking up the test offline by downloading the attached question material. Since this test happens offline, corrections or results calculation does not happen online like in the case of an online test.
This is useful for situations where exams/tests are conducted and evaluated within the office premises. The marks can be updated online later in the Grades.
To add an Offline Test. Within a module click + (add Icon) > Offline Test.
Enter the basic information such as the name, duration, and marks in the Basic Info tab, Use the Test Lock tab to lock the test until a specific date. Resources tab is where the question paper is uploaded. You can also the mark the test as mandatory if required. (Test will be required to mark as completed for the learner to successfully complete the course)
The learner will essentially download the attached resource when he or she takes the test, evaluation happens offline and the trainer can update the marks in the grade book after the test is completed. The duration here is simply suggestive.
Online Test
Content
Want to add your own content for learners?
Type, format, and edit using the content editor feature. Content lets you add your own custom content and make it part of the course.
To add content, within an existing module click + (add icon) > Content.
Fill in the basic information such as the content title, read duration, and description in the Basic Info tab, you can also make the content mandatory using the Mark content as a mandatory tab.
Mark as Intro content is useful when the content added here serves as an introduction to the course.
Now navigate to the Content Editor tab to type your own content, and use the toolbar on the top, to format your text.
Session (Applicable only for blended learning courses)
Single or multiple sessions can be conducted under each module. Each session will have a trainer, and the type of training can be either classroom or e-learning (or both). Sessions can be created only for Blended learning courses.
To add a session,
- Go to the respective module.
- Click Session under the + (add icon).
- Give a name for the session.
- If this is a mandatory session, check Mark as mandatory.
- Select the trainer and the type of training.
- Enter the date and start and end time for the course.
- Select the room.
- If you wish to lock the session until a specific date, you can do it from Session Lock tab.
- Additional resources can be uploaded from the Resources tab.
If e-learning is selected as the type of training, you will have the option of facilitating a webinar with the Zoho Meeting integration.
Course admin can mark attendance in bulk, setting learners in the list as either present or absent.
Upcoming Sessions Widget in Dashboard
The Upcoming Sessions widget helps learners quickly view their next scheduled LMS sessions directly from the dashboard. It displays the next five upcoming sessions along with their scheduled dates and times, making it easier to stay informed and prepared.
To view the upcoming session widget, from the Zoho People home page, navigate to Home > My Space > Dashboard.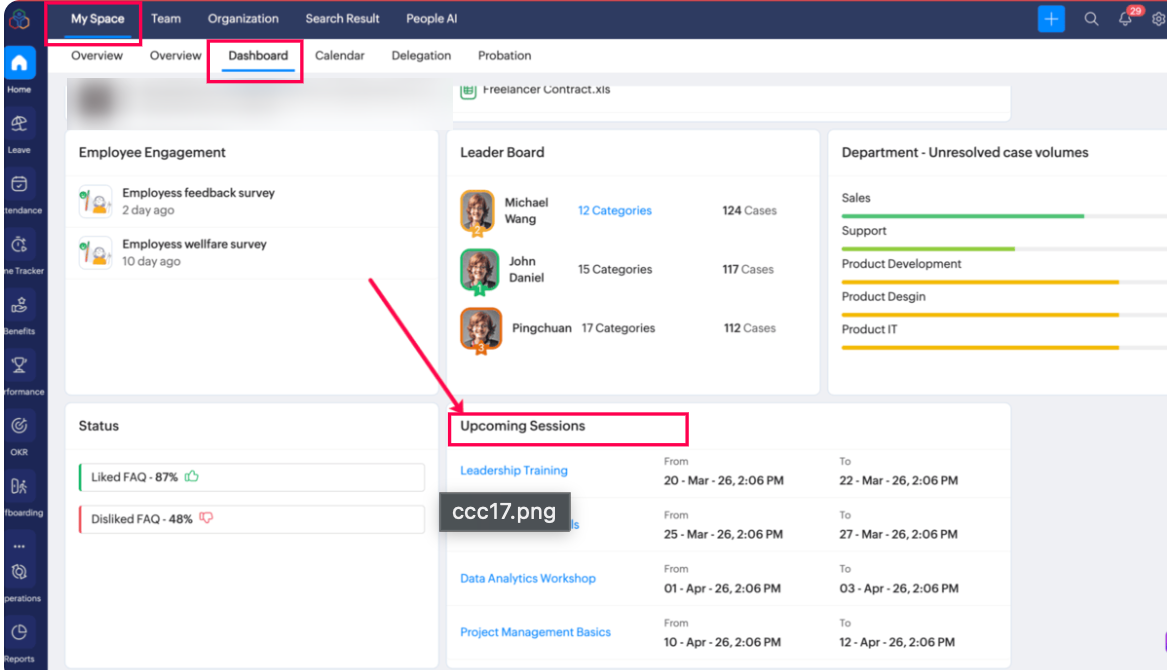
Modules
Cloning a Course (Catalog tab)
If you want to create an identical course to an existing one, use the clone option under the ellipsis icon of the existing course.
-
Select the batch from the drop down if it is a blended learning course.
-
Select the components you want to clone - Overview, Modules, and Members.
-
Click Clone.
-
To view the cloned courses, navigate to LMS (left side tab) > Catalog > Courses (You can rename it as per your need).

When a course is cloned, pre and post learning activities and certificate settings will also be cloned along with the overview.
In the Catalog tab, use the dropdown filter on the left side to choose between Applicable Courses, which shows only the courses relevant to you, and All Courses, which displays the complete list of courses available in the catalog.

This applies to the Learning Plans tab as well.
Disabling / Enabling a Course
Disabling a course
Disabling a course temporarily restricts learners from accessing it until the admin re-enables it. This feature is helpful when the course admin needs to update or review the course or retain it for possible future use.
To disable a course, select a course you want to disable > click on the ellipsis icon > Disable.
Enabling a course
When a course is enabled, it becomes active and it will accessible to the learners. Only the enrolled users can view and access all the assignments, and all the materials in the course.
To enable a course, select the filter icon in the right corner > State > Disabled.
Now select the course you want to enable > ellipsis icon > Enable.
Grading in LMS
Manager Evaluation
Notes
You can get a consolidated view of all notes from various courses here. Click Add Note to add a note from this space.
Feedback
Giving and receiving feedback is essential for the success of a course. A learner can write and submit his feedback when accessing the course, or on completion (as per configuration).
For a consolidated view of the collected feedback, use the Course Ratings report.
Learn more about Feedback Settings.
Discussions
LMS Calendar
The calendar helps you keep track of the courses attended as well as the upcoming ones, so you don't miss anything.
Courses Activity Log | Audit Log
The 'Courses Activity Log' captures all changes made to course configurations. It provides detailed insights into who performed each action, including additions, removals, and modifications to course settings. Activity logs can be viewed for individual courses.
To access the audit log:
- Open any course.
- Click on the More Options icon (circular ellipses icon)
- Select the Activity Log option.
The captured logs include changes made within the LMS configuration under the following course settings tabs:
- Basics
- Learning Objectives
- Manage Batches
- Applicable to
- Branding
- Permissions
- Reminders
- Grade Configuration
- Certificates
- Pre learning activities
- Post learning activities
- Manager evaluation
- Feedback
- Cost
- Course admin
Here is an example of a course activity log: