Offboarding in Zoho People

ATTENTION
This 'Offboarding' service may not be available on all Zoho People accounts, as it is enabled only upon request or for recently created accounts. To enable the “Offboarding” service, please contact support@zohopeople.com.
What is the Offboarding service in Zoho People?
Offboarding is the formal process of transitioning employees out of an organization. This separation may occur due to resignation, termination, layoffs, or retirement. A well-structured offboarding process includes clearance procedures, responsibility transfers, exit interviews, access revocation, paperwork management, and more. Zoho People's Offboarding service is designed to support HR teams and employees at every stage of this journey, ensuring a smooth and efficient transition.
Here is a visual representation of how resignation requests are handled in Zoho People:
Offboarding Settings
Configuring the Offboarding Process
Creating Resignation Flows
- Begin by navigating to the offboarding service settings. To do this, go to Settings (gear icon on the top-right corner) > Offboarding > Resignation Flow tab.
- You will see the list of resignation flows. By default, only the "General" flow is available. Click the listed general flow to edit it, or click the Add New Flow button to create a new resignation flow.
Let us look at the process of adding a new resignation flow. You will be presented with the Add Flow window once you click the Add New Flow button.
- Enter a name and description for your flow. Location-based and designation-based applicability can also be configured here. Additionally, add the HR Partners who will be responsible for handling all resignation requests that correspond to the flow you are adding. Finally, click Submit.
The flow configuration window will now appear. The flow configuration includes a series of five steps, accessible through the tabs on the left.
 Can a non-administrator user be assigned as an HR Partner?
Yes, any user—including those with the Team Member role—can be assigned as an HR Partner.
What a non-admin HR Partner can do:
- Approvals: Approve, reject, cancel, or revoke requests.
- Record actions: Edit and complete requests, and change the employee status of the concerned employee.
- Related processes:
- Clearance: Add new, trigger mapped, edit non-completed, and complete clearances.
- Interview: Trigger interviews and view completed ones.
- Association: Reassign reportees.
- Documents: Generate, regenerate, download, send, add, and delete documents.
- Process timeline: View timelines of associated requests.
All of the actions above are limited to resignation requests that the non-admin HR Partner handles.
What a non-admin HR Partner cannot do:
- Cannot add a new resignation request for non-reportees. They can only add records for themselves or their reportees, depending on permission settings.
- The Preferences tab lets you specify the standard notice period, select the corresponding HR Partner (the same person as in step 3), and configure an approval process for the requests raised.

'Single Level' refers to the first immediate reporting manager of the employee. For example, if Two Levels is selected, the approval request will go to both the first-level and the second-level reporting manager (the employee's reporting manager and that manager's manager).

If the approval flow includes the reporting manager, but the exiting employee does not have a reporting manager, the approval will be handled exclusively by the HR Partners.
- As part of the approval process, the email notification that will be sent can also be edited. To edit the email template, click the Edit icon (pencil icon) hyperlink. Once you have made the changes, click Save to proceed.
- Proceed to the Clearances tab. Here, you have the option to add new clearance forms (Add New Clearance Form button) or to add an existing clearance form (Use Existing Clearance Form button). Let us look at the steps for creating a new clearance process. Click the Add New Clearance Form button to proceed.

The default clearance forms available are IT Clearance, HR Clearance, and Admin Clearance.
How does the clearance process work?
The clearance process includes a form that the clearance owner has to fill out and mark as completed. Multiple clearances can be associated with a resignation flow, and the period for completing each clearance can be customized.
Who can be selected as clearance owners?
Any employee can be selected as a clearance owner. The default system options include: Exiting Employee, Reporting Manager, and HR Partner.
- Enter a name for the clearance process, and select the clearance owner who will be responsible for verifying that the clearance process is completed.
- Specify the start and end dates. Click Save to proceed once you have specified the dates. In the example below, eight days are allotted to complete the clearance process, which starts 10 days before the relieving date and ends two days after the relieving date.
When configuring the start and end dates, keep in mind that the period (eight days in this example) also includes weekends and non-working days.
- Once you proceed, you will see the Customize Form page, where the clearance form can be customized. Add any fields that you want to include and click the close button (X mark) once you are done. The form will be saved automatically.

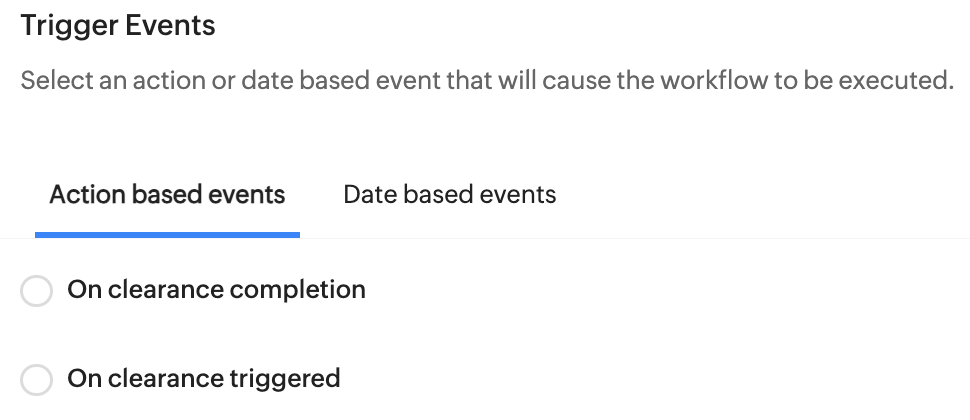
You can set up automated actions tied to clearance events—such as when a clearance is initiated or completed. This is done by configuring a workflow for the relevant clearance-associated form.
- Now that you have a clearance process in place, you can either add more clearance processes or click the Exit Interview tab to proceed.
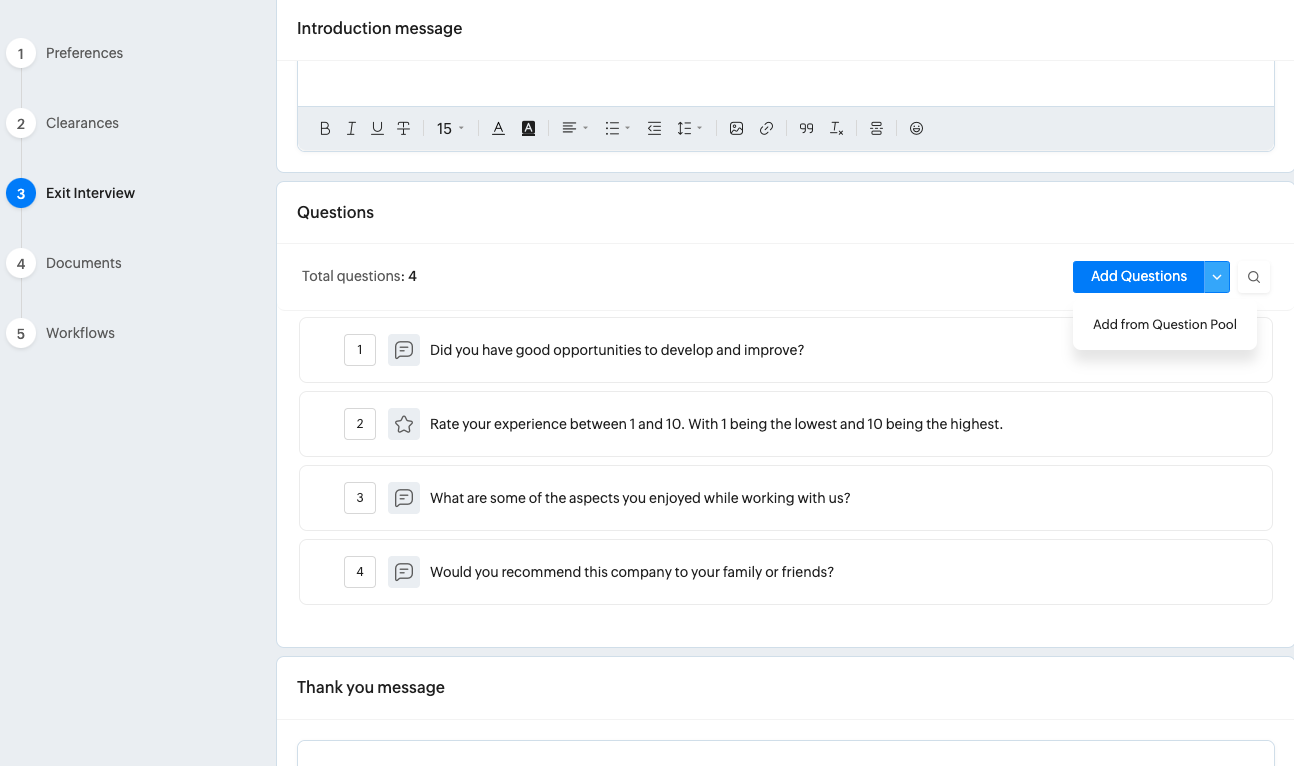
- In the Exit Interview tab, you can create a new exit interview or use an existing interview template.
- Use the Gear icon within the Exit Interview tab to change the name of the exit interview and configure when it is to be initiated.
What is an exit interview?
An exit interview comprises questions that the departing employee is expected to answer. It can be used to gather feedback from departing employees to identify areas for improvement, enhance workplace policies, and understand the reasons behind their resignation.
- Proceed by adding questions manually or by using the Add From Question Pool option (click the drop-down). An introduction message and a thank-you message can also be added.
- Click the Preview button to preview the exit interview. Once you have all the required questions in place, proceed to the Documents tab.
- The Documents tab lets you map exit-related documents, such as the experience letter or relieving letter, to this resignation flow. To do this, click the Use Existing Document button and select one or both of the letter templates.
What are the default available documents?
Experience Letters and Relieving Letters are available by default.
- Once the documents are added, you can click to edit them, or hover your pointer over them for rename and delete options. (This feature uses mail merge template documents from Zoho Writer.)
- Finally, proceed to the Workflows tab to add any associated workflows. You can configure email alerts and custom function (Deluge-based) actions to be triggered during the following scenarios:
- When a new resignation request is added.
- When a resignation request is edited.
- When an offboarding process is completed.
- When the employee status is changed.
- Click the close button (X button). You have now successfully created a new resignation flow.
By default, employee login access is automatically disabled at 8:30 AM on the day after their last working date.
To manually enable or disable login access for a resigned employee, go to Settings > Manage Accounts > Users, search the employee, and use the Login Access toggle under Actions.
To edit the general resignation flow or any flow you have created, click one of the resignation flows on the Resignation Flow page (Settings > Offboarding > Resignation Flow). This can be used to change applicability, associated interviews, clearances, and more. The status indicator can be clicked to enable or disable a resignation flow. When you hover your pointer over a flow, you will see options to edit and delete it.

A maximum of 10 resignation flows can be created. Each flow can contain a maximum of 10 clearance processes.
Managing Last Working Date Settings
Configure how the employee's last working date is determined during the offboarding process. To configure, navigate to Settings > Offboarding > Preferences > Configuration
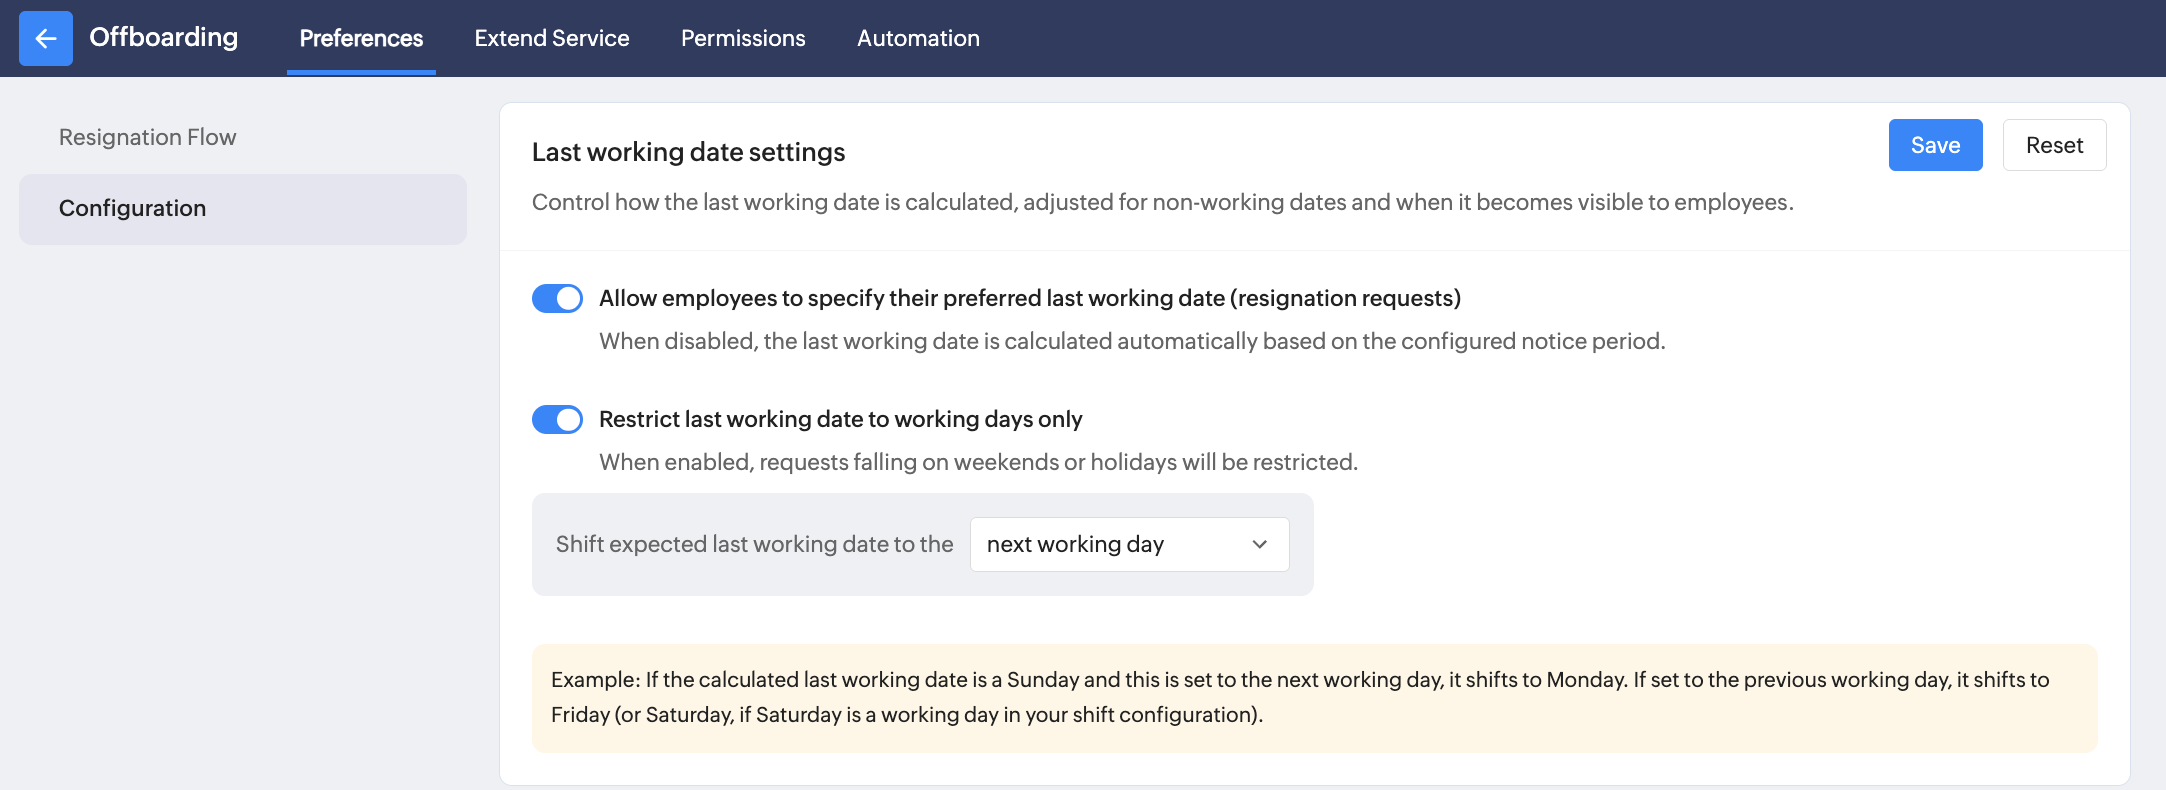
Allow employees to specify their preferred last working date (resignation requests)
Enable this option to allow employees to choose their preferred last working date while submitting a resignation request.
When enabled - Employees can enter a preferred last working date when submitting their resignation. The selected date may be subject to your organization's notice period, and approval processes.
When disabled - Employees cannot choose a last working date, the system will automatically calculates the last working date based on the configured notice period.
This setting applies only to resignation requests. It does not apply to termination records.
Restrict last working date to working days only
Enable this option to ensure that the last working date always falls on a working day.
If the calculated or selected last working date falls on a weekend or holiday, Zoho People automatically shifts it based on your selected preference.
Options include:
Next working day, Previous working day

Example: If the calculated last working date is a Sunday and the option selected here is 'next working day', it shifts the last working date to Monday. If set to the previous working day, it shifts to Friday (or Saturday, if Saturday is a working day in your shift configuration).
Managing Date of Exit Update Settings
Configure when the Date of Exit field in the employee record should be updated. To configure, navigate to Settings > Offboarding > Preferences > Configuration
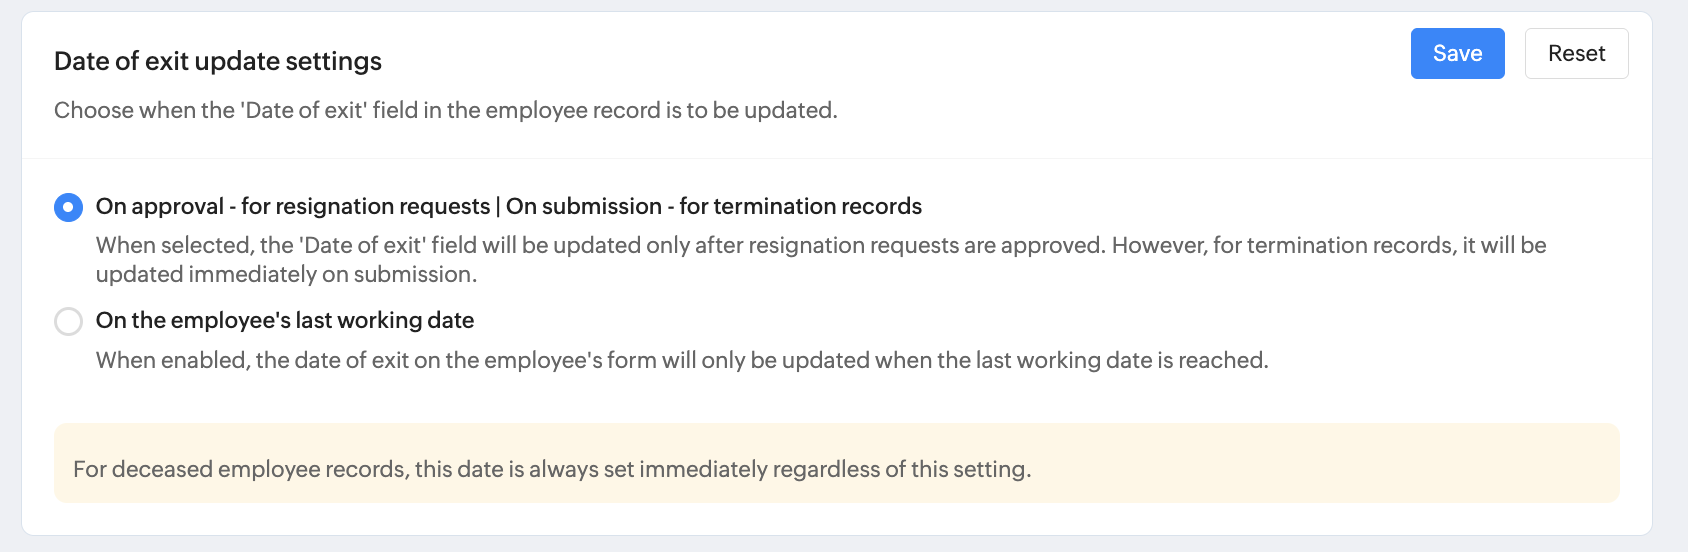
On approval (Resignation requests) | On submission (Termination records)
Select this option if you want the employee's Date of Exit to be updated on approval / on submission (for termination records).
i.e, for resignation requests - the 'Date of exit' is updated only after the resignation request is approved.
and for termination records - the 'Date of exit' is updated immediately when the termination record is submitted.
On the employee's last working day
Select this option to update the Date of Exit only when the employee's last working day is reached.
For deceased employee records, the Date of Exit is updated immediately regardless of the selected configuration. This behavior cannot be changed.
Managing Clearance Forms
To manage and create new clearance forms, navigate to Settings > Offboarding > Extend Services > Clearance Forms.
The clearance forms created here can be used in resignation flows. Click an existing clearance form to edit it, or hover your pointer over it to view the delete option.
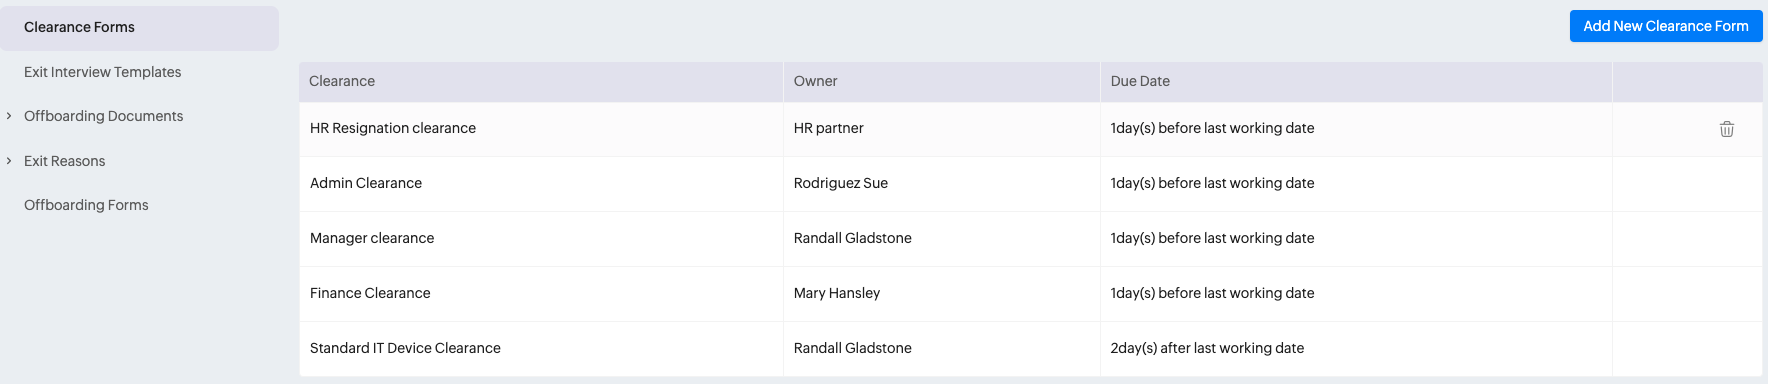
To create a new clearance form, click Add New Clearance Form.
- Enter a name for the clearance process, and select the clearance owner who will be responsible for verifying that the clearance process is completed (through the resignation flow process).
- Specify the start and end dates. Click Save to proceed once you have specified the dates. In the example below, eight days are allotted to complete the clearance process, which starts 10 days before the relieving date and ends two days after the relieving date.
- Once you proceed, you will see the Customize Form page, where the clearance form can be customized by dragging and dropping fields. Add any fields that you want to include, and click the close button (X mark) once you are done. The form will be saved automatically.
- Now that you have created a clearance process, it can be selected when creating or editing resignation flows.
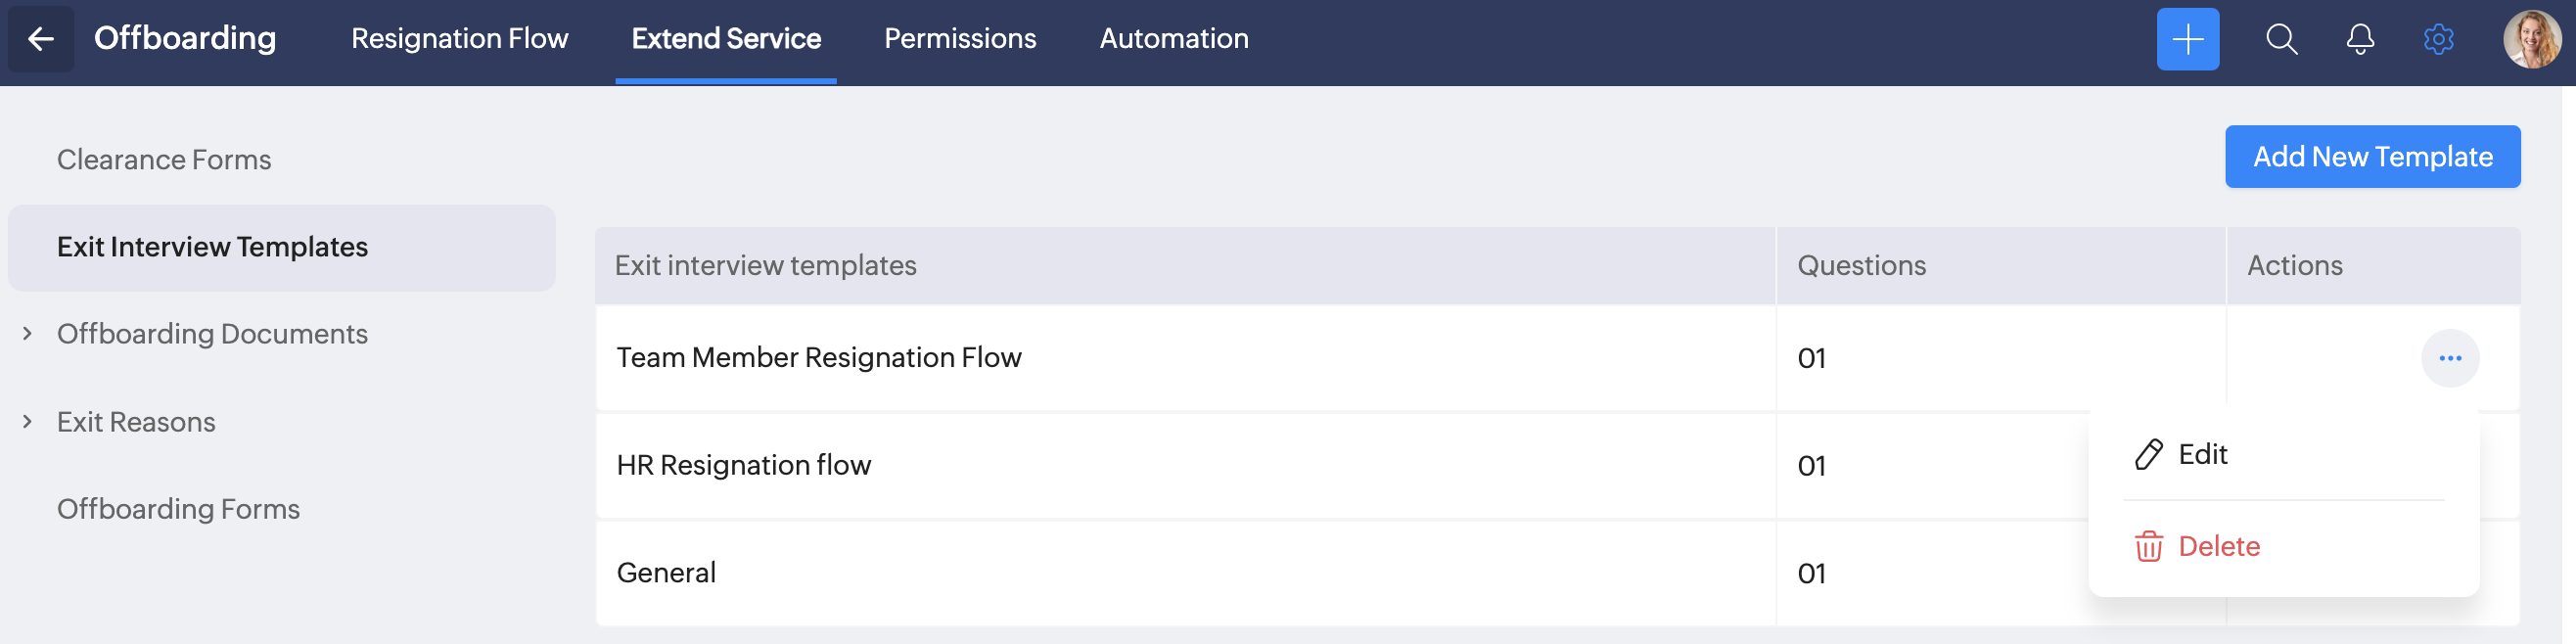
Manage Exit Interview Templates
To manage and create new exit interview templates, navigate to Settings > Offboarding > Extend Services > Exit Interview Templates.
The exit interview templates created here can be used in resignation flows. Click an exit interview template to edit it, or hover your pointer over it to view additional options such as Edit and Delete.
To create a new exit interview template, click the Add New Template button. Add questions manually or use the Add From Question Pool option (click the drop-down). An introduction message and a thank-you message can also be added. Once you have all the required questions in place, click the close button (X icon).
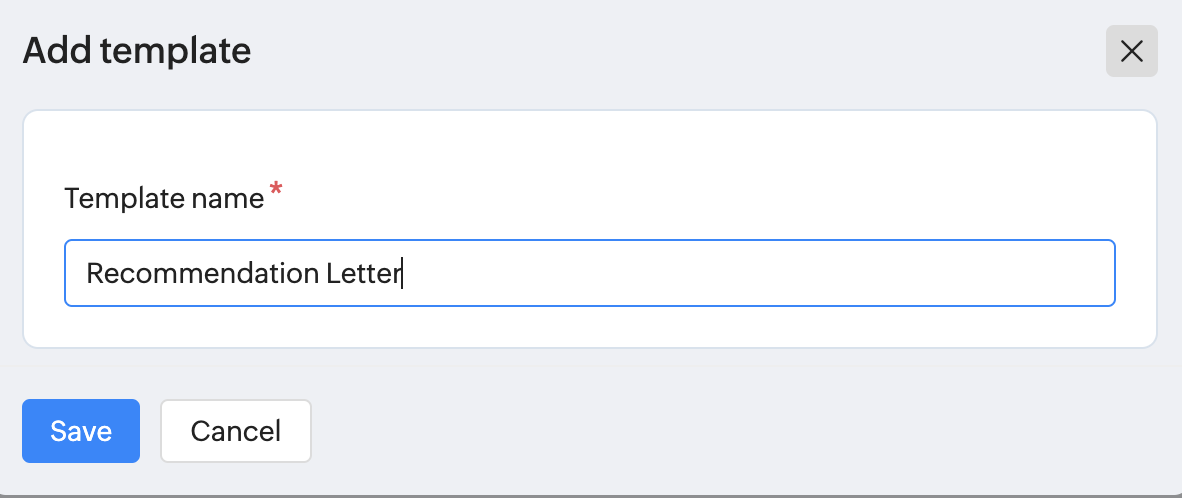
Managing Offboarding Documents
To manage the templates of existing offboarding documents or to create new templates, navigate to Settings > Offboarding > Extend Services > Offboarding Documents.
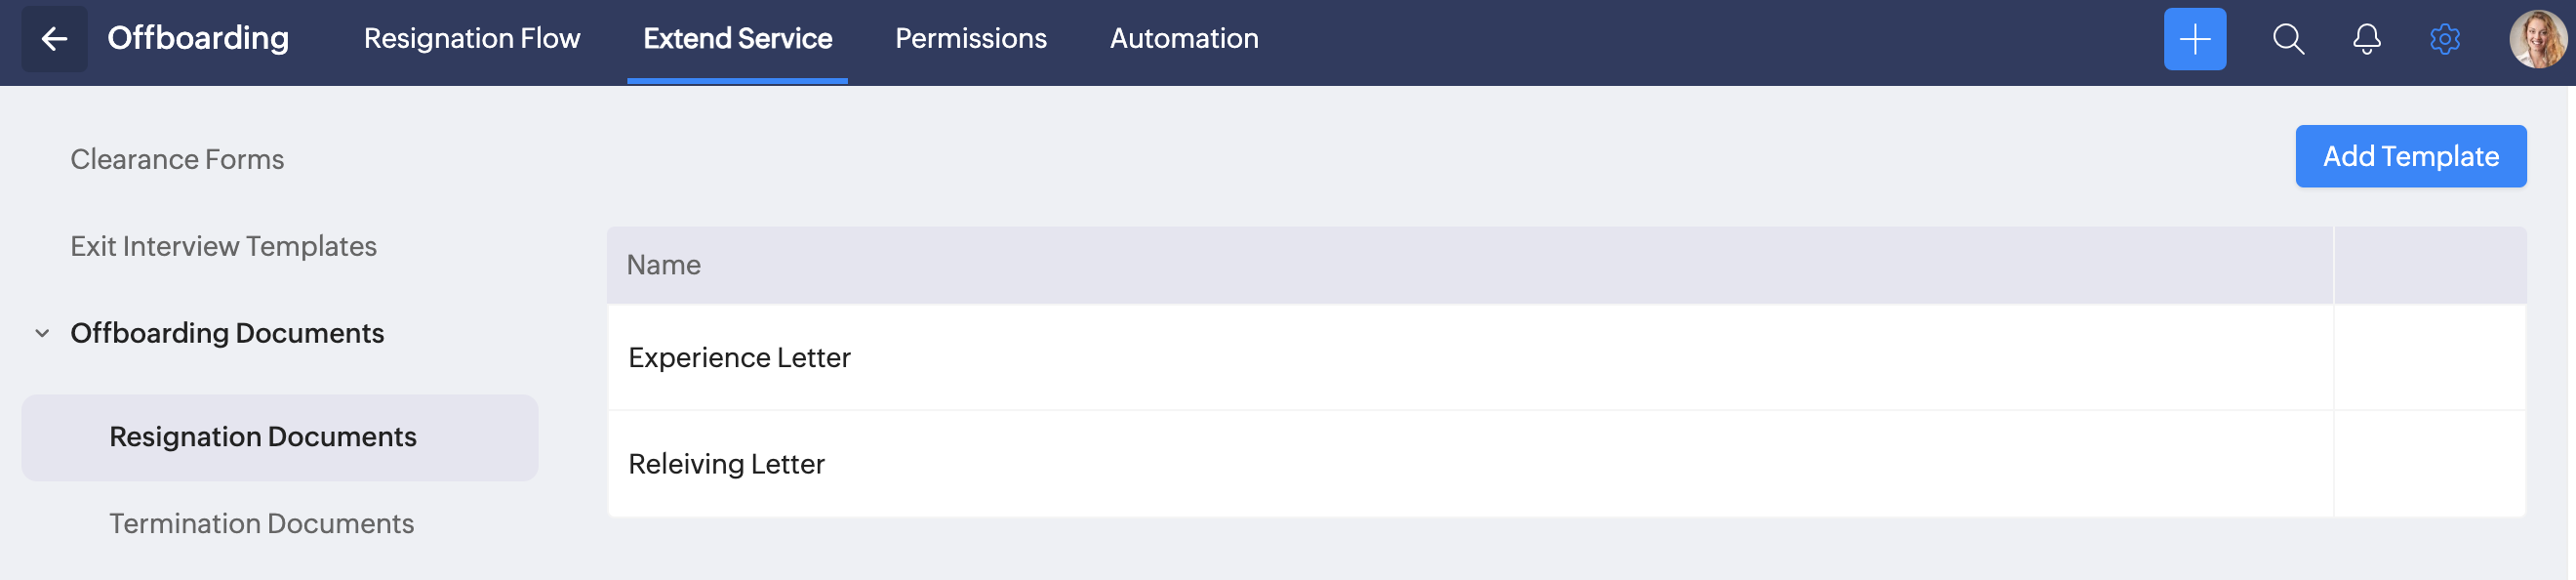
Here, click an existing template to edit it. You can also rename an existing template by hovering your pointer over it and clicking the edit icon.
To create a new template from scratch, click Add Template. Enter a template name and click Save to proceed.
You will see the mail merge template gallery. Once a template is selected, you will be taken to Zoho Writer's mail merge editor, where you can fully customize the letter template.
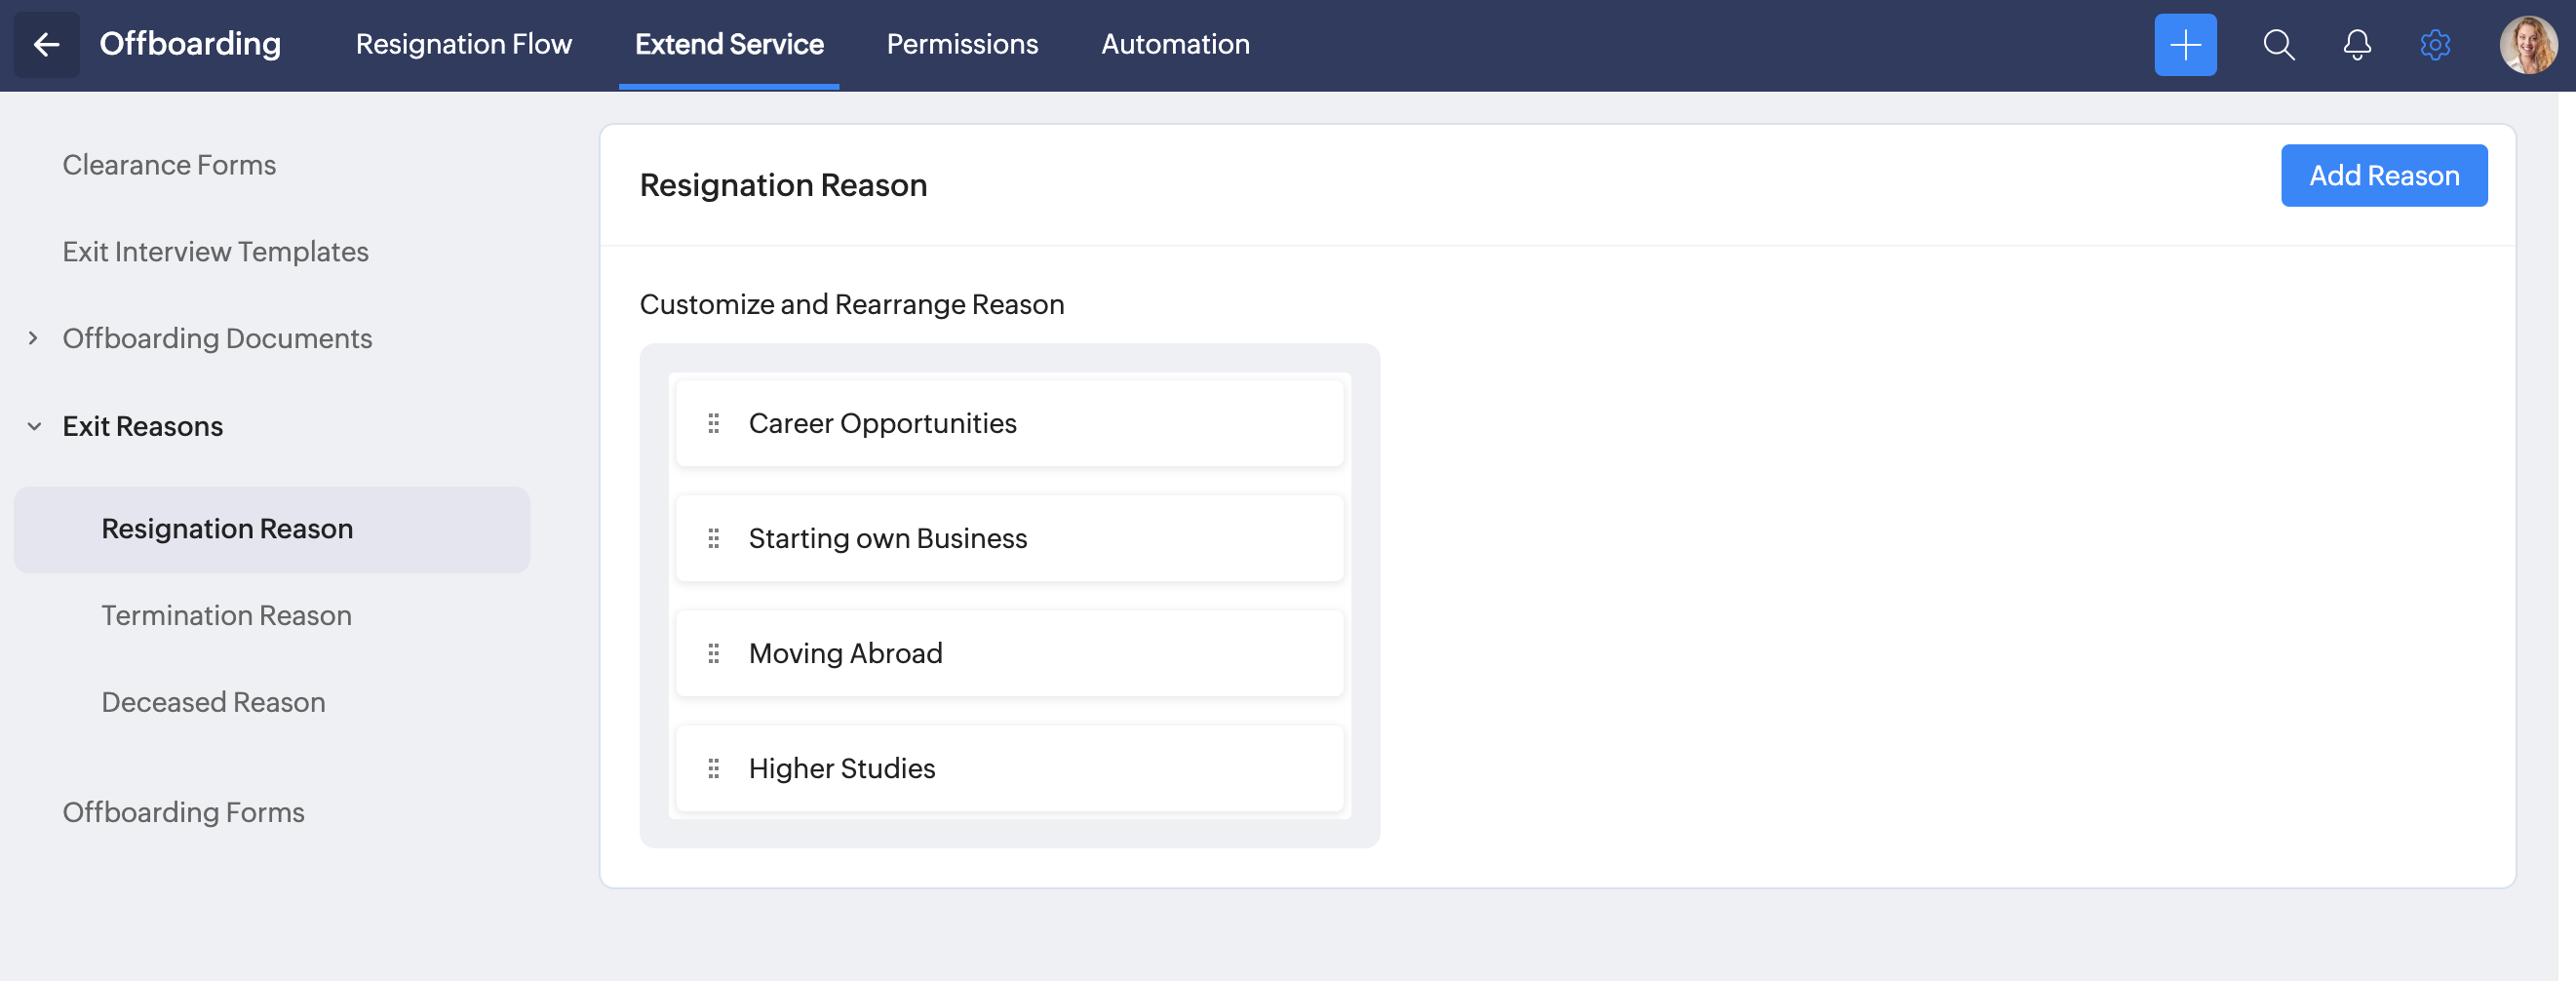
Manage Exit Reasons
Reasons are classified into resignation, termination, and deceased reasons. The reasons will be listed when raising the corresponding offboarding request. To manage these exit reasons or to add new ones, navigate to Settings > Offboarding > Extend Services > Exit Reasons.
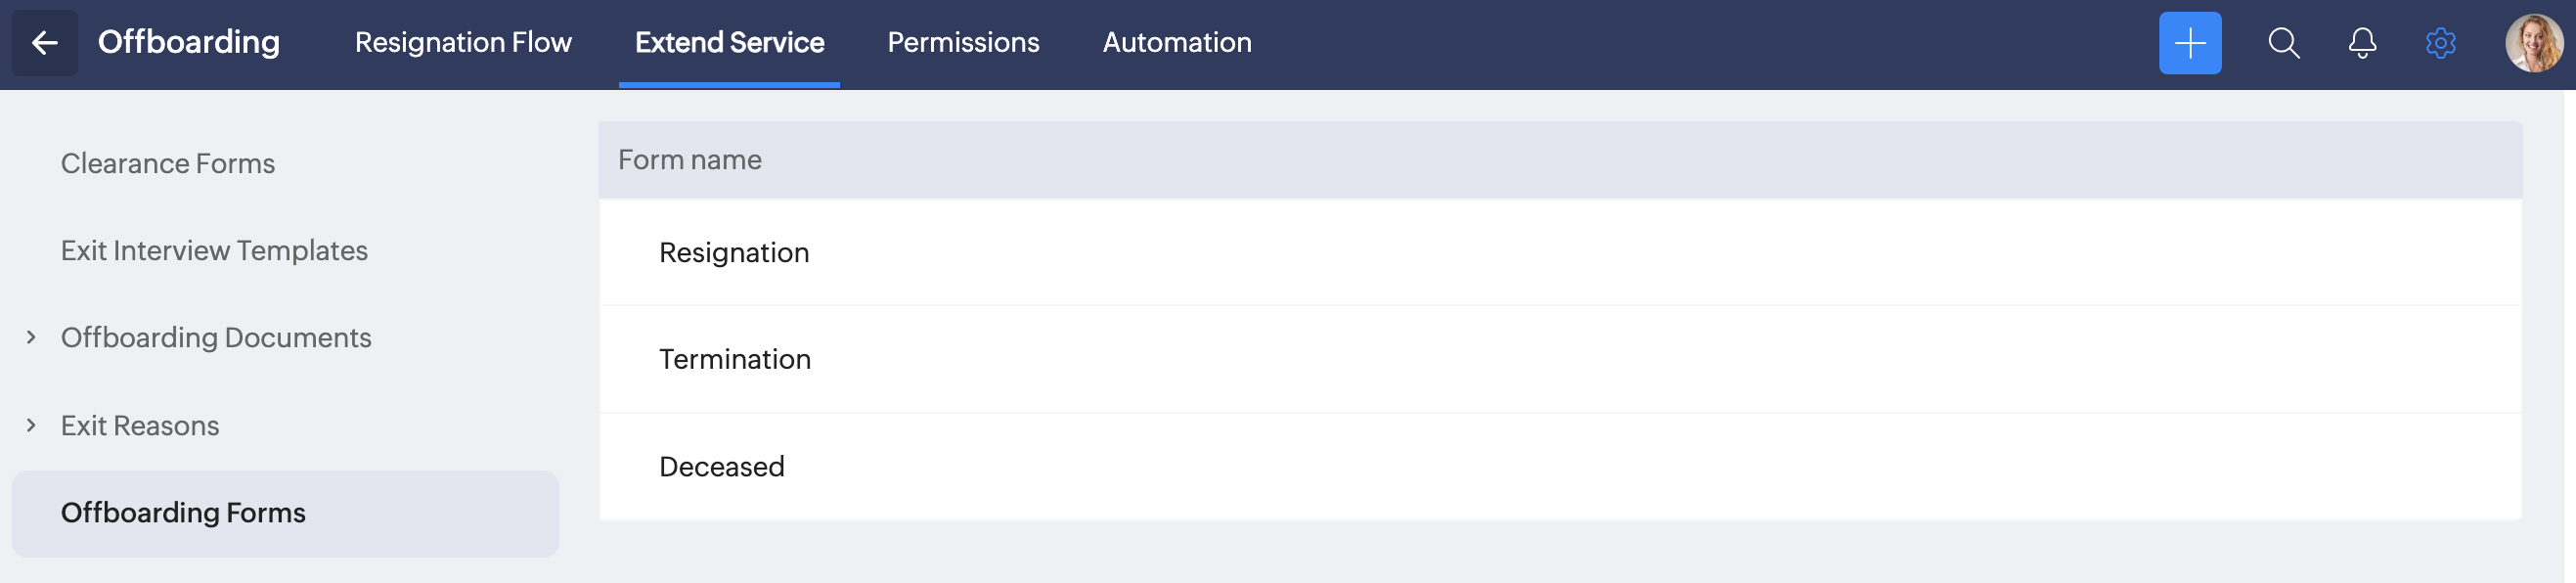
Customize Offboarding Forms
The forms associated with offboarding—namely Resignation, Termination, and Deceased—can be customized by navigating to Settings > Offboarding > Extend Services > Offboarding Forms. Click the corresponding form to edit it. During editing, all Zoho People form-editing features such as adding fields, editing field properties, and adding sections can be performed.
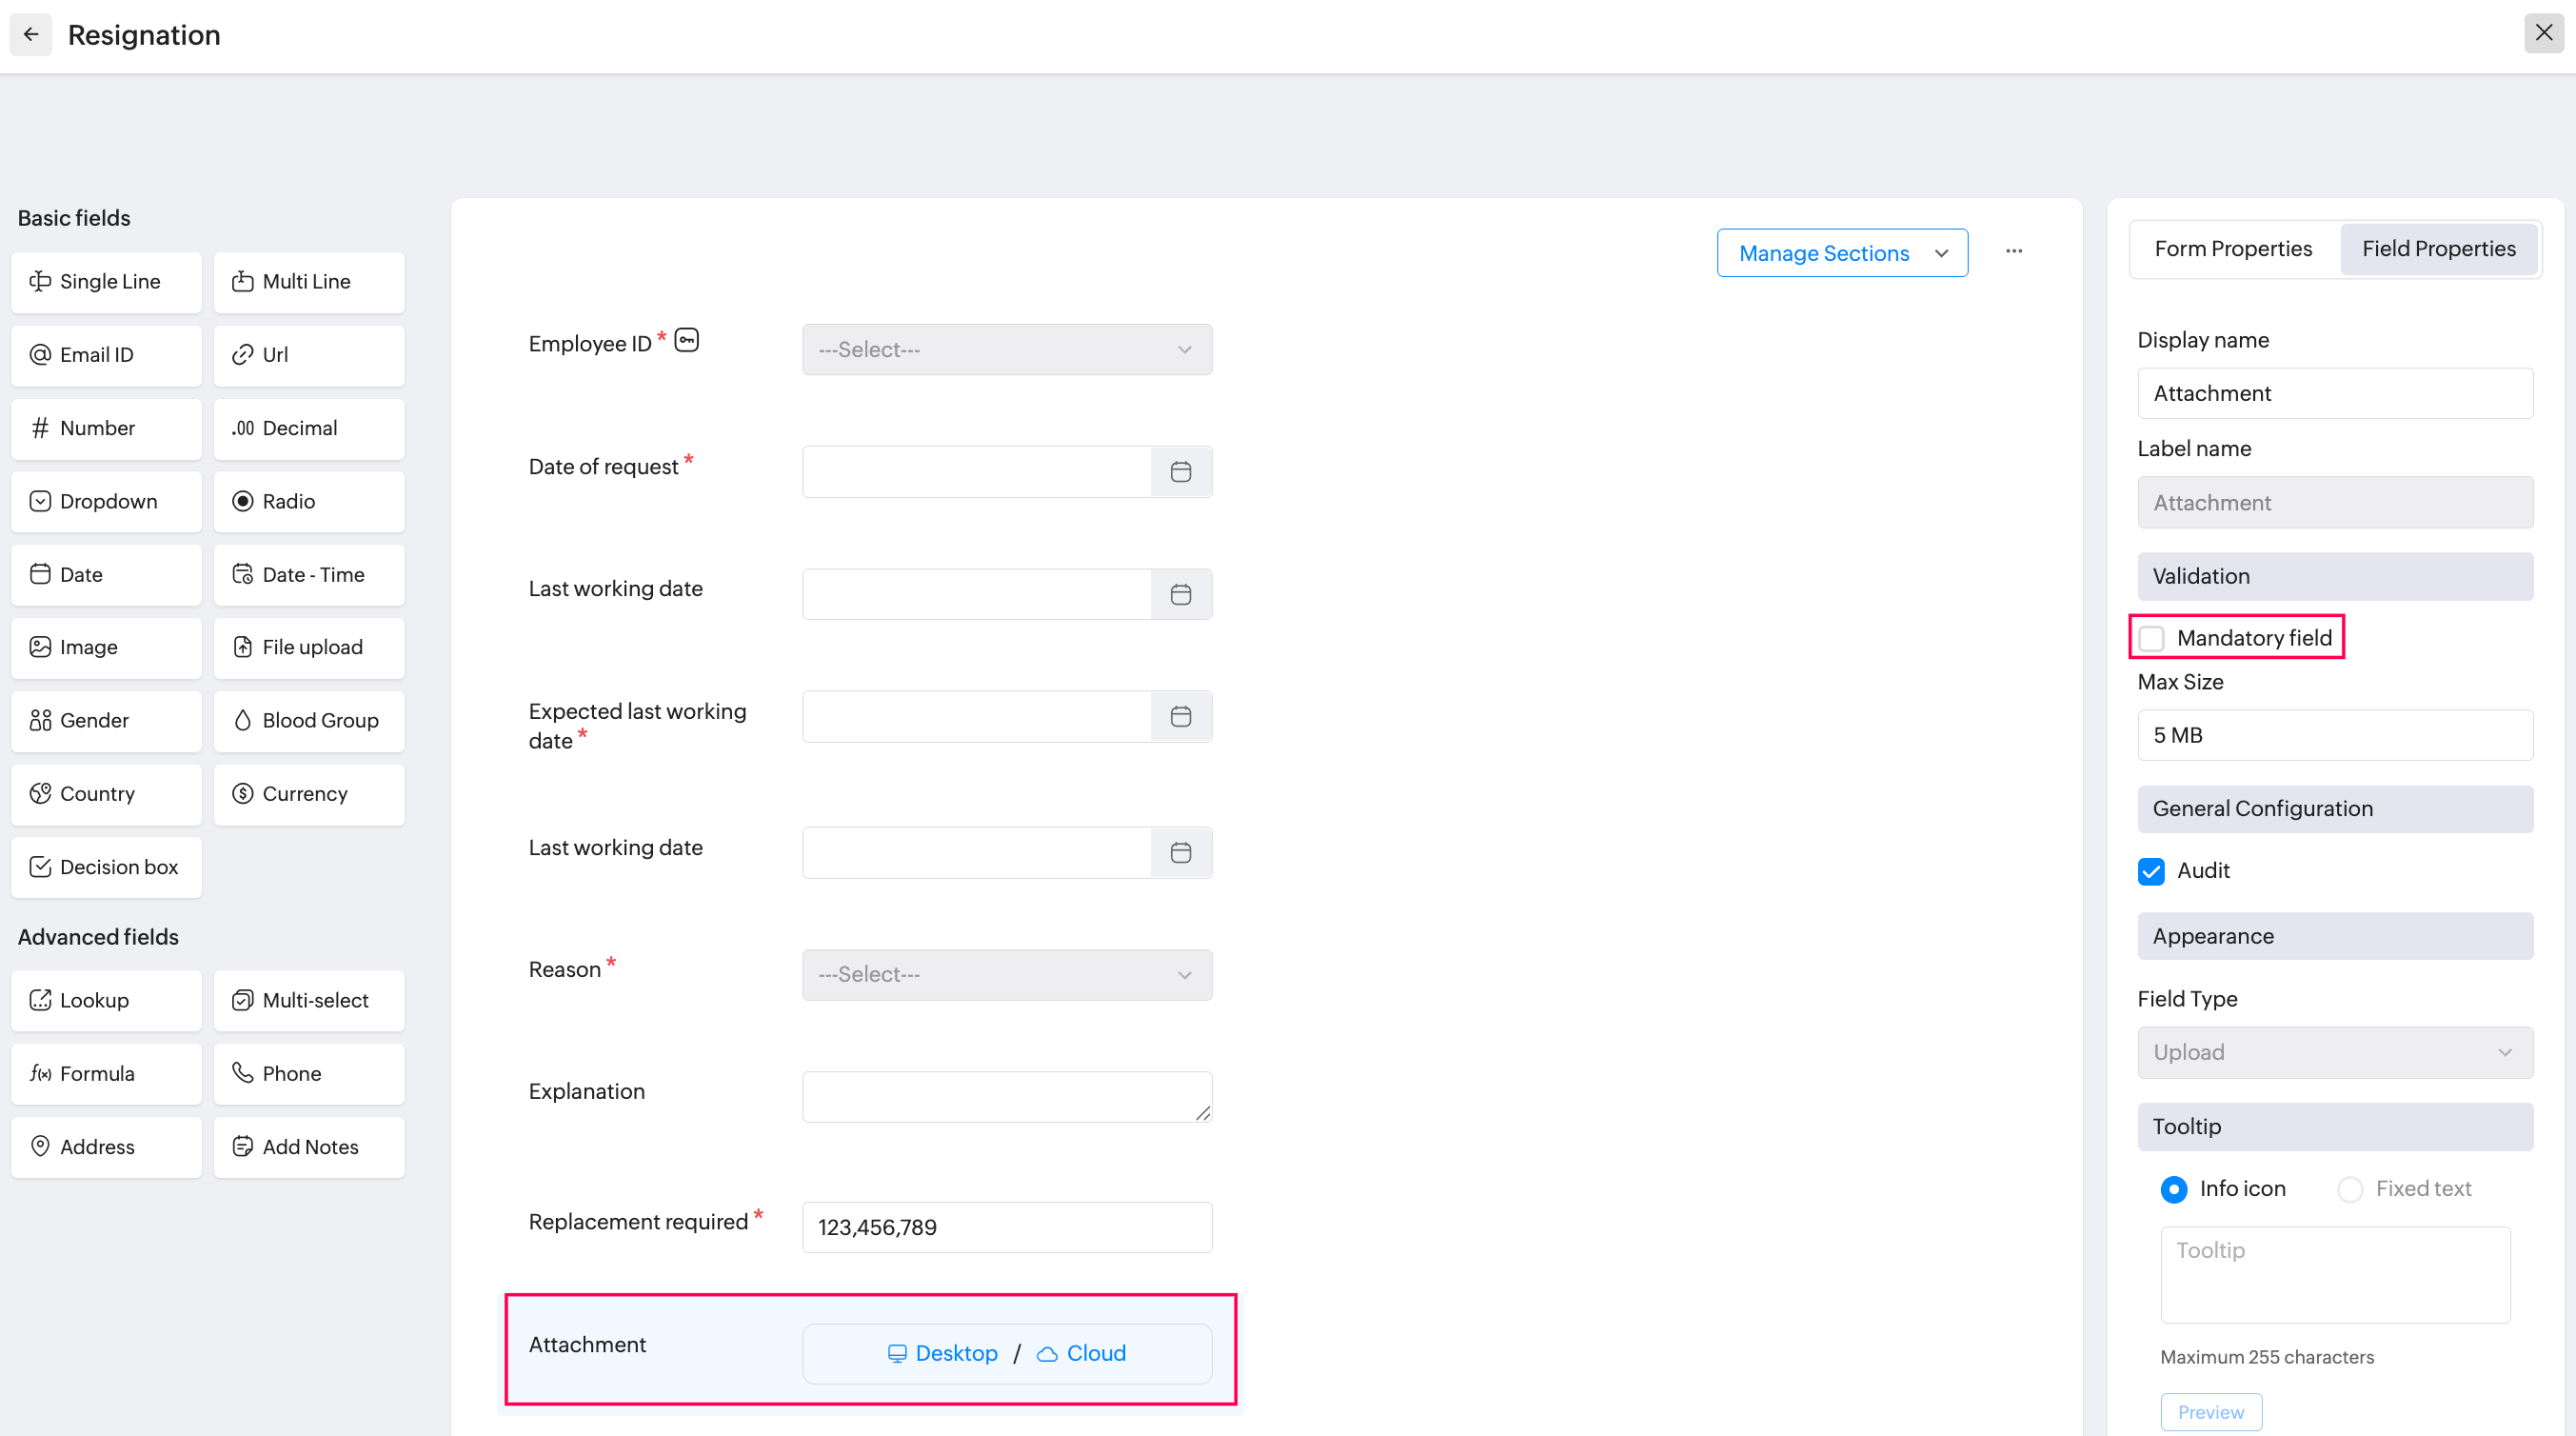
Make Attachments Mandatory for Offboarding Requests
To make attachments mandatory, navigate to Settings > Offboarding > Extend Services and select one of the forms.
For example, let us take the Resignation form. Select the Attachment field, and enable the Mandatory checkbox in the field properties configuration space.
Configure Who Can Raise Resignation Requests
To set permissions associated with raising resignation requests, navigate to Settings > Offboarding > Permissions.
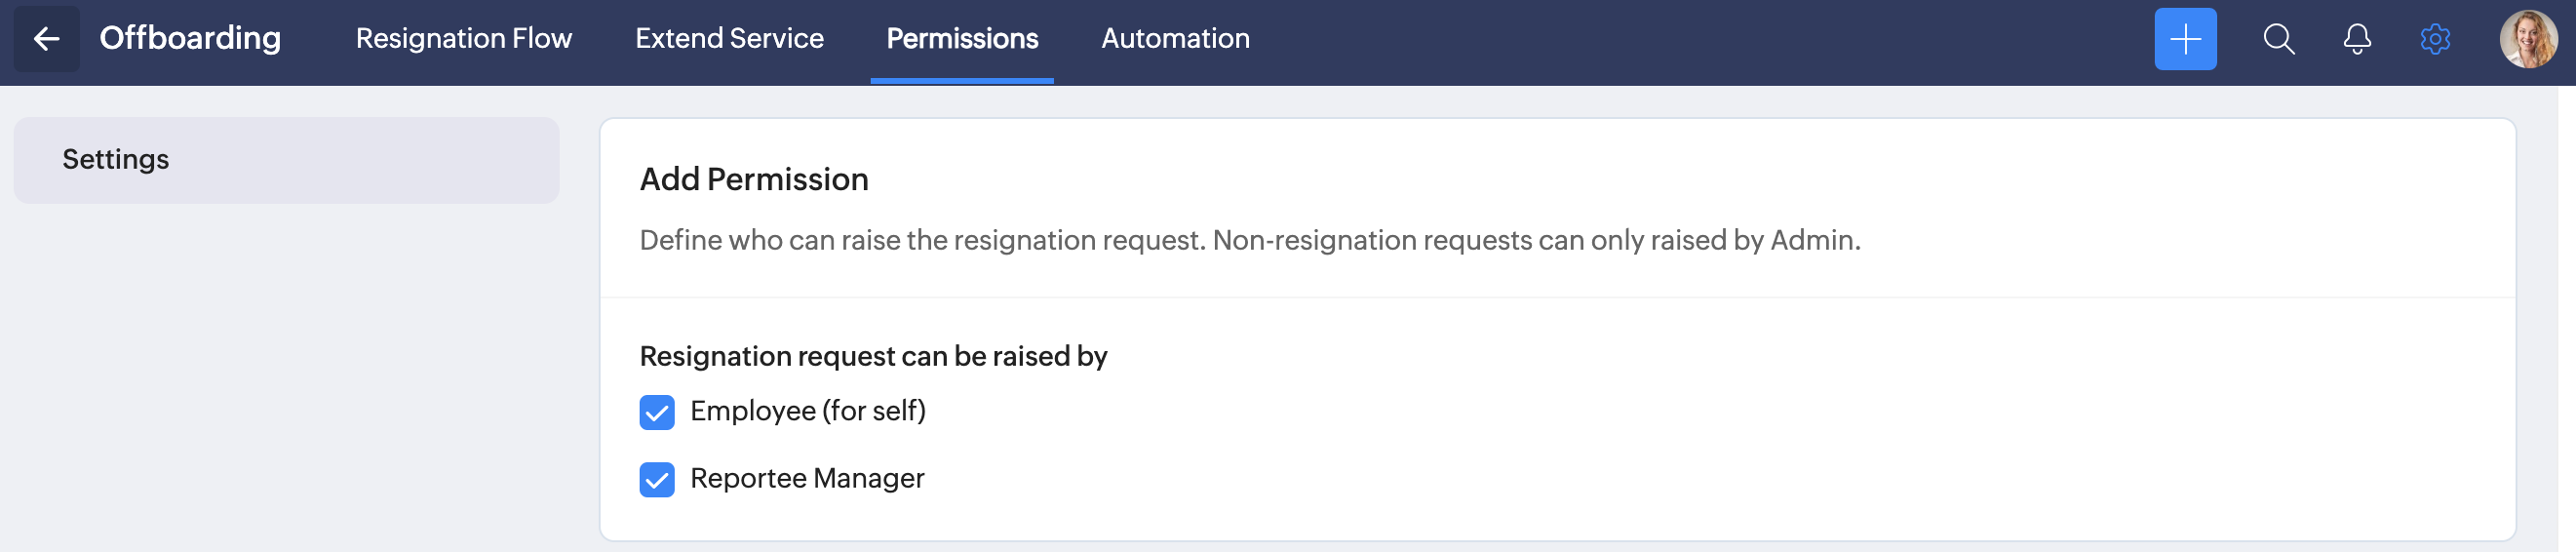
These permissions only apply to standard resignation requests. Termination and deceased requests can only be raised by administrators.
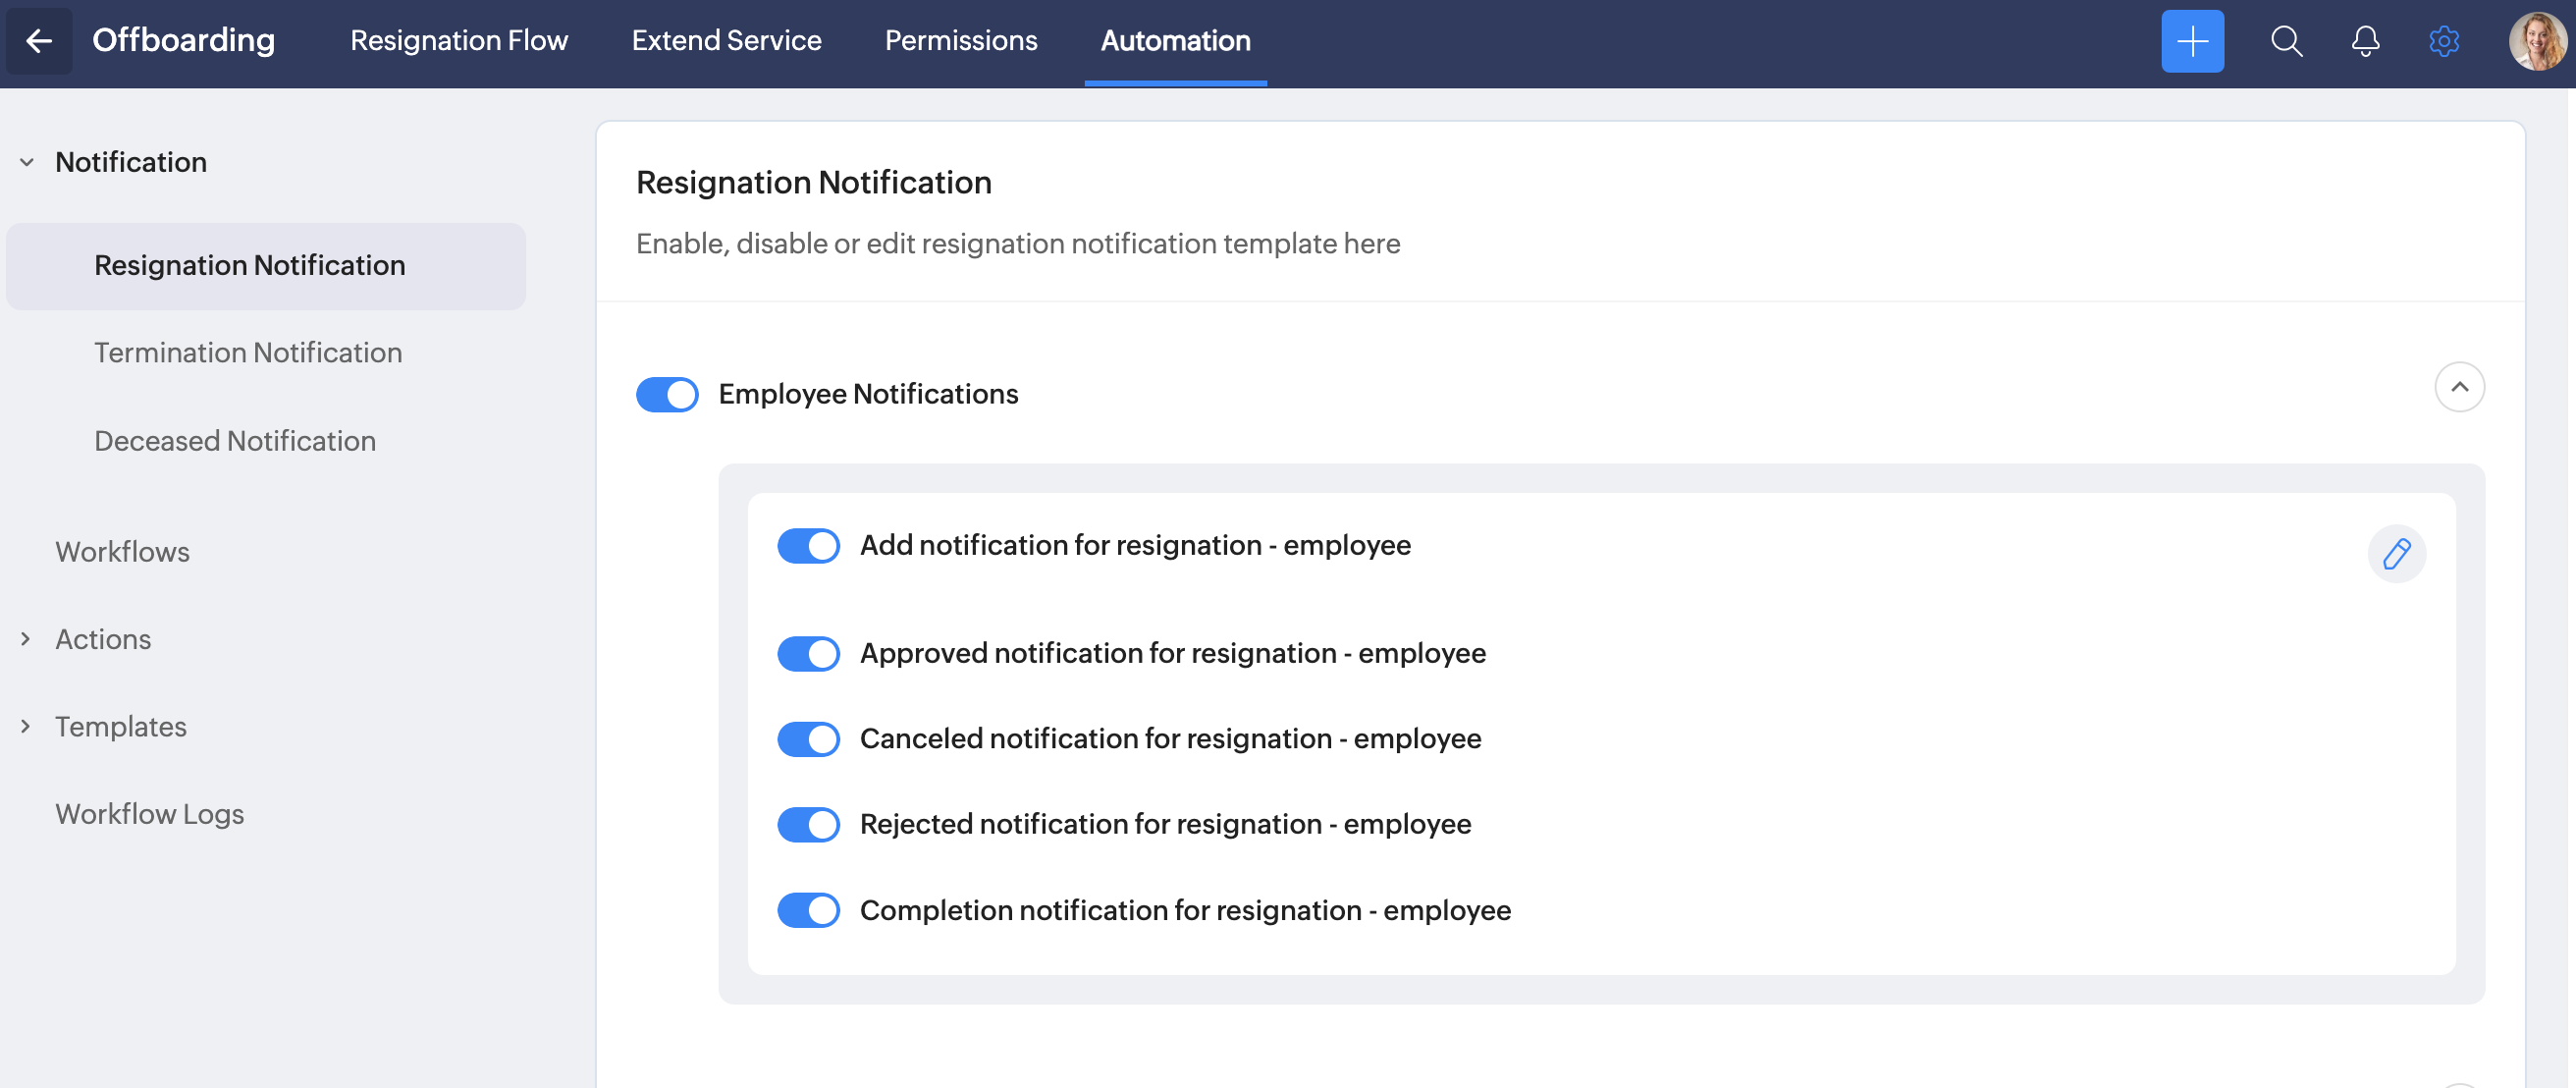
Configure Offboarding Notifications and Automation
To enable or disable offboarding-related notifications, or to make changes to the email content, navigate to Settings > Offboarding > Automation > Notifications.
The notifications are classified into three types, based on who they are intended for:
- Employee Notifications
- Reporting Manager Notifications
- HR Partner Notifications
From the notifications page, you can use the status switch to enable or disable notifications. To edit the email template, hover your pointer over a notification and click the edit icon (pencil icon).
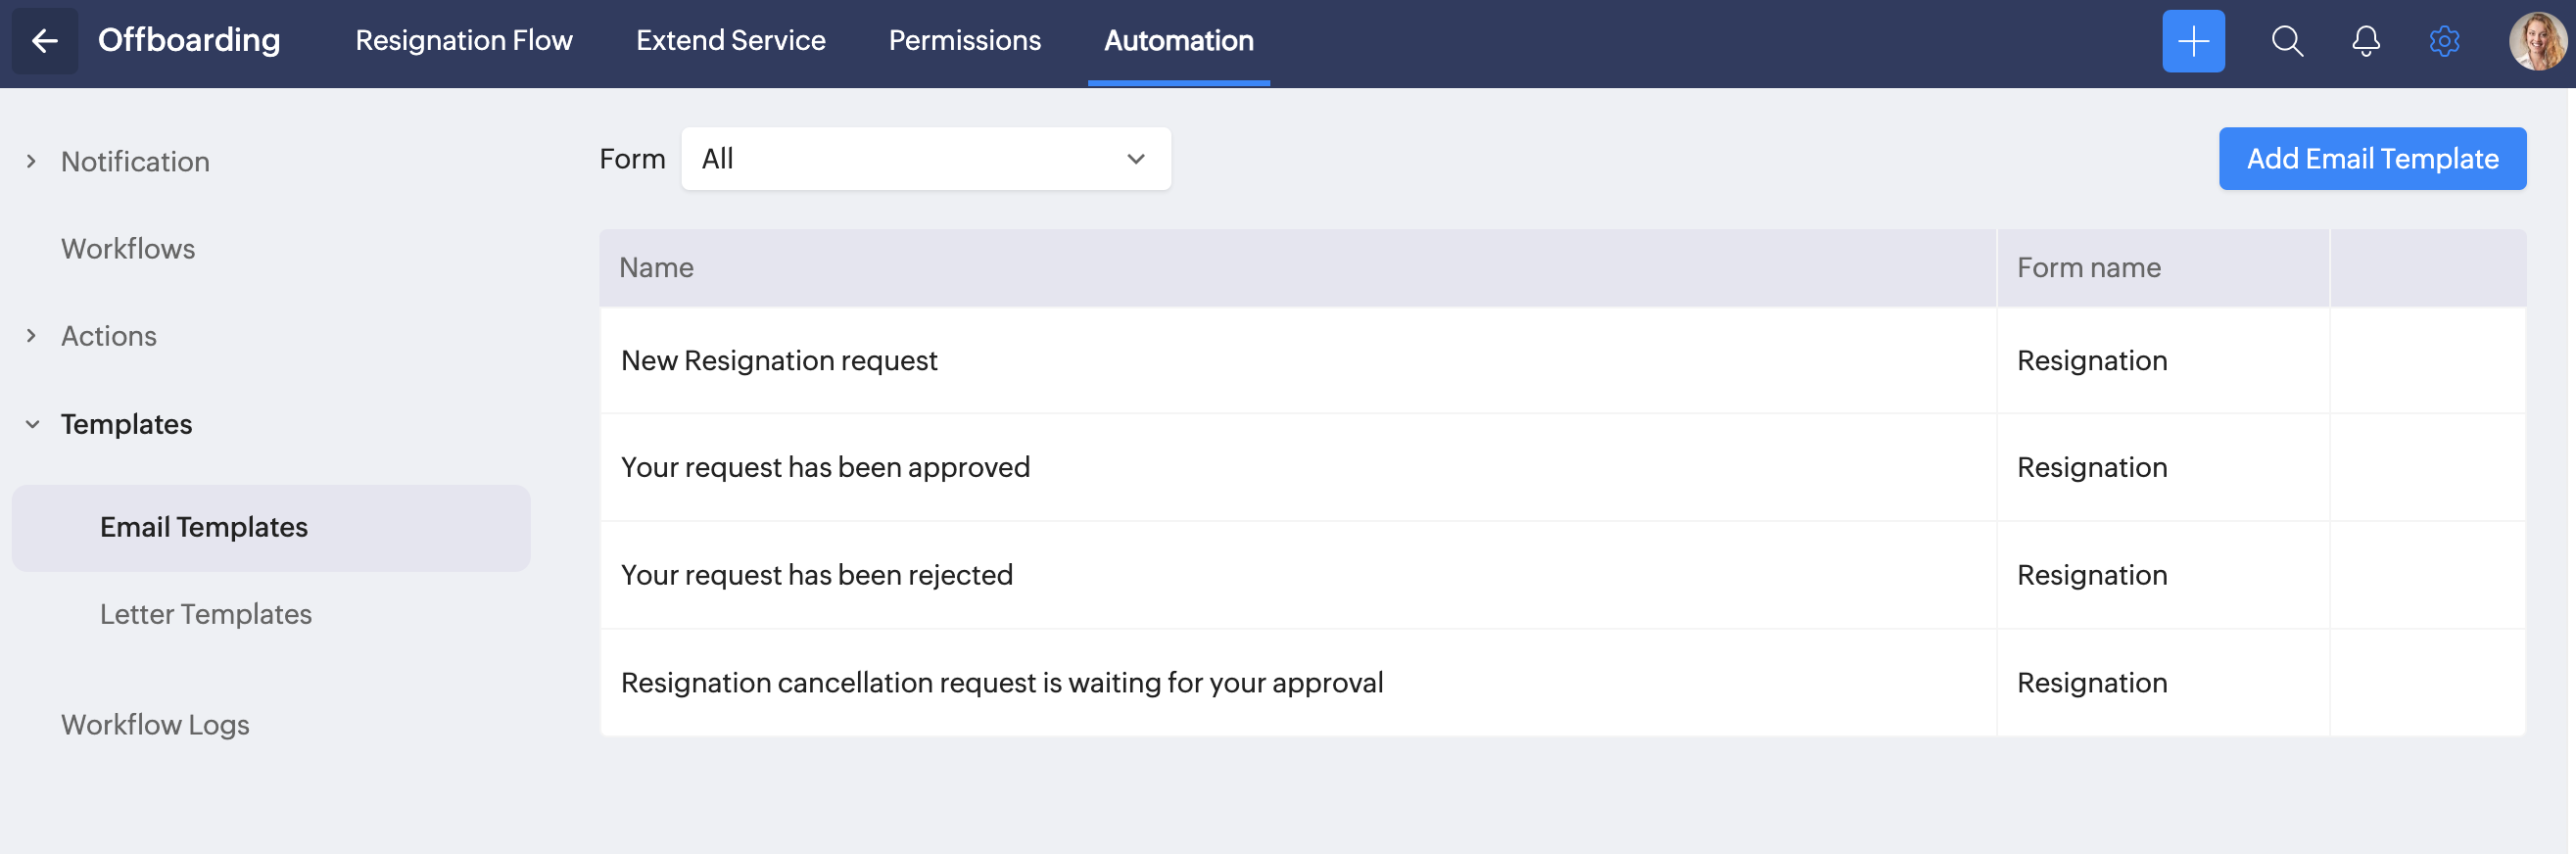
To modify the email templates associated with the offboarding service, navigate to Settings > Offboarding > Automation > Templates > Email Templates.
For other automation-related features, refer to our common help page on Automation features.
Offboarding User Service
Raising a Resignation Request
After careful consideration, follow the steps below to raise a resignation request:
- Navigate to the Offboarding user service from the left bar.
- Click the Add Resignation Request button.
- Fill in the details, including the expected last working date, reason, and explanation. Add any related attachments if required.
Your organization can have different notice periods in place for resignation processes. The person handling the resignation requests can change the notice period.
- Click Submit. You will be required to give consent once more by clicking Yes.
- Your resignation request is now raised. The status can be tracked from the offboarding service (left bar). The person handling resignation requests must approve the request for it to proceed.
From here, you can also view your career history (click the Career History tab), see the offboarding request timeline bar, send a follow-up email, or click View to see approver details.
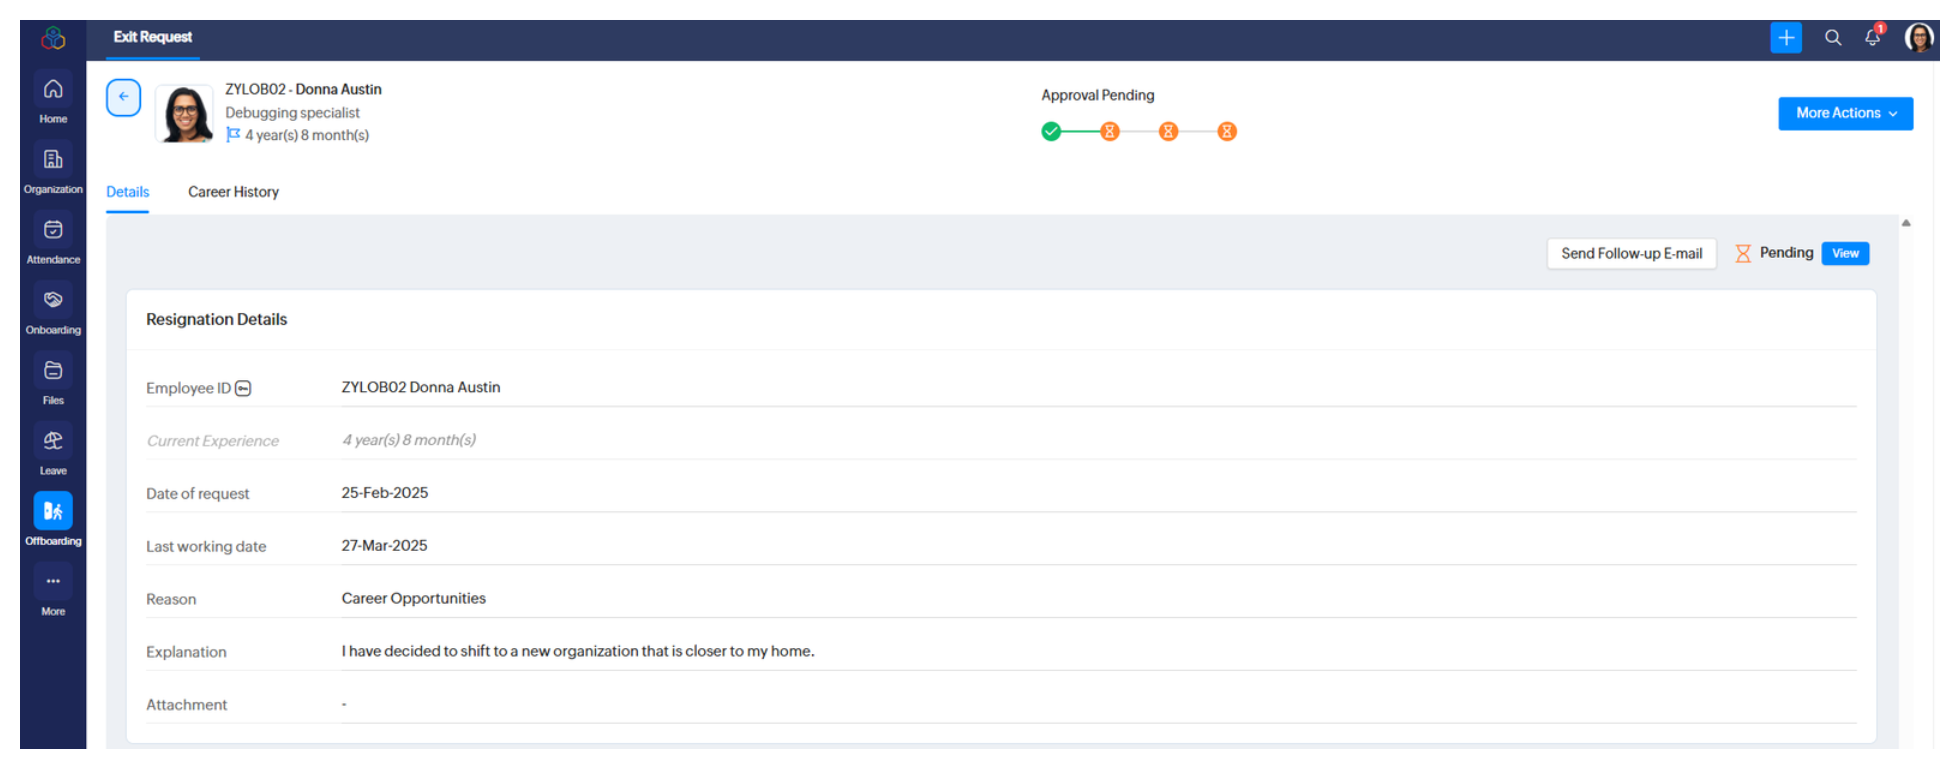
The approver can approve or reject any resignation request.
If you try to add a resignation record that has a past date selected, the current login status of that employee must be enabled. For past-dated records, the login will then be switched to disabled, and the request will be auto-approved and auto-completed by the system. Additionally, you may see a dialog box that includes an option to initiate the flow if required.
Let us proceed with the next steps of the resignation request:
- Once the request has been approved, the resignation request will move on to subsequent steps, which can involve clearances and exit interviews. The status can be tracked from the offboarding service (left bar) page. The offboarding timeline bar will indicate the current stage of the offboarding process.
Each clearance process will be handled by a specific employee, and may include verification of the return of office equipment, completion of knowledge transfer (KT), and so on. The employees handling clearances may contact you during this step. Typically, you will also receive notifications by email when clearance processes are completed.
- If the resignation process includes an exit interview, select the Exit Interview tab from the offboarding service and click Enter Feedback. Answer the questionnaire, then click Submit. The answers can be reviewed by the person handling the resignation request.
- Once all the clearance and interview processes are completed, the status of the offboarding request will be updated to Waiting for Completion.
During this stage, your organization may generate offboarding documents such as experience letters and relieving letters and email them to you, along with any other formal processes. Your organization will then mark the offboarding process as complete and proceed with the login disabling process.
Some organizations may restrict employees from raising resignation requests. To allow employees to raise resignation requests, the Employees (for self) option must be enabled under the Resignation request can be raised by option on the Settings > Offboarding > Permissions page.
During the notice period, your Zoho People home page will display a  button that can be clicked to navigate to the corresponding resignation request page.
Administrators can also submit resignation requests on an employee's behalf. Navigate to Operations > Offboarding > Track Offboarding > Add Request > Add Resignation to perform this action. (You will see a drop-down to select the employee.) Managers can also submit resignation requests on their reportee's behalf. Navigate to the Offboarding user service (left bar) > Team > Add Resignation Request to perform this action. The availability of this option depends on the permissions configured under Settings > Offboarding > Permissions.
By default, employee login access is automatically disabled at 8:30 AM on the day after their last working date.
To manually enable or disable login access for a resigned employee, go to Settings > Manage Accounts > Users, search the employee, and use the Login Access toggle under Actions.
Canceling a Resignation Request
Click the More Actions drop-down from the offboarding service and click Cancel Request.
Once the request is canceled, the status will indicate Canceled (  )on the offboarding service page. Your Zoho People system will maintain records of all canceled resignation requests.
Points to note regarding resignation request cancellation:
- A request can be canceled by the person who raised the resignation request. (HR Partners and administrators can revoke resignation requests; the corresponding topic is covered below.)
- A request can be canceled only before it is approved.
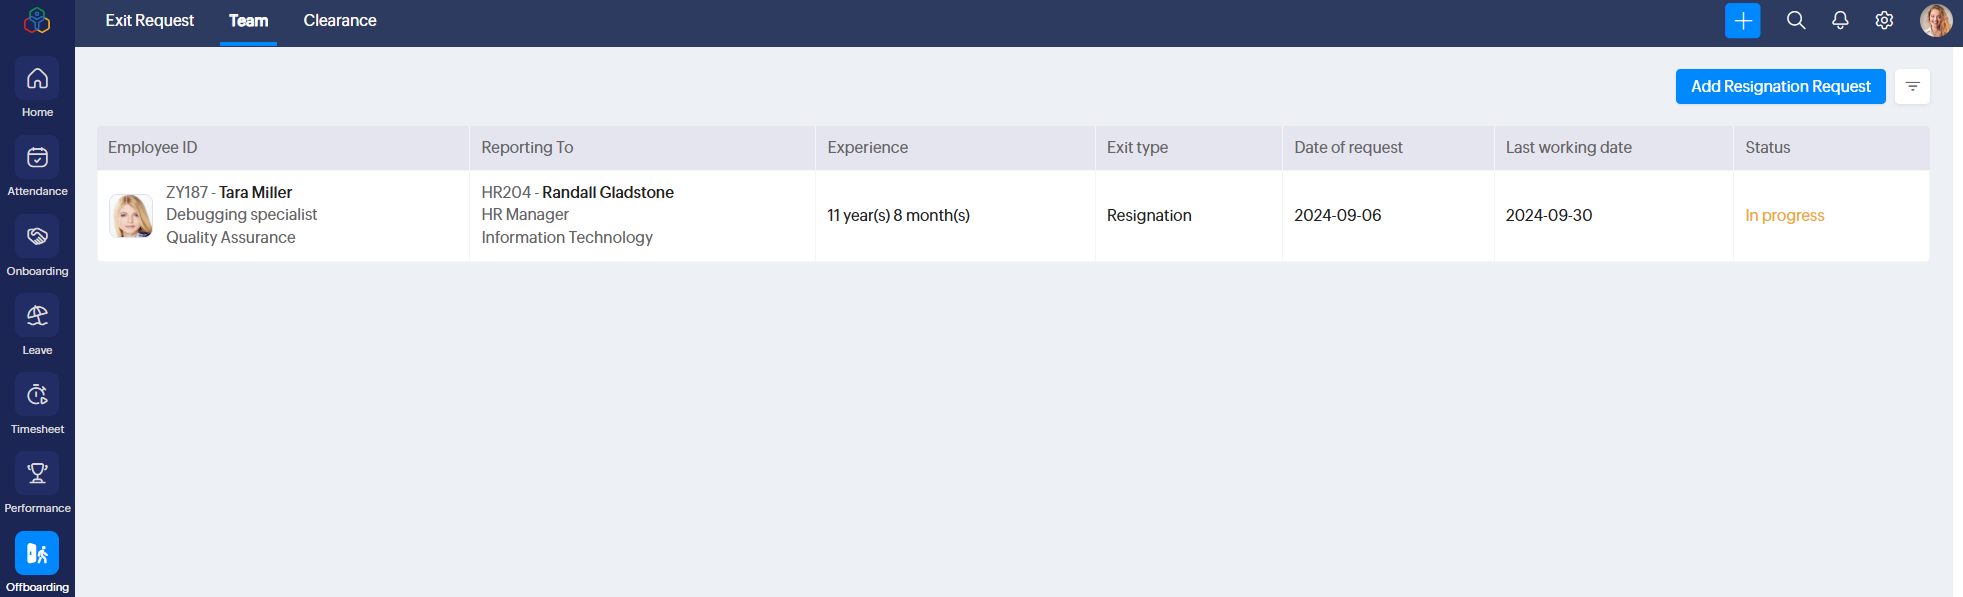
Follow Up on Reportees' Resignation Requests
Managers can follow up on their reportees' resignation requests from the Team tab in the offboarding user service (left bar). Click one of the resignation records for a detailed view.
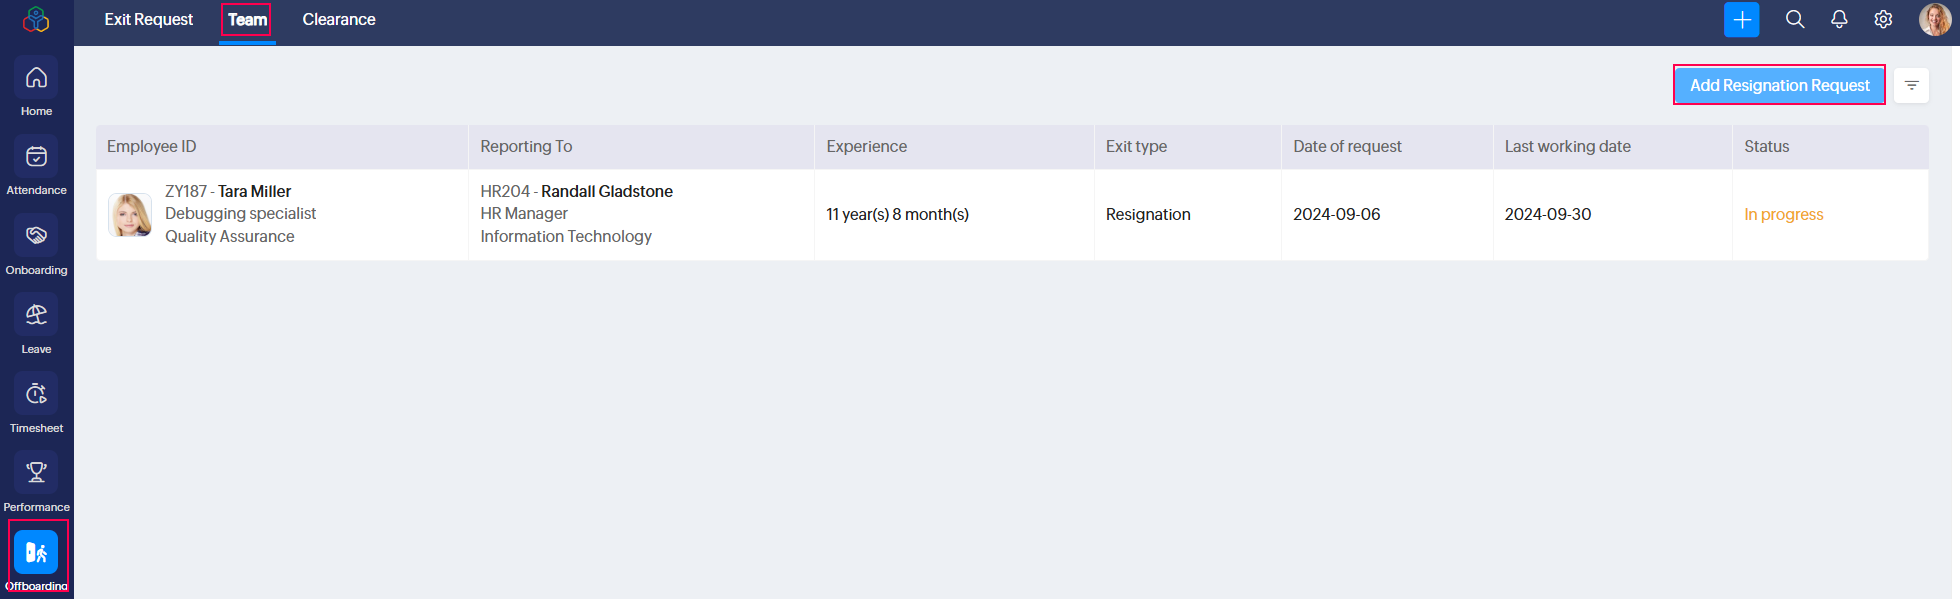
Raising a Resignation Request on a Reportee's Behalf
Based on the permissions configured on the Settings > Offboarding > Permissions page, managers can be authorized to raise resignation requests on their employees' behalf. Click the Add Resignation Request button available in the Offboarding user service (left bar) > Team tab to perform this action.
Handling Clearances
For employees handling clearances, the Offboarding user service (left bar) will display the Clearance tab. Each clearance process will have its own sub-tab (for example, Standard IT Device Clearance). Additionally, My Clearance and Manager Clearance views, along with status filters, are available. You can select a clearance record for a detailed view.

A clearance process consists of a form, which must be filled out. Once the form is completed, click Submit and Complete to mark the clearance process as completed.
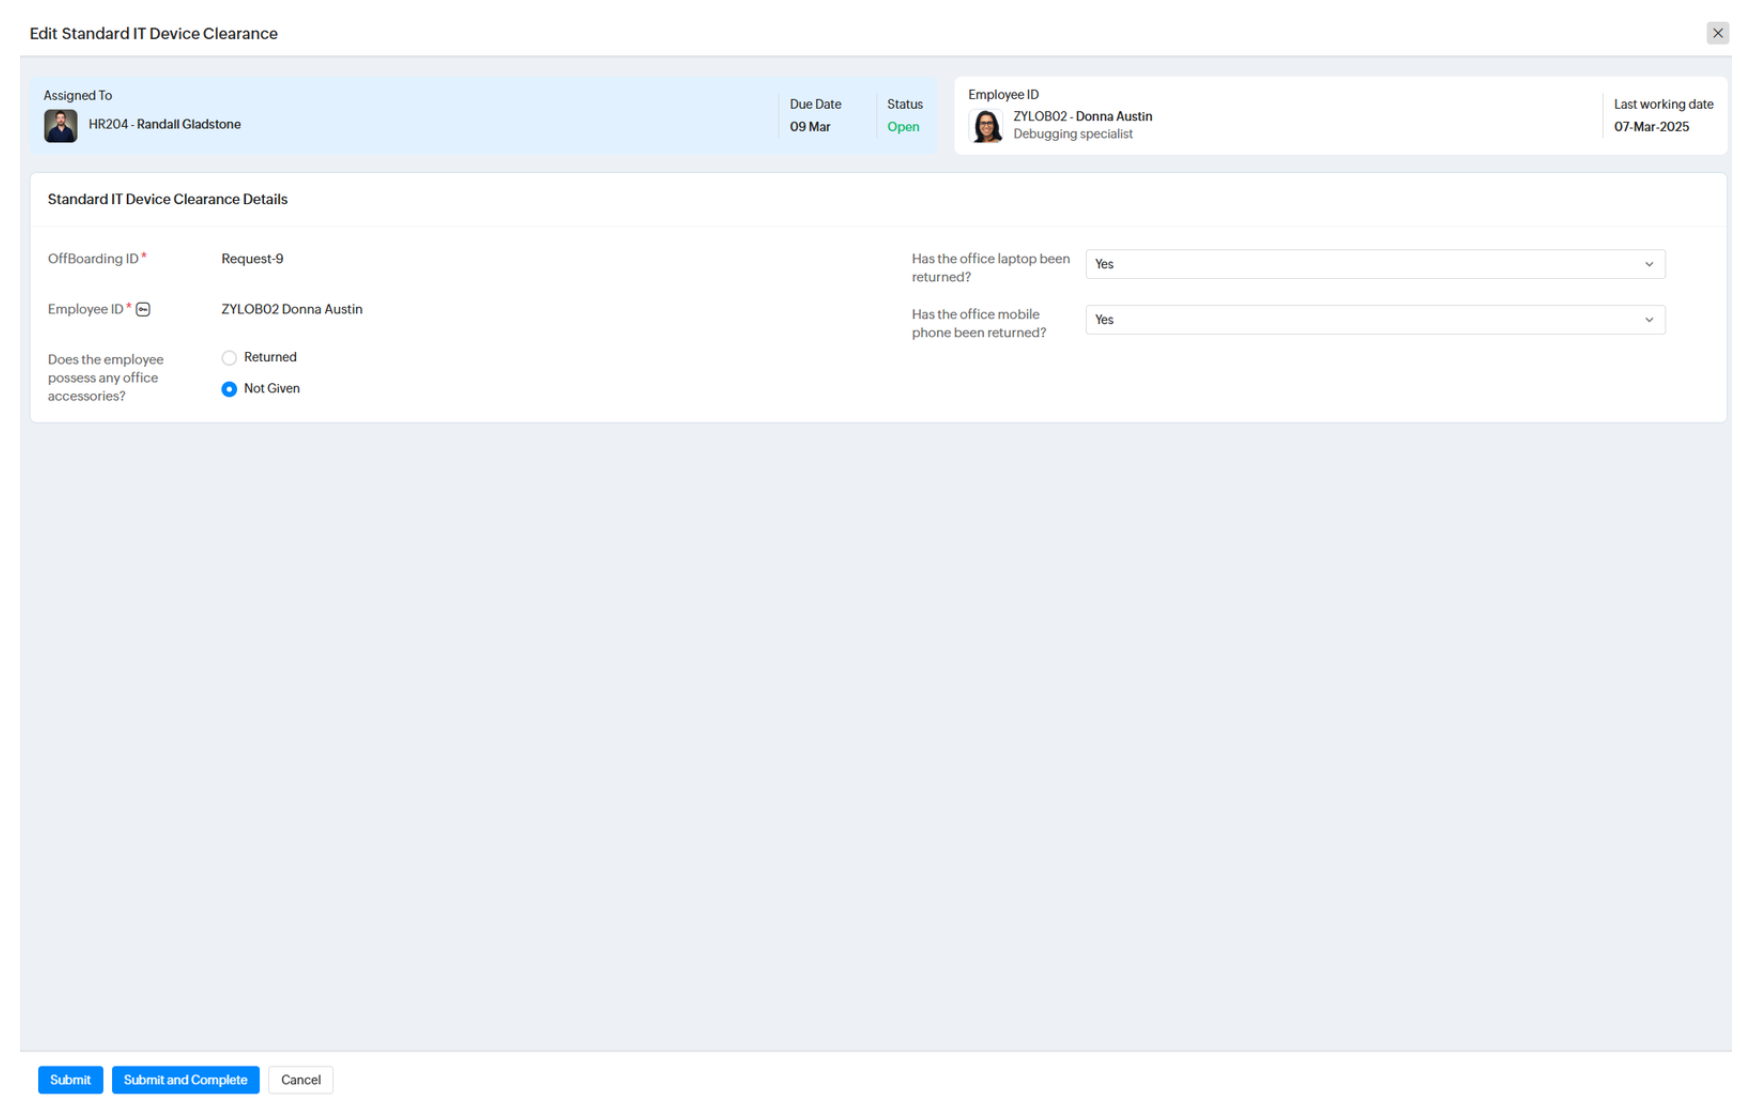
Once the clearance process is marked as completed, the concerned employee will be notified, and their resignation request will proceed to further clearances, exit interviews, and so on.
Revoking a Resignation Request
What do we mean by "revoking a resignation request"?
Revoking a request refers to the process of halting or canceling a resignation request by the HR Partner or administrator. Earlier, we discussed cancellation of a resignation request, which can only be performed by the exiting employee. A revoke can only be performed by the HR Partner or administrator.
Here is a tabular representation that explains the difference between resignation request cancellation and revoking:
Request Raised By | Request Status | Cancellation Possibility | Revoke Possibility |
Employee for themselves | Not approved | Yes, the exiting employee can cancel | Yes, the HR Partner or administrator can revoke |
Employee for themselves | Approved | Not allowed | Yes, the HR Partner or administrator can revoke |
Employee for themselves | Approved and marked as completed | Not allowed | Not allowed |
Employee for themselves | Approved and LWD has lapsed | Not allowed | Not allowed |
HR Partner or administrator on another employee's behalf | Not approved | Yes, the exiting employee can cancel | Yes, the HR Partner or administrator can revoke |
HR Partner or administrator on another employee's behalf | Approved | Not allowed | Yes, the HR Partner or administrator can revoke |
HR Partner or administrator on another employee's behalf | Approved and marked as completed | Not allowed | Not allowed |
HR Partner or administrator on another employee's behalf | Approved and LWD has lapsed | Not allowed | Not allowed |
Steps to Revoke a Resignation Request
It is important to note that only an administrator or HR Partner can revoke a resignation request.
Before a resignation request can be revoked, it must first be in an approved state. However, the request must not be completed, and the last working day (LWD) must not have lapsed.
Now, let us look at the steps:
- To revoke a resignation request, navigate to the corresponding offboarding request (either from the Offboarding user service > Team tab, or through Operations > Offboarding > Track Offboarding list).
- Go to the More Actions option and select Revoke.
- You will be prompted to enter a reason. Enter the reason and click Confirm.
- The resignation request will now be revoked.
Offboarding Operations
To navigate to offboarding operations, click the Operations icon at the bottom-left corner and select Offboarding.
Administrators can perform the following actions from offboarding:
- Track offboarding requests by status.
- Add offboarding-related requests, including:
- Resignation requests on other employees' behalf
- Termination records
- Deceased records
- View termination, deceased, and resignation records.
- Cancel or revoke resignation requests.
- Handle applicable clearances.
Along with the administrator, the HR Partner selected when creating an HR process can also handle all associated resignation-related processes.
Handling a Resignation Request (HR Partner)
Approving a Resignation Request
When an approval request is raised, the HR Partner must first approve it. To do this, navigate to the corresponding resignation request (Operations > Offboarding > Track Offboarding) and open the resignation request.
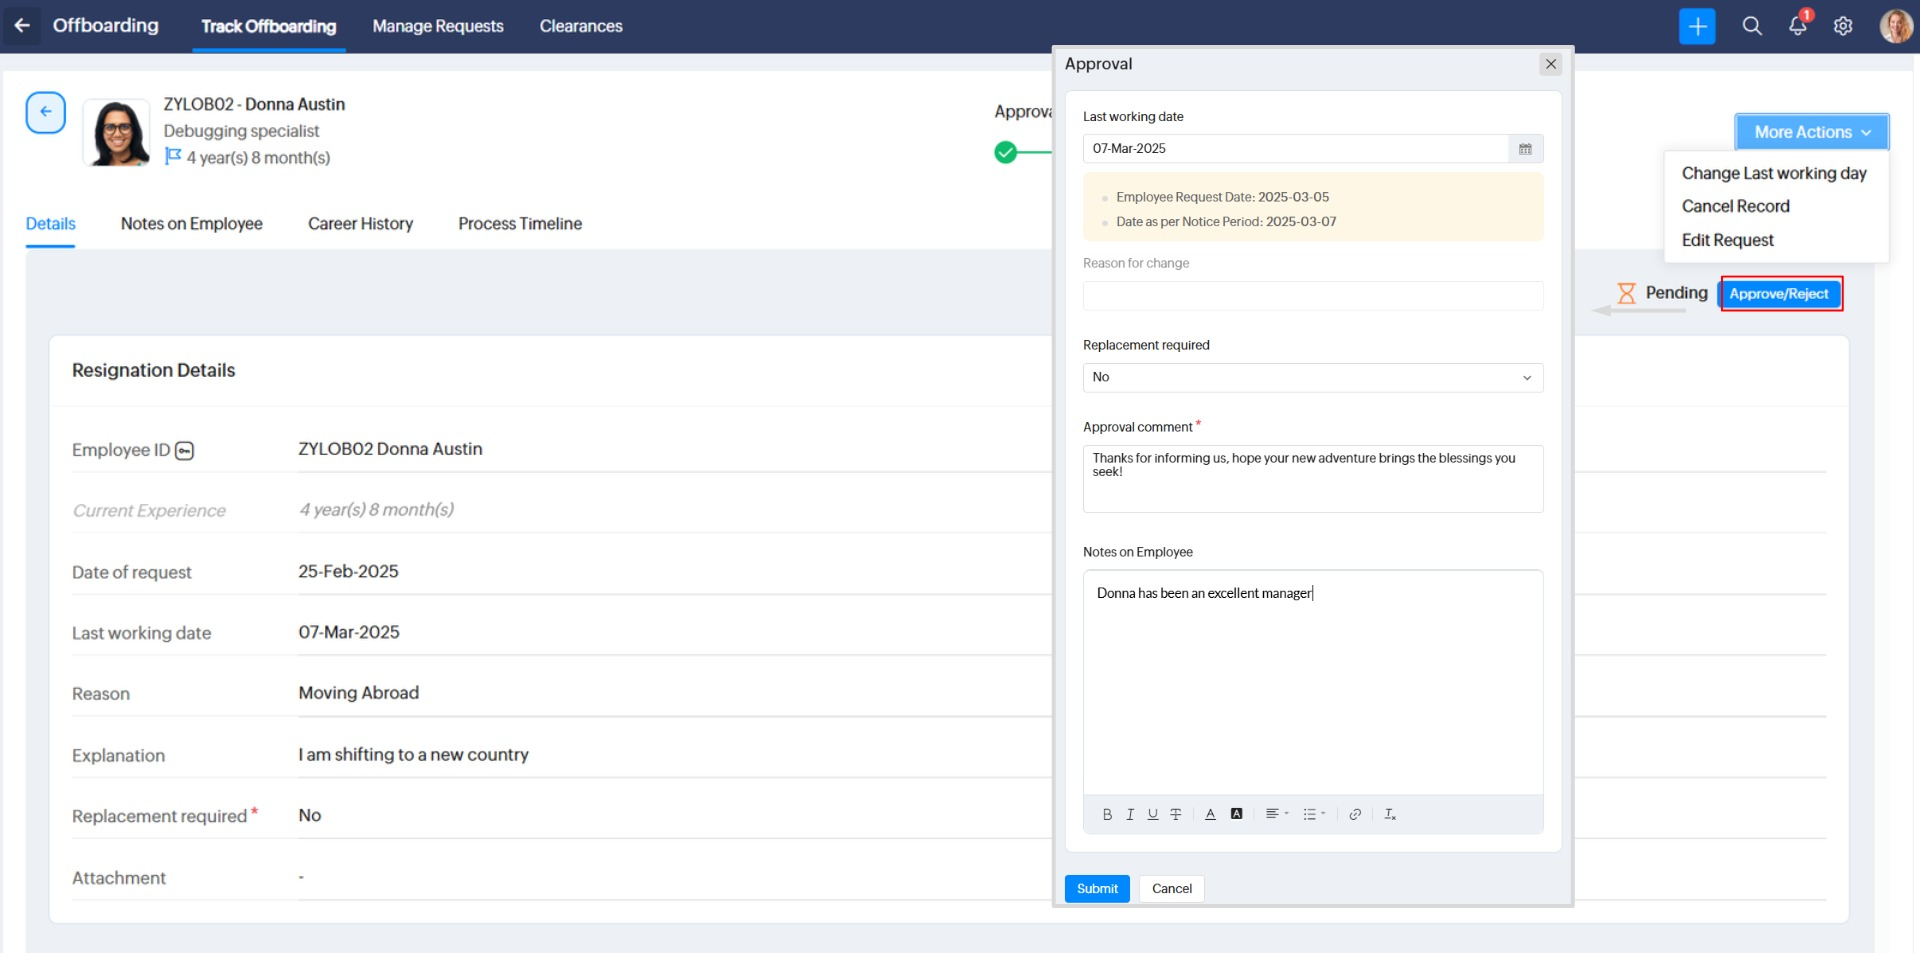
- Click the Approve/Reject button.
- Make any changes to the last working date if required. The system will display dates based on the standard notice period associated with the resignation flow and the date requested by the employee.
- You can also specify whether a replacement is required using the provided drop-down.
- Enter an approval comment and add a note about the employee if required. (The employee will not be able to view the note; it is visible only to the HR Partner, reporting manager, and administrators.)
- Click Submit.
Once the request is approved, it will move to the clearance stage.
Track Clearances
When viewing the resignation request, navigate to the Clearance tab to view and track clearance requests.
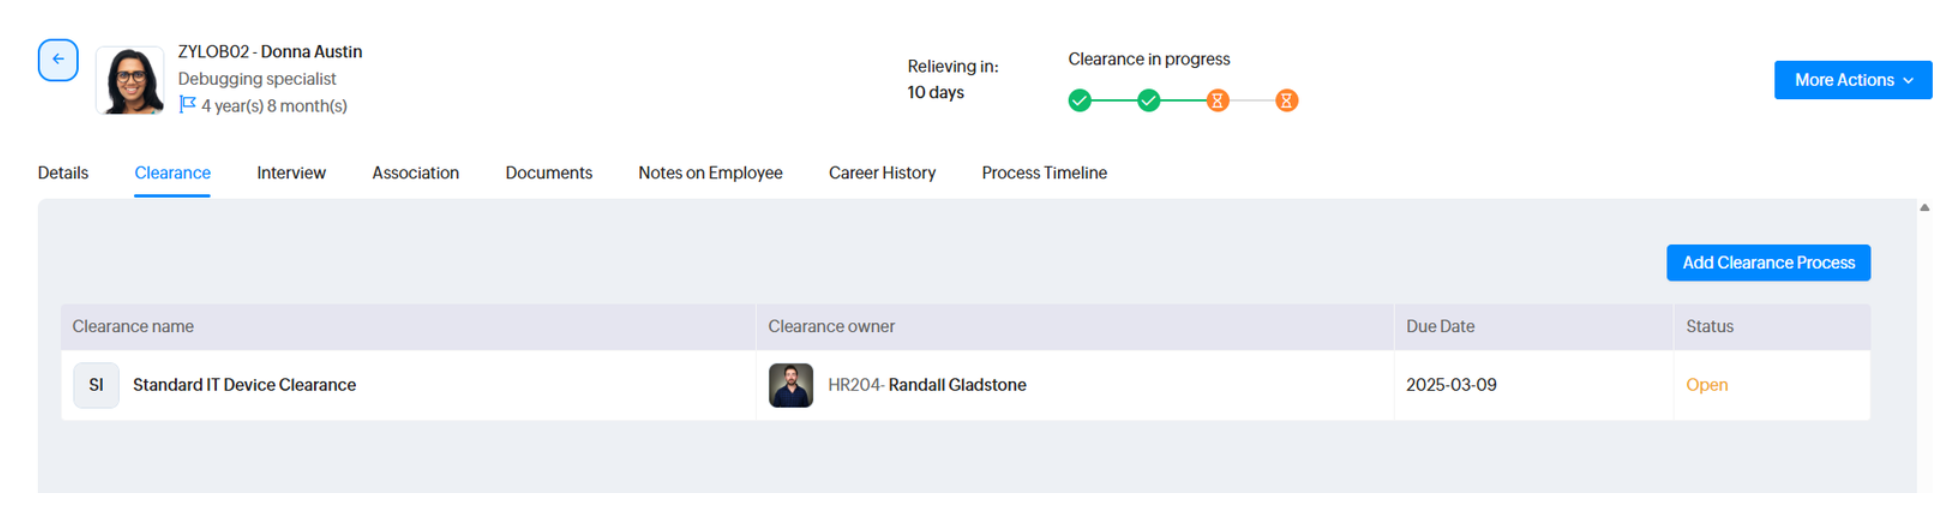
This is how clearances will work:
- Each clearance will be initiated automatically based on the period configured during the resignation flow setup.
- Each clearance process will be handled by an individual employee selected during the resignation flow setup.
- If you wish to manually initiate a clearance process associated with a resignation request, click the Trigger Clearance button.
- Administrators and HR Partners can manually select a clearance process and click Complete Clearance to skip the standard flow.
- Associated clearances can also be tracked from the Offboarding user service (left bar).
- Each resignation flow can have multiple clearance processes.
- Based on the notifications configured during the resignation flow setup, the concerned employee and the person handling the clearance process will be notified by email automatically.
- Once all clearance processes associated with a resignation flow are completed, the resignation request will move to the next stage (for example, the exit interview).
Track Exit Interview
When viewing the resignation request, navigate to the Interview tab to view and track the exit interview.
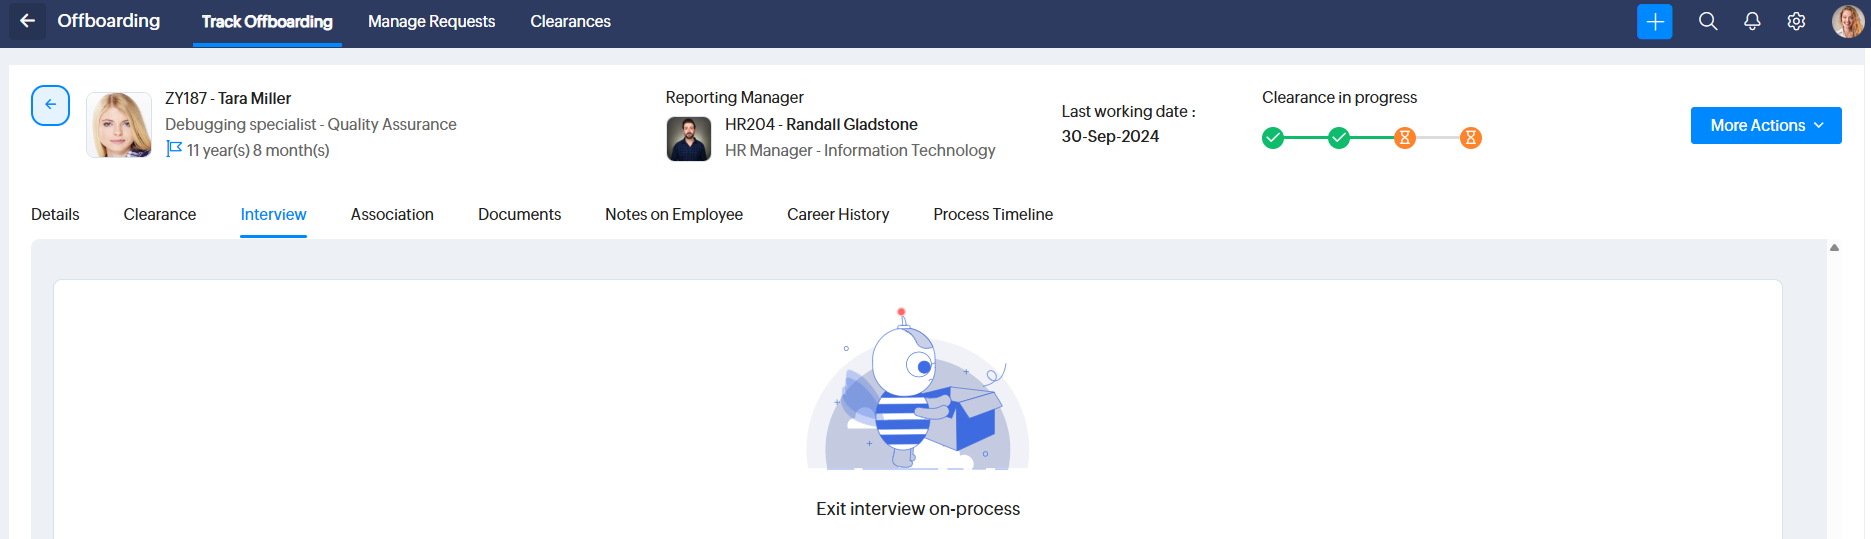
This is how an exit interview process will work:
- The resigning employee must complete the exit interview. They can do so by navigating to the Offboarding user service (left bar), selecting their exit request, and clicking the Interview tab. Employees must click the Enter Feedback button and answer the questions.
- The answers can be viewed by the HR Partner, reporting manager, and administrators by navigating to the corresponding resignation request on the Track Offboarding page. These answers help organizations gather feedback from departing employees to improve workplace policies, culture, and retention strategies.
- Once the exit interview and all clearance processes are completed, the resignation request will move to the next stage: Waiting for Completion.
Handle Associations (Change Reporting Manager)
This step is crucial when the departing employee has reportees. Associations let you assign new reporting managers to the employees who currently report to the departing employee. To handle associations, navigate to the corresponding resignation request and select the Association tab.
- From the Associations page, use the checkboxes to select reportees and click the Assign Reporting To button.
- Select a new reporting manager.
- Click Assign.
The Associations page will now display details of the new reporting manager for the reportees.
The offboarding process can only be completed when associations are completed—that is, the departing employee must not have any reportees.
Handle Pending Approvals (of the Departing Employee)
Before a resignation process can be completed, it is necessary to forward all pending approvals (or approve or reject the requests before this step). Approvals can be forwarded in Zoho People by navigating to Home > Team > Approvals, selecting the corresponding pending approvals, and clicking the Forward button. You will be prompted to select a new approver when performing this action.
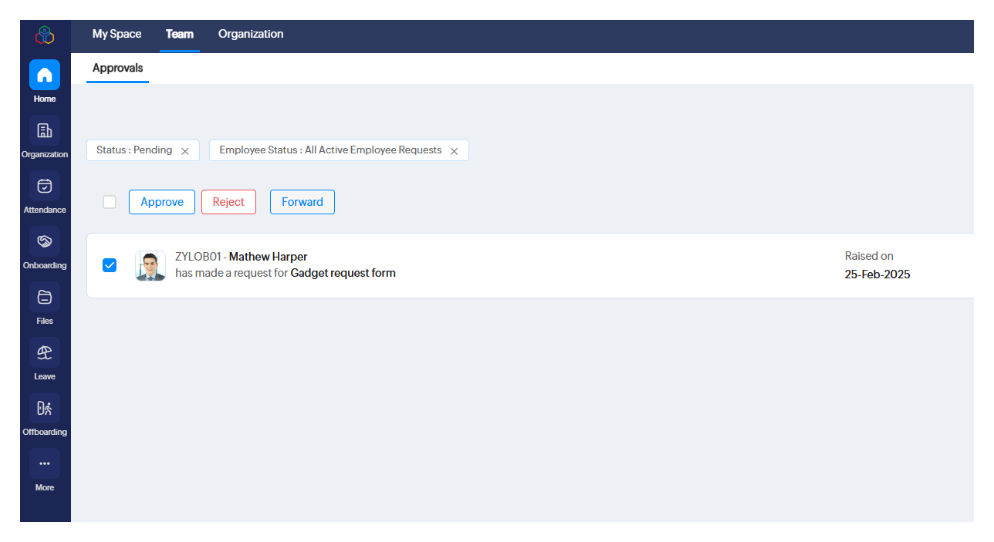
The offboarding process can only be completed when the departing employee does not have any pending approval requests.
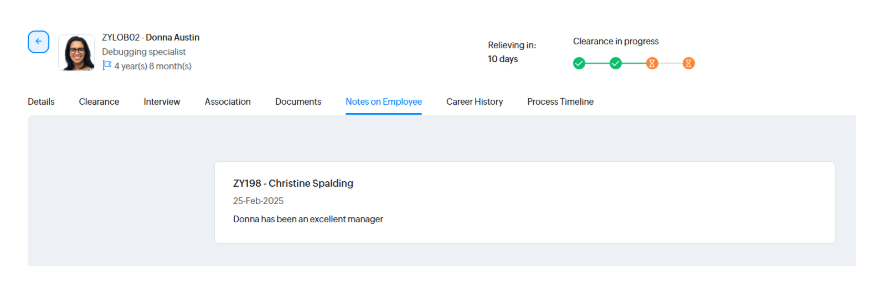
View Notes on Employee
HR Partners, reporting managers, and administrators can add and exchange notes on departing employees. This feature is useful for communicating important details, feedback, or rehire information about the departing employee. To view these notes, navigate to the resignation request and select the Notes on Employee tab. Click the Add button to add a new note.
Generate, Download, and Email Offboarding Documents
The Documents tab within the resignation record lists all documents associated with a resignation flow. Before the employee departs, it is important to generate these documents and share them with the employee.
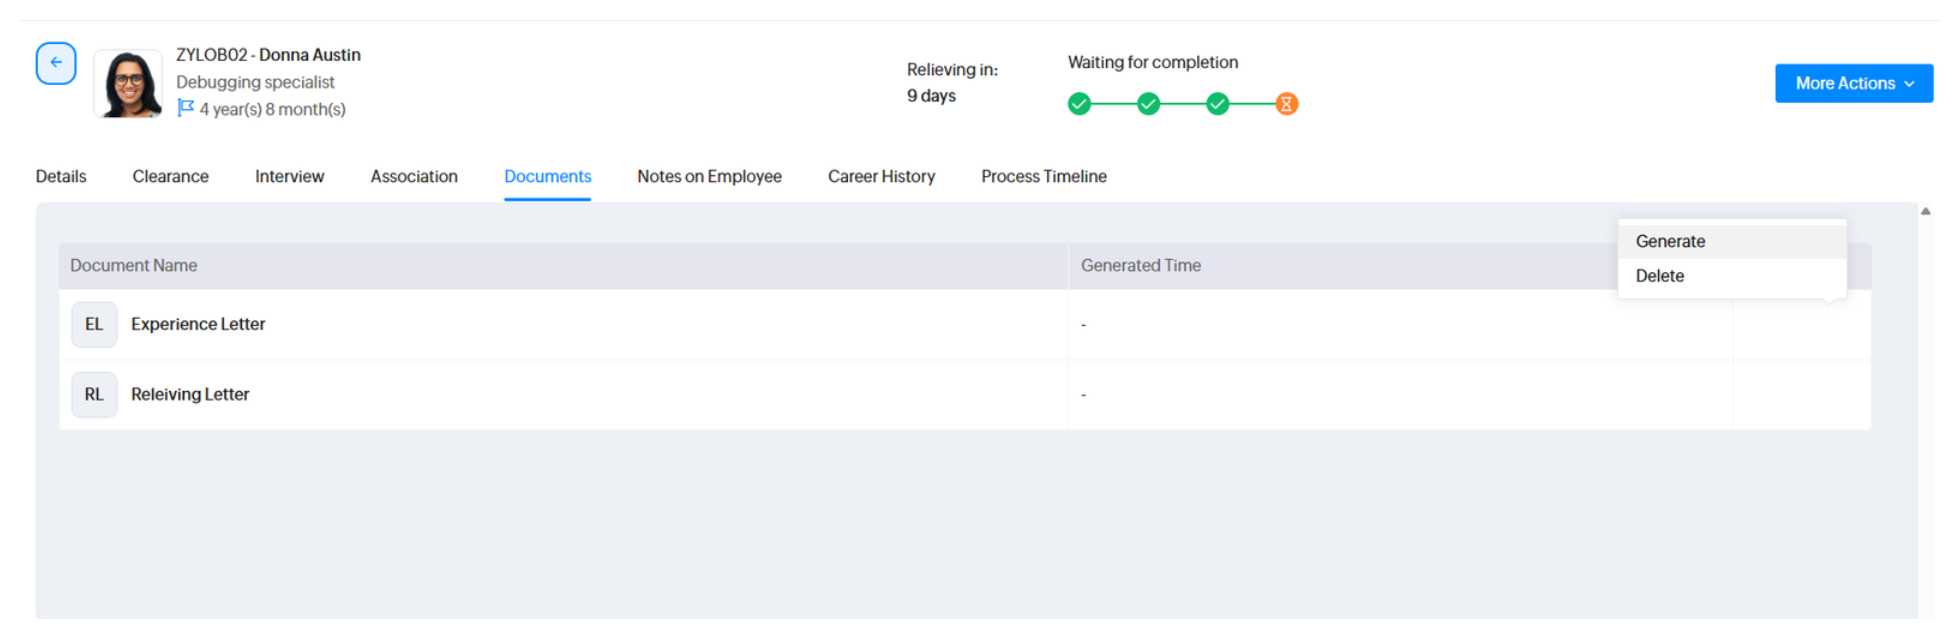
To generate and share a document:
- Hover your pointer over a document, click the ellipsis icon, and click Generate.
- The document will be generated. Click the download button at the bottom-left corner, or click Close (X icon) to exit the document view.
- Once the full view is closed, new options will appear in the ellipsis menu. These include Regenerate, Send Email, Delete, and Download (a separate icon). You can use the Send Email option to send the generated document to any email address, such as the departing employee's personal email address.

If your organization requires a physical signed copy, we recommend that you download the document using the option available here, sign it, and hand it over to the employee.
If the LWD (last working date) is updated after the offboarding documents are generated, the information in the documents will become outdated and irrelevant. The same is true if the template has been updated in offboarding settings. In both cases, it is essential to regenerate the document before it is shared with the departing employee. Use the Regenerate option available within the ellipsis icon on the Documents page to regenerate documents.
Update LWD (Last Working Day)
The HR Partner or administrator can update the last working date of the departing employee. For example, if the employee requests an early exit and all clearances are already completed before the due date, the LWD can be updated to an earlier date. If more time is required, the LWD can also be extended.
To change the LWD:
- Navigate to the corresponding resignation request (through Manage Requests in Offboarding Operations).
- Select the Change Last Working Day option available under More Actions.
- Select a new LWD, enter the reason, and click Submit.
When the LWD (last working date) is updated, the start and due dates of clearances will be recalculated based on the updated working date. (However, the HR Partner can still manually trigger the clearance process.) Additionally, any previously generated documents will contain outdated information and will need to be regenerated.
View Offboarding Process Timeline
The process timeline contains a detailed view of all the processes and actions that were part of the offboarding process. To view the process timeline of a selected offboarding request, navigate to the corresponding resignation record on the Track Offboarding page in Offboarding (Operations) and select the Process Timeline tab. (This can only be viewed by the HR Partner and administrators, not by the departing employee.)
View Career History
Departing employees, HR Partners, administrators, and managers can view the career history of the employee by navigating to the corresponding resignation record and clicking the Career History tab.
Completing an Offboarding Request
Once all associated processes are completed and the offboarding request is in the Waiting for Completion state, you can complete the offboarding request. To do this, navigate to the corresponding resignation record on the Track Offboarding page in Offboarding (Operations).
Select the Complete Offboarding option available within the More Actions button.
You will see a confirmation prompt or receive any error messages regarding pending associations or approvals. Proceed to mark the offboarding request as complete.
The status change of the departing employee and the disabling of login can only be initiated on the LWD (last working date).
Changing Employee Status
Once all associated processes are completed and the last working date is reached in the Waiting for Completion state of the offboarding request, you can initiate the employee status change. To do this, navigate to the corresponding resignation record on the Track Offboarding page in Offboarding (Operations).
Select the Change Employee Status option available within the More Actions button.
You will see a confirmation pop-up requesting consent before the action is performed.
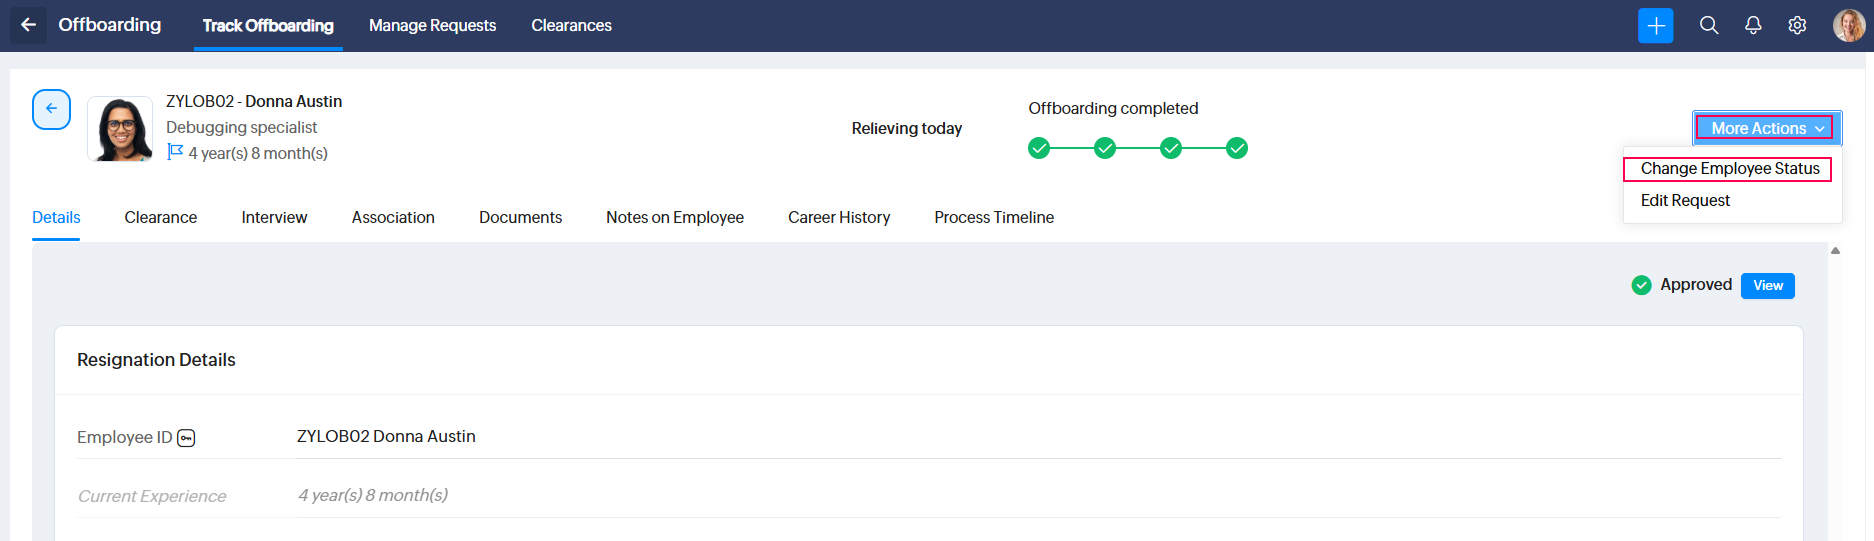
Additionally, if the employee has any pending approvals, system will show an additional prompt that allows transferring all pending approval requests to a new approver. The new approver will handle all approval requests of this exiting employee going forward.
Select a new approver and click Confirm to initiate the transfer.
Editing a Resignation Request
The HR Partner or administrator can edit a few details after a resignation request is raised. Details such as the reason, replacement requirement, and attachments can be changed by editing the request. You will also be prompted to provide a reason for the change.
To edit a resignation request, access the corresponding request from the Track Offboarding page in Offboarding (Operations). Click the More Actions button and select Edit Request.
If you want to change the last working date of the request, follow the instructions in the Update LWD topic covered above.
Add and View Employee Termination Records
Administrators can add employee termination records to Zoho People. Follow the steps below to add a termination record.
To add a termination record:
- Navigate to Operations and select the Offboarding service.
- Select the Add Request option and click Add Termination.
- Fill in the details, and select the employee status to be stored in the record. Add an explanation if required and attach any related documents. You can also indicate whether a replacement is required for this employee.
- Click Submit.
The terminated employee will be automatically restricted from logging into the system on the login disable date selected above.
To view termination records:
Navigate to Operations > Offboarding > Manage Requests > Termination tab. You can click an individual record for additional information.

Add and View Employee Deceased Records
Administrators can add deceased employee records to Zoho People. Follow the steps below to add a deceased employee record.
To add a new record:
- Navigate to Operations and select the Offboarding service.
- Select the Add Request option and click Add Deceased.
To view deceased records:
Navigate to Operations > Offboarding > Manage Requests > Deceased tab. You can click an individual record for additional information.

When offboarding requests are raised, they can be marked as Yes for replacement required. This applies to resignation, deceased, and termination requests. To access a list of replacement-required employees, navigate to Manage Requests (Operations > Offboarding), then use the filter option to select the Replacement Required filter and apply it. You will see the list of employee records that have been marked Yes for replacement required.
Importing and Exporting Resignation Records
Exporting Resignation Records
Steps to export resignation records:
- Navigate to Operations > Offboarding > Manage Requests > Resignation.
- Click the three-dot menu (ellipsis icon) in the top-right corner.
- Select Export or History Export:
- Export: Current view of resignation records.
- History Export: Full audit trail or history data.
- In the export pop-up:
- Choose the file format: .XLS, .XLSX, .CSV, or .TSV.
- Download the sample template if required.
- Enable the required options:
- Include files and images: When exporting, associated images and files will also be included in the ZIP file.
- Include approval data: Includes the approval flow and details in the exported file.
- Click Export, and the file will be downloaded.
Importing Resignation Records
Use the import option to add multiple new resignation entries in bulk.
Steps to import resignation records:
- Navigate to Operations > Offboarding > Manage Requests > Resignation.
- Click the three-dot menu (ellipsis icon) in the top-right corner.
- Select Import.
- In the import pop-up:
- Select Resignation from the provided drop-down.
- Use the Download Sample Template link to download a sample file if required.
- Click Upload File.
- Browse and select a file to import (.XLS, .XLSX, and .CSV file formats are supported).
Important points to keep in mind for imported records:
- Existing records cannot be updated, skipped, or overwritten.
- Use integer values for the Replacement Required field:
- Yes = 1
- No = 0
- Decide later = -1
How is imported data processed?
Refer to the table below to understand how resignation records are imported:
Contains Past-Date Records | Contains Future or Current-Date Entries | |
Importing Data | Login will be disabled immediately. No approval will be triggered (auto-approved by the system). Offboarding requests will be marked as complete automatically. | The normal flow will be followed. |