Candidate Onboarding Records
The Candidate tab displays all Candidate records who have been invited to join the organization, you can perform the following actions in this tab.

The candidate tab is available in Operations as well as User Service (left side tab), based on the permissions you can access the tabs from any of the interface and manage the candidate records.
Create, Edit or Delete View
Create View
Create onboarding record view for customized viewing experience of the candidate onboarding records. You can set the view as default, set permissions for the view to make it accessible to employees who will be handling the candidate onboarding.
To create Candidate record view:
- Navigate to Operations > Onboarding > Candidate tab.
- Click the Candidate View dropdown and click Create View.
- Enter the view name.
- Set as default view if required.
- Select the view permission.
 Setting view permissions will allow applicable employees to view the custom view in the Onboarding service where they can manage the records provided with necessary permissions in Zoho People. For more details, refer to Onboarding - Permission.
 - In Select Columns, select the candidate form field names and move to right side.
- Add criteria to the view to display records defined according to the criteria.
- Click Save.
The view will be created and listed to applicable employees.
Edit View
You can edit the candidate record view to your preference.
To edit view:
- Navigate to Operations > Onboarding > Candidate tab.
- Select the view from the dropdown and click Edit.
- Move the view fields as required
- Click Save.
Delete view

You can only delete the custom views. Deleting the view will delete the view to all applicable employees.
To delete a view:
- Navigate to Operations > Onboarding > Candidate tab.
- Select the view form the dropdown and click Delete > Confirm.
Add Candidate
Candidate tab allows administrators to add candidate by providing the necessary details. The added candidate will be listed in Onboarding > Candidate Onboarding Reports > Not Triggered tab.
To add candidate:
- Navigate to Operations > Onboarding > Candidate tab.
- Click Add Candidate.
- Fill in the necessary details and click Submit.

Click Submit and New to add one after the another.
Actions available Upon Record Selection
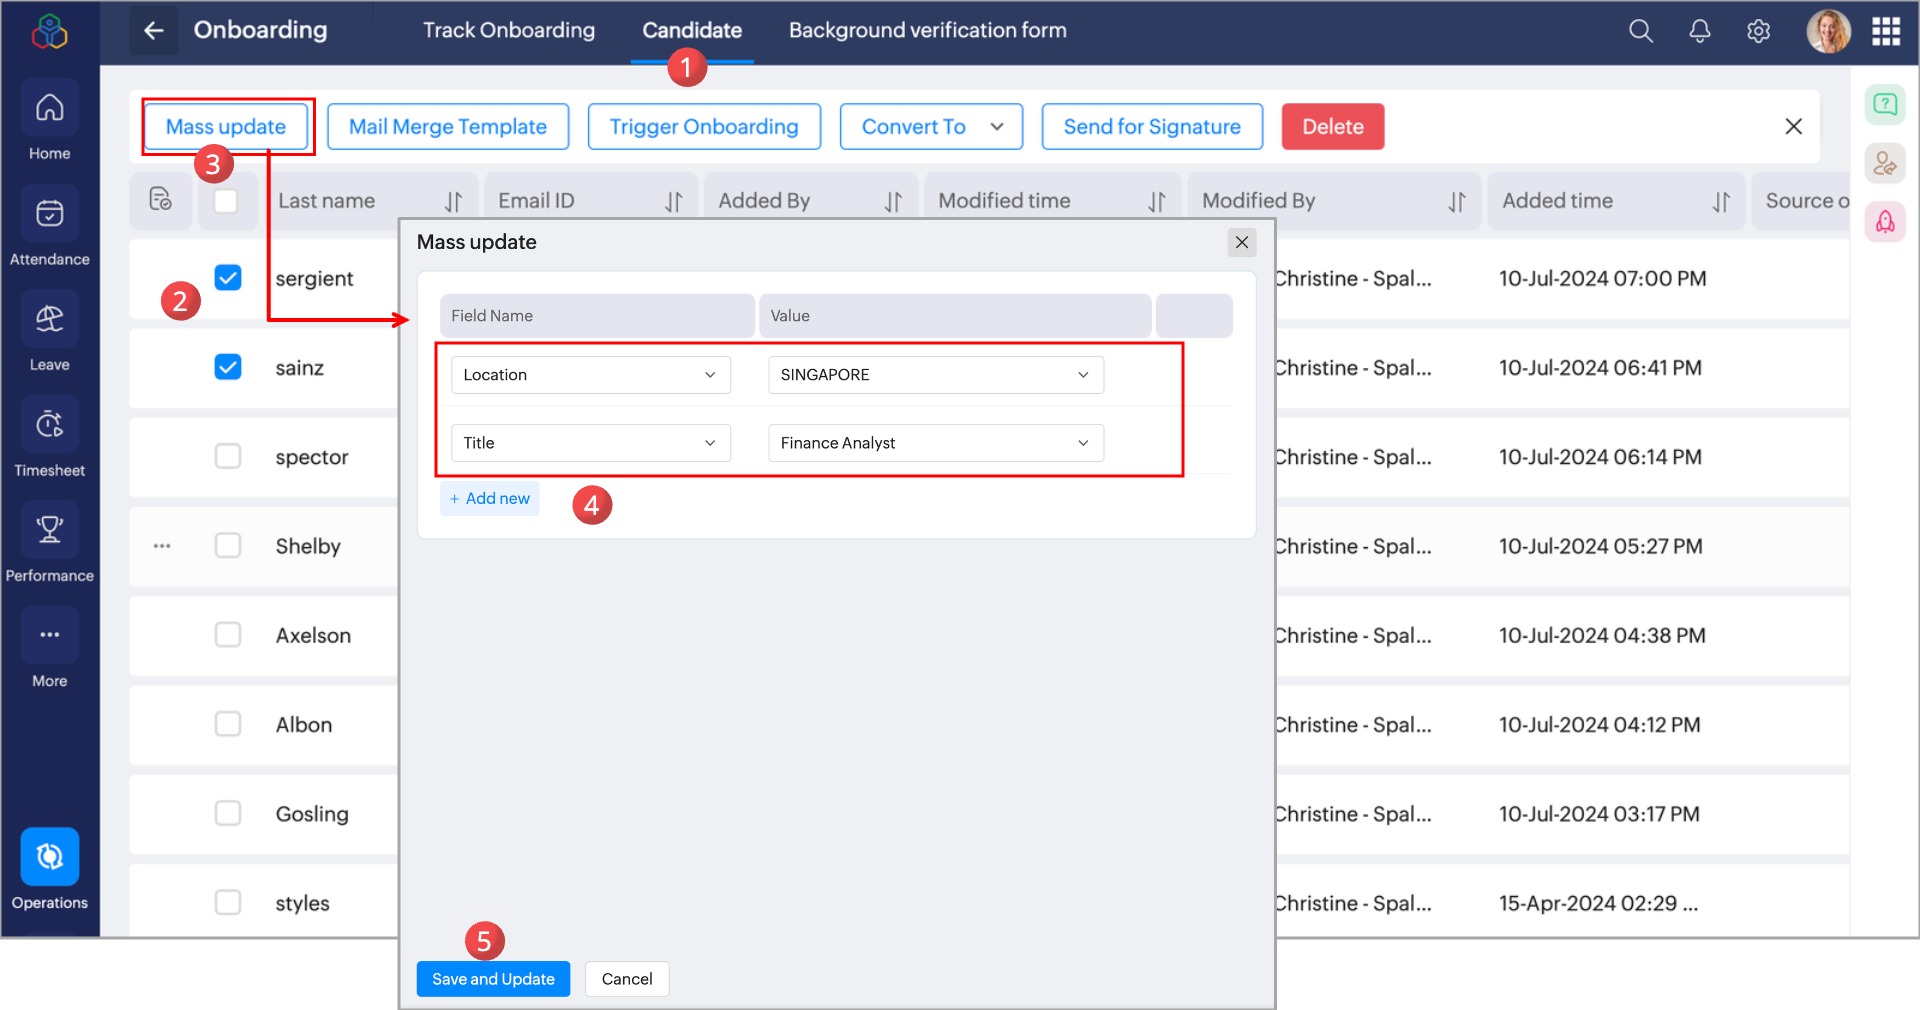
Select the candidate record to perform any of the following actions. To select the record, navigate to Onboarding > Operations > Candidate, and select the check box of the records.
Mass update
This option allows you to mass update the candidate record field values. You can multi select the records and update their form field information at once as provided in the below image.

Mail Merge Template
The Mail Merge Template option allows you to send pre-formatted documents to multiple candidates at once. Use this option to send personalized letters, such as offer letters, background verification authorization letters, interview invitations, and more.

To use this option you must have set up your Mail Merge Templates in Settings > Onboarding > Automation > Templates > Mail Merge Templates
To send a Mail Merge documents to your candidates.
- Navigate to Operations > Onboarding > Candidate tab.
- Select the candidate records for whom you would like to generate and send the letter.
- Click Mail Merge Template.
- Select the available template from the dropdown.
- Click Merge.
The Mail Merge template will be displayed. - Click Preview Merge, to view the merged documents.
- The merge document for each selected candidates will be displayed.
- Use the following options as needed:
Print: Prints the merge document for all the selected records or for the current record displayed
Download: Download the the merge document for all the selected records or for the current record displayed
Email this record: Sends the merge document to the recipients via email.
Send for Signature: Sends the merge document to the recipients for signature.
Trigger Onboarding
To trigger onboarding for multiple records at once, select the record and click Trigger Onboarding.

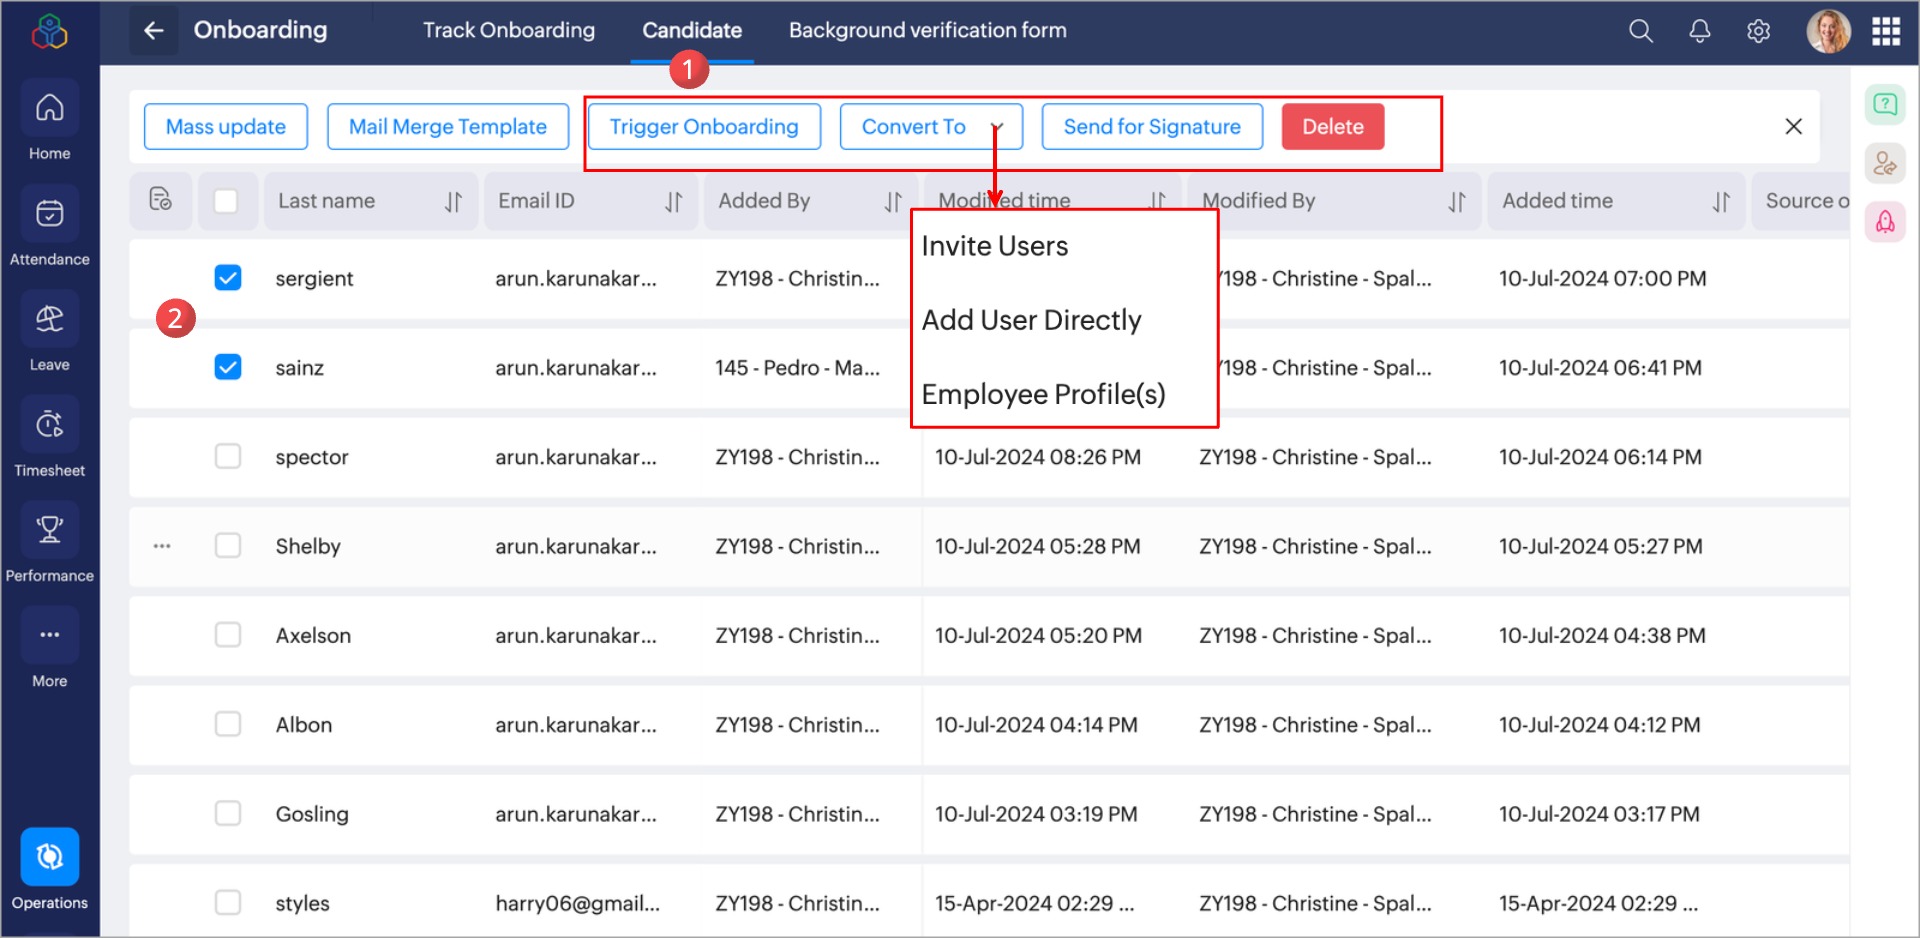
Convert To
To convert Candidate to Employee or Employee Profile, select the candidate records and click the Convert to dropdown and select the required option listed below:
- Invite Users: An email invitation will be sent to the user, allowing them to set up the password and log in to the Zoho People application. Once they have logged in, the user will be added to Zoho People user records.
- Add Users Directly: Users will be directly added to Zoho People user records and based on the password selection, the password will be mailed to administrators who is performing the convert action, which they can share with the candidate to login to their Zoho People account.
- Employee Profiles: A user record will be added to Zoho People's Employee Profile record in Settings > Manage Accounts > Users. The employee profile user will not have access to Zoho People.
Send for Signature
To send document for e-signature for multiple candidate, select the candidate records and click Send for Signature, for more information, refer to Sending E-sign Documents from a Form.
Delete Candidate
To delete the candidate, select the required candidate records and click Delete.

All data related to the selected candidates will be deleted from Zoho People.
Import Candidate Records
Import option allows you to import records of multiple candidates at once. You can define the candidate form field values in XLS file and import them.
To import the candidate record:
- Navigate to Operations > Onboarding > Candidate.
- Click ellipsis icon and click Import.
- Click Download sample template.
 A Candidate Template.XLS file will be downloaded to your downloads folder.
 - Open the template and fill in the candidate details such as Candidate ID, email, First Name and Last Name and other required details to be imported.
- Go to import section in Zoho People and click Upload file and select the candidate template file in which you have added the candidate details.
- Select Import data for and Import based on values and click next
- Select the required option to update duplicate values
- Click Proceed.
- Candidate data will be imported to Zoho People and you can view the import details in the import summary section.
Export Candidate Records
Export option allows you to export all the candidate form records.
To export the candidate record:
- Navigate to Operations > Onboarding > Candidate.
- Click ellipsis icon and click Export.
- Select the file format and other options export options if necessary.
- Click Export.

Candidate view.xls file will be downloaded to your downloads folder where you can find the exported data.
Bulk File Upload
Bulk file upload options allows you to add files to your candidates form at once. The file will be uploaded to the selected file upload fields of Candidates record.
To Bulk File Upload to candidate records:
- Navigate to Operations > Onboarding > Candidate.
- Click ellipsis icon and click Bulk File Upload.
- Select the file upload field from Upload data for dropdown.
- Select upload based on values
 For example, if you have selected Upload based on values as Candidate Id, your file name should be named with Candidate ID CND 173, CND174 and so on.
 - Add files named with Upload based on values and zip them on your computer folder.
- Click Upload File in Zoho People and select the zip file
- Click Submit.
The files are uploaded to the candidate records and you can use them to send for signature.
E-Sign Documents
Select this option to view the documents that are sent for e-signature for the candidates and their status.
To view the e-Sign documents of the candidate:
- Navigate to Operations > Onboarding > Candidate
- Click the ellipsis icon and click E-Sign Documents.
- The documents sent for e-signature to the candidates are listed here. Click on a record to view the e-sign Document details.
Zoho CRM Training Programs
Learn how to use the best tools for sales force automation and better customer engagement from Zoho's implementation specialists.
Zoho DataPrep Personalized Demo
If you'd like a personalized walk-through of our data preparation tool, please request a demo and we'll be happy to show you how to get the best out of Zoho DataPrep.
Centralize Knowledge. Transform Learning.
All-in-one knowledge management and training platform for your employees and customers.
New to Zoho Writer?
You are currently viewing the help pages of Qntrl’s earlier version. Click here to view our latest version—Qntrl 3.0's help articles.
Zoho Sheet Resources
Zoho Forms Resources
New to Zoho Sign?
Zoho Sign Resources
New to Zoho TeamInbox?
Zoho TeamInbox Resources
New to Zoho ZeptoMail?
New to Zoho Workerly?
New to Zoho Recruit?
New to Zoho CRM?
New to Zoho Projects?
New to Zoho Sprints?
New to Zoho Assist?
New to Bigin?
Related Articles
Candidate Onboarding Reports
The Candidate Onboarding Reports section allows you to invite candidates and monitor their onboarding status. Once they have completed their onboarding, you can fill out the checklist, mark the candidate's onboarding as completed, and convert them to ...New Onboarding Portal for Candidate and Employee Onboarding - Zoho People 5.0
The new Onboarding Portal for both candidate and employee onboarding in Zoho People 5.0 is now available for you to switch with no data loss or reconfiguration. Designed with a focus on simplicity and efficiency, this upgraded portal ensures a ...Onboarding - Flows
Zoho People onboarding flows contain preset tabs that you can customize to your organization's preferences, making the onboarding process for your new hires more aligned with your organization's policies and requirements. Set up Onboarding Flows To ...Onboarding - Operations
What is Operations in Onboarding Service? Operations in onboarding is an administrator space to manage the onboarding process for Candidates and Employees. For more information on Onboarding service, refer to Onboarding Service Overview. What can be ...Trigger Employee Onboarding
Once the Candidate onboarding is completed the administrators can convert the Candidate to Employee. Upon conversion, the candidate will be added as User in Zoho People. To convert a candidate to employee, refer to Candidate Onboarding Reports. You ...
New to Zoho LandingPage?
Zoho LandingPage Resources


